순서 흐름
1. npx create-react-app dailydiary 생성
2. 필요없는 기본설정파일 삭제 (✔ 삭제)
3. src폴더 내 DiaryEditor.js컴포넌트 생성 후 App.js 에 연결!
// src/DiaryEditor.js
const DiaryEditor = () => {
  return <div>hello~</div>;
};
export default DiaryEditor;
// src/App.js
import "./App.css";
import DiaryEditor from "./DiaryEditor";
function App() {
return (
<div className="App">
<DiaryEditor />
</div>
);
}
export default App;4. DiaryEditor.js컴포넌트 -> 작성자 input, 내용 content, 감정점수 select, 제출 버튼 생성
4-1. 작성자 input, 내용 content
import { useState } from "react";
const DiaryEditor = () => {
const [state, setState] = useState({
author: "",
content: "",
});
const handleChangeState = (e) => {
setState({
...state,
[e.target.name]: e.target.value,
});
};
return (
// className 을 파일명과 동일하게 해준 이유는 css 조작 쉽게하기위해!
<div className="DiaryEditor">
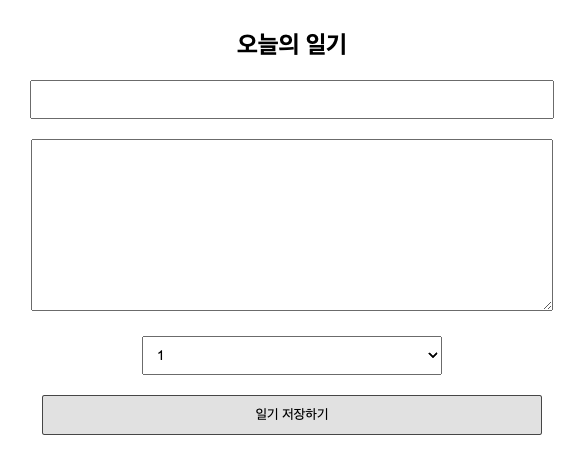
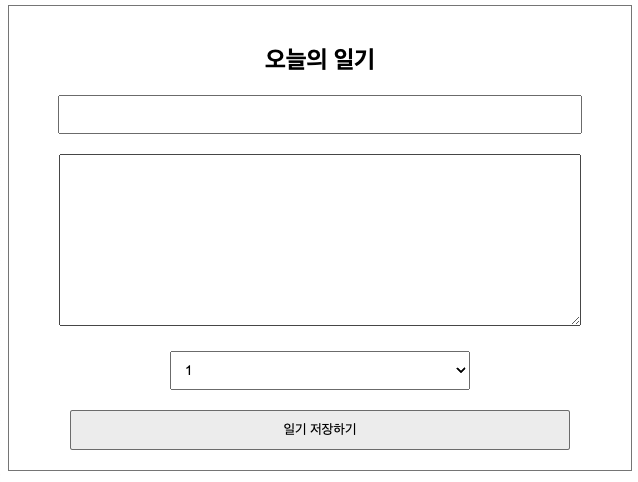
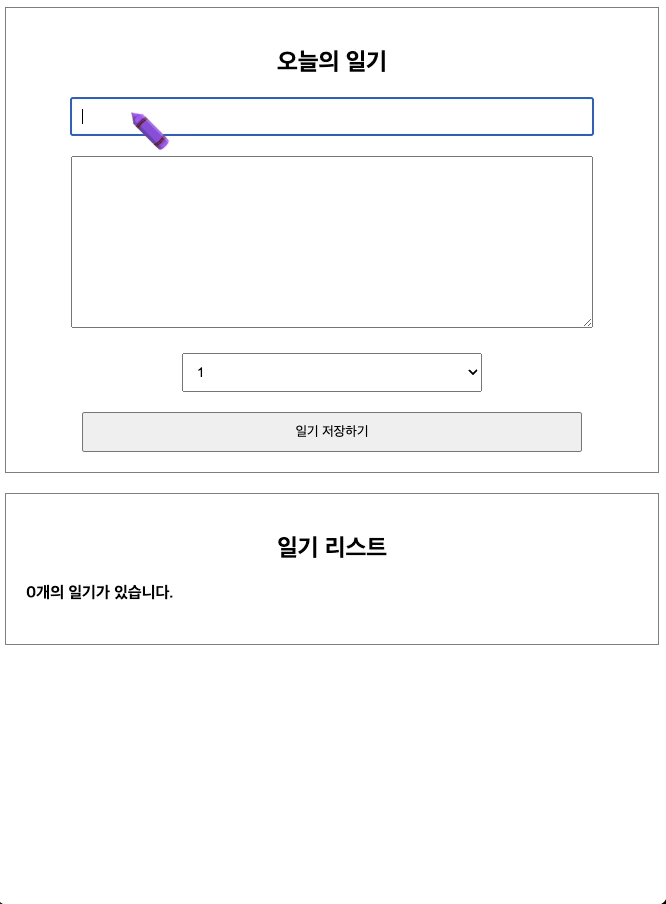
<h2>오늘의 일기</h2>
<div>
<input
name="author"
value={state.author}
onChange={handleChangeState}
/>
</div>
<div>
<textarea
name="content"
value={state.content}
onChange={handleChangeState}
/>
</div>
</div>
);
};
export default DiaryEditor;4-2. 감정 select
const [state, setState] = useState({
   author: "",
   content: "",
   emotion: 1, //이부분 추가!
 });

	<div>
       <select
         name="emotion"
         value={state.emotion}
         onChange={handleChangeState}
       >
         <option value={1}>1</option>
         <option value={2}>2</option>
         <option value={3}>3</option>
         <option value={4}>4</option>
         <option value={5}>5</option>
       </select>
     </div>
4-3. 제출 버튼
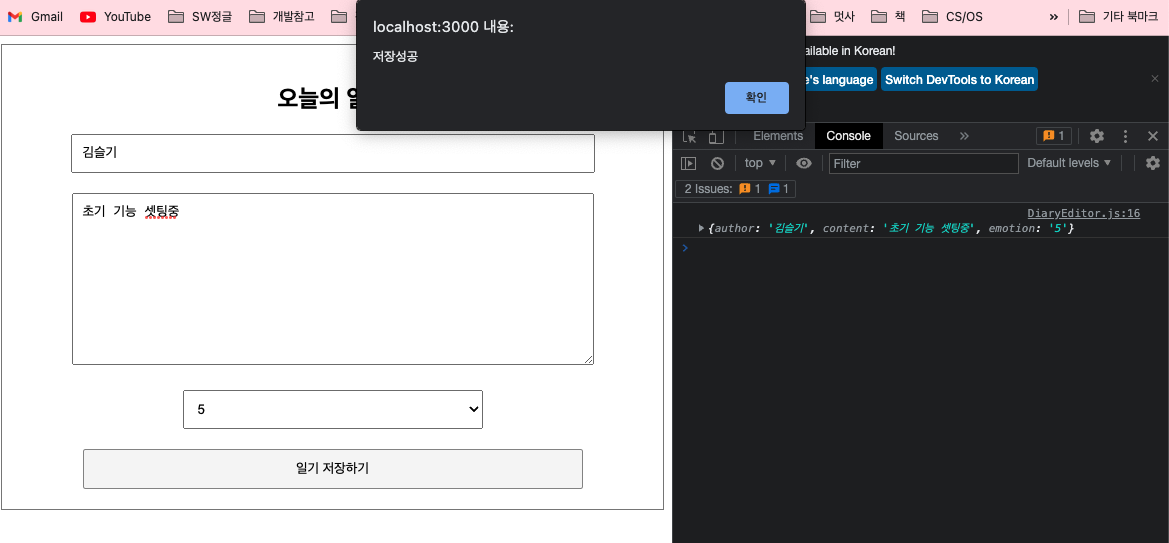
const handleSubmit = (e) => {
    console.log(state);
    alert("저장성공");
  };

	<div>
        <button onClick={handleSubmit}>일기 저장하기</button>
      </div>
4-4 css 적용
.DiaryEditor {
  border: 1px solid gray;
  text-align: center;
  padding: 20px;
}

.DiaryEditor input,
textarea {
  margin-bottom: 20px;
  width: 500px;
  padding: 10px;
}

.DiaryEditor textarea {
  height: 150px;
}

.DiaryEditor select {
  width: 300px;
  padding: 10px;
  margin-bottom: 20px;
}

.DiaryEditor button {
  width: 500px;
  padding: 10px;
  cursor: pointer;
}
5. useRef dom 조작
input, textarea에 특정 길이 이상이 잘 들어왔는지 확인
author 에 1글자 이상 있는지, content에 5글자 이상 있는지 확인
그러려면일기저장하기버튼을 클릭시 일어나야하니까,handleSubmit조작
5-1. handleSubmit 함수 설정
  const handleSubmit = (e) => {
    if (state.author.length < 1) {
      //포커스해주기!
      return;
    }
    if (state.content.length < 5) {
      //포커스해주기
      return;
    }

    alert("저장성공");
  };
5-2. useRef로 dom 접근
import { useState, useRef } from "react";

const DiaryEditor = () => {
	const authorInput = useRef();
	const contentInput = useRef();
 // ~~~

	<input
          ref={authorInput} //추가
          name="author"
          value={state.author}
          onChange={handleChangeState}
        />
    <textarea
          ref={contentInput} //추가
          name="content"
          value={state.content}
          onChange={handleChangeState}
        />
5-3. handleSubmit 함수 조작
 const handleSubmit = (e) => {
    if (state.author.length < 1) {
      //포커스해주기!
      authorInput.current.focus(); //추가
      return;
    }
    if (state.content.length < 5) {
      //포커스해주기
      contentInput.current.focus(); //추가
      return;
    }

    alert("저장성공");
  };
6. 리스트 렌더링
6-1. DiaryList 컴포넌트 생성
const DiaryList = () => {
  return <div className="DiaryList"></div>;
};

export default DiaryList;
6-2. dummyList생성
App.js 에서 dummyList 생성 후 Props 로 전달
const dummyData = [
  {
    id: 1,
    author: "김슬기1",
    content: "하이루1",
    emotion: 1,
    created_date: new Date().getTime(),
  },
  {
    id: 2,
    author: "김슬기2",
    content: "하이루2",
    emotion: 2,
    created_date: new Date().getTime(),
  },
  {
    id: 3,
    author: "김슬기3",
    content: "하이루3",
    emotion: 3,
    created_date: new Date().getTime(),
  },
  {
    id: 4,
    author: "김슬기4",
    content: "하이루4",
    emotion: 4,
    created_date: new Date().getTime(),
  },
];

function App() {
  return (
    <div className="App">
      <DiaryEditor />
      <DiaryList diarylist={dummyList} /> //추가
    </div>
  );
}
6-3. DiaryList props로 dummylist 받기
const DiaryList = ({ diaryList }) => {
  console.log(diaryList);
  return <div className="DiaryList"></div>;
};
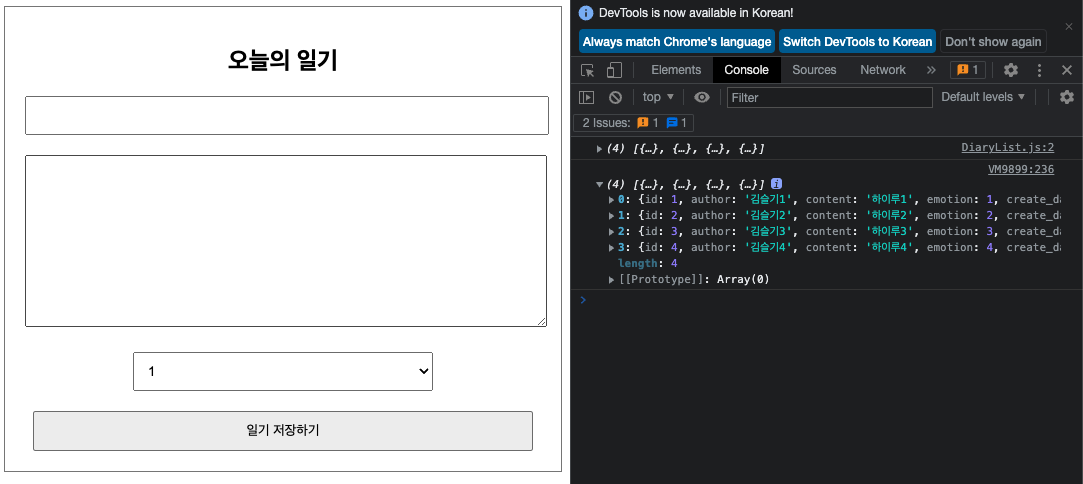
콘솔로 잘 들어오고 있음을 확인!
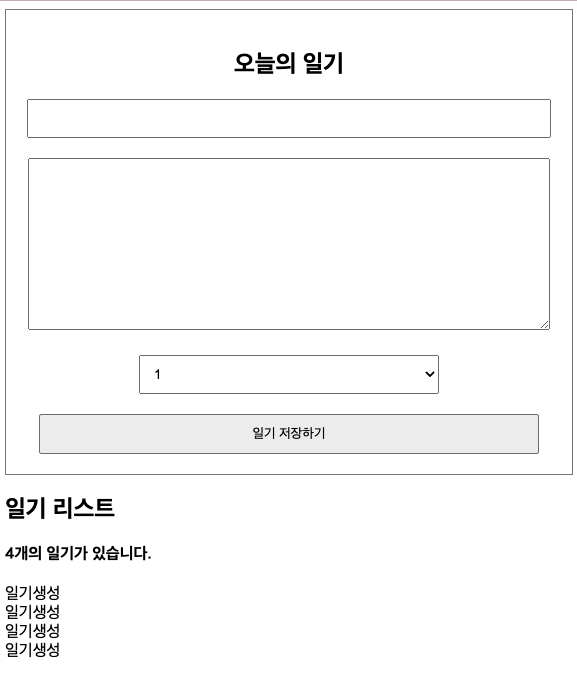
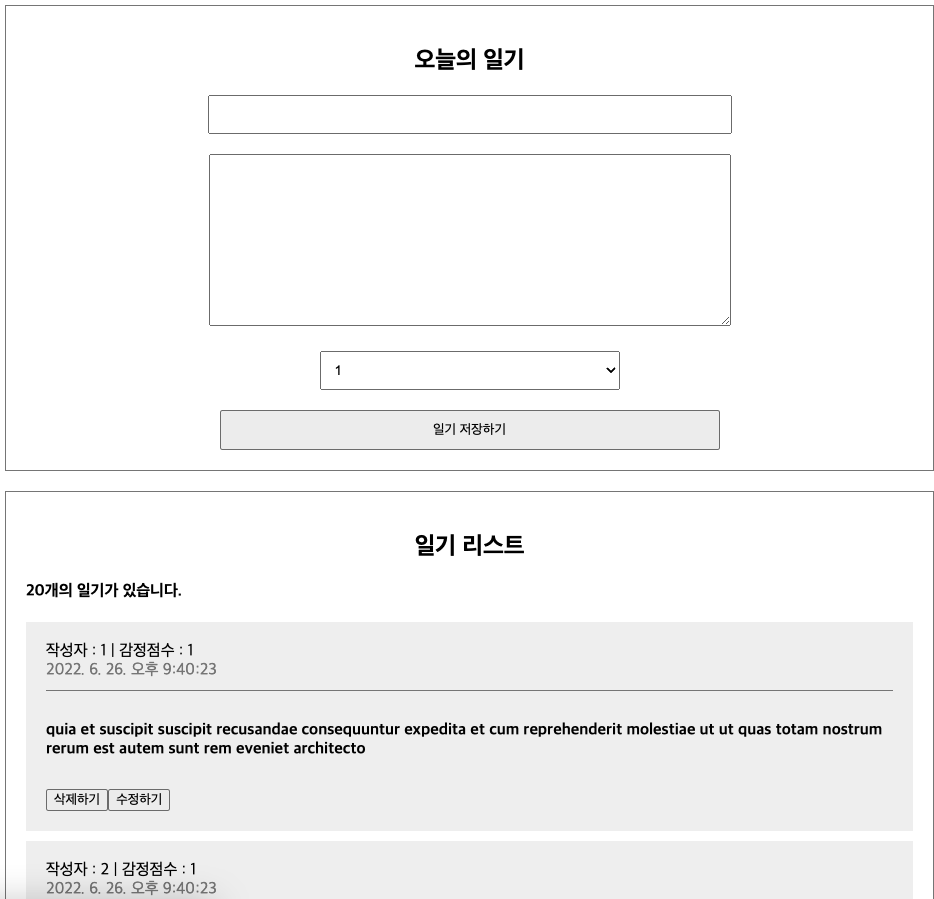
6-4. map 함수로 diarylist 생성
const DiaryList = ({ diaryList }) => {
  console.log(diaryList);
  return (
    <div className="DiaryList">
      <h2>일기 리스트</h2>
      <h4>{diaryList.length}개의 일기가 있습니다.</h4>
      <div>
        {diaryList.map((it) => (
          <div>일기생성</div>
        ))}
      </div>
    </div>
  );
};

export default DiaryList;
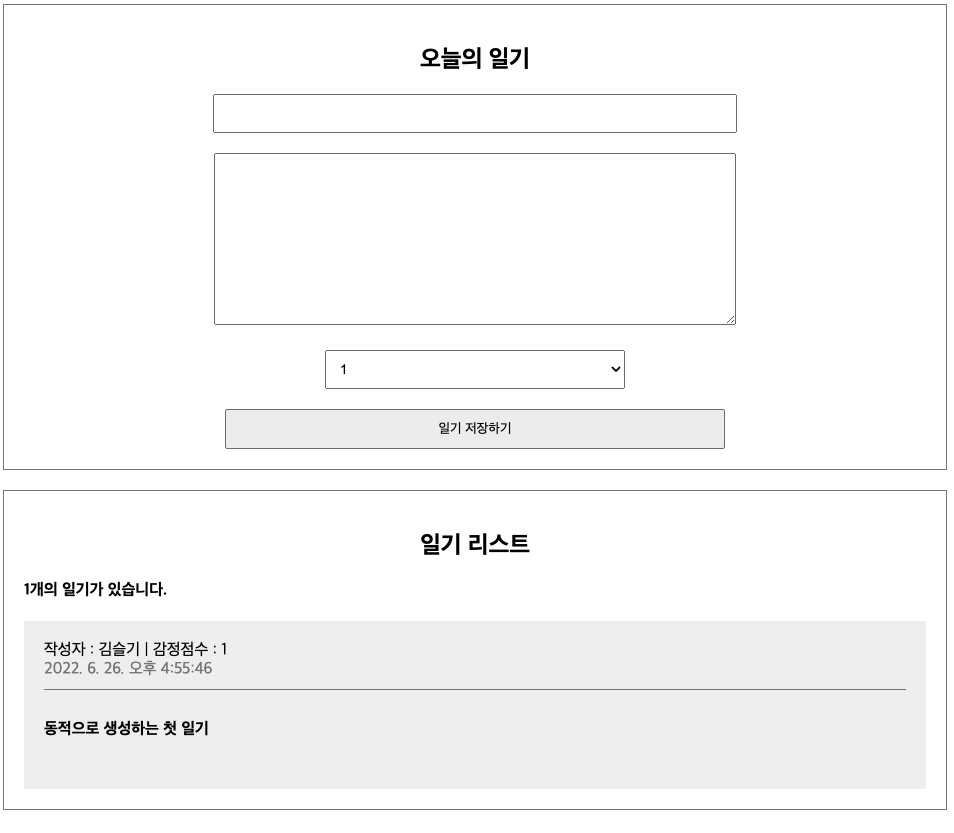
6-5. DiaryItem 컴포넌트 생성
일기생성 부분에 컴포넌트로 내용을 넣어주자!
const DiaryItem = ({ author, content, emotion, created_date }) => {
  return (
    <div className="DiaryItem">
      <div className="info">
        <span>
          작성자 : {author} | 감정점수 : {emotion}
        </span>
        <br />
        <span className="date">{new Date(created_date).toLocaleString()}</span>
      </div>
      <div className="content">{content}</div>
    </div>
  );
};

export default DiaryItem;
DiaryList 컴포넌트 수정
const DiaryList = ({ diaryList }) => {
  console.log(diaryList);
  return (
    <div className="DiaryList">
      <h2>일기 리스트</h2>
      <h4>{diaryList.length}개의 일기가 있습니다.</h4>
      <div>
        {diaryList.map((it) => (
          <DiaryItem key={it.id} {...it} /> //추가
        ))}
      </div>
    </div>
  );
};

6-6. css 적용
/* List */

.DiaryList {
  border: 1px solid gray;
  padding: 20px;
  margin-top: 20px;
}

.DiaryList h2 {
  text-align: center;
}

/* item */
.DiaryItem {
  background-color: rgb(240, 240, 240);
  margin-top: 10px;
  padding: 20px;
}

.DiaryItem .info {
  border-bottom: 1px solid gray;
  padding-bottom: 10px;
  margin-bottom: 10px;
}

.DiaryItem .date {
  color: gray;
}

.DiaryItem .content {
  font-weight: bold;
  margin-bottom: 30px;
  margin-top: 30px;
}

7. 리스트 데이터 추가하기
배열을 이용한 리액트의 리스트에 아이템을 동적으로 추가해보기

<DiaryEditor/>에 생성된 data가<DiaryList>로 가야하는데 같은 레벨에서는 Props로 전달 불가능.
그렇다면,<App/>에 useState()를 이용해서 각각 전달해주면 됨!
어떻게 ?<DiaryEditor/>에서 setData -><App/>Data 올라옴 -><DiaryList/>로 Data내려줌!
7-1. App.js 에서 onCreate()함수 생성 및 props로 전달
function App() {
  const dataId = useRef(0); //초기 id :0 인것을 가리키기 위해 작성
  const [data, setData] = useState([]);
  const onCreate = (author, content, emotion) => {
    const created_date = new Date().getTime();
    const newItem = {
      author,
      content,
      emotion,
      created_date,
      id: dataId.current,
    };
    dataId.current += 1; //id 값은 다음번엔 +1 해줘서 중복안되게!
    setData([newItem, ...data]);
  };
  return (
    <div className="App">
      <DiaryEditor onCreate={onCreate} /> //props로 OnCreate전달
      <DiaryList diarylist={data} /> //props로 data전달
    </div>
  );
}
7-2. <DiaryEditor/> 컴포넌트 수정
const DiaryEditor = ({ onCreate }) => { //props로 onCreate 함수 받기

   const handleSubmit = () => {
    if (state.author.length < 1) {
      // alert("작성자는 최소 1글자 이상 입력해주세요");
      //focus
      authorInput.current.focus();
      return;
    }
    if (state.content.length < 5) {
      // alert("일기 본문은 최소 5글자 이상 입력해주세요");
      //focus
      contentInput.current.focus();
      return;
    }
    onCreate(state.author, state.content, state.emotion); //추가
    alert("저장성공");
    setState({             //저장 후 초기화
      author: "",
      content: "",
      emotion: "",
    });
}
8. 리스트 데이터 삭제하기
8-1. <DiaryItem/> 컴포넌트 내 삭제하기 버튼 생성
<button onClick={() => console.log(id)}> 삭제하기 </button>8-2. <App/> 컴포넌트에 onDelete 함수 생성 후 Props로 넘겨주기
  const onDelete = (targetId) => {
    console.log(`${targetId}가 삭제되었습니다.`);
  };


return(
      <DiaryList onDelete={onDelete} diaryList={data} />
)
8-3. <DiaryList/> 컴포넌트 수정
const DiaryList = ({ onDelete, diaryList }) => { //추가

  const DiaryList = ({ onDelete, diaryList }) => {
  console.log(diaryList);
  return (
    <div className="DiaryList">
      <h2>일기 리스트</h2>
      <h4>{diaryList.length}개의 일기가 있습니다.</h4>
      <div>
        {diaryList.map((it) => (
          <DiaryItem key={it.id} {...it} onDelete={onDelete} /> //추가
        ))}
      </div>
    </div>
  );
};


}
8-4. <DiaryItem/> 컴포넌트 수정
const DiaryItem = ({
  onDelete,
  author,
  content,
  emotion,
  created_date,
  id, //추가
}) => {
  return (
    <div className="DiaryItem">
      <div className="info">
        <span>
          작성자 : {author} | 감정점수 : {emotion}
        </span>
        <br />
        <span className="date">{new Date(created_date).toLocaleString()}</span>
      </div>
      <div className="content">{content}</div>
      <button
        onClick={() => {
          console.log(id);
          if (window.confirm(`${id + 1}번째 일기를 정말 삭제하시겠습니까?`)) {
            onDelete(id); //추가
          }
        }}
      >
        삭제하기
      </button>
    </div>
  );
};

export default DiaryItem;
8-5. <App/> 컴포넌트에 onDelete 함수 생성 부분 setData()
 const onDelete = (targetId) => {
    console.log(`${targetId}가 삭제되었습니다.`);
    const newDiaryList = data.filter((it) => it.id !== targetId); //추가
    setData(newDiaryList); //추가
  };
9. 리스트 데이터 수정하기
배열을 이용한 리액트의 리스트에 아이템을 동적으로 수정해보기
9-1. <DiaryItem/> 수정하기 버튼 필요
<button onClick={handleRemove}>삭제하기</button>
<button onClick={toggleIsEdit}>수정하기</button>
9-2. 버튼 클릭시 textarea 수정 필요 & 수정중인 상태 필요
  const [isEdit, SetIsEdit] = useState(false);
  const toggleIsEdit = () => SetIsEdit(!isEdit);

 <div className="content">
        {isEdit ? (
          <>
            <textarea />
          </>
        ) : (
          <>{content}</>
        )}
      </div>
9-3. textarea 내용 저장 필요
  const [localContent, setLocalContent] = useState(content);

<div className="content">
        {isEdit ? (
          <>
            <textarea
              value={localContent}
              onChange={(e) => setLocalContent(e.target.value)}
            />
          </>
        ) : (
          <>{content}</>
        )}
      </div>
9-4. 수정하기 버튼 클릭시 내용 변경 -> 수정취소, 수정완료

 {isEdit ? (
        <>
          {" "}
          <button onClick={handleQuitEdit}>수정취소</button>
          <button>수정완료</button>
        </>
      ) : (
        <>
          {" "}
          <button onClick={handleRemove}>삭제하기</button>
          <button onClick={toggleIsEdit}>수정하기</button>
        </>
      )}
9-5. 수정취소 버튼 클릭시 handleQuitEdit()함수 실행
const handleQuitEdit = () => { //수정취소 버튼
    SetIsEdit(false);
    setLocalContent(content);
  };
9-6. 수정완료 버튼 클릭시 handleEdit()함수 실행
그러려면, onEdit()함수 <App/>에서 생성!
  const onEdit = (targetId, newContent) => {
    setData(
      data.map((it) =>
        it.id === targetId ? { ...it, content: newContent } : it
      )
    );
  };


 return (
    <div className="App">
      <DiaryEditor onCreate={onCreate} />
      <DiaryList onEdit={onEdit} onRemove={onRemove} diaryList={data} /> //추가
    </div>
);<DiaryList/>에 Props로 전달해줬으니, 이부분도 수정
const DiaryList = ({ onEdit, onRemove, diaryList }) => {
  console.log(diaryList);
  return (
    <div className="DiaryList">
      <h2>일기 리스트</h2>
      <h4>{diaryList.length}개의 일기가 있습니다.</h4>
      <div>
        {diaryList.map((it) => (
          <DiaryItem key={it.id} {...it} onEdit={onEdit} onRemove={onRemove} />
        ))}
      </div>
    </div>
  );
};
<DiaryItem/> 에 Props로 전달해줬으니, 이부분 수정
const DiaryItem = ({
 onEdit, onRemove, author, content, emotion, created_date, id,
}) => {

    const localContentInput = useRef();

   const handleEdit = () => {
    if (localContent.length < 5) {
      localContentInput.current.focus();
      return;
    }
    if (window.confirm(`${id + 1}번째 일기를 수정하시겠습니까?`)) {
      onEdit(id, localContent);
      toggleIsEdit();
    }
  };

  return(

  {isEdit ? (
        <>
          {" "}
          <button onClick={handleQuitEdit}>수정취소</button>
          <button onClick={handleEdit}>수정완료</button>
        </>
      ) : (
        <>
          {" "}
          <button onClick={handleRemove}>삭제하기</button>
          <button onClick={toggleIsEdit}>수정하기</button>
        </>
      )}
)
10. LifeCycle
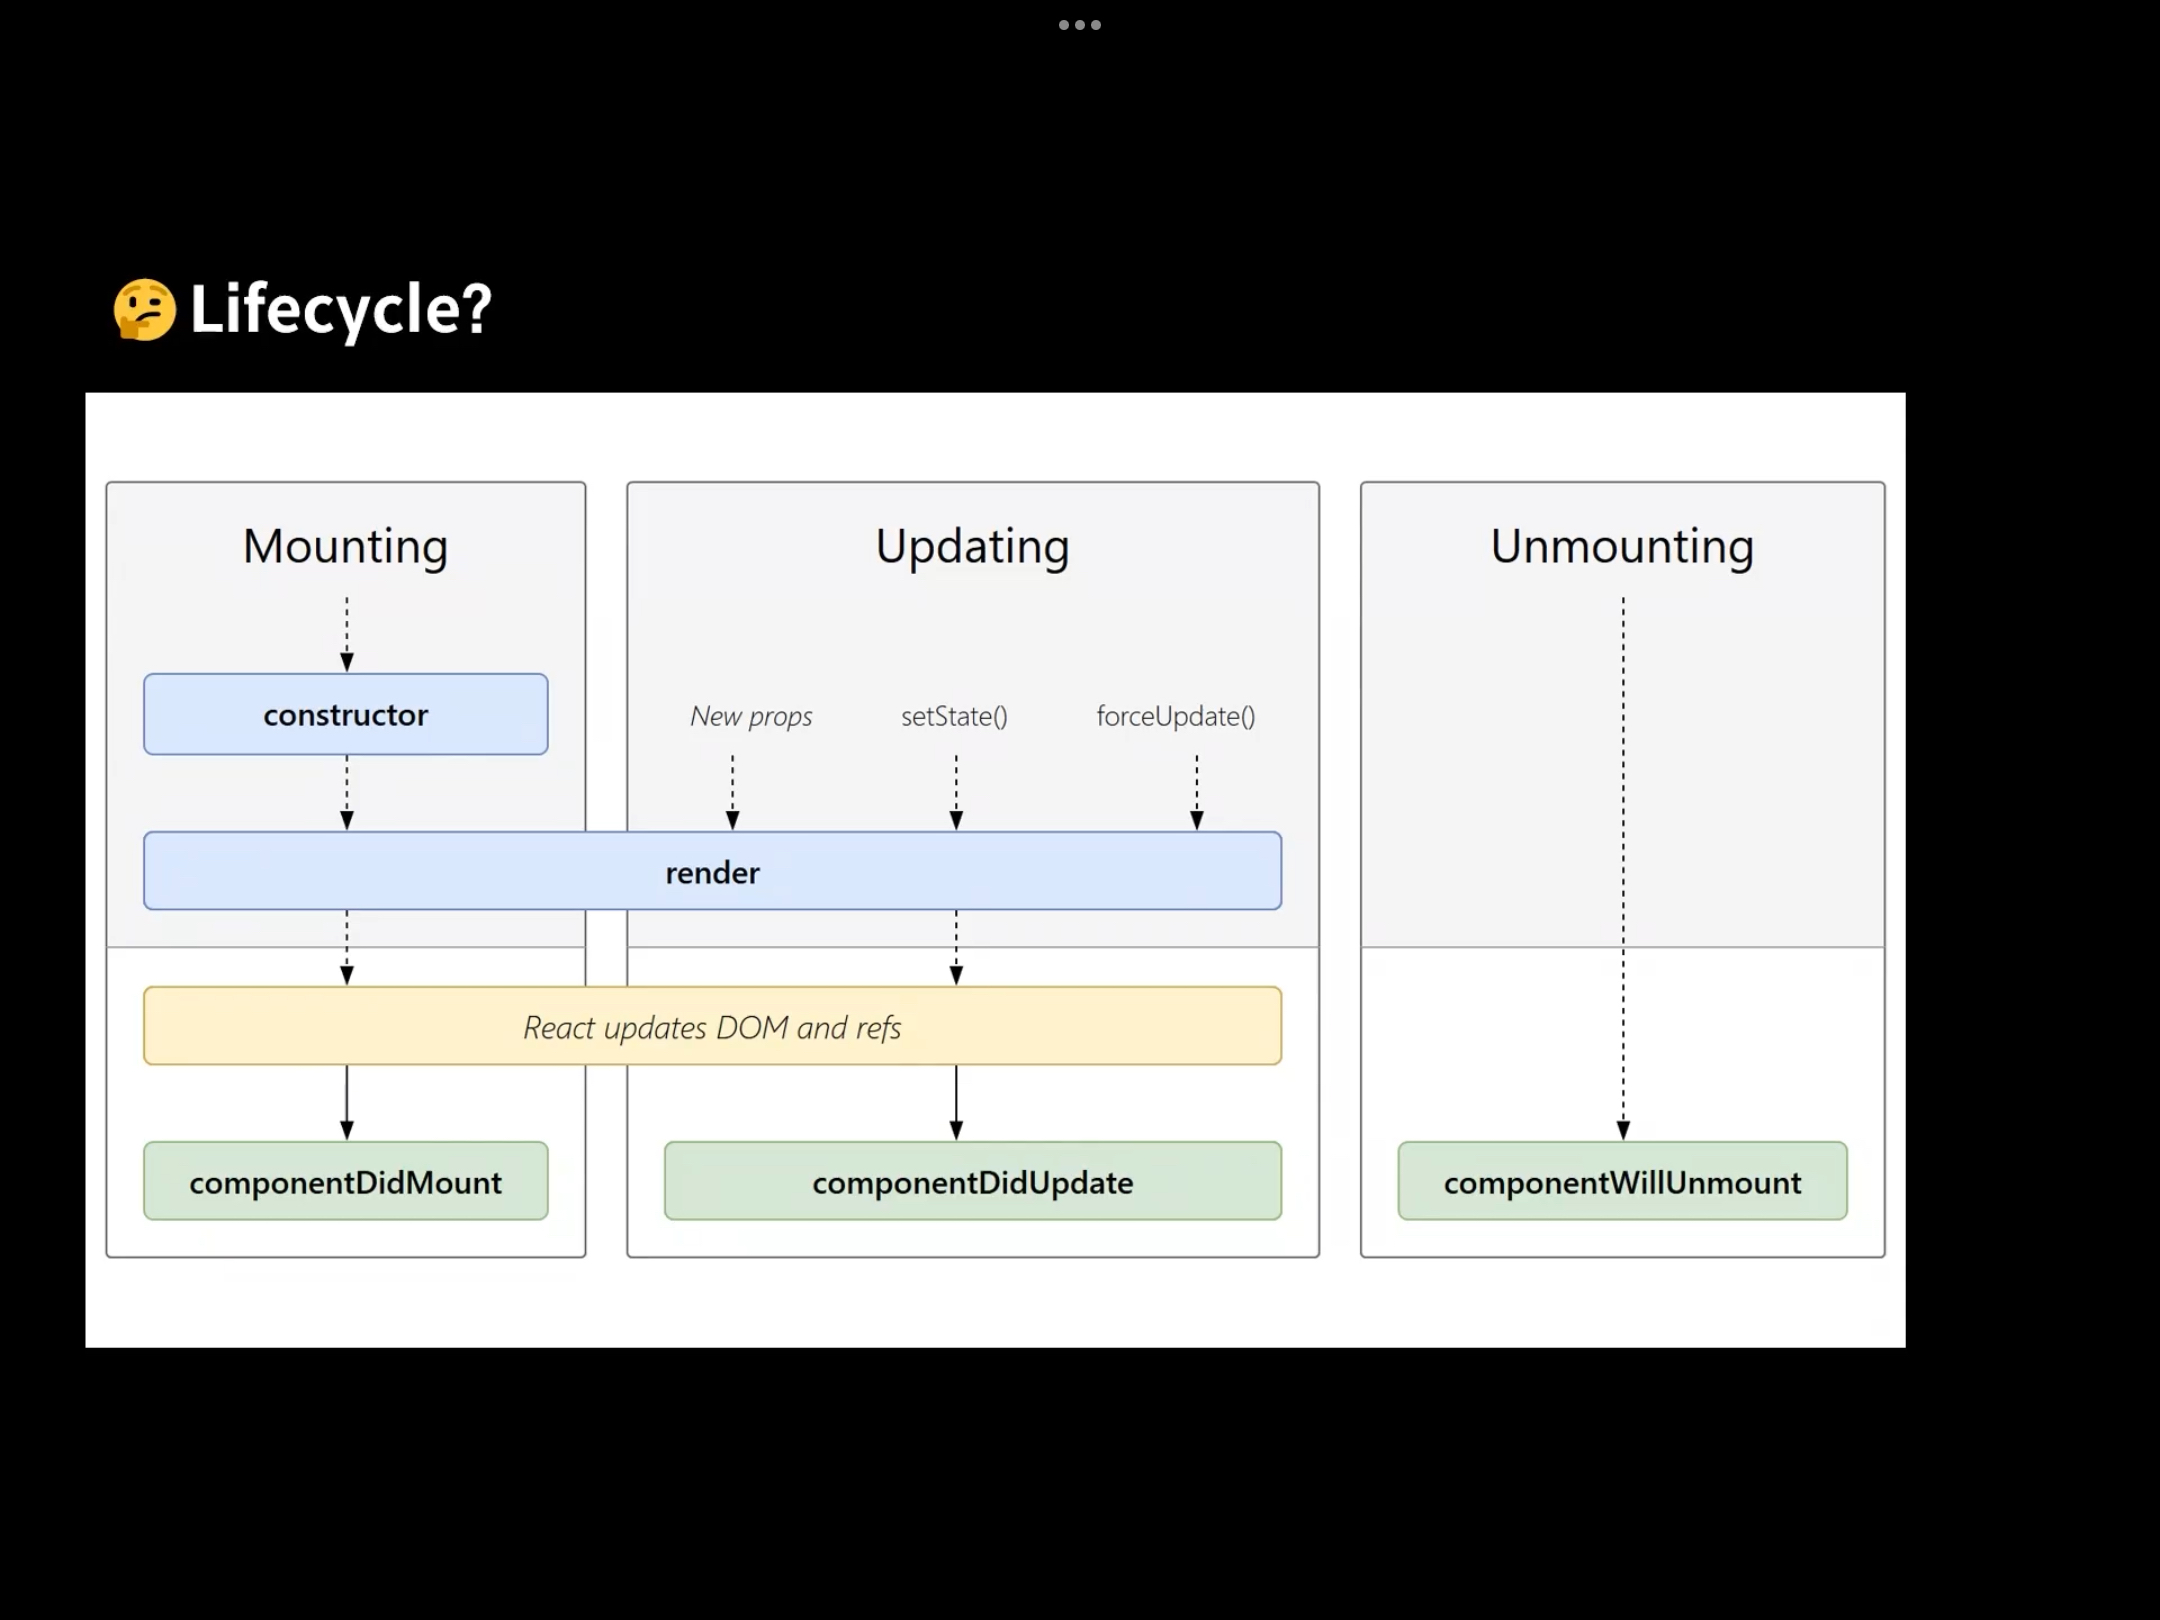

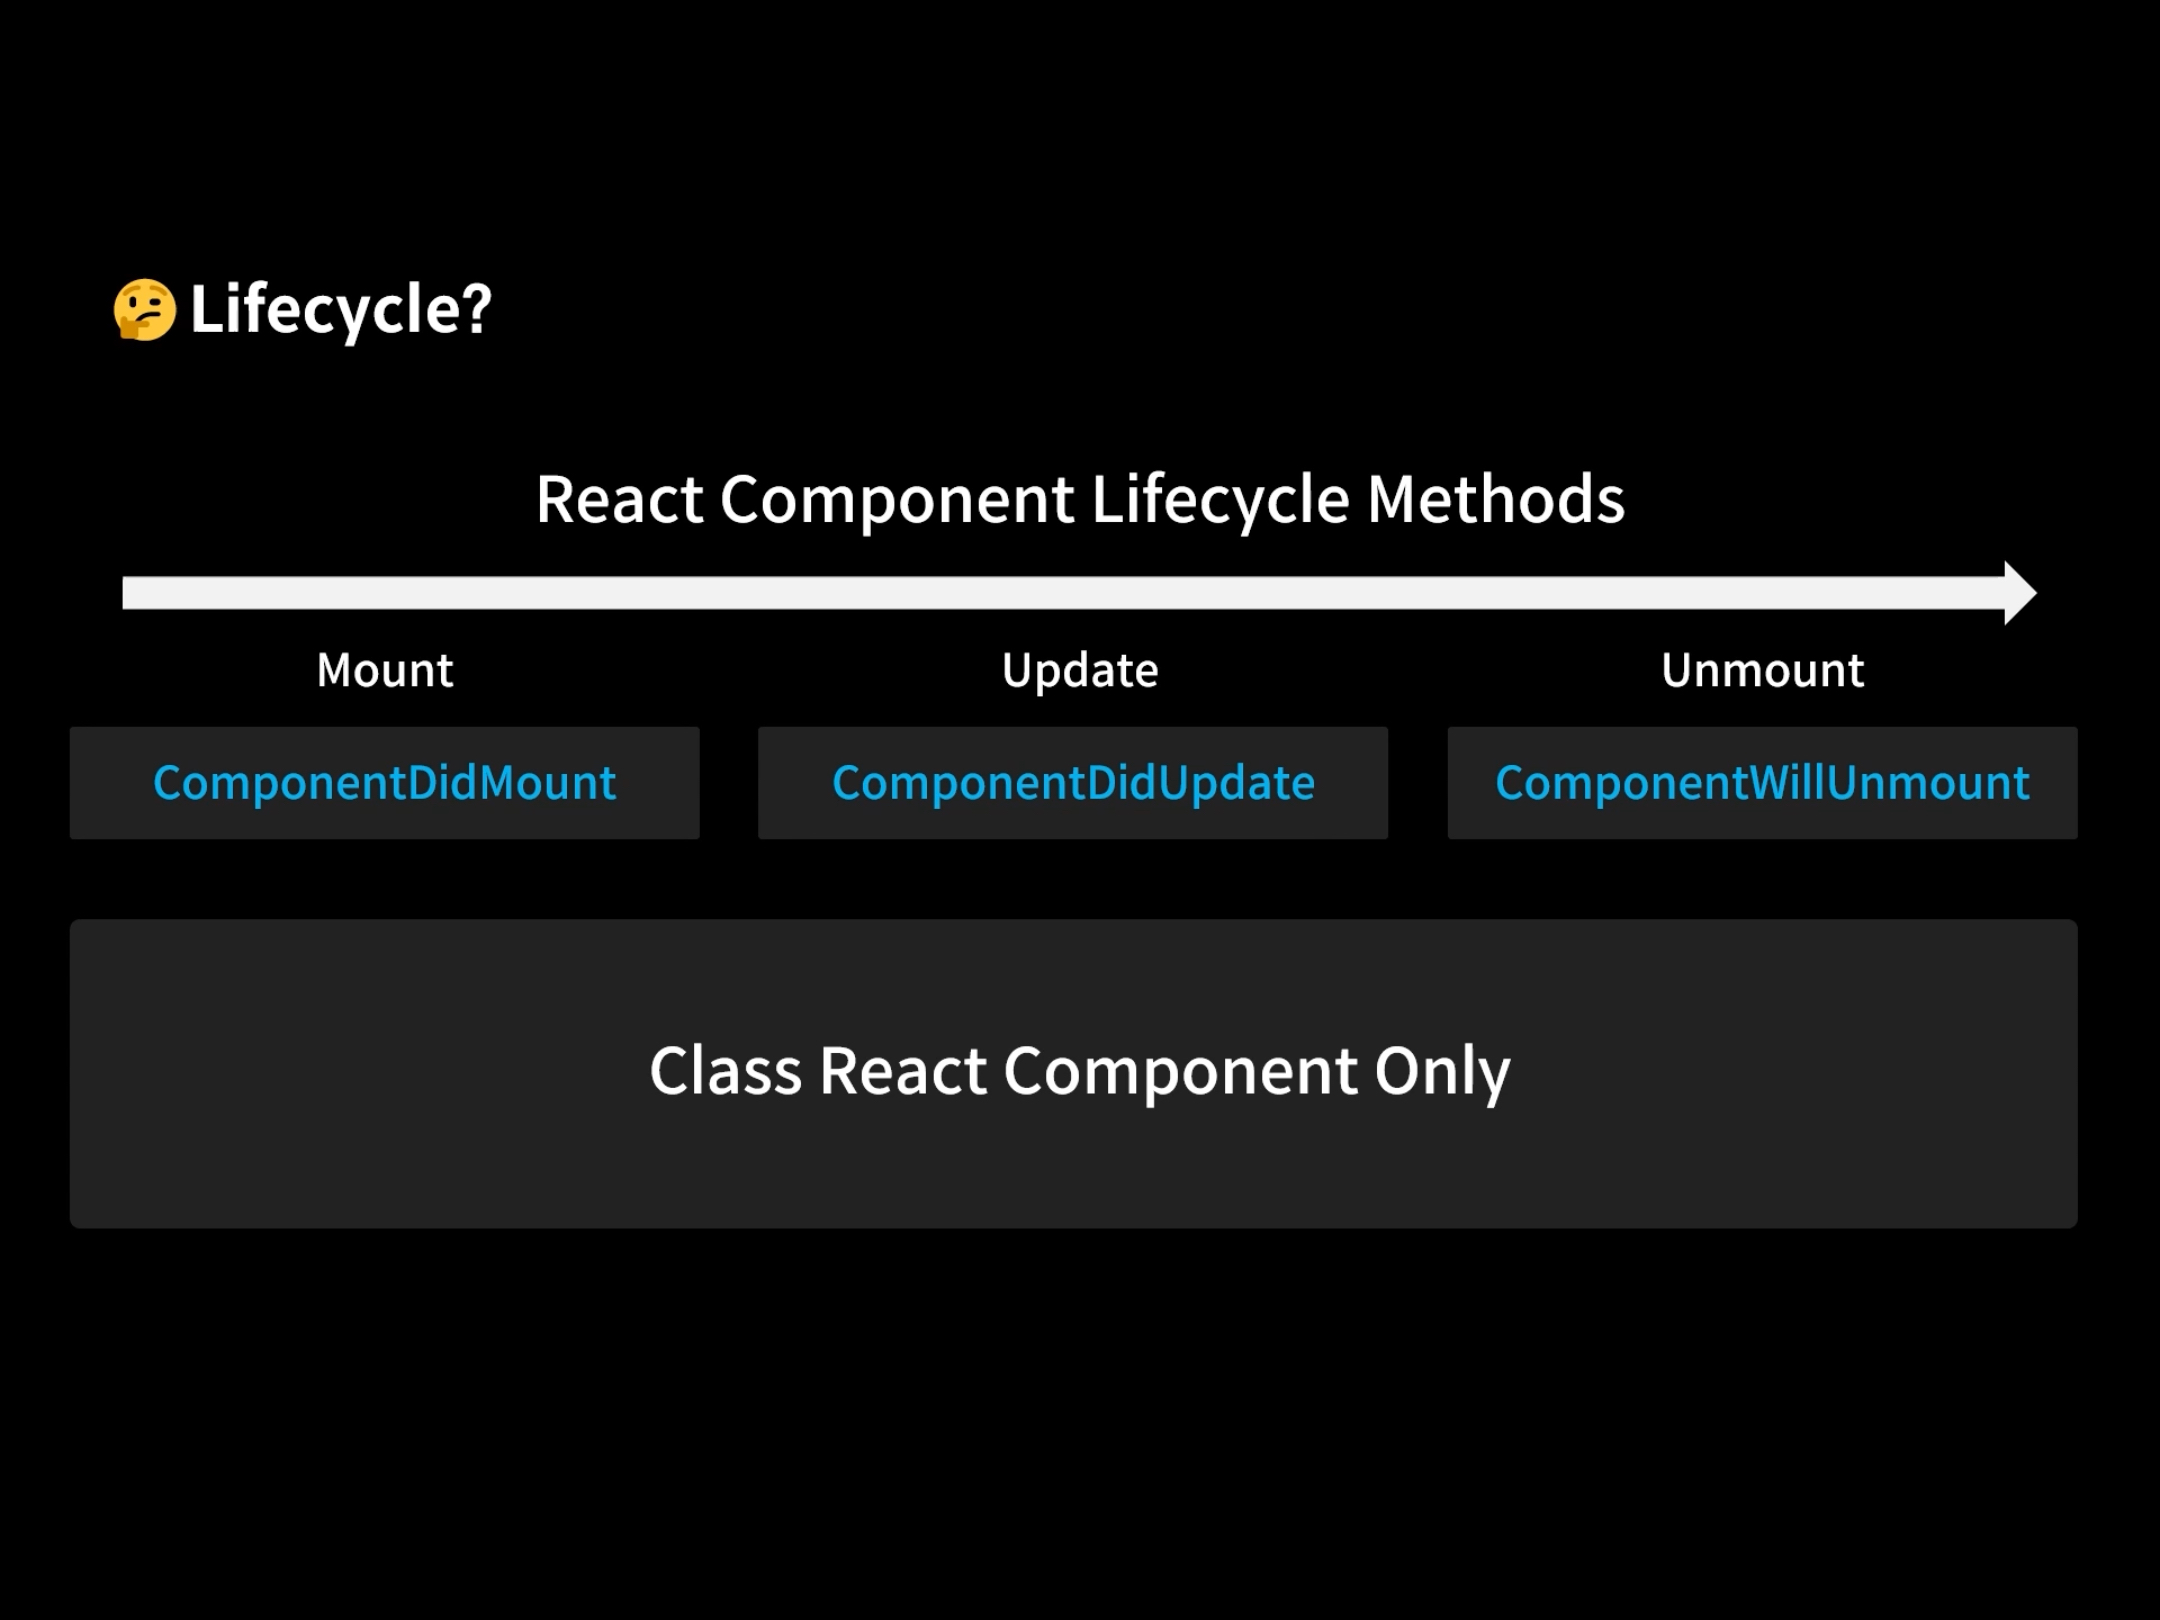
문제점 ? -> 클래스형 컴포넌트에서만 사용가능함
10.1 <APP/>컴포넌트에 <LifeCyle/>컴포넌트 넣어주기
<div className="App">
      <LifeCycle/> //추가
      <DiaryEditor onCreate={onCreate} />
      <DiaryList onEdit={onEdit} onRemove={onRemove} diarylist={data} />
    </div>
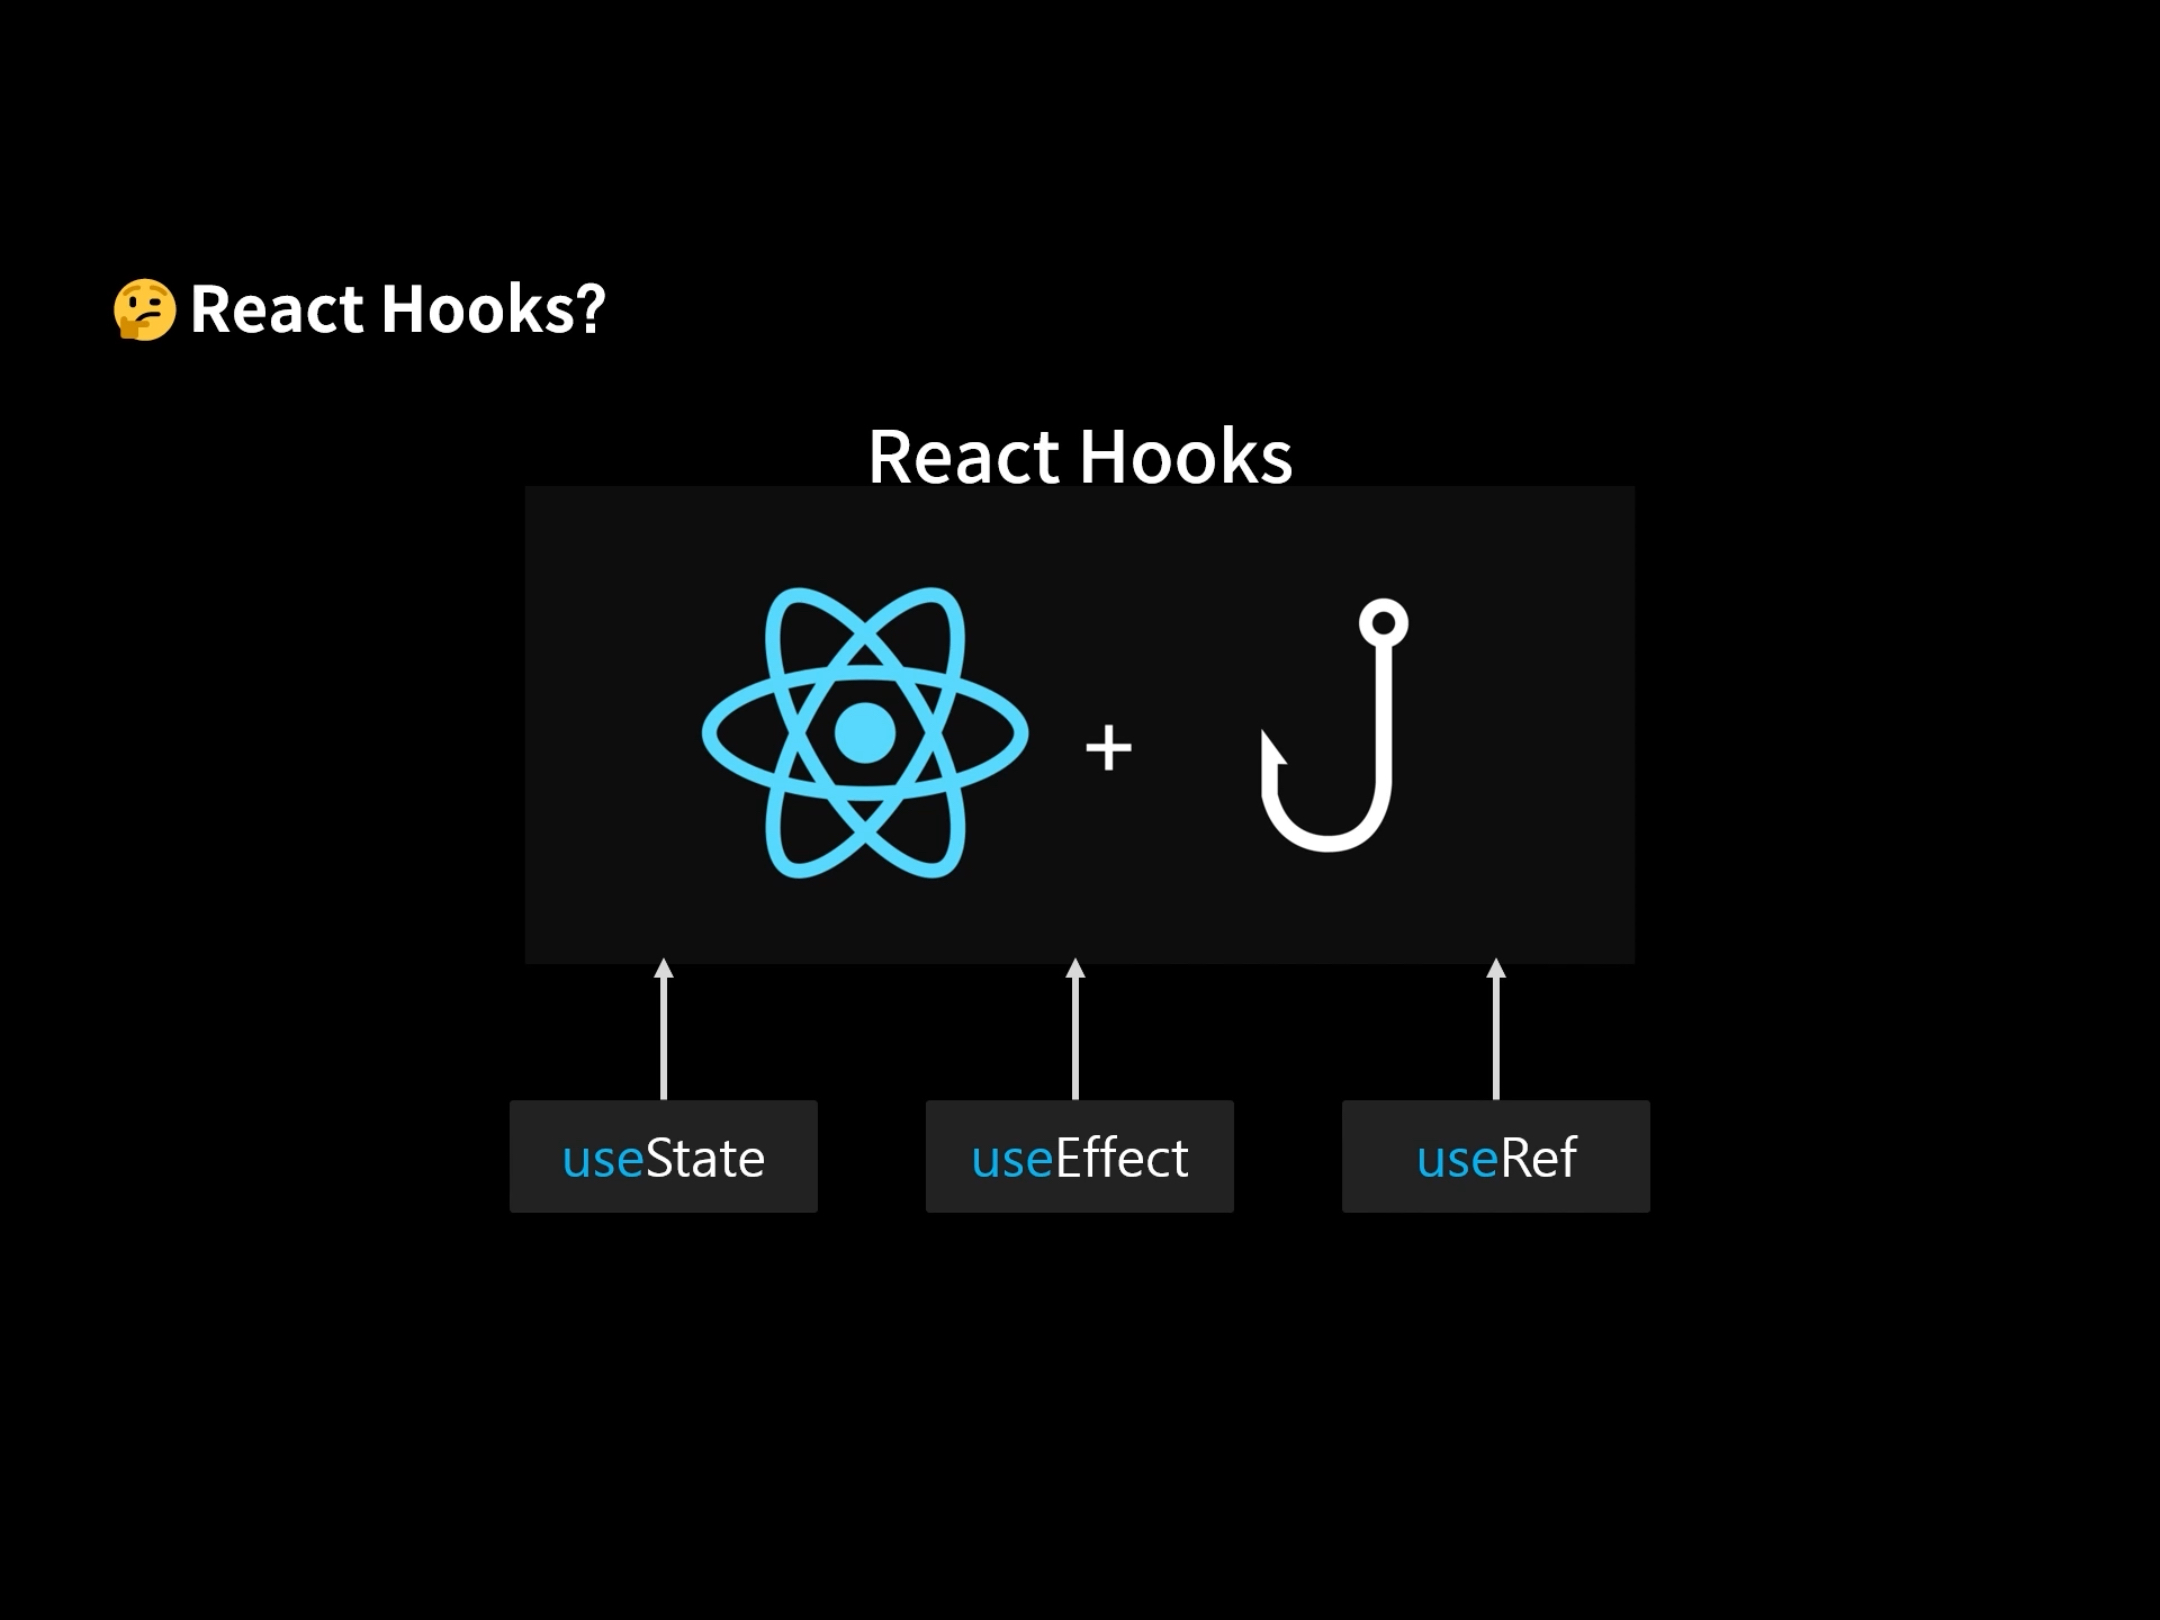
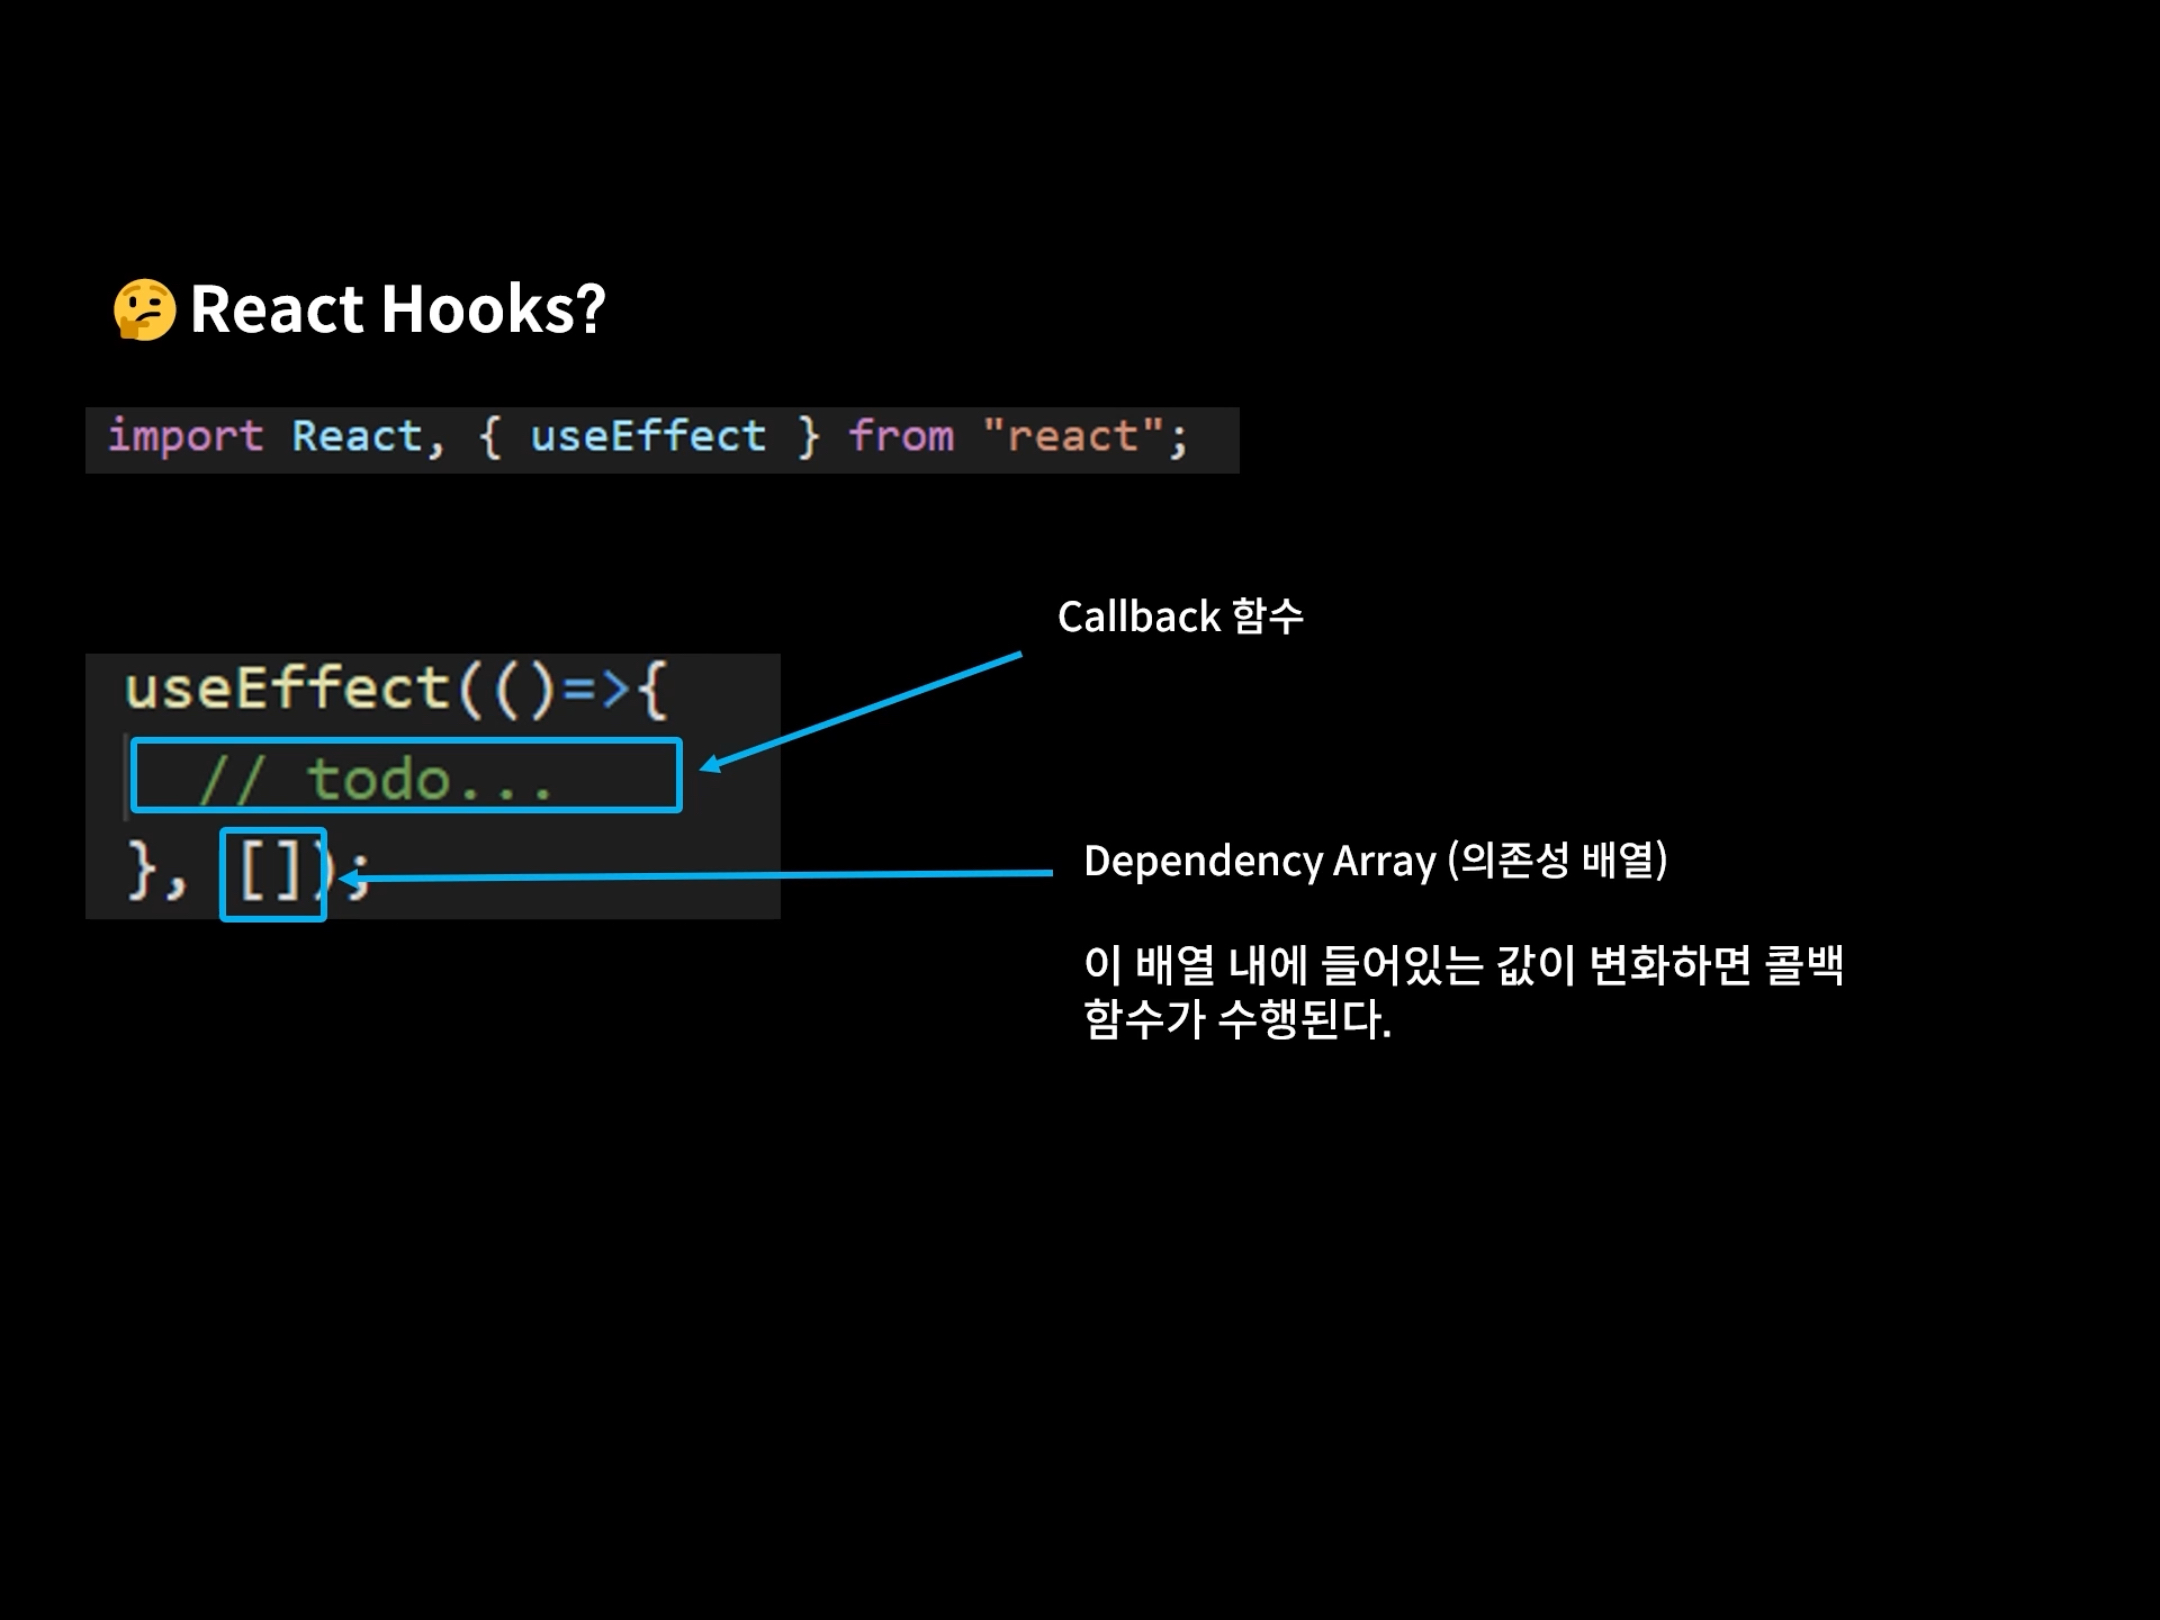
10.2 <LifeCycle/> 컴포넌트 내 useEffect
dpendency array의 값이 변화하게 되면 콜백함수가 실행이된다! , [] 빈배열시 Mount시점에만 작동함
import React, { useEffect, useState } from "react";

const LifeCycle = () => {
     const [count, setCount] = useState(0);
     const [text, setText] = useState("");


    useEffect(() => {
      console.log("Mount!"); //이 콜백함수는 컴포넌트가 Mount 시점에만 작동하기 때문에, +버튼을 눌러도 작동하지않음,
      //마운트 시점에 뭘 하고 싶으면, 두번째인자에 빈배열 전달해주고 콜백함수에 하고싶은걸 넣어주면 된다!
     }, []);

     useEffect(() => {
       console.log("Update!!"); //dependency array를 전달하지않으면 업데이트 될 때마다 렌더됨!
     });

     useEffect(() => {
       console.log(`count is update: ${count}`);
     }, [count]); //dpendency array에 count를 넣어주면, dpendency array의 값이 변화하게 되면 콜백함수가 실행이된다!
  return (
    <div style={{ padding: 20 }}>
      { <div>
        {count}
        <button onClick={() => setCount(count + 1)}>+</button>
      </div>
      <div>
        <input value={text} onChange={(e) => setText(e.target.value)}></input>
      </div> }

    </div>
  );
};
export default LifeCycle;
10.1 <LifeCycle/> 컴포넌트에 <UnmountTest/>컴포넌트 넣어주기
UnMout 시점에 실행되게 하려면? 콜백함수가 return 함수를 실행하게 하면 됨!
const UnmountTest = () => {
  useEffect(() => {
    console.log("Mount!");
    return () => {
      //UnMout 시점에 실행되게 됨 -> 콜백함수가 return 함수를 실행하게 하면 됨!
      console.log("UnMount!!!");
    };
  }, []);
  return <div>Unmount Testing Component</div>;
};


const LifeCycle = () => {

  const [isVisible, SetIsVisible] = useState(false);
  const toggle = () => SetIsVisible(!isVisible);

  return (
    <div style={{ padding: 20 }}>
    <button onClick={toggle}>ON/OFF</button>
    {isVisible && <UnmountTest />}
    </div>
  );
};
export default LifeCycle;
10. API로 데이터 받아오기
<App/>
function App() {

  const getData = async () => {
    const res = await fetch("https://jsonplaceholder.typicode.com/posts").then(
      (res) => res.json()
    );
    console.log(res);
  };

  useEffect(() => {
    getData();
  }, []);
~~
}
데이터 잘 들어오고 있음!
이 중, 20개정도만 가져와서 일기를 작성해보자!
const getData = async () => {
    const res = await fetch("https://jsonplaceholder.typicode.com/posts").then(
      (res) => res.json()
    );
    const initData = res.slice(0, 20).map((it) => {
      return {
        author: it.id,
        content: it.body,
        emotion: Math.floor(Math.random() * 5) + 1, //0~4까지의 수를 만들고, 정수로 만들어주기 위해 Math.floor 해주고 +1 => 1~5 랜덤!
        created_date: new Date().getTime(),
        id: dataId.current++,
      };
    });
    setData(initData);
  };

  useEffect(() => {
    getData();
  }, []);
11. useMemo()
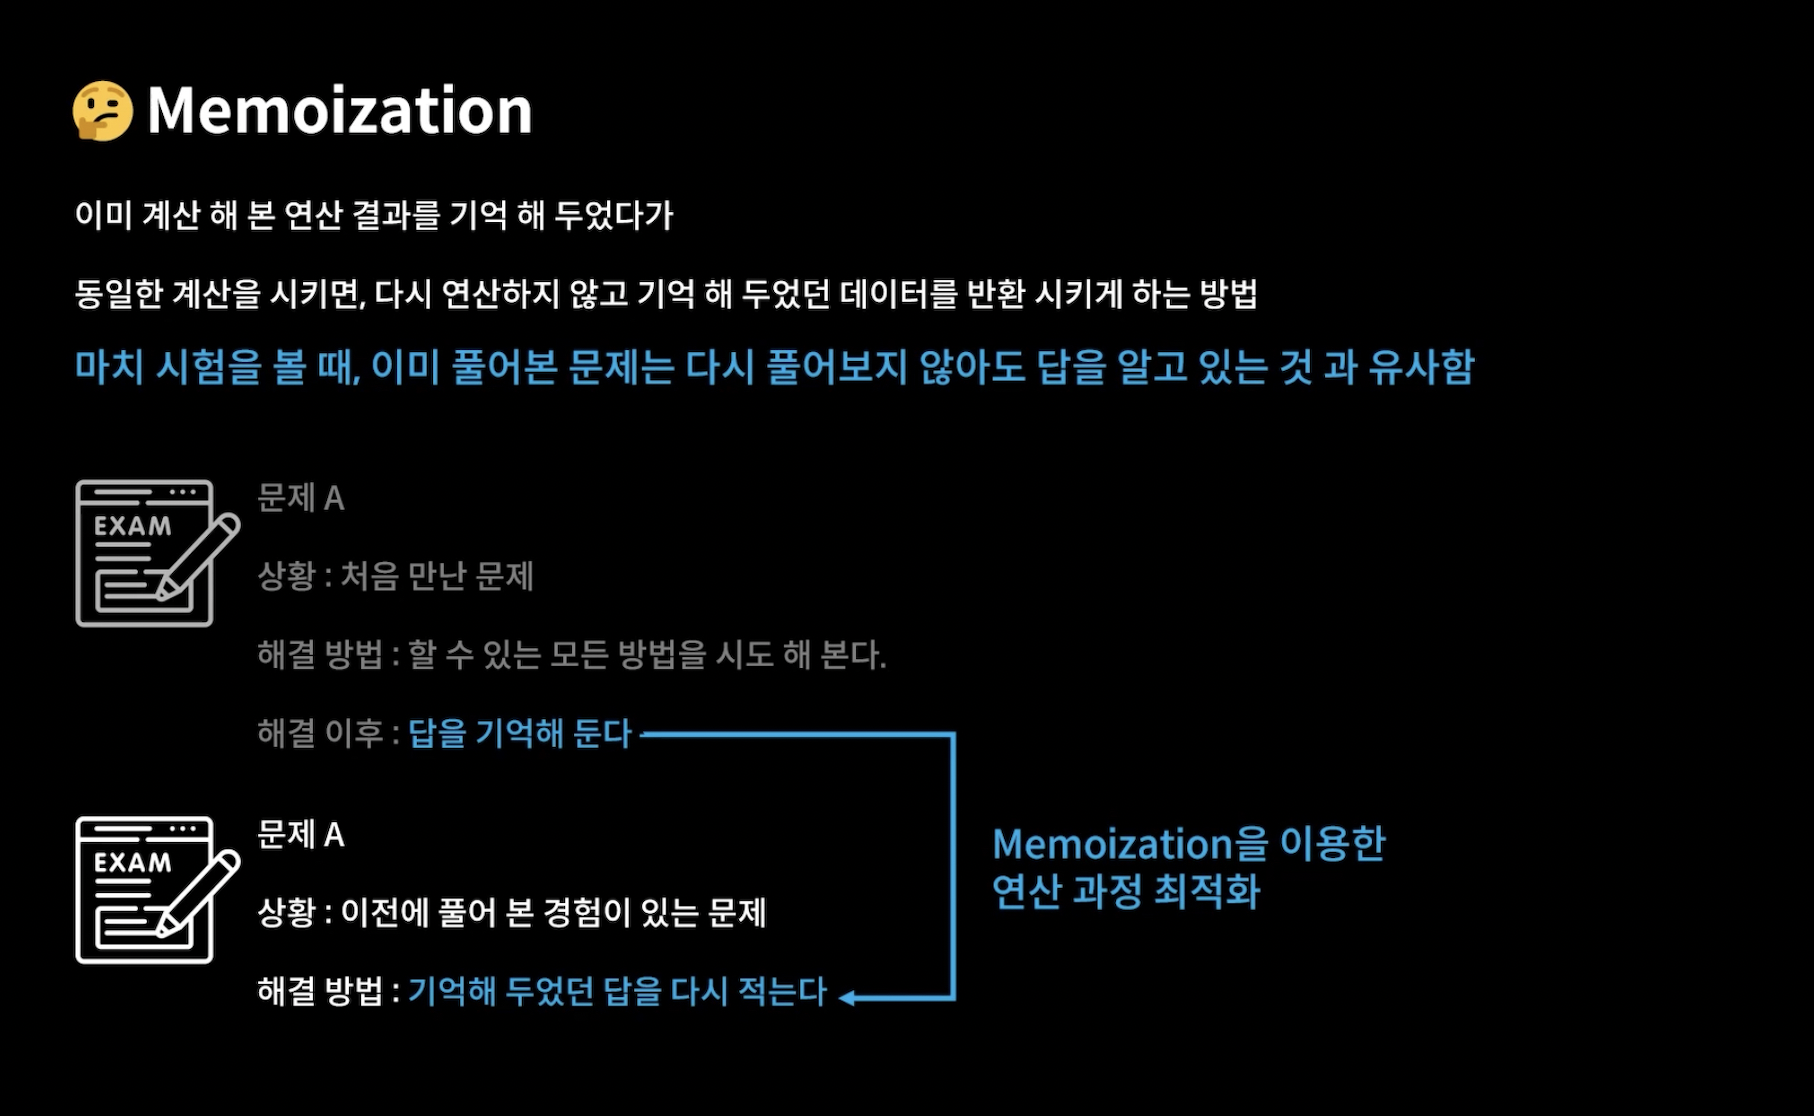
함수가 있고, 리턴 값이있는데, 리턴까지의 연산을 최적화 하고 싶으면 useMemo()를 사용해서 dependency Array에 변화할 값을 걸어놓으면 연산 최적화를 할 수 있다!
const getDiaryAnalysis = useMemo(() => {
console.log("일기 분석 시작");
const goodCount = data.filter((it) => it.emotion >= 3).length;
const badCount = data.length - goodCount;
const goodRatio = (goodCount / data.length) * 100;
return {
goodCount,
badCount,
goodRatio,
};
}, [data.length]); //[data.legnth]가 변화할때만 다시 계산!
return (
<div className="App">
{/* <LifeCycle/> */}
<DiaryEditor onCreate={onCreate} />
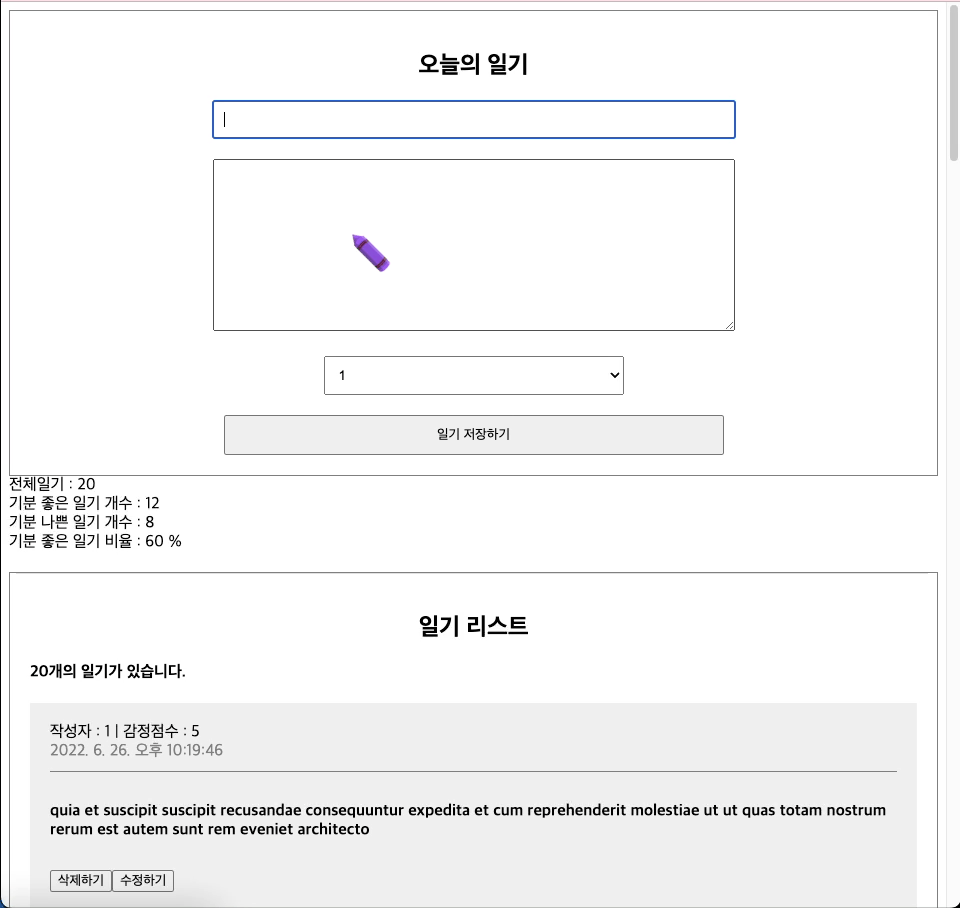
<div>전체일기 : {data.length}</div>
<div>기분 좋은 일기 개수 : {goodCount}</div>
<div>기분 나쁜 일기 개수 : {badCount}</div>
<div>기분 좋은 일기 비율 : {goodRatio} %</div>
<DiaryList onEdit={onEdit} onRemove={onRemove} diaryList={data} />
</div>
);더 공부해봐야할것
React.memo
useCallback
useReducer
Context