어제에 이어 Redis 강의를 들으며 MSA 구현 과제를 마무리했다.
캐싱 개념, 캐싱 전략
캐싱과 캐싱의 필요성
Redis가 많이 활용되는 또다른 주제는 캐싱(Caching)이다. 이는 자주 사용되는 데이터를 더 빠른 캐시(Cache)에 저장하는 기법을 부르는 용어이다.
캐시란?
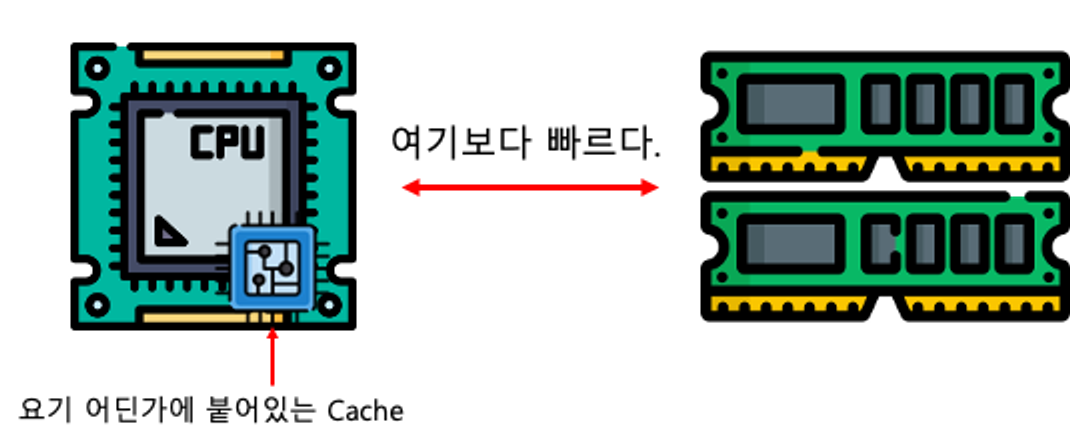
Cache는 본래 CPU 내부의 작은 영역으로, 정말 빈번히 접근하게 되는 데이터를 저장해두는 임시 기억 장치이다. 기본적으로 영속성을 위해 파일시스템(디스크)에 저장하고, 빠른 활용을 위해 메모리(RAM)에 저장한다면, 정말 많이 사용되는 휘발성 데이터가 캐시에 저장된다.
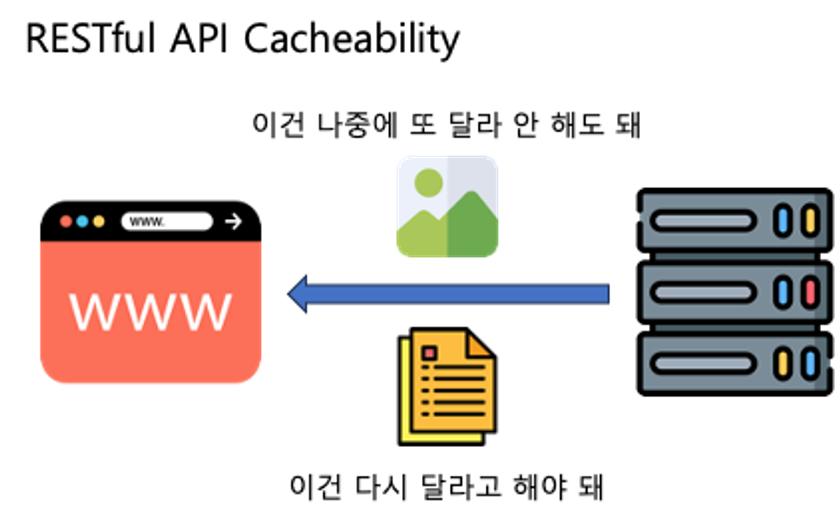
웹 브라우저에서는 자주 바뀌지 않는 이미지 등을 브라우저 캐시에 저장해 페이지를 줄이는 것도 캐싱의 일종이며, 이는 RESTful 설계 원칙 중에서 응답이 캐싱이 가능한지 명시해야 한다는 제약사항으로도 나타난다.
캐싱 전략
- 캐시 적중(Cache Hit): 캐시에 접근했을 때 찾고 있는 데이터가 있는 경우
- 캐시 누락(Cache Miss): 캐시에 접근했을 때 찾고 있는 데이터가 없는 경우
- 삭제 정책(Eviction Policy): 캐시에 공간이 부족할 때 어떻게 확보하는지에 대한 정책
캐시에 찾는 데이터가 있을지 없을지는 캐시에 접근하기 전까지는 알기 어렵다. 그래서 어떤 데이터를 얼마나 오래 캐시에 보관할지에 대한 전략을 잘 세워, 적중률을 높이고 누락을 최대한 줄여야 한다.
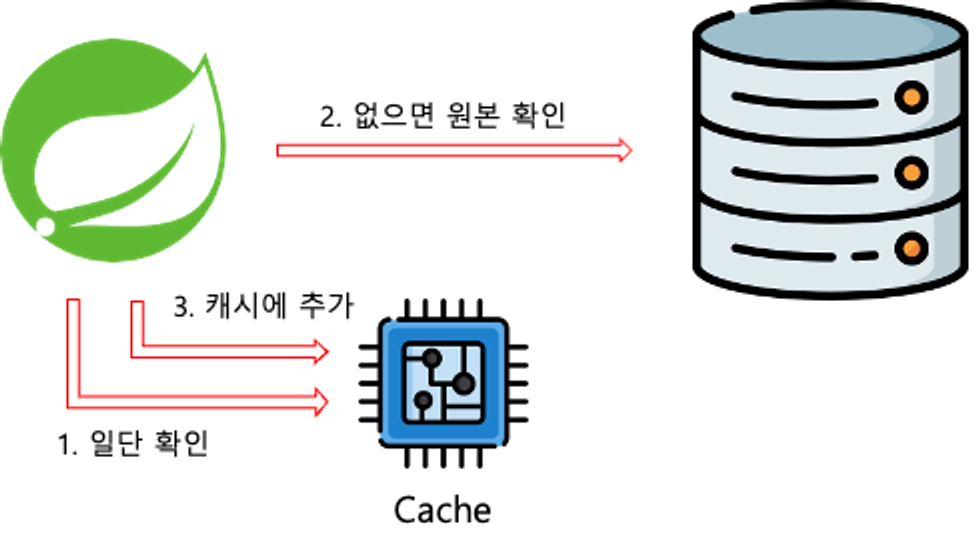
Cache-Aside
Lazy Loading이라고도 하며, 데이터를 조회할 때 항상 캐시를 먼저 확인하는 전략. 캐시에 데이터가 있으면 캐시에서 데이터를, 없으면 원본에서 데이터를 가져온 뒤 캐시에 저장한다
- 필요한 데이터만 캐시에 보관된다.
- 최초로 조회할 때 캐시를 확인하기 때문에 최초의 요청은 상대적으로 오래 걸린다.
- 반드시 원본을 확인하지 않기 때문에, 데이터가 최신이라는 보장이 없다.
Write-through
데이터를 작성할 때 항상 캐시에 작성하고, 원본에도 작성하는 전략
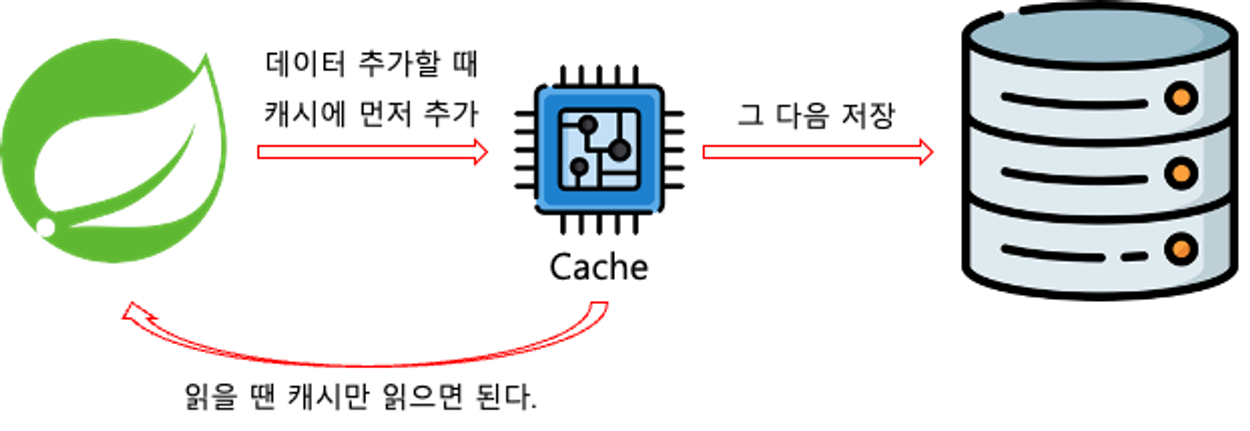
- 캐시의 데이터 상태는 항상 최신 데이터임이 보장된다.
- 자주 사용하지 않는 데이터도 캐시에 중복해서 작성하기 때문에, 시간이 오래 걸린다.
Write-Behind
캐시에만 데이터를 작성하고, 일정 주기로 원본을 갱신하는 방식
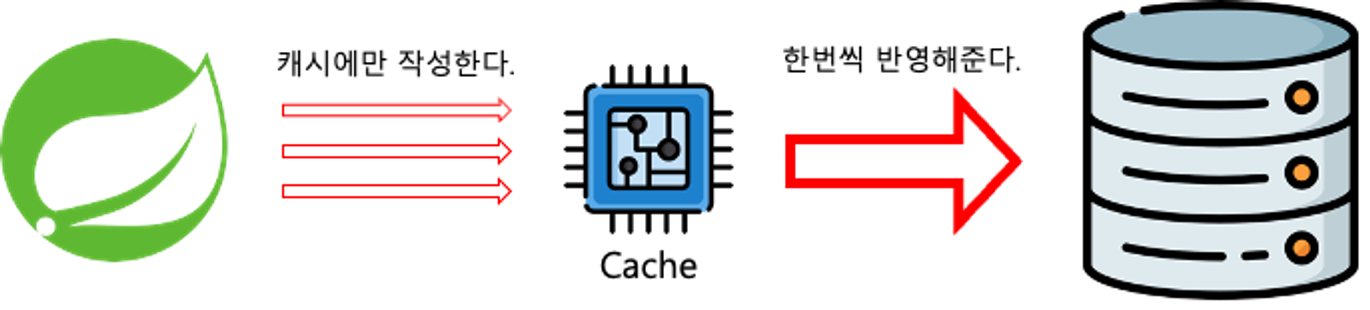
- 쓰기가 잦은 상황에 데이터베이스의 부하를 줄일 수 있다.
- 캐시의 데이터가 원본에 적용되기 전 문제가 발생하면 데이터 소실의 위험성이 존재한다.
프로젝트에 적용
우선 build.gradle 파일에 아래 의존성을 추가한다.
implementation 'org.springframework.boot:spring-boot-starter-data-redis'캐싱 설정을 구성하기 위해 Config 객체를 작성한다.
CacheConfig.java
@Configuration
@EnableCaching
public class CacheConfig {
    @Bean
    public RedisCacheManager cacheManager(
            RedisConnectionFactory redisConnectionFactory
    ) {
        // 설정 구성을 먼저 진행
        // Redos를 이용해서 Spring Cache를 사용할 때
        // Redis 관련 설정을 모아두는 클래스
        RedisCacheConfiguration configuration = RedisCacheConfiguration
                .defaultCacheConfig()
                // null을 캐싱하는지
                .disableCachingNullValues()
                // 기본 캐시 유지 시간(Time To Live)
                .entryTtl(Duration.ofSeconds(60))
                // 캐시를 구분하는 접두사 설정
                .computePrefixWith(CacheKeyPrefix.simple())
                // 캐시에 저장할 값을 어떻게 직렬화 / 역직렬화 할 것인지
                .serializeValuesWith(
                        SerializationPair.fromSerializer(RedisSerializer.java())
                );

        return RedisCacheManager
                .builder(redisConnectionFactory)
                .cacheDefaults(configuration)
                .build();
    }
}
사용할 service 코드에 Cache 관련 어노테이션을 작성한다.
ProductService.java
@Service
@RequiredArgsConstructor
public class ProductService {

    private final ProductRepository productRepository;

    @Cacheable(cacheNames = "productAllCache", key = "methodName")
    @Transactional(readOnly = true)
    public List<ProductResponseDto> findAll() {
        List<Product> Products =  productRepository.findAll();

        List<ProductResponseDto> ProductResponseDtos = new ArrayList<>();
        for (Product product : Products) {
            ProductResponseDtos.add(product.toProductResponseDto());
        }

        return ProductResponseDtos;
    }

    // Write-through
    // key = 결과값(Dto)의 ID
    @CachePut(cacheNames = "productCache", key = "#result.productId")
    @CacheEvict(cacheNames = "productAllCache", allEntries = true)
    public ProductResponseDto saveProduct(ProductRequestDto productRequestDto) {
        Product product = new Product().toEntity(productRequestDto);

        return productRepository.save(product).toProductResponseDto();
    }

    @Cacheable(cacheNames = "productCache", key = "args[0]")
    @Transactional(readOnly = true)
    public ProductResponseDto findById(Long id) {
        return productRepository.findById(id)
                .map(Product::toProductResponseDto)
                .orElse(null); // 존재하지 않는 상품 조회 시 null 반환
    }
}
@Cacheable
@Cacheable이 포함되게 되면 CacheConfig에서 설정한대로 캐싱 어노테이션이 동작하며, 전달된 인자가 동일한 호출에 대하여 캐시에서 데이터를 돌려주는 Cache-Aside방식의 캐식이 된다.
@CachePut
@Cacheable은 데이터를 캐시에서 발견할 경우(Hit), 메서드 자체를 실행하지 않는 반면, @CachePut은 항상 메서드를 실행하고, 결과를 캐싱합니다. 즉 위의 코드처럼 생성, 또는 수정에 대해서 적용하면 Write Through 전략처럼 동작한다.
@CacheEvict
Evict라는 말에서 유추 가능하듯, @CacheEvict는 주어진 정보를 바탕으로 캐시를 지워준다. key를 통해서 명확히 하나의 캐시를 지정할수도 있지만, 위의 코드에서는 allEntries = true 를 통해 저장된 모든 캐시를 지워준다.
ProductResponseDto.java
@Setter
@Getter
@NoArgsConstructor
@AllArgsConstructor
@Builder
public class ProductResponseDto implements Serializable {

    private Long productId;
    private String name;
    private Integer supplyPrice;

}
객체를 캐시의 결과값으로 사용하기 위해 위와 같이 implements Serializable을 작성해야 한다. (작성하지 않아 발생한 관련 이슈 👉 클릭)
