Flutter 일기
참고1: https://api.flutter.dev/flutter/material/FloatingActionButton-class.html
참고2: Doit! 플러터 앱프로그래밍 (9단원) - 조준수, [이지스퍼블리싱]
마지막 수정일 : 22/12/21
FloatingActionButton
오늘 배워볼 위젯은 FloatingActionButton.
Scaffold.floatingActionButton에 사용하는 위젯이고, 화면 하단에 둥근 버튼이 하나 생긴다. 다른 버튼과 마찬가지로 onPressed 속성을 설정하지 않으면, 못 쓰는 버튼이 된다.(터치에 반응하지 않는다.)
플러터 프로젝트를 생성하면 이미 코드가 적혀 있는데, floatingActionButton을 이용한 코드이다.
해당 버튼(+)을 누르면 화면의 숫자가 증가한다.
코드 예시로 알아보자
공식 페이지의 코드를 가져다가 조금만 변형해보았다.
import 'package:flutter/material.dart';
void main() => runApp(const MyApp());
/// This is the main application widget.
class MyApp extends StatelessWidget {
const MyApp({Key? key}) : super(key: key);
static const String _title = 'Flutter Code Sample';
Widget build(BuildContext context) {
return const MaterialApp(
title: _title,
home: MyHomePage(),
);
}
}
/// This is the stateless widget that the main application instantiates.
class MyHomePage extends StatefulWidget {
const MyHomePage({Key? key}) : super(key: key);
_MyHomePageState createState() => _MyHomePageState();
}
class _MyHomePageState extends State<MyHomePage> {
int _counter = 0;
void _incrementCounter() {
setState(() {
_counter++;
});
}
Widget build(BuildContext context) {
return Scaffold(
appBar: AppBar(
title: const Text('Floating Action Button'),
),
body: Center(
child: Column(
mainAxisAlignment: MainAxisAlignment.center,
children: [
Text(
'좋아요 버튼 눌러주세요!',
style: TextStyle(fontSize: 30),
),
SizedBox(
height: 30,
),
Text(
'$_counter',
style: TextStyle(fontSize: 50),
),
],
),
),
floatingActionButton: FloatingActionButton.extended(
onPressed: () {
_incrementCounter();
},
label: const Text('좋아요'),
icon: const Icon(Icons.thumb_up),
backgroundColor: Colors.pink,
),
);
}
}
보통은 FloatingActionButton을 쓰는데, extended라는 생성자가 하나 더 있다. 그냥 글자를 넣을 수 있다는 정도? 실행해보면 아래와 같다.
| 최초 화면 | 버튼 10번 클릭 이후 |
|---|---|
화면 하단에 navigationbar를 추가하고 싶은데, floatingActionButton을 네비게이션바와 겹치게 하고 싶다면 아래의 코드를 floatingActionButton 아래에 추가하면 된다.
bottomNavigationBar: BottomAppBar(
        color: Colors.orangeAccent,
        child: Container(height: 50,),
      ),
      floatingActionButtonLocation: FloatingActionButtonLocation.centerDocked,
실행하면 아래와 같다.
| FloatingActionButtonLocation.centerDocked | FloatingActionButtonLocation.endDocked |
|---|---|
앱을 다시 실행해도 '좋아요' 횟수가 그대로일 수는 없나?
플러터 프로젝트를 맨 처음 생성했을 때 나타나는 코드에서는 내가 floatingActionButton을 누른 횟수가 어딘가에 저장되지 않는다. 즉, 애뮬레이터 상에서 앱을 종료했다가 다시 켜면 0으로 초기화된다는 것이다.
버튼을 누른 횟수를 저장해서, 앱을 다시 실행해도 그 횟수에서 다시 더해지게끔 하고 싶다면? 공유 환경설정을 이용해보자. (Doit! 플러터 앱프로그래밍 (9단원) 을 읽고 작성하였다.)
SharedPreferences
일단 SharedPreferences 는 내장 위젯이 아니라 package 라서, pubspec.yaml 파일에 추가할 문구가 있다.
shared_preferences: ^2.0.15적은 양의 간단한 데이터를 저장하는 용도로 사용하며, SharedPreferences 객체를 만들어서 키-값 쌍으로 구성된 데이터를 넣는다.
! 주의
pub.dev - Data may be persisted to disk asynchronously, and there is no guarantee that writes will be persisted to disk after returning, so this plugin must not be used for storing critical data.
다만 주의할 점은 정말로 간단한 데이터 넣을 때만 사용하고, 중요한 데이터는 넣지 말아야 한다는 점이다.
코드 예시로 알아보자
일단 이 아래는 StatefulWidget 내에서 SharedPreferences를 사용하는 예시이다.
class _MyHomePageState extends State<MyHomePage> {
int _counter = 0;
//_counter의 값을 저장하기
void setData(int value) async{
var key='_counter';
SharedPreferences sp=await SharedPreferences.getInstance();
sp.setInt(key, value);
}
//_counter의 값을 불러오기
void loadData() async{
var key='_counter';
SharedPreferences sp=await SharedPreferences.getInstance();
setState(() {
var value=sp.getInt(key);
if(value==null)
_counter=0;
else
_counter=value;
});
}
void _incrementCounter() {
setState(() {
_counter++;
setData(_counter);
});
}
void initState() {
super.initState();
loadData();
}
//build 함수는 변경없음!
Widget build(BuildContext context) {
return Scaffold(
appBar: AppBar(
title: const Text('Floating Action Button'),
),
body: Center(
child: Column(
mainAxisAlignment: MainAxisAlignment.center,
children: [
Text(
'좋아요 버튼 눌러주세요!',
style: TextStyle(fontSize: 30),
),
SizedBox(
height: 30,
),
Text(
'$_counter',
style: TextStyle(fontSize: 50),
),
],
),
),
floatingActionButton: FloatingActionButton.extended(
onPressed: () {
_incrementCounter();
},
label: const Text('좋아요'),
icon: const Icon(Icons.thumb_up),
backgroundColor: Colors.pink,
),
bottomNavigationBar: BottomAppBar(
color: Colors.orangeAccent,
child: Container(height: 50,),
),
floatingActionButtonLocation: FloatingActionButtonLocation.centerDocked,
);
}
}
앱을 실행할 때, 이전까지의 _counter 값을 알아야 하므로 initState에 loadData 함수를 추가한다.
그리고 버튼을 누를 때 마다 공유 환경 설정 파일에 저장되어 있는 _counter 값을 변경해야 하므로, _incrementCounter() 함수에 setData() 함수를 추가한다.
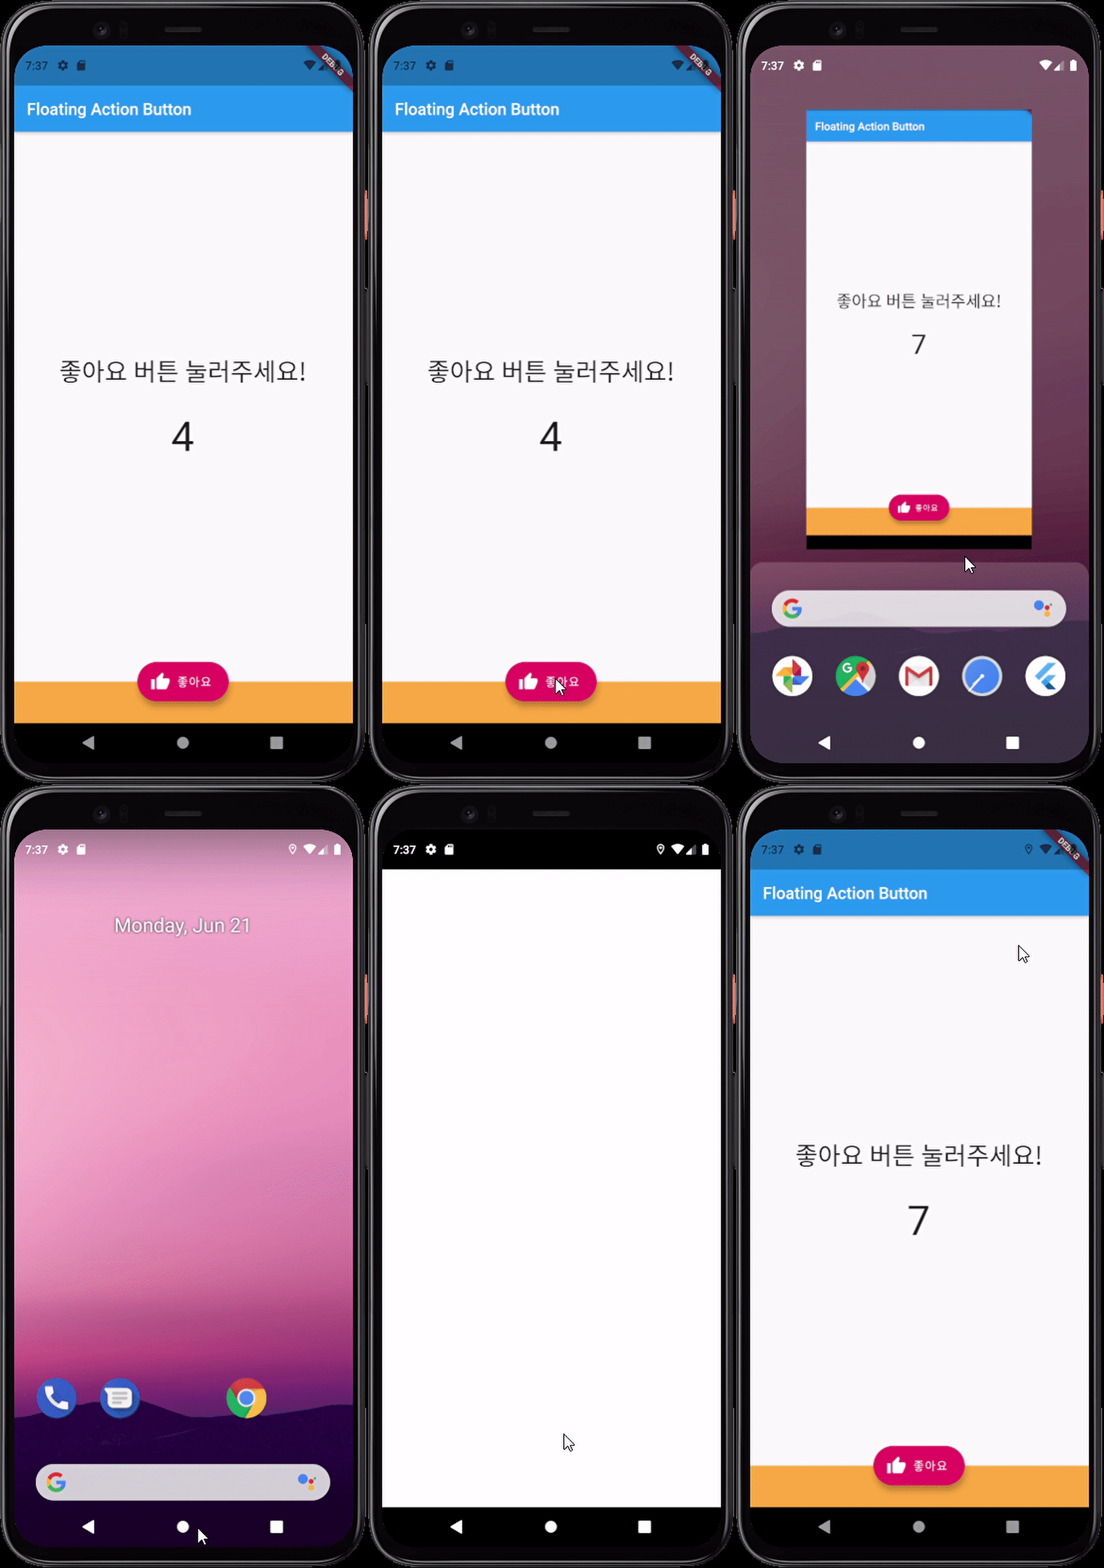
실행화면을 보자.

위와 같이 애뮬레이터 상에서 앱을 종료해도 누른 횟수가 그대로인 것을 알 수 있다.
22.12.21 - 화면이 3개인 앱에다가 간단한 데이터베이스 기능으로 넣으려고 했다가, 상태 관리 때문에 무참히 실패하고 말았다. SharedPreferences 객체 1개를 계속해서 쓰려니 controller의 기능을 하는 파일이 있어야 한다는 걸, 하루를 삽질하고 나서야 깨달았다... Provider, GetX를 배웠는데도 생각이 안나더라...ㅠㅠ
