내가 보려고 쓰는 Flutter Widget 일기
참고 : https://api.flutter.dev/flutter/widgets/Expanded-class.html
Expanded
오늘 배울 위젯은 Expanded.
플러터로 화면을 꾸밀 때는 Row, Column등을 활용하여 여러 위젯를 나열하는 경우가 많다. 이 경우 특정 자식의 크기만 확장하고 싶거나, Row, Column이 차지하는 공간만큼 위젯을 화면 가득 채우고 싶다면? Expanded를 사용한다.
Expanded는 Row, Column, Flex가 갖는 child 위젯의 크기를 확장시켜, 채울 수 있는 공간을 최대한 채우도록 한다. 확장하려는 자식 요소가 여러 개일 경우, flex 라는 요소를 활용해 크기를 할당할 수도 있다.
Expanded는 반드시 Row, Column, Flex의 자식 위젯으로 들어가야 하며, 이들은 반드시 StatelessWidget, StatefulWidget 안에서만 사용 가능하다.
코드 예시로 알아보자.
공식 사이트의 예제 코드를 가져다가 조금 변형해서 돌려보았다. Expanded 위젯, flex 요소에 주목해서 보자.
import 'package:flutter/material.dart';
void main() => runApp(const MyApp());
/// This is the main application widget.
class MyApp extends StatelessWidget {
const MyApp({Key key}) : super(key: key);
static const String _title = 'Flutter Code Sample';
Widget build(BuildContext context) {
return const MaterialApp(
title: _title,
home: ExpandedWidget(),
);
}
}
/// This is the stateless widget that the main application instantiates.
class ExpandedWidget extends StatelessWidget {
const ExpandedWidget({Key key}) : super(key: key);
Widget build(BuildContext context) {
return Scaffold(
appBar: AppBar(
title: const Text('Test Expanded Row'),
),
body: Center(
child: Column(
children: <Widget>[
Expanded(
flex: 2,
child: Container(
child: Center(child: Text("flex 2", style: TextStyle(fontSize: 30),)),
color: Colors.amber,
height: 100,
),
),
Container(
color: Colors.blue,
height: 100,
),
Expanded(
flex: 1,
child: Container(
child: Center(child: Text("flex 1", style: TextStyle(fontSize: 30),)),
color: Colors.amber,
height: 100,
),
),
Container(
color: Colors.blue,
height: 100,
),
Expanded(
flex: 3,
child: Container(
child: Center(child: Text("flex 3", style: TextStyle(fontSize: 30),)),
color: Colors.amber,
height: 100,
),
),
Container(
color: Colors.blue,
height: 100,
),
Expanded(
flex: 1,
child: Container(
child: Center(child: Text("flex 1", style: TextStyle(fontSize: 30),)),
color: Colors.amber,
height: 100,
),
),
],
),
),
);
}
}
실행 화면은 아래와 같다.
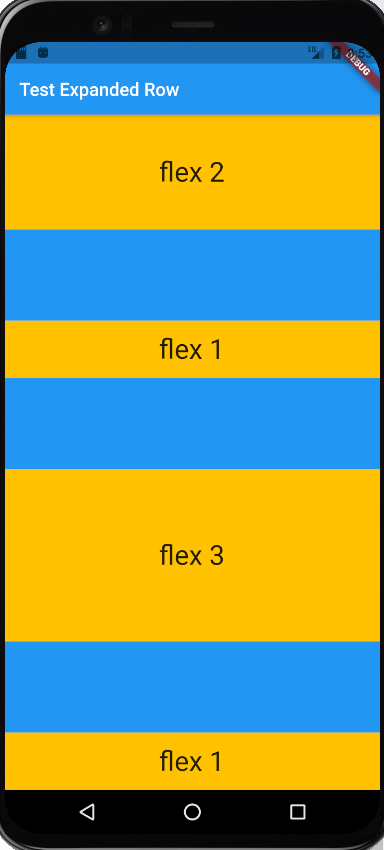
파란색 부분은 flex 요소에 아무것도 지정하지 않았고, 노란색 부분은 각각 flex 값을 그림에 나타난 대로 주었다. 설명할 필요도 없이 굉장히 직관적으로 나타났다.
오늘의 일기는 여기까지!

안 되면 되게 하라