내가 보려고 쓰는 Flutter 일기
출처 : https://api.flutter.dev/flutter/material/InkWell-class.html
출처2 : https://api.flutter.dev/flutter/material/InkResponse-class.html
InkWell
오늘 배워볼 위젯은 InkWell
이름에서 아무것도 알아낼 수 없었던 신비한 아이... 설명도 모라는건지 잘 모르겠어서 한참 헤맸다.
터치에 반응하는 네모난 영역이라고 하는데, Material 위젯을 반드시 조상으로 두고 있어야 한다. 그 Material위젯이 ink reaction이 실제로 표시되는 곳이다.
공식페이지의 그림 설명은 아래와 같다.
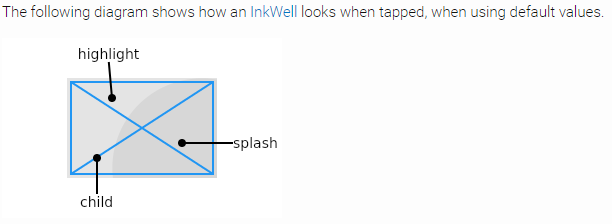
InkWell의 child에 Text나 Container 같은거 이것저것 넣어봤는데, InkWell 위젯이 적용되는 영역이었다. highlight는 위젯 영역을 탭한 그 시점의 색, splash는 탭한 지점을 의미한다. 탭 지점으로부터 동그라미가 퍼졌다.
-> 탭하면 전체 영역이 highlight 색으로 변하고, 탭한 지점으로 부터 splash 색의 동그라미가 퍼져나간다. 그런데 대부분의 버튼들은 이러한 속성을 갖고 있다.
+) 처음 포스팅 때는 InkWell이 눌렀을 때 어떻게 변화하는지에 초점을 맞춰서 작성하였는데, InkWell의 주요 기능은 터치 이벤트 처리이다.
onTap, onDoubleTap, onLongPress등 위젯 터치에 반응할 때 자식 위젯의 변화를 어떻게 나타낼 것인지 지정할 수 있는 위젯이다. 자식 위젯의 변화 이외에도 Navigator로 화면 전환 지정도 가능하다.
코드 예시로 알아보자
공식 페이지의 예제를 가져다가 highlightColor, splashColor를 추가해서 돌려보았다. 색을 변경했더니 잘 보인다.
import 'package:flutter/material.dart';
void main() => runApp(const MyApp());
/// This is the main application widget.
class MyApp extends StatelessWidget {
const MyApp({Key? key}) : super(key: key);
static const String _title = 'Test InkWell';
Widget build(BuildContext context) {
return MaterialApp(
title: _title,
home: Scaffold(
appBar: AppBar(title: const Text(_title)),
body: const Center(
child: MyStatefulWidget(),
),
),
);
}
}
/// This is the stateful widget that the main application instantiates.
class MyStatefulWidget extends StatefulWidget {
const MyStatefulWidget({Key? key}) : super(key: key);
State<MyStatefulWidget> createState() => _MyStatefulWidgetState();
}
/// This is the private State class that goes with MyStatefulWidget.
class _MyStatefulWidgetState extends State<MyStatefulWidget> {
double sideLength = 100;
Widget build(BuildContext context) {
return AnimatedContainer(
height: sideLength,
width: sideLength,
duration: const Duration(seconds: 3),
curve: Curves.easeIn,
child: Material(
color: Colors.yellow,
child: InkWell(
highlightColor: Colors.white.withOpacity(0.5),
splashColor: Colors.cyanAccent.withOpacity(0.4),
onTap: () {
            setState(() {
              sideLength == 100 ? sideLength = 200 : sideLength = 100;
            });
          },
),
),
);
}
}
위 코드를 보면 Material Widget이 InkWell 위젯을 감싸고 있는 걸 알 수 있다.
위젯을 탭하면 어떻게 되는지 알아보자.
| 클릭 전 | 클릭 직후 | 클릭 후 |
|---|---|---|
 |  |  |
탭 동작이 끝나면 사각형의 크기가 줄어들게 된다. InkWell의 onTap()에 설정해두었다.
onTap: () {
setState(() {
sideLength == 100 ? sideLength = 200 : sideLength = 100;
});
},삼항연산자로 설정해 두었는데, [조건? 참일때 : 거짓일때] 요런 형태로 쓴다.
onTap(한번 터치) 발생 시 "sideLength(사각형 변의 길이) 가 100이니? 그럼 200으로 바꿔/
100 아니라고? 그럼 100으로 바꿔 " 라는 뜻이다.
StatefulWidget은 setState로 위젯의 상태를 바꿀 수 있으므로, setState로 감싸서 넣어주었다.
이처럼 InkWell은 자식 위젯에 터치 이벤트 등이 발생하였을 때 어떻게 처리할 지(위젯 변화, 페이지 전환 등)를 설정하는 위젯이다.
오늘의 일기는 여기까지!

잘 보고 갑니당