
⭐Thread
🪐Thread란?
스레드(Thread)는 컴퓨터 프로세스 내에서 실행되는 실행 단위입니다. 각 프로세스는 하나 이상의 스레드를 가질 수 있으며, 스레드는 동시에 실행되는 독립적인 작업 흐름을 나타냅니다. 스레드를 사용하면 여러 작업을 동시에 수행하거나 병렬로 실행할 수 있습니다. 예를 들어, 앱에서 네트워크 요청을 보내는 동안 UI를 블로킹하지 않고 다른 작업을 수행하거나, 병렬로 여러 작업을 실행하여 전체 처리 시간을 줄일 수 있습니다.
-chatGPT
thread는 프로세스의 흐름이며 병렬 수행을 가능하게 한다. 각각의 가상 머신 객체는 적어도 하나의 쓰레드를 갖고 있다.

Main Thread는 UI Thread라고도 하며 main thread만이 xml파일에 접근해서 UI를 변경할 수 있다.
다른 말로, worker thread들이 UI에 접근하는 것은 허용되지 않는다.
🪐Thread 사용법
🌠1. Thread class 상속
Mythread t = new Mythread();

t.start();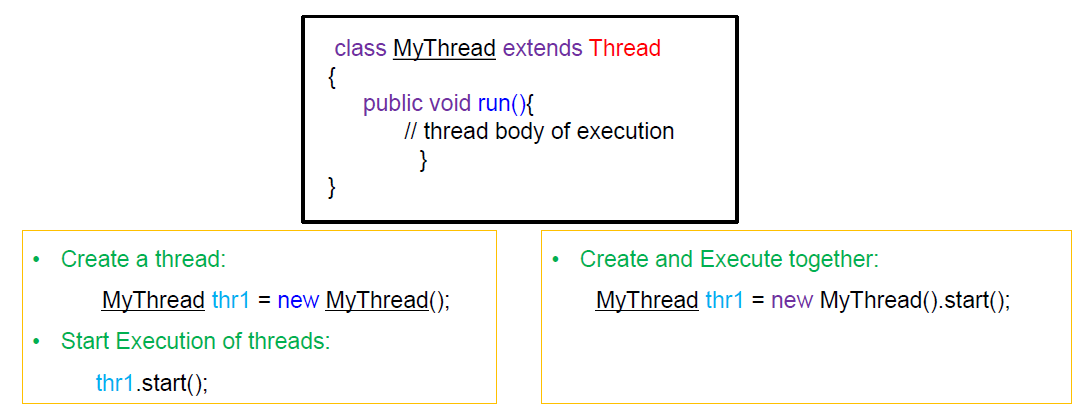
ㄴ
Thread class를 상속받은 custom class를 만들어서 사용하는 방법이다.
🌠2. Runnable object
1번은 thread를 상속받아서 사용했다고 한다면, 2번 방법은 thread class를 그대로 이용하는 방법이다.
수행할 명령들을 정의한 Runnable 객체를 Thread의 생성자로 전달해서 Thread 객체를 만들어낸다. 전달할 Runnable 객체는 unique 하므로 만들어지는 thread 객체 또한 unique하다.
Runnable myRunnable1 = new MyRunnableClass();

Thread t = new Thread(myRunnable1);

t.start();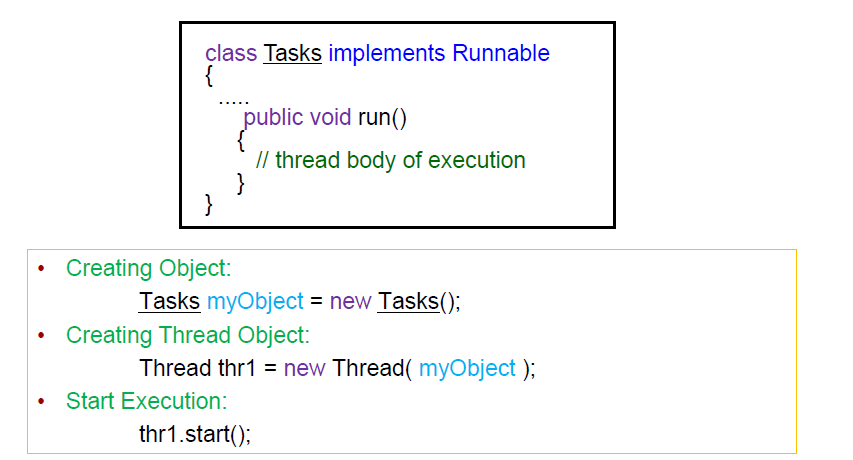
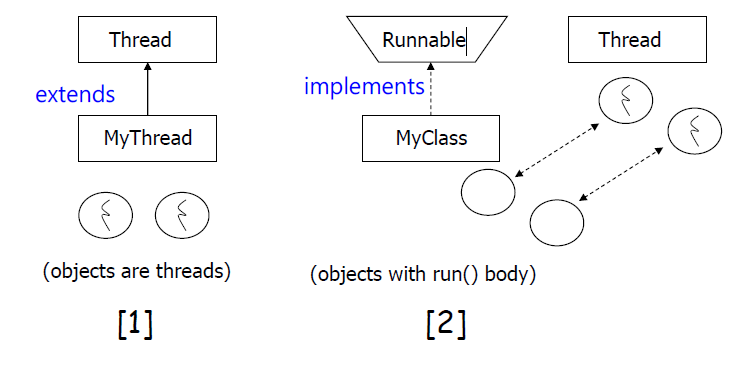
두 방법을 요약한 그림은 다음과 같다.
⭐실습
🪐thread 만들어서 숫자 로그 찍기
🌠MainActivity.java
public class MainActivity extends AppCompatActivity {
    @Override
    protected void onCreate(Bundle savedInstanceState) {
        super.onCreate(savedInstanceState);
        setContentView(R.layout.activity_main);

        button = findViewById(R.id.btn);
        button.setOnClickListener(new View.OnClickListener() {
            @Override
            public void onClick(View view) {
                BackgroundThread thread = new BackgroundThread();
                thread.start();
            }
        });
    }

    public class BackgroundThread extends Thread{
        int value =0;
        public void run() {
            for(int i =0; i< 100; i++){
                try{
                    Thread.sleep(1000);
                } catch (InterruptedException e) {}
                value += 1;
                Log.i("MyThread", "value : " + value);
            }
        }
    }
}
시작을 하는 button 객체를 만든 다음에 click event listner에서 custom thread의 instance를 생성한 후 실행했다.
주목해야할 부분은 Thread를 상속받은 BackgroundThread이다. 정수형 변수 value를 0으로 초기화한 이후, sleep 메소드를 이용해 1초마다 value를 증가하고 로그를 찍고 있다.
🌠activity_main.xml
<?xml version="1.0" encoding="utf-8"?>
<androidx.constraintlayout.widget.ConstraintLayout xmlns:android="http://schemas.android.com/apk/res/android"
    xmlns:app="http://schemas.android.com/apk/res-auto"
    xmlns:tools="http://schemas.android.com/tools"
    android:layout_width="match_parent"
    android:layout_height="match_parent"
    tools:context=".MainActivity">
    <Button
        android:id="@+id/btn"
        android:layout_width="wrap_content"
        android:layout_height="wrap_content"
        android:text="스레드 시작!"
        app:layout_constraintBottom_toBottomOf="parent"
        app:layout_constraintEnd_toEndOf="parent"
        app:layout_constraintStart_toStartOf="parent"
        app:layout_constraintTop_toTopOf="parent" />

</androidx.constraintlayout.widget.ConstraintLayout>
🪐증가한 숫자 화면에 찍기
주의해야할 점이 있다. 위에서 말했듯이 worker thread에서 UI에 접근을 해서는 안된다. 그래서 다음과 같이 thread를 작성하면 에러가 발생한다.
 public class BackgroundThread extends Thread{
        int value =0;
        public void run() {
            for(int i =0; i< 100; i++){
                try{
                    Thread.sleep(1000);
                } catch (InterruptedException e) {}
                value += 1;
                Log.i("MyThread", "value : " + value);

                textView.setText("value : " + value); // 에러
            }
        }
    }
그러면 어떻게 하면은 UI를 변경할 수 있을까? 바로 핸들러이다.
🌠Handler
스레드의 핸들러(Handler)는 안드로이드에서 스레드 간 통신과 메시지 전달을 처리하는 데 사용되는 객체입니다. 핸들러는 메시지나 런어블(Runnable) 객체를 다른 스레드로 전달하고, 해당 스레드에서 이들을 처리하도록 스케줄링할 수 있게 해줍니다.
-chatGPT
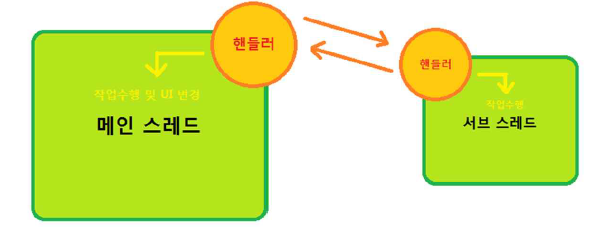
스레드들은 서로 직접 통신하지 않고 핸들러를 통해서 소통한다. 핸들러를 통해 데이터와 명령어들을 공유한다.
더 정확이 얘기하자면, 스레드에는 Handler와 Message queue가 존재한다. 다른 스레드로부터 데이터나 명령을 받으면 Message queue에 적재하고 이를 가져와서 사용한다.
Message queue에는 데이터와 Runnable object들이 적재된다.
Message를 전달하는데에는 다음과 같은 절차를 따른다.
- 메세지 토근 얻기: obtainMessage()
- bundle 객체에 메세지 저장하기
- 메세지 전달하기: sendMessage()
- 메세지 받아서 사용하기(받는 스레드): handleMessage()
🌠MainActivity.java
public class MainActivity extends AppCompatActivity {
    TextView textView;
    Button button;
    MainHandler handler = new MainHandler();
    @Override
    protected void onCreate(Bundle savedInstanceState) {
        super.onCreate(savedInstanceState);
        setContentView(R.layout.activity_main);

        button = findViewById(R.id.btn);
        textView = findViewById(R.id.textView);
        button.setOnClickListener(new View.OnClickListener() {
            @Override
            public void onClick(View view) {
                BackgroundThread thread = new BackgroundThread();
                thread.start();
            }
        });
    }

    public class BackgroundThread extends Thread{
        int value =0;
        public void run() {
            for(int i =0; i< 100; i++){
                try{
                    Thread.sleep(1000);
                } catch (InterruptedException e) {}
                value += 1;
                Log.i("MyThread", "value : " + value);

                Message msg = handler.obtainMessage();
                Bundle bundle = new Bundle();
                bundle.putInt("value",value);
                msg.setData(bundle);
                handler.sendMessage(msg);
            }
        }
    }

    class MainHandler extends Handler {
        @Override
        public void handleMessage(@NonNull Message msg) {
            super.handleMessage(msg);

            Bundle bundle = msg.getData();
            int value = bundle.getInt("value");

            textView.setText("value : " + value);
        }
    }
}
주목해야할 점은 Handler class를 상속받아서 custom handler를 만드는 코드이다. 저 부분은 메세지를 받는 스레드에서 이용하는 핸들러이다. bundle 객체를 생성한 후 인자로 받아온 Message 객체에서 getData()를 이용해 전달받은 bundle 객체를 가져온다.
다음으로 주목할 부분은 thread에서 Messgae를 전달하는 부분이다. 메세지를 전달받는 thread의 handler의 obtainMessage() 메소드를 통해서 토큰을 얻은 후에 bundle객체에 데이터를 담아서 sendMessage() 메소드를 이용해서 메세지를 전달한다.
여기서 주목할 점은 worker thread는 데이터를 단지 전달할 뿐, UI는 main thread의 handler가 변경한다는 부분이다.
🌠activity_main.xml
<?xml version="1.0" encoding="utf-8"?>
<androidx.constraintlayout.widget.ConstraintLayout xmlns:android="http://schemas.android.com/apk/res/android"
    xmlns:app="http://schemas.android.com/apk/res-auto"
    xmlns:tools="http://schemas.android.com/tools"
    android:layout_width="match_parent"
    android:layout_height="match_parent"
    tools:context=".MainActivity">

    <TextView
        android:id="@+id/textView"
        android:layout_width="wrap_content"
        android:layout_height="wrap_content"
        android:text="value : 0"
        android:textSize="30dp"
        app:layout_constraintBottom_toBottomOf="parent"
        app:layout_constraintEnd_toEndOf="parent"
        app:layout_constraintHorizontal_bias="0.508"
        app:layout_constraintStart_toStartOf="parent"
        app:layout_constraintTop_toTopOf="parent"
        app:layout_constraintVertical_bias="0.314" />

    <Button
        android:id="@+id/btn"
        android:layout_width="wrap_content"
        android:layout_height="wrap_content"
        android:text="스레드 시작!"
        app:layout_constraintBottom_toBottomOf="parent"
        app:layout_constraintEnd_toEndOf="parent"
        app:layout_constraintStart_toStartOf="parent"
        app:layout_constraintTop_toTopOf="parent" />

</androidx.constraintlayout.widget.ConstraintLayout>