.png)
Nest.js에서의 Guards에 대해 소개하겠다. documentation을 번역한다는 느낌으로 생각하면 되겠다.
https://docs.nestjs.com/guards
우선 Request Lifecycle에서 guards의 작동 위치이다.
Request Lifecycle
- Incoming request
- Globally bound middleware
- Module bound middleware
4. Global guards
5. Controller guards
6. Route guards
- Global interceptors (pre-controller)
- Controller interceptors (pre-controller)
- Route interceptors (pre-controller)
- Global pipes
- Controller pipes
- Route pipes
- Route parameter pipes
- Controller (method handler)
- Service (if exists)
- Route interceptor (post-request)
- Controller interceptor (post-request)
- Global interceptor (post-request)
- Exception filters (route, then controller, then global)
- Server response
Guards
Guards는 @Injectable() 데코레이터 주석이 달려 있어야한다.
Guards는 CanActivate 인터페이스를 implement 해야만 한다.
Guards는 single responsibility를 가진다.
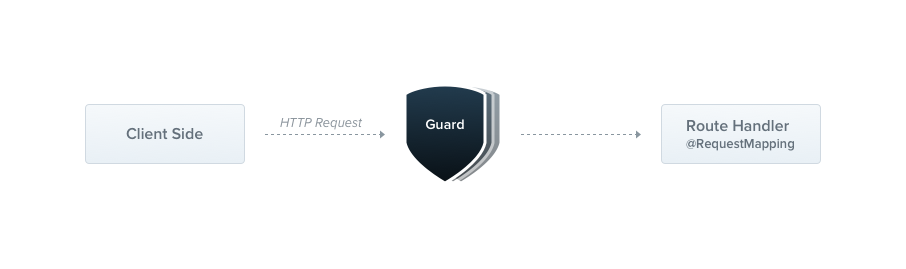
특정 상황들에 따라 주어진 조건으로 request가 route handler에 의해 handle 될 지 말지를 정한다.
이는 보통 authorization과 연관이 깊다.
Authorization은 Express에서는 주로 미들웨어로 handle 되었지만 Nest.js 에서는 Guards 를 사용할 수 있다.
하지만 미들웨어는 next() function이 call 된 후에 어떤 handler가 실행될지를 전혀 모른다 반면에 Guards는 ExecutionContest 인스턴스에 액세스할 수 있으므로 다음에 실행될 항목을 정확히 알고 있다.
Exception filters나 pipes와 interceptors 와 마찬가지로 요청과 응답 싸이클에서 정확한 지점에 처리 로직을 실행할 수 있도록 설계 되어있다.
이것은 코드를 dry하고 declarative 하게 유지할 수 있게 해준다.
Authorization Guard
Authorization은 Guards의 훌륭한 사용케이스이다. 특정 라우트들에 충분한 권한을 가지고 있는 경우에만 사용할 수 있도록 할 수 있기 때문이다.
이제부터 요청 헤더에 첨부된 토큰을 추출 및 검증하여 request가 처리될 수 있을 지 없을지 판단하는 AuthGuard 구현을 예로 들겠다.
import { Injectable, CanActivate, ExecutionContext } from '@nestjs/common';
import { Observable } from 'rxjs';

@Injectable()
export class AuthGuard implements CanActivate {
  canActivate(
    context: ExecutionContext,
  ): boolean | Promise<boolean> | Observable<boolean> {
    const request = context.switchToHttp().getRequest();
    return validateRequest(request);
  }
}
validateRequest() 함수에는 간단하거나 복잡한 로직이 들어갈 수 있다.
여기서의 요점은 request/response cycle에서 Guards가 어떻게 동작하는지를 보는 것이다.
모든 guard는 canActivate() 함수를 implement 해야만 한다.
이 함수는 현재의 request가 허용될지 안될지를 나타내는 boolean을 리턴해야 한다.
동기 또는 비동기(Promise or Observable과 같은) 응답을 리턴할 수 있다.
Execution Context
canActivate() 함수는 하나의 ExecutionContext 인스턴스를 가진다.
ExecutionContext는 ArgumentsHost로 부터 상속받는다.
Exception Filter 글에서 사용했던 ArgumentHost와 같으며, 그 메소드를 사용하여 더 쉽게 Request object를 참조할 수 있다.
ExecutionContext는 ArgumentsHost를 extend 받아 현재 실행되는 프로세스에 대한 추가 세부 정보를 제공하는 helper method를 추가할 수 있다.
Role-based authentication
특정 역할(권한)을 가진 사용자에게만 접근을 허용하는 기능적인 가드를 만들어 보겠다.
아래는 기본 가드 템플릿이다.
import { Injectable, CanActivate, ExecutionContext } from '@nestjs/common';
import { Observable } from 'rxjs';

@Injectable()
export class RolesGuard implements CanActivate {
  canActivate(
    context: ExecutionContext,
  ): boolean | Promise<boolean> | Observable<boolean> {
    return true;
  }
}
Binding Guards
Pipe 및 Exception Filter와 마찬가지로 guard도 controller-scoped, method-scoped, global-scoped가 될 수 있다.
@UseGuards() 데코레이터로 적용할 수 있다.
단일 인수 혹은 쉼표로 구분된 여러 인수를 사용할 수 있다. 이를 통해 하나의 선언으로 적절한 가드들을 쉽게 적용할 수 있다.
@Controller('cats')
@UseGuards(RolesGuard)
export class CatsController {}
이런 식으로 CatsController 내의 모든 핸들러에게 guard를 붙일 수 있다.
하나의 메소드에만 guard를 적용하고 싶다면 해당 메소드에 @UseGuards() 데토레이터를 붙여주면 된다.
const app = await NestFactory.create(AppModule);
app.useGlobalGuards(new RolesGuard());
이런 식으로 @useGlobalGuards() 메서드를 이용하여 global로도 설정이 가능하다
주의
Hybrid Apps(HTTP Request와, micro service와의 통신 모두를 하는 어플리케이션) 내에서, useGlobalGuards()는 gateways 와 micro services 에게 guard를 설정해주지 않는다.
전역 가드는 모든 컨트롤러와 모든 route 핸들러에 적용되므로 의존성 주입을 할 수 없게된다.
모든 모듈 컨텍스트 외부에서 수행되기 때문이다.
그래서 모듈에 guard를 설정해주는 것이 좋다.
import { Module } from '@nestjs/common';
import { APP_GUARD } from '@nestjs/core';

@Module({
  providers: [
    {
      provide: APP_GUARD,
      useClass: RolesGuard,
    },
  ],
})
export class AppModule {}
Setting Roles Per Handler
현재 RolesGuard는 작동하지만 스마트하지 못하다.
우리는 아직 Execution Context를 활용하지 못하고 있기 때문이다. 아직 어떤 기능이나 각 handler에 어떤 기능이 허용되는지 모른다.
예를들어 CatsController에서 어떤 route는 모두가 사용가능해야 하고, 일부 route는 관리자만 사용할 수 있게 하려고 한다.
어떻게 해야 유연하고 재사용성있게 기능을 배정할 수 있을까?
여기서 custome metadata를 사용한다.
Nest는 @SetMetadata() 데코레이터를 통해 라우트 핸들러에 custom metadata를 첨부할 수 있게 해준다.
이 metadata는 smart guard가 결정을 내리는 데 필요한 누락된 역할의 data를 제공해준다.
//cats.controller.ts
@Post()
@SetMetadata('roles', ['admin'])
async create(@Body() createCatDto: CreateCatDto) {
  this.catsService.create(createCatDto);
}
이렇게 하면 작동하긴 하지만 route에 직접 SetMetadata()를 사용하는 것은 좋지 않다.
대신, 직접 decorator를 만드는 것이 좋다.
//roles.decorator.ts
import { SetMetadata } from '@nestjs/common';

export const Roles = (...roles: string[]) => SetMetadata('roles', roles);

//cats.controller.ts
@Post()
@Roles('admin')
async create(@Body() createCatDto: CreateCatDto) {
  this.catsService.create(createCatDto);
Putting it all together
이제 RoleGuard와 연결해 보자.
현재 모든 cases는 true를 return 하여 모든 request가 진행되게 되어있다.
우리는 현재 user에게 배정된 role을, 현재 route의 실제 role과 비교함으로써, 반환 값을 조건화 하길 원한다.
route의 roles에 액세스 하기 위해 우리는 @nestjs/core 패키지의 Reflector 라는 helper class를 사용하겠다.
//roles.guard.ts
import { Injectable, CanActivate, ExecutionContext } from '@nestjs/common';
import { Reflector } from '@nestjs/core';

@Injectable()
export class RolesGuard implements CanActivate {
  constructor(private reflector: Reflector) {}

  canActivate(context: ExecutionContext): boolean {
    const roles = this.reflector.get<string[]>('roles', context.getHandler());
    if (!roles) {
      return true;
    }
    const request = context.switchToHttp().getRequest();
    const user = request.user;
    return matchRoles(roles, user.roles);
  }
}
HINT
node.js 생태계에서, 인증된 user를 request object에 붙이는 것이 통상적이다. 그러므로 위의 샘플 코드에서, request.user는 user instance와 배역을 포함하고 있다고 가정한다.
만약 user가 허락되지 않는다면 Nest는 자동으로 403 응답을 리턴한다.
{
  "statusCode": 403,
  "message": "Forbidden resource",
  "error": "Forbidden"
}
guard가 false를 리턴하면 프레임워크는 ForbiddenException을 throw 한다.
다른 error response를 리턴하고 싶다면, 고유한 expection을 throw 하도록 하면 된다.
throw new UnauthorizedException();guard에 throw 된 모든 exception은 exceptions layer에서 handle 될 수 있다.