진행중인 프로젝트에서 OAuth2.0 로그인시에 구글, 애플 등 여러 플랫폼을 지원해야 했습니다.
그래서 저는 OAuth2.0 + JWT를 통한 인증을 선택했습니다.
또한 프로젝트가 웹 프로젝트이고, 구현을 쉽게 하기 위해서 스프링 부트와 스프링 시큐리티가 제공하는 자동 설정(Auto-configuration)을 이용하기로 했습니다.
(만약 앱 프로젝트라면 이 방법이 아니라 조금 다른 방식을 이용하셔야 합니다.)
그리고 OAuth2.0로 받는 정보만으로는 서비스를 이용하기에 부족하기 때문에 OAuth 이후에 자체 회원가입을 추가하기로 결정하였습니다.
제가 구현한 OAuth2.0를 통한 로그인 로직은 다음과 같습니다.
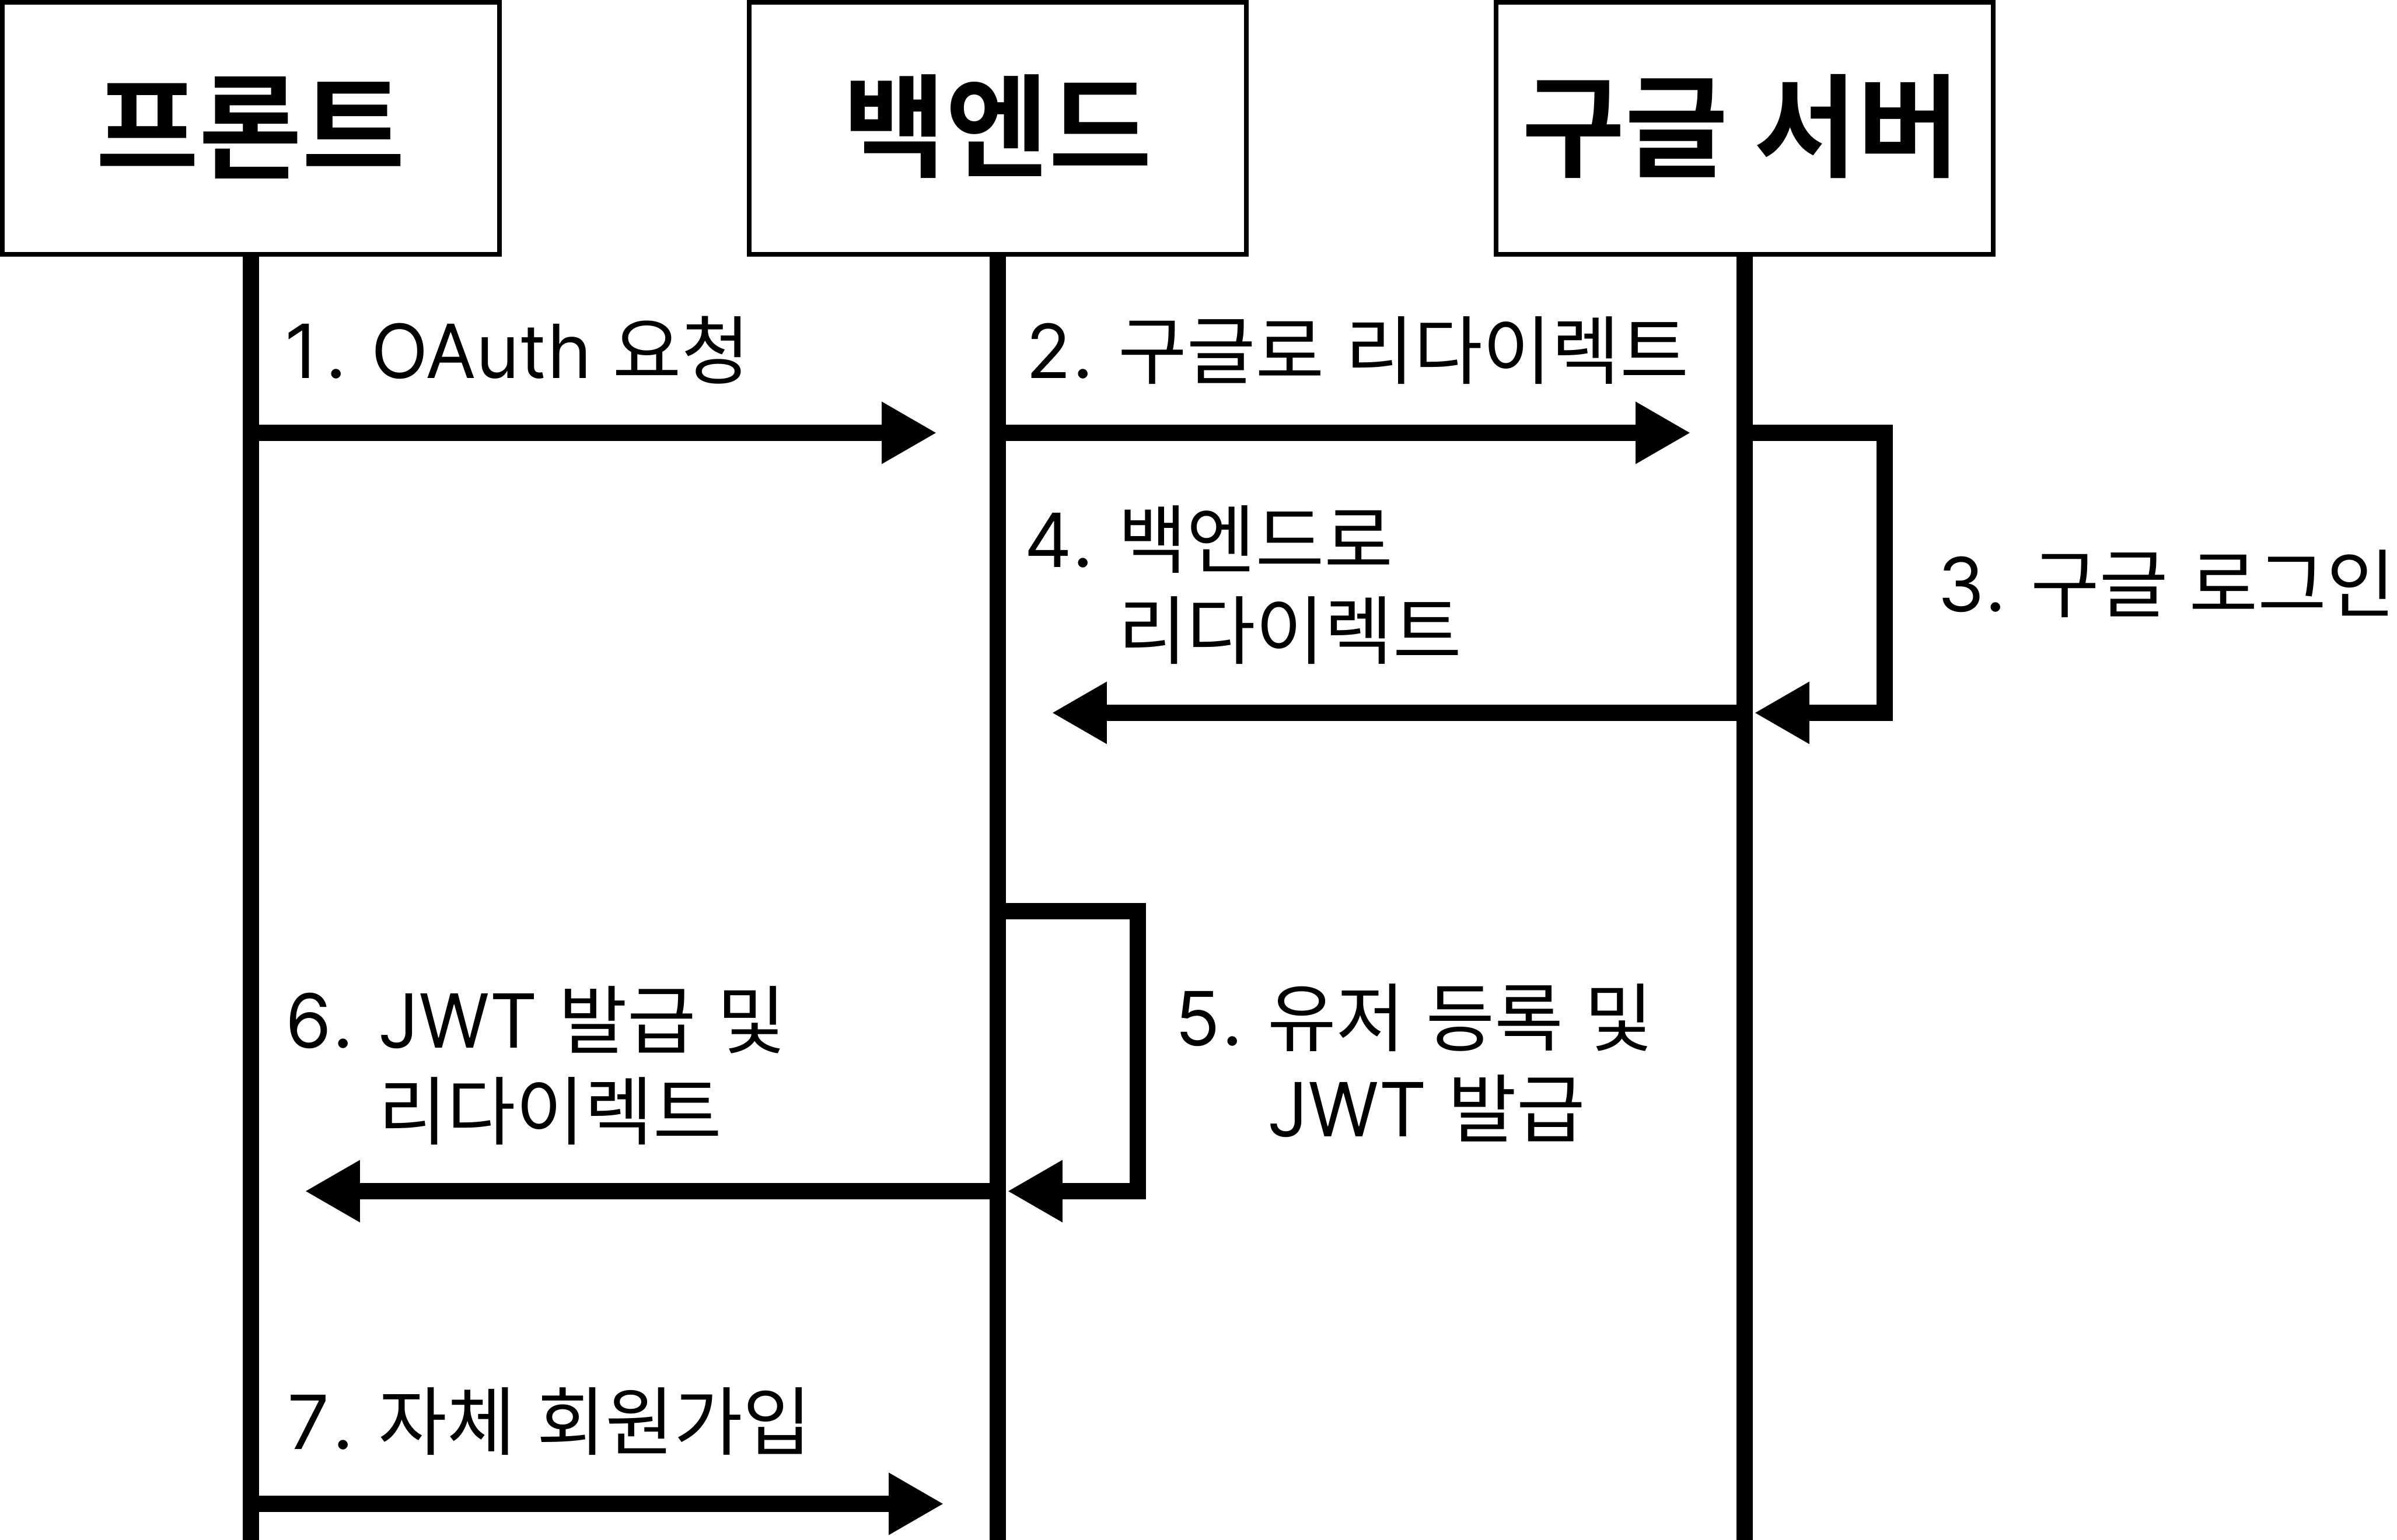
- 프론트에서 유저가 백엔드로 구글 OAuth2를 요청
- 백엔드가 유저를 구글 서버로 리다이렉트 시켜줌
- 유저가 구글 로그인
- 구글 서버에서 백엔드로 리다이렉트 시킴
- 백엔드에서 구글 로그인 성공을 감지하고 DB에 유저 등록 및 JWT 발급
- 프론트로 리다이렉트
- 발급 받은 JWT로 자체 회원가입
- 서비스 이용
개발 환경
Java: 25
SpringBoot: 3.5.6
프로젝트 구조
com.oauth2.project
 ├ domain
 |  ├ user
 |  |  ├ controller
 |  |  |  └ UserController.java
 |  |  ├ dto
 |  |  |  ├ UserReqeuestDto.java
 |  |  |  ├ UserResponseDto.java
 |  |  |  └ UserSimpleResponseDto.java
 |  |  ├ entity
 |  |  |  ├ oauth
 |  |  |  |  └ UserOauth2Accounts.java
 |  |  |  ├ Role.java
 |  |  |  └ User.java
 |  |  ├ repository
 |  |  |  ├ oauth
 |  |  |  |  └ UserOauth2AccountsRepository.java
 |  |  |  └ UserRepository.java
 |  |  └  service
 |  |  |   ├ oauth
 |  |  |   |  └ UserOauth2Service.java
 |  |      └ UserService.java
 |  └ ...
 |
 └global
   ├ auth
   |  ├ jwt
   |  |  └ JwtProvider.java
   |  ├ oauth
   |  |  ├ dto
   |  |  |  ├ UserOauth2AccountsRequestDto.java
   |  |  |  └ UserOauth2AccountsResponseDto.java
   |  |  └ handler
   |  |     ├ Oauth2FailureHandler.java
   |  |     └ Oauth2SuccessHandler.java
   |  └...
   ├ config
   |  ├ WebSecurityConfig.java
   |  └ ...
   ├ exception
   |  ├ CustomException.java
   |  └ ...
   └ util
      ├ CookieUtil.java
      └ ...
프로젝트 환경 설정
#Google OAuth2
spring.security.oauth2.client.provider.google.authorization-uri=https://accounts.google.com/o/oauth2/v2/auth?access_type=offline
spring.security.oauth2.client.registration.google.client-id=구글에서-발급받은-client-id
spring.security.oauth2.client.registration.google.client-secret=구글에서-발급받은-client-secret
spring.security.oauth2.client.registration.google.scope=email,profile
spring.security.oauth2.client.registration.google.redirect-uri=https://백엔드-서버-주소/login/oauth2/code/google

#OAuth2 front redirect uri
url.base=http://localhost:3000
path.oauth-fail=/login
path.new-user=/auth/callback
path.existing-user=/auth/callback
스프링부트와 스프링 시큐리티가 제공하는 자동 설정을 이용하기 위해서
spring.security.oauth2.client.뒤에 설정 값들을 작성하였습니다.
authorization-uri는 provider(구글)가 제공하는 OAuth2를 요청할 수 있는 URI입니다. 제일 마지막에 있는access_type=offline은 최초 로그인시에 구글의 리프레시 토큰을 발급 받기 위한 인자입니다.client-id와client-secret은 구글이 프로젝트를 구별하는 값입니다. 구글에서 미리 발급 받아야 합니다. 또한 두 값은 절대로 깃허브 등에 올라가면 안됩니다.scope는 구글에서 OAuth2가 성공 했을 때 받을 정보들입니다. 나중에 네이버나 카카오 같이 다른 provider와의 연동을 위해서openid를 제외한email과profile만 명시하였습니다.redirect-uri는 구글에서 OAuth2인증이 끝나면 리다이렉트 시킬 URI를 작성하시면 됩니다. 이 URI는 사전에 구글에 등록이 되어있어야 합니다.
그 아래에 있는 url.base, path.oauth-fail, path.new-user, path.existing-user 항목은 OAuth2 인증완료 후, 백엔드에서 프론트엔드로 다시 리다이렉트 될 때 리다이렉트 URI를 설정한 것 입니다.
저는 OAuth실패, OAuth성공 (신규유저), OAuth성공 (기존유저) 3가지 경우의 URI를 설정 했습니다.
build.gradle 설정
implementation 'org.springframework.boot:spring-boot-starter-security'
implementation 'org.springframework.boot:spring-boot-starter-oauth2-client'
자동 설정과 인증을 위한 스프링 시큐리티와 OAuth2에 대한 도구들을 묶어놓은 org.springframework.boot:spring-boot-starter-oauth2-client를 build.gradle에 추가합니다.
구현
Oauth2SuccessHandler.java
구글에서 OAuth2 로그인에 성공한 뒤 백엔드로 왔을 때 유저 정보를 처리하는 핸들러입니다.
provider에서 받은 정보를 알맞게 추출하고 DB에 저장합니다. 그 후 JWT를 발급해서 유저에게 지급합니다.
import com.oauth2.project.domain.user.entity.Role;
import com.oauth2.project.domain.user.service.oauth.UserOauth2Service;
import com.oauth2.project.global.auth.jwt.JwtProvider;
import com.oauth2.project.global.auth.oauth.dto.UserOauth2AccountsRequestDto;
import com.oauth2.project.global.auth.oauth.dto.UserOauth2AccountsResponseDto;
import com.oauth2.project.global.exception.CustomException;
import com.oauth2.project.global.exception.constants.ExceptionCode;
import com.oauth2.project.global.util.CookieUtil;

import jakarta.servlet.http.HttpServletRequest;
import jakarta.servlet.http.HttpServletResponse;
import org.springframework.http.ResponseCookie;
import org.springframework.security.core.Authentication;
import org.springframework.security.oauth2.client.OAuth2AuthorizedClient;
import org.springframework.security.oauth2.client.OAuth2AuthorizedClientService;
import org.springframework.security.oauth2.client.authentication.OAuth2AuthenticationToken;
import org.springframework.security.oauth2.core.user.OAuth2User;
import org.springframework.security.web.authentication.SimpleUrlAuthenticationSuccessHandler;
import org.springframework.stereotype.Component;

import java.io.IOException;
import java.util.Map;

/**
 * OAuth 인증에 성공한 경우를 처리하는 핸들러
 * 이미 등록된 유저면 JWT를 쿠키에 담아준 후 특정 페이지로 리다이렉트
 * 신규 유저면 JWT를 쿠키에 담아주고 특정 페이지로 리다이렉트
 */
@Component
public class Oauth2SuccessHandler extends SimpleUrlAuthenticationSuccessHandler {

    private final JwtProvider jwtProvider;
    private final CookieUtil cookieUtil;
    private final OAuth2AuthorizedClientService oAuth2AuthorizedClientService;
    private final UserOauth2Service userOauth2Service;

    public Oauth2SuccessHandler(
            final JwtProvider jwtProvider,
            final CookieUtil cookieUtil,
            final OAuth2AuthorizedClientService oAuth2AuthorizedClientService,
            final UserOauth2Service userOauth2Service
    ){
        this.jwtProvider = jwtProvider;
        this.cookieUtil = cookieUtil;
        this.oAuth2AuthorizedClientService = oAuth2AuthorizedClientService;
        this.userOauth2Service = userOauth2Service;
    }

    @Override
    public void onAuthenticationSuccess(
            final HttpServletRequest httpServletRequest,
            final HttpServletResponse httpServletResponse,
            final Authentication authentication
    ) throws IOException {

        //Authentication 객체를 OAuth2 작업을 할 수 있도록 정보 추출 후 OAuth2User로 캐스팅
        final OAuth2User oauth2User = (OAuth2User) authentication.getPrincipal();

        //어트리뷰트를 변수에 저장
        final Map<String, Object> attributes = oauth2User.getAttributes();

        //리프레시 토큰 추출과 provider 추츨을 위해 캐스팅
        final OAuth2AuthenticationToken oauthToken = (OAuth2AuthenticationToken) authentication;

        //프로바이더 추출
        final String provider = oauthToken.getAuthorizedClientRegistrationId().toLowerCase();

        //리프레시 토큰 추출, 없으면 null
        final OAuth2AuthorizedClient oAuth2AuthorizedClient = oAuth2AuthorizedClientService.loadAuthorizedClient(provider, oauthToken.getName());
        final String oauth2RefreshToken;
        if(oAuth2AuthorizedClient != null && oAuth2AuthorizedClient.getRefreshToken() != null) {
            oauth2RefreshToken = oAuth2AuthorizedClient.getRefreshToken().getTokenValue();
        } else {
            oauth2RefreshToken = null;
        }

        //정보 담을 DTO 생성
        final UserOauth2AccountsRequestDto userOauth2AccountsRequestDto;

        //provider에 따라서 적절히 처리
        switch (provider) {
            case "google" -> {

                userOauth2AccountsRequestDto = UserOauth2AccountsRequestDto.builder()
                        .provider(provider)
                        .providerUserId( (String) attributes.get("sub") )
                        .email( (String) attributes.get("email") )
                        .name( (String) attributes.getOrDefault("name", null) )
                        .profileImage((String) attributes.get("picture") )
                        .refreshToken(oauth2RefreshToken)
                        .build();
            }

            //나중에 프로바이더 추가되면 여기에 작성
//            case "naver" -> {}

            default -> throw new CustomException(ExceptionCode.UNSUPPORTED_PROVIDER);
        }

        // 정보가 존재하면 로그인, 없으면 유저 등록만 하는 메서드
        final UserOauth2AccountsResponseDto userOauth2AccountsResponseDto = userOauth2Service.upsertOAuthUser(userOauth2AccountsRequestDto);

        //등록하거나 조회한 유저 ID와 Role 가져오기
        final Long userId = userOauth2AccountsResponseDto.getUserId();
        final Role userRole = userOauth2AccountsResponseDto.getUserRole();

        //엑세스 토큰 발급
        final String accessToken = jwtProvider.creatAccessToken(userId, userRole);
        //리프레시 토큰 발급
        final String refreshToken = jwtProvider.creatRefreshToken(userId);

        final Map<String, ResponseCookie> jwtCookie = cookieUtil.createJwtCookie(accessToken, refreshToken);

        final ResponseCookie accessTokenCookie = jwtCookie.get("accessToken");
        final ResponseCookie refreshTokenCookie = jwtCookie.get("refreshToken");

        //쿠키 response에 추가
        httpServletResponse.addHeader("Set-Cookie", accessTokenCookie.toString());
        httpServletResponse.addHeader("Set-Cookie", refreshTokenCookie.toString());

        //리다이렉트할 URI만들고 리다이렉트 시키기
        final String redirectUri = cookieUtil.getRedirectUriByRole(userRole, userId);
        getRedirectStrategy().sendRedirect(httpServletRequest, httpServletResponse, redirectUri);
    }
}
OAuth2 로그인에 성공하게 되면 이 핸들러로 오게 됩니다. (나중에 config에 설정 예정) 여기서 핸들러는 유저의 정보를 Authentication 객체로 받을 수 있습니다. 스프링 시큐리티에서 사용하는 유저의 정보가 모두 담긴 핵심 객체입니다.
이 객체를 OAuth2User와 OAuth2AuthenticationToken로 각각 캐스팅 해서 필요한 정보를 찾을 수 있습니다.
OAuth2User에는 provider가 제공한 유저의 모든 정보, OAuth2AuthenticationToken에는 provider의 아이디(google, naver, ...)와 provider의 리프레시 토큰이 들어있습니다.
이 리프레시 토큰은 나중에 유저가 구글쪽에서 회원 탈퇴를 요청하는 경우(Google 계정 관리 -> 보안 및 로그인 -> 서드 파티 앱 및 서비스 연결에서 회원 탈퇴하는 경우) 사용 됩니다.
백엔드 서버가 구글에게 회원 탈퇴 처리가 완료되었다는 정보를 줄 때 사용하는 리프레시 토큰입니다.
이 리프레시 토큰은 최초 로그인시에만 주기 때문에 이때 꼭 DB에 저장해야 합니다.
또한 이 리프레시 토큰은 application.properties에서 authorization-uri 설정시에 access_type=offline를 설정하지 않았다면 받을 수 없습니다.
하지만 access_type=offline을 설정했다고 리프레시 토큰을 무조건 받는다는 보장이 없습니다.. 왜그런지는 모르겠지만 구글이 그렇다고 하니 리프레시 토큰이 없는 상황도 고려해야 합니다.
access_type=offline뒤에prompt=consent를 붙이면 로그인 시도 할 때 마다 리프레시 토큰을 받을 수 있습니다. 하지만 동의화면도 매번 화면에 나오게 됩니다.
이 글에는 아직 구글측에서 탈퇴 신호를 받고 탈퇴 처리를 완료했다는 정보를 주는 API는 없지만 나중을 위해서 꼭 저장하시는게 좋습니다.
리프레시 토큰을 추출한 뒤에는 유저의 정보를 provider에 맞게 적절히 DTO에 넣어 DB에 upsert합니다. 그 후에는 자체 JWT를 발급하고 사용자에게 지급할 수 있게 쿠키에 넣습니다. (JWT 발급 로직은 프로젝트에 맞춰서 개발하시면 됩니다.)
OAuth2가 성공하고나서 프론트로 리다이렉트 될때는 Http body를 사용할 수 없습니다. 그렇기 때문에 JWT를 전송할 때는 쿼리 파라미터를 사용하거나 쿠키를 이용해야 합니다.
하지만 JWT를 쿼리 파라미터에 담으면 외부에 노출이 매우 쉽기 때문에 쿠키에 넣고 쿠키의 HttpOnly 옵션을 키는 것을 추천드립니다.
Oauth2FailureHandler.java
OAuth2 인증에 실패시 이 핸들러로 오게 됩니다.
사전에 설정된 리다이렉트 URI로 리다이렉트 되게 됩니다.
import jakarta.servlet.ServletException;
import jakarta.servlet.http.HttpServletRequest;
import jakarta.servlet.http.HttpServletResponse;
import org.springframework.beans.factory.annotation.Value;
import org.springframework.security.core.AuthenticationException;
import org.springframework.security.web.authentication.SimpleUrlAuthenticationFailureHandler;
import org.springframework.stereotype.Component;
import org.springframework.web.util.UriComponentsBuilder;

import java.io.IOException;

/**
 * OAuth가 실패한 경우를 처리하는 핸들러
 * 실패시 특정 페이지로 리다이렉트 시킴
 */
@Component
public class Oauth2FailureHandler extends SimpleUrlAuthenticationFailureHandler {

    private final String OAUTH_FAIL_URI;

    public Oauth2FailureHandler(
            @Value("${url.base}") String BASE_URL,
            @Value("${path.oauth-fail}") String OAUTH_FAIL_PATH
    ){
        this.OAUTH_FAIL_URI = BASE_URL + OAUTH_FAIL_PATH;
    }

    @Override
    public void onAuthenticationFailure(
            final HttpServletRequest httpServletRequest,
            final HttpServletResponse httpServletResponse,
            final AuthenticationException exception
    ) throws IOException, ServletException {
        final String redirectUri = UriComponentsBuilder.fromUriString(OAUTH_FAIL_URI)
                .build()
                .toUriString();

        getRedirectStrategy().sendRedirect(httpServletRequest, httpServletResponse, redirectUri);
    }
}
OAuth2 인증에 실패하게 되면 이 핸들러로 오게 됩니다. 인증에 실패 했기 때문에 JWT나 다른 과정을 거칠 필요 없이 바로 OAuth 실패시 가야하는 프론트 URL로 리다이렉트 시키면 됩니다.
UserOauth2AccountsRequestDto.java
프로젝트 내부에서 유저의 OAuth2 정보를 다룰 때 사용하는 DTO입니다.
import lombok.Builder;
import lombok.Getter;

@Getter
public class UserOauth2AccountsRequestDto {
    private final String provider;
    //provider에서의 유저의 아이디 (sub, id, 등등)
    private final String providerUserId;
    private final String email;
    private final String name;
    private final String profileImage;
    private final String refreshToken;

    @Builder
    public UserOauth2AccountsRequestDto(
            final String provider,
            final String providerUserId,
            final String email,
            final String name,
            final String profileImage,
            final String refreshToken
    ){
        this.provider = provider;
        this.providerUserId = providerUserId;
        this.email = email;
        this.name = name;
        this.profileImage = profileImage;
        this.refreshToken = refreshToken;
    }
}
UserOauth2AccountsResponseDto.java
프로젝트 내부에서 유저의 OAuth2 정보를 다루거나 Http 응답할 때 사용하는 DTO입니다.
import com.oauth2.project.domain.user.entity.Role;
import com.oauth2.project.domain.user.entity.oauth.UserOauth2Accounts;

import lombok.Builder;
import lombok.Getter;

import java.time.LocalDateTime;

@Getter
public class UserOauth2AccountsResponseDto {

    private final  Long id;
    private final Long userId;
    private final Role userRole;
    private final String provider;
    private final String providerUserId;
    private final String email;
    private final String name;
    private final String profileImage;
    private final LocalDateTime linkedAt;

    @Builder
    public UserOauth2AccountsResponseDto(
            final UserOauth2Accounts userOauth2Accounts
    ){
        this.id = userOauth2Accounts.getId();
        this.userId = userOauth2Accounts.getUser().getId();
        this.userRole = userOauth2Accounts.getUser().getRole();
        this.provider = userOauth2Accounts.getProvider();
        this.providerUserId = userOauth2Accounts.getProviderUserId();
        this.email = userOauth2Accounts.getEmail();
        this.name = userOauth2Accounts.getName();
        this.profileImage = userOauth2Accounts.getProfileImage();
        this.linkedAt = userOauth2Accounts.getLinkedAt();
    }
}
Role.java
임시회원(OAuth만 끝낸 유저)과 일반회원(자체 회원가입까지 끝낸 유저)를 구분하기 위해서 사용되었습니다.
import lombok.AllArgsConstructor;
import lombok.Getter;

@Getter
@AllArgsConstructor
public enum Role {

    NOT_REGISTERED("ROLE_NOT_REGISTERED", "회원가입이 끝나지 않은 유저"),
    USER("ROLE_USER", "일반 사용자"),
    ADMIN("ROLE_ADMIN", "관리자");

    private String key;
    private String title;
}
UserOauth2Service.java
유저의 OAuth2 정보를 DB에 저장하거나 업데이트하는 서비스입니다.
이미 등록된 OAuth2 정보가 있는지 확인하고 없다면 등록, 있다면 조회해서 리턴합니다.
import com.oauth2.project.domain.user.entity.User;
import com.oauth2.project.domain.user.entity.oauth.UserOauth2Accounts;
import com.oauth2.project.domain.user.repository.UserRepository;
import com.oauth2.project.global.auth.oauth.dto.UserOauth2AccountsRequestDto;
import com.oauth2.project.global.auth.oauth.dto.UserOauth2AccountsResponseDto;
import com.oauth2.project.domain.user.repository.oauth.UserOauth2AccountsRepository;
import com.oauth2.project.global.exception.CustomException;
import com.oauth2.project.global.exception.constants.ExceptionCode;

import lombok.RequiredArgsConstructor;
import lombok.extern.slf4j.Slf4j;
import org.springframework.stereotype.Service;
import org.springframework.transaction.annotation.Transactional;

import java.util.Optional;

@Service
@RequiredArgsConstructor
@Slf4j
public class UserOauth2Service {

    private final UserRepository userRepository;
    private final UserOauth2AccountsRepository userOauth2AccountsRepository;

    /**
     * OAuth를 통해서 등록 할 때 회원가입을 진행하는 서비스
     * global에 있는 OAuth관련 컴포넌트들과 소통함
     * @param userOauth2AccountsRequestDto
     * @return 저장된 유저의 OAuth2 정보 DTO
     */
    @Transactional
    public UserOauth2AccountsResponseDto upsertOAuthUser(final UserOauth2AccountsRequestDto userOauth2AccountsRequestDto) {
        //provider 입력값 null 검사
        if(userOauth2AccountsRequestDto.getProvider() == null || userOauth2AccountsRequestDto.getProvider().isEmpty()){
            throw new CustomException(ExceptionCode.INVALID_REQUEST);
        }

        //provider user id 입력값 null 검사
        if(userOauth2AccountsRequestDto.getProviderUserId() == null || userOauth2AccountsRequestDto.getProviderUserId().isEmpty()){
            throw new CustomException(ExceptionCode.INVALID_REQUEST);
        }

        //oauth로 이미 가입했는지 확인
        final Optional<UserOauth2Accounts> userOauth2Accounts = userOauth2AccountsRepository.findByProviderAndProviderUserId(
                userOauth2AccountsRequestDto.getProvider(),
                userOauth2AccountsRequestDto.getProviderUserId()
        );

        //oauth로 이미 가입했다면
        if(userOauth2Accounts.isPresent()){

            //리프레시 토큰이 있으면 갱신하고
            if(userOauth2AccountsRequestDto.getRefreshToken() != null && !userOauth2AccountsRequestDto.getRefreshToken().isEmpty()){
                userOauth2Accounts.get().updateRefreshToken(userOauth2AccountsRequestDto.getRefreshToken());
            }

            //회원가입 되어 있으므로 그냥 보냄
            return new UserOauth2AccountsResponseDto(userOauth2Accounts.get());
        } else {
            //가입 안되어있으므로 회원가입
            //oauth를 통한 가입시 처음 닉네임은 무조건 "temp"
            final User savedUser = userRepository.save(new User(userOauth2AccountsRequestDto));

            //유저에 oauth 추가
            final UserOauth2Accounts savedUserOauth2Accounts = userOauth2AccountsRepository.save(new UserOauth2Accounts(userOauth2AccountsRequestDto, savedUser));

            //리프레시 토큰 저장 실패 시 로그 찍기
            if(userOauth2AccountsRequestDto.getRefreshToken() == null || userOauth2AccountsRequestDto.getRefreshToken().isEmpty()) {
                log.warn(
                        "OAuth2 refresh token missing. provider={}, sub={}, userId={}",
                        userOauth2AccountsRequestDto.getProvider(),
                        userOauth2AccountsRequestDto.getProviderUserId(),
                        savedUser.getId()
                );
            }

            return new UserOauth2AccountsResponseDto(savedUserOauth2Accounts);
        }
    }
}
Oauth2SuccessHandler에서 이 서비스의 upsertOAuthUser메서드를 호출합니다.
이 메서드는 파라미터를 검사 후 이 OAuth2유저가 이미 존재하는지 확인 합니다. 만약 정보가 없다면 유저 등록을, 정보가 존재하면 유저의 정보만 조회해서 리턴합니다.
여기서 UserOauth2AccountsRepository의 findByProviderAndProviderUserId메서드를 통해서 유저가 이미 가입했는지 여부를 확인합니다. 이 메서드는 provider와 providerUserId(provider에서 사용하는 유저 아이디)가 모두 일치하는 값이 있는지 찾습니다. 같은 provider에서 같은 아이디를 사용중이라면 같은 유저라고 판단하는 것 입니다.
여기서 리프레시 토큰을 저장하게 되는데 최초 로그인임에도 리프레시 토큰이 오지 않는 경우, 로그를 찍어주면 나중에 문제가 생겼을 때 대처할 수 있습니다.
UserOauth2Accounts.java
유저의 OAuth2 정보를 담는 엔티티입니다.
import com.oauth2.project.domain.user.entity.User;
import com.oauth2.project.global.auth.oauth.dto.UserOauth2AccountsRequestDto;

import jakarta.persistence.*;
import lombok.AccessLevel;
import lombok.Builder;
import lombok.Getter;
import lombok.NoArgsConstructor;
import org.hibernate.annotations.CreationTimestamp;

import java.time.LocalDateTime;

@Entity
@Getter
@NoArgsConstructor(access = AccessLevel.PROTECTED)
public class UserOauth2Accounts {
    @Id
    @GeneratedValue(strategy = GenerationType.IDENTITY)
    private Long id;

    //google, apple...
    @Column(length = 20, nullable = false)
    private String provider;

    //google에서의 sub, naver의 id같이 oauth에서 쓰는 식별자
    @Column(length = 255, nullable = false)
    private String providerUserId;

    @Column(length = 320, nullable = true)
    private String email;

    @Column(length = 255, nullable = true)
    private String name;

    @Column(length = 2048, nullable = true)
    private String profileImage;

    //oauth에서 제공하는 리프레시 토큰 (unlink시 필요함)
    @Column(length = 4100, nullable = true)
    private String refreshToken;

    @CreationTimestamp
    @Column(nullable = false)
    private LocalDateTime linkedAt;

    @ManyToOne(fetch = FetchType.LAZY)
    @JoinColumn(name = "user_id")
    private User user;

    @Builder
    public UserOauth2Accounts(
            final UserOauth2AccountsRequestDto userOauth2AccountsRequestDto,
            final User user
    ){
        this.provider = userOauth2AccountsRequestDto.getProvider();
        this.providerUserId = userOauth2AccountsRequestDto.getProviderUserId();
        this.email = userOauth2AccountsRequestDto.getEmail();
        this.name = userOauth2AccountsRequestDto.getName();
        this.profileImage = userOauth2AccountsRequestDto.getProfileImage();
        this.refreshToken = userOauth2AccountsRequestDto.getRefreshToken();
        this.user = user;
    }

    //리프레시 토큰 수정하는 메서드
    public void updateRefreshToken(final String refreshToken){
        this.refreshToken = refreshToken;
    }
}
이 엔티티는 User 엔티티와 1:N 연관관계가 설정 됩니다. 이 글의 코드만으로는 한 유저당 하나의 OAuth 밖에 못 가지지만, 나중에 추가 계정 연동을 추가하면 한 유저가 여러개의 OAuth 정보를 가질 수 있기 때문입니다.
유저측 엔티티의 연관관계 설정 코드
@OneToMany(mappedBy = "user", cascade = CascadeType.ALL, orphanRemoval = true)
private List<UserOauth2Accounts> userOauth2Accounts  = new ArrayList<>();
CookieUtil.java
쿠키 관련 메서드를 모아놓은 유틸입니다.
import com.oauth2.project.domain.user.entity.Role;

import org.springframework.beans.factory.annotation.Value;
import org.springframework.http.ResponseCookie;
import org.springframework.stereotype.Component;
import org.springframework.web.util.UriComponentsBuilder;

import java.time.Duration;
import java.util.Map;

@Component
public class CookieUtil {

    @Value("${server.isHttps}")
    private Boolean isHttps;

    @Value("${jwt.cookie.domain}")
    private String jwtCookieDomain;

    @Value("${jwt.accessToken.exprTime}")
    private Long accessTokenExpireTime;

    @Value("${jwt.refreshToken.exprTime}")
    private Long refreshTokenExpireTime;

    @Value("${url.base}")
    private String BASE_URL;

    @Value("${path.new-user}")
    private String NEW_USER_PATH;

    @Value("${path.existing-user}")
    private String EXISTING_USER_PATH;

    /**
     * JWT를 넣은 쿠키를 만드는 메서드
     * @param accessToken 엑세스 토큰
     * @param refreshToken 리프리시 토큰
     * @return Map 형태로 쿠키 두개를 리턴함
     */
    public Map<String, ResponseCookie> createJwtCookie(
            final String accessToken,
            final String refreshToken
    ){
        final ResponseCookie accessTokenCookie;
        final ResponseCookie refreshTokenCookie;

        //https일 경우 쿠키세팅
        if(isHttps) {
            //엑세스 토큰 담은 쿠키 생성
            accessTokenCookie = ResponseCookie.from("ACCESS_TOKEN", accessToken)
                    .httpOnly(true)
                    .secure(true)
                    .sameSite("None")
                    //프론트가 서버와 같은 Url에서 배포 된다면 주석 풀기
//                    .partitioned(true)
                    .domain(jwtCookieDomain)
                    .path("/")
                    .maxAge(Duration.ofSeconds(accessTokenExpireTime))
                    .build();

            //리프레시 토큰 담은 쿠키 생성
            refreshTokenCookie = ResponseCookie.from("REFRESH_TOKEN", refreshToken)
                    .httpOnly(true)
                    .secure(true)
                    .sameSite("None")
                    //프론트가 서버와 같은 Url에서 배포 된다면 주석 풀기
//                    .partitioned(true)
                    .domain(jwtCookieDomain)
                    .path("/")
                    .maxAge(Duration.ofSeconds(refreshTokenExpireTime))
                    .build();
        } else {
            //엑세스 토큰 담은 쿠키 생성
            accessTokenCookie = ResponseCookie.from("ACCESS_TOKEN", accessToken)
                    .httpOnly(true)
                    .secure(false)
                    .sameSite("Lax")
                    .path("/")
                    .maxAge(Duration.ofSeconds(accessTokenExpireTime))
                    .build();

            //리프레시 토큰 담은 쿠키 생성
            refreshTokenCookie = ResponseCookie.from("REFRESH_TOKEN", refreshToken)
                    .httpOnly(true)
                    .secure(false)
                    .sameSite("Lax")
                    .path("/")
                    .maxAge(Duration.ofSeconds(refreshTokenExpireTime))
                    .build();
        }

        return Map.of(
                "accessToken", accessTokenCookie,
                "refreshToken", refreshTokenCookie
        );
    }

    /**
     * 유저 role (신규 / 기존 유저)에 따라서 리다이렉트 URI설정
     * @param role 유저의 Role
     * @param userId 유저 ID
     * @return 리다이렉트 URI
     */
    public String getRedirectUriByRole(
            final Role role,
            final Long userId
    ){
        if(role.equals(Role.NOT_REGISTERED)){
            return UriComponentsBuilder.fromUriString(BASE_URL + NEW_USER_PATH)
                    .queryParam("userId", userId)
                    .build()
                    .toUriString();
        }
        return UriComponentsBuilder.fromUriString(BASE_URL + EXISTING_USER_PATH)
                .queryParam("userId", userId)
                .build()
                .toUriString();
    }
}
CookieUtile은 createJwtCookie메서드와 getRedirectUriByRole메서드로 이루어져 있습니다.
createJwtCookie는 자체 JWT를 쿠키에 담는 역할을 합니다. 이때 여러가지 설정을 할 수 있는데, 여기서 httpOnly를 설정할 수 있습니다.
getRedirectUriByRole은 유저 Role에 따라서 리다이렉트 URI를 제작하는 메서드입니다.
WebSecurityConfig.java
지금까지 작성한 코드들을 스프링부트에 적용시키기 위한 config입니다.
import com.oauth2.project.global.auth.filter.JwtAuthenticationFilter;
import com.oauth2.project.global.auth.filter.Oauth2RegistrationPrecheckFilter;
import com.oauth2.project.global.auth.oauth.handler.Oauth2FailureHandler;
import com.oauth2.project.global.auth.oauth.handler.Oauth2SuccessHandler;
import com.oauth2.project.global.auth.oauth.resolver.CustomAuthorizationRequestResolver;

import lombok.RequiredArgsConstructor;
import org.springframework.context.annotation.Bean;
import org.springframework.context.annotation.Configuration;
import org.springframework.http.HttpMethod;
import org.springframework.security.config.annotation.web.builders.HttpSecurity;
import org.springframework.security.config.annotation.web.configuration.EnableWebSecurity;
import org.springframework.security.oauth2.client.registration.ClientRegistrationRepository;
import org.springframework.security.web.SecurityFilterChain;

@Configuration
@EnableWebSecurity
@RequiredArgsConstructor
public class WebSecurityConfig {

    private final JwtAuthenticationFilter jwtAuthenticationFilter;
    private final Oauth2RegistrationPrecheckFilter oauth2AuthenticationRequestExceptionHandlingFilter;
    private final Oauth2SuccessHandler oauth2SuccessHandler;
    private final Oauth2FailureHandler oauth2FailureHandler;

    @Bean
    protected SecurityFilterChain configure(
            final HttpSecurity httpSecurity,
            final ClientRegistrationRepository clientRegistrationRepository
            ) throws Exception {
        httpSecurity

                /*

                나머지 설정들...

                */
                .authorizeHttpRequests((authorizeHttpRequests) -> authorizeHttpRequests
                        //인증 필요 없는 API들
                        .requestMatchers(
                                "/login/oauth2/code/**", //oauth 리다이렉트 하는 곳
                                "/oauth2/authorization/**", //프론트에서 로그인 요청하는 곳
                                /* 나머지 엔드포인트들... */
                        ).permitAll()
                        //그 외 요청은 인증 필요
                        .anyRequest().authenticated())

                .oauth2Login(customConfigurer -> customConfigurer
                        .successHandler(oauth2SuccessHandler)
                        .failureHandler(oauth2FailureHandler)
                );

        return httpSecurity.build();
    }
}
여기서는 OAuth2 설정들을 스프링부트에 적용시킵니다. OAuth2 과정에서authorizeHttpRequests를 통해 인증없이 접근할 수 있도록 해야하는 엔드포인트들이 몇가지 있습니다.
/login/oauth2/code/** OAuth provider가 백엔드로 리다이렉트 할 때 사용하는 엔드포인트입니다.
/oauth2/authorization/** 유저가 프론트에서 로그인 요청을 보내는 엔드포인트입니다.
위 두개를 열어주셔야 로그인이 가능합니다.
엔드포인트에
**자리에는 provider의 아이디(google, naver, ...)가 들어갑니다.
마지막으로 oauth2Login를 통해서 이전에 작성한 successHandler와 failureHandler를 설정해주시면 OAuth2 구현 완료입니다.
작동 확인
프론트에서 https://서버주소/oauth2/authorization/google로 접속하시면 아래와 같은 화면이 나옵니다.
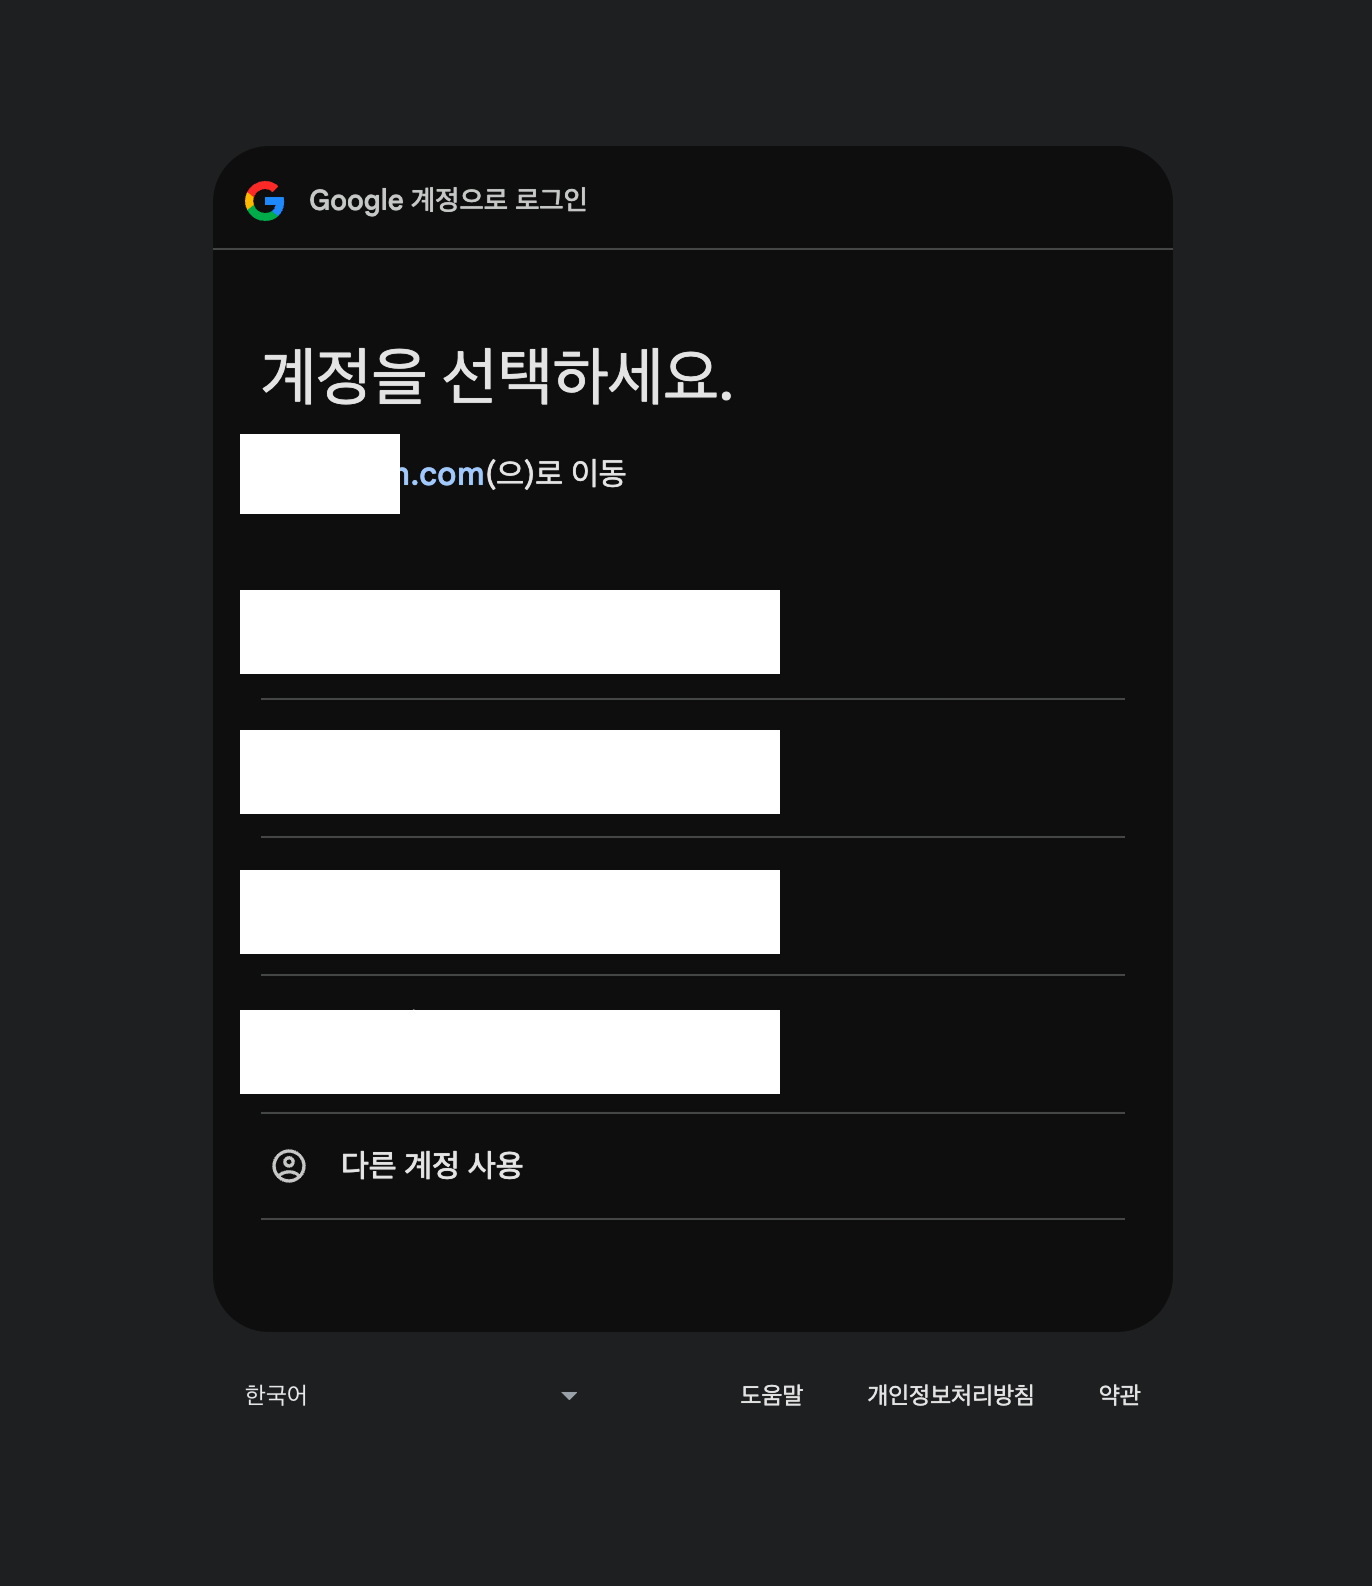
로그인할 계정을 선택하는 화면입니다. 계정을 선택하시면 구글 로그인이 진행되고, 백엔드로 리다이렉트 됩니다.
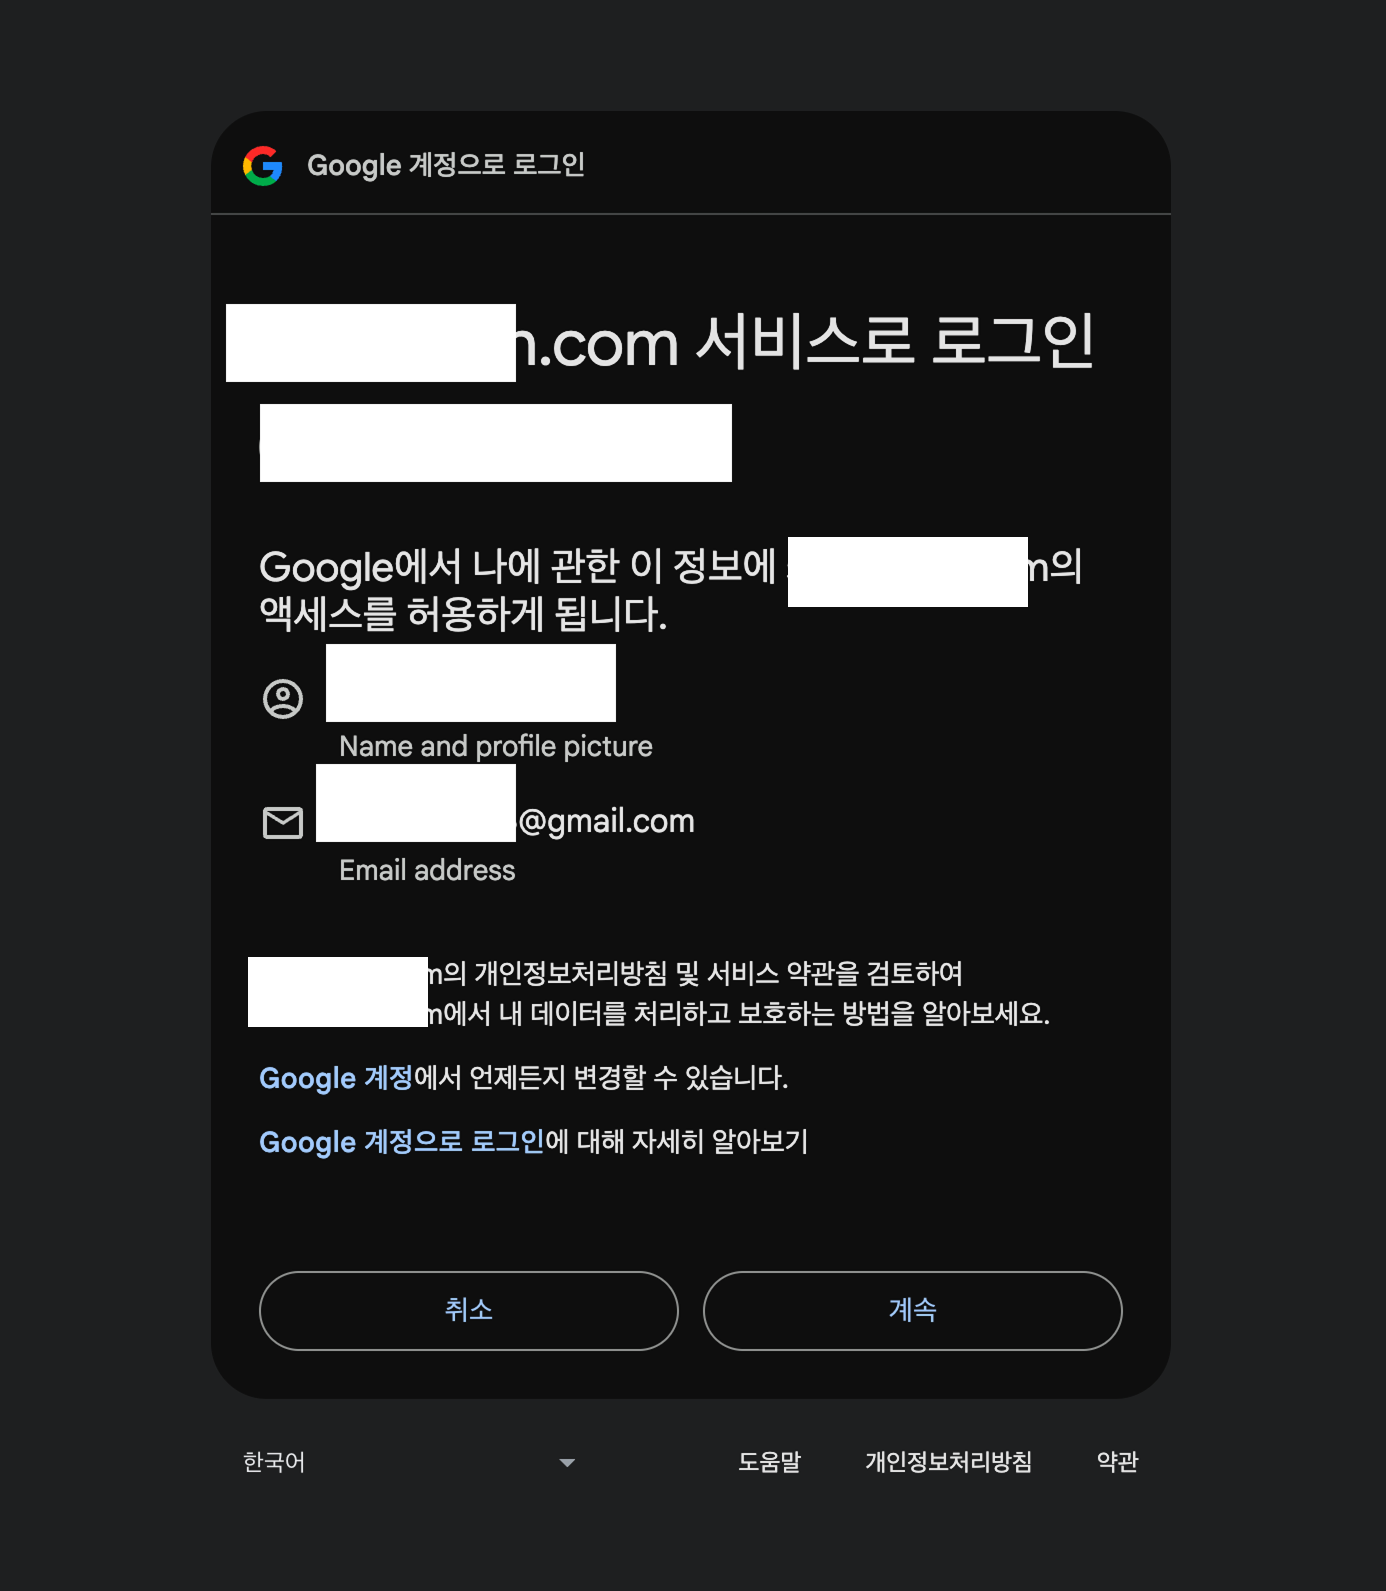
동의 화면입니다. 이 화면이 뜬다면 리프레시 토큰이 발급되었다는 것입니다. 만약 prompt=consent가 설정 되어있다면 이 화면이 매번 나오게 됩니다.
이후에는 설정한 프론트 주소로 리다이렉트 되게 됩니다. 이 때 자체 발행한 JWT는 쿠키에 담겨있습니다. 하지만 HttpOnly 옵션이 켜져있다면, 쿠키에 직접 접근할 수 없습니다. 그렇기 때문에 해당 쿠키가 포함된 상태로 서버에 요청을 보내서 쿠키에서 JWT를 꺼내거나, 서버에서 매 요청마다 JWT를 쿠키에서 꺼내도록 코드가 작성되어야 합니다.
이 때 쿠키에 담긴 JWT를 서버로 보내는 요청을 할 때 프론트에서
credentials: "include"라고 작성해주시고, 서버 쪽에서도 CORS설정시에.allowCredentials(true)라고 작성해주셔야 정상적으로 쿠키가 서버로 전송되게 됩니다.
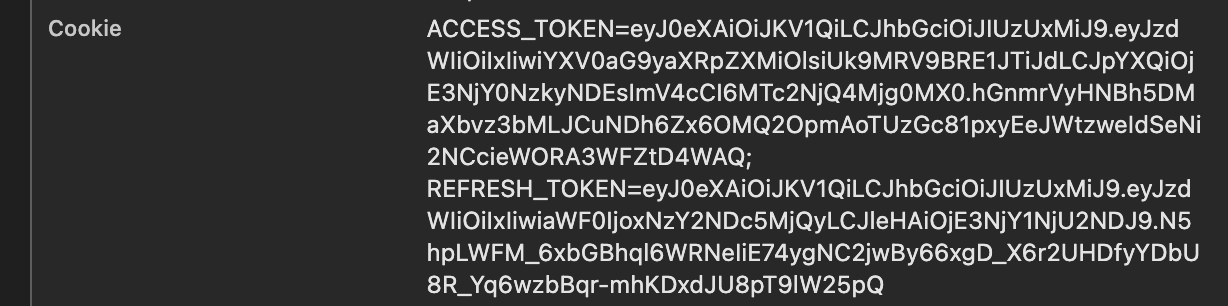
성공적으로 쿠키가 서버로 전송된다면 서버로 API요청을 넣는 Request Header에 이런식으로 JWT가 들어가게 됩니다.
저희는 쿠키에 담긴 JWT를 Response Body로 받을 수 있게 해주는 API를 만들어서 사용했습니다.
이렇게 JWT를 프론트에서 받게 되면 OAuth2를 이용한 로그인 과정은 끝나게 됩니다.