서론
예전부터 컴퓨터 견적을 맞추는 걸 좋아해서 CPU 벤치 순위를 자주 찾아보고 그랬다.
주로 찾아보는 블로그는 아래 블로그 였는데 어느 순간부터 최신 cpu 순위를 안올리기 시작했다.
https://090501.tistory.com/1326
집에 오면서 코틀린으로 웹 크롤링을 할 수 있다고 해서 재미있을거 같아 웹 크롤링을 해보면서
데이터를 가공해서 엑셀 다운로드 기능을 만들어 보았다.
본론
jsoup을 이용한 Kotlin 크롤링
사용하는 방법은 여러 방법이 있지만 jquery처럼 내부적으로 .select로 모든 데이터를 가공 할 수 있다.
아래와 같이 build.gradle.kts 셋팅을 했다.
plugins {
    id("org.springframework.boot") version Versions.springBoot
}

dependencies {
    implementation(project(":benchmark-def"))

    implementation("org.springframework.boot:spring-boot-starter-web")

    // crawling lib
    implementation("org.jsoup:jsoup:1.17.2")
    // excel lib
    implementation("org.apache.poi:poi-ooxml:5.2.5")


    runtimeOnly("com.h2database:h2")
    testImplementation("org.springframework.boot:spring-boot-starter-test")
}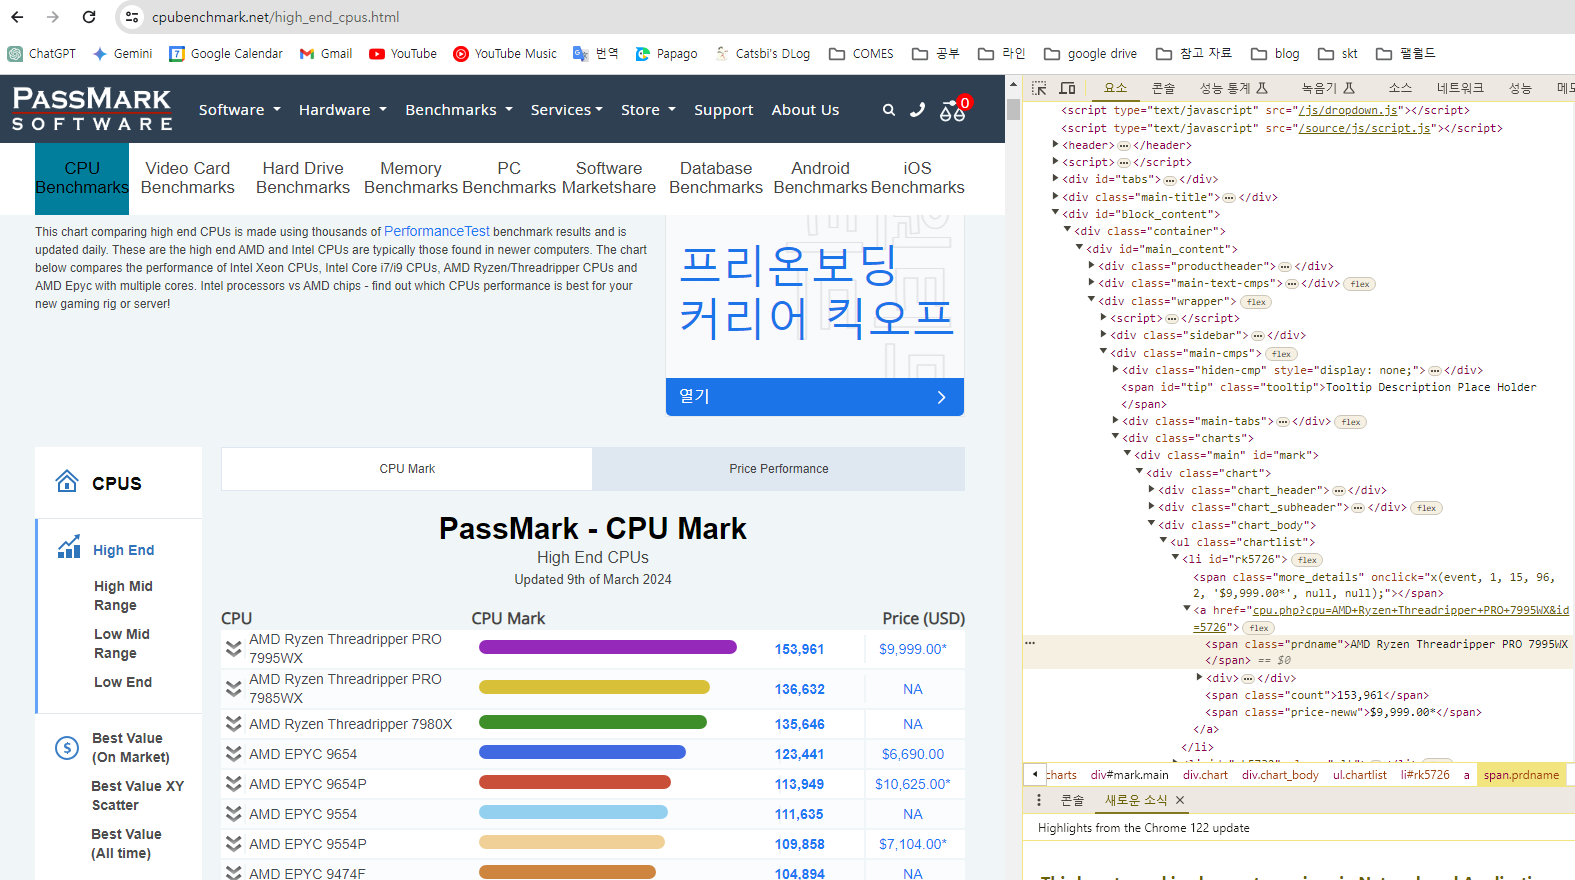
위 그림처럼 내가 가져오고 싶은 벤치마크에 대한 점수를 볼 수 있다.
영어로 되어 있고, 어디를 봐야할지 가독성이 떨어져서 이중에 필요한 내용만 추출해서
내가 원하는 데이터 가공 하였다.
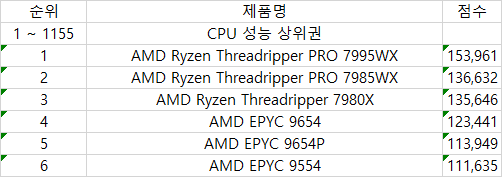
내가 원하는 데이터 형식은 아래와 같다
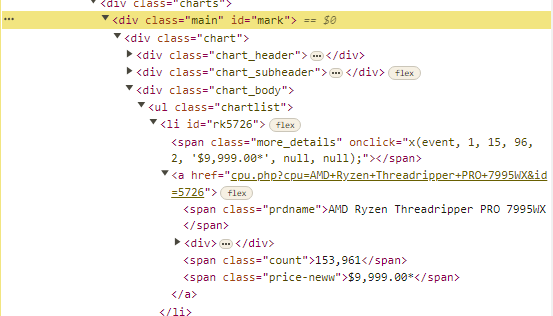
제품명을 가져오고 싶으면 아래 그림에서
div 태그에 id="mark" 인 데이터 중
li 태그에
- span 태그에 class="prdname"
- span 태그에 class="count"
해당 값만 필요하다.
해당 데이터를 뽑아 오기 위해서는 코드는 아래와 같이 구성 했다.
package com.example.blog.benchmark.api.crawling.persistence

import org.jsoup.Jsoup
import org.springframework.stereotype.Repository

@Repository
class PassMarkRepository {

    fun getCpuBenchMarks(url: String): MutableList<CpuPassMark> {
        val searchSite = url
        val doc = Jsoup.connect(searchSite).get()
        val selectDocByLi = doc
                .select("#mark")
                .select("li")

        val benchmarks = selectDocByLi.mapNotNull {
            val prdName = it.select(".prdname").first()
            val benchmark = it.select(".count").first()
            if (prdName == null || benchmark == null) {
                return@mapNotNull null
            }
            CpuPassMark(prdName.text(), benchmark.text())
        }

        return benchmarks.toMutableList()
    }
}

data class CpuPassMark(
        val prdName: String,
        val benchmark: String
)
해당 코드에서 하나씩 설명을 하자면
val searchSite = url
val doc = Jsoup.connect(searchSite).get()
url 정보는 enum 으로 관리를 했으며, Jsoup 라이브라리를 통해서 Document 정보를 모두 가져 온다.
package com.example.blog.benchmark.type

enum class CpuPassMarkUrl(val title: String, val url: String) {
    HIGH_END("CPU 성능 상위권", "https://www.cpubenchmark.net/high_end_cpus.html"),
    HIGH_MID("CPU 성능 중상위권", "https://www.cpubenchmark.net/mid_range_cpus.html"),

    // 데이터가 너무 많아 중상위권 까지만 데이터 추출 하기로 결정

//    LOW_MID("CPU 성능 중하위권", "https://www.cpubenchmark.net/midlow_range_cpus.html"),
//    LOW_END("CPU 성능 하위권", "https://www.cpubenchmark.net/low_end_cpus.html"),
}
그리고 아래 정보와 같이 doc에서 mark id 값을 가진 Element와 li 태그가 있는 Element만 찾아 추출을 한다.
val selectDocByLi = doc
                .select("#mark")
                .select("li")
혹시 해당 데이터 중 내가 추출하고 싶은 cpu 명과 벤치마크 결과가 없으면 해당 값을 추출 하지 않는 것으로 셋팅 했다.
val benchmarks = selectDocByLi.mapNotNull {
            val prdName = it.select(".prdname").first()
            val benchmark = it.select(".count").first()
            if (prdName == null || benchmark == null) {
                return@mapNotNull null
            }
            CpuPassMark(prdName.text(), benchmark.text())
        }
이와같이 데이터를 모두 셋팅 하면 해당 데이터를 내가 원하는 양식으로 Excel을 만든다.
excel 만드는 방법은 poi-java를 사용했기 때문에 코드만 첨부하고 글은 마치도록 하겠다.
package com.example.blog.benchmark.api.crawling

import com.example.blog.benchmark.api.crawling.persistence.PassMarkRepository
import com.example.blog.benchmark.api.file.ExcelService
import com.example.blog.benchmark.type.CpuPassMarkUrl
import org.springframework.stereotype.Service
import java.time.LocalDateTime
import java.time.format.DateTimeFormatter

@Service
class CrawlingService(
        private val passMarkRepository: PassMarkRepository,
        private val excelService: ExcelService
) {
    companion object {
        private val EXCEL_DATE_FORMAT = DateTimeFormatter.ofPattern("yyyyMMddHHmmss")
    }

    fun cpuBenchMark() {

        val data: MutableList<List<String>> = mutableListOf()
        var size = 0

        CpuPassMarkUrl.values().forEach {
            // data crawling
            val cpuBenchMarks = passMarkRepository.getCpuBenchMarks(it.url)
            val cpuBenchMarksSize = cpuBenchMarks.size

            // 순위 별 정보 셋팅
            data.add(listOf("${size + 1} ~ ${size + cpuBenchMarksSize}", it.title))

            // 정보 가공
            cpuBenchMarks.forEachIndexed { index, cpuPassMark ->
                val list = listOf("${index + 1 + size}", cpuPassMark.prdName, cpuPassMark.benchmark)
                data.add(list)
            }

            // size 재정의
            size += cpuBenchMarksSize
        }

        val header: List<String> = listOf("순위", "제품명", "점수")
        val filePath = "D:\\blog\\file\\excel"
        val fileName = "${LocalDateTime.now().format(EXCEL_DATE_FORMAT)}_CPU_BENCHMARK.xlsx"
        excelService.generateExcelFile(data, header, "$filePath\\$fileName")
    }
}
package com.example.blog.benchmark.api.file
import org.apache.poi.ss.usermodel.HorizontalAlignment
import org.apache.poi.xssf.usermodel.XSSFWorkbook
import org.springframework.stereotype.Service
import java.io.FileOutputStream
@Service
class ExcelService {
fun generateExcelFile(data: List<List<String>>, header: List<String>, filePath: String) {
val workbook = XSSFWorkbook()
val sheet = workbook.createSheet("Sheet1")
// 헤더 행 생성
val headerRow = sheet.createRow(0)
header.forEachIndexed { index, columnHeader ->
val cell = headerRow.createCell(index)
cell.setCellValue(columnHeader)
// 가운데 정렬을 위한 스타일 생성
val style = workbook.createCellStyle()
style.alignment = HorizontalAlignment.CENTER
cell.cellStyle = style
}
// 데이터 행 생성
data.forEachIndexed { rowIndex, rowData ->
val dataRow = sheet.createRow(rowIndex + 1)
rowData.forEachIndexed { columnIndex, cellValue ->
val cell = dataRow.createCell(columnIndex)
cell.setCellValue(cellValue)
// 가운데 정렬을 위한 스타일 생성
val style = workbook.createCellStyle()
style.alignment = HorizontalAlignment.CENTER
cell.cellStyle = style
}
}
// 열의 크기 자동 조절 (autoSizeColumn 사용)
for (i in header.indices) {
sheet.autoSizeColumn(i)
}
// 파일 저장
FileOutputStream(filePath).use {
workbook.write(it)
}
}
}이와 같이 작업한 결과물을 앞으로 아래 블로그에 개시할 예정이다.