1. 설치패키지
> conda install -c conda-forge dlib
> conda install -c conda-forge face_recognition
OpenCV는 기본적으로 설치되었다고 판단함.
참조 Link:
- face_recognition
- dlib

2. 코드 작성
import face_recognition
import cv2
import numpy as np
# Abdullah(DaeWon).kim
# email : sidcode@tawhid.io
# 2021-03-27
# 카메라 호출, USB 카메라를 따로 사용하여 디바이스 순번 ID 1번 사용,
# 기본 내장 카메라 는 보통 순번 ID 0 번 사용
# vcap = cv2.VideoCapture(1)
# 아래 와 같은 에러가 난다면 웹캠의 FPS 관련 처리 하지못하여 발생
# [ WARN:0] global C:\Users\appveyor\AppData\Local\Temp\1\pip-req-build-oduouqig\opencv\modules\videoio\src\cap_msmf.cpp (434)
# `anonymous-namespace'::SourceReaderCB::~SourceReaderCB terminating async callback
# 다음과 같이 cv2.CAP_DSHOW(다이렉트쇼)로 해결 해준다.
vcp = cv2.VideoCapture(1 + cv2.CAP_DSHOW)
# 카메라 사이즈 설정
vcp.set(cv2.CAP_PROP_FRAME_WIDTH, 640)
vcp.set(cv2.CAP_PROP_FRAME_HEIGHT, 480)
# 얼굴 인식 / 검출 관련 모델(가중치) 파일
# https://github.com/opencv/opencv/tree/master/data/haarcascades
# 얼굴 모델 파일 불러오기
# face_casecade_xml = 'openCV_XML/haarcascade_frontalface_default.xml'
# face_casecade = cv2.CascadeClassifier(face_casecade_xml)
# # 눈 모델 파일 불러오기
# eye_cascade_xml = 'openCV_XML/haarcascade_eye.xml'
# eye_cascade = cv2.CascadeClassifier(eye_cascade_xml)
## 얼굴 사진 과 이름등은
# 1. 해당 디렉토리 전체(순번정렬된 이미지)이미지
# 2. DB 또는 json등을 이용하여 위의 내용 이미지와
# 동일한 순서로 이름등을 등록하면
# 다수의 대상의 여러각도의 이미지와 매칭해 사용가능
# 가족얼굴
family_face = [
"images/myson_03.png",
"images/mypic_01.jpg",
"images/wife_01.png"
]
# 가족 이름
known_face_names = [
"JiYul.Kim",
"Abdullah.Kim",
"Aicha"
]
# 가족의 이미지 로드및 인코딩 list
known_face_encodings = []
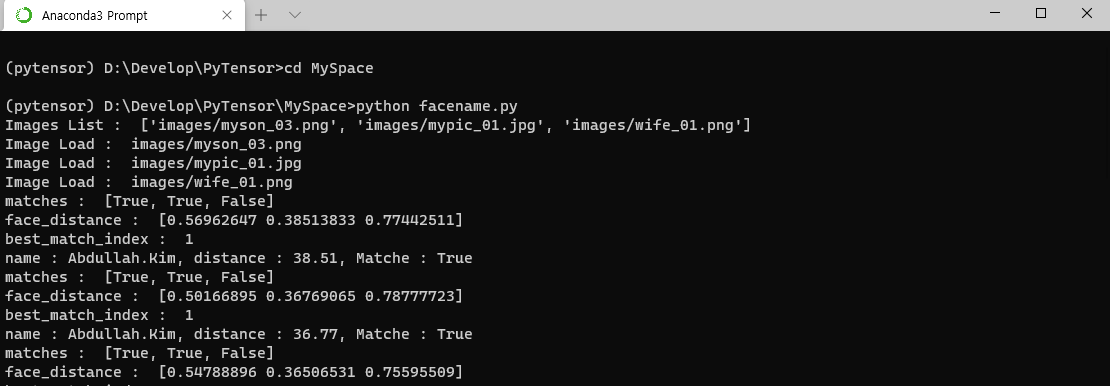
print("Images List : ", family_face)
# 이미지 로드및 인코딩
for face_img in family_face :
# 이미지를 불러온다.
load_images = face_recognition.load_image_file(face_img)
print("Image Load : ", face_img)
# print(load_images)
# 이미지를 인식가능한 코드로 인코딩 해준다.
known_face_encodings.append(face_recognition.face_encodings(load_images)[0])
# print(known_face_encodings)
# print("known_face_encodings : " , known_face_encodings)
# 안면 인식에서 사용될 변수들을 초기화 해준다.
face_locations = []
face_encodings = []
face_names = []
process_this_frame = True
show_name = []
while True :
# vcap.read() 프레임 읽기
# ret 은 카메라 상태 이며, 정상 : True, 비정상 : False
# frame 은 현재시점의 플레임
ret, frame = vcp.read()
# 빠른 얼굴 인식을 위해 1/4로 플레임을 줄여준다.
# frame, {가로, 새로} 사이즈 (0, 0)설정시 원본크기, 가로=곱할 배수, 세로=곱할 배수
small_frame = cv2.resize(frame, (0, 0), fx=0.25, fy=0.25)
# OpenCV의 BGR컬러에서 FACE_RECOGNITION에서 사용할 RGB컬러로 변환
# 다차원 아래 결과값 참조
rgb_small_frame = small_frame[:, :, ::-1]
# print('small_frame : ', small_frame)
# print('rgb_small_frame : ', rgb_small_frame)
'''
결과:
small_frame : [[[215 200 187]
[214 199 186]
[215 199 186]
...
[188 187 178]
[107 105 95]
[ 42 43 31]]]
rgb_small_frame : [[[187 200 215]
[186 199 214]
[186 199 215]
...
[ 31 43 42]]]
'''
# frame의 이미지를 계속 저장하여 비교
if process_this_frame :
# 화면에서 찾은 모든 얼굴들의 frame 이미지들을 인식가능한 코드로 인코딩 해준다.
face_locations = face_recognition.face_locations(rgb_small_frame, model="cnn") # (모델 설정 가능)
face_encodings = face_recognition.face_encodings(rgb_small_frame, face_locations)
face_names = []
for face_encoding in face_encodings :
# 매칭 얼굴 비교 하기
matches = face_recognition.compare_faces(known_face_encodings, face_encoding)
print("matches : ", matches)
name = "Unknown" # 기본적으로 모르는 사람으로 표시
# frame의 이미지 와 입력된 얼굴과의 매칭시 가장낮은 값이 가장 비슷한 비율값
face_distance = face_recognition.face_distance(known_face_encodings, face_encoding)
print("face_distance : ", face_distance)
# 인식된 얼굴의 최소 틀림 값의 index 반환
best_match_index = np.argmin(face_distance)
print("best_match_index : ", best_match_index)
# 최소 매칭값의 index가 존재하는지 체크 후 해당 가족의 이름을 가져온다.
if matches[best_match_index] :
name = known_face_names[best_match_index]
# print("np.argmax(face_distance) : ", np.argmax(face_distance))
# 비율 값 소수점 2자리 까지 가지오기
distance = str(np.round(face_distance[np.argmin(face_distance)] * 100, 2))
name_distance = name + distance
# 화면에 표시될 이름과 비율관련 추가
face_names.append(name_distance)
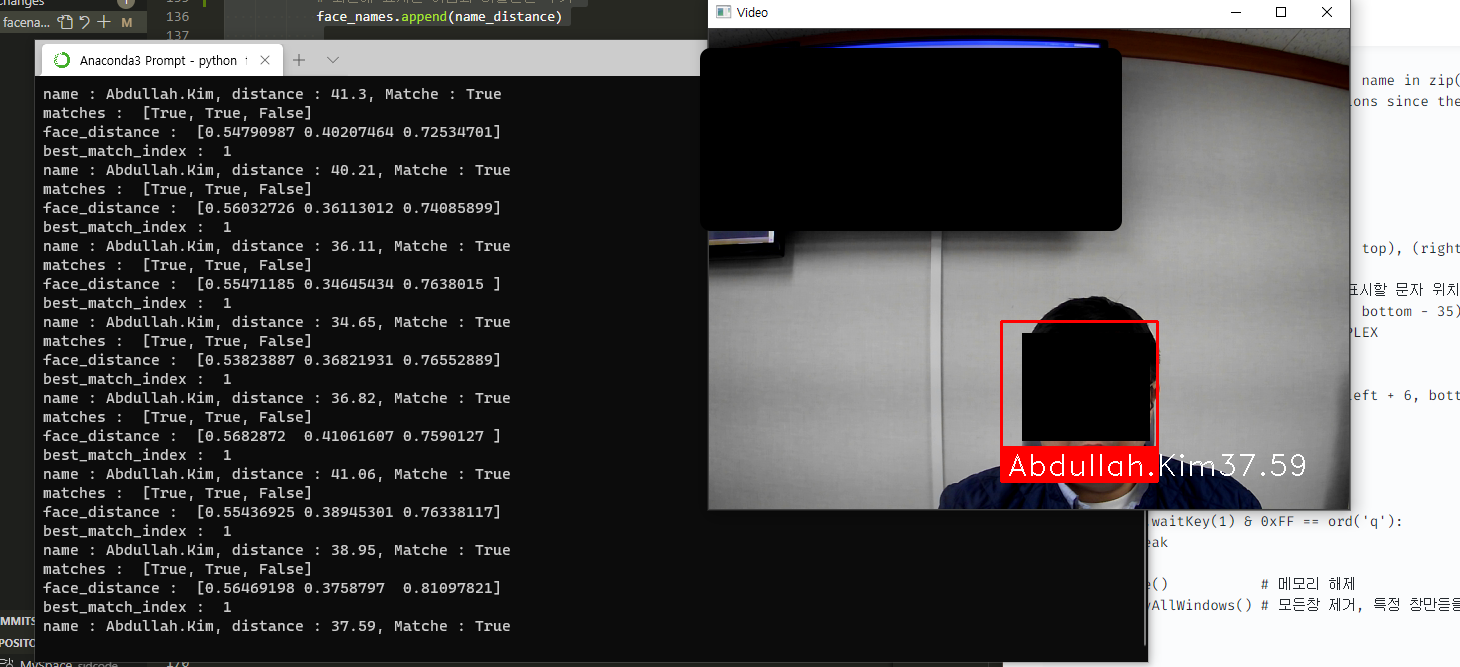
print("name : %s, distance : %s, Matche : %s" %(name, distance, matches[best_match_index]))
process_this_frame = not process_this_frame
# 화면 표시
for (top, right, bottom, left), name in zip(face_locations, face_names):
# Scale back up face locations since the frame we detected in was scaled to 1/4 size
top *= 4
right *= 4
bottom *= 4
left *= 4
# 화면상 얼굴의 사각 표시
cv2.rectangle(frame, (left, top), (right, bottom), (0, 0, 255), 2)
# 화면상 얼굴의 사각표시 밑에 표시할 문자 위치
cv2.rectangle(frame, (left, bottom - 35), (right, bottom), (0, 0, 255), cv2.FILLED)
font = cv2.FONT_HERSHEY_DUPLEX
# 사각 표시할 문자 설정
cv2.putText(frame, name, (left + 6, bottom - 6), font, 1.0, (255, 255, 255), 1)
# 윈도우창 (Title , 프레임 이미지)
cv2.imshow('Video', frame)
# 'q' 문자 로 종료 처리
if cv2.waitKey(1) & 0xFF == ord('q'):
break
vcp.release() # 메모리 해제
cv2.destroyAllWindows() # 모든창 제거, 특정 창만듣을 경우 ("VideoFrame")
I will do, what i want!!