시작에 앞서
지난 포스팅의 정답은 (가), (나) 전부 10 입니다.
드디어 class 차례입니다. 한방에 3개의 포스팅을 하다보니 너덜너덜 해졌습니다.

할리스 커피로 연명하면서 버텼습니다 ㅋ 후딱해서 나머지 두 포스팅도 마무리 하도록 하겠습니다....
이번 장에선 프로토타입(prototype) 과 class, extends, import, export 키워드를 다룹니다. 'use strict' 모드에 대해서도 살펴봅니다.
프로토타입(prototype)
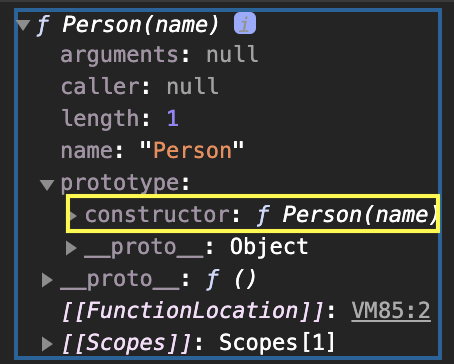
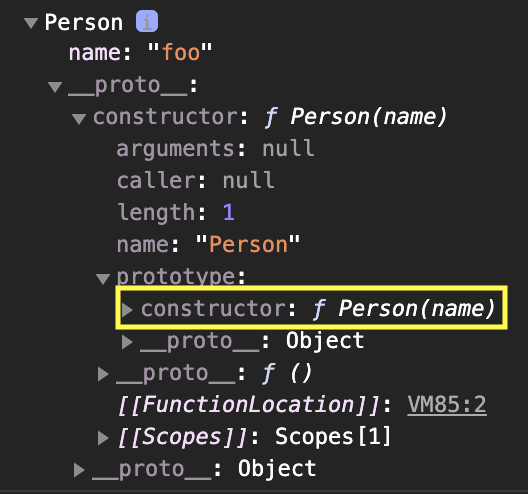
아래코드를 콘솔창에서 실행한 후 콜솔에 찍혀 있는 내용을 자세히 살펴 보겠습니다.
// 생성자 함수 생성
function Person(name) {
	this.name = name;
}

// foo 객체 생성

var foo = new Person('foo');

console.dir(Person);
console.dir(foo);
+) 이전에는 계속 console.log()를 사용했는데 이번에는 console.dir()을 사용했습니다.
- console.log ⇒ 매개변수로 전달된 값을 출력한다
- console.dir ⇒ 매개변수로 전달된 객체의 속성을 출력한다
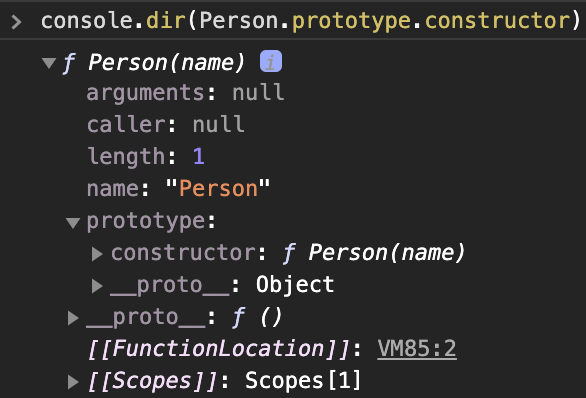
라는 차이가 있습니다. 즉, console.dir(Object)를 하면 해당 객체 속성을 자세히 볼 수 있습니다.
console.dir(Person);
console.dir(foo);
console.dir(Person.prototype.constructor);
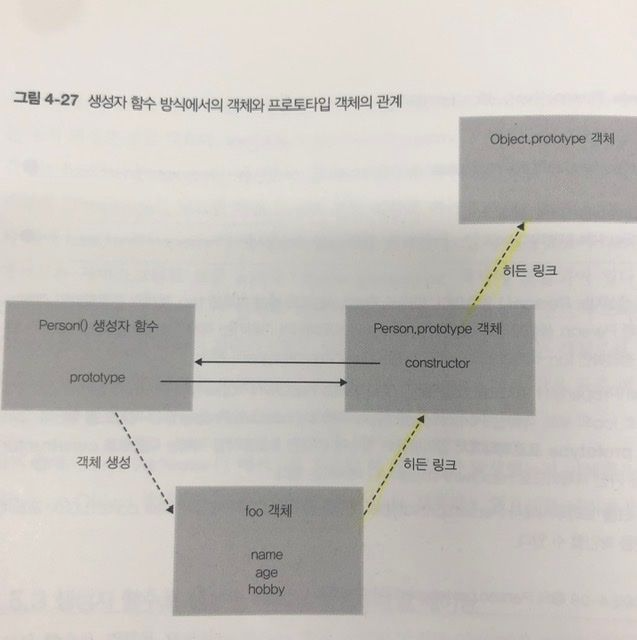
이를 이해하기 쉽게 표현한 그림이다.
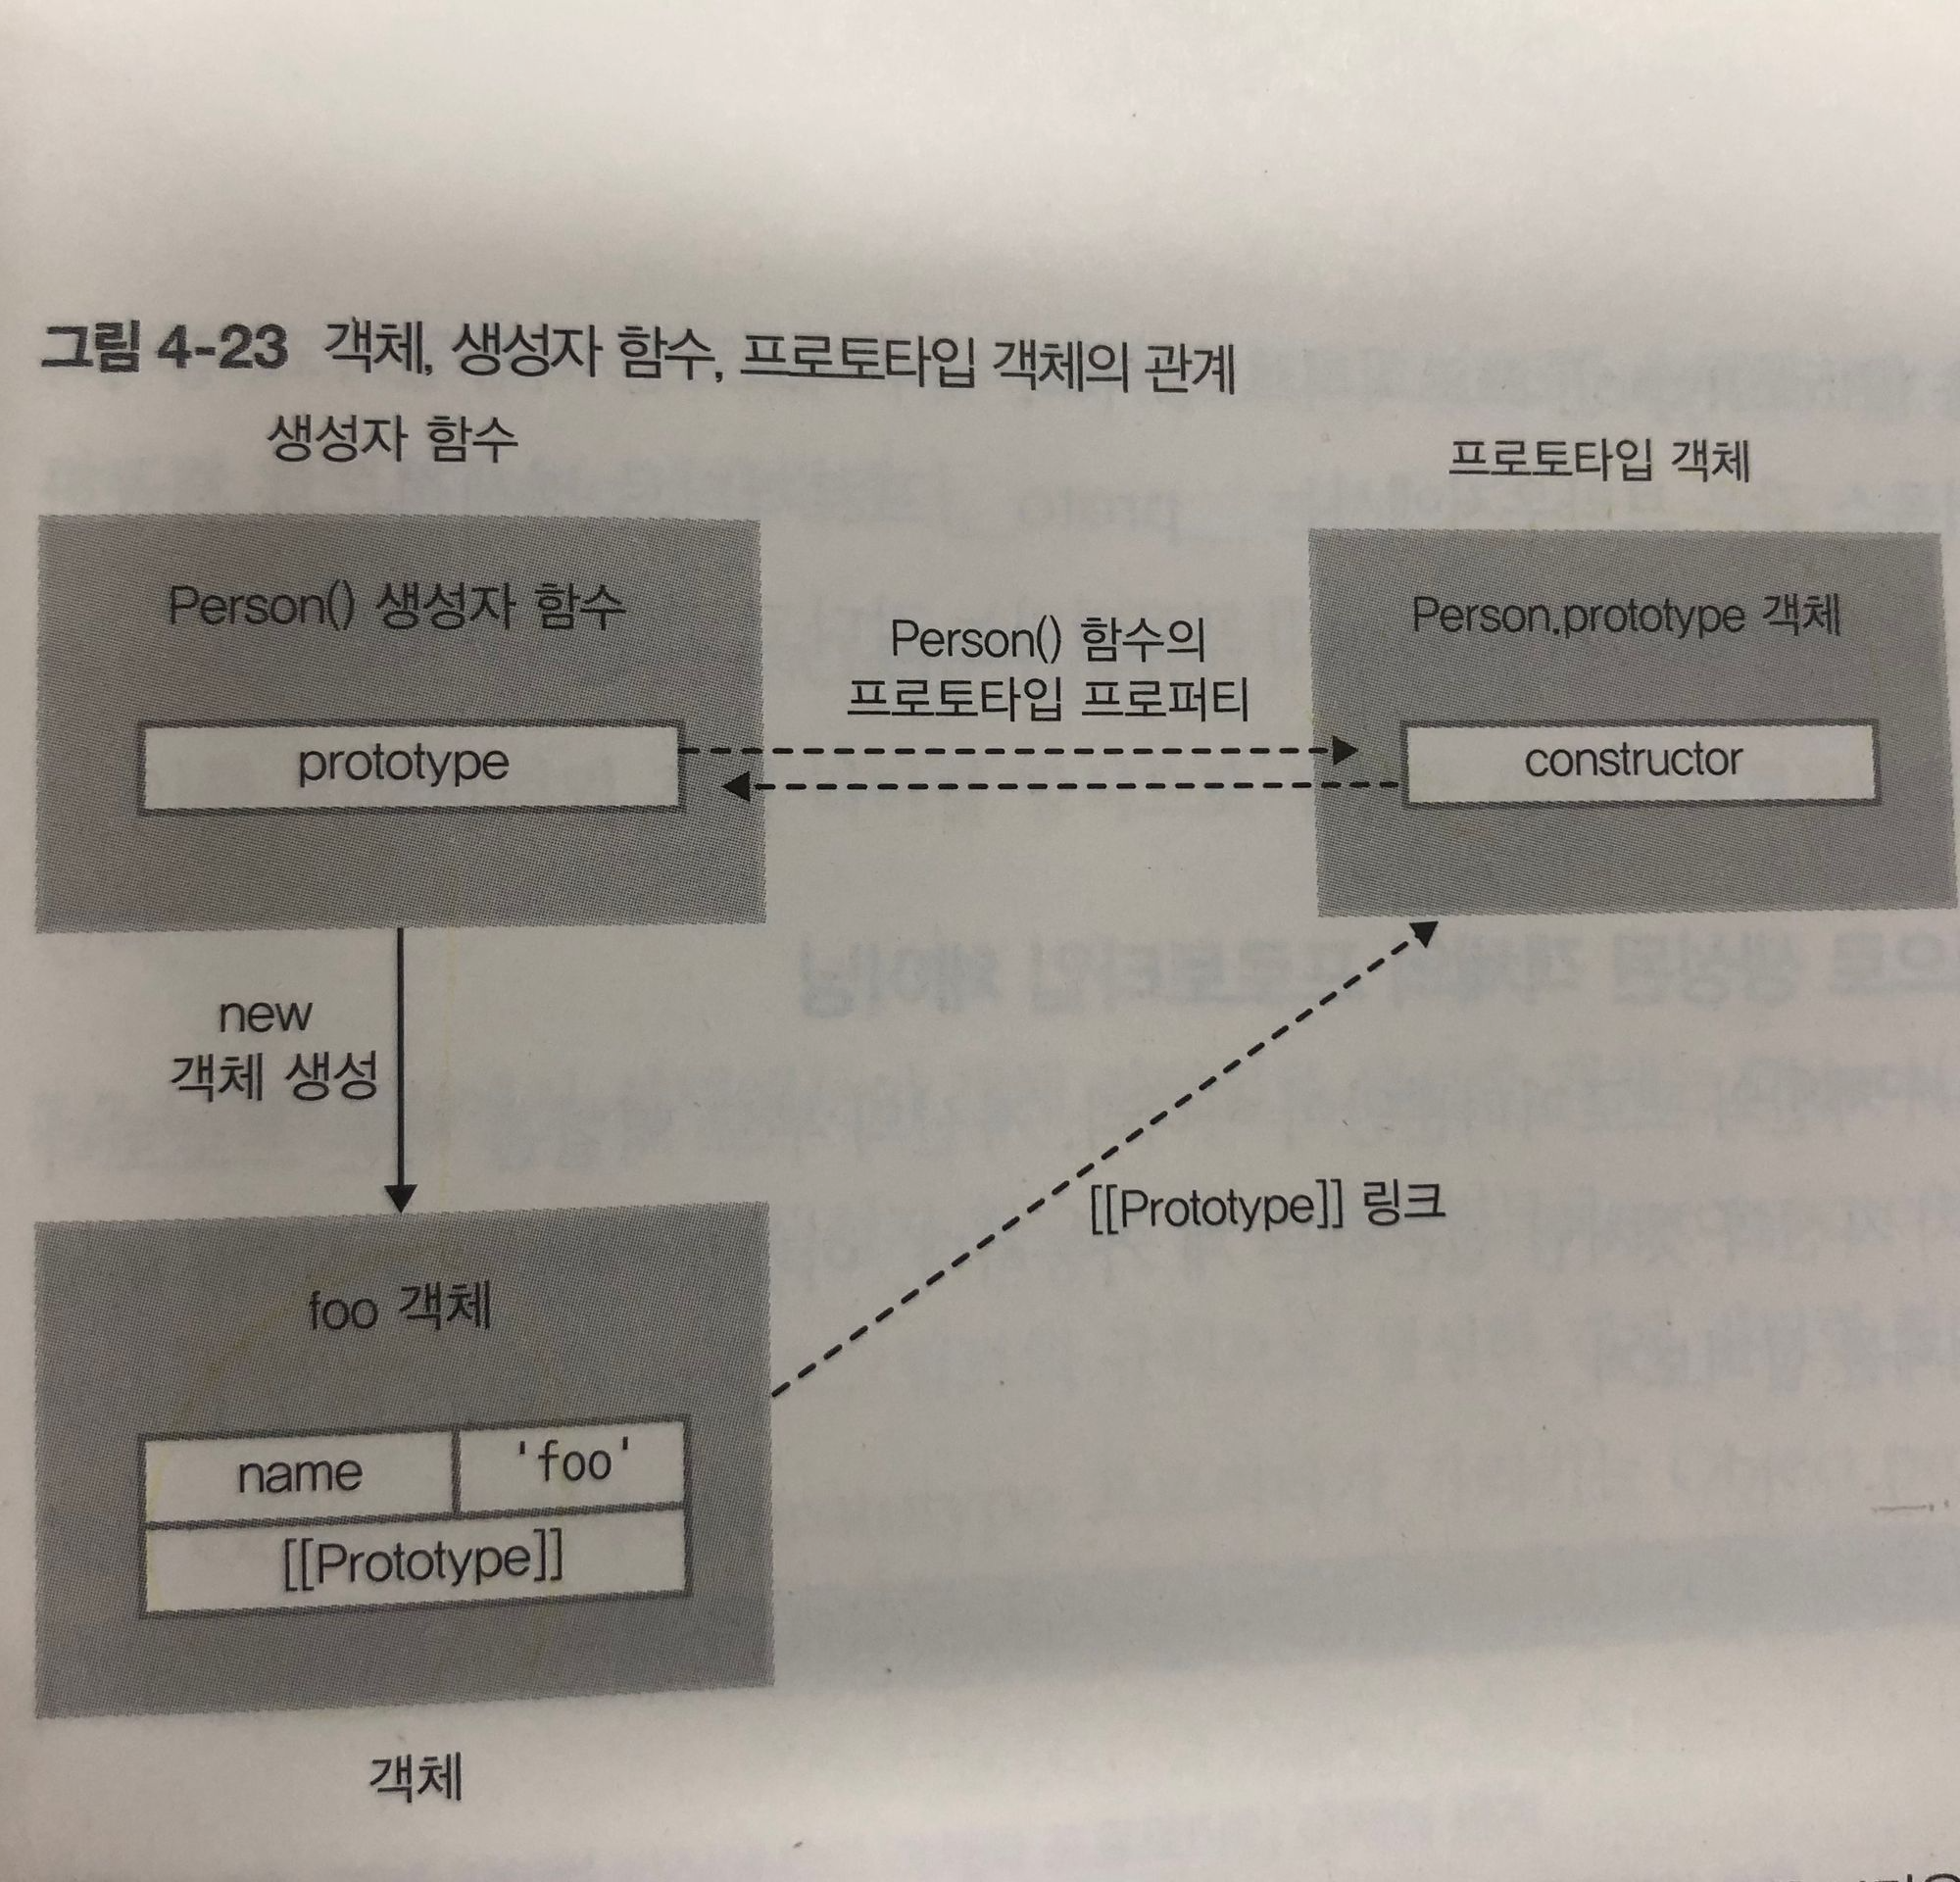
Person() 생성자 함수를 new 키워드를 이용해 foo 객체를 생성할 경우 foo 객체는 proto( [[Prototype]]링크) 가 생성됩니다.
이 proto는 히든 링크를 타고 Person() 생성자 함수의 Person.prototype 객체를 바라보고 있습니다.
Person.prototype 객체 역시 내부의 proto 히든 링크를 통해 상위 개념인 Object.prototype을 바라보고 있습니다.
프로토타입 체이닝
이를 프로토타입 체이닝이라고 합니다(Prototype Chaining) 👉 참고 포스팅
체이닝 어디서 들어본 말이죠? 챕터 1 에서 스코프 체이닝이라는 개념을 배웠습니다.
그때 내부 실행 컨텍스트에서 먼저 값을 찾고 없으면 외부 실행 컨텍스트를 참조해서 값을 찾는다고 했죠?
여기도 비슷한 개념입니다.
먼저 객체 내부에서 메서드를 찾고 없다면 proto (프로토타입 링크)를 타고 상위 객체로 가서 메서드를 찾게 됩니다.
다르게 말하면 상위 객체의 메서드를 하위 객체가 쓸 수 있다는 의미입니다.
그럼 prototype 은 어떤 상황에 쓰면 좋은지 알아보겠습니다.
function Person(name, age) { // 생성자 함수 생성
	this.name = name;
	this.age = age;
}

var pangsik = new Person('신광식', 29)
var iu = new Person('이지은', 28)

pangsik.setOlder = function() {
	this.age += 1;
}
pangsik.getAge = function() {
	return this.age += 1;
}

iu.setOlder = function() {
	this.age += 1;
}
iu.getAge = function() {
	return this.age += 1;
}
먼저 생성자 함수 Person을 정의합니다.
이후에 new 키워드를 통해 생성자함수를 인스턴스화 시킵니다.
pangsik 객체에 setOlder 메서드와 getAge를 추가해주었습니다.
iu 객체에도 setOlder 메서드와 getAge를 추가해주었습니다.
이때 같은 메서드를 다른 객체에 여러번 중복해서 생성하는게 매우 불 — 편합니다.😤😤😤
개발자는 반복을 싫어하니까요.
반복적인 부분을 개선할 방법이 없을까요? 바로 prototype을 이용하면 됩니다.
좀 전에 하위 객체는 상위 객체가 가지고 있는 메서드를 사용할 수 있다고 했습니다.
그럼 pangsik 객체와 iu 객체의 상위 객체인 Person 객체에 메서드를 추가하면
두 객체 모두 setOlder(), getAge() 메서드를 사용할 수 있다는 의미가 됩니다.
아래와 같이 코드를 수정해 봅시다.
function Person(name, age) {
    this.name = name;
    this.age = age;
}

Person.prototype.setOlder = function() {
	this.age += 1;
}
Person.prototype.getAge = function() {
	return this.age += 1;
}

var pangsik = new Person('신광식', 29)
var iu = new Person('이지은', 28)

pangsik.setOlder();
iu.setOlder();
반복적인 메서드 작업을 단 한번만 해도 되게 끔 만들었습니다.
그래서 prototype 개념을 알면 반복적인 작업을 줄여나갈 수 있게 됩니다.
이는 불필요한 메서드를 없애므로 불필요한 메모리 낭비도 막을 수 있습니다.
class
드디어 클래스 입니다. ES5 까지는 클래스가 없어 생성자 함수를 활용해 생성자를 만들었는데요.
ES6+부터는 class 키워드가 추가 됐습니다.
먼저 기존의 ES5 문법에서 생성자 함수를 활용해 만든 인스턴스 객체입니다.
//ES5
function Person(name, age) { // 생성자함수
  this.name = name;
  this.age = age;
}

Person.prototype.profile = function() { // 프로토타입
  return '이름 : '+ this.name + '나이 : '+ this.age;
}

var iu = new Person('이지은', 28); // iu 객체 생성

iu.profile(); //"이름: 이지은 나이 : 28" // 프로토타입 체이닝을 이용한 메서드 사용
다음은 class 키워드를 이용해 만든 인스턴스 객체입니다.
//ES6
class Person {
	constructor(name, age) { //생성자 함수
          this.name = name;
          this.age = age;
	}
	profile() {  // 객체 메서드
      	  return '이름 : '+ this.name + '나이 : '+ this.age;
	}
}

let iu = new Person('이지은', 28); // iu 객체 생성
iu.profile(); //"이름: 이지은 나이 : 28" // 객체 메서드 사용
먼저 기존의 생성자 함수 대신에 class 내부에 생성자 constructor() 가 보입니다.
또한 prototype 대신에 class 내부에 profile() 메서드가 보입니다.
기존에 class 기반 언어에서 보았던 구조를 ES6+부터 사용할 수 있게 되었습니다.
+)class 키워드는 공식적으로 syntactic sugar(문법적 설탕)이라고 표현합니다. 새로운 기능이라기보단 기존의 prototype을 통한 동작을 추상화 키워드이죠. 하지만 syntactic sugar라는 표현에 반대하는 입장도 있습니다.
이는 https://gomugom.github.io/is-class-only-a-syntactic-sugar/ 포스팅에서 한번 읽어보시면 좋을 듯합니다.
객체 생성자 상속받기
PS과 IU라는 새로운 객체 생성자를 만든다고 가정해봅시다.
해당 객체 생성자들에서 Person의 기능을 재사용한다고 가정해봅시다.
function Person(job, name, age) {
  this.job = job;
  this.name = name;
  this.age = age;
}

Person.prototype.profile = function() {
  return '직업 : '+ this.job + ' 이름 : '+ this.name + ' 나이 : '+ this.age;  return '직업 : '+ this.job + ' 이름 : '+ this.name + ' 나이 : '+ this.age;
};

function PS(name, age) {
  Person.call(this, 'Programmer', name, age);
}
PS.prototype = Person.prototype;

function IU(name, age) {
  Person.call(this, 'Singer', name, age);
}
IU.prototype = Person.prototype;

var ps = new PS('신광식', '29');
var iu = new IU('이지은', '28');

ps.profile(); // "직업 : Programmer 이름 : 신광식 나이 : 29"
iu.profile(); // "직업 : Singer 이름 : 이지은 나이 : 28"
추가적으로 prototype 을 공유해야 하기 때문에 상속받은 객체 생성자 함수를 만들고 나서 PS.prototype, IU.prototype 값을 Person.prototype 으로 설정해주었습니다.
call() 메서드를 활용해 구현하는 방식이 생각보다 까다롭고 가독성도 떨어지는 느낌입니다.
하지만 ES6+ 부터 class, extends 키워드 등장으로 손쉽게 상속을 구현할 수 있게 되었습니다.
extends
상속을 할 때는 extends 키워드를 사용하며, constructor에서 사용하는 super() 함수가 상속받은 클래스의 생성자를 가르킵니다.
class Person {
    constructor (job, name, age) {
        this.job = job;
        this.name = name;
        this.age = age;
    }
    profile() {
      return '직업 : '+ this.job + ' 이름 : '+ this.name + ' 나이 : '+ this.age;
    }
}

class PS extends Person { // Student 클래스에서 Person 클래스를 상속
    constructor (name, age) {
        super('Programmer', name, age) // super() 함수가 상속받은 클래스의 생성자를 가르킴.
          this.name = name;
          this.age = age;
    }
}

class IU extends Person { // Student 클래스에서 Person 클래스를 상속
    constructor (name, age) {
        super('Singer', name, age) // super() 함수가 상속받은 클래스의 생성자를 가르킴.
          this.name = name;
          this.age = age;
    }
}

const ps = new PS('신광식', '29');
const iu = new IU('이지은', '28');

ps.profile(); // "직업 : Programmer 이름 : 신광식 나이 : 29"
iu.profile(); // "직업 : Singer 이름 : 이지은 나이 : 28"
Module System
react의 index.js 내부를보면 import React from 'react'; import ReactDOM from 'react-dom'; 과 같은 코드가 보입니다. 이를 모듈 시스템이라고 하면 import, export와 같은 키워드가 있습니다.
이 또한 매우 중요한 키워드이니 잘 숙지해야 합니다.
export(내보내기)
- export는 내부 스크립트 객체를 외부 스크립트로 모듈화 하는 것.
- export를 선언하지 않았으면 외부 스크립트에서 import를 통해 사용할 수 없습니다.
- export 방식에는 named 와 default 두가지 방식이 있습니다.
nemed export
- name export를 사용한다면 import 하는 스크립트에서 위와 같이 정해진 이름을 사용해야 합니다.
- export할 때 as 통해 이름을 변경할 수 있습니다.
// 각각 선언
export const string = 'string'
export const array = [1,2,3]
export const obj = {obj:'obj'}
export function func(){console.log(a)}
// 힌번에 선언
export {string, array, obj, func as f}
default export
- export 뒤에 default를 써야합니다.
- default export는 한 객체만 선언할 수 있기에 스크립트 메인 객체에 선언하는 것이 좋습니다.
- default export는 const, let, var와 함께 선언하지 못합니다.
export default func; // 단일 선언
export {string, array, obj, func as default}
re-export
- import로 가져온 객체들은 다시 export로 선언 할 수 있습니다.
//default로 받아온 객체는 다음과 같이 as를 이용해서 변수명을 정해 export를 선언할 수 있다.
export {default as foo, string} from './Export.js'

//import 한 모든 객체를 내보내야 한다면
export * from './Export.js'
import(가져오기)
- import를 선언하여 외부에서 export를 선언한 객체를 가져올 수 있습니다.
named export를 선언한 객체 import
// 각각 선언
import {string, array, obj} from './Export.js'

// 한번에 선언
import * as module from './Export'

module.string
module.array
module.obj
default export를 선언한 객체 import
// default만 선언
import foo from './Export.js'

// 다른 것과 함께 가져오기
import foo, {string, array, obj} from './Export'

// 같은 객체에서 선언
import {default as foo, string, array, obj} from './Export'
+) ES6의 module system에서의 모듈은 기본적으로 strict 모드(use strict)로 동작합니다.
use strict
use strict는 es5문법으로 엄격 모드라고도 불립니다.
- 흔히 발생하는 코딩 실수를 잡아내서 예외를 발생 시킬 수 있습니다.
- 상대적으로 안전하지 않은 액션이 발생하는 것을 방지합니다.
- 정확하게 고려되지 않은 기능들을 비활성화 시킵니다.
예제 코드
'use strict'는 반드시 최상단에 위치 해야합니다.
strict 모드에서 선언하지 않은 변수를 참조하면 ReferenceError가 발생합니다.
'use strict'; //strict 모드 실행
a = 3; //Uncaught ReferenceError: a is not defined
함수안에서만 use strict를 선언을 하면 함수 안에서만 엄격한 모드로 실행됩니다.
전역에서는 이전과 같이 사용이 가능합니다.
function() {
'use strict'
 ...
}
변수, 함수, 매개변수의 삭제시 SyntaxError가 발생합니다.
'use strict'

var x =1;
delete x; //SyntaxError: Delete of an unqualified identifier in strict mode.

fuction foo(a) {
	delete a; //SyntaxError: Delete of an unqualified identifier in strict mode.
}
delete foo; //SyntaxError: Delete of an unqualified identifier in strict mode.
매개변수 이름의 중복 되면 SyntaxError가 발생합니다.
'use strict';

  //SyntaxError: Duplicate parameter name not allowed in this context
  function foo(x, x) {
    return x + x;
  }
  console.log(foo(1, 2));
with 문을 사용하면 SyntaxError가 발생합니다.
'use strict';

  // SyntaxError: Strict mode code may not include a with statement
  with({ x: 1 }) {
    console.log(x);
  }
일반 함수의 this
strict mode 에서 함수를 일반 함수로서 호출하면 this에 undefined가 바인딩됩니다.
생성자 함수가 아닌 일반 함수 내부에서는 this를 사용할 필요가 없기 때문입니다.
이때 에러는 발생하지 않습니다.
'use strict';

  function foo() {
    console.log(this); // undefined
  }
  foo();

  function Foo() {
    console.log(this); // Foo
  }
  new Foo();
복습
prototype을 통한 메서드를 추가한 후 인스턴스 객체에서 해당 메서드를 사용하는 코드를 만만들어보세요! 🙌
