개요

UIKit 을 이용한 프로젝트를 진행하려고 하였다. 나는 평소에 강의나 인터넷을 참고하여 UI를 그렸는데,스토리보드를 사용한다면 git Conflict가 자주 일어나기 때문에, 또 storyboard는 xml로 되어있어서 코드리뷰하기 힘들 것 같다라는 생각이 들어 는 스토리보드 없이 코드를 작성해야했다
처음으로 Programmatic UI를 작성해보기 때문에 유튜브의 강의를 참고하여 스터디를 하였다.
이 비디오에서는 UIKit을 사용하여 스위프트의 프로그래밍 UI를 소개합니다. 스토리보드를 삭제하는 것으로 시작하여 간단한 UI를 구축하고 UINavigation Controller에 내장하여 새로운 화면으로 이동합니다. 이 스위프트 튜토리얼은 Xcode 14와 iOS 16에서 만들어졌습니다.
현재 내 Mac에서는 Xcode 15와 iOS 17을 사용하고 있기 때문에 그대로 진행하면서 오류가 발생하면 인터넷에서 고쳐볼 생각이다. (아마 그대로 작동하지않을까 싶음)
프로젝트 생성

- UIKit를 사용하므로 Storyboard와 Swift를 사용한다.
- Interface는 Storyboard로 Language는 Swift로 설정한다.
스토리보드 삭제
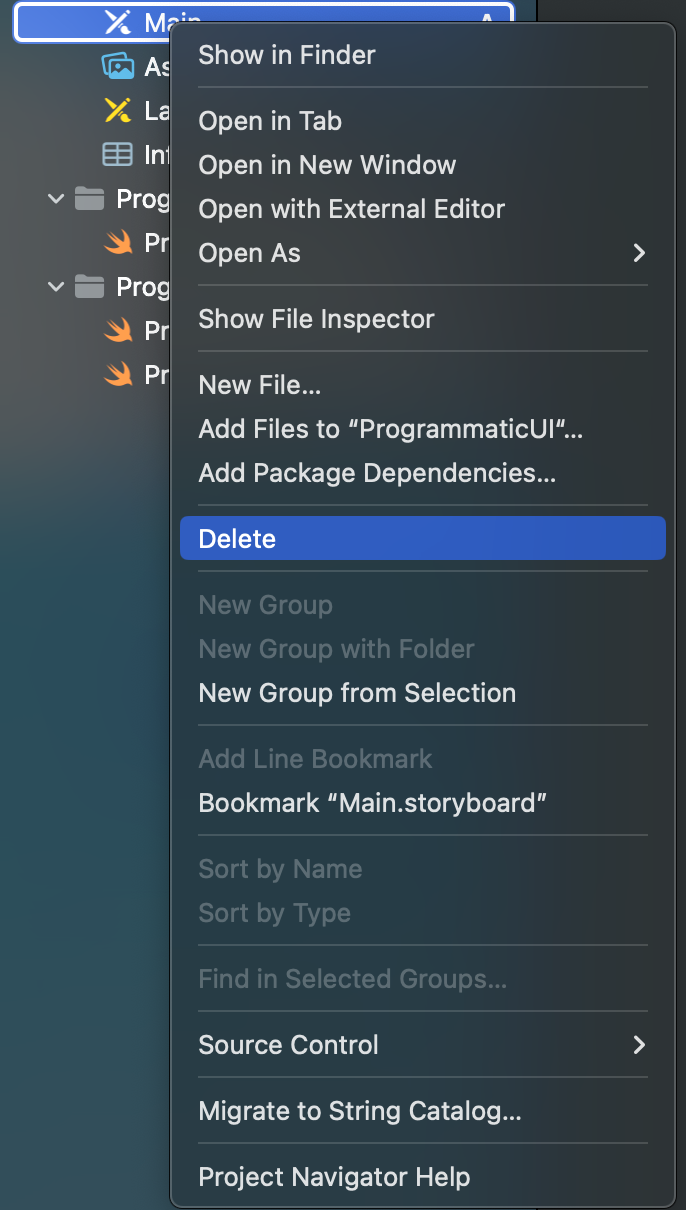
스토리보드를 삭제하고 나면 프로젝트는 여전히 스토리보드가 있다고 생각하기 때문에 또 다른 설정이 필요하다.
Info 설정
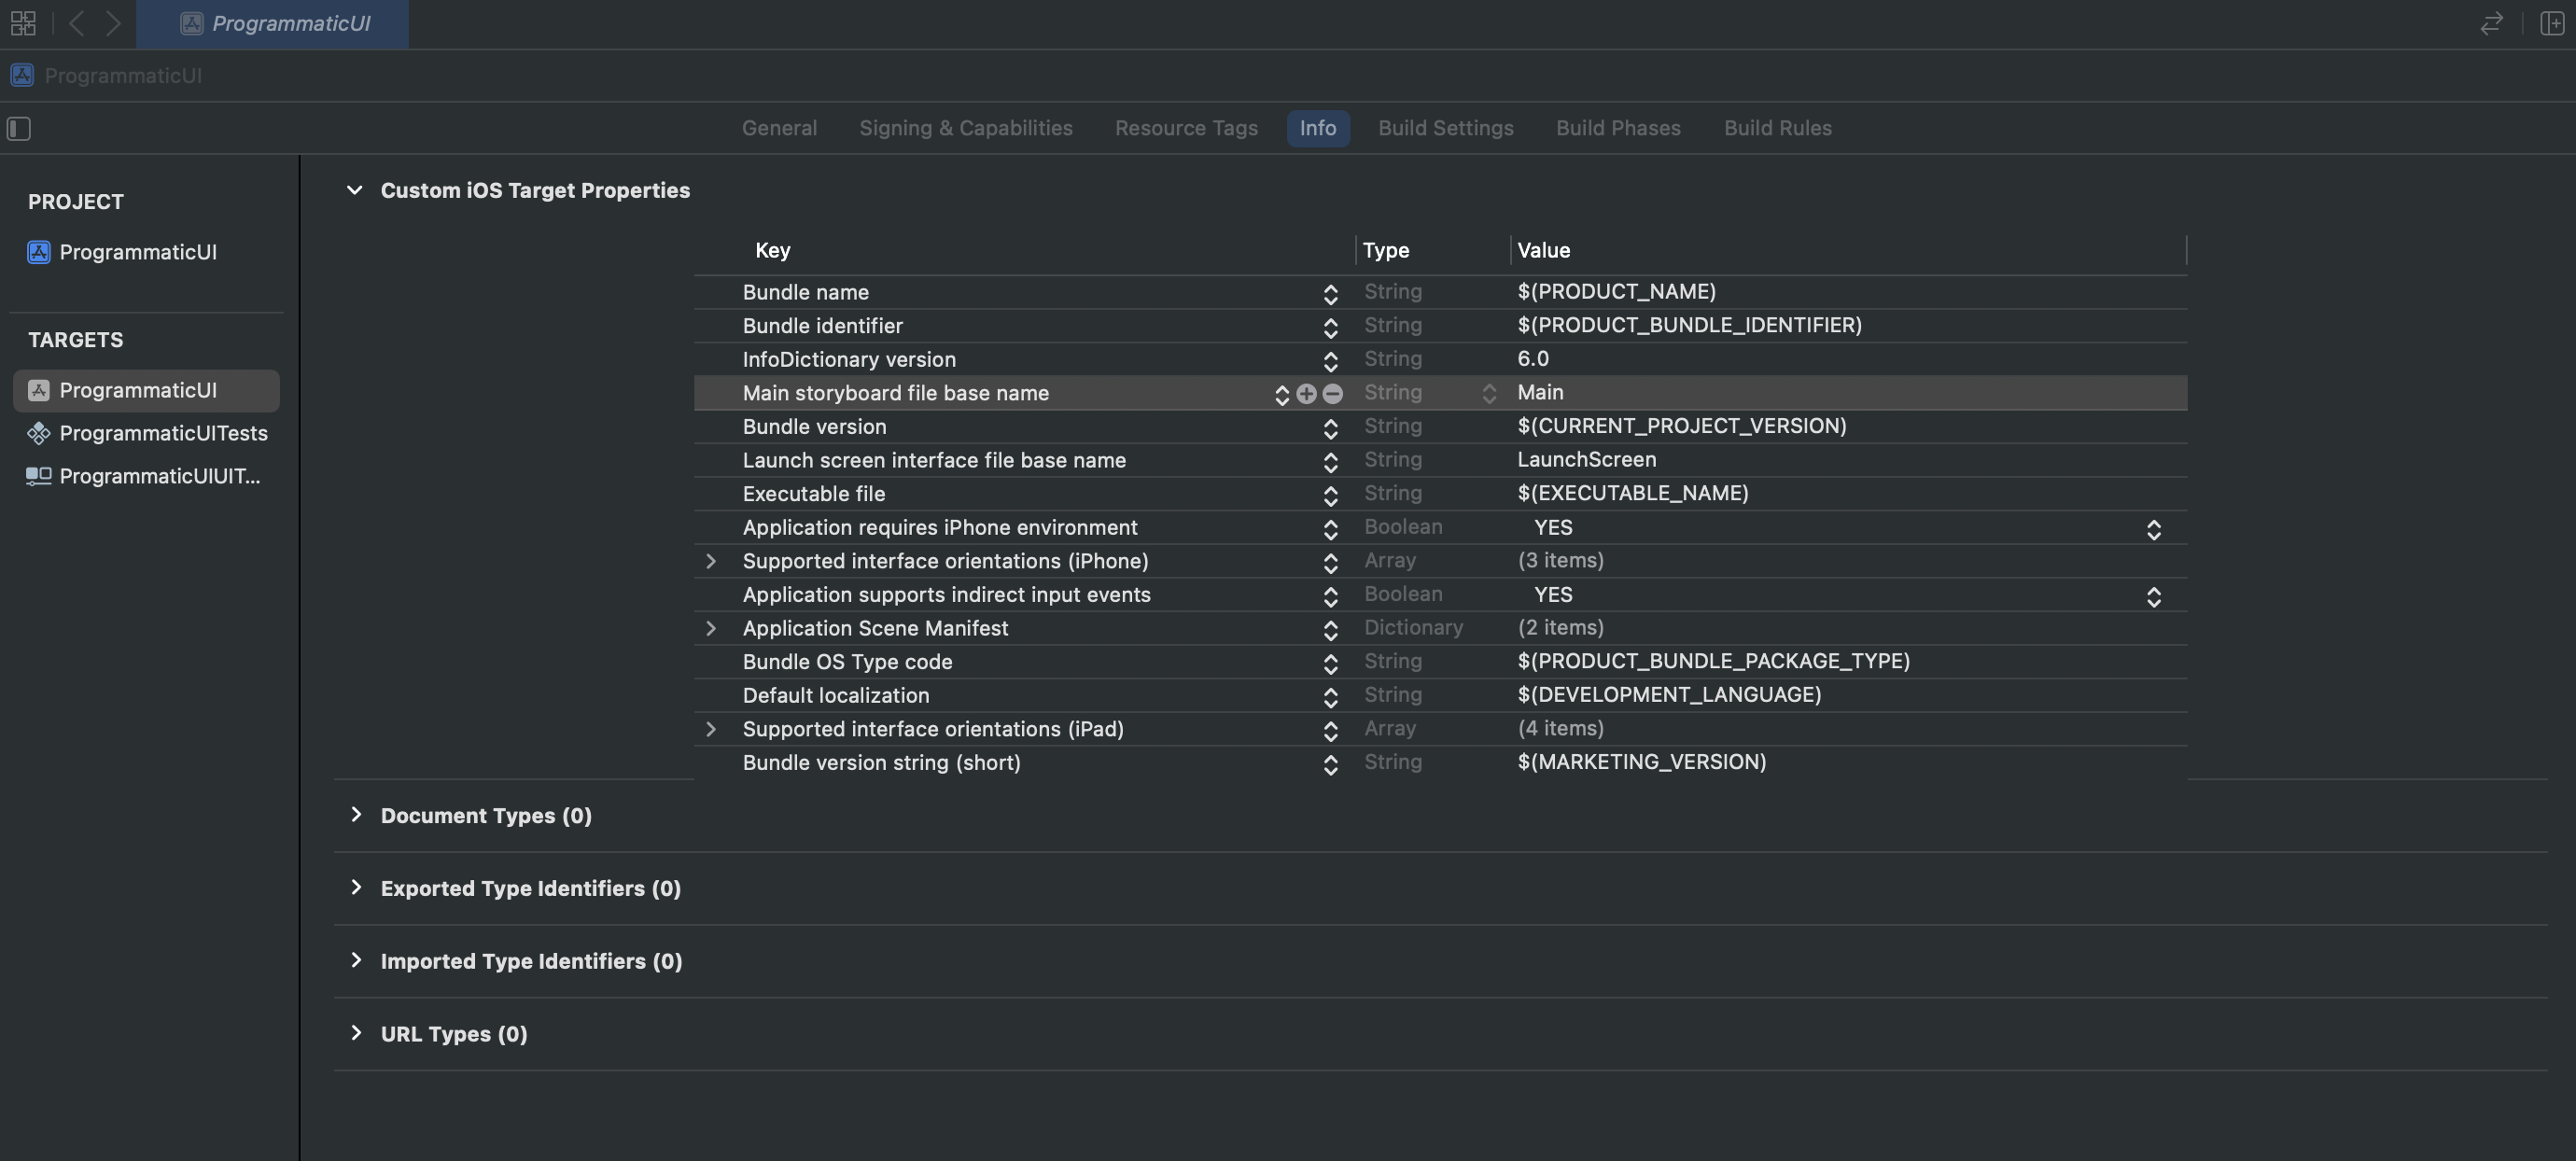
Project -> Info -> Custom iOS Target Properties -> Main storyboard file base name 을 - 버튼을 눌러서 삭제시킨다.
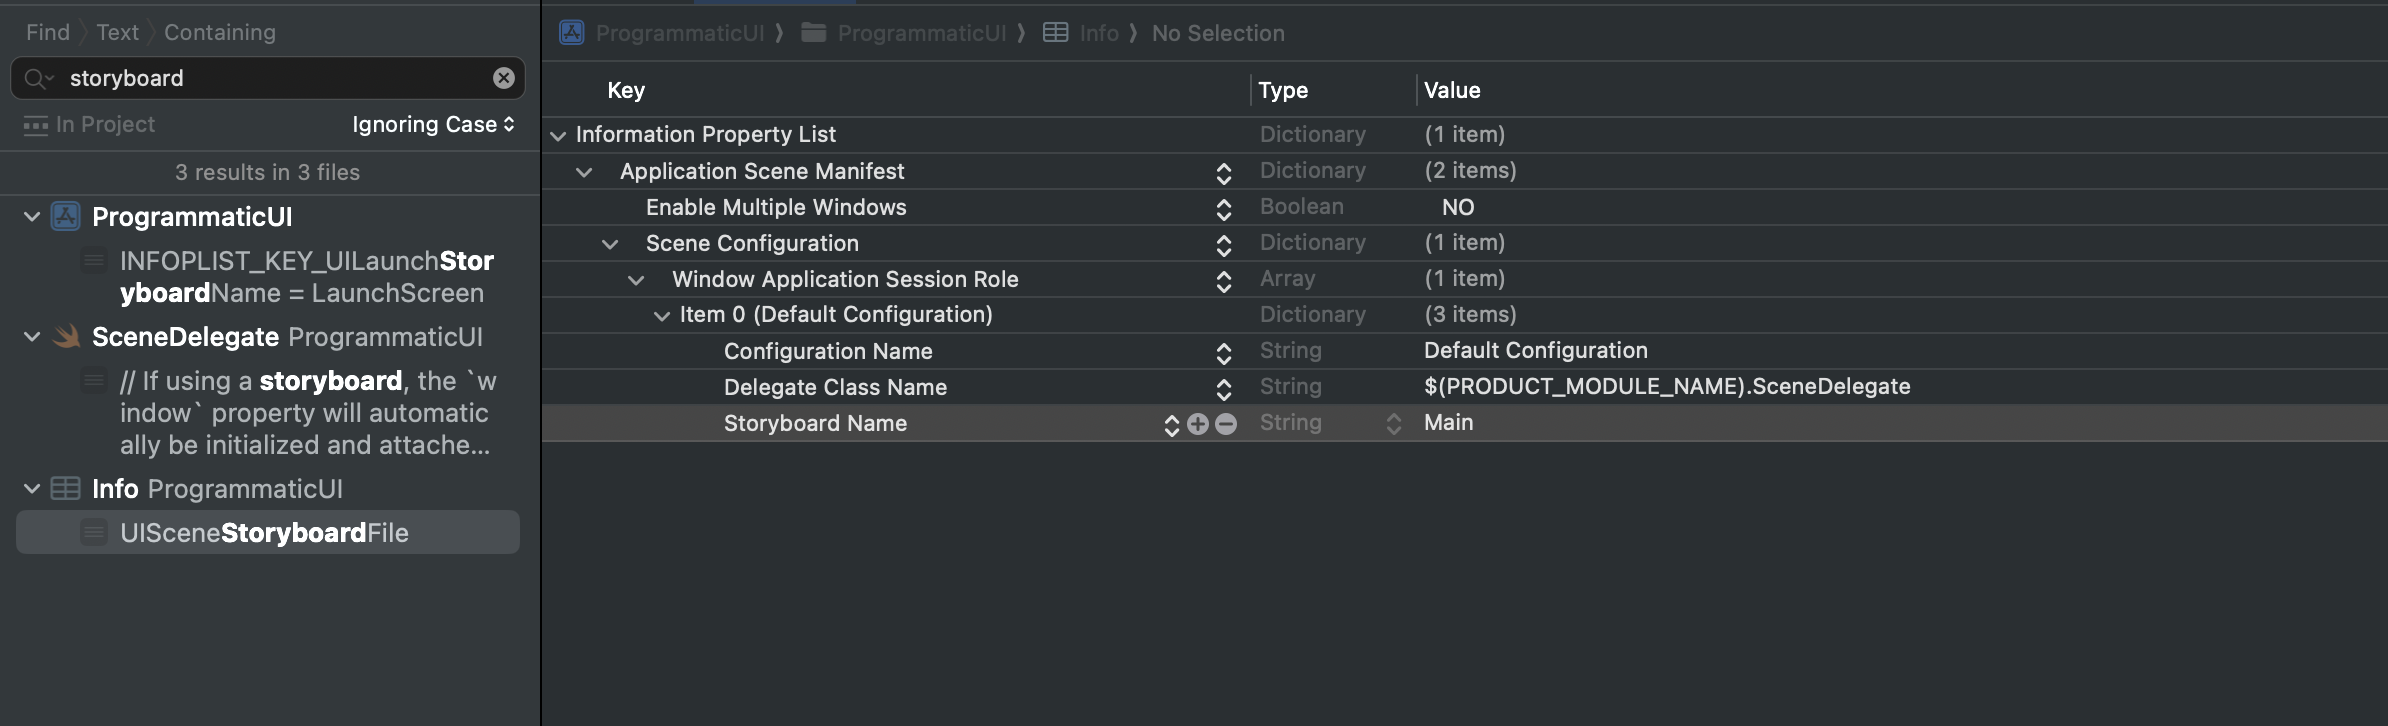
UISeceneStoryboardFile 설정
SceneDelegate 설정
SceneDelegate는 화면에 무엇을 보여줄지 관리하는 역할을 한다. UISceneSession life cycle에서 가장 먼저 불리는 메소드로 새로운 UIWindow를 생성하고 window의 rootViewController를 설정한다
class SceneDelegate: UIResponder, UIWindowSceneDelegate {

    var window: UIWindow?

    func scene(_ scene: UIScene, willConnectTo session: UISceneSession, options connectionOptions: UIScene.ConnectionOptions) {
        // Use this method to optionally configure and attach the UIWindow `window` to the provided UIWindowScene `scene`.
        // If using a storyboard, the `window` property will automatically be initialized and attached to the scene.
        // This delegate does not imply the connecting scene or session are new (see `application:configurationForConnectingSceneSession` instead).
        guard let windowScene = (scene as? UIWindowScene) else { return }

        window = UIWindow(frame: windowScene.coordinateSpace
            .bounds) //
        window?.windowScene = windowScene
        window?.rootViewController = FirstScreen()
        window?.makeKeyAndVisible()
    }
}
실행결과
import UIKit
class FirstScreen: UIViewController {
override func viewDidLoad() {
super.viewDidLoad()
view.backgroundColor = .systemMint
// Do any additional setup after loading the view.
}
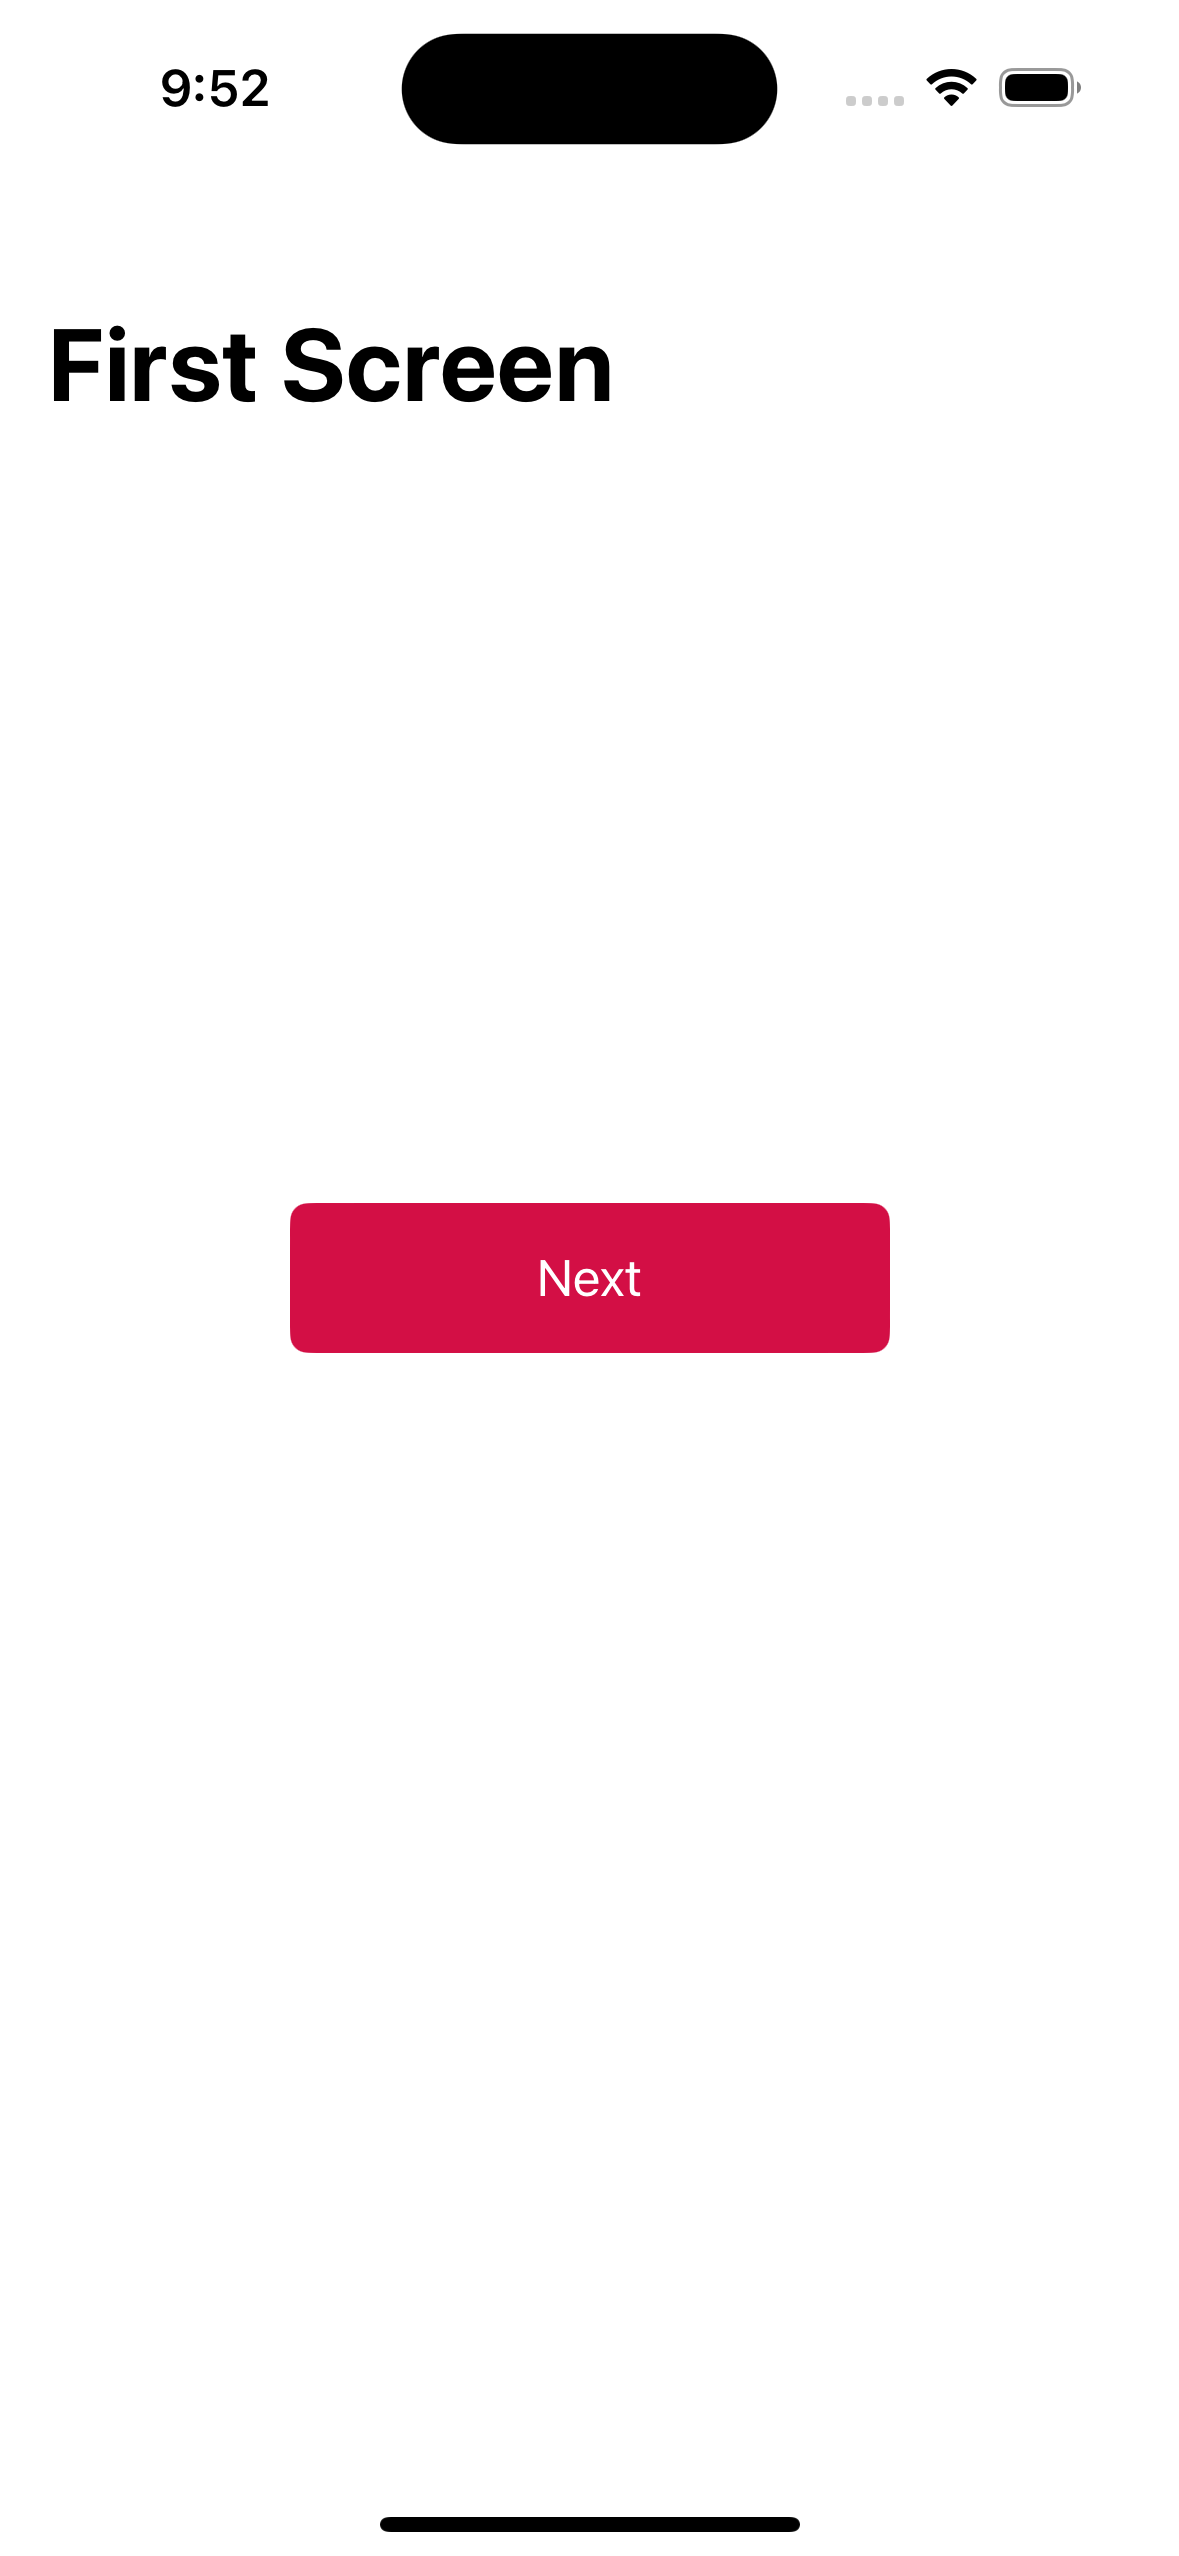
}첫 화면에 backgroundColor를 변경한 후 확인해보았다.

UI 구축하기
버튼을 하나 생성하고 해당 버튼을 누르면 Navigation 이 되도록 만들어 보았다.
import UIKit
class FirstScreen: UIViewController {
let nextButton = UIButton()
override func viewDidLoad() {
super.viewDidLoad()
view.backgroundColor = .systemBackground
title = "First Screen"
navigationController?.navigationBar.prefersLargeTitles = true
setupButton()
// Do any additional setup after loading the view.
}
// 버튼 설정
func setupButton() {
view.addSubview(nextButton)
nextButton.configuration = .filled()
nextButton.configuration?.baseBackgroundColor = .systemPink
nextButton.configuration?.title = "Next"
// addTarget을 통해 해당 뷰컨트롤러에서 이벤트가 발생하면 action을 줌
nextButton.addTarget(self, action: #selector(goToNextScreen), for: .touchUpInside)
//tamic autolayout 을 constrait layout 으로 변경
nextButton.translatesAutoresizingMaskIntoConstraints = false
// 단일 제약조건에 대해 true르 만듬
// nextButton.centerXAnchor.constraint(equalTo: view.centerXAnchor).isActive = true
// 단일 제약조건 그룹을 생성하는 방법이 있긴함 이거쓰면 모두 active한 상태로 만듬
NSLayoutConstraint.activate([
nextButton.centerXAnchor.constraint(equalTo: view.centerXAnchor),
nextButton.centerYAnchor.constraint(equalTo: view.centerYAnchor),
nextButton.widthAnchor.constraint(equalToConstant: 200),
nextButton.heightAnchor.constraint(equalToConstant: 50)
])
}
// 다음 화면으로 이동하는 로직
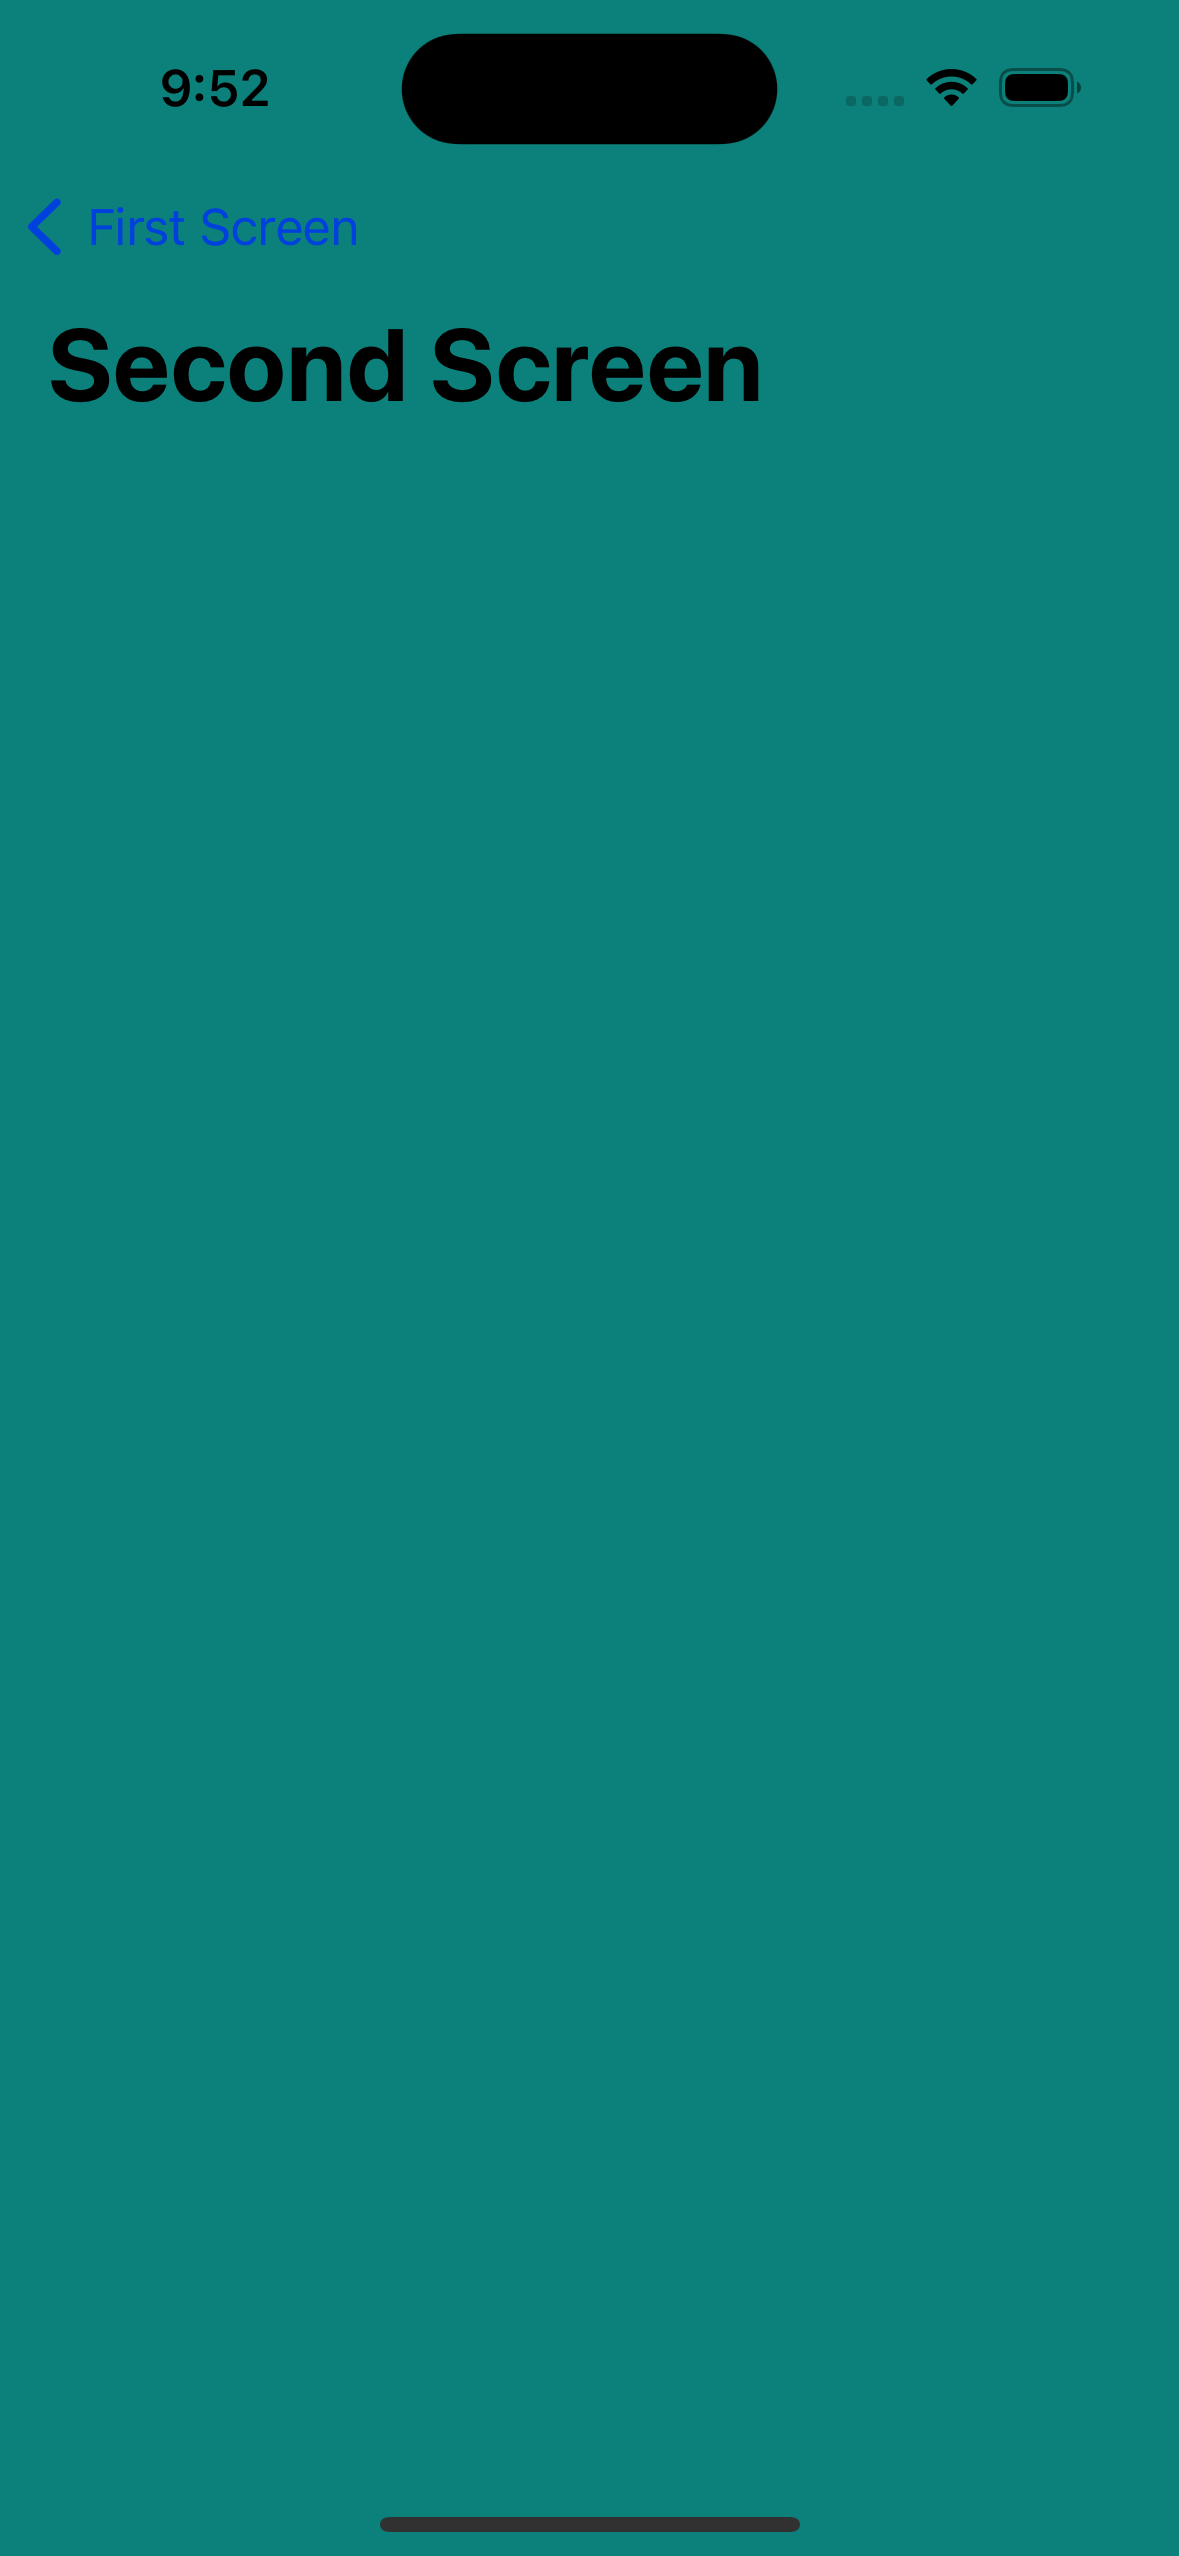
@objc func goToNextScreen() {
let nextScreen = SecondScreen()
nextScreen.title = "Second Screen"
navigationController?.pushViewController(nextScreen, animated: true)
}
}
개인적으로 UI를 구성하는 방식이 python에서 QT 작업을 할 때와 비슷하다는 생각이 들었다.
그럼에도 흠 .. 뭔가 만족스럽지 못했다. 우선 objc 를 꼭 사용해야만 하는지, 궁금해서 더 찾아보았다.
찾아보니 iOS14 + 부터 생긴 UIAction이라는 기능이 있었다. 해당 기능을 사용하면 버튼에 Action을 추가할 수 있는데 (UIAction을 만들 때 엄청 많은 프로퍼티가 있긴한데 나중에 더 알아봐야겠다.)
UIAction을 사용하면 @objc 메소드 대신 클로저 기반의 방식으로 이벤트 핸들링이 가능하다. action 로직을 더 직관적으로 작성할 수 있고, 코드의 유지 관리가 더 쉬워보인다.
현재 스위프트 개발 트렌드에 더 부합 해 보인다.
아래는 비교
nextButton.addTarget(self, action: #selector(goToNextScreen), for: .touchUpInside)let action = UIAction { [weak self] _ in
self?.goToNextScreen()
}
nextButton.addAction(action, for: .touchUpInside)UIAction의 클로저 내에서 [weak self]를 사용하는 것은 self(즉, 현재의 UIViewController 인스턴스)에 대한 강한 참조 순환을 방지하기 위함입니다. 이를 통해 메모리 누수를 방지할 수 있습니다.
결과