Glow-tts 코드 리뷰 1편
1. init.py
-
class FlowGenerator_DDI(models.FlowGenerator) : models.py 라이브러리에서 import한 모듈, init 부분을 상속 받아 모델에 변수들을 넘겨주는 부분, models.py에 FlowGenerator_DDI 부분을 보면 torch.nn 모듈을 상속 받아 사용하는 것을 알 수 있음
getattr(hps.data,"add_blank",False): getattr(object, name) 형식으로 사용되는데, 뒤에 False의 경우 name이 존재하지 않을 경우, default를 False로 한다는 의미, 만약 add_blank가 hps.data안에 존재하지 않을 경우, AttributeError가 발생하게 됨. 이를 방지하기 위해서 False를 default로 settingoptimizer_g = commons.Adam(): common.py의 Adam optimizer를 사용generator.parameters():scheduler = hps.train.scheduler← noam 사용!- linear한 warm up 후 inverse square root를 취하여 업데이트 하는 방식
- 'Attention is all you need" 논문에서 transformer 업데이트에 사용한 Lr Scheduler
dim_model=hps.model.hidden_channelswarmup_steps=hps.train.warmup_stepslr=hps.train.learning_ratebetas=hps.train.betaseps=hps.train.eps
-
main() :
-
utils.get_hparams(): python parser들 가져오는 모듈 -
utils.get_logger(): model_dir에 log를 찍는 모듈 -
logger.info(hps): print 찍는 부분 -
TextMelLoader(hps.data.training_files, hps.data): torch.utils.data.Dataset 모듈을 사용→ Tacotron2의 data_utils.py에서 갖고 옴
-
torch.utils.data.Dataset(class TextMelLoader) :
-
Dataset
__init__: 객체 생성 및 초기화__len__: 데이터셋의 샘플 개수를 반환__getitem__(self, idx): 주어진 인덱스에 해당하는 샘플을 데이터셋에 불러옴
-
DataLoader
- DataLoader에 데이터셋을 불러온 뒤에는 필요에 따라 데이터셋을 순회함
shuffle=True: 모든 batch를 순회한 뒤 데이터가 섞임drop_last=True: 데이터셋을 batch size로 나눴을 때 last를 학습에 사용하지 않음collate_fn:- map-style 데이터셋에서 sample list를 batch 단위로 바꾸기 위해서 많이 필요한 기능, zero-padding이나 Variable Size 데이터 등 데이터 사이즈를 맞추기 위해서 많이 사용됨.
- glow-tts 안에서는 zero-padding을 위해서 사용됨.
- automatic batching disabled : 데이터셋에서 batch단위로 샘플이 호출될 때 Dataloader에서 사용 → Numpy 배열을 Pytorch tensors로 변환해 줌
- automatic batching enabled : 파이토치 automatic batch 관련 링크
- single-process data loading / multi-process data loading :
- single-process data loading(default) : resource(s)가 dataset을 공유해서 사용하고 있을 때 == 전체 dataset이 작아서 memory에 적재 가능한 경우
- dataset을 main process에서 불러옴(dataset을 불러올 때 CPU와 GPU 사이에서 많은 교류가 일어나면 오히려 병목이 생김. trade-off관계)
- single-process의 경우 error tracing 및 debugging이 편함
- multi-process data loading :
num_workers개수에 따라 loader worker processes를 갖게됨(memory usage = num_workers * size of parent process) subprocess 개수(=적절한 CPU 코어 개수를 할당) DataLoader num_workers에 대한 고찰
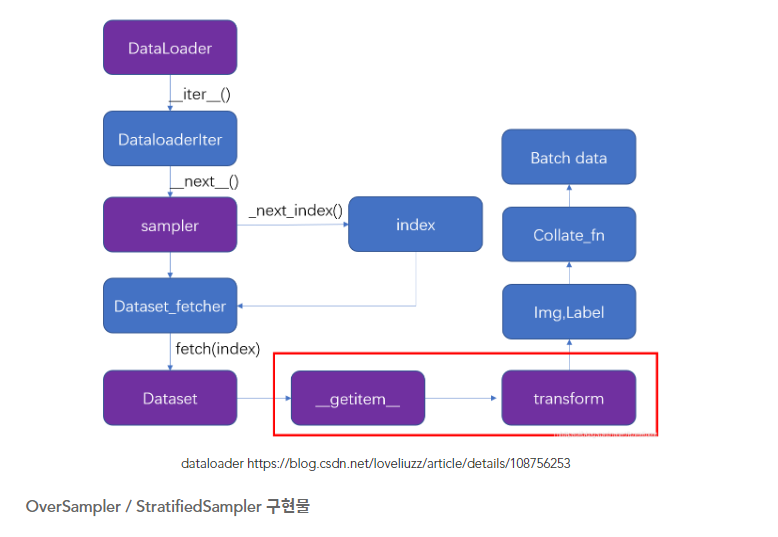
위 이미지와 DistributedSampler와는 약간의 차이가 있음
pin_memory=True- It is generally not recommended to return CUDA tensors in multi-process loading because of many subtleties in using CUDA and sharing CUDA tensors in multiprocessing (see CUDA in multiprocessing). Instead, we recommend using automatic memory pinning (i.e., setting
pin_memory=True), which enables fast data transfer to CUDA-enabled GPUs. - True → Tensor를 CUDA 고정 메모리에 올림.
- It is generally not recommended to return CUDA tensors in multi-process loading because of many subtleties in using CUDA and sharing CUDA tensors in multiprocessing (see CUDA in multiprocessing). Instead, we recommend using automatic memory pinning (i.e., setting
블로그 정리 잘 되어 있는 글
torch.utils.data - PyTorch 1.11.0 documentation
-
-
class TextMelCollate
- input text token과 mel 가장 길이가 긴 것으로 sorting하고 zero padding하는 class
- torch.LongTensor : 64-bit Integer
-
generator.train()
x: text sequence를 tokenizing한 후, max sequence length에 길이를 맞춰 tokenizing한 torch tensor 값, batch size 개수만큼 iteration별로 나눠서 담김, sorting 되어 있음.x.length: text sequence의 sequence 길이y: audio 파일을 mel로 converting 한 값, 즉 numpy 형태로 [196,80,140]과 같은 꼴로 담김- 196 : batch size 개수만큼 mel을 1개의 iteration에 사용하게 됨
- 80 : mel size
- 140 : mel 개수
y.length: mel 개수의 최댓값들을 sorting 해 놓은 tensor 값
※
generator.train()의 의미(generator ← torch.nn에서 상속됨)
-
-
2. train.py
-
main()
-
os.environ['MASTER_ADDR'] = 'localhost'- os 라이브러리에서 환경 변수 관련 세팅을 할 수 있음
-
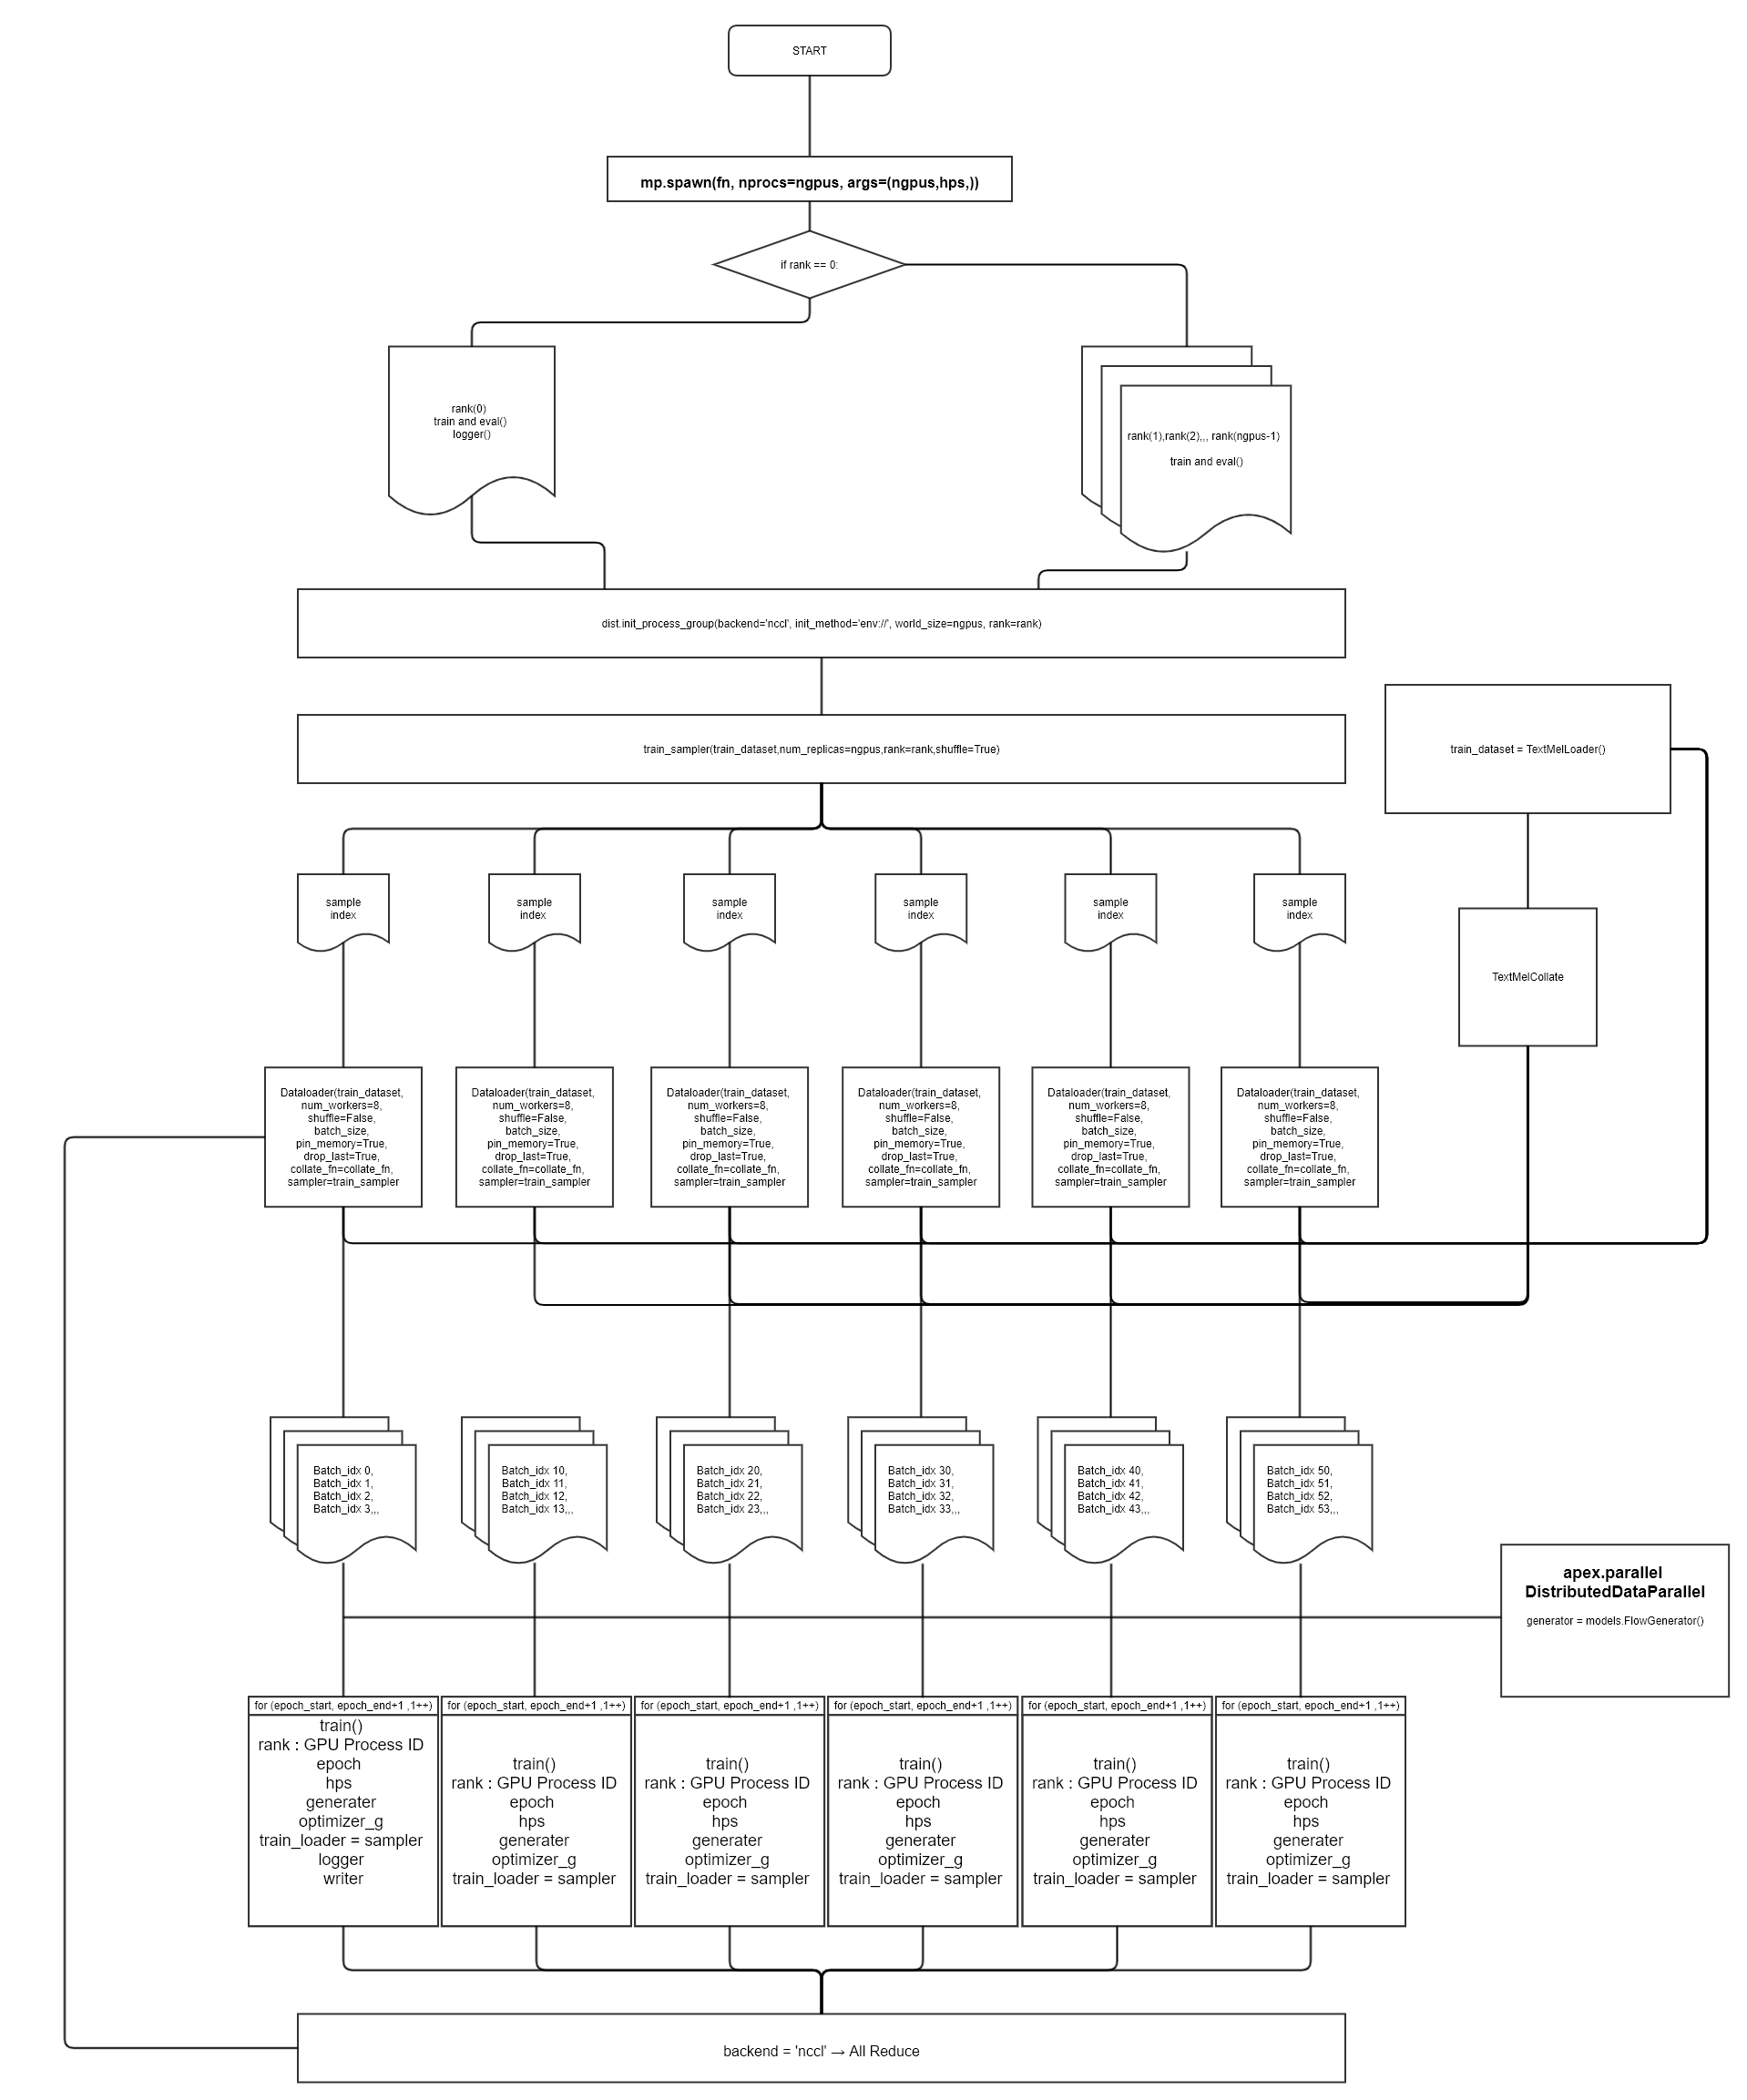
mp.spawn(train_and_eval, nprocs=n_gpus, args=(n_gpus, hps,))
- torch.multiprocessing 관련 모듈
- subprocesses를 생성하는 모듈,
- spawn(fn, args=(), nprocs=1, join=True, daemon=False, start_method='spawn')
- spawn 정의 :
”The parent process starts a fresh python interpreter process. The child process will only inherit those resources necessary to run the process objects run() method. In particular, unnecessary file descriptors and handles from the parent process will not be inherited. Starting a process using this method is rather slow compared to using fork or forkserver.”
- fn : 진입점
- args=() : fn에서 사용할 변수
- nprocs : 생성할 프로세스 개수
- join=True : 프로세스들이 blocking join하도록 함, blocking join의 경우 자신의 process를 exit(종료)하기 전에 wait(대기)하고 join시킴
- daemon=False : parent process가 종료되어도 child process가 종료되지 않음. parent process는 자신의 process가 마지막으로 exit되기 전에 child process에 join을 하면서 child process의 종료를 기다림
Multiprocessing package torch.multiprocessing - PyTorch 1.11.0 documentation
Python Multiprocessing 가이드
블로킹/논블로킹, 동기/비동기 I/O란?c. train_and_eval(rank, n_gpus, hps)
-
학습과 추론을 진행하는 함수
-
rank : Data Distributed Parallel에서 가동되는 process ID
-
디버깅 결과, GPU process ID가 찍힘(gpu 6장 사용 시, 0,1,2,3,4,5)
-
Global Rank : 전체 node에 가동되는 process ID
-
Local Rank : 각 node별 process ID / node 내 process local rank
-
cf) node : 분산 처리에서 GPU가 달려 있는 machine
- ex, 컴퓨터가 한 대 이면 node 0
- ex, 컴퓨터가 두 대 이면 node 0,1
-
-
logger = utils.get_logger(hps.model_dir): python의 logging 라이브러리 활용 -
utils.check_git_hash(hps.model_dir): git_hash function을 확인해보면,subprocess.getoutput을 활용하여 subprocess들의 stdout과 stderr를 반환하는 것을 알 수 있다. -
writer = SummaryWriter(log_dir=hps.model_dir)
writer_eval = SummaryWriter(log_dir=os.path.join(hps.model_dir, "eval"))
- Tensorboard 활용해서 model 학습 및 추론 정보 시각화할 수 있는 모듈
torch.utils.tensorboard - PyTorch 1.11.0 documentation
-
dist.init_process_group(backend='nccl', init_method='env://', world_size=n_gpus, rank=rank)
-
backend='nccl'-
분산 처리에서 backend 란, cuda,cudnn,mkl(math kernel library),mkldnn,openMP(open Multi-processing)에 function을 사용할 수 있도록 도와줌
-
여러 개의 gpu에서 학습을 진행하기 때문에 각각의 gpu에서 연산된 결과가 있을 것이고 그 결과들을 통합하여 gradient를 구해야 하기 때문에 backend가 사용됨.
-
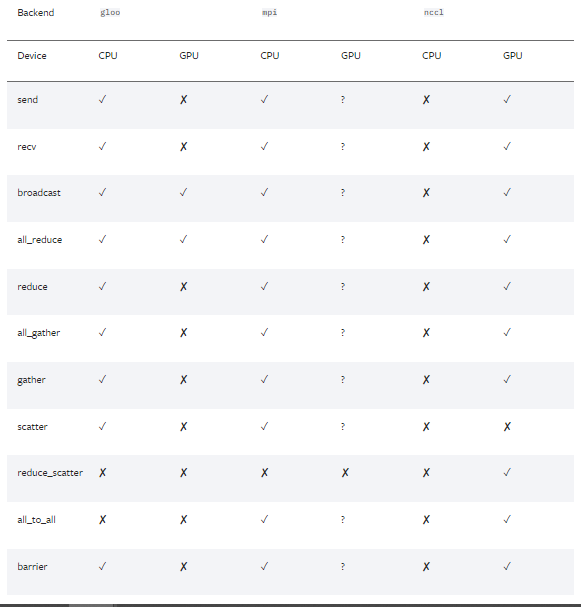
torch backend의 경우 크게 3가지 종류가 있다.
-
gloo : 분산 CPU Traing 시 주로 사용
-
NCCL : 분산 GPU Training 시 주로 사용
“NCCL 백엔드는 CUDA Tensor들에 대한 집합 연산의 최적화된 구현체를 제공”
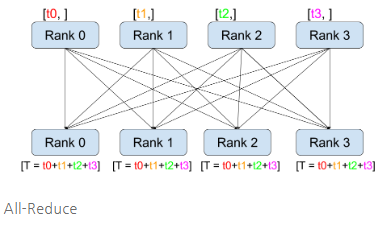
“GPU간 통신을 통해서 gradient 계산 및 업데이트 하는 방법론 中 1가지”
-
MPI : 고성능 컴퓨팅 시 사용
-
-
-
-
init_method='env://': 분산 처리하는 프로세스 그룹의 URL을 specifying 하여 initalize 함. 공유 파일 시스템에 대한 경로 정보 및 TCP 통신을 위한 프로세스 연결 교환 정보를 지정할 수 있음. default 는init_method='env://'※ 참고 자료
Distributed communication package - torch.distributed - PyTorch 1.11.0 documentation
-
-
torch.manual_seed(hps.train.seed): random number를 seed로 설정하고 torch.Generator 객체를 반환 -
torch.cuda.set_device(rank): rank(GPU Process ID)로 cuda setting -
train_dataset = TextMelLoader(hps.data.training_files, hps.data): 참고! -
train_sampler = torch.utils.data.distributed.DistributedSampler( train_dataset, num_replicas=n_gpus, rank=rank, shuffle=True)
“DistributedSampler 모듈은 torch.nn.parallel.DistributedDataParallel 모듈과 함께 사용하면 좋음. Dataset의 subset을 sampler로 load할 때, exclusive하게 sample을 추출하게 됨”
- num_replicas : world_size == ngpus
generator = models.FlowGenerator()참고!if hps.train.fp16_run:fp16을 사용하는 이유! (부동소수점을 생각해보자)amp.initialize(generator, optimizer_g._optim, opt_level="O1")“Amp(automatic mixed precision), 처리 속도를 높이기 위한 FP16연산과 정확도 유지를 위한 FP32 연산을 섞어 학습하는 방법” [NVIDIA APEX] Amp에 대해 알아보자 (Automatic Mixed Precision) “Apex DistributedDataParallel”generator = DDP(generator)apex.parallel - Apex 0.1.0 documentation [PYTORCH] DistributedDataParallel이란? - Nvidia APEX로 구현하기
-
-
train(rank, epoch, hps, generator, optimizer_g, train_loader, logger, writer)
-
train_loader.sampler.set_epoch(epoch): torch.utils.data.distributed.DistributedSampler에서 추출한 sample을 사용 -
batch_idx = batch 개수 == ( len(train_loader) ÷ world_size(ngpus) ÷ batch_size )
⇒ ex 1) 12,000 ÷ 6 ÷ 196 = 10.2 ⇒ batch_idx = [0,1,2,3,4,5,6,7,8,9]
⇒ ex 2) train_data : 12000, gpu : 1, batch_size : 16 인 경우,
-
batch_idx = 12000 ÷ 1 ÷ 16 = 750

x : text token, x_length : len(x[i]) for i in range(batch_size) / x.shape : torch.size([batch_size,max(x[i])])
y : mel / y_length : len(y[i]) for i in range(batch_size) / y.shape : torch.size([batch_size,mel_size,max(y[i])) ; y[i] = mel개수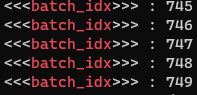
0번부터 749번까지 for문
⇒ batch_idx가 0일 때,
(y_gen, **), ** = generator.module(x[:1], x_lengths[:1], gen=True)실행
-
-
3. glow-tts 순서도
- train.py 기준으로 flow 작성
-
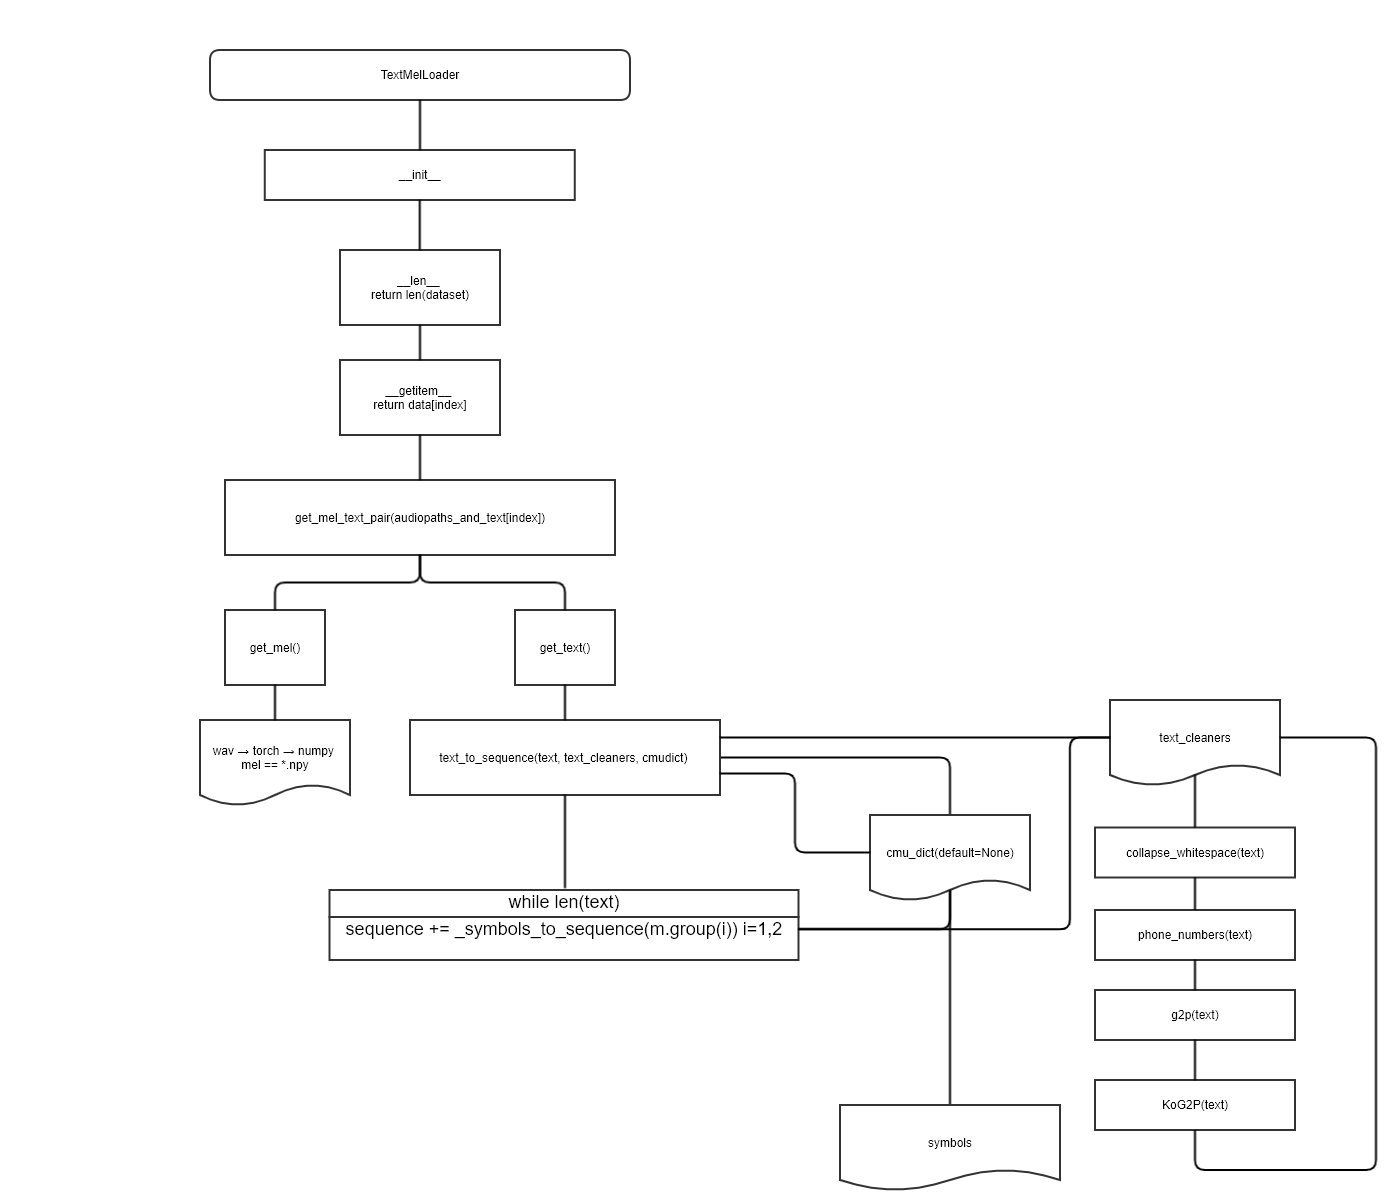
TextMelLoader 텍스트 전처리 과정
- torch.utils.data.Dataset 상속