pyaudio 사용
사실 Kaldi의 portaudio를 사용하려고 하였다.
하지만 Kaldi의 경우, C코드이기때문에, portaudio가 Python으로 wrapping되어있는 pyaudio를 사용해보려고한다.
Kaldi portaudio
PyAudio
간단한 설치 방법은,
sudo apt-get install portaudio19-dev
pip3 install pyaudio
최소한 python 3.8이상 환경에서 사용하는 것이 중요하다.
PyAudio 활용하여 재생
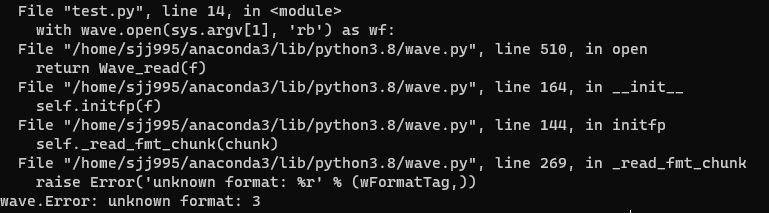
이후, 레퍼런스에 존재하는 기본 재생 모듈을 사용해보려고 하면, 아래와 같은 오류가 발생한다.
"""PyAudio Example: Play a wave file."""

import wave
import sys

import pyaudio

CHUNK = 1024

if len(sys.argv) < 2:
    print(f'Plays a wave file. Usage: {sys.argv[0]} filename.wav')
    sys.exit(-1)

with wave.open(sys.argv[1], 'rb') as wf:
    # Instantiate PyAudio and initialize PortAudio system resources (1)
    p = pyaudio.PyAudio()

    # Open stream (2)
    stream = p.open(format=p.get_format_from_width(wf.getsampwidth()),
                    channels=wf.getnchannels(),
                    rate=wf.getframerate(),
                    output=True)

    # Play samples from the wave file (3)
    while len(data := wf.readframes(CHUNK)):  # Requires Python 3.8+ for :=
        stream.write(data)

    # Close stream (4)
    stream.close()

    # Release PortAudio system resources (5)
    p.terminate()
wav파일을 읽는데서 발생하는 오류이기 때문에, wave 형식에 맞게 바꿔주어야한다.
Wav 전처리 및 확인 모듈
-
sox && soxi
sudo apt install sox -
ffmpeg
sudo apt install ffmpeg
위의 오디오 관련 에러가 발생하는 이유는, 채널이 모노이기 때문이다. 따라서 스테레오로 바꿔준다면 정상적으로 작동한다.
ffmpeg -i sample.wav -ac 2 new_sample2.wav마이크 및 스피커 작동 테스트
혹시나, PyAudio가 정상적으로 작동하는지 확인하기 위해서는 컴퓨터의 마이크 및 스피커 디바이스가 정상적으로 작동하는지 테스트해줘야한다.
import pyaudio

audio = pyaudio.PyAudio()

for index in range(audio.get_device_count()):
    desc = audio.get_device_info_by_index(index)
    print("DEVICE: {device}, INDEX: {index}, RATE: {rate} ".format(
        device=desc["name"], index=index, rate=int(desc["defaultSampleRate"])))
마이크를 사용하여 녹음하고 저장하는 모듈
import pyaudio
import numpy as np
import wave

CHUNK = 1024
FORMAT = pyaudio.paInt16
CHANNELS = 2
RATE = 22050

p = pyaudio.PyAudio()

stream = p.open(format=FORMAT,
                channels=CHANNELS,
                rate=RATE,
                input=True,
                frames_per_buffer=CHUNK)

print('start recording')

frames = []
seconds = 3
for i in range(0,int(RATE / CHUNK * seconds)):
    data = stream.read(CHUNK)
    frames.append(data)

print('record stopped')

stream.stop_stream()
stream.close()
p.terminate()

wf = wave.open("output.wav",'wb')
wf.setnchannels(CHANNELS)
wf.setsampwidth(p.get_sample_size(FORMAT))
wf.setframerate(RATE)
wf.writeframes(b''.join(frames))
wf.close()
Google STT 스트리밍 입력에서 오디오를 텍스트로 변환
스트리밍 입력에서 오디오를 텍스트로 변환 | Cloud Speech-to-Text 문서 | Google Cloud
위의 구글 클라우드 Speech-to-Text를 활용하면 실시간으로 데이터를 Chunk단위로 보내는 것이 가능하다.
- Client
import time
import uuid
import requests
from requests.adapters import   HTTPAdapter,Retry
import json
import base64

from six.moves import queue
import pyaudio

POST_URL = "http://127.0.0.1/stt"
FORMAT = pyaudio.paInt16
CHANNELS = 1
RATE = 22050
CHUNK = int(RATE / 1) #100ms 단위로 전송
TIME = 10

class MicRecord(object):
    """Opens a recording stream as a generator yielding the audio chunks."""
    def __init__(self,rate,chunk,channels,pyaudio_format):
        self._rate = rate
        self._chunk = chunk
        self._channels = channels
        self._pyaudio_format = pyaudio_format

        # 마이크 입력 버퍼 생성
        self._buff = queue.Queue()
        self.closed = True

    def __enter__(self):
        self.audio_interface = pyaudio.PyAudio()
        self.audio_stream = self.audio_interface.open(format=self._pyaudio_format,
                        channels=self._channels,
                        rate=self._rate,
                        input=True,
                        frames_per_buffer=self._chunk,
                        # Run the audio stream asynchronously to fill the buffer object.
                        # This is necessary so that the input device's buffer doesn't
                        # overflow while the calling thread makes network requests, etc.
                        stream_callback=self._fill_buffer)
        self.closed = False
        return self

    def __exit__(self,type,value,traceback):
        self.audio_stream.stop_stream()
        self.audio_stream.close()

        self.closed = True
        # Signal the generator to terminate so that the client's
        # streaming_recognize method will not block the process termination.
        self._buff.put(None)
        self.audio_interface.terminate()

    def _fill_buffer(self,in_data,frame_count,time_info,status_flags):
        """Continuously collect data from the audio stream, into the buffer."""
        self._buff.put(in_data)
        return None, pyaudio.paContinue

    def generator(self):
        # Use a blocking get() to ensure there's at least one chunk of
        # data, and stop iteration if the chunk is None, indicating the
        # end of the audio stream.
        while not self.closed:
            chunk = self._buff.get()
            if chunk is None:
                return

            data = [chunk]

            # Now consume whatever other data's still buffered.
            while True:
                try:
                    chunk = self._buff.get(block=False)
                    if chunk is None:
                        return
                    data.append(chunk)
                except queue.Empty:
                    break

            yield b''.join(data)

def send_data(sid,chunk):
    session = requests.Session()
    retry = Retry(connect=3,backoff_factor=0.5)
    adapter = HTTPAdapter(max_retries=retry)
    session.mount('http://',adapter=adapter)
    session.mount('https://',adapter=adapter)

    headers = {'Content-Type':'application/json'}
    post_data = {"id":sid,"stream":chunk}
    print(post_data)
    # post_data = {"id":'name',"stream":'test'}

    response = session.post(POST_URL,headers=headers,json=post_data,verify=False)


    return response


def main():
    sid = str(uuid.uuid1())
    with MicRecord(RATE,CHUNK,CHANNELS,FORMAT) as stream:
        audio_generator = stream.generator()
        for i in range(10):
            for x in audio_generator:
                post_data = base64.b64encode(x)
                response_text = send_data(sid,str(post_data))
                print(response_text)
            # TODO async delay를 걸어야될지
            time.sleep(0.001)

if __name__ == "__main__":
main()- Server
from flask import Flask,request,jsonify
import json

app = Flask(__name__)

@app.route('/')
def home():
    return 'hello world'

@app.route("/stt",methods=['POST'])
def stream():
    if request.method == 'POST':
        content_type = request.headers.get('Content-Type')
        if content_type == 'application/json':
            request_json = request.json
            return 'ok'
        else:
            return 'sth error'

if __name__ == "__main__":
    app.run(debug=True,host='0.0.0.0',port=5000,use_reloader=False)
간단한 클라이언트 개발 시, 발생한 issue
-
콜백함수 사용
- 구글 코드를 참고해보면 기본적으로
_fill_buffer라는 콜백함수를 이용한다. - 처음에 어느 부분에서 이 콜백 함수를 호출하는지 몰랐었다. API 명세서를 확인해보니, Pyaudio객체를
open할 때,stream_callback이라는 인자값으로 콜백함수를 활용한다. - 콜백함수의 역할은 버퍼에 Chunk단위로 들어오는 데이터를 담아준다. 또한, 리턴값으로
paContinueflag를 넘겨주어 steaming이 가능하도록 한다.
- 구글 코드를 참고해보면 기본적으로
-
제너레이터 활용
-
제너레이터는
yield와 같이 활용할 수 있다. iterator안에서yield키워드를 사용하는데, 키워드가 호출되면 암시적으로 return이 호출된다. -
일반적으로 제너레이터를 사용하는 이유는 메모리를 효율적으로 관리하기 위해서이다.
-
일반적인 함수의 경우, 사용이 종료되면 결과 값을 호출부로 반환한 뒤 함수 자체를 종료시킨 후에 메모리 상에서 정리된다.
-
하지만
yield의 경우, 함수가 실행 중에yield를 만났을 경우, 해당 함수는 그 상태로 정지되며, 반환값을 next()를 호출한 쪽으로 전달한다. 이후 해당 함수는 일반적인 경우처럼 종료되는 것이 아니라 그 상태로 유지되게 된다. 즉, 함수에서 사용된 로컬 변수나 데이터들이 메모리에 그대로 유지하게 되는 것이다.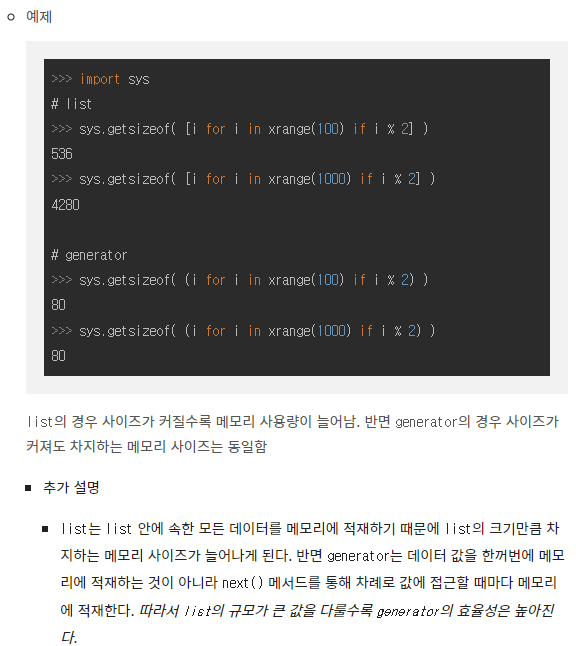
출처(참고 자료) : https://milhouse93.tistory.com/159
-
Lazy Evaluation 효과
- 계산 시, 순차적으로 계산 결과 값이 필요할 때까지 기다리고 다음 계산으로 넘어갈 수 있음.
-
-
구글 STT 및 스트리밍을 서비스로 하는 Task에서 제너레이터를 활용하면, 위 핵심적인 두 가지특징을 통해, 메모리를 효율적으로 관리하며, Lazy Evaluation의 장점을 취할 수 있을 것이라 생각된다.
-
Chunk 단위로 데이터를 쪼개서 보낼 때, 제너레이터는 핵심적인 역할을 수행한다.
-
-
Context Manager 활용 (feat. enter, exit …)
- Python은 간결하다는 장점이 있는데 이를 더 돋보이게 하는것이 Context Manger라고 생각한다.
enter의 경우, with절을 실행할 때, 호출되며, with절이 끝날 때,exit이 호출된다. 자세한 내용은 다음 링크를 참고하자.
출처(참고 자료) : https://wjunsea.tistory.com/110
-
https 및 http
- 처음에 request URL로 https를 활용하여, OpenSSL에러가 발생했다.
- 기본적으로 requests.Session()을 활용하여 보내는 것이 안전하다. 출처(참고 자료) : https://bobbyhadz.com/blog/python-requets-max-retries-exceeded-with-url
- 기본적으로 requests.Session()을 활용하여 보내는 것이 안전하다. 출처(참고 자료) : https://bobbyhadz.com/blog/python-requets-max-retries-exceeded-with-url
- 처음에 request URL로 https를 활용하여, OpenSSL에러가 발생했다.
-
바이트형식은 json안에 넣어서 request로 보낼 수 없다.
- string 형태로 형변환하여 보내자.
- 바이트 타입의 경우, traffic에서 많은 부분을 차지할 수 있다. 최소화하기 위해 base64모듈을 활용할 수 있다. 출처(참고 자료) : https://docs.python.org/ko/3.7/library/base64.html
- cf. uuid의 경우도 마찬가지이다. string으로 형변환하여 보내자.

안녕하세요. for i range(10)에서 10은 time 10을 의미하는건가요?