Introduction
In this post, I will take a step-by-step approach to configuring vSAN ESA to use RDMA in a home lab environment and validate the configuration.
This post will also cover network, NIC, and vSphere configuration for using RDMA with vSAN ESA.
Cluster Configuration
The cluster used for testing had the following configuration.
- ESXi Hosts: Huawei 1288H V5 / 2288H V5 (8 total)
- NIC: Mellanox ConnectX-4 100GbE Dual Port
- Switch: Arista DCS-7304 (w/ 4x 7320X-32C-LC)
- SSDs: Intel P4610 3.2 TB U.2 NVMe SSD (x16) / Micron 7300 MAX 3.2 TB U.2 NVMe SSD (x16) - one disk unavailable due to backplane failure
- vSphere: vSphere 8.0 U3b (Build 24280767)
And the cluster must meet the following requirements.
vSAN ESA configuration requirements
vSAN ESA Ready Node
Currently, vSAN ESA only officially supports systems that are certified as vSAN ESA Ready Node. You can enable ESA on non-Ready Node systems, but they are not officially supported by VMware. In the production environment, you should use ESA Ready Nodes.
10GbE or higher networks
To fully utilize the performance of vSAN ESA, you need a network bandwidth of 25 Gbps or more.
However, with the recent approval of the AF-0 ESA Ready Node configuration, it is now officially possible to configure ESA with 10GbE networks.
NIC Firmware Versions
Like vSAN OSA, vSAN ESA has a compatibility list for NIC firmware.
You can find the list of VCF/vSAN Ready Nodes in the Broadcom Compatibility Guide, along with the NICs supported by the system.
Note that the vSAN compatibility of a NIC is not OSA/ESA specific. It covers both use cases.
If your systems are not Ready Nodes, you can check if it supports vSAN over RDMA.
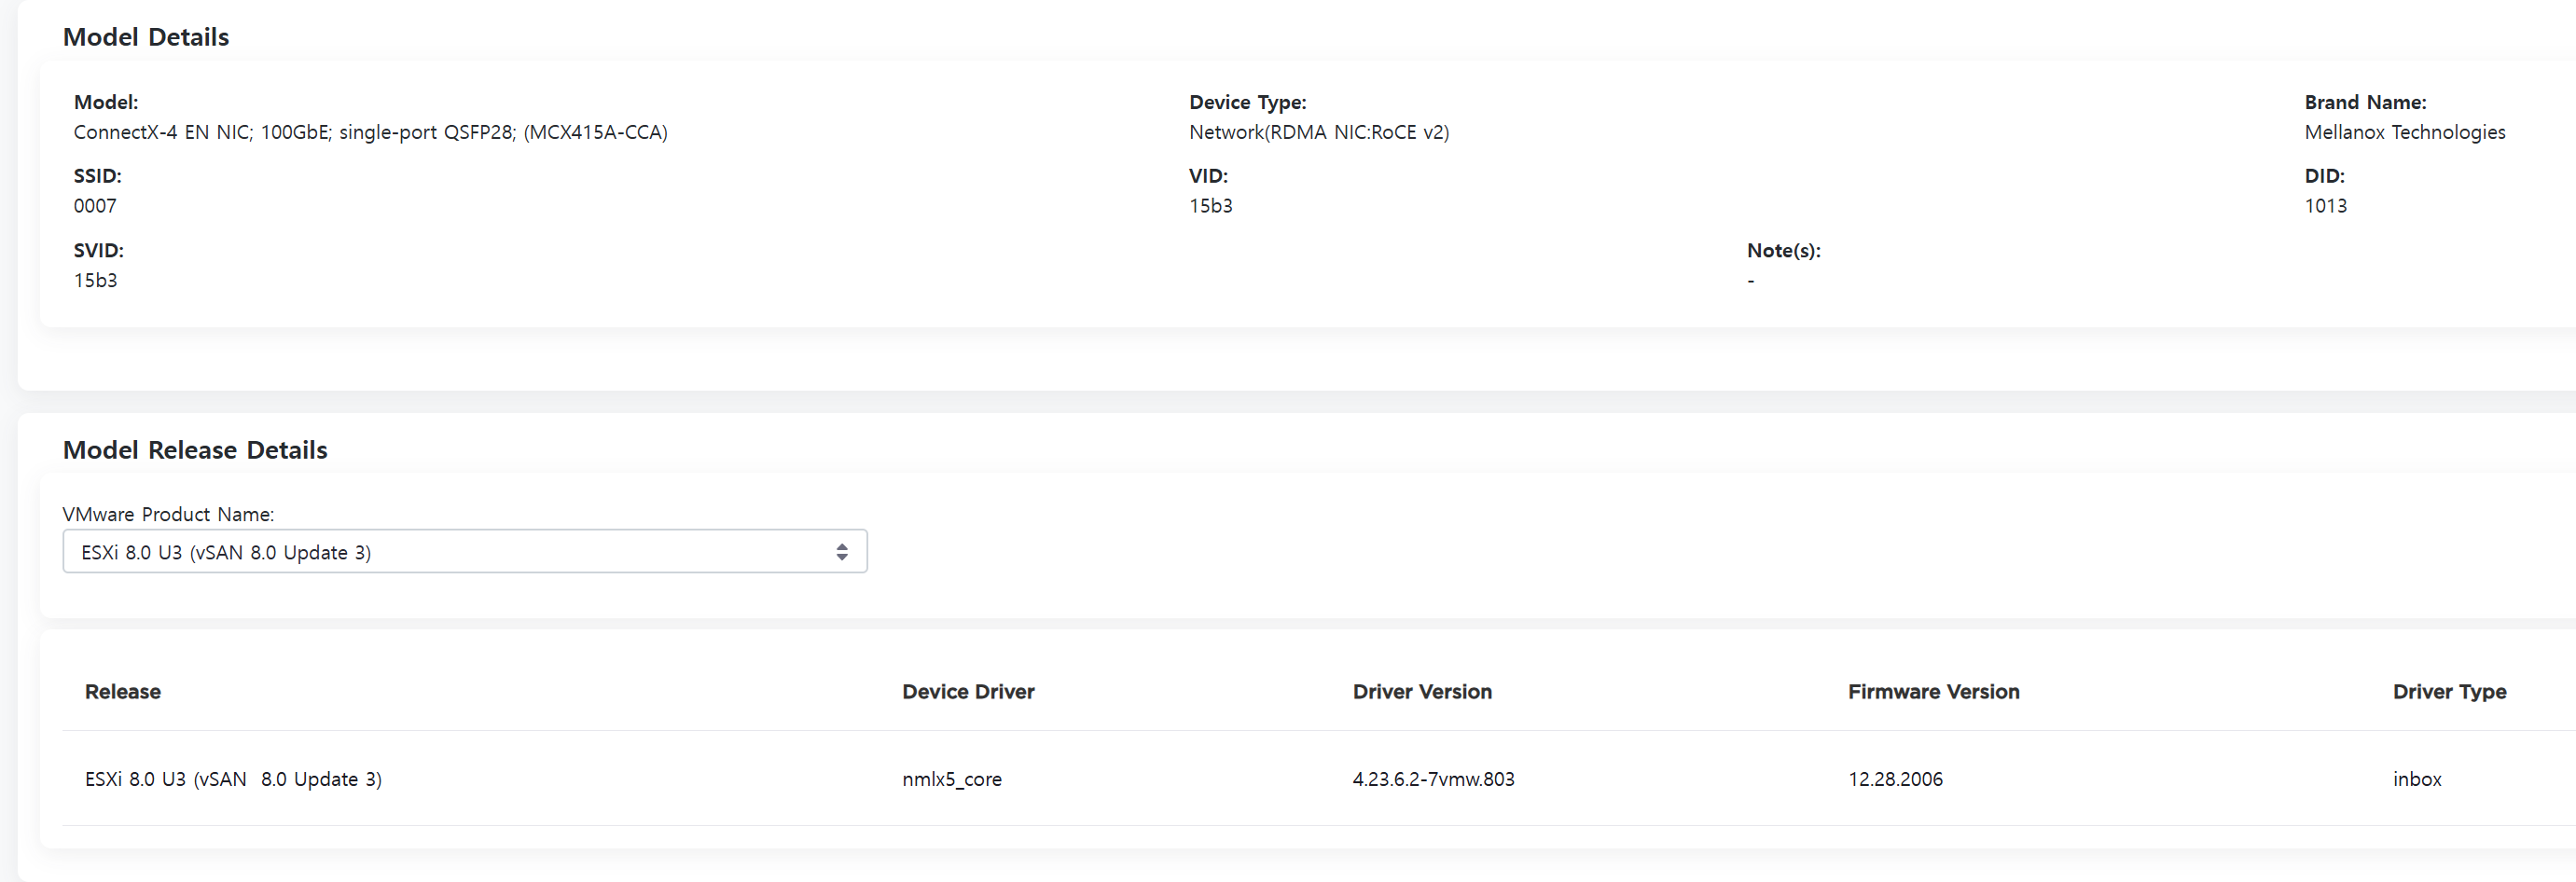
My ConnectX-4 EN NIC requires firmware version 12.28.2006, and you can check the current firmware version via the Mellanox MFT's mlxfwmanager.
RDMA Configuration Requirements
To enable the RDMA feature in vSAN ESA, the following components are required.
- RoCEv2 supported NIC
- DCBx/PFC supported Ethernet switch
Configuring vSAN ESA over RDMA
If your environment meets all the prerequisites, you can proceed to the actual configuration.
Switch Setup
First, configure RoCEv2 on the switch.
Enable LLDP
Since DCBx is based on LLDP, enable LLDP globally by running the lldp run command in config mode.
When LLDP is enabled, both TX/RX are allowed on all interfaces of the switch.
Use the show lldp command to check the LLDP configuration status on an interface-by-interface basis.
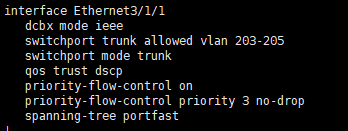
Configuring PFC
Configure Lossless Fabric using PFC.
# Config Mode

interface ethernet 3/1/1
dcbx mode ieee
qos trust dscp
priority-flow-control on
priority-flow-control priority 3 no-drop
An example of the interface configuration when the settings completed is shown below.
NIC Settings
DCBx/PFC settings must also be configured on the NIC.
There are three types of settings: those that need to be configured at the firmware level, those that need to be configured in both firmware and driver, and those that need to be configured in the driver.
Firmware settings
- DCBx enabled or not
- LLDP TX/RX enabled or not
- DCBx Operation mode (IEEE/CEE)
Firmware/Driver Settings
- PFC Lossless Class
Driver Settings
- DCBx Hardware/Software Mode
- PCP/DSCP (L2/L3 Trust) Mode Selection
Firmware Configuration Example
/opt/mellanox/bin/mlxconfig -d <Device_ID> set \
lldp_nb_dcbx_p1=1 lldp_nb_rx_mode_p1=2 lldp_nb_tx_mode_p1=2 dcbx_willing_p1=1 \
lldp_nb_dcbx_p2=1 lldp_nb_rx_mode_p2=2 lldp_nb_tx_mode_p2=2 dcbx_willing_p2=1 \
dcbx_ieee_p1=1 dcbx_cee_p1=0 dcbx_ieee_p2=1 dcbx_cee_p2=0 \
cnp_dscp_p1=26 cnp_dscp_p2=26 cnp_802p_pro_p1=3 cnp_802p_pro_p2=3
The above firmware configuration sets the PCP/DSCP Class used by the CNP of ECN to 3, enables LLDP/DCBx, and sets the DCBx operation mode to IEEE.
Example driver configuration
esxcli system module parameters set -m nmlx5_core -p “pfctx=0x08 pfcrx=0x08 trust_state=2 dcbx=1”
esxcli system module parameters set -m nmlx5_rdma -p “pcp_force=3 dscp_force=26”
The above driver parameter configuration configures the PFC Class for RDMA traffic to 3, and then allows the DCBx settings to follow the firmware configuration.
Last but not least, it enables PFC L3 Trust (DSCP) mode.
Finally, you need to reboot the host to apply the firmware and driver settings to ESXi.
Once the host has finished rebooting, you can check the current PFC configuration status of ESXi with the command esxcli network nic dcb status get.
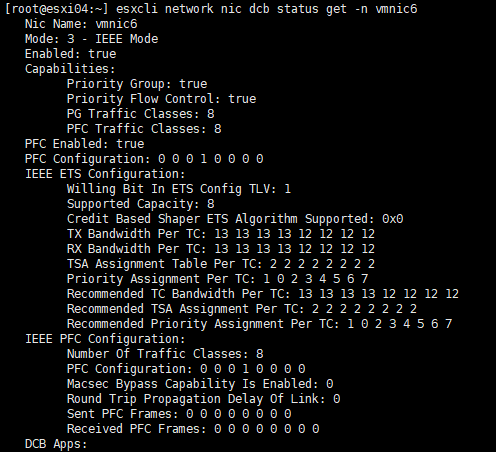
In an optimal configuration, ETS/ECN should be enabled, but that will be covered in a future article.
Configure vSAN ESA over RDMA
With the preparation complete, it is time to actually configure vSAN ESA.
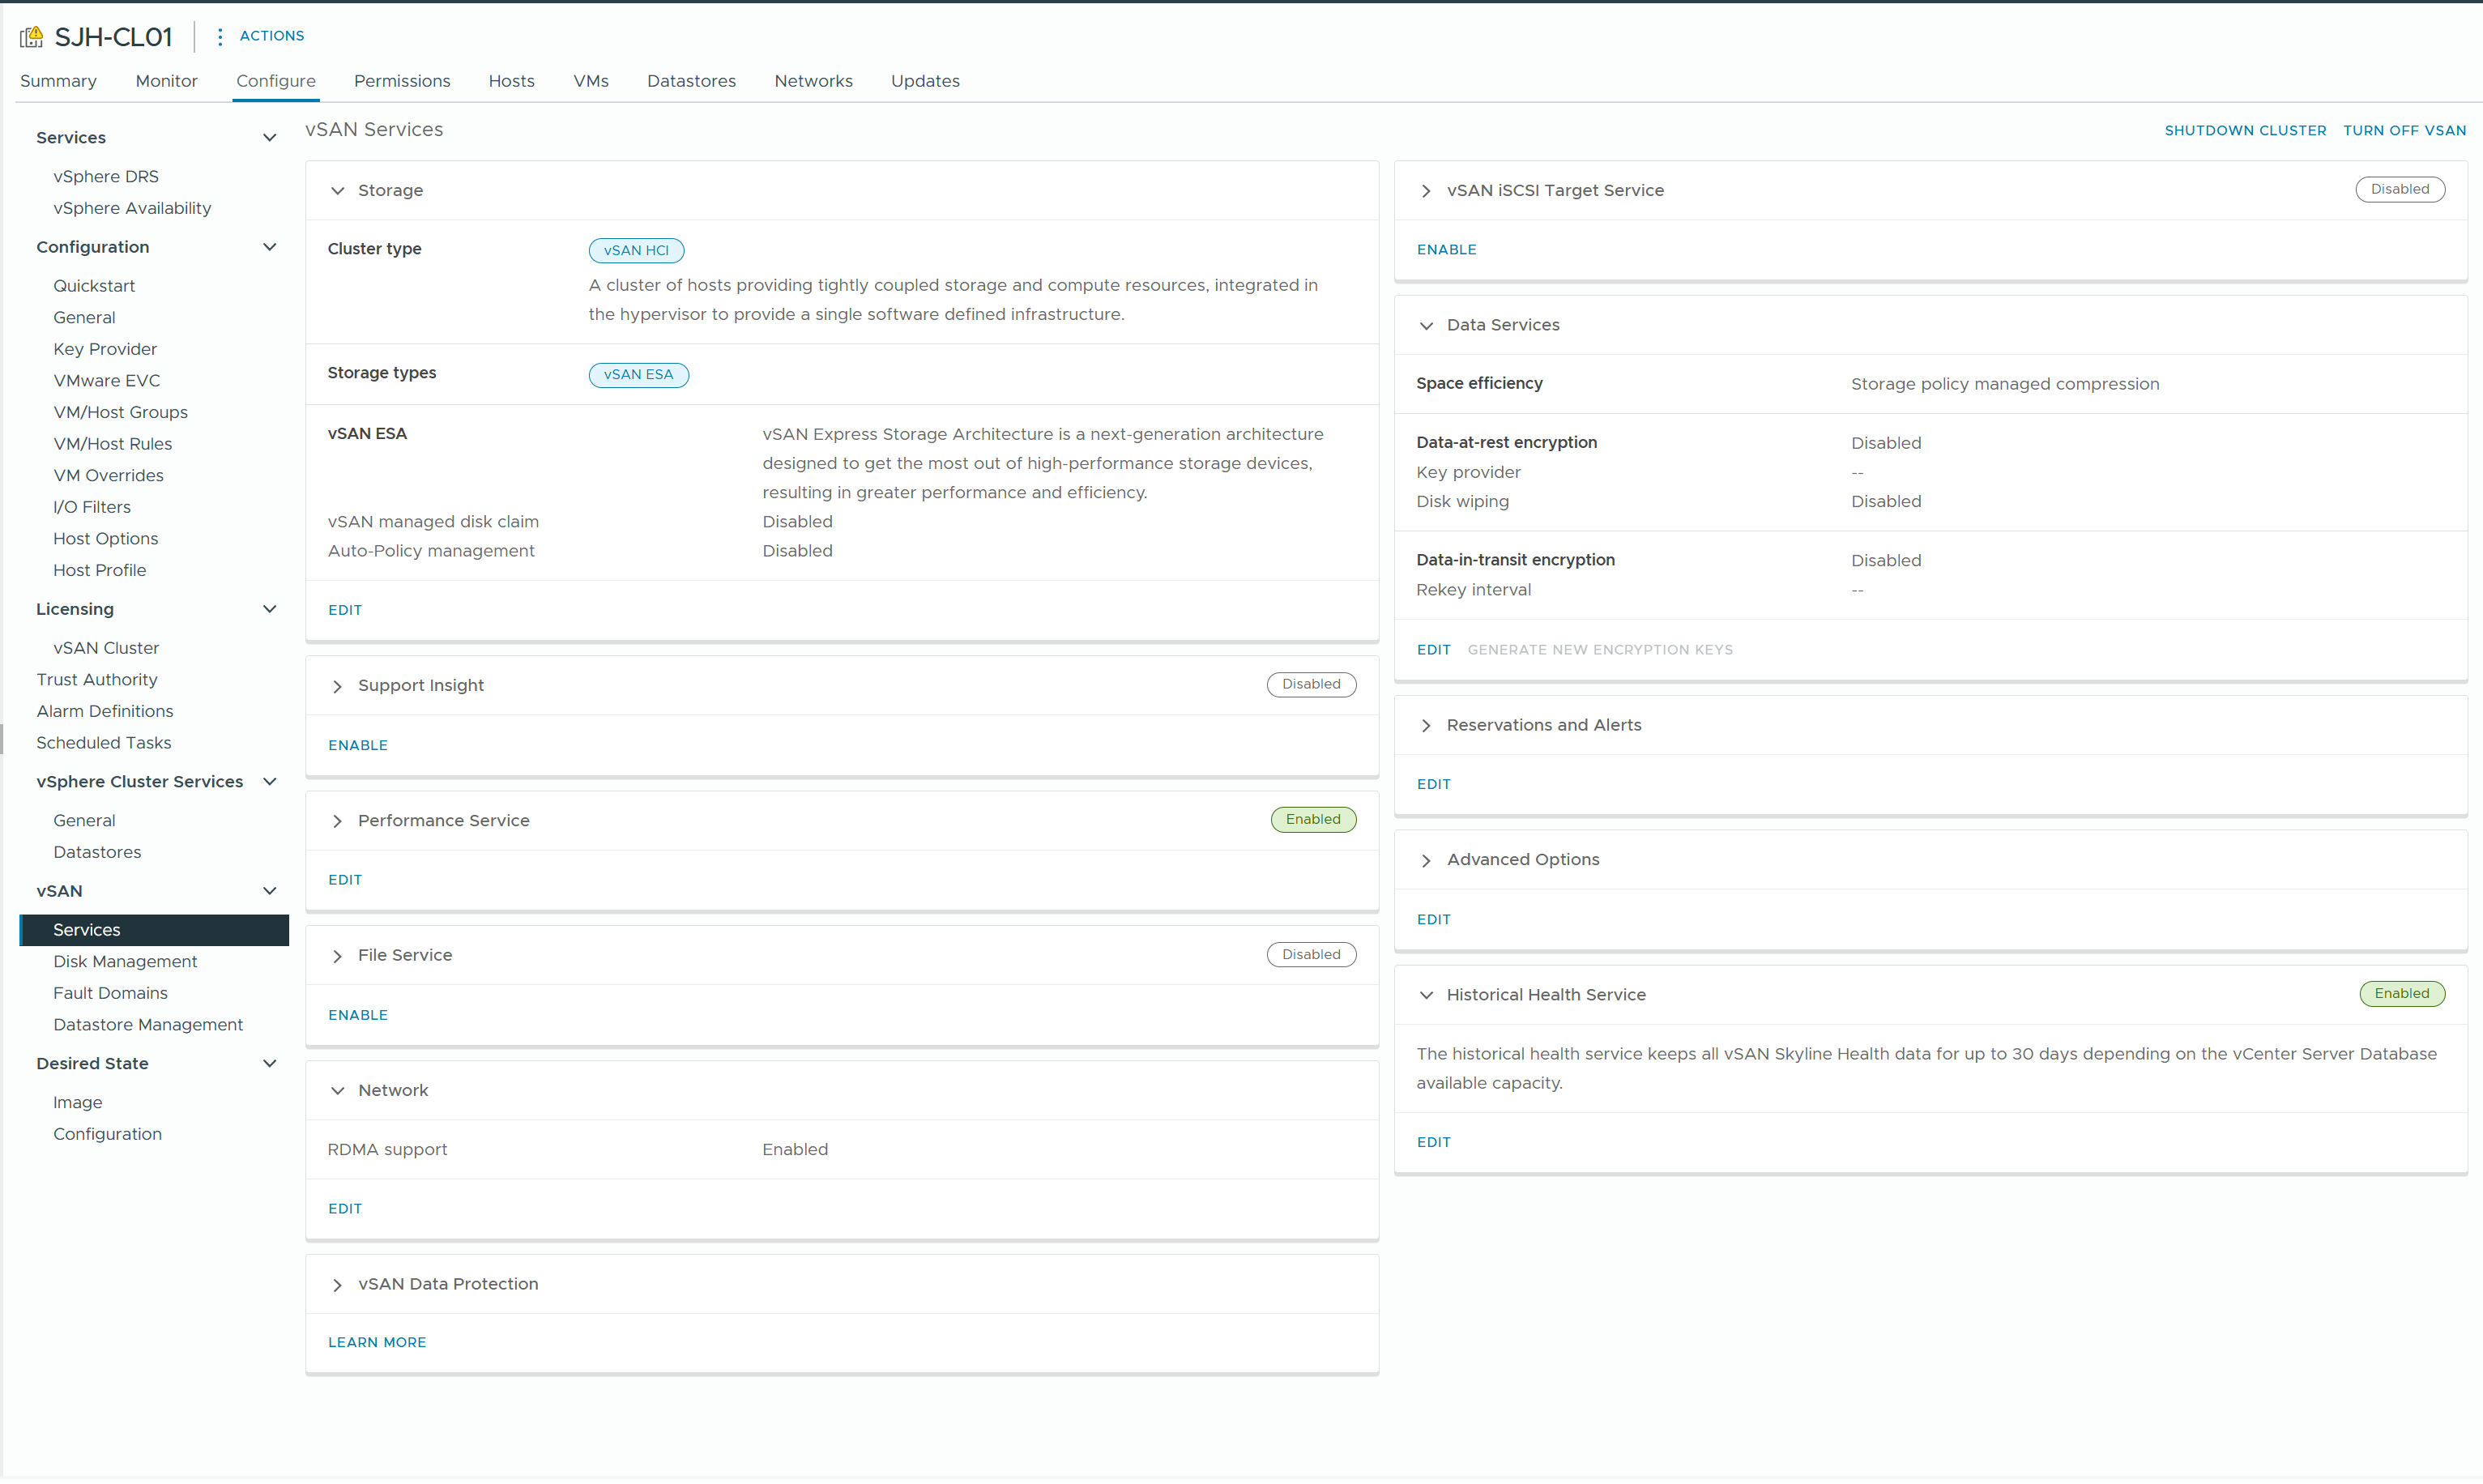
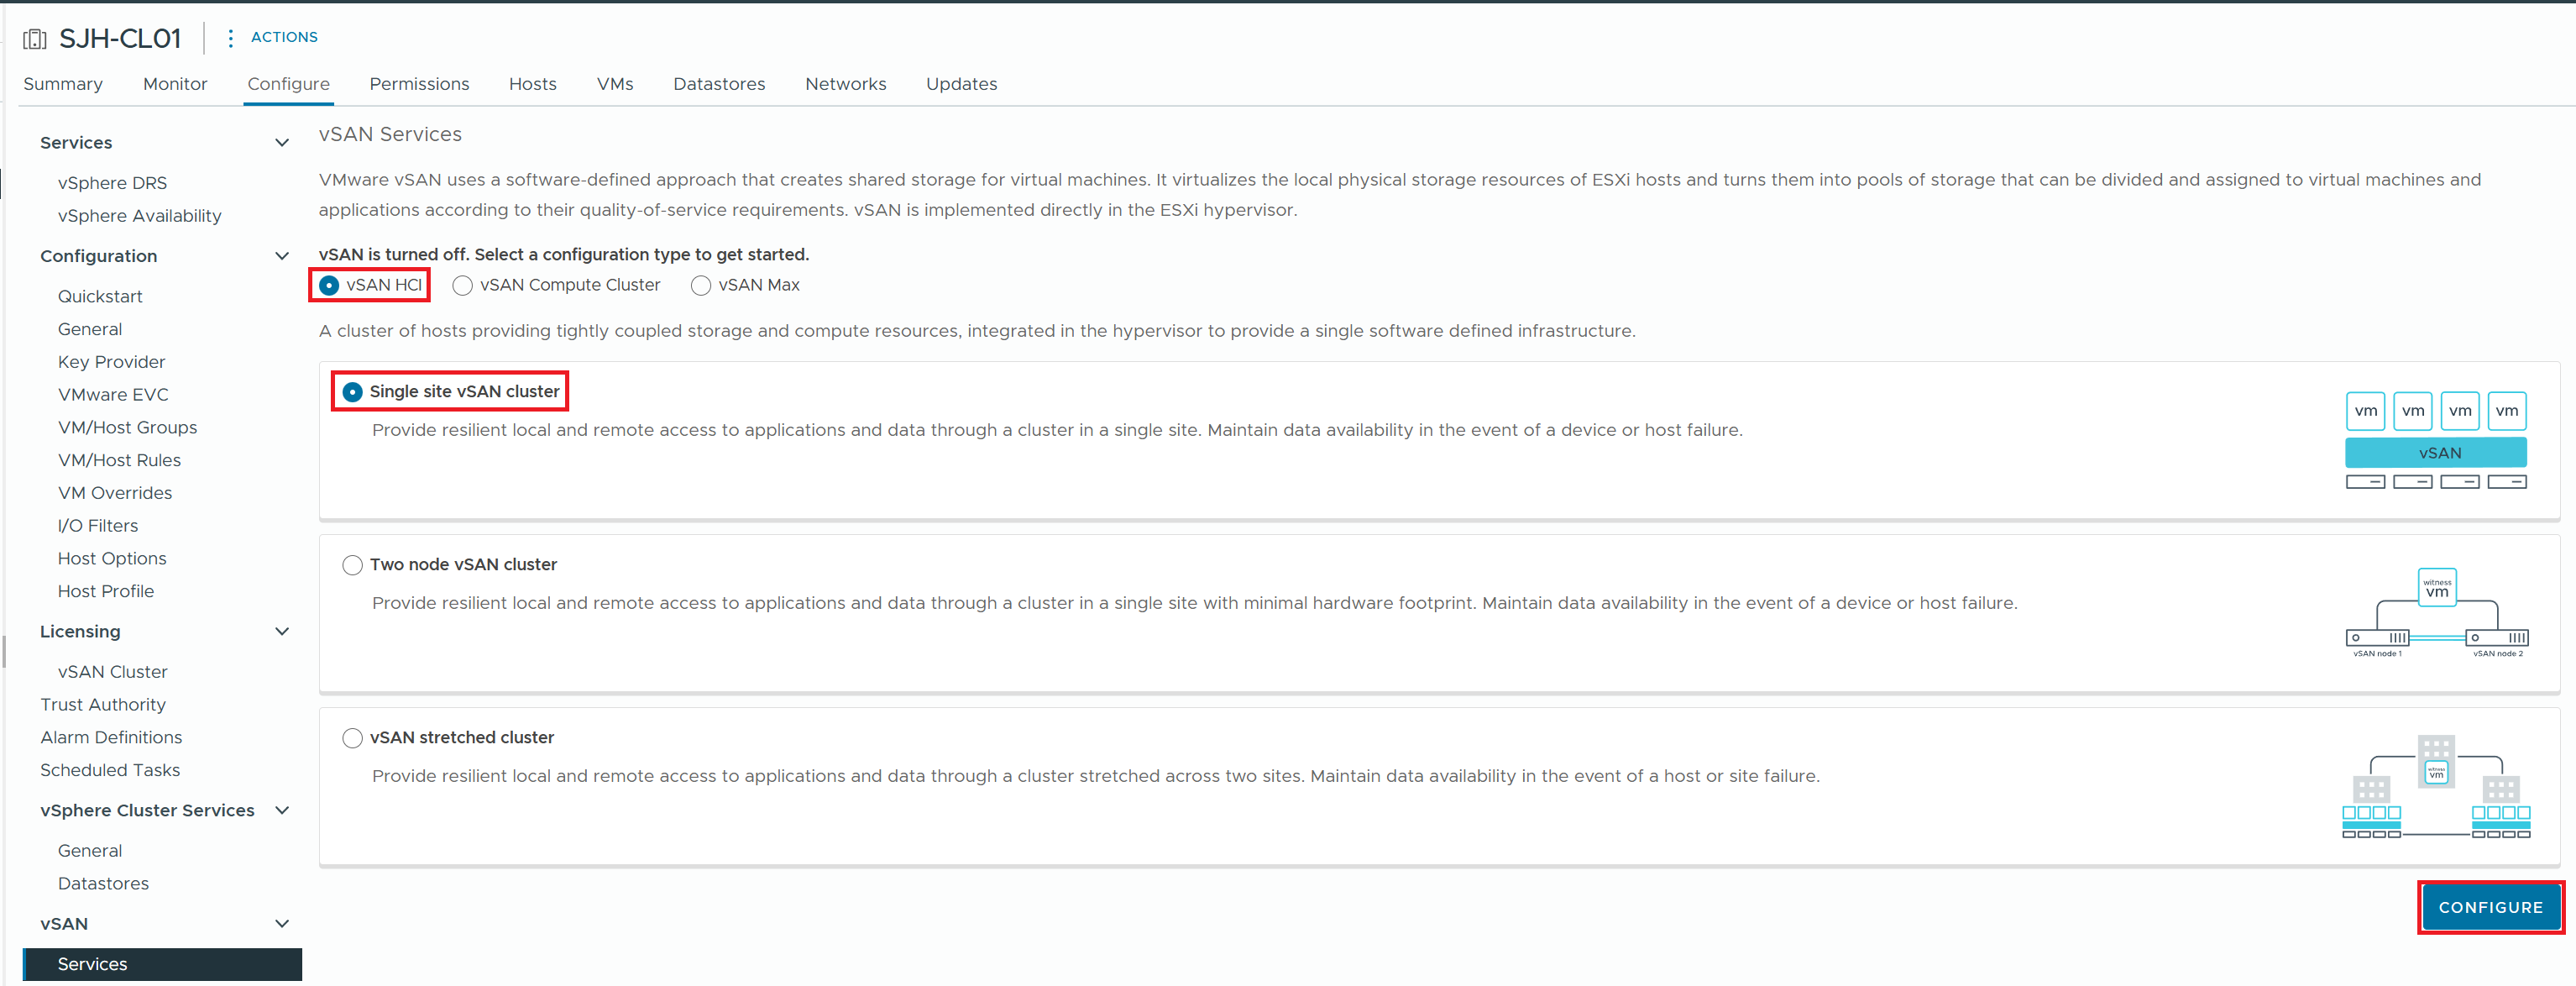
1) From the Cluster Configure > vSAN > Services menu, start the vSAN HCI configuration
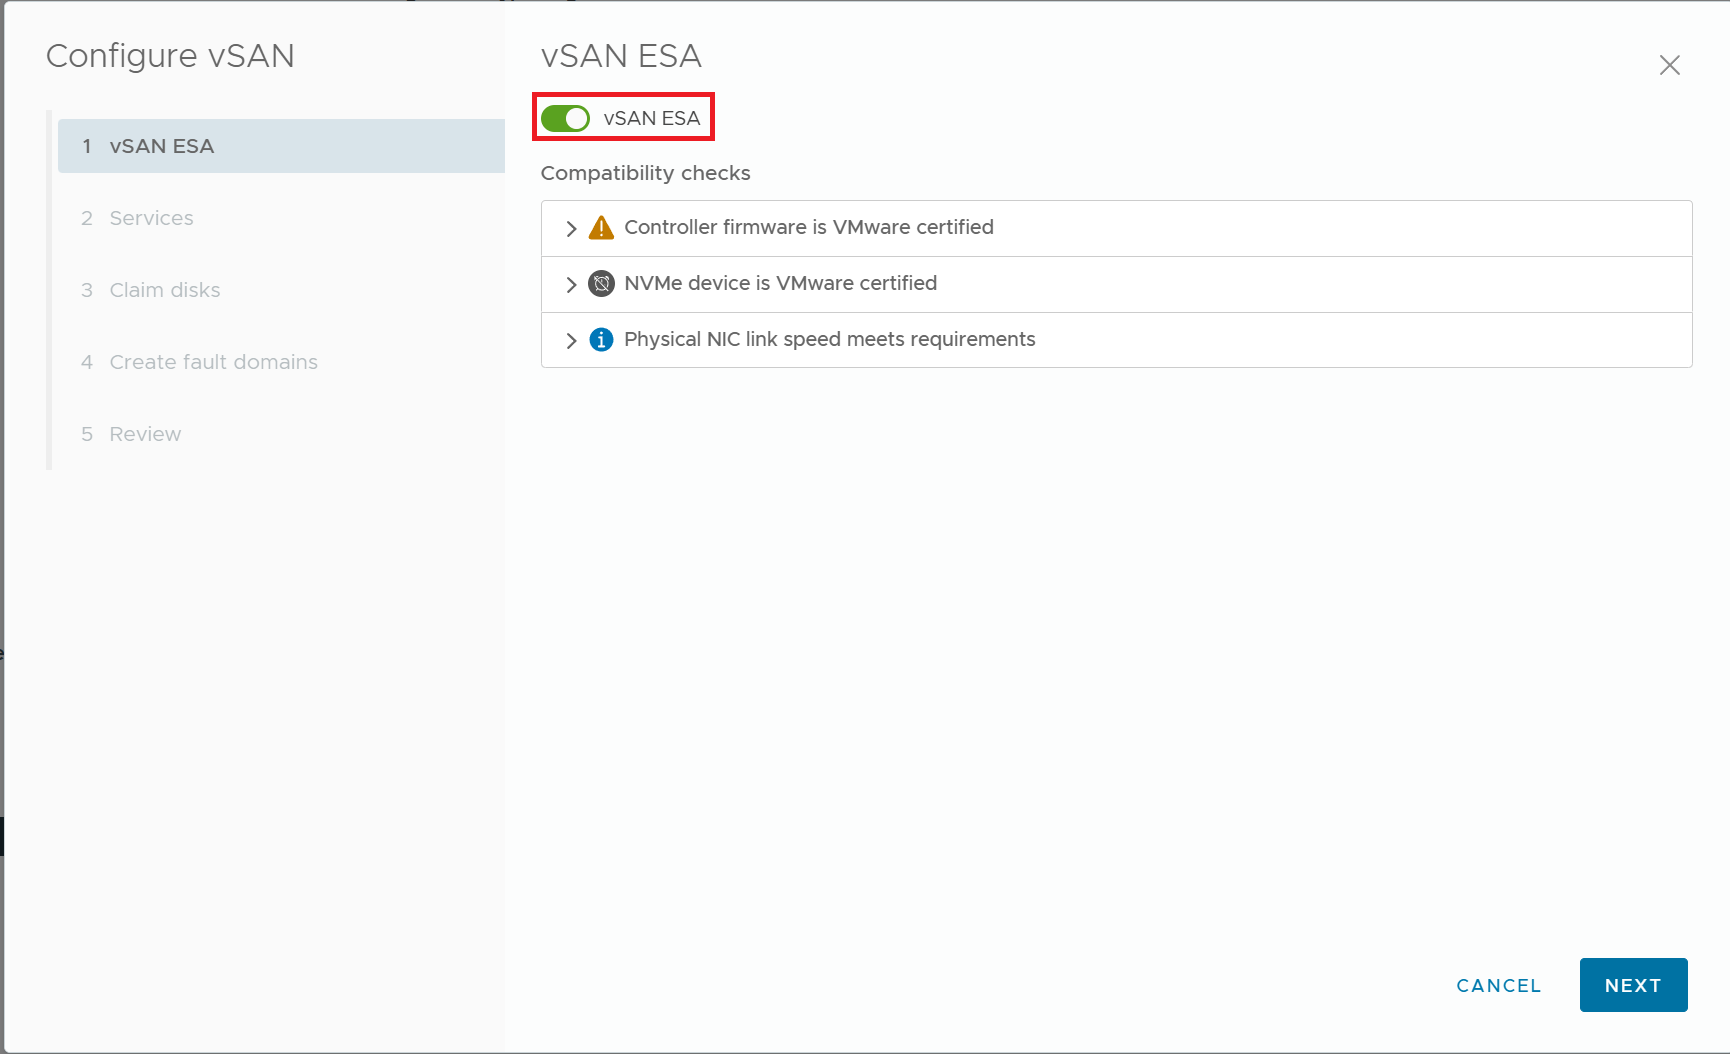
2) Enable vSAN ESA
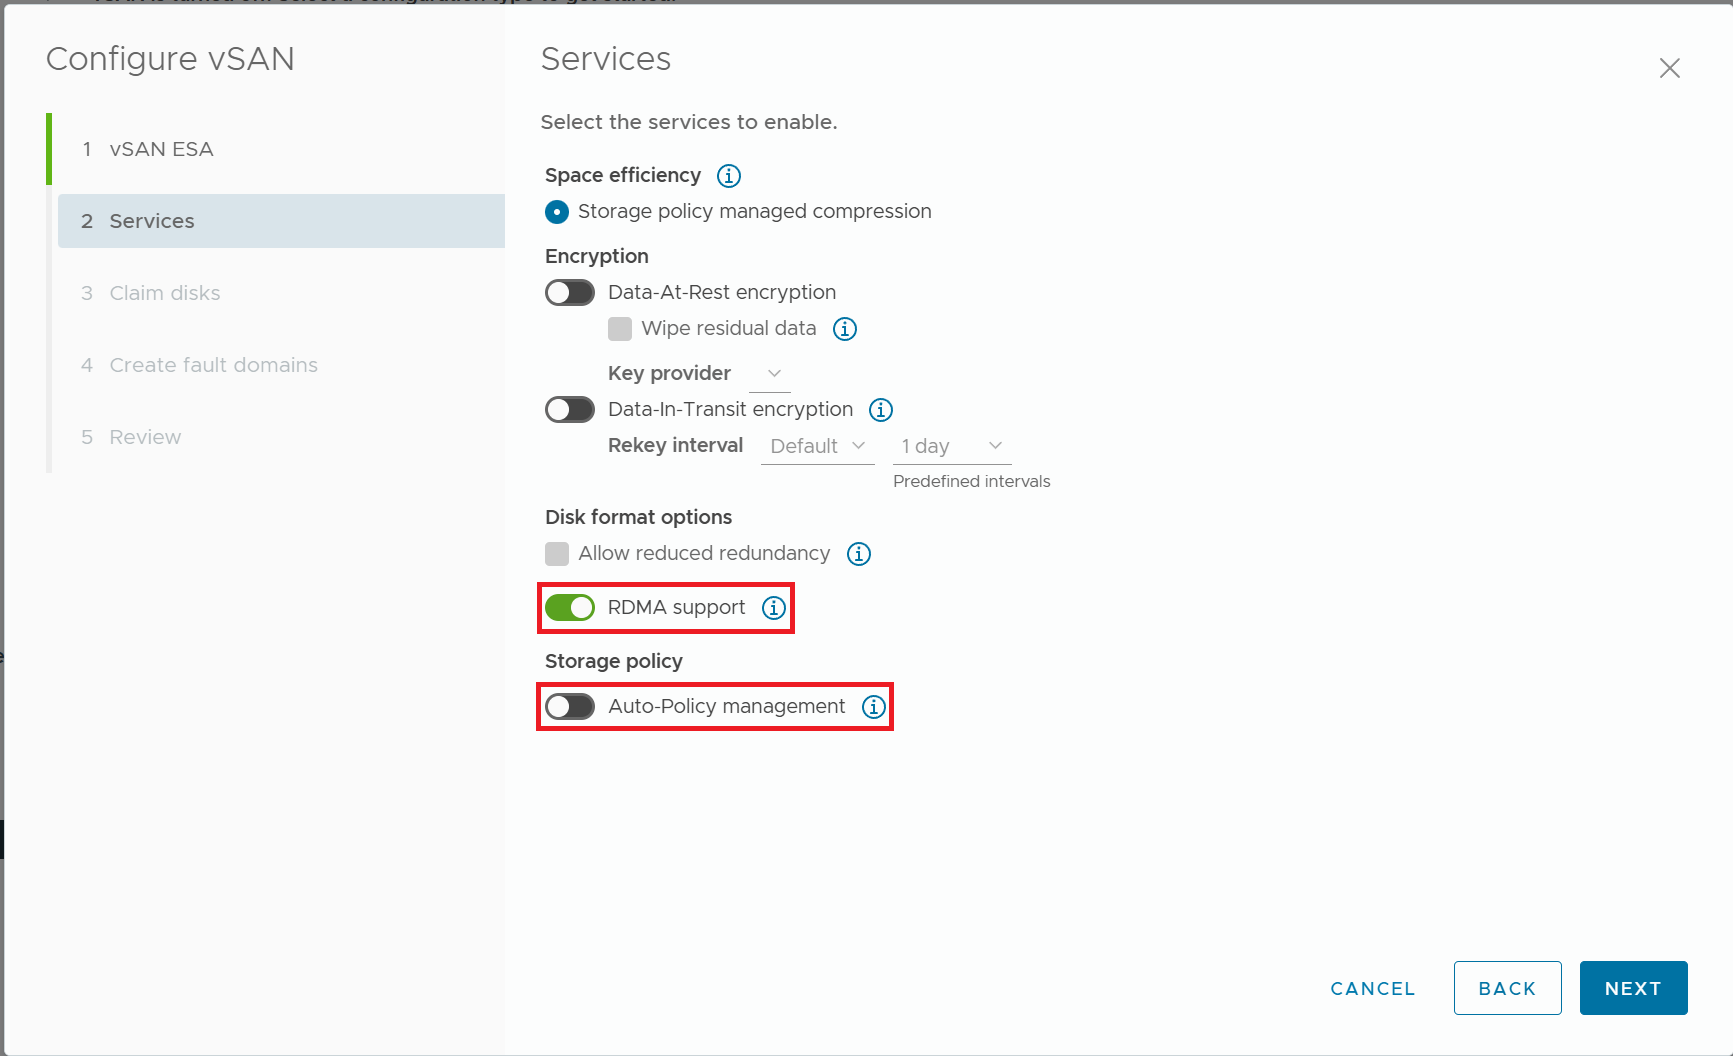
3) Turn on RDMA Support, and turn off Auto-Policy management.
4) Claim the NVMe disks for use by vSAN ESA
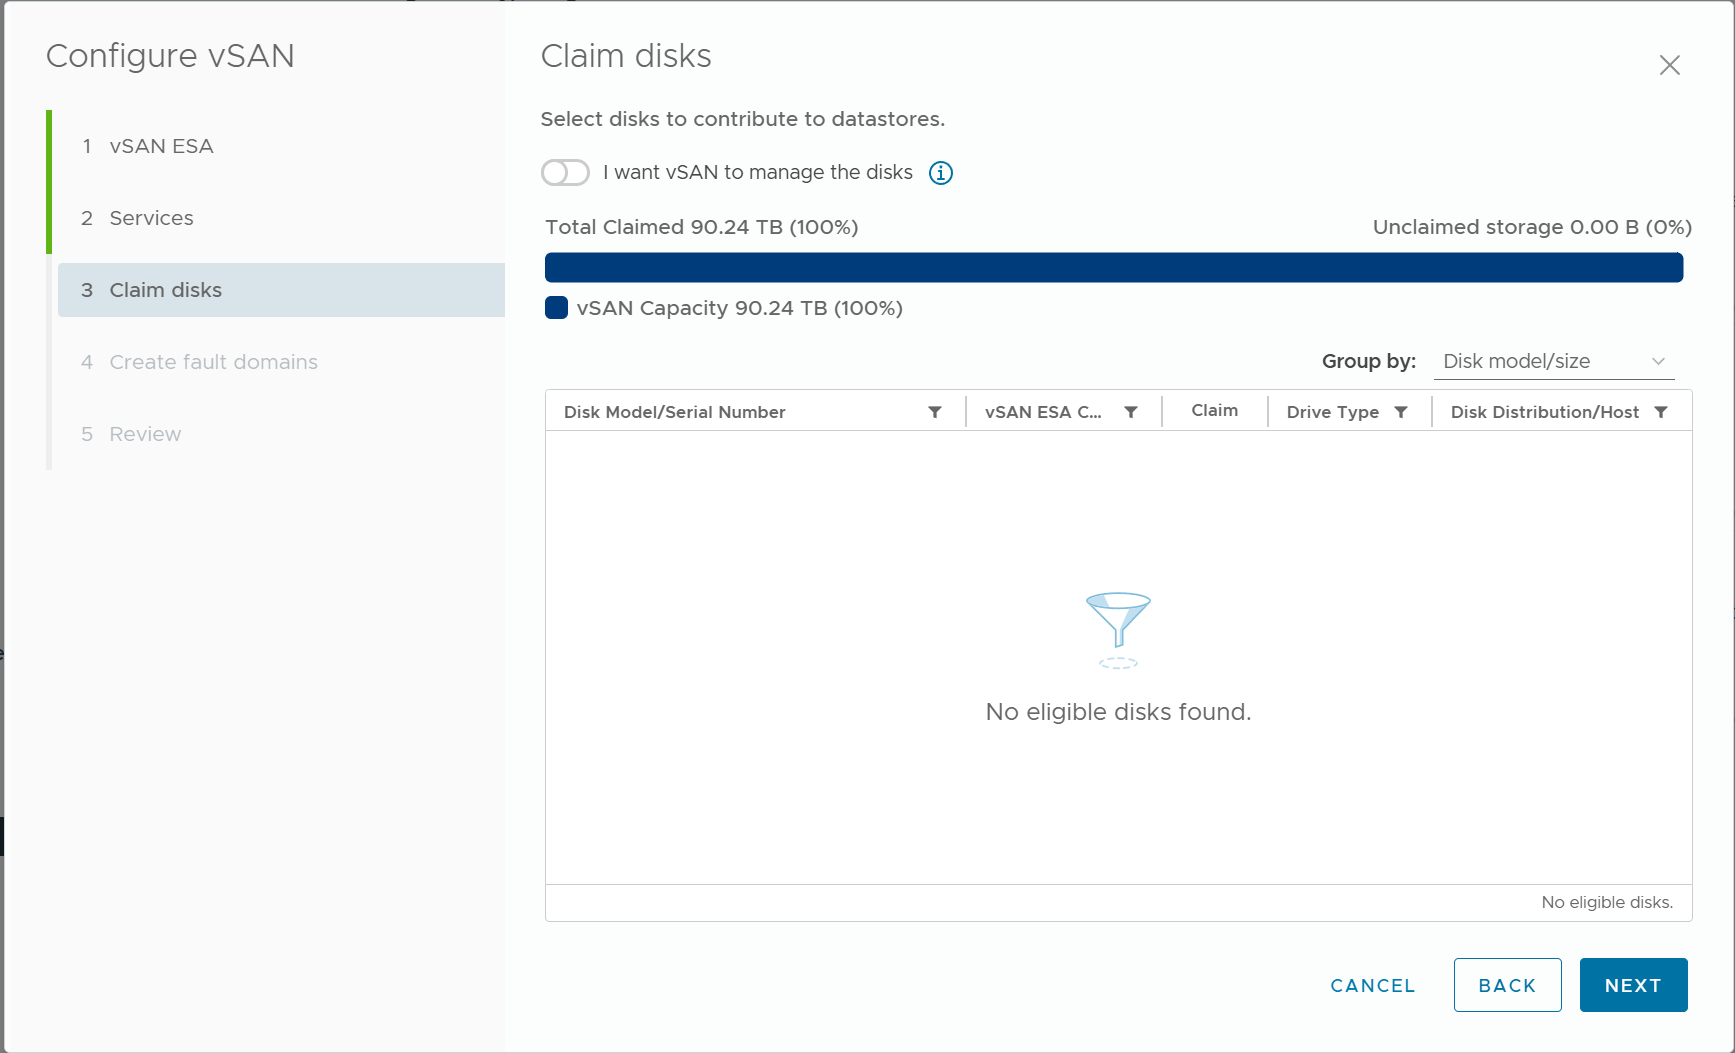
In the above figure, I can't see any eligible disks because I have already claimed all NVMe disks, but if you are configuring a new cluster, you can claim NVMe disks by checking the checkbox in the Claim column.
5) Set the Fault Domain
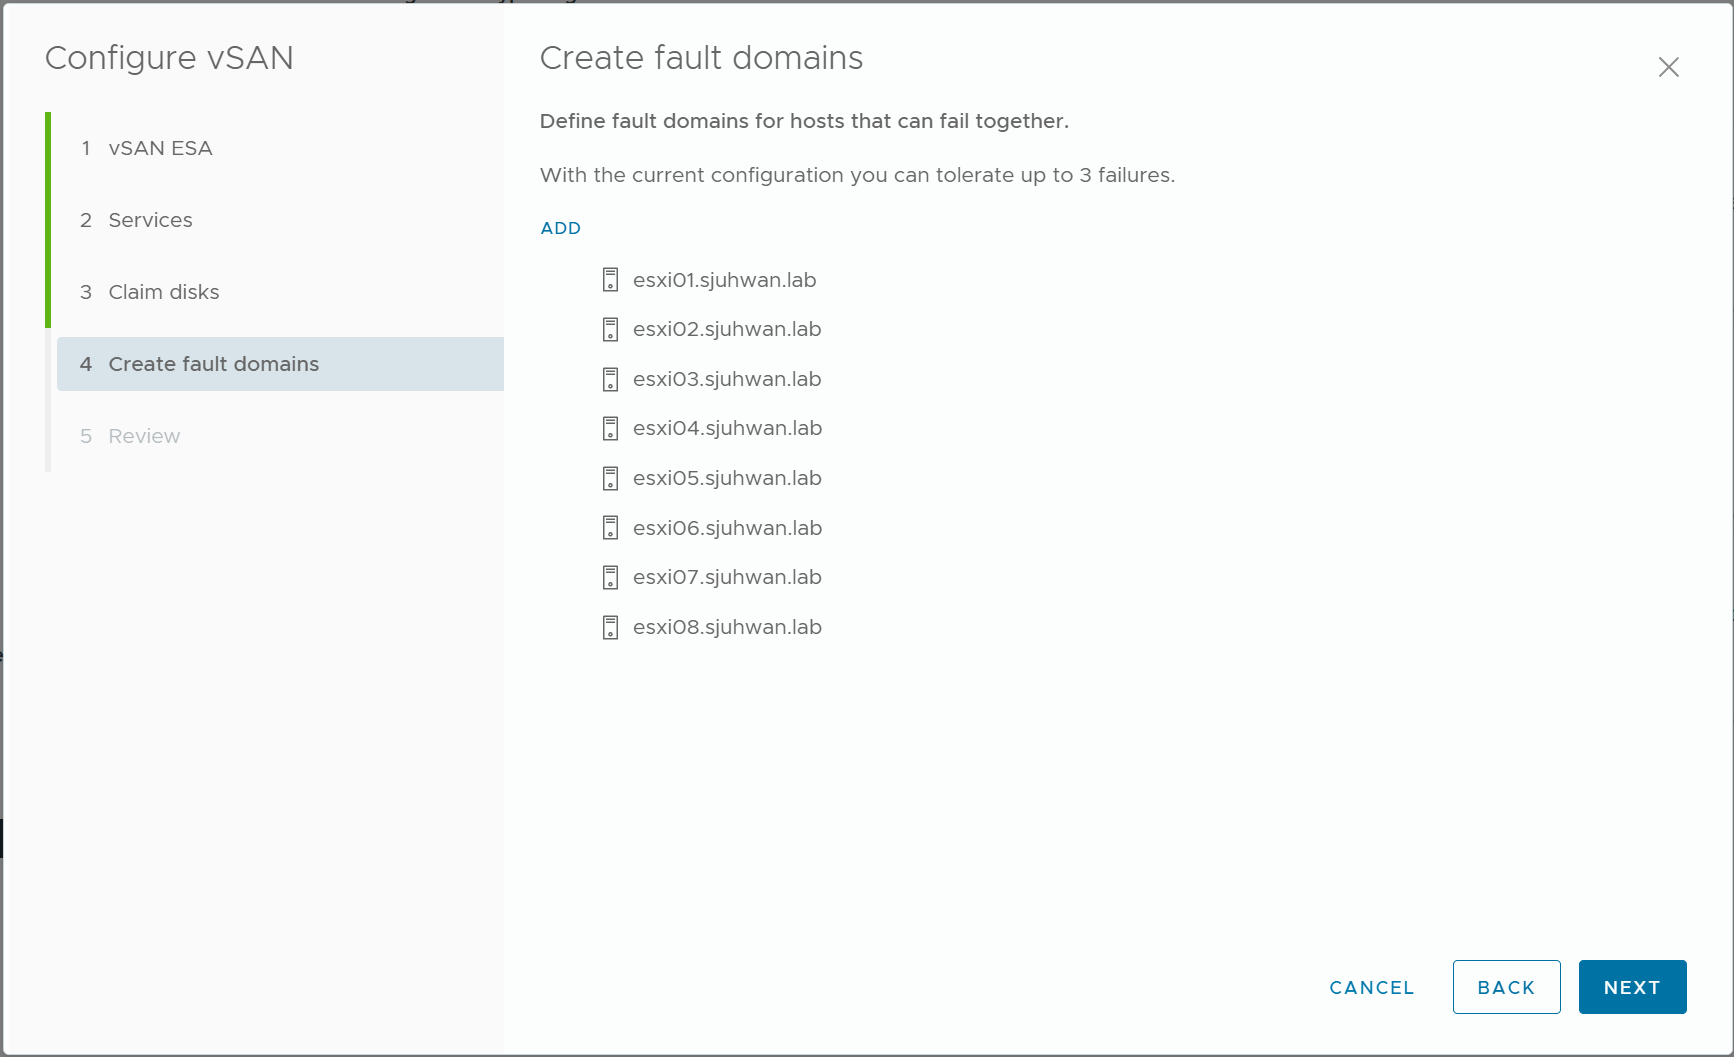
In general, we will want to treat the entire nodes as a single Fault Domain.
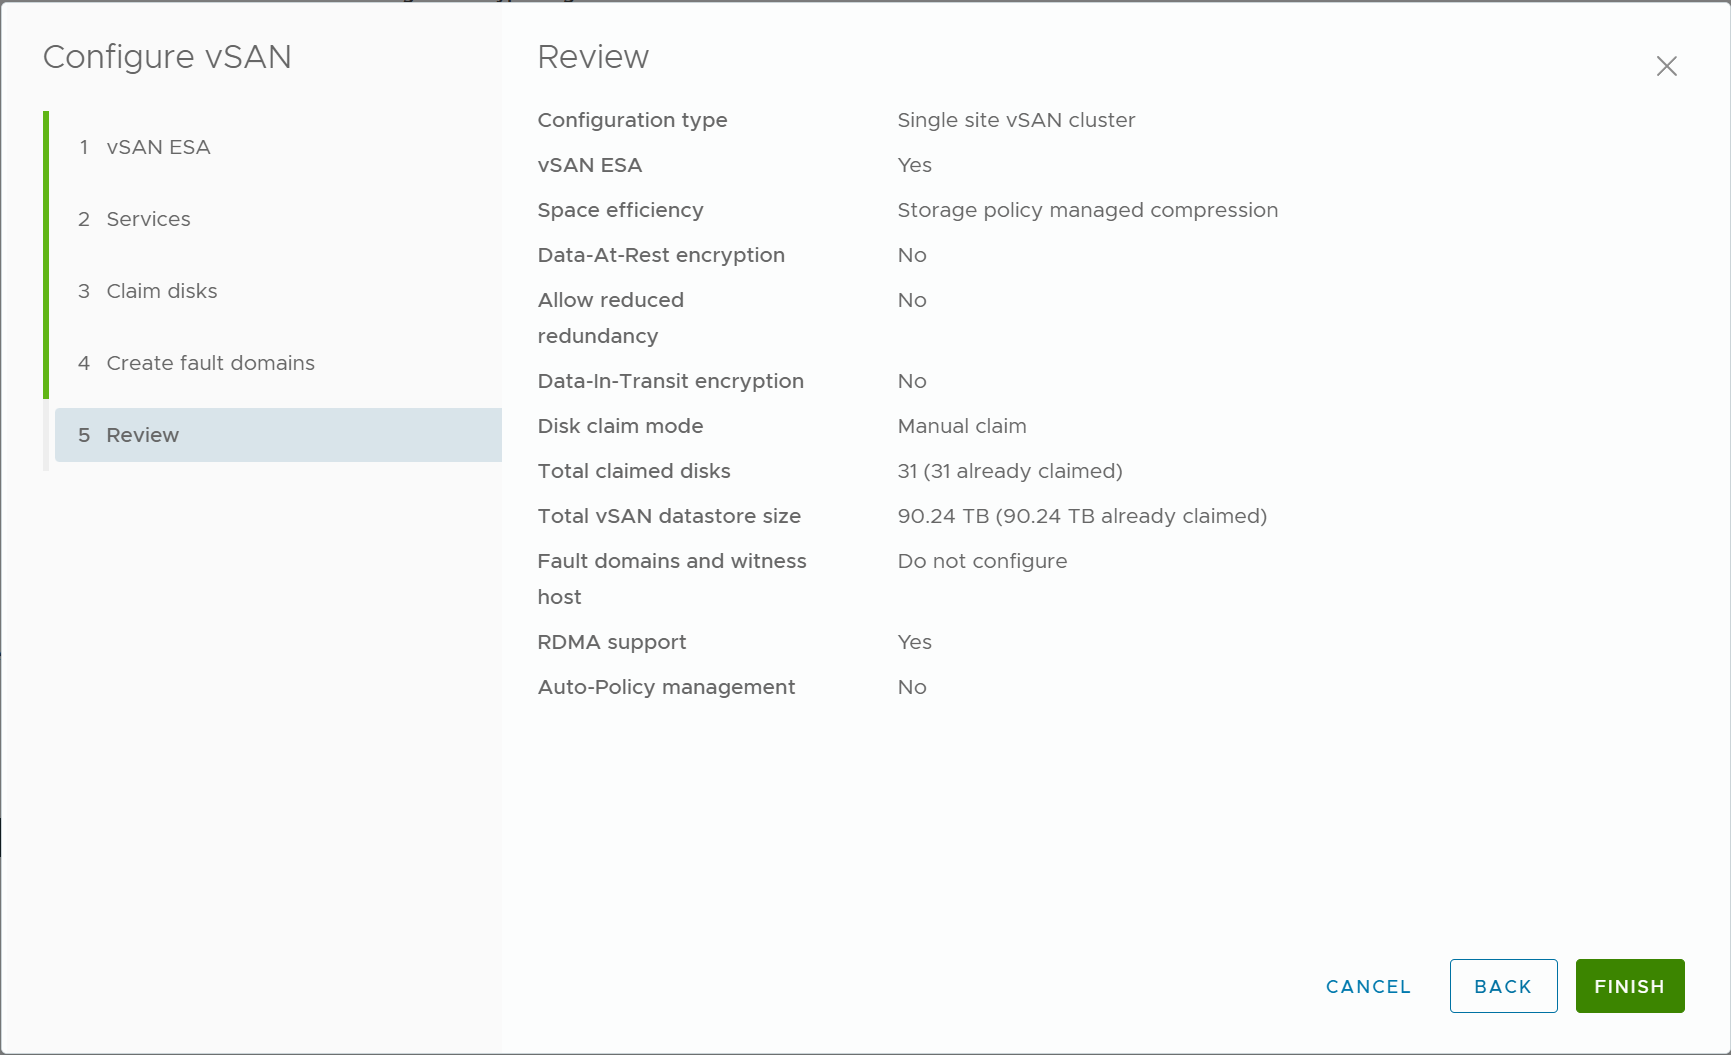
6) Review the configuration so far and proceed to configure vSAN ESA.
Validate the configuration
You can check the vSAN configuration in the Configure/Monitor tab of the Cluster
1) Configure > vSAN > Services
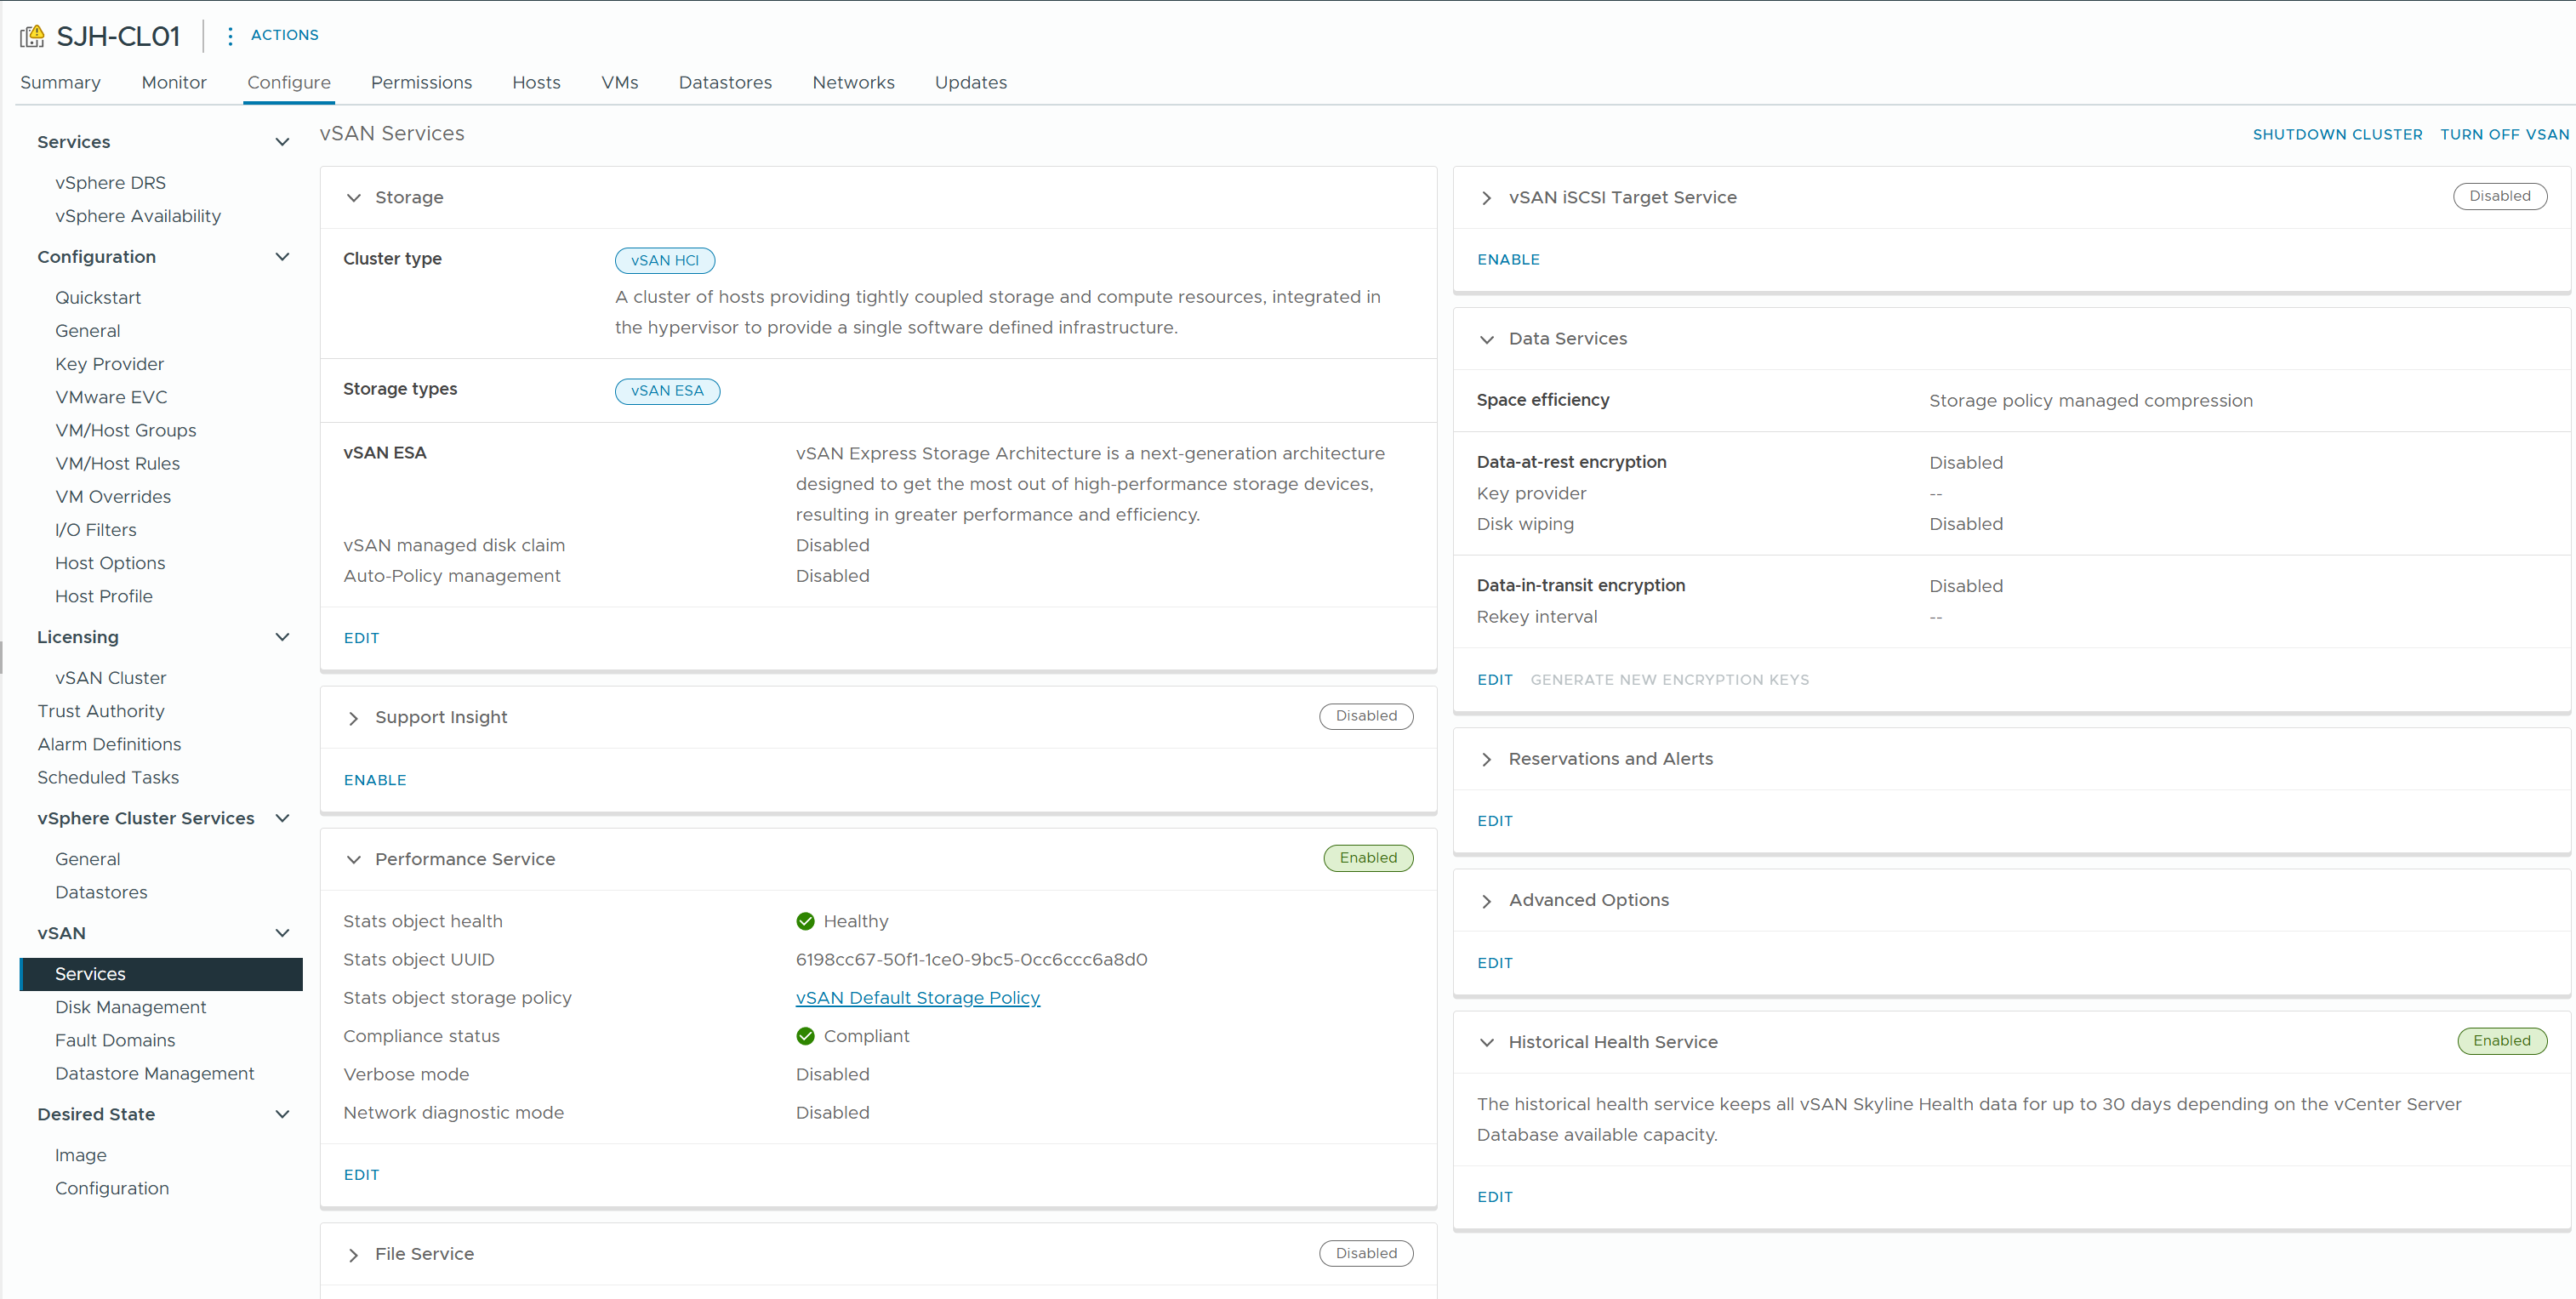
Check the overall configuration status of the cluster and the health of the components.
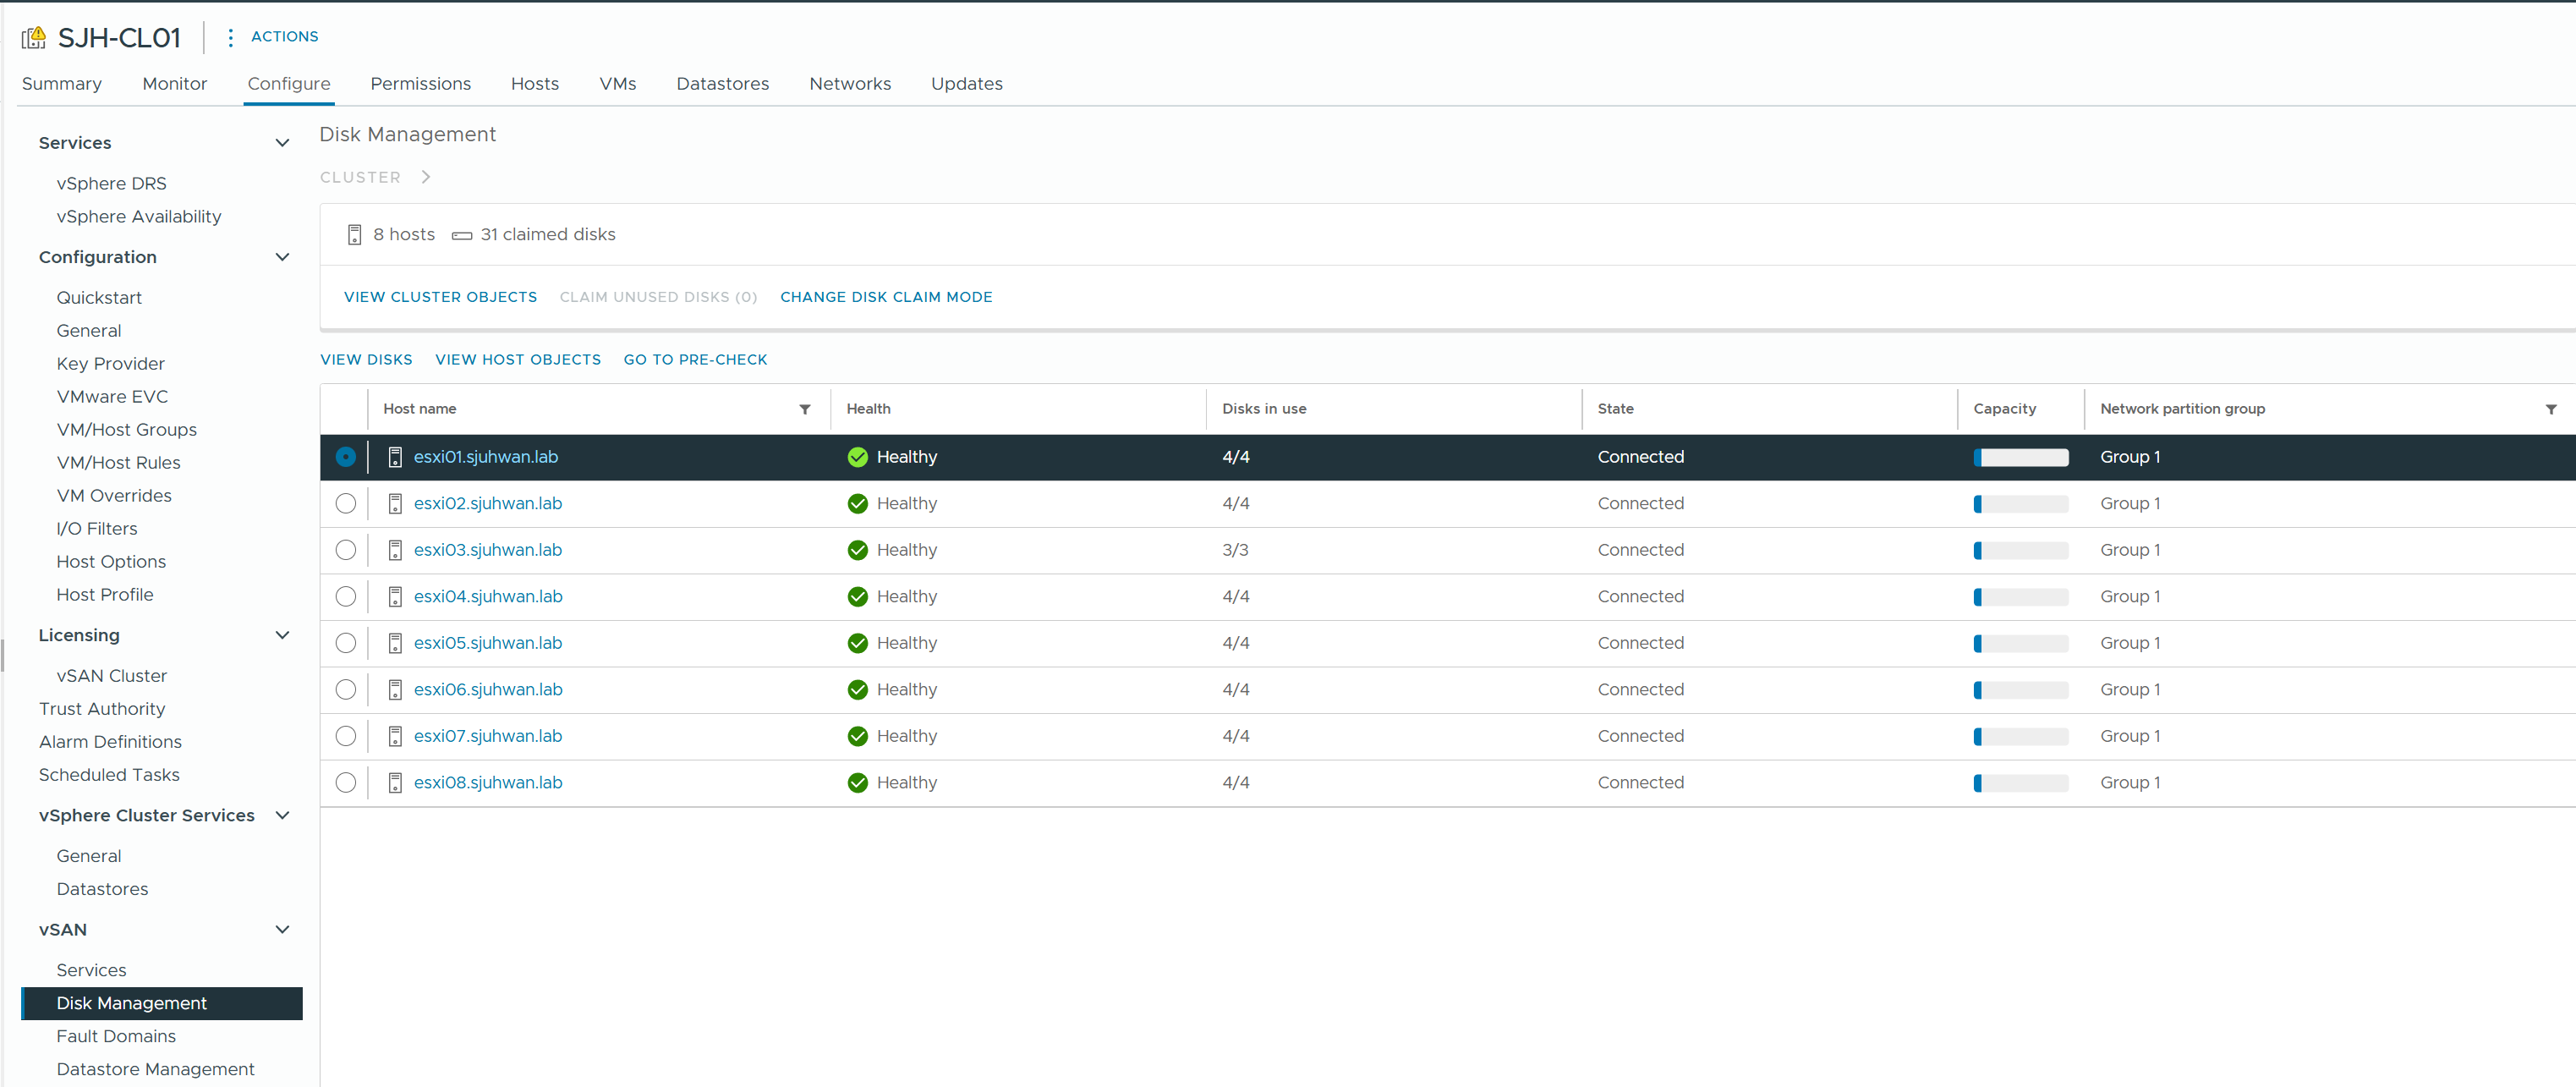
2) Configure > vSAN > Disk Management
3) Monitor > vSAN > Skyline Health
This is a dashboard that provides a comprehensive view of the health of your vSAN cluster and any configuration inconsistencies.
4) VSISH RDT Information.
vsish -e get /vmkModules/rdt/clusterProtocol
vsish -e get /vmkModules/rdt/allConnCount
If you have RDT connections with protocol number 2 (RDMA) as shown above, vSAN is operating in RDMA mode.
Configure Storage Policy
After verifying the cluster working as normal, configure the Storage Policy for vSAN Object.
1) Configure vSAN Performance Service policy
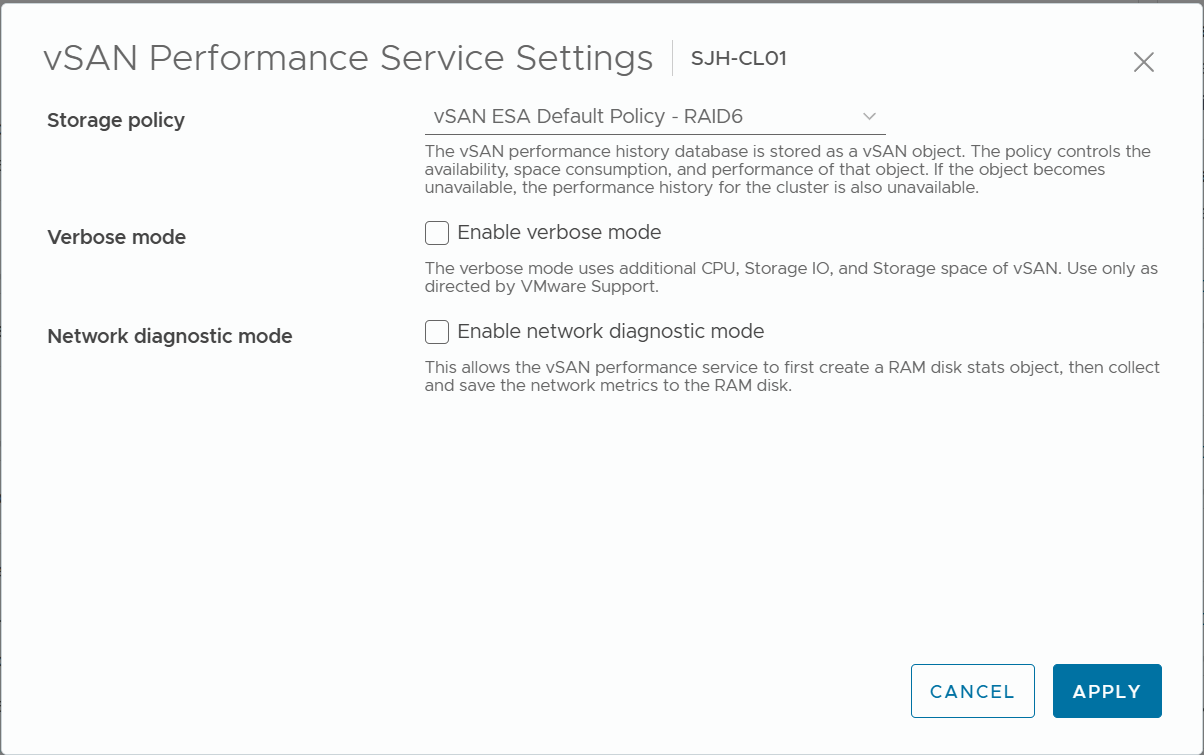
It is recommended to use vSAN ESA Default Policy - RAID5 for clusters with 4 or fewer hosts, and vSAN ESA Default Policy - RAID6 for clusters with 5 or more hosts.
2) Configure the vSAN Datastore Default Policy.
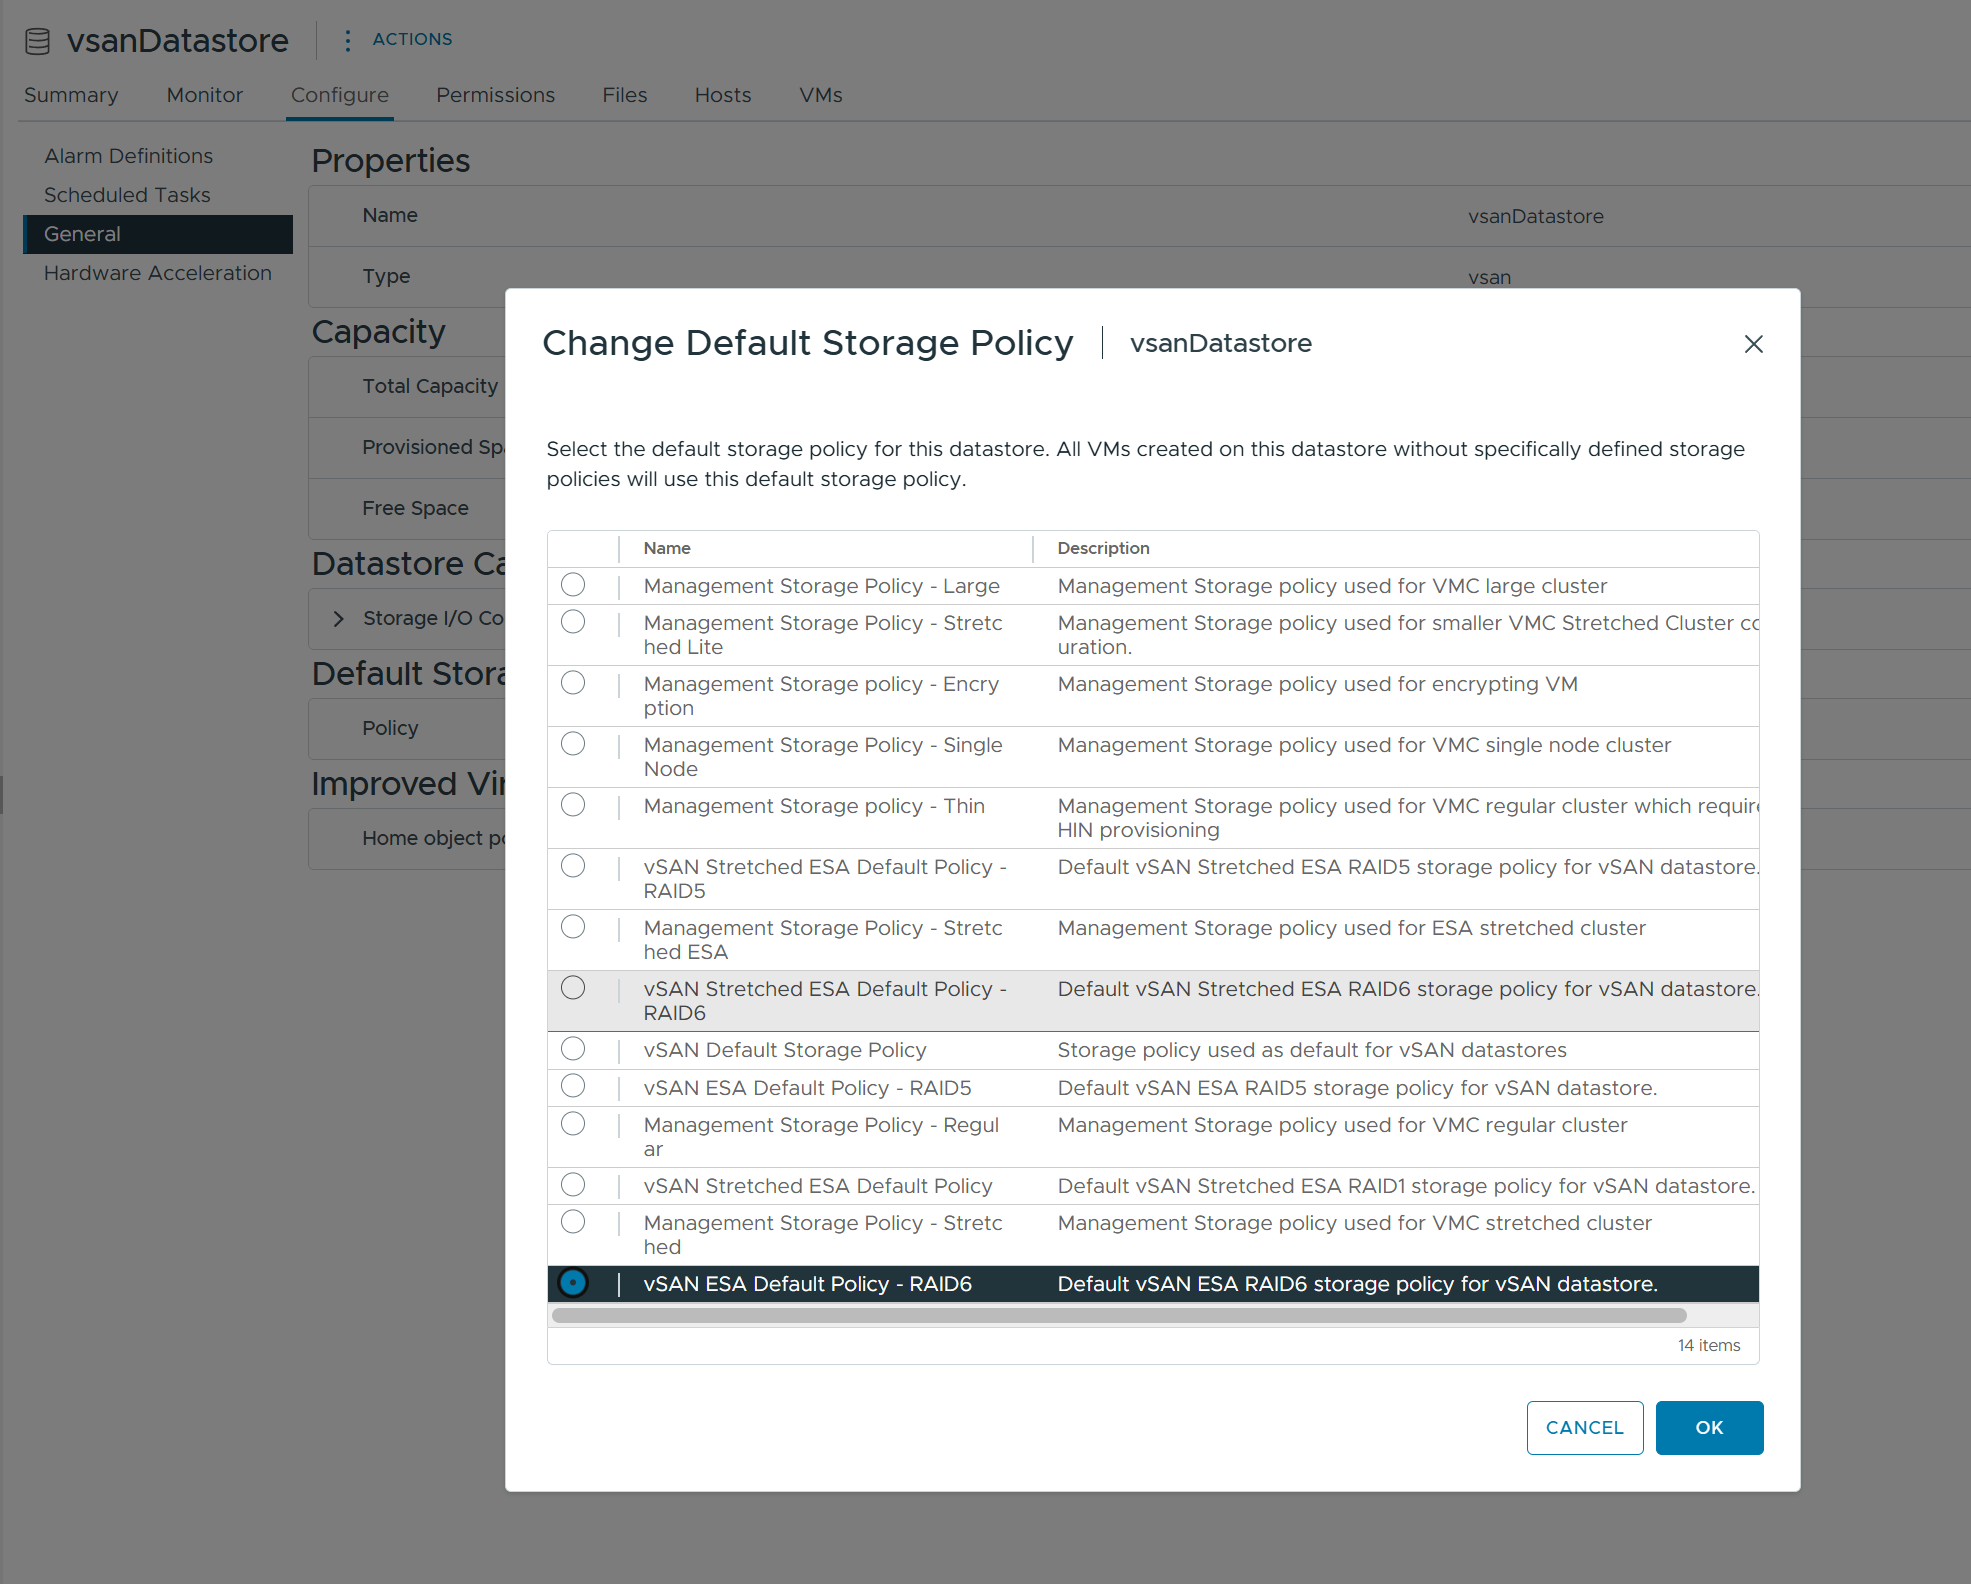
Similarly, flexibly configure RAID5/RAID6 depending on the number of nodes.
Troubleshooting
When CMMDS reports Cluster Partitioning
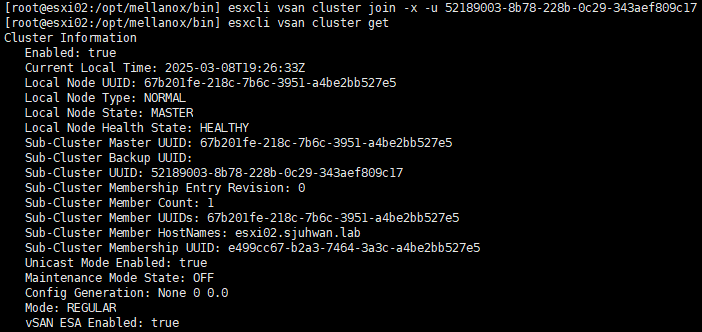
First, check the vSAN cluster status by running the esxcli vsan cluster get command on the host.
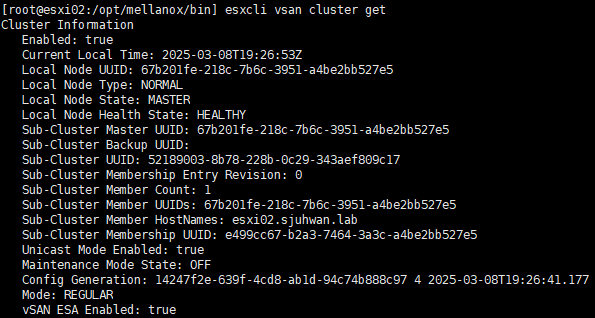
If you see only one host, as shown in the image above, there is a problem with your vSAN configuration.
In this case, you can categorize the number of cases as follows
- Network configuration issues
- Unicast Agent registration issues
- Cluster registration issues
- Configuration mismatch issues
To identify the problem, perform the following steps.
Verify node-to-node communication using vmkping

Verify that when the problematic node can communicate with other hosts in the cluster.
Also, MTU mismatch can cause problems, test vmkping using the vSwitch's MTU value.
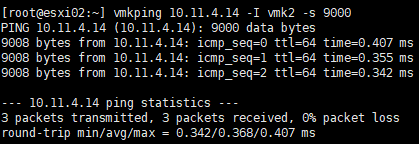
In the above case, there is no problem with communication between the nodes, so we can confirm that it is not a network issue.
If there is an issue with the network connection, you should check the logical/physical configuration of the vSAN network, VLAN configuration, MTU configuration, etc.
Unicast Agent Registration Issues
CMMDS manages a list of Unicast Agents for communication between nodes. If for some reason this list is not properly configured during vSAN configuration, communication between vSAN nodes might fail.
Run the command esxcli vsan cluster unicastagent list on the problem host.

If you see all the other cluster nodes in the output list except host-itself, this is normal.
Therefore, in this case, it is not a problem with the Unicast Agent registration.
If the Unicast Agent list is incorrect, you can resolve the issue by manually adding other nodes to the cluster.
See VMware KB 326427 to register the Unicast Agent and check if this resolves the network partition issue.
Cluster Registration Issues
If, for some reason, the cluster was not properly registered during the vSAN configuration process, you might encounter problems.
In most cases, this is resolved by rejoining the vSAN node to the cluster.
Run the esxcli vsan cluster leave command on the faulty host.

Then run esxcli vsan cluster -u <Sub-Cluster-UUID>. The Sub-Cluster UUID can be found in the output of the esxcli vsan cluster get command on the healthy node.
For vSAN ESA, run esxcli vsan cluster -x -u <Sub-Cluster-UUID>.
In the above case, the problem persisted even after rejoining the node to the cluster.
Configuration Mismatch Issues
The next thing we can consider is configuration inconsistencies between vSAN nodes. Because I have created and destroyed vSAN clusters a few times before, I have thought that the process of configuring a new cluster might not have completely cleaned up the existing configuration on some nodes.
In this case, restarting vsanmgmtd might help. Run the command /etc/init.d/vsanmgmtd restart to allow the management daemon to resynchronize configuration information.
If the problem persists after restarting vsanmgmtd, restart the ESXi host to reload the configuration.

After restarting the host, the issue was finally resolved.
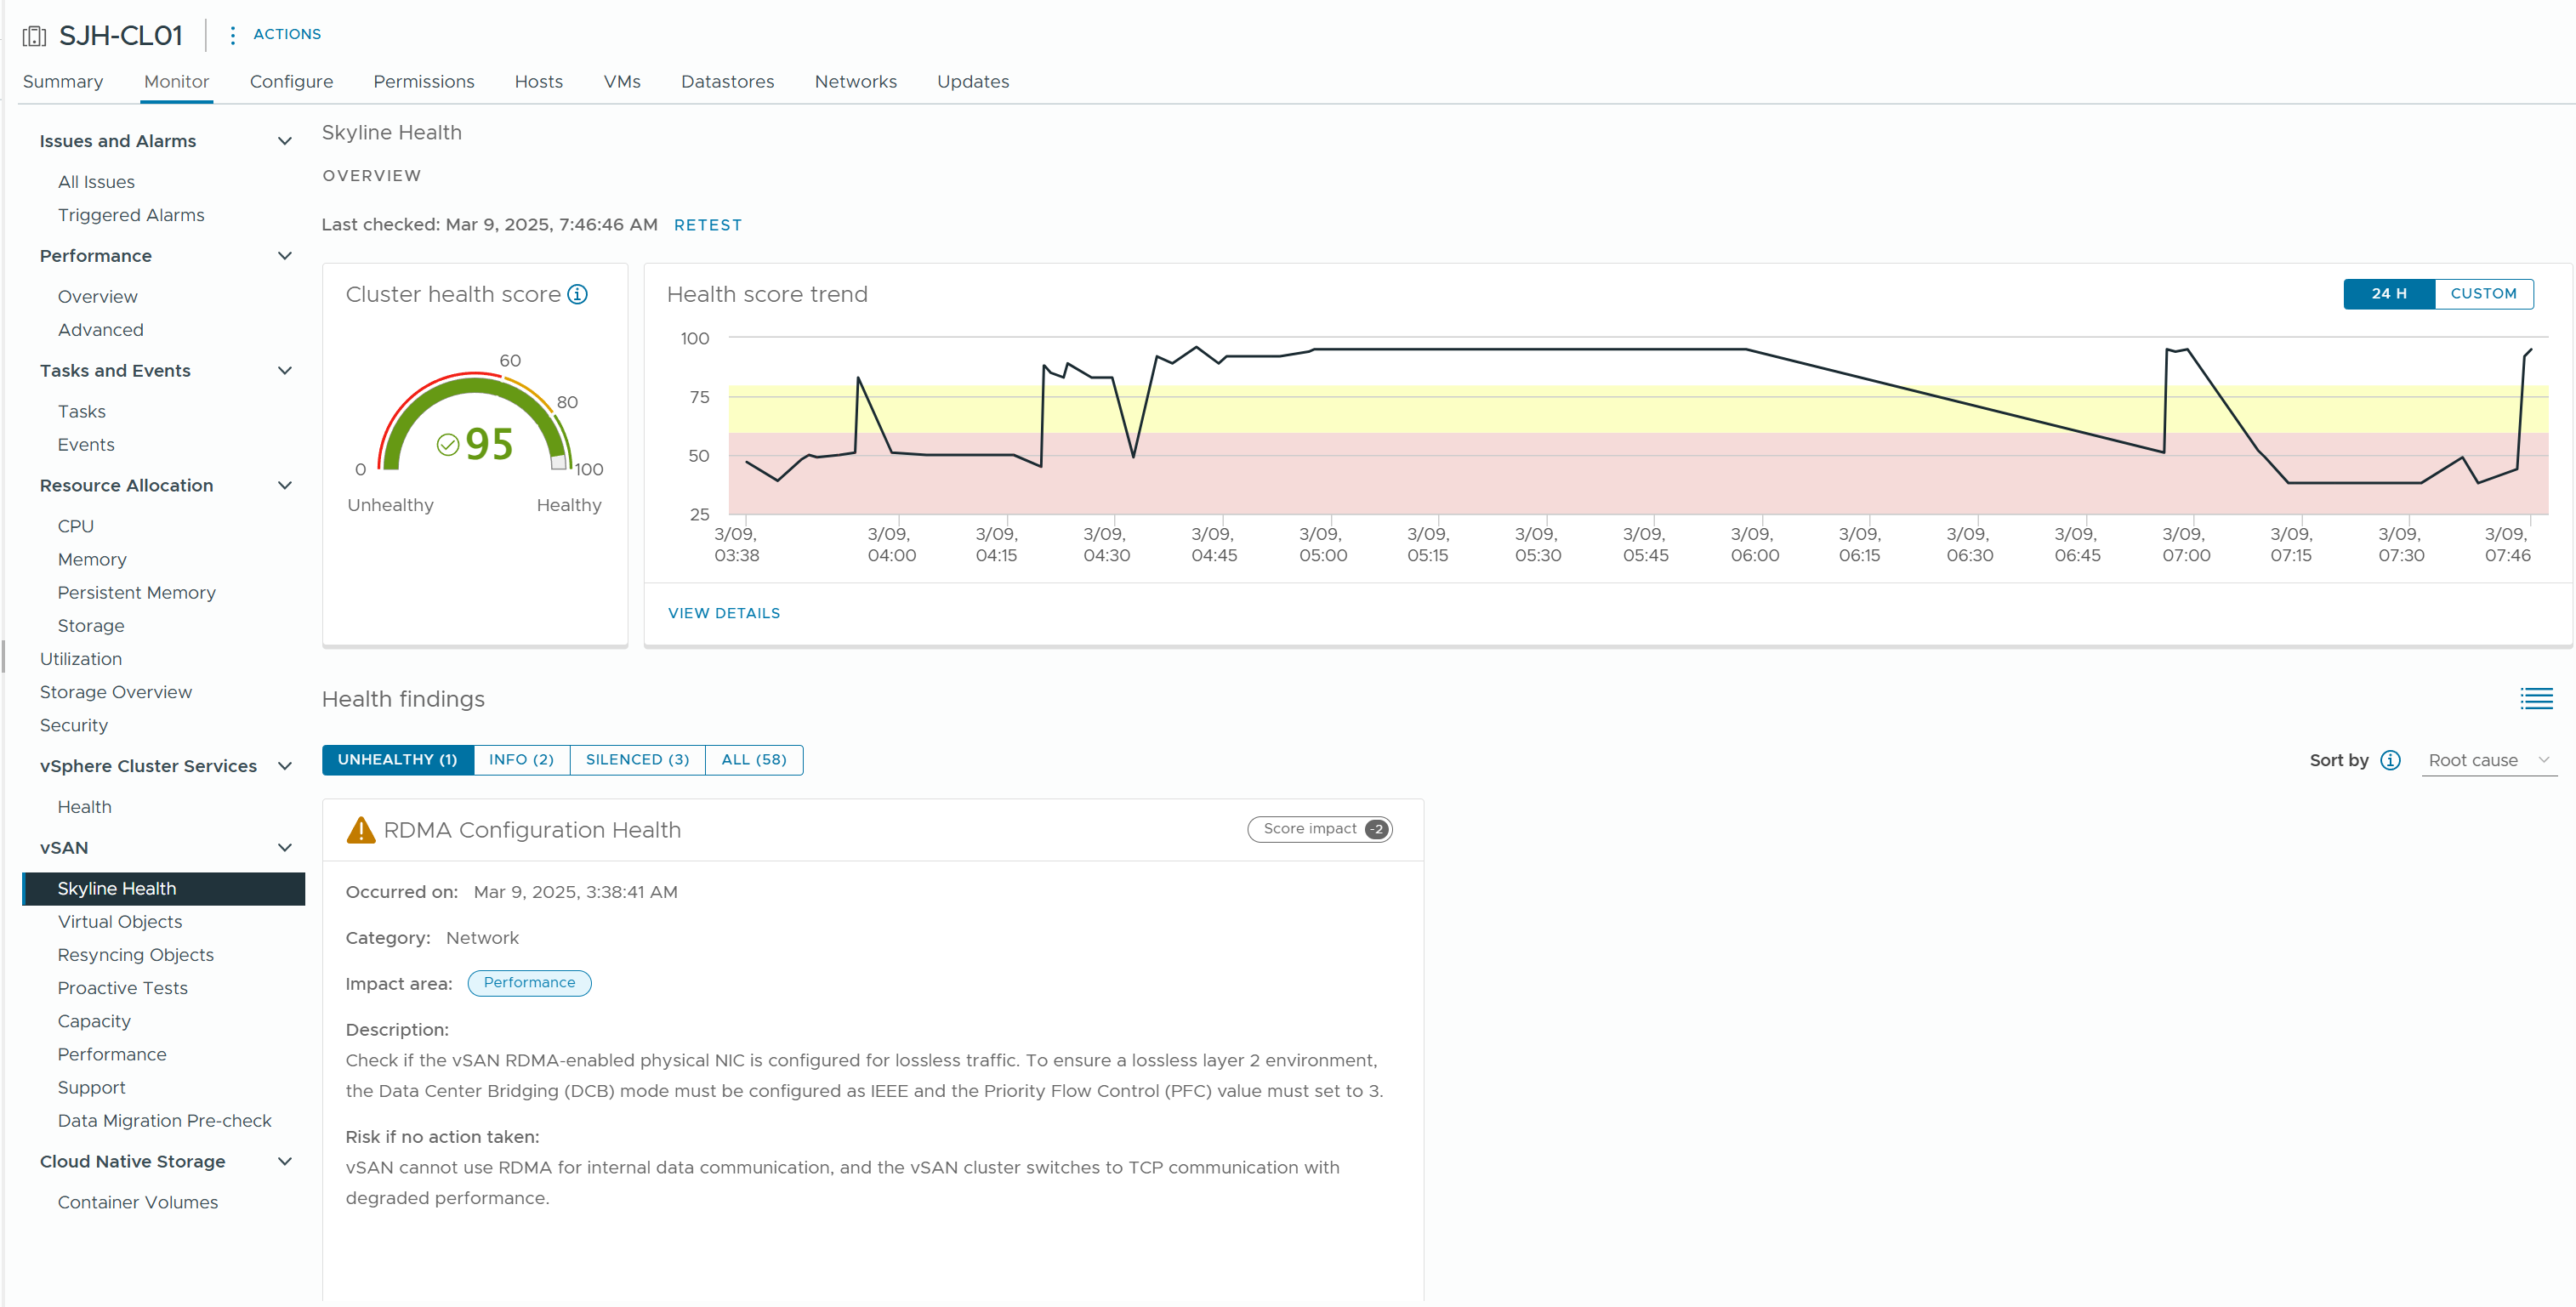
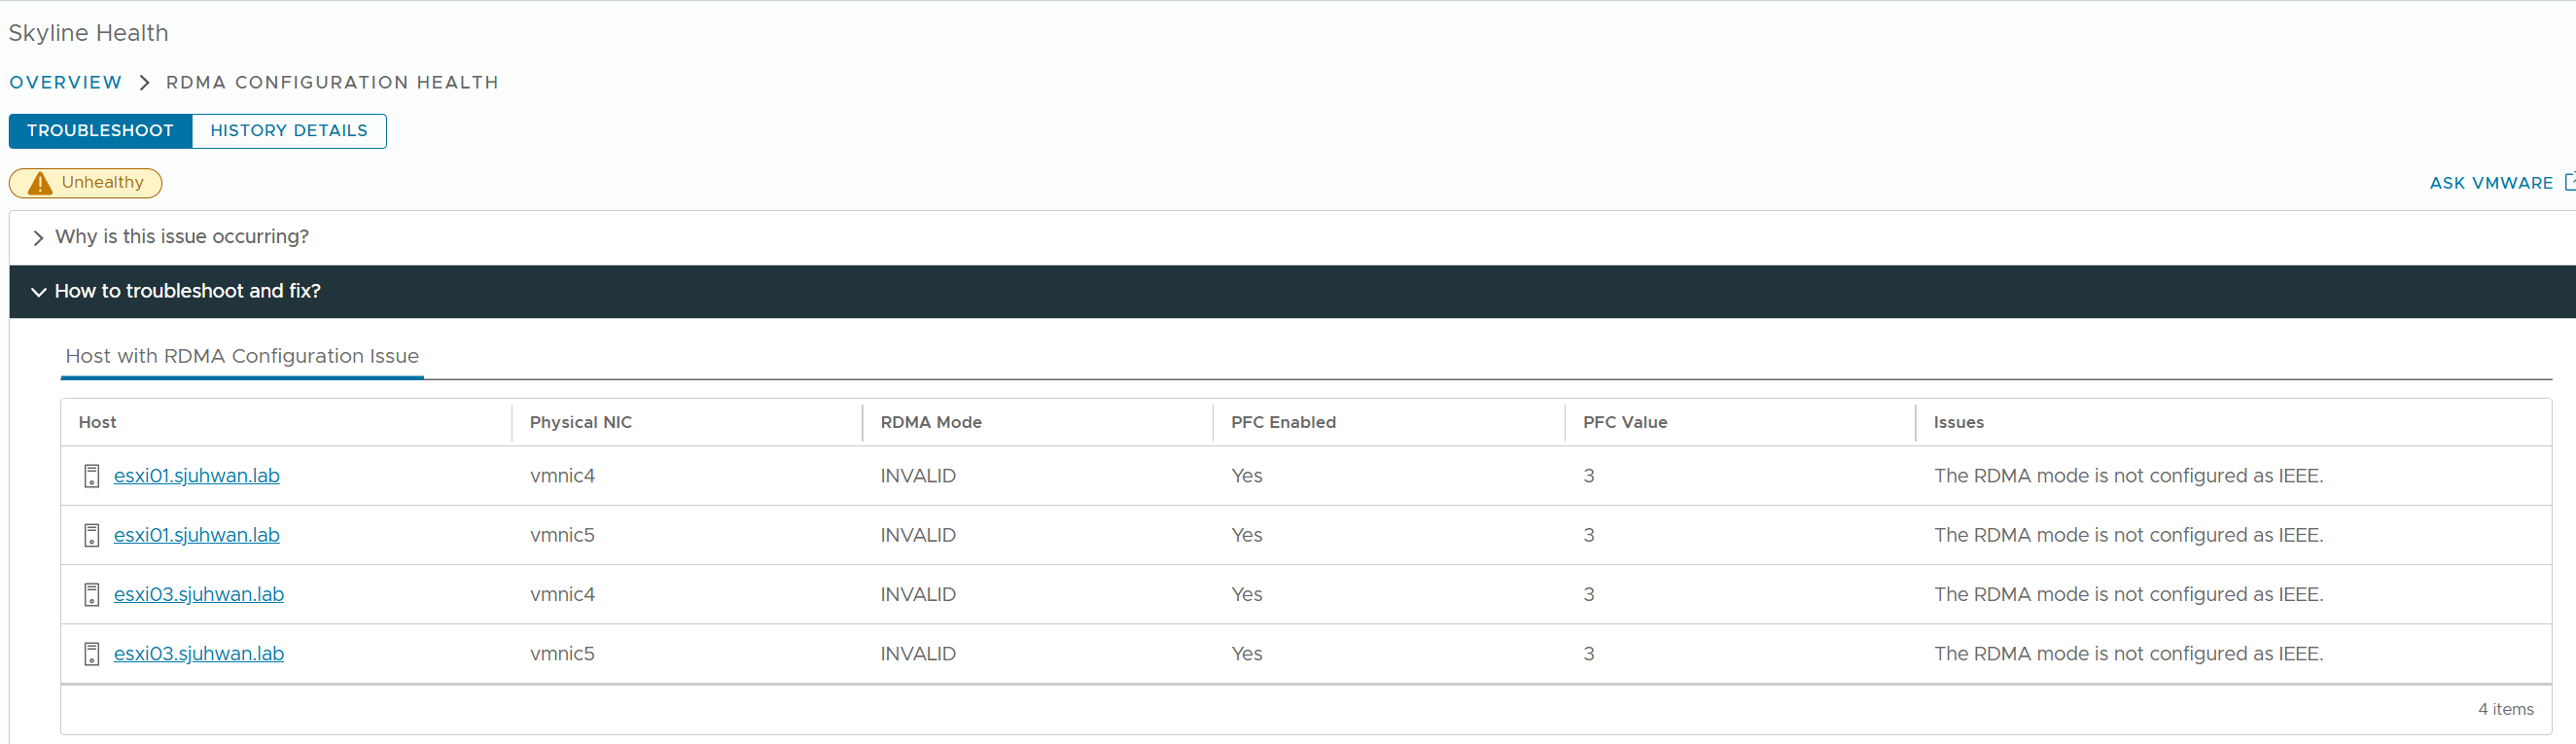
If vCenter reporting an RDMA Configuration Issue in a vSAN cluster.
Go to vSAN > Skyline Health to determine which node/port is having the issue.
For DCBx configuration issues, you can check the current configuration status with the command esxcli network nic dcb status get.
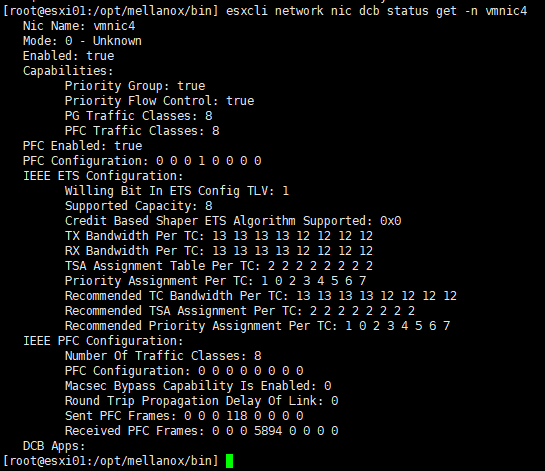
As reported by Skyline Health, you can see that the DCBx mode is configured as Unknown instead of IEEE.
There are many possible causes for this issue, including firmware/driver settings, firmware version inconsistencies, and even bugs in the ESXi DCBx agent.
If all settings and firmware configurations are correct, you should open a support ticket with VMware to resolve the issue. However, if the configuration is correct, performance should not be affected.