Deeplearning.ai의 convolutional neural network 37~42강의 리뷰 및 neural style transfer 논문 리뷰에 관한 글입니다.
해당 글은 빅데이터 연합동아리 tobigs 이미지 세미나 자료로 사용되었습니다.
What is neural style transfer?
 사진1
사진1
Nueral style transfer는 신경망을 이용한 스타일 변환이다. 위의 사진1과 같이 content image와 style image가 있을 때, 신경망을 통해 content image에 style image의 style을 입힌 generated image를 생성하는 것이다.
Neural style transfer를 사용하기 위해서 Convolutional networks의 shallow layers와 deep layers의 특성을 파악해야 한다.
What are deep convolutional networks learning?
 사진2
사진2
출처: Visualizing and Understanding Convolutional Networks(ZFnet)
ZFnet의 deconvolution 방법을 통해 feature activation을 시각화하면 사진2의 결과를 얻을 수 있다.
각각의 layer들에 대해 확인해보면 다음과 같다.
- layer1 & layer2:edge나 color와 같은 low level feature들이 나타난다.
- layer3: 좀 더 복잡한 invariance와 외양(texture)을 갖는 특징을 추출할 수 있다.
- layer4 & layer5: 위치나 자세 변화 등까지 포함한 사물이나 개체의 전부를 보여준다.
각각 layer이 추출하는 특징과 사진2를 통해 신경망은 층이 깊어질수록 더 복잡한 특징들을 추출하도록 학습된다는 것을 알 수 있다.
Cost function
사진3
Neural style transfer의 cost function은 다음과 같다
G: generated image
C: content image
S: style image
: weighting factor
논문에서는 = or 정도로 설정하였다.
G(generated image)를 만드는 방법은 다음과 같다
- Initiate G randomly
- Use gradient descent to minimize J(G)
Initiate G randomly code
input_img = content_img.clone()
# if you want to use white noise instead uncomment the below line:
# input_img = torch.randn(content_img.data.size(), device=device)
Use gradient descent code
def get_input_optimizer(input_img):
    # this line to show that input is a parameter that requires a gradient
    optimizer = optim.LBFGS([input_img.requires_grad_()])
    return optimizer
참고)LBFGS는 optimizer의 한 종류이고, 본 논문에서 사용된 optimizer이다. 하지만 tensorflow implement에서는 Adam optimizer를 대신 사용해도 성능에 별 차이가 없다고 한다.
Content Loss
: 층의 feature map of G
: 층의 feature map of C
: filter(channel)
: heigth x width, 즉 하나의 채널 각각의 픽셀
feature map은 pre-trained된 CNN을 통해서 얻어진다. 해당 논문에서는 ImageNet Dataset으로 학습된 VGG19를 사용했다. 또한 모든 feature map은 activation function을 통과한 값이다.
위의 loss를 보면 G와 C의 번째 feature map의 차이의 제곱을 loss로 정의한다. loss를 최소화시킬것이므로 번째 feature map의 차이를 줄이는 것이다. 이는 각각의 feature map이 image에 대한 context representation을 갖고 있기 때문이다.
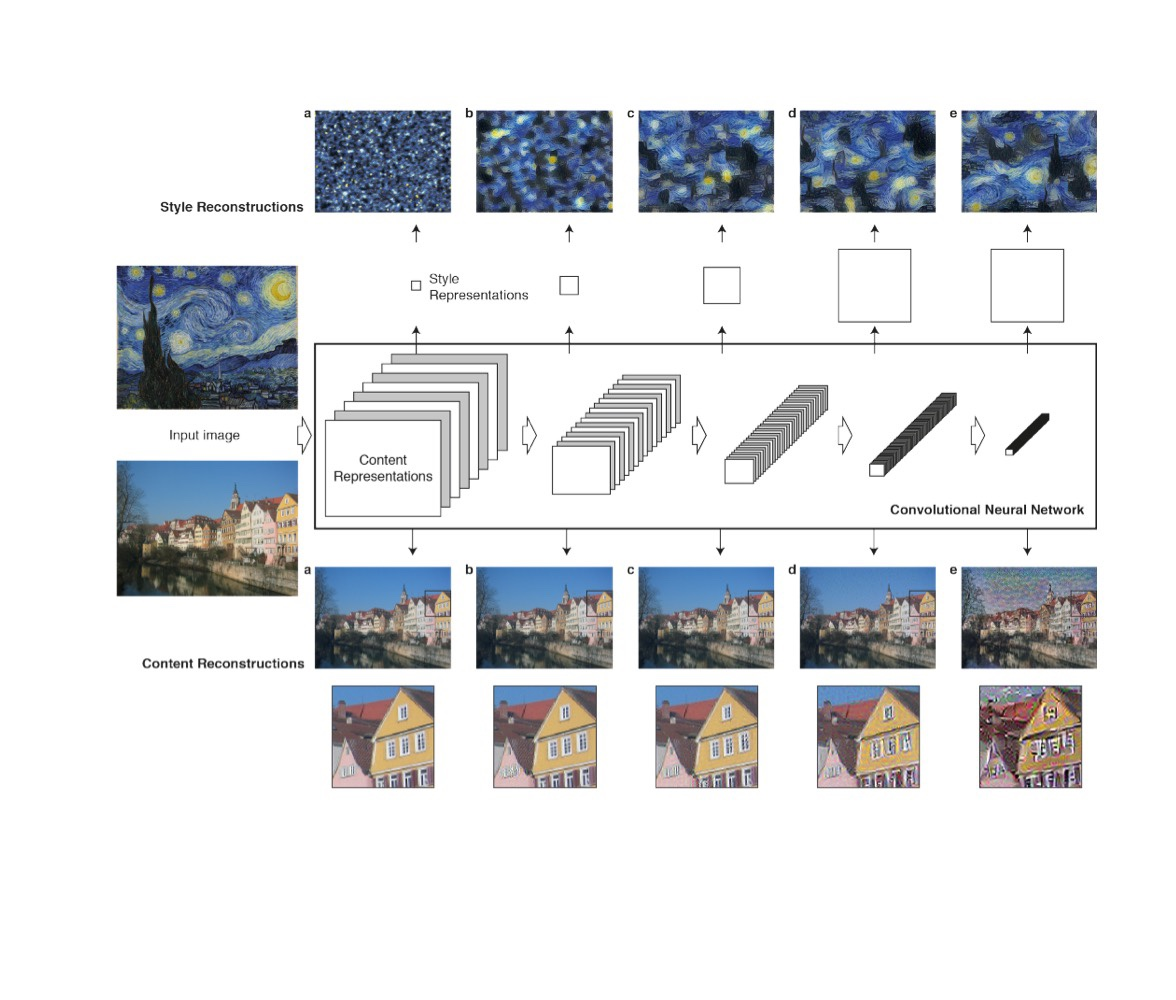
 사진4
사진4
사진4의 content reconstruction을 확인하면 깊은 층으로 갈수록 low-level feature 정보는 잃고, high-level feature 정보만 유지한다. 따라서 content loss를 계산할 때, 사용할 feature map의 층을 얕은 층과 깊은 층 사이 중간에서 골라야한다. 논문의 저자들은 (d)에 해당하는 층의 feature map을 사용했다.
class ContentLoss(nn.Module):

    def __init__(self, target,):
        super(ContentLoss, self).__init__()
        # we 'detach' the target content from the tree used
        # to dynamically compute the gradient: this is a stated value,
        # not a variable. Otherwise the forward method of the criterion
        # will throw an error.
        self.target = target.detach()

    def forward(self, input):
        self.loss = F.mse_loss(input, self.target)
        return input
Style Loss
논문에서 style representation을 feature map의 filter(channel)간의 상관관계로 정의한다. 이 feature correlation을 Gram Matrix()로 내적을 이용해 계산한다.
: layer
: channel의 수 (각 channel)
: height x width (각 pixel)
Gram matrix를 이용해 각 층(layer)의 style image와 generated image의 style 차이를 square error로 다음과 같이 정의한다.
: Generated image의 층의 style representation
: Style image의 층의 style representation
: 층의 filter(channel)의 개수
: 층의 height x width
각각의 을 이용한 linear combination을 통해 최종 style loss를 다음과 같이 정의한다.
: weighting factors
을 통해 각 층에서의 style loss(=)에 가중치를 부여한다. 본 논문에서는 사진4의 style representation 5개를 모두 사용하고, 각각의 가중치는 0.2이다. 따라서 이를 제외한 층의 style representation은 무시하므로 가중치는 0이다.
Gram matrix와 style loss의 코드는 다음과 같다.
def gram_matrix(input):
    a, b, c, d = input.size()  # a=batch size(=1)
    # b=number of feature maps
    # (c,d)=dimensions of a f. map (N=c*d)

    features = input.view(a * b, c * d)  # resise F_XL into \hat F_XL

    G = torch.mm(features, features.t())  # compute the gram product

    # we 'normalize' the values of the gram matrix
    # by dividing by the number of element in each feature maps.
    return G.div(a * b * c * d)

class StyleLoss(nn.Module):

    def __init__(self, target_feature):
        super(StyleLoss, self).__init__()
        self.target = gram_matrix(target_feature).detach()

    def forward(self, input):
        G = gram_matrix(input)
        self.loss = F.mse_loss(G, self.target)
        return input
전체 학습 구조
 사진5
사진5
모델의 학습은 사진5와 같이 이뤄진다. 학습을 진행할 때, feature extractor(pre-trained VGG19)는 학습이 되지 않게 설정한다.
Arbitrary Style Transfer in Real-time with Adaptive Instance Normalization
Adaptive Instance Normalization
 사진6
사진6
먼저 batch normalization의 수식을 확인해 보자
: learnable affine parameters
위의 batch normalization에서 사진6처럼 instance마다 normalization을 수행하는 것이 instance normalization이다.
다음은 instance normalization의 수식이다.
: learnable affine parameters
수식 이외에도 inference시에 batch normalization과 Instance normalization이 존재한다.
batch normalization의 경우 학습 때 미니 배치들의 의 이동 평균을 이용하는 반면 instance normalization은 inference시 데이터의 를 이용한다.
해당 논문의 저자들은 batch normalization과 instance normalization을 비교하는 실험을 통해 instance normalization이 style normalization을 수행하는 것을 확인했다. 또한 conditional instance normalization이 affine paramters마다 다른 조건(style condition)의 이미지를 생성하는 것을 확인했다.
이를 통해 논문의 저자들은 AdaIN(Adaptive Instace Normalization)을 제안한다.
AdaIn의 수식은 다음과 같다.
: content input
: style input
AdaIN의 affine parameters는 학습되는 값이 아닌 style input의 통계치이다.
논문의 저자들은 AdaIN을 통해 임의의 style을 context image에 적용하는 style transfer를 제안할 수 있었다.
Architecture
 사진7
사진7
네트워크는 사진7의 구조로 구성되어 있다.
VGG Encoder를 통해 context image와 style image의 feature map을 얻은 후 AdaIN을 통해 target feature maps t를 만들고 이를 Decoder를 통해 이미지를 생성한다.
수식으로 표현하면 다음과 같다.
: VGG Encoder, Decoder
: context image, style image
: target feature maps
: generated image
Loss function
: style loss weight
: a layer in VGG-19
loss의 형태가 기존의 style transfer와 조금 다른 점들이 있지만, VGG-19을 통해 feature map들의 차이를 계산한다는 점은 동일하다.
결과
 사진8
사진8
 표1
표1
ours가 AdaIN 구조를 사용한 style transfer
Gatys et al.이 coursera 강의에 나오는 style transfer
Ulyanov et al.이 IN 구조를 사용한 style transfer
해당 논문의 결과가 생성과 시간 성능이 다른 모델들 보다 좋다는 것을 확인할 수 잇다.
1D and 3D Generalizations
1D covolution
 사진9
사진9
사진9의 왼쪽을 input이고, 오른쪽을 1D convolution filter라 하자.
input: 8x1
filter : 5x1
1D convolution 연산을 수행하면 [238, 161, 244, 206]으로 4x1의 output을 얻게 된다. 2D convolution과 같이 filter가 input을 stride만큼 뛰어 돌아가면서 연산하고, filter의 개수로 output의 channel이 결정된다.
1D convolution은 시계열 데이터를 다룰 때 주로 사용된다.
3D convolution
 사진10
사진10
3D volume의 차원을 14x14x14라 하고, 3D filter의 차원을 5x5x5라 하자. 그러면 3D convolution 연산을 수행하면 10x10x10 차원의 output을 얻는다. 1D, 2D convolution와 마찬가지로 filter가 input을 stride 만큼 뛰어 돌아가면서 연산하고, filter의 개수로 output의 channel이 결정된다.
3D convolution은 CT(컴퓨터 단층 촬영)와 같이 이미지의 모음이나 비디오 데이터를 다룰 때 주로 사용된다.
References
coursera 강의: https://www.youtube.com/watch?v=ArPaAX_PhIs&list=PLkDaE6sCZn6Gl29AoE31iwdVwSG-KnDzF
A Neural Algorithm of Artistic Style 논문: https://arxiv.org/abs/1508.06576
Arbitrary Style Transfer in Real-time with Adaptive Instance Normalization 논문: https://arxiv.org/abs/1703.06868
코드 참조(A Neural Algorithm of Artistic Style관련)
pytorch tutorial
tensorflow tutorial
논문 저자 jupyter implement(pytorch)
참고 블로그
https://www.popit.kr/neural-style-transfer-%EB%94%B0%EB%9D%BC%ED%95%98%EA%B8%B0/
https://lifeignite.tistory.com/46
https://eehoeskrap.tistory.com/430
출처를 사진 또는 표 하단에 밝히지 않은 사진 및 표는 coursera강의, 두 논문에 출처가 있습니다.

좋은 글 감사합니다. 핵심만 간결하게 되어 있어서 금방 이해할 수 있었어요!
다만, AdaIN 수식에 오타가 있어서 글 남깁니다.
마지막에 x의 평균을 더하는 것으로 되어있는데, y의 평균이 되어야할 것 같습니다.