✏️ 오늘 학습한 내용
1. Views와 Templates
2. Forms와 Customizing
🔎 Views와 Templates
Views를 이용한 모델 활용
polls.views.py
from django.http import HttpResponse
from .models import *

# index함수가 호출되면 hello world를 출력해라
def index(request):
    # Question 목록에서 pubdate를 역순 정렬해서 상위 5개를 가져옴
    latest_question_list = Question.objects.order_by('-pub_date')[:5]
    # question_text만 모아서 ,으로 연결
    output = ', '.join(q.question_text for q in latest_question_list)
    return HttpResponse(output)
Templates를 이용한 모델 활용
-
Template
html을 활용해서 데이터를 잘 표시해주는 도구
-
Templates 생성
-
polls내부에Templates/polls/index.html생성polls.Templates.polls.index.html
<!-- views 변수의 값을 html 상에서 치환해주기 위해서 중괄호를 두번 사용--> <ul> <li>{{first_question}}</li> </ul> -
polls.views.pyfrom django.http import HttpResponse from .models import * # render : 화면에 그려줌 from django.shortcuts import render # index함수가 호출되면 hello world를 출력해라 def index(request): # Question 목록에서 pubdate를 역순 정렬해서 상위 5개를 가져옴 latest_question_list = Question.objects.order_by('-pub_date')[:5] context = {'first_question': latest_question_list[0]} # context를 통해 first_question이란 변수를 전달 # render가 index.html 파일을 그려줌 return render(request,'polls/index.html', context)
-
Templates에서 제어문 사용
( list를 전달해 반복문으로 출력 )
-
polls.views.pyfrom django.http import HttpResponse from .models import * # render : 화면에 그려줌 from django.shortcuts import render # index함수가 호출되면 hello world를 출력해라 def index(request): # Question 목록에서 pubdate를 역순 정렬해서 상위 5개를 가져옴 latest_question_list = Question.objects.order_by('-pub_date')[:5] context = {'questions': latest_question_list} # context를 통해 first_question이란 변수를 전달 # render가 index.html 파일을 그려줌 return render(request,'polls/index.html', context) -
polls.Templates.polls.index.html{% if questions %} <ul> <!-- 제어문을 사용할 때는 중괄호 퍼센트로 묶는다. --> {% for question in questions %} <!-- templates에서 인덱싱을 할때는 대괄호가 아니라 .을 사용--> <li>{{question}}</li> <!-- 제어문의 끝을 항상 표기해야함--> {% endfor %} </ul> {% else %} <p> no questions </p> {% endif %}
상세(Detail) 페이지 만들기
polls 뒤에 원하는 질문의 id를 입력했을 때, 그 세부 페이즈가 나오도록 템플릿을 작성
-
polls.urls.py... urlpatterns = [ ... # int형식이 들어온다면, question_id로 받고 views의 detail를 실행시켜라 path('<int:question_id>/', views.detail, name='detail'), ] -
polls.views.py... def detail(request, question_id): # 입력받은 id와 일치하는 question을 불러옴 question = Question.objects.get(pk=question_id) return render(request,'polls/detail.html', {'question': question}) -
polls.Templates.polls.detail.html<!-- question 표시 --> <h1>{{question.question_text}}</h1> <!-- 연관 Choice 표시, template을 사용할 때는 괄호를 사용하지 않음--> <ul> {% for choice in question.choice_set.all %} <li>{{choice.choice_text}}</li> {% endfor %} </ul>
상세 페이지로 링크 추가
기존의 index.html를 수정하여, question들에 링크를 걸어줌
-
polls.urls.py... # 앞으로 템플릿에서 url 태그를 사용할 때, 이름 앞에 polls를 붙여줘야함 # App마다 다른 detail url을 사용하기 위함 app_name = 'polls' -
polls.Templates.polls.index.html{% if questions %} <ul> {% for question in questions %} <!-- question.id를 detail 이름을 가진 urlpattern에 전달 --> <!-- url태그 사용법 : url, 원하는 url 이름, 넘겨줘야하는 값 --> <li><a href="{% url 'polls:detail' question.id %}">{{question.question_text}}</a></li> <!-- 이렇게도 사용 가능--> <!-- <li><a href="/polls/{{question.id}}">{{question.question_text}}</a></li> --> {% endfor %} </ul> {% else %} <p> no questions </p> {% endif %}
404 에러 처리
- 404 Page not found :사용자가 잘못된 요청을 했을 때 발생
- 500 : 알 수 없는 에러가 발생했을 때 발생
-
현재 페이지의 문제점
http://127.0.0.1:8000/polls/500/ 를 입력했을 때,
잘못된 요청을 했음을 알려주는 404 에러가 아닌,
500 에러가 발생. -
Django Shell에서 확인해본 결과
Question.objects.get(pk=500)입력 시,
DoseNotExist 에러가 발생하는 것을 확인즉, get은 찾지못하는 경우 에러가 발생한다는 것을 알 수 있음
-
문제 해결
polls.views.pyfrom .models import * from django.http import HttpResponse # 404 사용 # from django.http import Http404 # django에서 제공하는 404 숏컷 from django.shortcuts import render , get_object_or_404 def detail(request, question_id): # try-catch문 """ try: question = Question.objects.get(pk=question_id) except Question.DoesNotExist: raise Http404("Question does not exist") """ # shorcut question = get_object_or_404(Question, pk=question_id) return render(request,'polls/detail.html', {'question': question})
🔎 Forms와 Customizing
Forms를 사용한 투표 기능 추가
-
CSRF 토큰
- 서버에서 그려준 form에서만 제출할 수 있도록 방어하는 역할
- 토큰이 있어야 제출을 할 수 있는 권한이 생김
-
polls.Templates.polls.detail.html<form action={% url 'polls:vote' question.id %} method='post'> <!-- 토큰이 있어야 제출을 할 수 있는 권한이 생김 --> <!-- 서버에서 그려준 form에서만 제출할 수 있도록 방어하는 역할--> {% csrf_token %} <h1>{{question.question_text}}</h1> <!-- error_message를 받은 경우에만 출력 --> {% if error_message %} <p><strong>{{error_message}}</strong></p> {% endif %} {% for choice in question.choice_set.all %} <!-- choice1, choice2, ... --> <!-- for문이 돌때마다 counter가 1씩 증가--> <input type="radio" name="choice" id="choice{{forloop.counter}}" value="{{choice.id}}"> <label for ="choice{{forloop.counter}}"> {{choice.choice_text}} </label> </br> {% endfor %} <input type="submit" value="Vote"> </form> -
polls.urls.py... urlpatterns = [ path('', views.index, name='index'), path('<int:question_id>/', views.detail, name='detail'), path('<int:question_id>/vote', views.vote, name='vote'), ] -
polls.views.pyfrom .models import * from django.http import HttpResponse, HttpResponseRedirect # django에서 제공하는 404 숏컷 from django.shortcuts import render , get_object_or_404 from django.urls import reverse ... def vote(request, question_id): question = get_object_or_404(Question, pk=question_id) try : # post로 받아온 값 중에 name이 choice인 것을 받아와라 (투표한 choice를 가져와라) selected_choice = question.choice_set.get(pk=request.POST['choice']) except (KeyError, Choice.DoesNotExist) : return render(request, 'polls/detail.html', {'question': question, 'error_message': '선택이 없습니다.'}) else : selected_choice.votes += 1 selected_choice.save() # url을 연결하는 다른 방법, post일때만 사용 가능 return HttpResponseRedirect(reverse('polls:index'))
에러 방어
-
사례 1
polls.views.py에서except (KeyError, Choice.DoesNotExist)를 해준 이유?-
선택하려한 Choice가 Table 내에서 지워졌을 경우,
-
Browser의 오류로 선택한 Choice의 value값이 서버와 적합성이 맞지않는 이상한 값으로 변했을 경우
그대로 vote했을 시 DoesNotExist 에러가 발생하기 때문에, 이를 방지하기 위해 Choice.DoesNotExist도 넣어준 것
-
-
사례 2
A와 B, 두 사람이 서로 다른 장고 서버에 접속했을 때, 완전히 동시에 같은 choice를 선택하고 vote를 했을 경우,
가정 : A서버와 B서버는 동일한 데이터베이스를 공유함
문제 : A서버, B서버 모두
selected_choice.votes += 1가 동시에 실행되어
두 명이 투표했음에도 votes가 1만 증가하는 결과가 발생해결 방안 : 메모리로 값을 읽어온 다음에 1을 증가시키는 연산을 서버가 아닌 DB에서 진행 시키는 것
from django.db.models import F
# F : 바로 DB에서 값을 읽어서 사용해라
selected_choice.votes = F('votes') + 1
결과(result) 조회 페이지
-
polls.Templates.polls.result.html<h1>{{question.question_text}}</h1> {% for choice in question.choice_set.all %} <label> {{choice.choice_text}} -- {{choice.votes}} </label> </br> {% endfor %} -
polls.urls.py... urlpatterns = [ path('', views.index, name='index'), path('<int:question_id>/', views.detail, name='detail'), path('<int:question_id>/result', views.result, name='result'), path('<int:question_id>/vote', views.vote, name='vote'), ] -
polls.views.pyfrom .models import * from django.http import HttpResponse, HttpResponseRedirect # django에서 제공하는 404 숏컷 from django.shortcuts import render , get_object_or_404 from django.urls import reverse ... def vote(request, question_id): ... else : selected_choice.votes += 1 selected_choice.save() # HttpResponseRedirect가 값을 전달하는 방법, args = ( ,) ,를 꼭 붙여야함 return HttpResponseRedirect(reverse('polls:result',args= (question_id,)))
Django Admin의 편집 페이지 커스터마이징
polls.admin.py
from django.contrib import admin
# polls내 models에 있는 모든 함수를 불러옴
from .models import *


# 모델에 대한 Admin을 커스터마이징할 것이란 것을
# 장고에게 알려줘야함

# Choice도 question에서 생성할 수 있게끔 기능 추가
class ChoiceInline(admin.StackedInline):
    model = Choice
    extra = 3

# Admin에서 사용할 field를 정의
class QuestionAdmin(admin.ModelAdmin) :
    fieldsets = [
        ('질문 섹션', {'fields' : ['question_text']}),
        # 'classes' : ['collapse']로 숨기기
        ('생성일',{'fields':['pub_date'], 'classes' : ['collapse']}),
    ]
    # pub_date의 경우 자동 생성되기에 수정이 불가능함
    # 그래서 readonly처리해주지않으면 admin에서 접근시 에러발생
    readonly_fields = ['pub_date']
    inlines = [ChoiceInline]


# Question, Choice 모델을 불러옴
admin.site.register(Question, QuestionAdmin)
admin.site.register(Choice)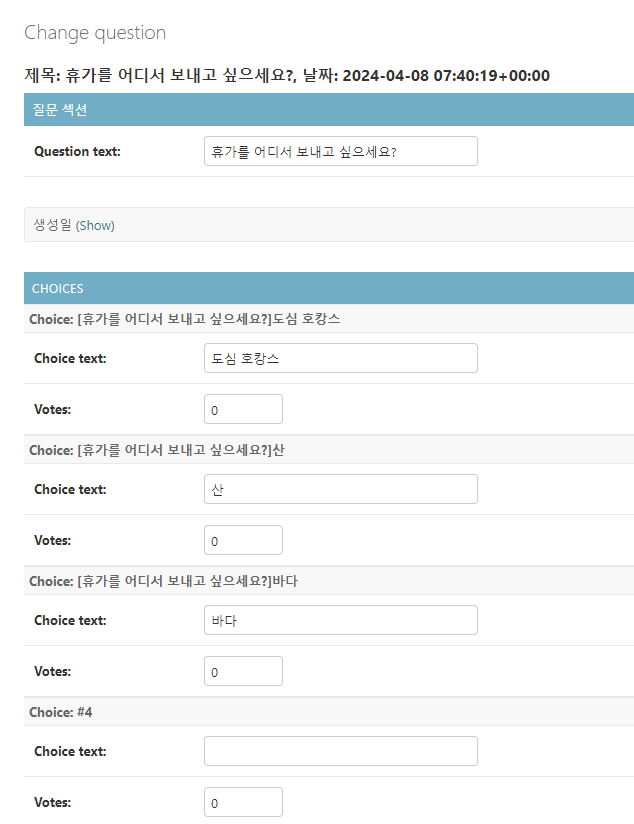
Django Admin의 목록 페이지 커스터마이징
-
polls.admin.pyfrom django.contrib import admin # polls내 models에 있는 모든 함수를 불러옴 from .models import * # Choice도 question에서 생성할 수 있게끔 기능 추가 class ChoiceInline(admin.StackedInline): model = Choice extra = 3 class QuestionAdmin(admin.ModelAdmin) : fieldsets = [ ('질문 섹션', {'fields' : ['question_text']}), # 'classes' : ['collapse']로 숨기기 ('생성일',{'fields':['pub_date'], 'classes' : ['collapse']}), ] # str method에서 정의된 내용이 아니라 # 컬럼을 나열해 가시화 함 list_display = ('question_text','pub_date','was_published_recently') readonly_fields = ['pub_date'] inlines = [ChoiceInline] # 검색 기능 추가 # 생성일을 기준으로 filter생성 (datetime을 보고 자동으로 옵션 제공) list_filter = ['pub_date'] # 단어를 넣어 질문 검색 기능 생성 # search_fields = ['question_text'] # Choice의 옵션으로도 검색하기 search_fields = ['question_text','choice__choice_text'] # Question, Choice 모델을 불러옴 admin.site.register(Question, QuestionAdmin) -
polls.models.py... from django.contrib import admin class Question(models.Model): # verbose_name으로 칼럼의 이름을 변경 question_text = models.CharField(max_length=200,verbose_name='질문') pub_date = models.DateTimeField(auto_now_add=True,verbose_name='생성일') # admin이란 데코레이터를 통해서 칼럼의 이름을 변경 # boolean=True 불린 값을 보기 좋게 바꿔줌 @admin.display(boolean=True, description='최근생성(하루기준)') def was_published_recently(self): return self.pub_date >= timezone.now() - datetime.timedelta(days=1) def __str__(self): if self.was_published_recently(): new_badge = 'NEW!!!' else: new_badge = '' return f'{new_badge} 제목: {self.question_text}, 날짜: {self.pub_date}' ...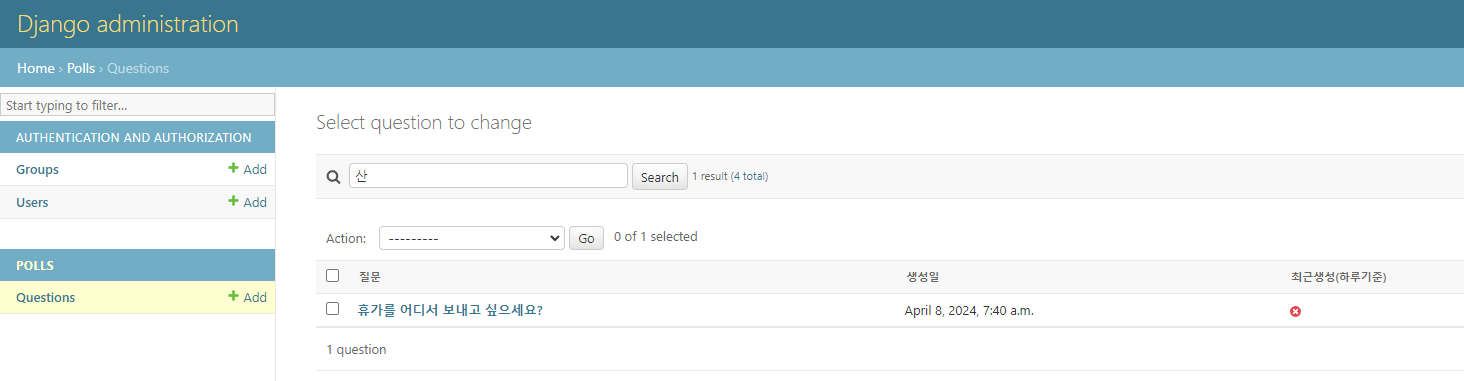
웹 서비스를 운영할 때, 관리자를 위한 기능을 구현해야할 때,
Admin에서 소화하는 것이 가장 쉽고 편리하다.
-> 개발 시간 절약