CloudNet@에서 진행하는 Istio Study 2주차 4장 내용입니다.
📕 이번 Chapter에서 다루는 내용
- 진입 지점 정의
- 인입 트래픽을 클러스터 내 배포로 라우팅하기
- 인입 트래픽 보호하기 (HTTPS, x.509)
- HTTP아닌 트래픽 라우팅 (TCP)
실습 환경 준비
- k8s(1.23.17) 배포
Windows의 권한 문제로 extramounts를 생략하고, 컨테이너 내부에서 직접 Git Clone 진행
kind create cluster --name myk8s --image kindest/node:v1.23.17 --config - <<EOF
kind: Cluster
apiVersion: kind.x-k8s.io/v1alpha4
nodes:
- role: control-plane
  extraPortMappings:
  - containerPort: 30000 # Sample Application (istio-ingrssgateway) HTTP
    hostPort: 30000
  - containerPort: 30001 # Prometheus
    hostPort: 30001
  - containerPort: 30002 # Grafana
    hostPort: 30002
  - containerPort: 30003 # Kiali
    hostPort: 30003
  - containerPort: 30004 # Tracing
    hostPort: 30004
  - containerPort: 30005 # Sample Application (istio-ingrssgateway) HTTPS
    hostPort: 30005
  - containerPort: 30006 # TCP Route
    hostPort: 30006
  - containerPort: 30007 # New Gateway
    hostPort: 30007
networking:
  podSubnet: 10.10.0.0/16
  serviceSubnet: 10.200.1.0/24
EOF
istio 1.17.8 설치
# myk8s-control-plane 진입 후 설치 진행
docker exec -it myk8s-control-plane bash
-----------------------------------
# (옵션) 코드 파일들 마운트 확인
tree /istiobook/ -L 1
혹은
git clone ... /istiobook

# istioctl 설치
export ISTIOV=1.17.8
echo 'export ISTIOV=1.17.8' >> /root/.bashrc

curl -s -L https://istio.io/downloadIstio | ISTIO_VERSION=$ISTIOV sh -
cp istio-$ISTIOV/bin/istioctl /usr/local/bin/istioctl
istioctl version --remote=false

# default 프로파일 컨트롤 플레인 배포
istioctl install --set profile=default -y

# 설치 확인 : istiod, istio-ingressgateway, crd 등
kubectl get istiooperators -n istio-system -o yaml
kubectl get all,svc,ep,sa,cm,secret,pdb -n istio-system
kubectl get cm -n istio-system istio -o yaml
kubectl get crd | grep istio.io | sort

# 보조 도구 설치
kubectl apply -f istio-$ISTIOV/samples/addons
kubectl get pod -n istio-system

-----------------------------------

# 실습을 위한 네임스페이스 설정
kubectl create ns istioinaction
kubectl label namespace istioinaction istio-injection=enabled
kubectl get ns --show-labels

# istio-ingressgateway 서비스 : NodePort 변경 및 nodeport 지정 변경 , externalTrafficPolicy 설정 (ClientIP 수집)
kubectl patch svc -n istio-system istio-ingressgateway -p '{"spec": {"type": "NodePort", "ports": [{"port": 80, "targetPort": 8080, "nodePort": 30000}]}}'
kubectl patch svc -n istio-system istio-ingressgateway -p '{"spec": {"type": "NodePort", "ports": [{"port": 443, "targetPort": 8443, "nodePort": 30005}]}}'
kubectl patch svc -n istio-system istio-ingressgateway -p '{"spec":{"externalTrafficPolicy": "Local"}}'
kubectl describe svc -n istio-system istio-ingressgateway

# NodePort 변경 및 nodeport 30001~30003으로 변경 : prometheus(30001), grafana(30002), kiali(30003), tracing(30004)
kubectl patch svc -n istio-system prometheus -p '{"spec": {"type": "NodePort", "ports": [{"port": 9090, "targetPort": 9090, "nodePort": 30001}]}}'
kubectl patch svc -n istio-system grafana -p '{"spec": {"type": "NodePort", "ports": [{"port": 3000, "targetPort": 3000, "nodePort": 30002}]}}'
kubectl patch svc -n istio-system kiali -p '{"spec": {"type": "NodePort", "ports": [{"port": 20001, "targetPort": 20001, "nodePort": 30003}]}}'
kubectl patch svc -n istio-system tracing -p '{"spec": {"type": "NodePort", "ports": [{"port": 80, "targetPort": 16686, "nodePort": 30004}]}}'
4.1 Traffic ingress concepts
Ingress
- 네트워킹 커뮤니티에는 잘 정의된 진입점으로 네트워크를 연결하는 상황을 설명하는 용어가 있는데, 바로 ingress point 이다.
- ingress 란 네트워크 외부에서 발원해 네트워크 내부 엔드포인트를 향하는 트래픽을 말한다.
Virtual IPs: Simplifying services access
- Domain을 단일 IP에 대응시키면, 서비스 장애에 취약하다. 가용성이 낮다.
- Reverse proxy에 가상 IP를 대응한다.
Virtual hosting: Multiple services from a single access point
- 서로 다른 서비스 여러 개를 진입점 하나로 호스팅하는 것을 virtual hosting 이라고 한다.
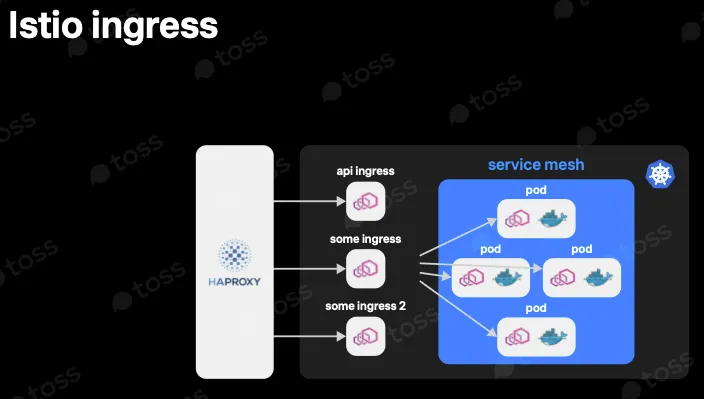
4.2 Istio ingress gateways
Istio Service Proxy(Envoy Proxy)가 Istio ingress gateway에서 실제로 작동 중인지 확인
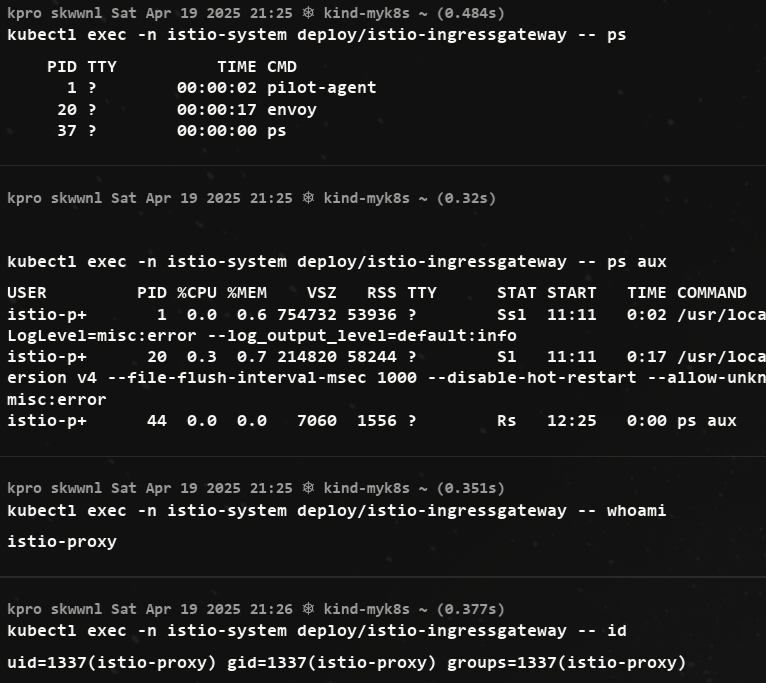
- 동작 중인 프로세스로 pilot-agent 와 envoy가 보인다.
ingress gateway가 트래픽을 클러스터 내부로 허용하도록 설정하려면, 우선 Istio의 리소스인 Gateway 와 VirtualService 를 이해해야 한다.
4.2.1 Specifying Gateway resources
- 이스티오에서 인그레스 게이트웨이를 설정하려면, Gateway 리소스를 사용해 개방하고 싶은 포트와 그 포트에서 허용할 가상 호스트를 지정한다.
- 살펴볼 예시 Gateway 리소스는 매우 간단해 80 포트에서 가상 호스트
webapp.istioinaction.io를 향하는 트래픽을 허용하는 HTTP 포트를 개방한다.
apiVersion: networking.istio.io/v1alpha3
kind: Gateway
metadata:
  name: coolstore-gateway #(1) 게이트웨이 이름
spec:
  selector:
    istio: ingressgateway #(2) 어느 게이트웨이 구현체인가?
  servers:
  - port:
      number: 80          #(3) 노출할 포트
      name: http
      protocol: HTTP
    hosts:
    - "webapp.istioinaction.io" #(4) 이 포트의 호스트
kubectl get gw,vs -n istioinaction
NAME AGE
gateway.networking.istio.io/coolstore-gateway 26m
#
docker exec -it myk8s-control-plane istioctl proxy-status
NAME CLUSTER CDS LDS EDS RDS ECDS ISTIOD VERSION
istio-ingressgateway-996bc6bb6-p6k79.istio-system Kubernetes SYNCED SYNCED SYNCED SYNCED NOT SENT istiod-7df6ffc78d-w9szx 1.17.8
docker exec -it myk8s-control-plane istioctl proxy-config listener deploy/istio-ingressgateway.istio-system
ADDRESS PORT MATCH DESTINATION
0.0.0.0 8080 ALL Route: http.8080
...
docker exec -it myk8s-control-plane istioctl proxy-config routes deploy/istio-ingressgateway.istio-system
NAME DOMAINS MATCH VIRTUAL SERVICE
http.8080 * /* 404
...
# HTTP 포트(80)을 올바르게 노출했다. VirtualService 는 아직 아무것도 없다.
docker exec -it myk8s-control-plane istioctl proxy-config routes deploy/istio-ingressgateway.istio-system -o json
docker exec -it myk8s-control-plane istioctl proxy-config routes deploy/istio-ingressgateway.istio-system -o json --name http.8080
[
{
"name": "http.8080",
"virtualHosts": [
{
"name": "blackhole:80",
"domains": [
"*"
]
}
],
"validateClusters": false,
"ignorePortInHostMatching": true
}
]4.2.2 Gateway routing with virtual services
VirtualService를 통해 게이트웨이로 들어오면 그 트래픽을 서비스 메시 내 특정 서비스로 가져온다.
VirtualService 리소스는 클라이언트가 특정 서비스와 통신하는 방법을 정의하는데, 구체적으로 FQDN, 사용 가능한 서비스 버전, 기타 라우팅 속성(재시도, 요청 타임아웃 등)이 있다.
아래는 VirtualService의 예제이다.
apiVersion: networking.istio.io/v1alpha3
kind: VirtualService
metadata:
  name: webapp-vs-from-gw     #1 VirtualService 이름
spec:
  hosts:
  - "webapp.istioinaction.io" #2 비교할 가상 호스트네임(또는 호스트네임들)
  gateways:
  - coolstore-gateway         #3 이 VirtualService 를 적용할 게이트웨이
  http:
  - route:
    - destination:            #4 이 트래픽의 목적 서비스
        host: webapp
        port:
number: 80- 게이트웨이로 들어오는 트래픽에 대해 수행할 작업을 이 VirtualService 리소스로 정의한다.
- spec.gateway 필드에서 보듯이, 이 트래픽 규칙들은 이전 절에서 만든 coolstore-gateway 게이트웨이 정의를 통해 들어온 트래픽만 적용된다.
- 또한 이 규칙들은 가상 호스트
webapp.istioinaction.io로 향하는 트래픽에만 적용된다.
kubectl apply -n istioinaction -f ch4/coolstore-vs.yaml

# 확인
kubectl get gw,vs -n istioinaction
NAME                                            AGE
gateway.networking.istio.io/coolstore-gateway   26m

NAME                                                   GATEWAYS                HOSTS                         AGE
virtualservice.networking.istio.io/webapp-vs-from-gw   ["coolstore-gateway"]   ["webapp.istioinaction.io"]   49s

#
docker exec -it myk8s-control-plane istioctl proxy-status
NAME                                                  CLUSTER        CDS        LDS        EDS        RDS        ECDS         ISTIOD                      VERSION
istio-ingressgateway-996bc6bb6-p6k79.istio-system     Kubernetes     SYNCED     SYNCED     SYNCED     SYNCED     NOT SENT     istiod-7df6ffc78d-w9szx     1.17.8

docker exec -it myk8s-control-plane istioctl proxy-config listener deploy/istio-ingressgateway.istio-system
docker exec -it myk8s-control-plane istioctl proxy-config routes deploy/istio-ingressgateway.istio-system
NAME          DOMAINS     MATCH                  VIRTUAL SERVICE
http.8080     webapp.istioinaction.io     /*                     webapp-vs-from-gw.istioinaction
...
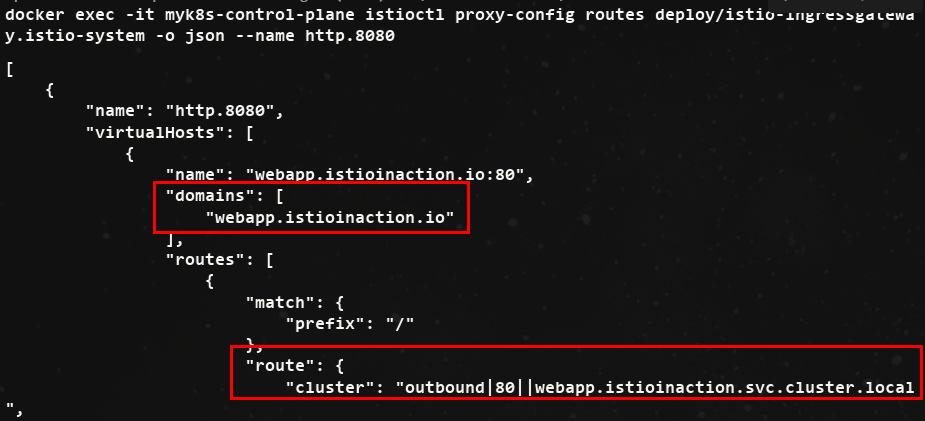
docker exec -it myk8s-control-plane istioctl proxy-config routes deploy/istio-ingressgateway.istio-system -o json --name http.8080- 위 내용을 진행하면, 아래의 사진처럼 비교할 도메인과 라우팅에 대한 정보가 나온다.
- VirtualService를 정의하면 이스티오 게이트웨이에 엔보이 루트를 어떻게 생성하는지 확인 할 수 있다는 점이다.
실제 서비스를 배포해서 비교
# 배포
kubectl apply -f services/catalog/kubernetes/catalog.yaml -n istioinaction
kubectl apply -f services/webapp/kubernetes/webapp.yaml -n istioinaction- Pod 확인

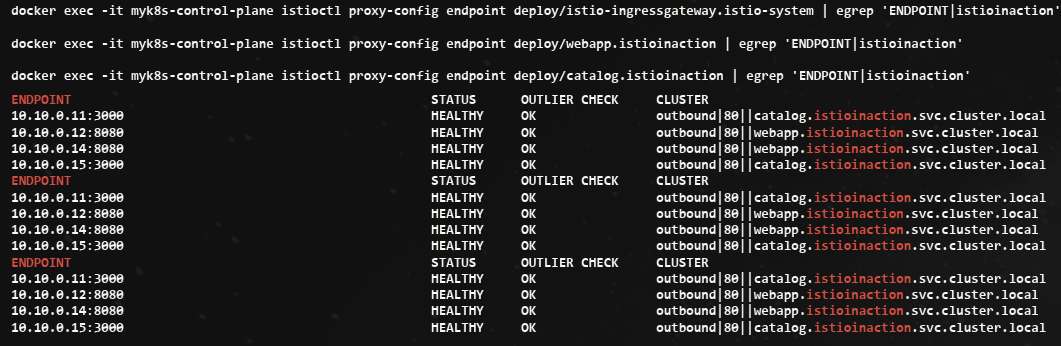
# istio-ingressgateway 에서 catalog/webapp 의 Service(ClusterIP)로 전달하는게 아니라, 바로 파드 IP인 Endpoint 로 전달함.
## 즉, istio 를 사용하지 않았다면, Service(ClusterIP) 동작 처리를 위해서 Node에 iptable/conntrack 를 사용했었어야 하지만,
## istio 사용 시에는 Node에 iptable/conntrack 를 사용하지 않아서, 이 부분에 대한 통신 라우팅 효율이 있다.
docker exec -it myk8s-control-plane istioctl proxy-config endpoint deploy/istio-ingressgateway.istio-system | egrep 'ENDPOINT|istioinaction'
ENDPOINT                                                STATUS      OUTLIER CHECK     CLUSTER
10.10.0.18:3000                                         HEALTHY     OK                outbound|80||catalog.istioinaction.svc.cluster.local
10.10.0.19:8080                                         HEALTHY     OK                outbound|80||webapp.istioinaction.svc.cluster.local
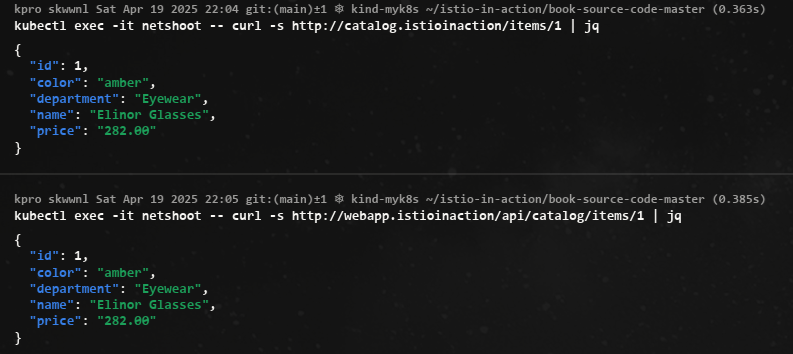
- netshoot로 내부에서 catalog, webapp 접속 확인
!! replicas를 2로 증가시켜 istio EDS(Endpoint) 확인
- istio controlplane 는 어떻게 K8S Service(Endpoint)의 정보를 획득할 수 있었을까? ⇒ Istio 가 K8S API에 요청하여 Service 등 정보를 주기적으로 Watch 하고, 변경 시 정보 요청하여 획득함
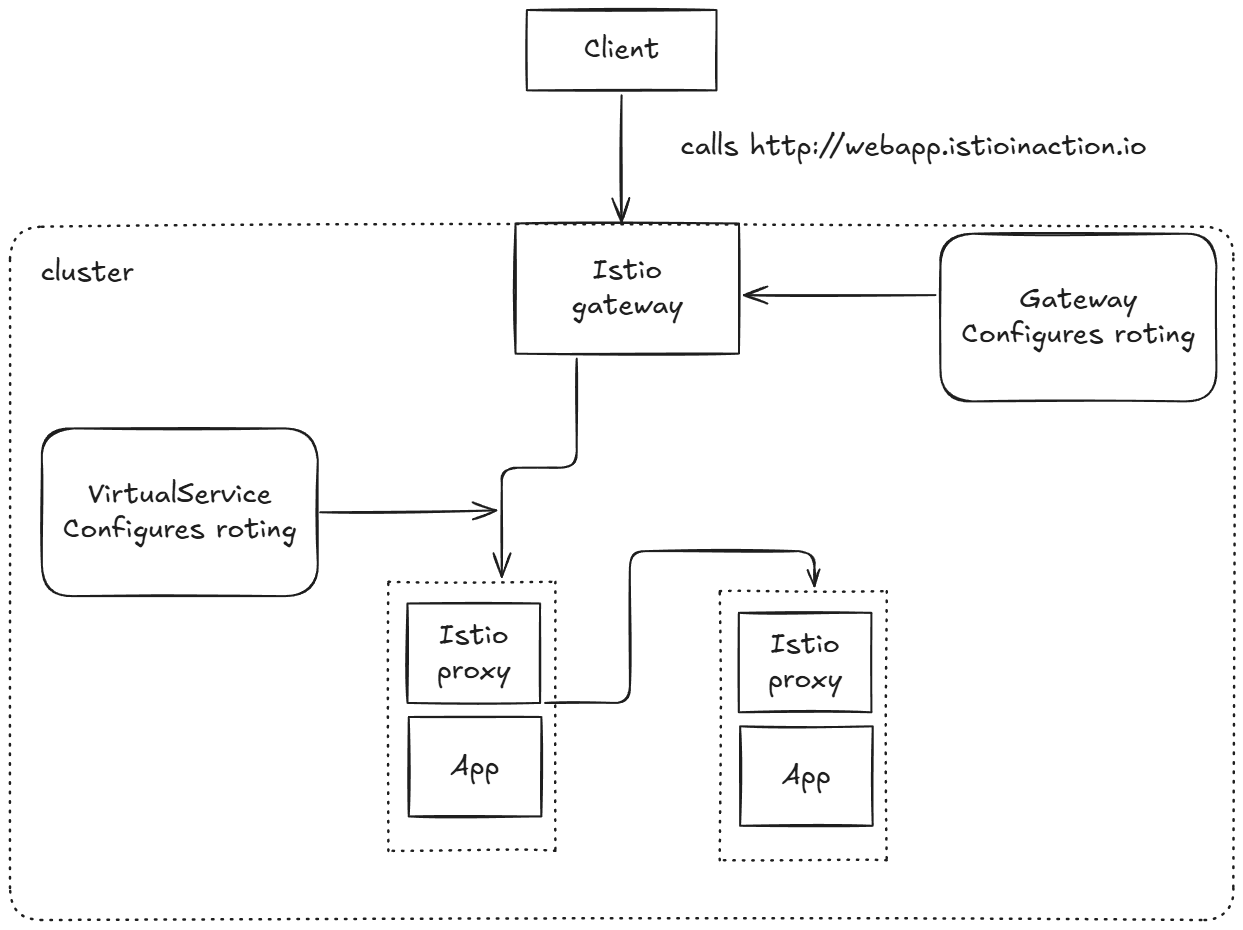
4.2.3 Overall view of traffic flow
- 이스티오 게이트웨이 리소스는 서비스 메시 클러스터의 에지에서 리스닝하고자 하는 포트, 프로토콜, 가상 호스트를 정의한다.
- VirtualService 리소스는 에지에서 허용된 트래픽이 가야 할 곳을 정의한다.
4.2.4 Istio ingress gateway vs. Kubernetes Ingress
쿠버네티스를 실행할 때 ‘왜 Istio는 그냥 쿠버네티스 인그레스 v1 리소스를 인그레스로 지정하지 않는가?’ 라는 의문이 생길 수 있다. Istio는 쿠버네티스 인그레스 v1 리소스를 지원하지만, 쿠버네티스 인그레스 v1 사양에는 상당한 한계가 있다.
- 쿠버네티스 인그레스 v1 의 사양이 HTTP 워크로드에 맞춰져 매우 단순
- 실제로 인그레스 사양은 80포트와 443 포트만 인그레스 포인트로 간주한다. 이는 클러스터 운영자가 서비스 메시로 허용할 수 있는 트래픽 유형을 심각하게 제한한다.
-
쿠버네티스 인그레스 v1 리소스는 사양이 심각하게 부족
-
사양이 부족하다 보니 벤더 대부분의 설정이 디플로이먼트의 맞춤형 애노테이션으로 노출하는 방식
- 이 애노테이션은 벤더마다 상이하고 호환되지 않으므로, Istio가 이런 추세에 따랐다면 에지 게이트웨이로서 엔보이의 모든 기능을 반영하기 위해 애노테이션이 더 많이 필요했을 것이다
Istio는 인그레스 패턴을 백지 상태에서 시작해 구축하기로 결정했고, 4계층(전송)과 5계층(세션) 속성을 7계층(애플리케이션) 라우팅 문제로부터 명확하게 분리해냈다.
- Istio Gateway는 L4/L5 처리
- VirtualService는 L7 처리
4.2.5 Istio ingress gateway vs. API gateways
- API 게이트웨이는 조직이 네트워크나 아키텍처 경계의 서비스를 사용하는 클라이언트에게 서비스 구현의 세부 사항을 추상화활 수 있게 해준다.
- 예컨대 클라이언트는 잘 문서화된 API들을 호출하게 되고, 이 API들은 앞뒤 호환성을 지니면서 발전하며, 셀프 서비스와 기타 사용 메커니즘을 제공할 수 있다.
- API 게이트웨이는 여러 보안 기술(OIDC, OAuth 2.0, LDAP)을 사용해 클라이언트를 식별할 수 있어야 하고, 메시지를 변형할 수 있어야 하며(SOAP → REST, gRPC → REST, 바디 및 헤더 텍스트 기반 변환 등), 비즈니스 수준으로 정교하게 속도를 제한할 수 있어야 하고, 자체 가입 기능이나 개발자 포털을 제공할 수 있어야 한다.
Istio의 인그레스 게이트웨이는 이런 것들을 기본적으로는 제공하지 않는다.
4.3 Securing gateway traffic
4.3.1 HTTP traffic with TLS
- 들어오는 트래픽 모두가 HTTPS로 제공되도록 하는 것이다.
인증서/키를 쿠버네티스 시크릿으로 만들기
docker exec -it myk8s-control-plane istioctl proxy-config secret deploy/istio-ingressgateway.istio-system
RESOURCE NAME     TYPE           STATUS     VALID CERT     SERIAL NUMBER                               NOT AFTER                NOT BEFORE
default           Cert Chain     ACTIVE     true           10902120529195607333566582145784256806      2025-04-20T11:07:34Z     2025-04-19T11:05:34Z
ROOTCA            CA             ACTIVE     true           100833383177951782303120048448390599242     2035-04-17T11:07:23Z     2025-04-19T11:07:23Z

# webapp-credential 시크릿 만들기
kubectl create -n istio-system secret tls webapp-credential \
--key ch4/certs/3_application/private/webapp.istioinaction.io.key.pem \
--cert ch4/certs/3_application/certs/webapp.istioinaction.io.cert.pem

# 확인 : krew view-secret
kubectl view-secret -n istio-system webapp-credential --all
게이트웨이 리소스가 인증서와 키를 사용하도록 설정
apiVersion: networking.istio.io/v1alpha3
kind: Gateway
metadata:
  name: coolstore-gateway
spec:
  selector:
    istio: ingressgateway
  servers:
  - port:
      number: 80  #1 HTTP 트래픽 허용
      name: http
      protocol: HTTP
    hosts:
    - "webapp.istioinaction.io"
  - port:
      number: 443 #2 HTTPS 트래픽 허용
      name: https
      protocol: HTTPS
    tls:
      mode: SIMPLE #3 보안 연결
      credentialName: webapp-credential #4 TLS 인증서가 들어 있는 쿠버네티스 시크릿 이름
    hosts:
- "webapp.istioinaction.io"- Gateway 리소스에서 인그레스 게이트웨이의 443 포트를 열고, 이를 HTTPS로 지정한다.
- 또한 게이트웨이 설정에 tls 부분을 추가해 TLS에 사용할 인증서와 키의 위치를 지정한다.

- 실패한 curl 결과
# 1
curl -v -H "Host: webapp.istioinaction.io" https://localhost:30005/api/catalog
* Host localhost:30005 was resolved.
* IPv6: ::1
* IPv4: 127.0.0.1
* Trying [::1]:30005...
* Connected to localhost (::1) port 30005
* ALPN: curl offers h2,http/1.1
* (304) (OUT), TLS handshake, Client hello (1):
* CAfile: /etc/ssl/cert.pem
* CApath: none
* LibreSSL SSL_connect: SSL_ERROR_SYSCALL in connection to localhost:30005
* Closing connection
curl: (35) LibreSSL SSL_connect: SSL_ERROR_SYSCALL in connection to localhost:30005
# 서버(istio-ingressgateway 파드)에서 제공하는 인증서는 기본 CA 인증서 체인을 사용해 확인할 수 없다는 의미다.
# curl 클라이언트에 적절한 CA 인증서 체인을 전달해보자.
# (호출 실패) 원인: (기본 인증서 경로에) 인증서 없음. 사설인증서 이므로 “사설CA 인증서(체인)” 필요
# 2
curl -v -H "Host: webapp.istioinaction.io" https://localhost:30005/api/catalog \
--cacert ch4/certs/2_intermediate/certs/ca-chain.cert.pem
* Host localhost:30005 was resolved.
* IPv6: ::1
* IPv4: 127.0.0.1
* Trying [::1]:30005...
* Connected to localhost (::1) port 30005
* ALPN: curl offers h2,http/1.1
* (304) (OUT), TLS handshake, Client hello (1):
* CAfile: ch4/certs/2_intermediate/certs/ca-chain.cert.pem
* CApath: none
* LibreSSL SSL_connect: SSL_ERROR_SYSCALL in connection to localhost:30005
* Closing connection
curl: (35) LibreSSL SSL_connect: SSL_ERROR_SYSCALL in connection to localhost:30005
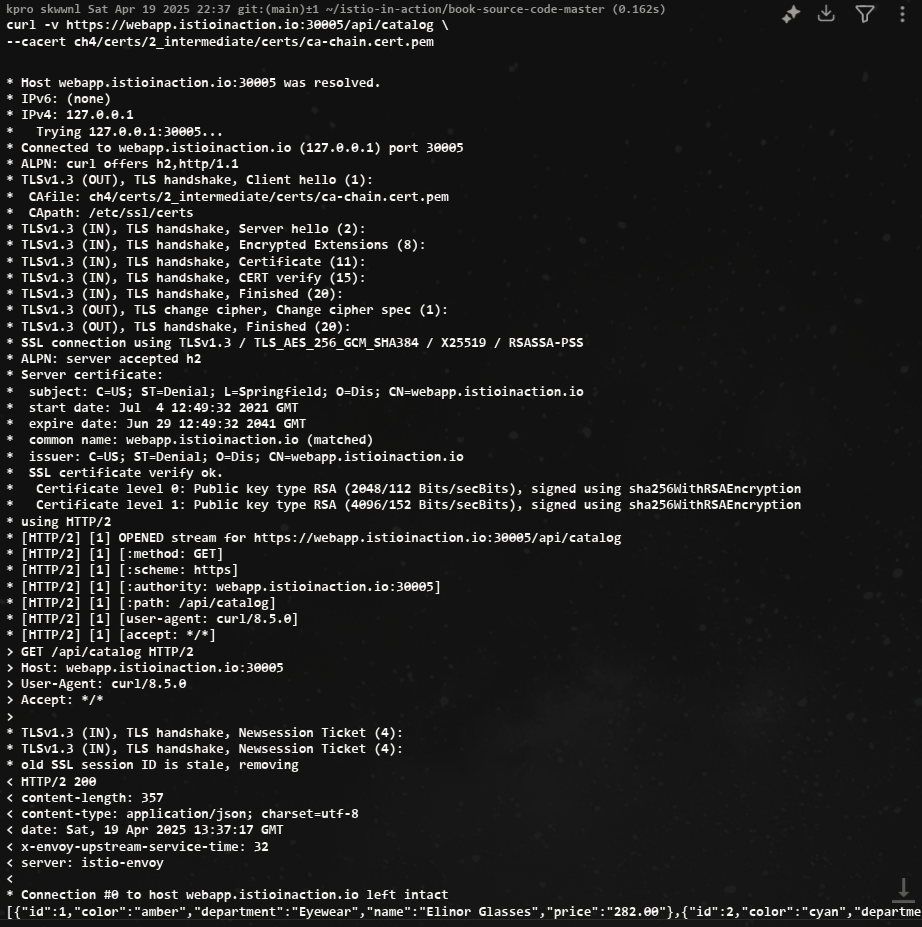
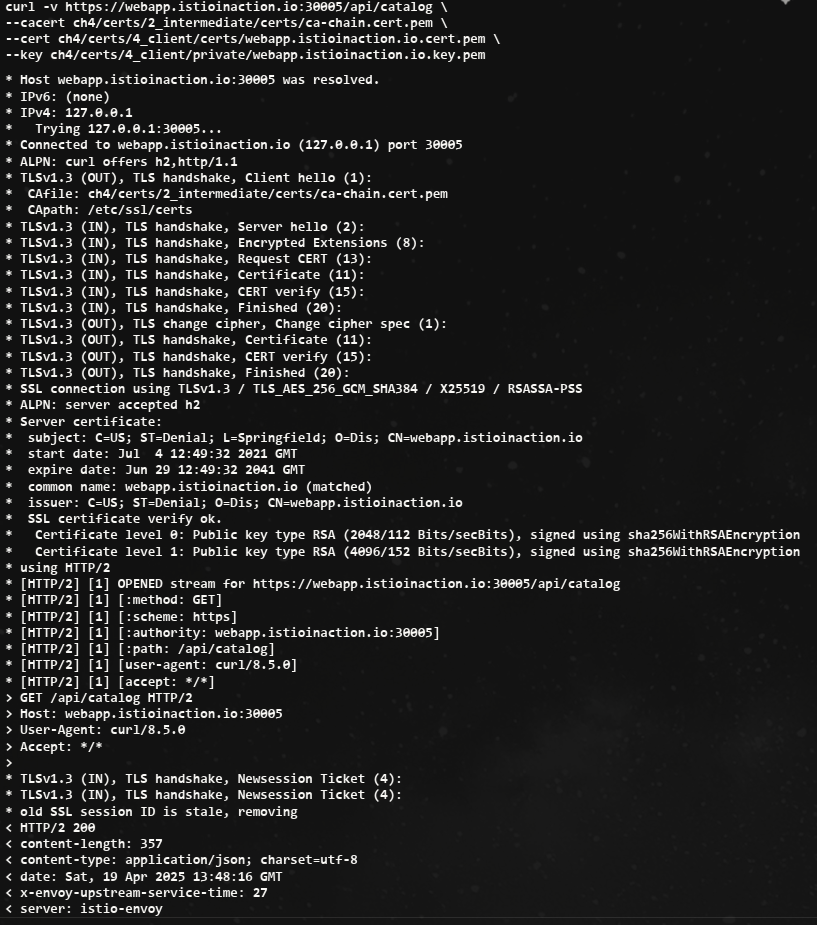
# (호출 실패) 원인: 인증실패. 서버인증서가 발급된(issued) 도메인 “webapp.istioinaction.io”로 호출하지 않음 (localhost로 호출함)- HTTPS로 성공한 curl 결과
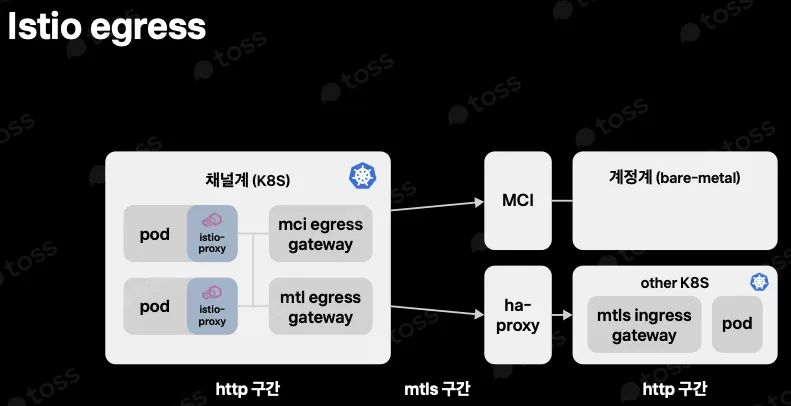
4.3.3 HTTP traffic with mutual TLS
클라이언트에게도 공개 인증서를 보내게 하여 서버와 클라이언트가 서로 신뢰할 수 있음을 검증한다.
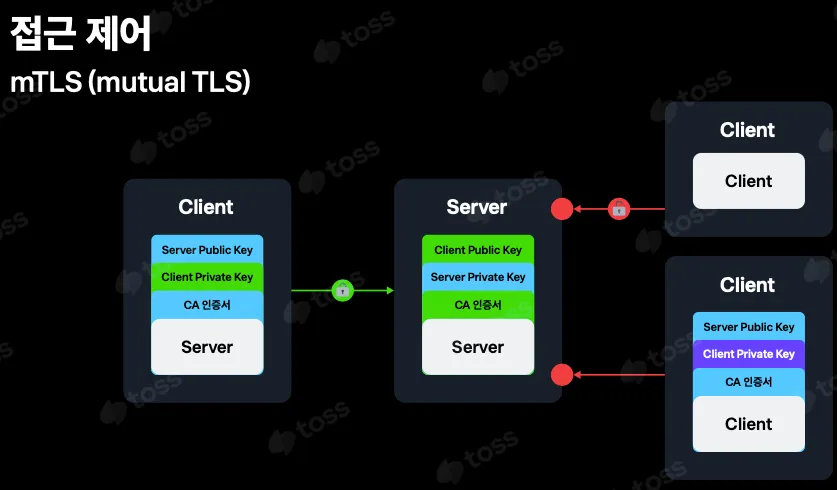
istio-ingressgateway 가 mTLS 커넥션에 참여하도록 구성하려면, 클라이언트의 인증서를 검증하는 데 사용할 수 있도록 CA 인증서 집합을 제공해야 한다.
# Secret 생성 : (적절한 CA 인증서 체인) 클라이언트 인증서
kubectl create -n istio-system secret \
generic webapp-credential-mtls --from-file=tls.key=\
ch4/certs/3_application/private/webapp.istioinaction.io.key.pem \
--from-file=tls.crt=\
ch4/certs/3_application/certs/webapp.istioinaction.io.cert.pem \
--from-file=ca.crt=\
ch4/certs/2_intermediate/certs/ca-chain.cert.pem
CA 인증서 체인의 위치를 가리키도록 이스티오 Gateway 리소스를 업데이트하고, expected 프로토콜을 mTLS로 구성
apiVersion: networking.istio.io/v1alpha3
kind: Gateway
metadata:
  name: coolstore-gateway
spec:
  selector:
    istio: ingressgateway
  servers:
  - port:
      number: 80
      name: http
      protocol: HTTP
    hosts:
    - "webapp.istioinaction.io"
  - port:
      number: 443
      name: https
      protocol: HTTPS
    tls:
      mode: MUTUAL # mTLS 설정
      credentialName: webapp-credential-mtls # 신뢰할 수 있는 CA가 구성된 자격 증명
    hosts: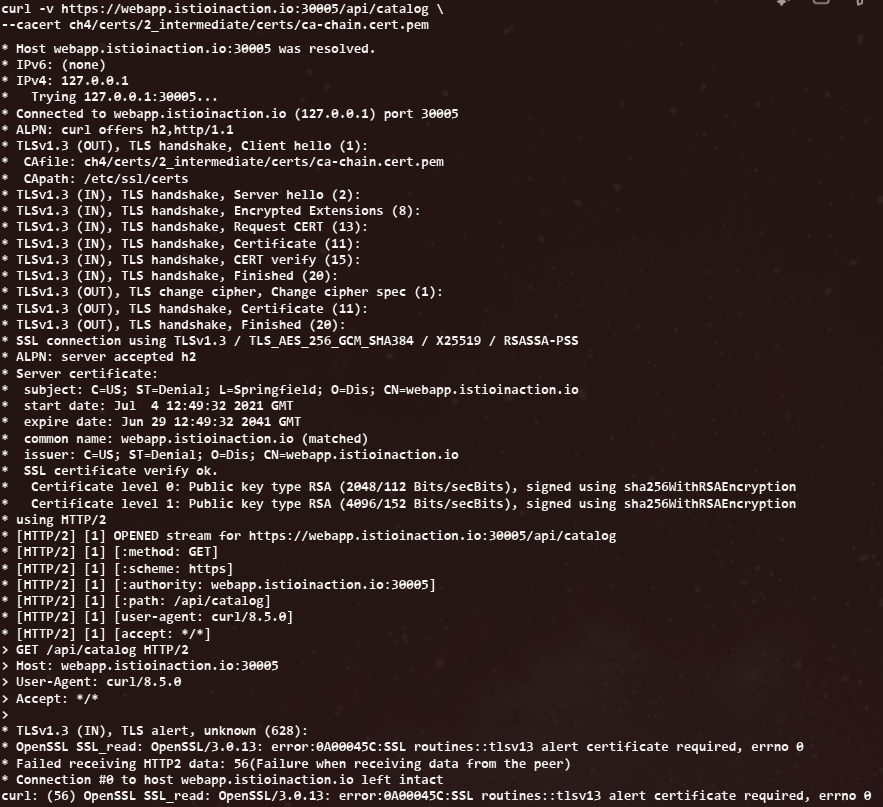
- "webapp.istioinaction.io"-
curl 실패
-
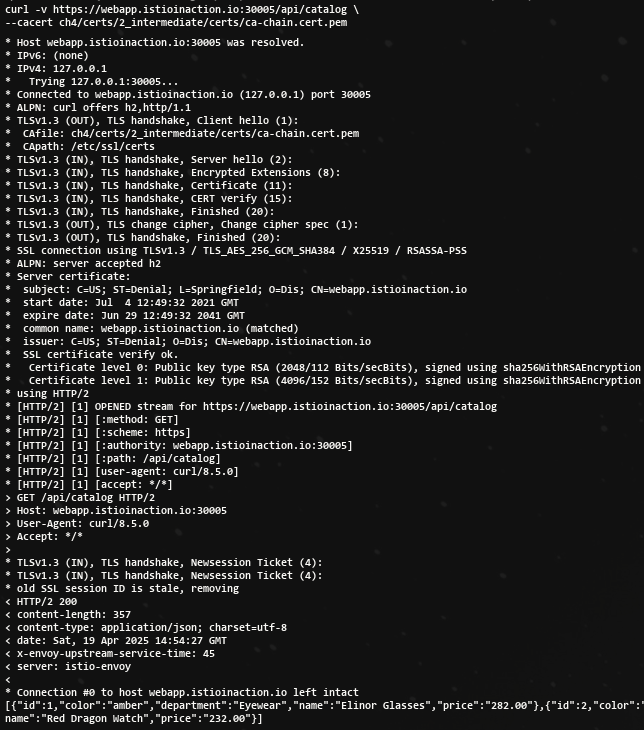
curl 성공
4.3.4 Serving multiple virtual hosts with TLS
동일한 HTTPS 포트(443)에서 자체 인증서와 비밀 키가 있는 여러 가상 호스트를 서빙할 수 있다.
- HTTPS로 서빙하는 가상 호스트를 여럿 기술하고 있는 이스티오 Gateway 리소스
apiVersion: networking.istio.io/v1alpha3
kind: Gateway
metadata:
  name: coolstore-gateway
spec:
  selector:
    istio: ingressgateway
  servers:
  - port:
      number: 443
      name: https-webapp
      protocol: HTTPS
    tls:
      mode: SIMPLE
      credentialName: webapp-credential
    hosts:
    - "webapp.istioinaction.io"
  - port:
      number: 443
      name: https-catalog
      protocol: HTTPS
    tls:
      mode: SIMPLE
      credentialName: catalog-credential
    hosts:
    - "catalog.istioinaction.io"
HTTPS 를 서빙하지만, 호스트이름이 다르다는 것을 유의
- 인증서, 키 추가
openssl x509 -in ch4/certs2/3_application/certs/catalog.istioinaction.io.cert.pem -noout -text

kubectl create -n istio-system secret tls catalog-credential \
--key ch4/certs2/3_application/private/catalog.istioinaction.io.key.pem \
--cert ch4/certs2/3_application/certs/catalog.istioinaction.io.cert.pem

# Gateway 설정 업데이트
kubectl apply -f ch4/coolstore-gw-multi-tls.yaml -n istioinaction

# Gateway 로 노출한 catalog 서비스용 VirtualService 리소스 생성
cat ch4/catalog-vs.yaml
apiVersion: networking.istio.io/v1alpha3
kind: VirtualService
metadata:
  name: catalog-vs-from-gw
spec:
  hosts:
  - "catalog.istioinaction.io"
  gateways:
  - coolstore-gateway
  http:
  - route:
    - destination:
        host: catalog
        port:
          number: 80

#
kubectl apply -f ch4/catalog-vs.yaml -n istioinaction- curl 1
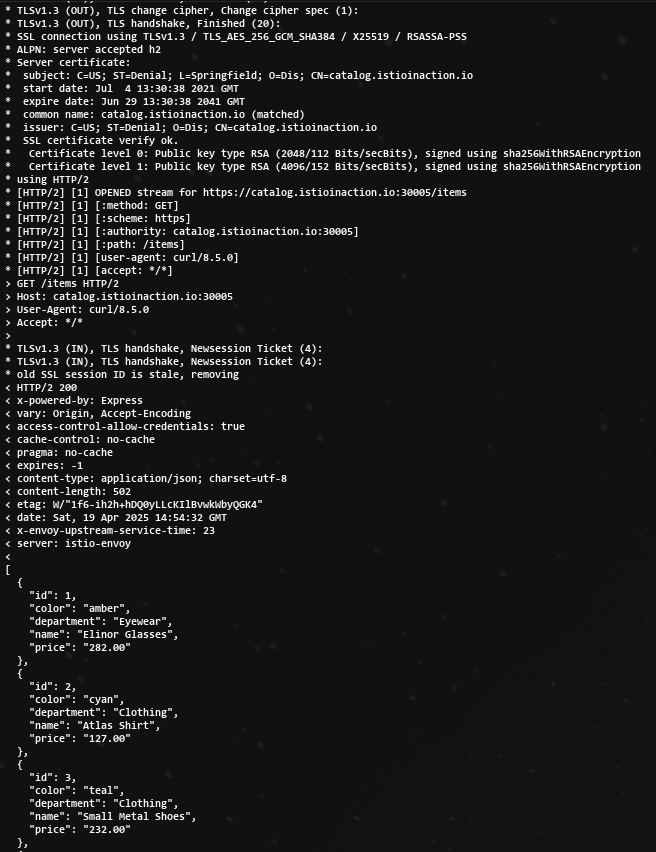
- curl 2
동일한 포트에 어느 서비스에 접근하는 인증서를 알 수 있는 해답은 SNI(서버 이름 표시)라는 TLS 확장을 이용한다.
4.4 TCP traffic
- Istio gateway는 HTTP/HTTPS 트래픽뿐 아니라 TCP로 접근하는 모든 트래픽을 처리할 수 있다.
- 트래픽을 단순 TCP로 다루면 재시도, 요청 수준 서킷 브레이킹, 복잡한 라우팅 등과 같은 유용한 기능을 사용할 수 없다. 단순히 이스티오가 어떤 프로토콜을 사용하는지 분간할 수 없기 때문이다.
클라이언트가 클러스터 내에서 실행 중인 서비스와 통신할 수 있도록 Istio gateway에 TCP 트래픽을 노출하는 방법을 알아보자.
4.4.1 Exposing TCP ports on an Istio gateway
- 서비스 메시 내에서 TCP 기반 서비스를 만드는 것
- 이 예제는 깃허브의 에코 서비스를 사용한다. https://github.com/cjimti/go-echo
cat ch4/echo.yaml
apiVersion: apps/v1
kind: Deployment
metadata:
  name: tcp-echo-deployment
  labels:
    app: tcp-echo
    system: example
spec:
  replicas: 1
  selector:
    matchLabels:
      app: tcp-echo
  template:
    metadata:
      labels:
        app: tcp-echo
        system: example
    spec:
      containers:
        - name: tcp-echo-container
          image: cjimti/go-echo:latest
          imagePullPolicy: IfNotPresent
          env:
            - name: TCP_PORT
              value: "2701"
            - name: NODE_NAME
              valueFrom:
                fieldRef:
                  fieldPath: spec.nodeName
            - name: POD_NAME
              valueFrom:
                fieldRef:
                  fieldPath: metadata.name
            - name: POD_NAMESPACE
              valueFrom:
                fieldRef:
                  fieldPath: metadata.namespace
            - name: POD_IP
              valueFrom:
                fieldRef:
                  fieldPath: status.podIP
            - name: SERVICE_ACCOUNT
              valueFrom:
                fieldRef:
                  fieldPath: spec.serviceAccountName
          ports:
            - name: tcp-echo-port
              containerPort: 2701
---
apiVersion: v1
kind: Service
metadata:
  name: "tcp-echo-service"
  labels:
    app: tcp-echo
    system: example
spec:
  selector:
    app: "tcp-echo"
  ports:
    - protocol: "TCP"
      port: 2701
      targetPort: 2701
kubectl apply -f ch4/echo.yaml -n istioinaction
#
kubectl get pod -n istioinaction
NAME READY STATUS RESTARTS AGE
tcp-echo-deployment-584f6d6d6b-h7scj 2/2 Running 0 27s
...실습
# tcp 서빙 포트 추가 : 편집기는 vi 대신 nano 선택 <- 편한 툴 사용
KUBE_EDITOR="nano"  kubectl edit svc istio-ingressgateway -n istio-system
...
  - name: tcp
    nodePort: 30006
    port: 31400
    protocol: TCP
    targetPort: 31400
...

# 확인
kubectl get svc istio-ingressgateway -n istio-system -o jsonpath='{.spec.ports[?(@.name=="tcp")]}'
{"name":"tcp","nodePort":30006,"port":31400,"protocol":"TCP","targetPort":31400}

# 게이트웨이 생성
cat ch4/gateway-tcp.yaml
apiVersion: networking.istio.io/v1alpha3
kind: Gateway
metadata:
  name: echo-tcp-gateway
spec:
  selector:
    istio: ingressgateway
  servers:
  - port:
      number: 31400
      name: tcp-echo
      protocol: TCP
    hosts:
    - "*"

kubectl apply -f ch4/gateway-tcp.yaml -n istioinaction
kubectl get gw -n istioinaction

# 에코 서비스로 라우팅하기 위해 VirtualService 리소스 생성
cat ch4/echo-vs.yaml
apiVersion: networking.istio.io/v1alpha3
kind: VirtualService
metadata:
  name: tcp-echo-vs-from-gw
spec:
  hosts:
  - "*"
  gateways:
  - echo-tcp-gateway
  tcp:
  - match:
    - port: 31400
    route:
    - destination:
        host: tcp-echo-service
        port:
          number: 2701

#
kubectl apply -f ch4/echo-vs.yaml -n istioinaction
kubectl get vs -n istioinaction
NAME                  GATEWAYS                HOSTS                          AGE
catalog-vs-from-gw    ["coolstore-gateway"]   ["catalog.istioinaction.io"]   44m
tcp-echo-vs-from-gw   ["echo-tcp-gateway"]    ["*"]                          6s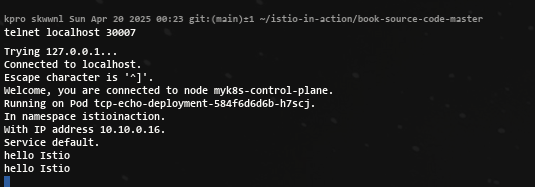
webapp-vs-from-gw ["coolstore-gateway"] ["webapp.istioinaction.io"] 3h59m- telnet 설치
apt install inetutils-telnet- telnet Test!
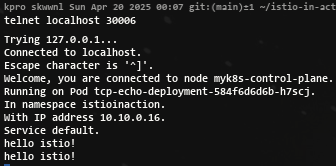
4.4.2 Traffic routing with SNI passthrough
Istio ingress gateway에서 트래픽을 종료하지 않고 SNI 호스트네임에 따라 TCP 트래픽을 라우팅하는 방법을 다룬다.
-
게이트웨이가 하는 일은 SNI 헤더를 살펴보고 트래픽을 특정 백엔드로 라우팅하는 것 뿐이다. TLS 커넥션 종료는 그 후 백엔드에서 처리한다.
-
커넥션은 게이트웨이를 ‘통과 passthrough’ 하고, 처리는 게이트웨이가 아닌 실제 서비스가 담당하게 된다.
-
Gateway 리소스
apiVersion: networking.istio.io/v1alpha3
kind: Gateway
metadata:
  name: sni-passthrough-gateway
spec:
  selector:
    istio: ingressgateway
  servers:
  - port:
      number: 31400 #1 HTTP 포트가 아닌 특정 포트 열기
      name: tcp-sni
      protocol: TLS
    hosts:
    - "simple-sni-1.istioinaction.io" #2 이 호스트를 포트와 연결
    tls:
      mode: PASSTHROUGH #3 통과 트래픽으로 처리
앞 절에서 했던 것처럼 게이트웨이에 인증서를 설정할 필요가 없다.
- 예제 Application 배포
kubectl apply -f ch4/sni/simple-tls-service-1.yaml -n istioinaction
kubectl get pod -n istioinaction

# 기존 Gateway 명세(echo-tcp-gateway) 제거 : istio-ingressgateway의 동일한 port (31400, TCP)를 사용하므로 제거함
kubectl delete gateway echo-tcp-gateway -n istioinaction

# 신규 Gateway 설정
kubectl apply -f ch4/sni/passthrough-sni-gateway.yaml -n istioinaction
kubectl get gw -n istioinaction
- VirtualService 리소스 라우팅 규칙 지정
apiVersion: networking.istio.io/v1alpha3
kind: VirtualService
metadata:
  name: simple-sni-1-vs
spec:
  hosts:
  - "simple-sni-1.istioinaction.io"
  gateways:
  - sni-passthrough-gateway
  tls:
  - match: #1 특정 포트와 호스트의 비교 부분
    - port: 31400
      sniHosts:
      - simple-sni-1.istioinaction.io
    route:
    - destination: #2 트래픽이 일치하는 경우 라우팅 목적지
        host: simple-tls-service-1
        port:
          number: 80 #3 서비스 포트로 라우팅

#
kubectl apply -f ch4/sni/passthrough-sni-vs-1.yaml -n istioinaction
kubectl get vs -n istioinaction - 호출 테스트 1 (되지 않는다..)
curl https://simple-sni-1.istioinaction.io:30006/ \
--cacert ch4/sni/simple-sni-1/2_intermediate/certs/ca-chain.cert.pem- 인증서가 다르고 SNI 호스트에 기반해 라우팅을 하는 두 번째 서비스를 배포
# 두 번째 서비스 배포
cat ch4/sni/simple-tls-service-2.yaml
kubectl apply -f ch4/sni/simple-tls-service-2.yaml -n istioinaction
# gateway 설정 업데이트
cat ch4/sni/passthrough-sni-gateway-both.yaml
kubectl apply -f ch4/sni/passthrough-sni-gateway-both.yaml -n istioinaction
# VirtualService 설정
cat ch4/sni/passthrough-sni-vs-2.yaml
kubectl apply -f ch4/sni/passthrough-sni-vs-2.yaml -n istioinaction
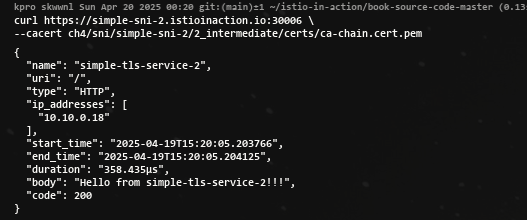
# 호출테스트2
echo "127.0.0.1 simple-sni-2.istioinaction.io" | sudo tee -a /etc/hosts
curl https://simple-sni-2.istioinaction.io:30006 \
--cacert ch4/sni/simple-sni-2/2_intermediate/certs/ca-chain.cert.pem- 호출 테스트 2 성공!
4.5 Operational tips
4.5.1 Split gateway responsibilities
-
인그레스 게이트웨이를 여럿(다른 진입점) 둘 수 있다.
-
다른 진입점을 배포해 트래픽을 나누고 다양한 서비스 간 트래픽 경로를 격리하고 싶을 수도 있다.
-
어떤 서비스는 성능에 더 민감하거나, 고가용성이 더 필요하거나, 컴플라이언스를 이유로 격리돼야 할 수도 있다.
-
어떤 떄는 다른 팀에 영향을 주지 않도록 각 팀이 각자의 게이트웨이 및 설정을 소유하게 하고 싶을 수도 있다.
새 커스텀 게이트웨이를 설치하기 위해서 직접 내부에서 진행
#
docker exec -it myk8s-control-plane bash
------------------------------------------
# istioinaction 네임스페이스에 Ingress gateway 설치
cat <<EOF > my-user-gateway-edited.yaml
apiVersion: install.istio.io/v1alpha1
kind: IstioOperator
metadata:
  name: my-user-gateway-install
  namespace: istioinaction
spec:
  profile: empty
  values:
    gateways:
      istio-ingressgateway:
        autoscaleEnabled: false
  components:
    ingressGateways:
    - name: istio-ingressgateway
      enabled: false
    - name: my-user-gateway
      namespace: istioinaction
      enabled: true
      label:
        istio: my-user-gateway
      k8s:
        service:
          ports:
            - name: tcp  # my-user-gateway 에서 사용할 포트 설정
              port: 31400
              targetPort: 31400
              nodePort: 30007 # 외부 접속을 위해 NodePort Number 직접 설정
EOF

# istioctl manifest generate -n istioinaction -f my-user-gateway-edited.yaml
istioctl install -y -n istioinaction -f my-user-gateway-edited.yaml

exit
------------------------------------------

# IstioOperator 확인
kubectl get IstioOperator -A
NAMESPACE       NAME                      REVISION   STATUS   AGE
istio-system    installed-state                               5h48m
istioinaction   my-user-gateway-install                       17s

#
kubectl get deploy my-user-gateway -n istioinaction
NAME              READY   UP-TO-DATE   AVAILABLE   AGE
my-user-gateway   1/1     1            1           65s

# 포트 확인
kubectl get svc my-user-gateway -n istioinaction -o yaml
...
  - name: tcp
    nodePort: 30007
    port: 31400
    protocol: TCP
    targetPort: 31400
...
실습 : my-user-gateway를 경유하여 TCP 통신
# Gateway
cat <<EOF | kubectl apply -n istioinaction -f -
apiVersion: networking.istio.io/v1alpha3
kind: Gateway
metadata:
  name: echo-tcp-gateway
spec:
  selector:
    istio: my-user-gateway  #  New gateway
  servers:
  - port:
      number: 31400
      name: tcp-echo
      protocol: TCP
    hosts:
    - "*"
EOF

# VirtualService 명세
cat ch4/echo-vs.yaml
kubectl apply -f ch4/echo-vs.yaml -n istioinaction

# 앱 배포
cat ch4/echo.yaml
kubectl apply -f ch4/echo.yaml -n istioinaction- 호출 테스트 성공!
4.5.2 Gateway injection
- 사용자에게 IstioOperator 리소스(기존 이스티오 설치를 변경할 수 있는)에 대한 전체 접근 권한을 부여하지 않고도 자체 게이트웨이를 만들 수 있게 허용하는 방법은 게이트웨이 주입 gateway injection 을 사용하는 것이다.
- 게이트웨이 주입을 사용하며, 미완성 subbed-out 게이트웨이 디플로이먼트를 배포하고 이스티오가 나머지를 채우는 방식이 된다.
- 팀에서 미완성 게이트웨이 Deployment 리소스를 주고 이스티오가 나머지를 자동 설정하게 할 수 있다.
apiVersion: apps/v1
kind: Deployment
metadata:
  name: my-user-gateway-injected
  namespace: istioinaction
spec:
  selector:
    matchLabels:
      ingress: my-user-gateway-injected
  template:
    metadata:
      annotations:
        sidecar.istio.io/inject: "true" #1 주입 활성화
        inject.istio.io/templates: gateway #2 gateweay 템플릿
      labels:
        ingress: my-user-gateway-injected
    spec:
      containers:
      - name: istio-proxy #3 반드시 이 이름이어야 한다
        image: auto #4 미완성 이미지
...
#
cat ch4/my-user-gw-injection.yaml
kubectl apply -f ch4/my-user-gw-injection.yaml

#
kubectl get deploy,svc,ep my-user-gateway-injected -n istioinaction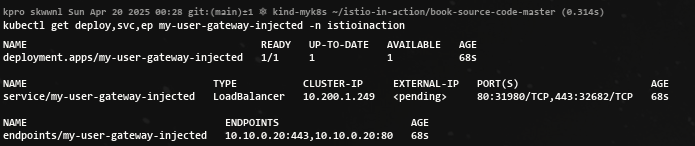
4.5.3 Ingress gateway access logs
- 프록시에서 일반적인 기능은 처리하는 모든 요청을 기록하는 것이다. 이 액세스 로그는 문제 해결에 유용한다.
- 이스티오의 프록시(엔보이)도 액세스 로그를 만들 수 있다.
- 데모 설치 프로필에서는 인그레스 게이트웨이와 서비스 프록시가 액세스 로그를 표준 출력 스트림에 출력하도록 설정된다.
- 액세스 로그를 보려면 컨테이너 로그를 출력하기만 하면 된다.
kubectl logs -f deploy/istio-ingressgateway -n istio-system- 위 명령은 인그레스 게이트웨이의 액세스 로그를 출력한다. 따라서 앞선 예제들에서 만들어낸 트래픽들의 기록을 볼 수 있다.
기본 프로필을 사용한 운영 환경 이스티오에서는 액세스 로깅이 비활성화돼 있다.
- 표준 출력 스트림으로 출력하도록 accessLogFile 속성을 변경해 이를 변경할 수 있다.
#
kubectl get cm -n istio-system istio -o yaml
data:
  mesh: |-
    defaultConfig:
      discoveryAddress: istiod.istio-system.svc:15012
      proxyMetadata: {}
      tracing:
        zipkin:
          address: zipkin.istio-system:9411
    enablePrometheusMerge: true
    rootNamespace: istio-system
    trustDomain: cluster.local
  meshNetworks: 'networks: {}'
..

#
docker exec -it myk8s-control-plane bash
------------------------------------------
# 표준 출력 스트림으로 출력하도록 accessLogFile 속성을 변경
istioctl install --set meshConfig.accessLogFile=/dev/stdout
y 입력

exit
------------------------------------------

# configmap 에 mesh 바로 아래에 accessLogFile 부분 추가됨
kubectl get cm -n istio-system istio -o yaml
...
  mesh: |-
    accessLogFile: /dev/stdout
...

# 애플리케이션 호출에 대한 로그도 출력됨!
kubectl stern -n istioinaction -l app=webapp -c istio-proxy
webapp-7685bcb84-h5knf istio-proxy [2025-04-14T09:30:47.764Z] "GET /items HTTP/1.1" 200 - via_upstream - "-" 0 502 1 1 "172.18.0.1" "beegoServer" "4c10dba4-f49a-4b58-9805-ac30515dd417" "catalog.istioinaction:80" "10.10.0.8:3000" outbound|80||catalog.istioinaction.svc.cluster.local 10.10.0.9:60052 10.200.1.251:80 172.18.0.1:0 - default
webapp-7685bcb84-h5knf istio-proxy [2025-04-14T09:30:48.805Z] "GET /items HTTP/1.1" 200 - via_upstream - "-" 0 502 6 6 "172.18.0.1" "beegoServer" "7733f4d0-6e3a-4138-a126-fe25c30e51f4" "catalog.istioinaction:80" "10.10.0.8:3000" outbound|80||catalog.istioinaction.svc.cluster.local 10.10.0.9:60898 10.200.1.251:80 172.18.0.1:0 - default
...
액세스 로그는 기본적으로 꺼져 있는데, 운영 환경 클러스터에서 수백 또는 수천 개의 워크로드가 있고 각 워크로드가 많은 트래픽을 처리한다는 점을 고려하면 합리적이다.
더 나은 접근 방식은 관심 있는 워크로드에 대해서만 액세스 로그를 켜는 것이며, 이는 텔레메트리 API를 사용해 가능하다.
apiVersion: telemetry.istio.io/v1alpha1
kind: Telemetry
metadata:
  name: ingress-gateway
  namespace: istio-system
spec:
  selector:
    matchLabels:
      app: istio-ingressgateway #1 레이블과 일치하는 파드는 텔레메트리 설정을 가져온다
  accessLogging:
  - providers:
    - name: envoy #2 액세스 로그를 위한 프로바이더 설정
    disabled: false #3 disable 를 false 로 설정해 활성화한다
4.5.4 Reducing gateway configuration
- 기본적으로, 이스티오는 모든 프록시가 메시 내의 모든 서비스를 알도록 구성한다. 메시에 서비스가 많다면 데이터 플레인 프록시의 설정이 매우 커질 수 있다. 그리고 설정이 크면 리소스 증폭, 성능 문제, 확장성 문제로 이어질 수 있다.
- 이 문제를 해결하기 위해 데이터 플레인과 컨트롤 플레인 모두에게 설정을 최적화할 수 있다.
- Sidecar 리소스를 사용해 이 설정을 줄이는 방법
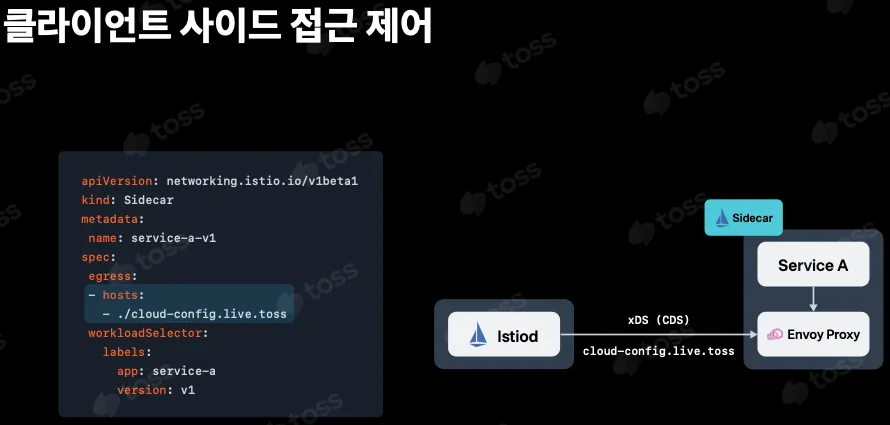
!! 그러나 Sidecar 리소스는 게이트웨이에는 적용되지 않는다.
- 새 게이트웨이(인그레스 게이트웨이 등)를 배포하면 프록시에는 메시 내 라우팅할 수 있는 모든 서비스가 설정된다. 이렇게 하면 설정이 아주 커져 게이트웨이에 부담이 될 수 있다.
프록시에서 필요 이상의 설정은 제거하고 게이트웨이 관련 설정만 포함되도록 하는 것이다.
어느 버전이든 다음 설정으로 게이트웨이의 설정 잘라내기를 명시적으로 활성화할 수 있다.
apiVersion: install.istio.io/v1alpha1
kind: IstioOperator
metadata:
  name: control-plane
spec:
  profile: minimal
  components:
    pilot:
      k8s:
        env:
        - name: PILOT_FILTER_GATEWAY_CLUSTER_CONFIG
          value: "true"
  meshConfig:
    defaultConfig:
      proxyMetadata:
        ISTIO_META_DNS_CAPTURE: "true"
    enablePrometheusMerge: true
이 설정의 핵심은 PILOT_FILTER_GATEWAY_CLUSTER_CONFIG 기능 플래그이다.
# Summary
- Ingress gateways는 서비스 메시에 들어오는 트래픽을 세밀하게 제어합니다.
- 게이트웨이 리소스를 사용하면 메시 내로 허용하는 트래픽 종류를 호스트별로 설정할 수 있다.
- 메시 내의 다른 서비스와 마찬가지로, 트래픽을 라우팅하기 위해 VirtualService 리소스를 사용합니다.
- TLS 모드는 호스트마다 다음 모드 중 하나로 구성할 수 있습니다.
- 현재 지원되지 않는 L7 프로토콜의 경우 Istio에서 순수 TCP 트래픽이 지원됩니다. 그러나 재시도, 복잡한 라우팅 등 일반 TCP에서는 많은 기능을 사용할 수 없습니다.
- 게이트웨이 주입을 사용하여 팀이 자체 게이트웨이를 관리할 수 있도록 할 수 있습니다.
