VUEX store 여러 개를 모듈화하기

store를 여러개 만들고 쉽게 사용해봅시다.
전체 코드
1. vuex 쉽게 알아보기
개인적인 의견이지만
vuex는 vue의 전역변수 이라고 생각하는데 상태 관리 패턴, 중앙 집중식 저장소 등 용어가 너무 어려운것 같습니다.
제일 쉽게 알아봅시다.
1) vuex
vue에서 전역변수를 사용할건데 규칙과 절차를 가지고 사용할 수 있도록 도와주는 라이브러리
2) store
전역 변수
3) 모듈화
전역변수를 여러개 만든다.
보통, 클래스 하나에 로그인, 활동 정보등을 다 넣지는 않으니까 여러개 만들어서 세분화합니다.
4) actions
mutations에 값 보내는 함수
5) mutations
state의 값 변경하는 함수, setter
6) state
값을 저장하는 객체
7) getters
state의 값 반환하는 함수
computed 속성이 들어있습니다.
개인적으로, actions, mutations 2개까지 필요없다고 생각합니다. 클래스에 값 넣기 위해서 setter를 2개를 쓰지는 않자나요. 내가 이해 하지 못하는 큰 뜻이 있겠지만.
2. 직접 만들어 보기
1) 뷰 프로젝트 생성
vue cli 4.x (4버전 이상) 을 사용해서 프로젝트를 생성합니다
// vue create 생성할 프로젝트 이름

vue create vuex_modules
2) axios 설치 및 실행
패키지 매니저인 npm 또는 yarn을 사용해서 axios를 설치합니다.
그리고, vue 개발 서버를 실행합니다.
# npm 사용
# vuex 설치
npm i vuex
# 개발 서버 실행
npm run serve
# yarn 사용
# vuex 설치
yarn add vuex
# 개발 서버 실행
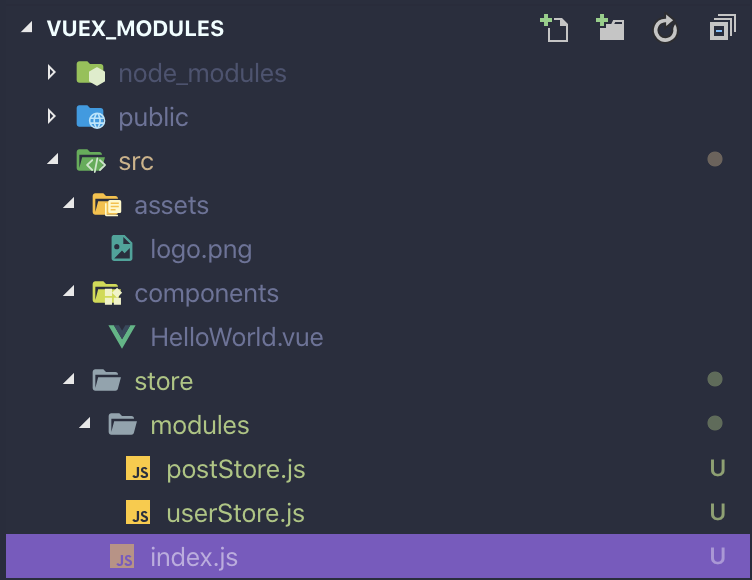
yarn run serve3) store 디렉토리 구조 만들기
디렉토리 생성
/root/src/store
/root/src/store/modules
파일 생성
/root/src/store/index.js
/root/src/store/modules/postStore.js
/root/src/store/modules/userStore.js
4) userStore.js
유저 이름을 관리하기 위한 스토어입니다.
// 파일 위치: /root/src/store/modules/userStore.js

const userStore = {
    namespaced: true,
    state: {
        userName: '도로시'
    },
    getters: {
        GE_USER_NAME: state => state.userName
    },
    mutations: {
        MU_USER_NAME: (state, payload) => {
            /*
                여기서는 payload를 객체로 받습니다.
                payload를 객체로 받으면, mutation를 조금더 유연하게 사용할 수 있기는 합니다.
            */
            state.userName = payload.userName
        }
    },
    actions: {
        AC_USER_NAME: ({ commit }, payload) => {
            commit('MU_USER_NAME', payload)
        }
    }
}

export default userStore
5) postStore.js
포스트 리스트를 관리하기 위한 스토어입니다.
포스트 리스트는 객체 리스트이며, title, author를 가지고 있습니다.
// 파일 위치: /root/src/store/modules/postStore.js

const postStore = {
    namespaced: true,
    state: {
        postList: [
            {
                title: 'vuex 쉽게 알아보기',
                author: '도로시'
            },
            {
                title: 'axios 알아보기',
                author: '도로시'
            },
            {
                title: 'react 알아보기',
                author: '토토'
            }
        ]
    },
    getters: {
        GE_POST_LIST: state => state.postList
    },
    mutations: {
        MU_POST_LIST: (state, payload) => {
            state.postList = payload
        }
    },
    actions: {
        AC_USER_NAME: ({ commit }, payload) => {
            commit('MU_POST_LIST', payload)
        }
    }
}

export default postStore
6) index.js
// 파일 위치: /root/src/store/index.js

import Vue from 'vue'
import Vuex from 'vuex'

Vue.use(Vuex)

// 작성한 모듈을 가져옵니다.
import userStore from '@/store/modules/userStore.js'
import postStore from '@/store/modules/postStore.js'

const store = new Vuex.Store({
  modules: {
    // 키: 값 형태로 저장됩니다.
    userStore: userStore,
    postStore: postStore
  }
})

export default store
7) main.js
// 파일 위치: /root/src/main.js

import Vue from 'vue'
import App from './App.vue'

// store의 index.js를 가져옵니다.
import store from '@/store/index.js'

Vue.config.productionTip = false

// 뷰 인스턴스 생성
new Vue({
  render: h => h(App),
  // store를 넣고 뷰 인스턴스를 생성합니다.
  store,
}).$mount('#app')
8) App.vue 수정하기
중요하게 봐야할 부분은 mapActions, mapGetters 입니다.
mapActions
methods에 작성된 mapActions로 store의 actions를 가져옵니다.
mapGetters
computed에 작성된 mapGetters로 store의 getters를 가져옵니다.
mapMutations
mapMuations로 muations를 가져올 수 있으며, mapActions와 사용법이 같습니다. methods에 정의합니다.
<!--파일 위치: /root/src/App.vue -->


<template>
  <div id="app">
    유저 이름: <input
      v-model="userName"
      type="text"
    >
    <button @click="searchName">
      검색
    </button>

    <div
      v-for="(item, idx) in computedList"
      :key="idx"
    >
      제목: {{ item.title }}
      저자: {{ item.author }}
    </div>
  </div>
</template>

<script>
// vuex 라이브러리에서 mapActions, mapGetters 함수를 가져옵니다.
import { mapActions, mapGetters } from 'vuex'

/*
  namespaced: true를 사용했기 때문에 선언해줍니다.
  index.js 에서 modules 객체의 '키' 이름입니다.

  modules: {
    키: 값
    userStore: userStore,
    postStore: postStore
  }
*/
const userStore = 'userStore'
const postStore = 'postStore'

export default {
  name: 'App',
  data() {
    return {
      userName: ''
    }
  },
  computed: {
    /*
      mapGetter는 store의 getters를 가져옵니다.

      네임스페이스를 사용하기 때문에 키 이름을 적어줍니다. (userStore, postStore)

      2가지 방식으로 가져올 수 있습니다.
      1) 이름 지정해서 가져오기
      2) getters 이름 그대로 사용해서 가져오기
    */
    // 1) 이름 지정해서 가져오기
    ...mapGetters(userStore, {
      storeUserName: 'GE_USER_NAME'
    }),

    // 2) getters 이름 그대로 사용해서 가져오기
    ...mapGetters(postStore, [
      'GE_POST_LIST'
    ]),

    // 스토어의 리스트 중에서 검색한 유저이름의 포스트 목록만 반환합니다.
    computedList() {
      let list = []

      for(let item of this.GE_POST_LIST) {
        if(item.author == this.storeUserName) {
          list.push(item)
        }
      }

      return list
    }
  },
  watch: {
    // getters에 watch를 걸 수 있습니다.
    storeUserName(val) {
      this.userName = val
    }
  },
  created() {
    this.userName = this.storeUserName
  },
  methods: {
    /*
      mapGetter는 store의 getters를 가져옵니다.

      네임스페이스를 사용하기 때문에 키 이름을 적어줍니다. (userStore, postStore)

      2가지 방식으로 가져올 수 있습니다.
      1) 이름 지정해서 가져오기
      2) getters 이름 그대로 사용해서 가져오기

      개인의 취향이지만, getters 이름 그대로 사용하는 것을 추천드립니다.

      다른 메소드 이름으로 매핑 예를 들면, setUserName: AC_USER_NAME 하면,
      setUserName 함수가 나중에는 스토어 함수인지, 현재 파일의 함수인지 헷갈리는 경우가 있습니다.
    */
    ...mapActions(userStore, [
      'AC_USER_NAME'
    ]),
    // 버튼을 클릭하면 수행됩니다.
    searchName() {
      const payload = {
        userName: this.userName
      }
      // store의 userName을 변경합니다.
      this.AC_USER_NAME(payload)
    }
  }
}
</script>
7) 확인하기
- 검색 버튼을 눌렀을때 AC_USER_NAME 로 스토어의 userName을 바꾸고
- mapGetter로 스토어의 userName을 가져오고
- computedList가 스토어의 userName과 일치하는 저자의 포스트만 반환합니다.

vuex가 점점 무거워져서 모듈화를 찾아보던 중에,,, 정리가 너무 잘 되어있네요 감사합니다!!
제가 듣기로 action은 mutation을 하기 전 제어 처리를 하기 위한 공정이고 state를 직접 바꾸는 역할만 mutation에서 해주는 걸로 나누어졌다고 들었어요! 좋은 자료 잘 보고 갑니다 🙇♂️