SSE 대화응답 스트리밍
이전 기사에서는 세 단계로 빠르게 통합을 구현했지만 이러한 동기화된 응답 방법은 사용자 경험을 크게 저하시킵니다.
특히 문제가 너무 복잡한 경우 대형 모델은 이를 처리하는 데 더 많은 시간이 필요하므로 사용자는 오랫동안 빈 화면을 마주해야 하는데, 이는 분명히 그대로 나타나는 "타자기 효과"와 비교할 수 없습니다.
이러한 실시간 피드백의 대화형 경험은 스트리밍 응답의 독특한 매력이며 AI 애플리케이션의 표준 구성이 되기도 했습니다.
Spring BootLLM
이 글에서는 스트리밍 API와 기술을 사용하여 AI 응답이 타자기처럼 자연스럽게 느껴지도록 프로젝트를 업그레이드할 것입니다.
Spring AISSE(Server-Sent Events)
SSE를 만나보세요.
직접 코딩하기 전에 잠시 시간을 내어 이 구현의 핵심 기술을 이해하는 것이 중요합니다.
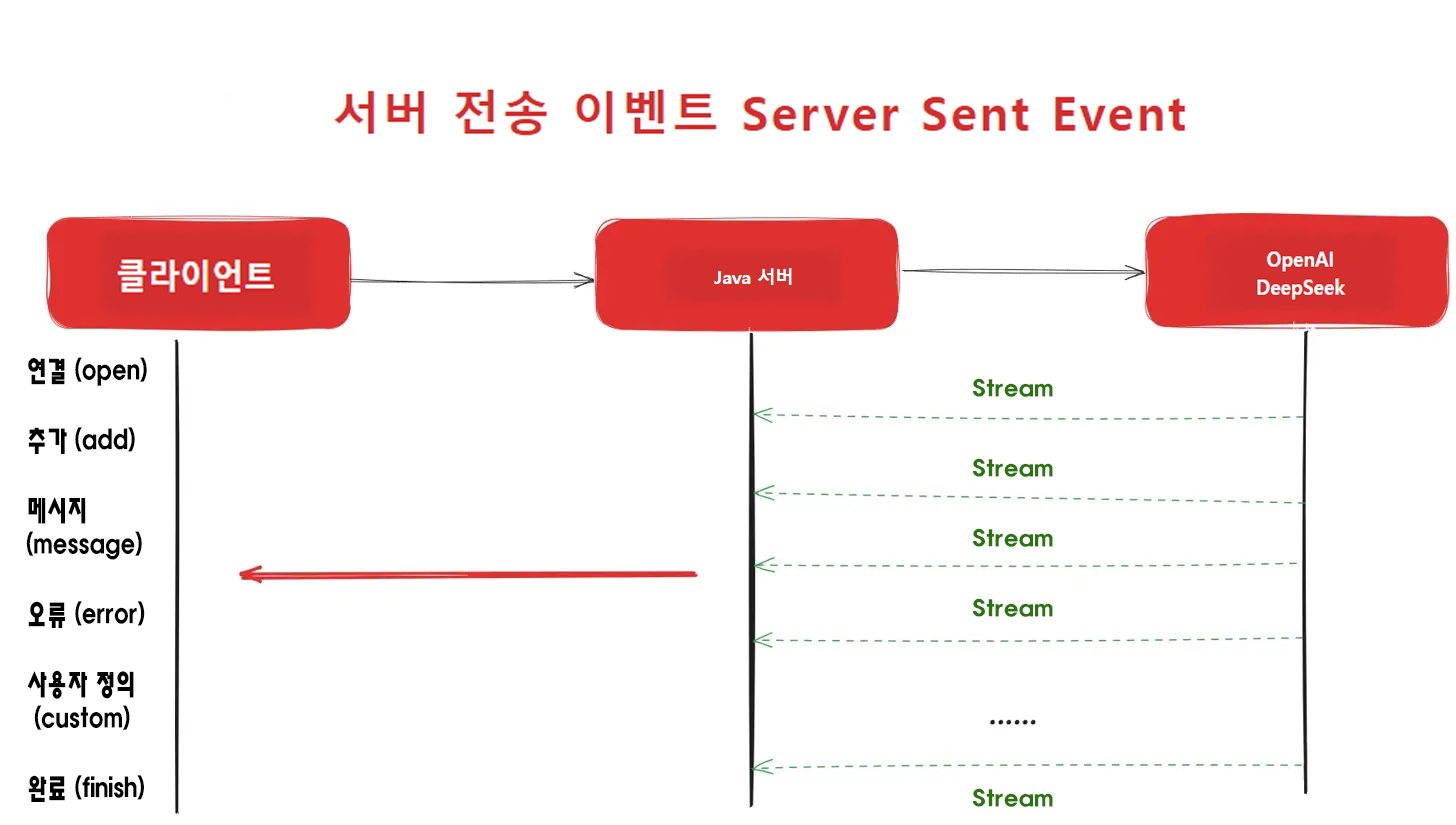
남남동, 전체 이름 서버에서 보낸 이벤트, 즉 "서버 전송 이벤트". 다음과 같이 생각하십시오.뉴스 앱의 "속보" 피드를 팔로우합니다.。
앱에서 "알림 허용"을 한 번만 클릭하면 되며(연결을 설정하기 위해) 새로운 빅 뉴스가 발생하자마자 앱 서버가 메시지를 휴대폰으로 적극적으로 푸시하므로 앱을 계속해서 새로 고칠 필요가 없습니다.
귀하의 브라우저(클라이언트)가 당사 서버(서버)와 연결을 설정하면 서버는 언제든지 새로운 데이터(새로운 AI 생성 단어)를 브라우저에 능동적으로 "푸시"할 수 있으며 브라우저는 이를 수신하기만 하면 됩니다.
1개입니다서버에서 클라이언트로의 단방향 경로。
왜 WebSocket 대신 SSE를 선택했을까요?
일부 독자분들께서는 "왜 WebSocket을 사용하지 않았을까?" 하고 궁금해하실 수 있습니다.
이 부분에 대해 WebSocket과 SSE를 비교해서 설명해 드릴게요.
-
WebSocket
WebSocket은 마치 위챗
(혹은 카카오톡)통화와 같습니다.
여러분과 서버가 언제든지 자유롭게 대화할 수 있는 양방향 통신이죠.
기능이 매우 강력하지만, AI 챗봇 시나리오에서는 마치"닭 잡는 데 소 잡는 칼"을 쓰는 것과 비슷합니다. -
SSE (Server-Sent Events)
SSE는 뉴스 푸시 알림처럼 서버가 일방적으로 데이터를 보내는 방식입니다.
서버만 "말"할 수 있고, 우리는 그저 듣기만 하면 됩니다.
그래서 단방향 통신이죠.
AI 챗봇 시나리오를 생각해 봅시다.
우리가 질문을 하면, AI는 한 단어씩 답변을 보내고 우리는 그 내용을 조용히 듣기만 하면 됩니다.
AI가 우리의 말을 다시 들을 필요는 없죠. 따라서 더 가볍고 단순한 SSE가 우리 시나리오에 딱 맞는 완벽한 선택이 되는 것입니다.
프로젝트 시작
1. SSE 서비스 관리자 만들기
먼저, 모든 클라이언트 연결을 관리하는 SSE 서비스 관리자를 만들어야 합니다.
이 관리자는 어떤 사용자가 연결되었는지 기록하고, 특정 사용자에게 메시지를 전달하는 "관제 센터" 같은 역할을 합니다.
package com.sleekydz86;

import com.sleekydz86.enums.SSEMsgType;
import lombok.extern.slf4j.Slf4j;
import org.springframework.util.CollectionUtils;
import org.springframework.web.servlet.mvc.method.annotation.SseEmitter;

import java.io.IOException;
import java.util.Map;
import java.util.concurrent.ConcurrentHashMap;
import java.util.function.Consumer;

@Slf4j
public class SSEServer {

    // 모든 사용자의 SseEmitter 연결을 저장하는 맵
    private static final Map<String, SseEmitter> sseClients = new ConcurrentHashMap<>();

    /**
     * 연결 설정
     * @param userId 연결할 사용자의 ID
     * @return 설정된 SseEmitter 객체
     */
    public static SseEmitter connect(String userId) {
        // 타임아웃을 0L로 설정하여, 타임아웃 없이 유지되도록 합니다.
        // 기본값은 30초이며, 타임아웃 시 예외가 발생할 수 있습니다.
        SseEmitter sseEmitter = new SseEmitter(0L);

        // 연결 완료, 타임아웃, 예외 발생 시 호출될 콜백 함수를 등록합니다.
        sseEmitter.onTimeout(timeoutCallback(userId));
        sseEmitter.onCompletion(completionCallback(userId));
        sseEmitter.onError(errorCallback(userId));

        // 맵에 사용자 ID와 SseEmitter 객체를 저장합니다.
        sseClients.put(userId, sseEmitter);
        log.info("SSE 연결됨, 사용자 ID: {}", userId);

        return sseEmitter;
    }

    /**
     * 특정 사용자에게 메시지 전송
     * @param userId 메시지를 받을 사용자 ID
     * @param message 전송할 메시지 내용
     * @param msgType 메시지 유형
     */
    public static void sendMsg(String userId, String message, SSEMsgType msgType) {
        if (CollectionUtils.isEmpty(sseClients) || !sseClients.containsKey(userId)) {
            return;
        }
        SseEmitter sseEmitter = sseClients.get(userId);
        sendEmitterMessage(sseEmitter, userId, message, msgType);
    }

    /**
     * 모든 사용자에게 메시지 전송
     * @param message 전송할 메시지 내용
     */
    public static void sendMsgToAllUsers(String message) {
        if (CollectionUtils.isEmpty(sseClients)) {
            return;
        }
        sseClients.forEach((userId, sseEmitter) ->
                sendEmitterMessage(sseEmitter, userId, message, SSEMsgType.MESSAGE)
        );
    }

    /**
     * SseEmitter를 통해 메시지 전송
     */
    private static void sendEmitterMessage(SseEmitter sseEmitter,
                                          String userId,
                                          String message,
                                          SSEMsgType msgType) {
        // 이벤트 이름(name)을 지정하여, 프런트엔드에서 이 이름을 통해 이벤트를 수신하도록 합니다.
        SseEmitter.SseEventBuilder msgEvent = SseEmitter.event()
                .id(userId)
                .data(message)
                .name(msgType.type);

        try {
            sseEmitter.send(msgEvent);
        } catch (IOException e) {
            log.error("SSE 메시지 전송 오류, 사용자 ID: {}, 오류: {}", userId, e.getMessage());
            close(userId); // 전송 오류 발생 시 해당 연결을 제거합니다.
        }
    }

    /**
     * 연결 종료
     * @param userId 종료할 사용자의 ID
     */
    public static void close(String userId) {
        SseEmitter emitter = sseClients.get(userId);
        if (emitter != null) {
            emitter.complete(); // 이 호출은 onCompletion 콜백을 트리거하고, 그 안에서 맵에서 연결이 제거됩니다.
        }
    }
}
이 관리자의 핵심 기능은 다음과 같습니다.
- 연결(Connect): 새로운 사용자를 위한 SSE 연결을 설정하고, 다양한 콜백 함수들을 등록하는 기능을 합니다.
- 메시지 보내기(Send Message): 다양한 메시지 유형을 지원하며, 특정 사용자에게 메시지를 보낼 수 있습니다.
- 닫기(Close): 연결을 안전하게 종료합니다.
다음으로, 여러 종류의 SSE 메시지를 구분할 수 있도록 메시지 유형 열거형(Enum)을 만들어 보겠습니다.
package com.sleekydz86.enums;

public enum SSEMsgType {

    MESSAGE("message", "한 번에 보내는 일반 메시지"),
    ADD("add", "메시지 이어붙이기, 스트리밍 푸시에 적합"),
    FINISH("finish", "메시지 전송 완료"),
    CUSTOM_EVENT("custom_event", "사용자 정의 메시지 타입"),
    DONE("done", "메시지 전송 완료");

    public final String type;
    public final String value;

    SSEMsgType(String type, String value) {
        this.type = type;
        this.value = value;
    }
}
전용 SSE 컨트롤러 만들기
관리 도구를 사용하려면 프론트엔드가 접속할 수 있는 진입점도 만들어줘야 합니다.
그래서 이제 전용 SSE 컨트롤러를 만들 겁니다.
package com.sleekydz86.controller;

import com.sleekydz86.enums.SSEMsgType;
import com.sleekydz86.utils.SSEServer;
import org.springframework.http.MediaType;
import org.springframework.web.bind.annotation.GetMapping;
import org.springframework.web.bind.annotation.RequestMapping;
import org.springframework.web.bind.annotation.RequestParam;
import org.springframework.web.bind.annotation.RestController;
import org.springframework.web.servlet.mvc.method.annotation.SseEmitter;

@RestController
@RequestMapping("/sse")
public class SSEController {

    @GetMapping(path = "/connect", produces = { MediaType.TEXT_EVENT_STREAM_VALUE })
    public SseEmitter connect(@RequestParam String userId) {
        return SSEServer.connect(userId);
    }

}
이 컨트롤러는 아주 간단합니다.
유일한 역할은 SSEServer.connect()를 호출하고 반환된 SseEmitter 객체를 Spring MVC에 전달하는 것뿐이에요.
이렇게 SseEmitter를 반환하면 Spring Boot가 긴 연결을 계속 유지하게 됩니다.
2. 핵심 채팅 서비스 개선하기
이 부분이 이번 작업의 핵심입니다!
기존의 동기식 채팅 방식을 스트리밍 처리로 바꾸려고 합니다.
이렇게 하면 AI의 답변이 사용자에게 실시간으로 푸시될 수 있겠죠.
package com.sleekydz86.service.impl;

import com.sleekydz86.bean.ChatEntity;
import com.sleekydz86.enums.SSEMsgType;
import com.sleekydz86.service.ChatService;
import com.sleekydz86.utils.SSEServer;
import lombok.extern.slf4j.Slf4j;
import org.springframework.ai.chat.client.ChatClient;
import org.springframework.stereotype.Service;
import reactor.core.publisher.Flux;

@Service
@Slf4j
public class ChatServiceImpl implements ChatService {

    private final ChatClient chatClient;

    public ChatServiceImpl(ChatClient.Builder chatClientBuilder) {
        this.chatClient = chatClientBuilder.build();
    }

    @Override
    public void doChat(ChatEntity chatEntity) {
        String userId = chatEntity.getCurrentUserName();
        String prompt = chatEntity.getMessage();

        // ChatClient를 사용하여 프롬프트를 스트리밍 방식으로 처리
        Flux<String> stringFlux = chatClient
                .prompt(prompt)
                .stream()
                .content();

        // 스트리밍 결과 처리
        stringFlux
                // 에러 발생 시 처리
                .doOnError(throwable -> {
                    log.error("AI 스트리밍 오류: " + throwable.getMessage());
                    // 사용자에게 오류 메시지 전송 후 연결 종료
                    SSEServer.sendMsg(userId, "AI 서비스 오류가 발생했습니다.", SSEMsgType.FINISH);
                    SSEServer.close(userId);
                })
                // 스트림 데이터 구독
                .subscribe(
                        // 다음 데이터가 올 때마다 실행
                        content -> SSEServer.sendMsg(userId, content, SSEMsgType.ADD),
                        // 에러 발생 시 실행
                        error -> log.error("스트리밍 처리 중 오류 발생: " + error.getMessage()),
                        // 스트림 완료 시 실행
                        () -> {
                            SSEServer.sendMsg(userId, "done", SSEMsgType.FINISH);
                            SSEServer.close(userId);
                        }
                );
    }
}
주요 변경 사항은 다음과 같습니다.
- 기존 동기식 호출 대신 스트리밍 응답 사용:
stream().content()를 사용해 응답을 스트리밍 방식으로 가져옵니다. - 논블로킹(Non-blocking) 처리:
subscribe()를 이용해 스트림을 구독하고, 코드가 멈추지 않고 비동기적으로 처리되게 합니다. - 실시간 푸시: 서버가 데이터를 받을 때마다 바로 SSE를 통해 프론트엔드로 푸시하여 실시간 효과를 낼 수 있습니다.
3. 채팅 인터페이스 만들기
이제 사용자의 채팅 요청을 받을 일반 HTTP 인터페이스도 필요합니다.
package com.sleekydz86.controller;

import com.sleekydz86.bean.ChatEntity;
import com.sleekydz86.service.ChatService;

import jakarta.annotation.Resource;
import org.springframework.web.bind.annotation.*;

@RestController
@RequestMapping("/chat")
public class ChatController {

    @Resource
    private ChatService chatService;


    @PostMapping("/ai")
    public void chat(@RequestBody ChatEntity chatEntity) {
        chatService.doChat(chatEntity);
    }

}
이 인터페이스는 반환되는 데이터가 HTTP 요청이 아닌 SSE를 통해 푸시되기 때문에 반환 유형이 void입니다.
4. 프론트엔드 페이지 작성
이제 스트리밍 효과를 직접 눈으로 볼 수 있도록 깔끔하고 보기 좋은 채팅 인터페이스를 만들어보겠습니다.
다음 코드를 프로젝트 디렉터리인 src/main/resources/static에 index.html로 저장해 주세요.
<!DOCTYPE html>
<html lang="ko">
<head>
    <meta charset="UTF-8">
    <meta name="viewport" content="width=device-width, initial-scale=1.0">
    <title>SSE 스트리밍 대화</title>
    <style>
        body {
            font-family: -apple-system, BlinkMacSystemFont, "Segoe UI", Roboto, "Helvetica Neue", Arial, sans-serif;
            background-color: #f4f7f9;
            margin: 0;
            display: flex;
            justify-content: center;
            align-items: center;
            height: 100vh;
        }
        .chat-container {
            width: 90%;
            max-width: 800px;
            height: 90vh;
            background-color: #fff;
            border-radius: 12px;
            box-shadow: 0 4px 20px rgba(0, 0, 0, 0.1);
            display: flex;
            flex-direction: column;
            overflow: hidden;
        }
        .chat-header {
            background-color: #4a90e2;
            color: white;
            padding: 16px;
            font-size: 1.2em;
            text-align: center;
            font-weight: bold;
        }
        .chat-messages {
            flex-grow: 1;
            padding: 20px;
            overflow-y: auto;
            display: flex;
            flex-direction: column;
            gap: 15px;
        }
        .message {
            padding: 12px 18px;
            border-radius: 18px;
            max-width: 75%;
            line-height: 1.5;
        }
        .user-message {
            background-color: #dcf8c6;
            align-self: flex-end;
            border-bottom-right-radius: 4px;
        }
        .bot-message {
            background-color: #e9e9eb;
            align-self: flex-start;
            border-bottom-left-radius: 4px;
        }
        .chat-input-area {
            display: flex;
            padding: 15px;
            border-top: 1px solid #e0e0e0;
            background-color: #f9f9f9;
        }
        #message-input {
            flex-grow: 1;
            padding: 12px;
            border: 1px solid #ccc;
            border-radius: 20px;
            resize: none;
            font-size: 1em;
            margin-right: 10px;
        }
        #send-button {
            padding: 12px 25px;
            border: none;
            background-color: #4a90e2;
            color: white;
            border-radius: 20px;
            cursor: pointer;
            font-size: 1em;
            transition: background-color 0.3s;
        }
        #send-button:disabled {
            background-color: #a0c7ff;
            cursor: not-allowed;
        }
    </style>
</head>
<body>
<div class="chat-container">
    <div class="chat-header">AI 실시간 대화 로봇</div>
    <div class="chat-messages" id="chat-messages">
        </div>
    <div class="chat-input-area">
        <textarea id="message-input" placeholder="질문을 입력하세요..." rows="1"></textarea>
        <button id="send-button">보내기</button>
    </div>
</div>
<script>
    // DOM 요소 가져오기
    const chatMessages = document.getElementById('chat-messages');
    const messageInput = document.getElementById('message-input');
    const sendButton = document.getElementById('send-button');

    // 간단한 고유 사용자 ID 생성
    const userId = 'user-' + Date.now() + '-' + Math.random().toString(36).substr(2, 9);
    let eventSource = null;
    let currentBotMessageElement = null;

    // 1. 페이지 로드 후, 즉시 SSE 연결
    function connectSSE() {
        if (eventSource) {
            eventSource.close();
        }
        // 참고: URL은 백엔드의 SSEController 경로와 일치해야 합니다.
        eventSource = new EventSource(`/sse/connect?userId=${userId}`);

        // 'add' 이벤트를 수신합니다. (백엔드의 SSEMsgType.ADD와 동일)
        eventSource.addEventListener('add', (event) => {
            if (!currentBotMessageElement) {
                // 첫 데이터가 도착하면 새로운 봇 메시지 창을 만듭니다.
                currentBotMessageElement = createMessageElement('bot-message');
                chatMessages.appendChild(currentBotMessageElement);
            }
            // 받은 데이터를 봇 메시지 창에 추가합니다.
            // OpenAI의 스트리밍 응답에서 "null" 문자열이 올 수 있으므로 필터링이 필요합니다.
            if (event.data && event.data.toLowerCase() !== 'null') {
                currentBotMessageElement.textContent += event.data;
            }
            scrollToBottom();
        });

        // 'finish' 이벤트를 수신합니다. (백엔드의 SSEMsgType.FINISH와 동일)
        eventSource.addEventListener('finish', (event) => {
            console.log('스트림 완료:', event.data);
            // 스트림이 끝나면 봇 메시지 요소를 초기화하고, 보내기 버튼을 다시 활성화합니다.
            currentBotMessageElement = null;
            sendButton.disabled = false;
            messageInput.disabled = false;
            // 역할이 끝났으므로 연결을 안전하게 종료합니다.
            eventSource.close();
        });

        eventSource.onerror = (error) => {
            console.error('SSE 오류:', error);
            sendButton.disabled = false;
            messageInput.disabled = false;
            eventSource.close(); // 오류 발생 시에도 연결을 종료합니다.
        };
    }

    // 2. 메시지 전송 로직
    async function sendMessage() {
        const message = messageInput.value.trim();
        if (!message) return;

        // UI에 사용자의 메시지를 표시합니다.
        const userMessageElement = createMessageElement('user-message', message);
        chatMessages.appendChild(userMessageElement);
        messageInput.value = '';
        scrollToBottom();

        // 중복 전송을 막기 위해 입력 창과 버튼을 비활성화합니다.
        sendButton.disabled = true;
        messageInput.disabled = true;

        // 새로운 메시지를 받을 준비를 위해 SSE 연결을 다시 설정합니다.
        connectSSE();

        // HTTP POST 요청으로 백엔드 AI 채팅을 호출합니다.
        try {
            // 참고: URL은 백엔드의 ChatController 경로와 일치해야 합니다.
            await fetch('/chat/ai', {
                method: 'POST',
                headers: {
                    'Content-Type': 'application/json',
                },
                body: JSON.stringify({
                    currentUserName: userId,
                    message: message,
                }),
            });
        } catch (error) {
            console.error('메시지 전송 실패:', error);
            const errorMessage = createMessageElement('bot-message', '죄송합니다. 메시지 전송에 실패했습니다.');
            chatMessages.appendChild(errorMessage);
            sendButton.disabled = false;
            messageInput.disabled = false;
        }
    }

    // 보조 함수: 메시지 DOM 요소 생성
    function createMessageElement(className, text = '') {
        const div = document.createElement('div');
        div.className = `message ${className}`;
        div.textContent = text;
        return div;
    }

    // 보조 함수: 스크롤을 맨 아래로 이동
    function scrollToBottom() {
        chatMessages.scrollTop = chatMessages.scrollHeight;
    }

    // 이벤트 바인딩
    sendButton.addEventListener('click', sendMessage);
    messageInput.addEventListener('keydown', (event) => {
        if (event.key === 'Enter' && !event.shiftKey) {
            event.preventDefault();
            sendMessage();
        }
    });
</script>
</body>
</html>
이 프런트엔드 페이지의 작업 흐름은 다음과 같습니다.
- SSE 연결 설정:
EventSourceAPI를 사용해서 백엔드와 지속적인 연결을 만듭니다. - 이벤트 스트림 수신 대기:
add이벤트를 듣고 있다가 AI의 실시간 응답을 받습니다. 응답이 끝나면finish이벤트를 받아서 알 수 있습니다. - 채팅 요청 보내기: 일반 HTTP POST 요청으로 백엔드에 있는 AI 채팅 기능을 실행합니다.
- 응답 실시간 렌더링: 데이터가 들어올 때마다 바로 화면에 추가해서 마치 타자기로 치는 듯한 효과를 줍니다.
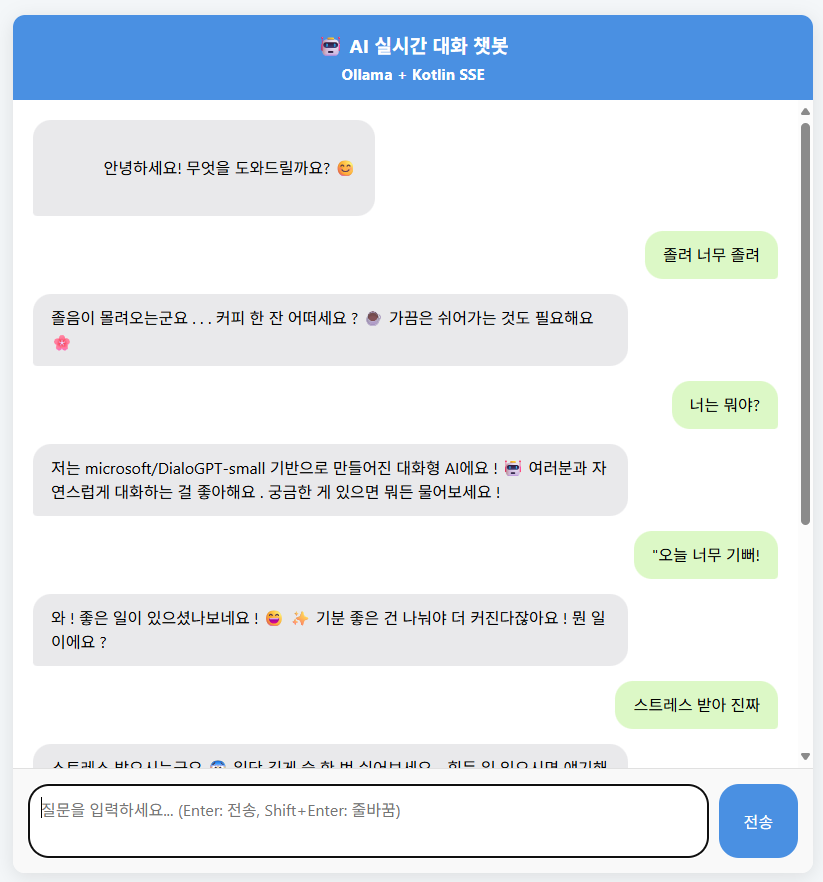
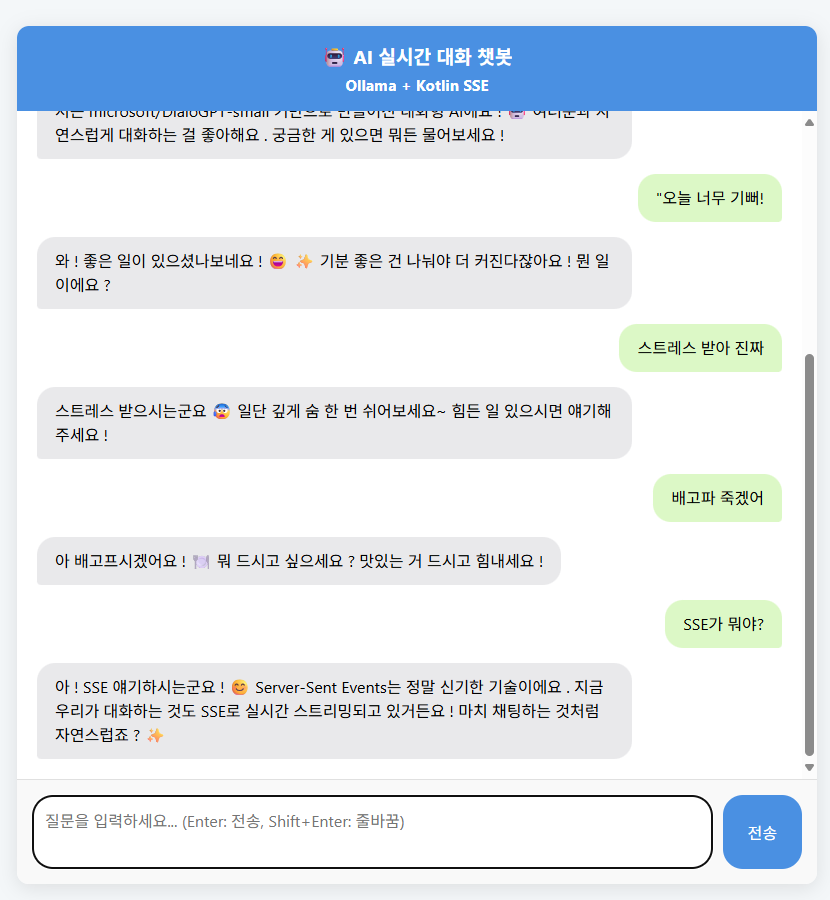
테스트해보기
이제 프로젝트를 실행해서 스트리밍의 매력을 직접 경험해볼까요? http://localhost:8080/index.html로 접속하면 깔끔한 채팅 인터페이스가 보일 거예요.
몇 가지 질문을 해보세요.
AI의 답변이 더 이상 한참을 기다려야 하는 단발성 응답이 아니라, 마치 실제 사람이 타이핑하는 것처럼 단어 하나씩 부드럽게 나타나는 것을 확인할 수 있을 겁니다.
결론
이 글을 통해 우리는 일반 AI 채팅 애플리케이션을 스트리밍 응답을 지원하는 버전으로 성공적으로 업그레이드했습니다.
이 과정을 다시 정리해 볼게요.
- SSE 기술에 대한 깊은 이해: SSE는 간단하고 가벼워서 특히 서버에서 클라이언트로 일방적으로 데이터를 푸시하는 시나리오에 딱 맞습니다.
- Spring AI 스트리밍 API 마스터하기:
stream()메서드로 응답 스트림을 얻어내고, 반응형 프로그래밍과 함께 논블로킹(Non-blocking) 처리를 구현했습니다. - 완벽한 스트리밍 대화 시스템 구축: 백엔드에서의 SSE 관리와 스트리밍 처리부터 프런트엔드의 실시간 렌더링까지, 완벽한 솔루션을 만들었습니다.
스트리밍 응답은 단순히 기술적인 기능에 그치지 않고, 사용자 경험을 크게 향상시키는 핵심 요소입니다.
요즘 점점 더 보편화되고 있는 AI 애플리케이션에서 이 기술을 잘 다루면 여러분의 앱이 사용자 경험 면에서 한 발 앞서 나갈 수 있을 거예요.
혹시 이 글에 대해 궁금한 점이나 제안할 내용이 있다면, 언제든지 댓글로 자유롭게 소통해주세요! 다음 글에서 또 만나요! 👋