멀티 주사위 시스템 구현 및 물리적 충돌과 상호작용
1. 멀티 주사위 시스템 구현
- 단일 주사위가 아닌 여러 개의 주사위를 동시에 던져 각 주사위의 값을 계산하도록 확장이 됩니다.
- 이를 통해 다중 객체 관리 및 연산 효율성을 보여줄 수 있습니다.
2. 물리적 충돌과 상호작용 시뮬레이션
- 주사위 간 충돌이나 바닥과의 상호작용을 Three.js의 Physics 라이브러리와 통합하여 구현합니다.
- 실제 주사위가 물리 법칙에 따라 굴러가는 모습을 재현하여 결과값을 더 실감 나게 표시 합니다.
3. 결과 시각화
-
주사위 결과값을 UI로 표시하거나, 특정 조건에서 결과를 애니메이션으로 강조 합니다.
-
예를 들어, 특정 값(6)이 나오면 효과음과 함께 색상이 바뀌거나 텍스처가 강조되도록 구현합니다.
다중 주사위의 상태를 추적하고, 물리적 상호작용과 충돌 후 각 주사위의 최종 값을 계산 됩니다.
다음은 이를 위한 코드 설계와 구현입니다.
4. 주사위 클래스 설계
먼저, 주사위 하나를 관리하는 클래스를 작성합니다.
import * as THREE from "three";
import { GLTFLoader } from "three/examples/jsm/loaders/GLTFLoader";
import { Physics } from "ammo.js"; // 물리 엔진 라이브러리 (Ammo.js)

type FaceDirections = "+Y" | "-Y" | "+Z" | "-Z" | "+X" | "-X";

const faceValues: Record<FaceDirections, number> = {
    "+Y": 1,
    "-Y": 6,
    "+Z": 2,
    "-Z": 5,
    "+X": 3,
    "-X": 4,
};

const upDirections: Record<FaceDirections, THREE.Vector3> = {
    "+Y": new THREE.Vector3(0, 1, 0),
    "-Y": new THREE.Vector3(0, -1, 0),
    "+Z": new THREE.Vector3(0, 0, 1),
    "-Z": new THREE.Vector3(0, 0, -1),
    "+X": new THREE.Vector3(1, 0, 0),
    "-X": new THREE.Vector3(-1, 0, 0),
};

class Dice {
    mesh: THREE.Mesh;
    body: any; // Ammo.js의 물리 Body
    scene: THREE.Scene;

    constructor(scene: THREE.Scene, loader: GLTFLoader, position: THREE.Vector3) {
        this.scene = scene;

        // 주사위 모델 로드
        loader.load("dice_model.glb", (gltf) => {
            this.mesh = gltf.scene.children[0] as THREE.Mesh;
            this.mesh.position.copy(position);
            this.mesh.castShadow = true;
            this.mesh.receiveShadow = true;

            // 물리 엔진과 연결된 Body 생성
            this.body = Physics.createRigidBody(this.mesh, { mass: 1 });
            Physics.addBodyToWorld(this.body);

            this.scene.add(this.mesh);
        });
    }

    // 주사위 값 계산
    getDiceValue(): number {
        const currentQuaternion = this.mesh.quaternion.clone();
        let closestFace: FaceDirections | null = null;
        let maxDot = -Infinity;

        for (const [face, direction] of Object.entries(upDirections)) {
            const transformedDirection = direction.clone().applyQuaternion(currentQuaternion);
            const dot = transformedDirection.dot(new THREE.Vector3(0, 1, 0));
            if (dot > maxDot) {
                maxDot = dot;
                closestFace = face as FaceDirections;
            }
        }

        return closestFace ? faceValues[closestFace] : 0;
    }
}
5. 다중 주사위 시스템 관리
여러 개의 주사위를 관리하기 위한 클래스를 추가로 작성합니다.
class DiceManager {
    dices: Dice[];
    scene: THREE.Scene;
    loader: GLTFLoader;

    constructor(scene: THREE.Scene) {
        this.dices = [];
        this.scene = scene;
        this.loader = new GLTFLoader();
    }

    // 주사위 생성
    createDice(position: THREE.Vector3): void {
        const dice = new Dice(this.scene, this.loader, position);
        this.dices.push(dice);
    }

    // 모든 주사위 값 계산
    getAllDiceValues(): number[] {
        return this.dices.map((dice) => dice.getDiceValue());
    }

    // 주사위 던지기
    throwDices(): void {
        this.dices.forEach((dice) => {
            const force = new THREE.Vector3(
                (Math.random() - 0.5) * 10,
                10,
                (Math.random() - 0.5) * 10
            );
            const torque = new THREE.Vector3(
                (Math.random() - 0.5) * 10,
                (Math.random() - 0.5) * 10,
                (Math.random() - 0.5) * 10
            );
            Physics.applyForceAndTorque(dice.body, force, torque);
        });
    }
}
6. Three.js와 물리 엔진 통합
Three.js와 Ammo.js를 연결해 물리적 상호작용을 구현합니다.
const scene = new THREE.Scene();
const camera = new THREE.PerspectiveCamera(75, window.innerWidth / window.innerHeight, 0.1, 1000);
const renderer = new THREE.WebGLRenderer({ antialias: true });
renderer.shadowMap.enabled = true;

const physics = new Physics();
physics.init();

const diceManager = new DiceManager(scene);

// 주사위 생성
for (let i = 0; i < 5; i++) {
    const position = new THREE.Vector3(
        (Math.random() - 0.5) * 5,
        5,
        (Math.random() - 0.5) * 5
    );
    diceManager.createDice(position);
}

// 애니메이션 루프
function animate() {
    requestAnimationFrame(animate);

    // 물리 엔진 업데이트
    physics.update();

    // 렌더링
    renderer.render(scene, camera);
}

animate();
보너스..고급 주사위 값 계산 알고리즘
import * as THREE from 'three';

interface DiceFace {
    direction: THREE.Vector3;
    value: number;
}

class AdvancedDiceValueCalculator {
    private faces: DiceFace[];
    private epsilon: number;

    constructor() {
        this.faces = [
            { direction: new THREE.Vector3(0, 1, 0), value: 1 },   // +Y
            { direction: new THREE.Vector3(0, -1, 0), value: 6 },  // -Y
            { direction: new THREE.Vector3(0, 0, 1), value: 2 },   // +Z
            { direction: new THREE.Vector3(0, 0, -1), value: 5 },  // -Z
            { direction: new THREE.Vector3(1, 0, 0), value: 3 },   // +X
            { direction: new THREE.Vector3(-1, 0, 0), value: 4 }   // -X
        ];
        this.epsilon = 0.001; // 수치적 안정성을 위한 작은 오차 값
    }

    // 주사위 값 계산 고급 메서드
    calculateDiceValue(mesh: THREE.Mesh): number {
        const currentQuaternion = mesh.quaternion.clone();

        // 성능 최적화: 미리 월드 업 벡터 생성
        const worldUpVector = new THREE.Vector3(0, 1, 0);

        // 병렬 처리를 위한 최적화된 알고리즘
        const faceValues = this.faces.map(face => {
            const transformedDirection = face.direction.clone()
                .applyQuaternion(currentQuaternion);

            const dotProduct = transformedDirection.dot(worldUpVector);

            return {
                value: face.value,
                dotProduct: dotProduct
            };
        });

        // 가장 근접한 면 찾기 (오차 범위 포함)
        const topFace = faceValues.reduce((prev, current) =>
            (Math.abs(current.dotProduct - 1) < Math.abs(prev.dotProduct - 1))
                ? current
                : prev
        );

        // 오차 범위 내에서 안정적인 값 반환
        return Math.abs(topFace.dotProduct - 1) < this.epsilon
            ? topFace.value
            : -1; // 유효하지 않은 상태
    }

    // 디버깅 및 로깅 메서드
    logDetailedFaceInformation(mesh: THREE.Mesh): void {
        const currentQuaternion = mesh.quaternion.clone();
        const worldUpVector = new THREE.Vector3(0, 1, 0);

        console.log("📊 Detailed Dice Face Analysis:");
        this.faces.forEach(face => {
            const transformedDirection = face.direction.clone()
                .applyQuaternion(currentQuaternion);

            const dotProduct = transformedDirection.dot(worldUpVector);
            const angle = Math.acos(dotProduct) * (180 / Math.PI);

            console.log(`
                Face Value: ${face.value}
                Original Direction: ${face.direction.toArray()}
                Transformed Direction: ${transformedDirection.toArray()}
                Dot Product: ${dotProduct}
                Angle from Up Vector: ${angle.toFixed(2)}°
            `);
        });
    }
}

export default AdvancedDiceValueCalculator;
결론
이 글에서는 Three.js를 활용해 주사위의 윗면을 판별하는 방법을 포스팅 해 보았습니다.
다중 주사위의 물리적 상호작용을 Three.js와 물리 엔진(Ammo.js)을 사용해 구현한 예제입니다.
이를 통해 시각적으로나 기능적으로 보다 강력한 주사위 시뮬레이션을 보여줄 수 있습니다.
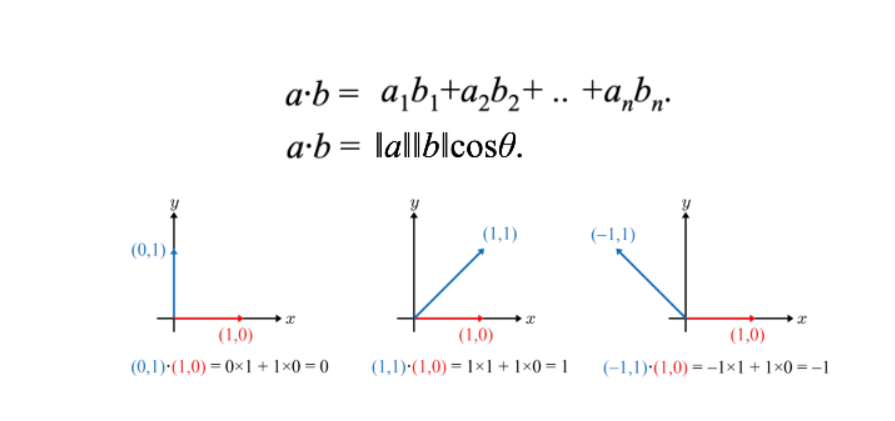
기본적인 점곱(Dot Product) 개념에서 출발하여, Quaternion 회전을 사용한 윗면 판별 로직을 구현하고, 성능 최적화와 확장성 있는 코드 설계까지 포스팅 했습니다.
이를 통해 주사위 값 판별과 같은 3D 애니메이션의 기초 로직을 배우는 것뿐만 아니라, 더 복잡한 3D 로직 개발로 확장 가능한 기반을 다질 수 있었습니다.
3D 그래픽스 로직 설계 및 최적화의 사례로 활용 가능하다는것을 프로젝트로 발전시킬 수 있는것을 배웠습니다.

레거시를 이해하면서도 새로운 기술을 현실적으로 적용할 수 있는 백엔드 개발자가 되는 것이 목표입니다.