실시간 알림 기능을 구현하려면 WebSocket 또는 Server-Sent Events (SSE)와 같은 기술을 사용할 수 있습니다.
WebSocket을 활용하면 양방향 통신을 통해 서버와 클라이언트 간의 실시간 데이터를 주고받을 수 있습니다.
이를 통해 사용자는 새로운 알림이 발생하면 즉시 확인할 수 있고, 읽지 않은 알림이 있는 경우 상단에 표시되도록 구현할 수 있습니다.
1. 설계 개요
1-1. 주요 기능 설계
-
알림 생성 및 저장: 서버에서 특정 이벤트(예: 새로운 게시물 등록, 댓글, 메시지 등)가 발생하면 알림을 생성하고 데이터베이스에 저장합니다.
-
실시간 알림 전송: 서버에서 알림이 생성되면 해당 사용자에게 WebSocket을 통해 실시간으로 알림을 전송합니다.
-
읽음/안읽음 상태 관리: 사용자가 알림을 읽으면 상태를 '읽음'으로 업데이트하고, 읽지 않은 알림이 있다면 상단에 표시합니다.
-
알림 목록 조회: 사용자가 알림 목록을 조회할 수 있으며, 읽지 않은 알림과 읽은 알림을 구분하여 볼 수 있습니다.
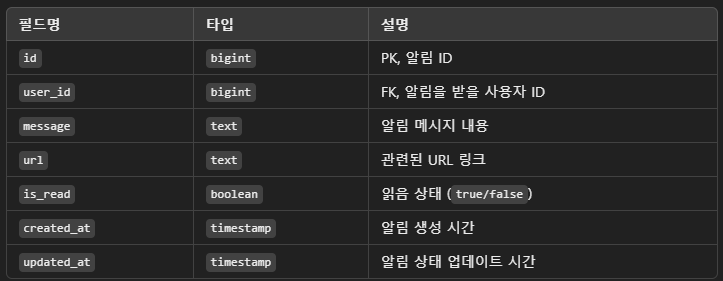
1-2. 데이터베이스 설계
알림 테이블의 스키마는 다음과 같이 설계할 수 있습니다.
Notification 테이블
2. 프로젝트 적용 시 장점
-
실시간성: 사용자가 알림을 즉시 확인할 수 있어 반응성이 높아집니다.
-
사용자 경험 향상: 알림 기능은 사용자에게 중요한 정보를 놓치지 않도록 도와줍니다.
-
확장성: 사용자와의 다양한 상호작용에 따라 알림 기능을 확장할 수 있습니다.
예를 들어, 특정 이벤트에 대한 구독 기능 추가 가능.
3. Nest.js 실시간 알림 구현
3-1. WebSocket 모듈 설정
먼저 @nestjs/websockets와 @nestjs/platform-socket.io 패키지를 설치합니다.
npm install @nestjs/websockets @nestjs/platform-socket.io이후 WebSocket Gateway를 구현합니다.
NotificationGateway.ts
import { WebSocketGateway, WebSocketServer, SubscribeMessage, MessageBody } from '@nestjs/websockets';
import { Server, Socket } from 'socket.io';

@WebSocketGateway({ namespace: 'notifications' }) // WebSocket 네임스페이스 설정
export class NotificationGateway {
  @WebSocketServer()
  server: Server;

  // 클라이언트와의 연결을 처리
  handleConnection(client: Socket) {
    console.log(`Client connected: ${client.id}`);
  }

  // 클라이언트 연결 종료 처리
  handleDisconnect(client: Socket) {
    console.log(`Client disconnected: ${client.id}`);
  }

  // 특정 사용자에게 알림 전송
  async sendNotificationToUser(userId: number, message: string, url: string) {
    this.server.to(`user_${userId}`).emit('notification', { message, url });
  }

  // 알림 읽음 상태 업데이트
  @SubscribeMessage('markAsRead')
  handleMarkAsRead(@MessageBody() data: { notificationId: number, userId: number }) {
    console.log(`Notification ${data.notificationId} marked as read by user ${data.userId}`);
    // 알림 상태 업데이트 로직 추가
  }
}
3-2. Service & Controller 구현
알림 생성 및 읽음 상태 업데이트 로직을 구현합니다.
NotificationService.ts
import { Injectable } from '@nestjs/common';
import { InjectRepository } from '@nestjs/typeorm';
import { Repository } from 'typeorm';
import { Notification } from '../entities/notification.entity';
import { NotificationGateway } from './notification.gateway';

@Injectable()
export class NotificationService {
  constructor(
    @InjectRepository(Notification)
    private notificationRepository: Repository<Notification>,
    private notificationGateway: NotificationGateway, // WebSocket Gateway 주입
  ) {}

  // 새로운 알림 생성
  async createNotification(userId: number, message: string, url: string) {
    const notification = this.notificationRepository.create({
      user_id: userId,
      message,
      url,
      is_read: false,
    });
    await this.notificationRepository.save(notification);

    // 실시간 알림 전송
    await this.notificationGateway.sendNotificationToUser(userId, message, url);
  }

  // 알림 읽음 상태 업데이트
  async markAsRead(notificationId: number, userId: number) {
    const notification = await this.notificationRepository.findOne({ id: notificationId, user_id: userId });
    if (notification) {
      notification.is_read = true;
      await this.notificationRepository.save(notification);
    }
  }

  // 사용자 알림 목록 조회
  async getUserNotifications(userId: number) {
    return this.notificationRepository.find({
      where: { user_id: userId },
      order: { created_at: 'DESC' },
    });
  }
}
NotificationController.ts
import { Controller, Post, Param, Body, Get } from '@nestjs/common';
import { NotificationService } from './notification.service';

@Controller('notifications')
export class NotificationController {
  constructor(private notificationService: NotificationService) {}

  @Post(':userId')
  async createNotification(
    @Param('userId') userId: number,
    @Body('message') message: string,
    @Body('url') url: string,
  ) {
    await this.notificationService.createNotification(userId, message, url);
    return { message: 'Notification created successfully' };
  }

  @Get(':userId')
  async getUserNotifications(@Param('userId') userId: number) {
    return this.notificationService.getUserNotifications(userId);
  }

  @Post(':notificationId/read')
  async markAsRead(@Param('notificationId') notificationId: number, @Body('userId') userId: number) {
    await this.notificationService.markAsRead(notificationId, userId);
    return { message: 'Notification marked as read' };
  }
}
3-3. 데이터베이스 테이블 생성
Notification Entity
import { Entity, Column, PrimaryGeneratedColumn, ManyToOne, JoinColumn } from 'typeorm';
import { User } from './user.entity';

@Entity()
export class Notification {
  @PrimaryGeneratedColumn()
  id: number;

  @Column({ type: 'bigint' })
  user_id: number;

  @ManyToOne(() => User, user => user.notifications)
  @JoinColumn({ name: 'user_id' })
  user: User;

  @Column({ type: 'text' })
  message: string;

  @Column({ type: 'text', nullable: true })
  url: string;

  @Column({ type: 'boolean', default: false })
  is_read: boolean;

  @Column({ type: 'timestamp', default: () => 'CURRENT_TIMESTAMP' })
  created_at: Date;

  @Column({ type: 'timestamp', default: () => 'CURRENT_TIMESTAMP' })
  updated_at: Date;
}
4. 프로젝트 적용 시 장점
-
실시간 알림 제공: 사용자에게 즉각적인 정보를 제공할 수 있어, 예약 알림이나 결제 확인, 중요 이벤트 등의 반응 속도를 높일 수 있습니다.
-
알림 이력 관리: 알림 이력을 데이터베이스에 저장하고 필요할 때 언제든지 조회할 수 있어 사용자 경험을 개선합니다.
-
확장성: 다양한 이벤트에 대해 실시간으로 알림을 추가할 수 있으며, WebSocket을 활용해 클라이언트와의 상호작용도 확장 가능합니다.
-
사용자 관리: 알림의 읽음/안읽음 상태를 관리하여 사용자가 중요한 정보를 놓치지 않도록 도울 수 있습니다.
이 설계를 바탕으로 프로젝트에 알림 기능을 효과적으로 구현할 수 있을 것입니다.
필요에 따라 Redis와 같은 캐시 서버를 사용해 실시간 성능을 최적화하거나
Kafka와 같은 메시징 시스템을 활용해 확장성을 높일 수 있다는것을 배웠습니다.