100 days of swiftui: 36
https://www.hackingwithswift.com/100/swiftui/36
struct with @State
@State인 struct의 경우 변화가 있을 때마다 새로운 instance를 만든다. 그리고 swift가 빠르게 변경된 요소를 화면에 반영한다.
TextField에서 값을 변경하면 struct의 속성인 lastName, firstName이 바로 변경되는 것을 확인할 수 있다.
struct User {
    var lastName = "Last"
    var firstName = "First"
}

struct ContentView: View {
    @State var user = User()
    var body: some View {
        VStack(alignment: .leading) {
            Text("Firstname: \(user.firstName)")
            Text("Lastname: \(user.lastName)")
            TextField("first name", text: $user.firstName)
            TextField("last name", text: $user.lastName)
        }
        .padding()
    }
}
class with @Observable
@State인 struct와 달리 @State인 class는 @Observable을 표기해주어야 변화가 반영된다. @Observable은 class 속성의 변화를 관찰하고, 변화가 생기면 다시 로드한다.
Observation을 import하고 @Observable에 우측 마우스로 클릭하여 Expand Macro된 것을 확인할 수 있다.
import Observation

@Observable
class User {
    var lastName = "Last"
    var firstName = "First"
}

struct ContentView: View {
    @State var user = User()
    var body: some View {
        VStack(alignment: .leading) {
            Text("Firstname: \(user.firstName)")
            Text("Lastname: \(user.lastName)")
            TextField("first name", text: $user.firstName)
            TextField("last name", text: $user.lastName)
        }
        .padding()
    }
}
코드 파일
https://github.com/treesofgroo/Ios-IExpense/commit/ebb98f0c8ce2583f02ae874878cdb275f8e712d8
@Environment
@Environment를 통해 유저가 지금 다크 모드인지 아닌지, 어디 timezone인지, 폰트 설정을 크게 했는지 아닌지 등의 정보를 알 수 있다. 그 중 dismiss를 활용해 현재 띄어진 View를 닫을 수도 있다.
아래는 버튼을 누르면 sheet로 SecondView를 띄우고 그 곳에서 버튼을 누르면 sheet가 닫기게 설정한 코드이다.
struct ContentView: View {
    @State private var showingSecondView = false
    var body: some View {
        VStack(alignment: .leading) {
            Button("show/hide the View") {
                showingSecondView.toggle()
            }
            .sheet(isPresented: $showingSecondView) {
                SecondView()
            }
        }
        .padding()
    }
}

struct SecondView: View {
    @Environment(\.dismiss) var dismiss
    var body: some View {
        Button("dismiss") {
            dismiss()
        }
    }
}
코드 파일
https://github.com/treesofgroo/Ios-IExpense/commit/a8090f2a170f08305e083ebed062d01a4671da59
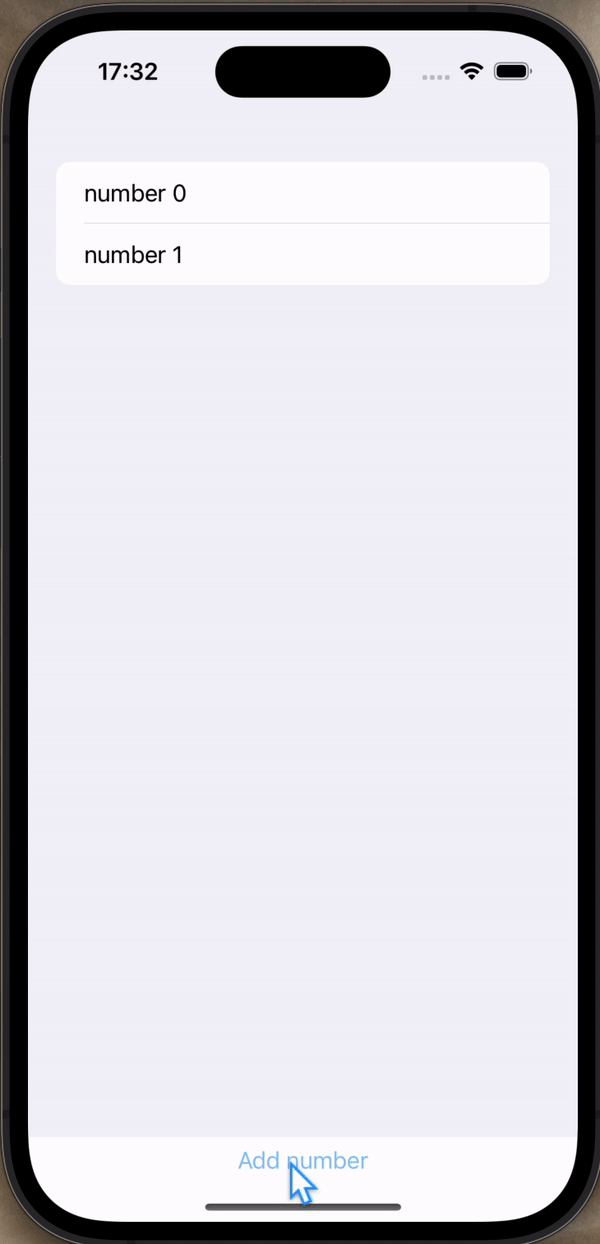
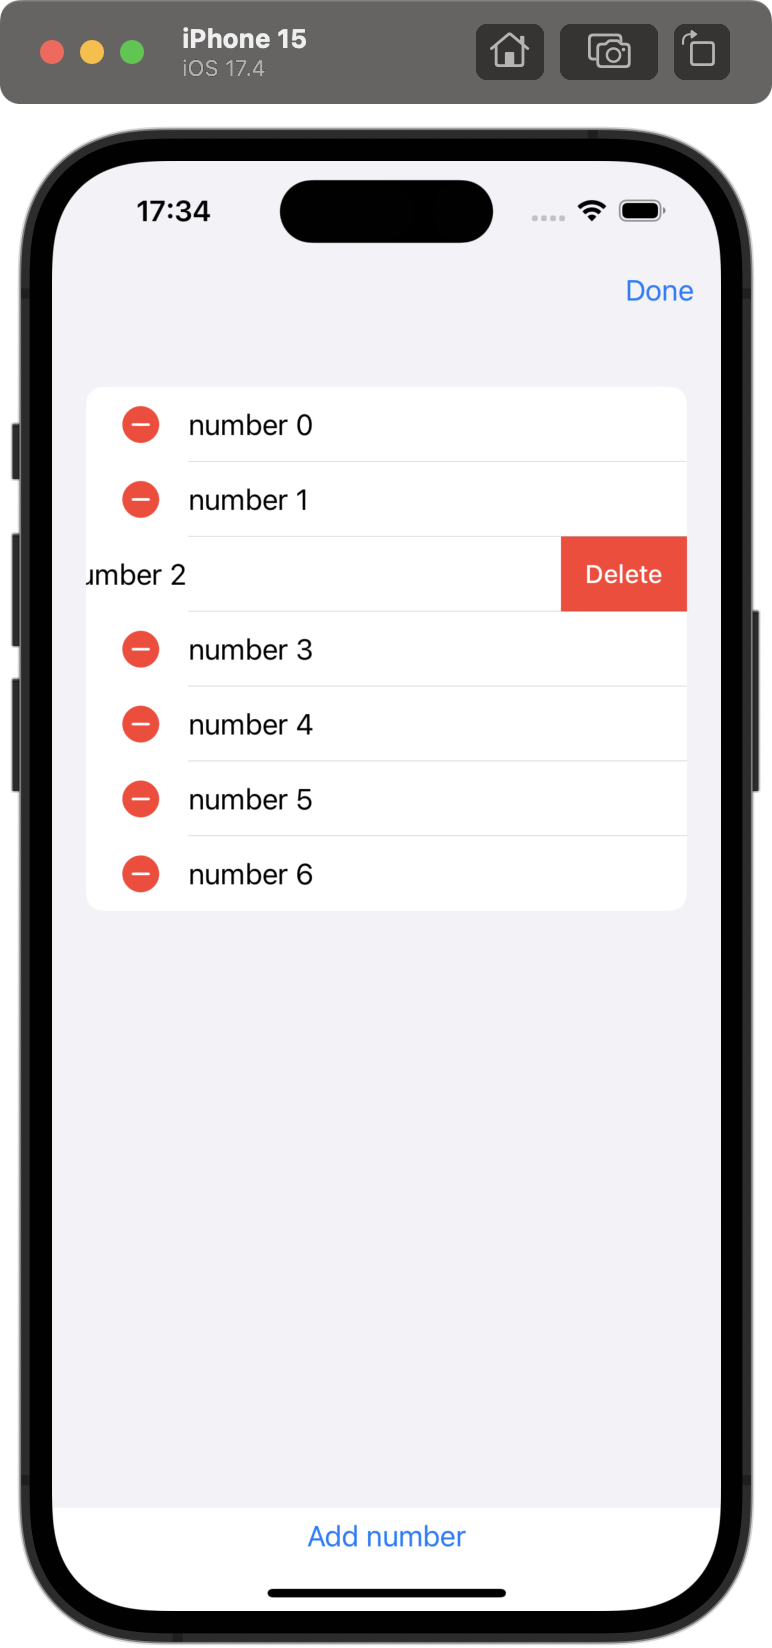
onDelete & EditButton
 |  |
|---|
swiftui에서 List를 만들고 각 요소를 스와이프 하거나 Edit 모드로 삭제할 수도 있다.
삭제할 수 있는 각 요소에 onDelete를 추가해서, 삭제할 경우 시행할 함수를 작성하면 된다.
그리고 List를 NavigationStack에 담고 그 안에 toolbar를 추가하여 EditButton()을 설정하면 edit모드로 List를 수정하고 done버튼으로 edit 모드를 종료할 수 있다.
struct ContentView: View {
    @State private var numbers = [Int]()
    @State private var number = 0
    var body: some View {
        NavigationStack {
            VStack {
                List {
                    ForEach(numbers, id: \.self) {
                        Text("number \($0)")
                    }
                    .onDelete(perform: { indexSet in
                        removeElement(at: indexSet)
                    })
                }
                Button("Add number") {
                    numbers.append(number)
                    number += 1
                }
            }
            .toolbar {
                EditButton()
            }
        }
    }
    func removeElement(at offset: IndexSet) {
        numbers.remove(atOffsets: offset)
    }
}
코드 파일
https://github.com/treesofgroo/Ios-IExpense/commit/28d25b867695faf073ce2b07b6ae195250ccc0bb
UserDefaults & AppStorage + Codable
data를 저장하는 방법은 여러가지가 있다. 그 중 간단하게 활용할 수 있는 것으로 UserDefaults와 AppStorage가 있다.
UserDefaults는 사용자가 가장 마지막으로 앱을 사용한 때, 최근에 읽은 곳 등을 저장하기에 적합한 곳으로 512KB이하로 저장할 수 있다고 한다. UserDefaults는 key로 식별하고 AppStorage라는 속성 wrapper를 통해서 이뤄지고 @State처럼 값이 변경되면 다시 로드한다. 그래서 아래처럼 정보를 저장하고 화면에도 반영할 수 있다.
struct ContentView: View {
    @State private var tapCount = UserDefaults.standard.integer(forKey: "tapCount")
    var body: some View {
        Button("tap count: \(tapCount)") {
            tapCount += 1
            UserDefaults.standard.set(tapCount, forKey: "tapCount")
        }
    }
}tapCount는 자동으로 0으로 설정된다. 그리고 UserDefaults는 정보를 저장하고 이를 업데이트 하는 데에 아주 조금의 시간이 걸려서, 저장되기도 전 찰나에 앱을 닫아버리면 마지막 변경이 적용되지 않는 경우도 있다.
AppStorage는 UserDefaults 없이 더 간단하게 활용할 수 있다.
struct ContentView: View {
    @AppStorage("tapCount") private var tapCount = 0
    var body: some View {
        Button("tap count: \(tapCount)") {
            tapCount += 1
        }
    }
}
그러나 struct처럼 복잡한 구조는 담지 못한다고 한다.
이 두 저장방식 모두 앱스토어에 앱을 심사받을 때는 질문을 받을 수도 있다고 하니 남용하지 않고 간단히 활용하는 것에 그치는 게 나아 보인다.
코드 파일
https://github.com/treesofgroo/Ios-IExpense/commit/44aba681036caacdd6647bb42d49b7bdff5c19cf
추가로 Codable이라는 프로토콜을 활용해 UserDefaults에 데이터를 저장하고 불러올 때 데이터 형태를 사용자화할 수 있다.
struct User: Codable {
    var firstName: String
    var lastName: String
}

struct ContentView: View {
    var user = User(firstName: "Hallo", lastName: "World")
    var body: some View {
        Button("Save user data") {
            let encoder = JSONEncoder()
            if let data = try? encoder.encode(user) {
                UserDefaults.standard.setValue(data, forKey: "userData")
                print("Saved user data")
            }
        }
    }
}
코드 파일
https://github.com/treesofgroo/Ios-IExpense/commit/81ac1a7f53b7610f8c43fa5b338f8775900d76bf
