학습 내용
네이버 웹툰의 홈탭과 웹툰 탭 일부를 실습했다.
7월 20일에 완료했던 네이버 메인 페이지에 웹툰 탭을 만들고 해당 탭을 누르면 웹툰 페이지와 연결되도록 코드를 변경했다.
웹툰의 메인 페이지 안에서는 웹툰 메인인 홈 탭과 목록을 볼 수 있는 웹툰 탭을 만들었다.
그 중 오늘 실습한 것은 웹툰 메인 홈의 상단부와 컨텐츠 영역 중 왼쪽에 해당하는 영역만 만들었다. 그리고 웹툰 탭은 상단부와 컨텐츠 영역 중 가장 위의 메뉴 버튼 구조만 잡았다.

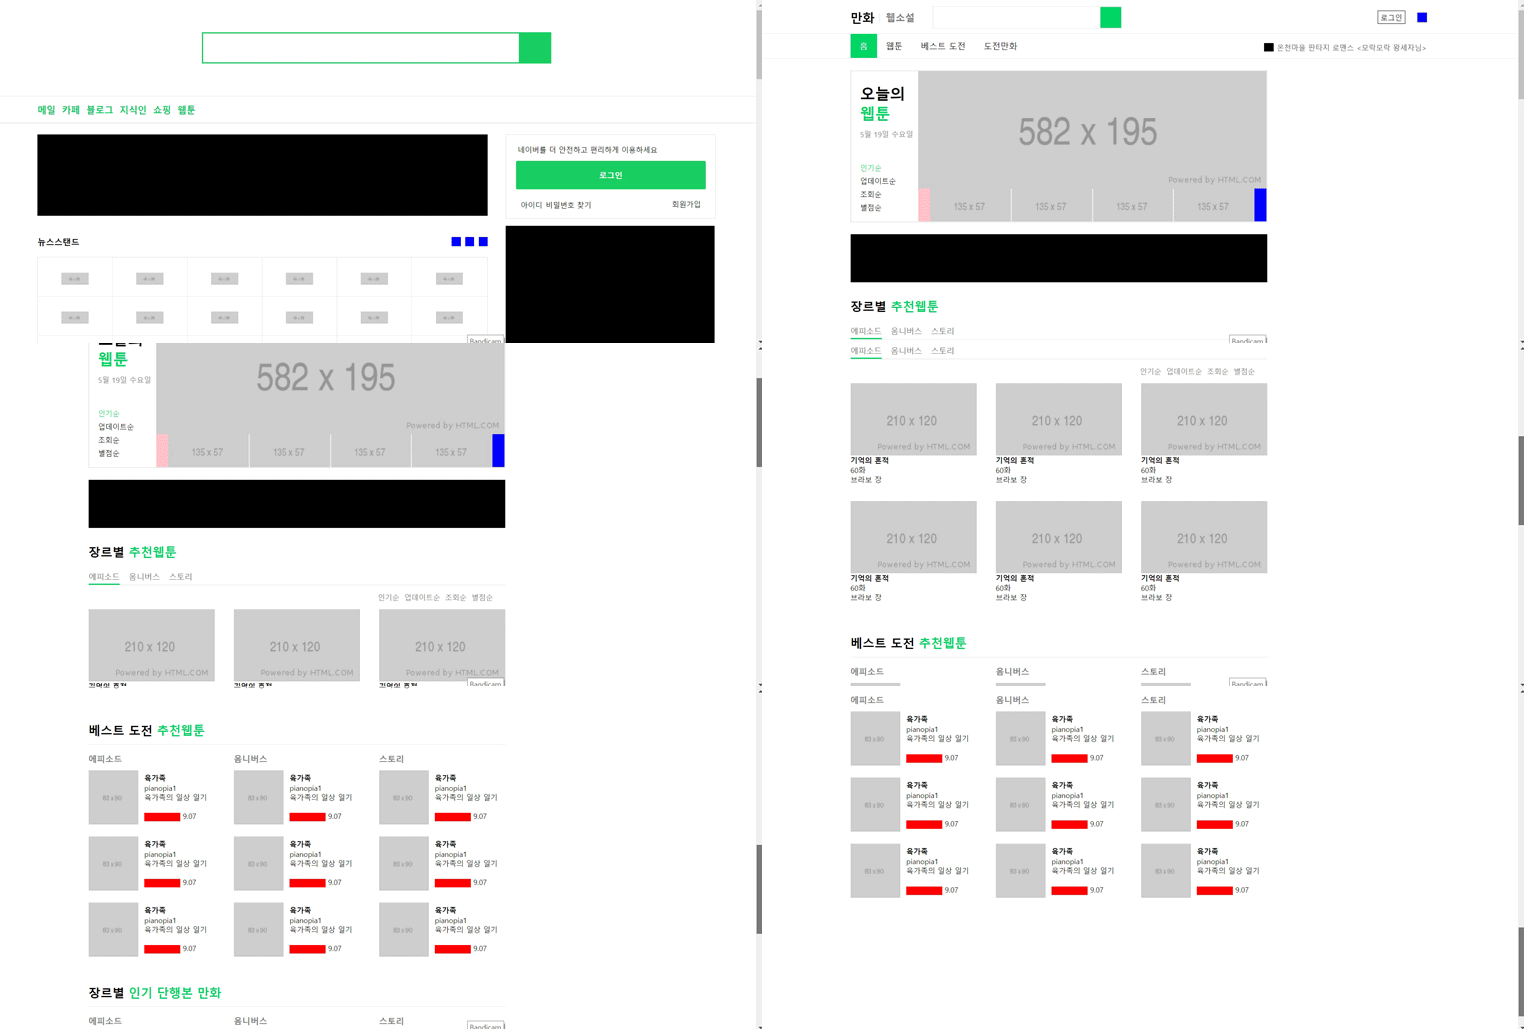
네이버 메인에서 웹툰 탭을 누르면 웹툰 목록 페이지로 이동하는 모습
웹툰 페이지 안에서 웹툰 탭으로 이동한 모습
웹툰에서 홈탭과 웹툰 탭, 2개의 페이지를 만들었는데 둘의 상단 header 영역이 같았다. 두 부분을 동일하게 처리하고 탭 선택시 초록색으로 바뀌는 부분만 신경 써줬다.
웹툰 - 홈 탭 페이지

header 영역
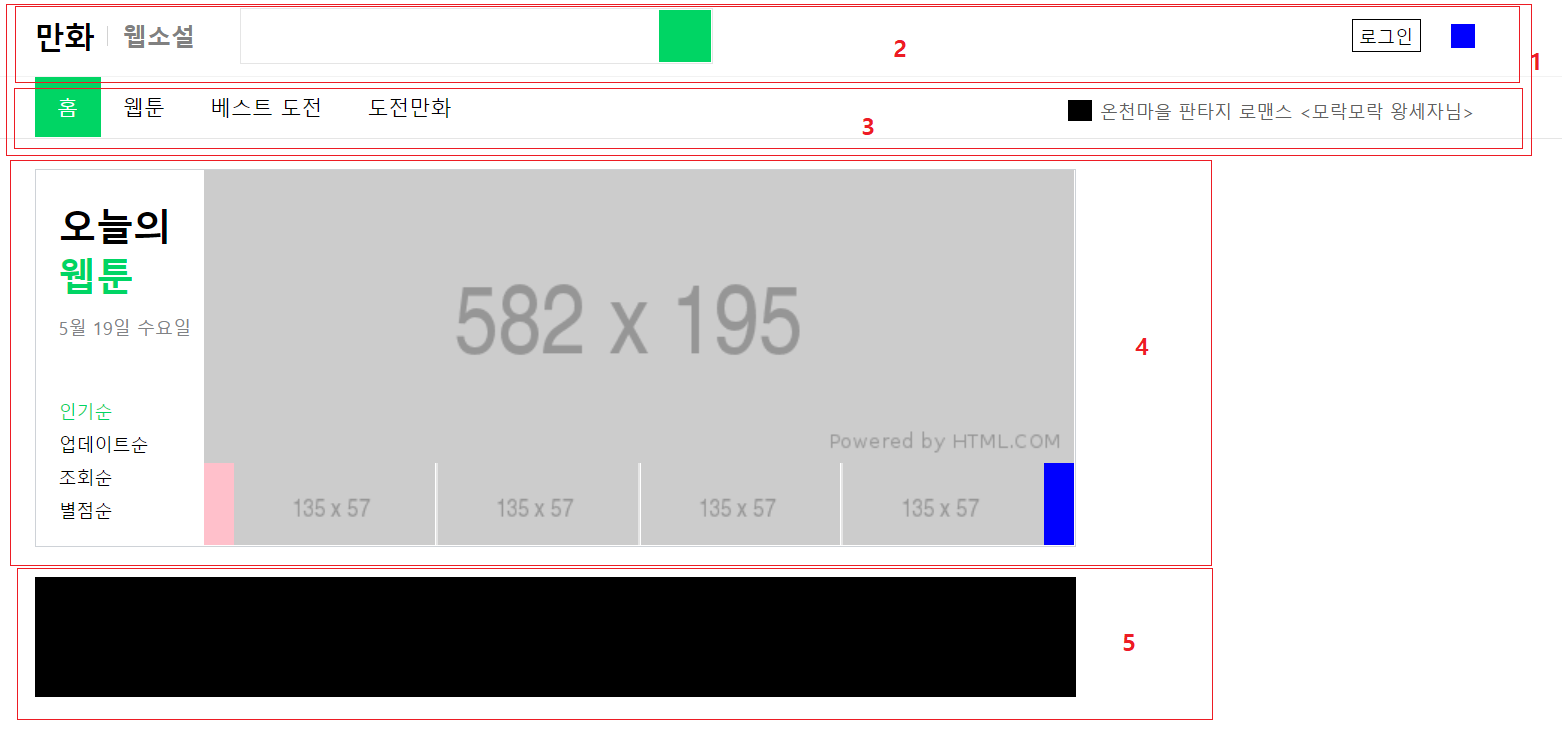
이미지에서 1번 영역에 해당하는 부분이다.
1번 안에서 2, 3으로 나누어서 작업하였다.
2, 3 영역 모두 왼쪽과 오른쪽으로 나누어서 작업하였다. 그리고 정렬 기능 flex를 이용하여 정렬했다.
우선 2번 영역
header 태그 안에서 div로 각 영역들을 만들어주고 세부적으로 짰다.
<div class="webtoon-header-top">
	<div class="webtoon-container">
		<div class="webtoon-header-left">
			<h2><a href="#">만화</a></h2>
			<em class="bar"></em>
			<h3><a href="#">웹소설</a></h3>

          		<div class="webtoon-header-input-wrap">
				<input type="text">
				<button type="button" class="btn-search"></button>
			</div>
		</div>

		<div class="webtoon-header-right">
			<a href="#" class="btn-login">로그인</a>
			<button type="button" class="btn-menu"></button>
		</div>
	</div>
</div>-
기존엔 가상 선택자 before를 이용하여 글자 사이의 "|"를 만들었는데 오늘은 em 태그를 이용했다.
-
페이지 내부의 모든 컨텐츠들이 중앙 정렬 되어있기 때문에 큰 영역들 안엔 항상 중앙 정렬만을 위한 영역을 하나 만든 후 그 안에다가 다른 설계를 한다.
.webtoon-container {
	width: 960px;
	margin: 0 auto;
}

#webtoon-header {
	background-color: #ffffff;
}

#webtoon-header .webtoon-header-top {
	background-color: #ffffff;
	border-bottom: solid 1px #f2f2f2;

	padding: 10px 0 8px 0;
}

#webtoon-header .webtoon-header-top .webtoon-container {
	display: flex;
	flex-wrap: wrap;
	justify-content: space-between;
	align-items: center;
}

#webtoon-header .webtoon-header-top .webtoon-header-left {
	display: flex;
	flex-wrap: wrap;
	align-items: center;

	width: 550px;
}

#webtoon-header .webtoon-header-top .webtoon-header-left h2 {
	font-size: 20px;
}

#webtoon-header .webtoon-header-top .webtoon-header-left .bar {
	width: 1px;
	height: 13px;
	background-color: #d2d2d2;

	margin-left: 8px;
	margin-right: 10px;
}

#webtoon-header .webtoon-header-top .webtoon-header-left h3 {
	margin-right: 30px;

	font-size: 16px;
}

#webtoon-header .webtoon-header-top .webtoon-header-left h3 a {
	color: grey;
}

#webtoon-header .webtoon-header-top .webtoon-header-input-wrap {
	display: flex;
	flex-wrap: wrap;
	align-items: center;

	width: 315px;
	height: 37px;
	border: solid 1px #e5e5e5;
}

#webtoon-header .webtoon-header-top .webtoon-header-input-wrap input {
	width: calc(100% - 35px);
	height: 100%;
	border: none;

	padding: 0 10px;
}

#webtoon-header .webtoon-header-top .webtoon-header-input-wrap input:focus {
	outline: none;
}

#webtoon-header .webtoon-header-top .webtoon-header-input-wrap .btn-search {
	width: 35px;
	height: 100%;
	background-color: #00d564;
}

#webtoon-header .webtoon-header-top .webtoon-header-right {
	display: flex;
	flex-wrap: wrap;
	justify-content: flex-end;
	align-items: center;
}

#webtoon-header .webtoon-header-top .webtoon-header-right .btn-login {
	border: solid 1px #000000;

	padding: 2px 4px;
	margin-right: 20px;

	font-size: 12px;
}

#webtoon-header .webtoon-header-top .webtoon-header-right .btn-menu {
	width: 16px;
	height: 16px;
	background-color: blue;
}-
width를 calc()를 이용해 쓰는 법을 잘 숙지해야겠다. 당장은 px로만 쓰는 게 너무 익숙해져서 px위주로 쓰지만 수치가 애매할 때 유용할 것 같다. input과 button 영역이 정확하게 들어맞았다. calc 내부에서 뺄셈을 할 때 마이너스 양 옆을 띄워야 한다.
-
오늘은 css 작성시 클래스로 경로를 적을 때 처음부터 아예 모든 경로를 미리 작성하고 css를 적었다. css 적용이 필요할 때마다 한 줄 씩 적는 것보다 차라리 간편하고 시간단축이 되어 좋았다.
밑으론 3번 영역
<div class="webtoon-header-nav">
	<div class="webtoon-container">
		<nav>
			<ul>
				<li class="on"><a href="webtoon.html">홈</a></li>
				<li><a href="webtoon-detail.html">웹툰</a></li>
				<li><a href="#">베스트 도전</a></li>
				<li><a href="#">도전만화</a></li>
			</ul>
		</nav>

		<div class="webtoon-header-link-wrap">
			<i class="icon-ex-mark"></i>
			<a href="#">온천마을 판타지 로맨스 <모락모락 왕세자님></a>
		</div>
	</div>
</div>- 아이콘인 i 태그를 처음 사용해봤다. i 태그는 inline-block 요소 성격을 가졌다. 아이콘 이미지를 백그라운드 이미지로 삽입할 땐 display를 block이든 inline-block으로 공간을 만들 수 있는 html 성격으로 바꿔줘야 한다.
#webtoon-header .webtoon-header-nav {
	border-bottom: solid 1px #e5e5e5;
}

#webtoon-header .webtoon-header-nav .webtoon-container {
	display: flex;
	flex-wrap: wrap;
	justify-content: space-between;
	align-items: center;
}

#webtoon-header .webtoon-header-nav nav {

}

#webtoon-header .webtoon-header-nav nav ul {
	display: flex;
	flex-wrap: wrap;
	align-items: center;
}

#webtoon-header .webtoon-header-nav nav ul li {
	width: auto;
	height: 40px;
}

#webtoon-header .webtoon-header-nav nav ul li.on a {
	background-color: #00d564;
	color: #ffffff;
}

#webtoon-header .webtoon-header-nav nav ul li a {
	display: block;
	width: 100%;
	height: 100%;
	padding: 0 15px;

	line-height: 40px;

	font-size: 14px;
}

#webtoon-header .webtoon-header-nav .webtoon-header-link-wrap .icon-ex-mark {
	display: inline-block;
	width: 16px;
	height: 14px;
	background-color: #000000;

	vertical-align: middle;
}

#webtoon-header .webtoon-header-nav .webtoon-header-link-wrap a {
	vertical-align: middle;
	font-size: 12px;
	color: #606060;
}

#webtoon-header .webtoon-header-nav .webtoon-header-link-wrap a:hover {
	text-decoration: underline;
}-
2번 영역 오른쪽의 로그인, 메뉴 버튼은 x축 중앙 정렬을 하기 위해 양쪽 다
vertical-align: middle;을 사용하였다. 나는 한쪽에만vertical-align: middle;을 적용하고 왜 정렬이 안되는지 고민했는데 적용해야할 것에 다 적어줘야한다. 기본적인 실수라서 개념을 제대로 다시 봐야할 것 같다. -
i 태그와 a 태그 둘 다 인라인 요소라서
vertical-align: middle;을 적용할 수 있다. -
flex를 https://flexbox.help/ 사이트를 이용하여 간편하게 적고 있지만 모든 속성을 다 알아야한다. 스스로 속성을 바꿔가며 적용해보고 개념을 알아야한다.
-
on이라는 클래스를 이용하여 background-color를 넣은 것이 인상 깊었다. 클래스를 2개 이상 적어 공통된 것과 차이를 줄 것을 나누는 법을 더 익혀야겠다.
#webtoon-header .webtoon-header-nav nav ul li.on a {
	background-color: #00d564;
	color: #ffffff;
}
main 영역
길게 왼쪽-오른쪽 영역으로 나누었고 오늘은 왼쪽 영역만 했다. 4~6번 영역이다.

4번 영역
<div class="webtoon-carousel webtoon-border">
	<div class="webtoon-carousel-left">
		<h2>오늘의<br><span>웹툰</span></h2>
		<p>5월 19일 수요일</p>
		<ul>
			<li class="on"><a href="#">인기순</a></li>
			<li><a href="#">업데이트순</a></li>
			<li><a href="#">조회순</a></li>
			<li><a href="#">별점순</a></li>
		</ul>
	</div>

	<div class="webtoon-carousel-right">

		<div class="webtoon-carousel-banner">
			<img src="https://via.placeholder.com/582x195">
		</div>

		<div class="webtoon-carousel-banner-nav">
			<ul>
				<li><img src="https://via.placeholder.com/135x57"></li>
				<li><img src="https://via.placeholder.com/135x57"></li>
				<li><img src="https://via.placeholder.com/135x57"></li>
				<li><img src="https://via.placeholder.com/135x57"></li>
			</ul>

			<a href="#" class="btn btn-prev"></a>
			<a href="#" class="btn btn-next"></a>

		</div>
	</div>
</div>
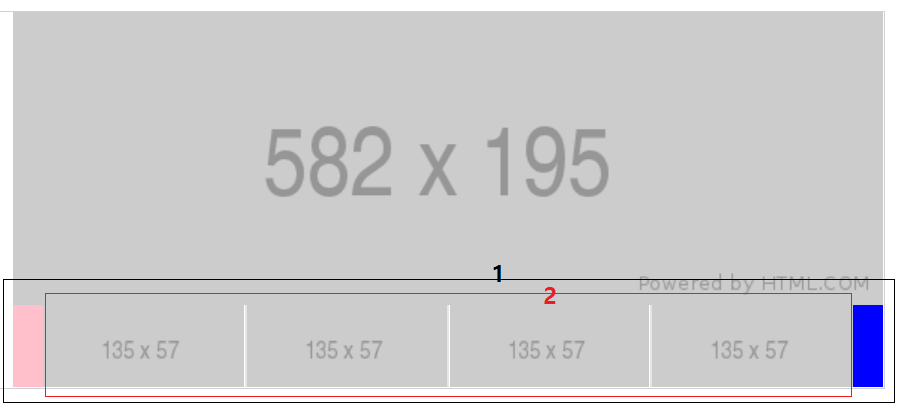
4번 안에서도 왼쪽과 오른쪽을 나눴다. 가장 포인트가 되는 작업이 582x195사이즈의 이미지 아래에 있는 이미지 목록들이었다. position을 이용한 작업이라 차원을 이해해야 혼자서도 작업할 수 있는 부분이다.
#webtoon-main .webtoon-container {
	overflow: hidden;
}

#webtoon-main .webtoon-main-left {
	float: left;

	width: 694px;
}

#webtoon-main .webtoon-main-left .webtoon-carousel {
	overflow: hidden;
	width: 694px;
	height: 252px;
	background-color: #ffffff;

	margin-bottom: 20px;
}

#webtoon-main .webtoon-main-left .webtoon-carousel .webtoon-carousel-left {
	float: left;
	width: 112px;
	padding: 20px 5px 0 15px;
}

#webtoon-main .webtoon-main-left .webtoon-carousel-left h2 {
	font-size: 25px;
	margin-bottom: 10px;
}

#webtoon-main .webtoon-main-left .webtoon-carousel-left span {
	color: #00d564;
}

#webtoon-main .webtoon-main-left .webtoon-carousel-left p {
	font-size: 12px;
	color: #808285;
}

#webtoon-main .webtoon-main-left .webtoon-carousel-left ul {
	margin-top: 40px;
}

#webtoon-main .webtoon-main-left .webtoon-carousel-left li {
	font-size: 12px;
	margin-bottom: 6px;
}

#webtoon-main .webtoon-main-left .webtoon-carousel-left li.on a {
	color: #00d564;
}

#webtoon-main .webtoon-main-left .webtoon-carousel-left li:last-child {
	margin-bottom: 0;
}

#webtoon-main .webtoon-main-left .webtoon-carousel .webtoon-carousel-right {
	float: right;
	width: calc(100% - 112px);
}

#webtoon-main .webtoon-main-left .webtoon-carousel-banner {
	width: 582px;
	height: 195px;
}

#webtoon-main .webtoon-main-left .webtoon-carousel-banner img {
	width: 100%;
	height: 100%;
}

#webtoon-main .webtoon-main-left .webtoon-carousel-banner-nav {
	position: relative;
}

#webtoon-main .webtoon-main-left .webtoon-carousel-banner-nav ul {
	display: flex;
	flex-wrap: wrap;
	align-items: center;

	width: 540px;
	margin: 0 auto;
}

#webtoon-main .webtoon-main-left .webtoon-carousel-banner-nav ul li {
	width: 135px;
	height: 57px;
	border-left: solid 1px #e5e5e5;
	border-right: solid 1px #e5e5e5;
}

#webtoon-main .webtoon-main-left .webtoon-carousel-banner-nav ul li:first-child {
	border-left: none;
}

#webtoon-main .webtoon-main-left .webtoon-carousel-banner-nav ul li:last-child {
	border-right: none;
}

#webtoon-main .webtoon-main-left .webtoon-carousel-banner-nav ul li img {
	width: 100%;
	height: 100%;
}

#webtoon-main .webtoon-main-left .webtoon-carousel-banner-nav .btn {
	position: absolute;
	width: 20px;
	height: 57px;
}

#webtoon-main .webtoon-main-left .webtoon-carousel-banner-nav .btn.btn-prev {
	left: 0;
	top: 0;
	background-color: pink;
}

#webtoon-main .webtoon-main-left .webtoon-carousel-banner-nav .btn.btn-next {
	right: 0;
	top: 0;
	background-color: blue;
}-
클래스 이름이 길어서 이때부터 경로 작성할 때 좀 힘들었다.
-
양쪽 영역을 float을 이용하였고 부모 태그엔 overflow: hidden;을 썼다.

1번 영역은 div로 먼저 감싼 후에 안에서 ul태그를 썼다. 가장 큰 div에 position: relative;를 쓰고 ul에 flex를 이용했다. 핑크와 블루 영역은 position: absolute;를 써서 각각 left와 right 속성을 이용해 왼쪽과 오른쪽으로 붙였다.
5번 영역은 광고였고 영역 크기와 색상만 지정해줬다.
아래의 만화 목록들은 크게 3부분으로 나눠져있었고 3개에 공통적으로 들어가는 영역이 6번 상단 영역이었다. 그래서 첫번째로 6번을 작성하고 복붙으로 나머지 2개의 영역에도 상단을 만들어줬다. 9번은 반복이라서 밑의 코드에선 한 부분만 옮겨적는다.
<div class="webtoon-content">
	<div class="webtoon-content-header webtoon-content-header-recommend">
		<h2>장르별 <span>추천웹툰</span></h2>

		<nav>
			<ul>
				<li class="on"><a href="#">에피소드</a></li>
				<li><a href="#">옴니버스</a></li>
				<li><a href="#">스토리</a></li>
			</ul>
		</nav>
	</div>

	<div class="webtoon-content-body">
		<nav>
			<ul>
				<li><a href="#">인기순</a></li>
				<li class="on"><a href="#">업데이트순</a></li>
				<li><a href="#">조회순</a></li>
				<li><a href="#">별점순</a></li>
			</ul>
		</nav>

		<ul class="webtoon-content-col-3">
			<li class="webtoon-content-col-3-type-1">
				<img src="https://via.placeholder.com/210x120">
				<div class="webtoon-content-col-3-info">
					<h4>기억의 흔적</h4>
					<p>60화</p>
					<span>브라보 장</span>
				</div>
			</li>
		</ul>
	</div>
</div>
아래는 css코드
#webtoon-main .webtoon-main-left .webtoon-content {
	background-color: #ffffff;
}

#webtoon-main .webtoon-main-left .webtoon-content .webtoon-content-header {
	position: relative;
	border-bottom: solid 1px #e5e5e5;
	padding: 26px 0 10px;
}

#webtoon-main .webtoon-main-left .webtoon-content .webtoon-content-header.webtoon-content-header-recommend {
	padding-bottom: 0;
}

#webtoon-main .webtoon-main-left .webtoon-content .webtoon-content-header h2 {
	font-size: 20px;
}

#webtoon-main .webtoon-main-left .webtoon-content .webtoon-content-header h2 span {
	color: #00d564;
}

#webtoon-main .webtoon-main-left .webtoon-content .webtoon-content-header nav {
	margin-top: 20px;
}

#webtoon-main .webtoon-main-left .webtoon-content .webtoon-content-header ul {
	display: flex;
	flex-wrap: wrap;
	align-items: center;
}

#webtoon-main .webtoon-main-left .webtoon-content .webtoon-content-header li {
	width: auto;
	height: 22px;
	margin-right: 15px;
}

#webtoon-main .webtoon-main-left .webtoon-content .webtoon-content-header li.on {
	border-bottom: solid 2px #00d564;
	margin-bottom: -1px;
}

#webtoon-main .webtoon-main-left .webtoon-content .webtoon-content-header li a {
	display: block;
	padding-bottom: 6px;

	font-size: 13px;
	color: #737373;
}

#webtoon-main .webtoon-main-left .webtoon-content .webtoon-content-body nav {
	padding: 12px;
}

#webtoon-main .webtoon-main-left .webtoon-content .webtoon-content-body nav ul {
	display: flex;
	flex-wrap: wrap;
	justify-content: flex-end;
	align-items: center;
}

#webtoon-main .webtoon-main-left .webtoon-content .webtoon-content-body nav ul li {
	margin-right: 8px;
	font-size: 12px;
}

#webtoon-main .webtoon-main-left .webtoon-content .webtoon-content-body nav ul li.on {

}

#webtoon-main .webtoon-main-left .webtoon-content .webtoon-content-body nav ul li a {
	color: grey;
}

#webtoon-main .webtoon-main-left .webtoon-content-col-3 {
	display: flex;
	flex-wrap: wrap;
	justify-content: space-between;
	align-items: center;
}

#webtoon-main .webtoon-main-left .webtoon-content-col-3 .webtoon-content-col-3-type-1 {
	width: 210px;
	height: 196px;
	font-size: 12px;
}

#webtoon-main .webtoon-main-left .webtoon-content-col-3-type-1-info img {
	margin-bottom: 10px;
}

#webtoon-main .webtoon-main-left .webtoon-content-col-3-type-1-info h4 {
	margin-bottom: 5px;
}

#webtoon-main .webtoon-main-left .webtoon-content-col-3-type-1-info p {
	margin-bottom: 5px;
}

#webtoon-main .webtoon-main-left .webtoon-content-col-3-type-1-info span {
	color: grey;
}
여기는 독특했다. ul li안에서 또다시 ul li를 써서 작성했다.
웹툰 - 웹툰 목록 페이지
header 영역은 홈 탭과 동일하다.
홈 탭과 다른 점은 main영역의 가장 상단에 요일별 장르별 작품별 작가별 이라는 메뉴가 있다는 점이다. 오늘은 css를 제외한 메뉴에 대한 도면만 간단하게 작성하였다.
- tip!
-
하나의 css파일에 여러 페이지 css를 다 작성하면 코드가 너무 길어지므로 연습시 별도의 css파일로 만들어주는 편이 좋다.
-
css에서 클래스 적을 때 html에서 적은 순서대로 쭉 적자.
-
작대기 만드는 여러 방법을 알아두면 편리하다. 지난번엔 가상 선택자 before를 이용하였고 오늘은 em을 이용하였다.
-
여러 페이지에서 공통된 테두리를 만든다면 .border라는 클래스를 만들어두고 통일하면 좋다.
-
클래스 이름이 너무 길어지면 가독성이 떨어진다.
어려운 내용
어제와 마찬가지로 구조가 복잡한데 클래스 이름도 많아지니까 코드를 잘못 적을 것 같아서 그 점이 어려웠다. 물론 잘못되면 고치면 되지만 일단 처음부터 잘 적는 것이 중요하다고 본다.
해결 방법
이전까진 클래스를 하나하나 생략하지 않고 적었지만 클래스 이름이 길어지니까 중간단계를 하나씩 생략하고 있다. 강의 실습을 따라하는 거지만 여러 페이지를 작성하다보면 생각보다 코드 분량이 엄청나다는 걸 알았으므로 클래스 이름을 줄여서 적는 법을 연습해봐야겠다.
소감
실제 웹툰 페이지와 흡사해서 만들면서 신기하고 재밌었다. 긴 페이지도 작은 것부터 시작하는 게 놀랍다.
css를 작성할 때 미리 경로를 다 적어두고 적용이 필요할 때 해당 경로를 찾아서 적으니까 코드를 적는 시간이 꽤 단축되었다. 또한 클래스 이름을 2개 이상 써서 활용하는 법도 아직 손에 익지 않았지만 클래스를 잘 이용하면 생각보다 편할 일이 많아 보인다. 앞으로는 클래스를 이용해 작성 시간을 줄이는 연습도 같이 해봐야겠다.

