vi /etc/sysconfig/selinux
SELINUX=disabled
dnf -y install epel-release
dnf -y install ansible
ansible --version
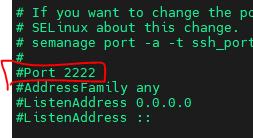
포트변경
vi /etc/ssh/sshd_config
방화벽 개방
firewall-cmd --add-port=2222/tcp
vi /etc/ansible/hosts
[serverd]
192.168.111.132 ansible_port=2222
ansible all -m ping
원격지 서버에 df 명령을 전송하여 출력
ansible all -m shell -a df -k -u rockylinux
ansible all -m ping -u rockylinux -k -e 'ansible_port=2222'
shell 모듈은 생략 가능
-m shell 부분을 제거 가능
ansible all -a 'cat /etc/passwd' -u rockylinux -k -e 'ansible_port=2222'
ed25519 기존 rsa 키 페어보다 빠름
since 2021 구세대 버전의 OS, 시스템 등과 호환성 문제
ssh-keygen -t ed25519
ssh-copy-id root@192.168.111.132 -p 2222
root 계정 암호 지우기
passwd -d root
vi /etc/ssh/sshd_config
- PermitRootLogin 루트 로그인 막을 경우 no로 변경
- PasswordAuthentication no로 변경
systemctl restart sshd
ansible_port 옵션 제거
vi /etc/ansible/hosts
[serverd]
192.168.111.132
ansible all -m ping
ansible all -m user -a "name=4gl"
ansible all -m shell -a "tail -1 /etc/passwd"
앤서블을 통한 유저 삭제
ansible all -m user -a "name=4gl state=absent"
웹 서버 설치 및 구동
yum 모듈 패키지 설치
ansible all -m yum -a "name=httpd state=present"
ansible all -m dnf -a "name=httpd state=latest"
설치 여부 확인
ansible all -m shell -a 'rpm -qa | grep httpd'
index.html 파일 작성 (server c 에서 작성해서 server d로 전송)
vi index.html
hello world
server d에 index.html 복사
ansible all -m copy -a "src=/root/index.html dest=/var/www/html"
파일 있는지 확인
ansible all -m shell -a 'ls /var/www/html'
server d 웹 서버 실행
ansible all -m service -a 'name=httpd state=started'
쉘 모듈로 시작되었는지 상태 확인
ansible all -m shell -a 'systemctl status httpd'
방화벽 개방
ansible all -m firewalld -a "service=http permanent=true state=enabled immediate=yes"
방화벽 개방 여부 확인
ansible all -m shell -a 'firewall-cmd --list-all'
외부 클라이언트에서 접속하여 확인
server a 접속 후 firefox에서 확인
작업을 일시적으로 다른 곳에 보내거나 그룹화해서 보낼 경우
추가적인 임시 인벤토리 생성 후 지정
vi myinven
myd
방화벽 전부 삭제
ansible -i myinven myd -m firewalld -a "service=http permanent=true state=disabled immediate=yes"
server d 웹서버 삭제
ansible all -m service -a 'name=httpd state=stopped'
ansible all -m file -a "path=/var/www/html/index.html state=absent"
ansible all -m dnf -a "name=httpd state=absent"
상호 간의 Server D에 자신의 Server C에서 출발하는 다음 작업을 수행하시오.
nginx 패키지 설치
index.html 작성 및 복사
서비스 시작
방화벽 개방
단, 작업 시 ansible 명령에 별도의 비밀번호를 넣지 않고 작업할 수 있도록 하시오.
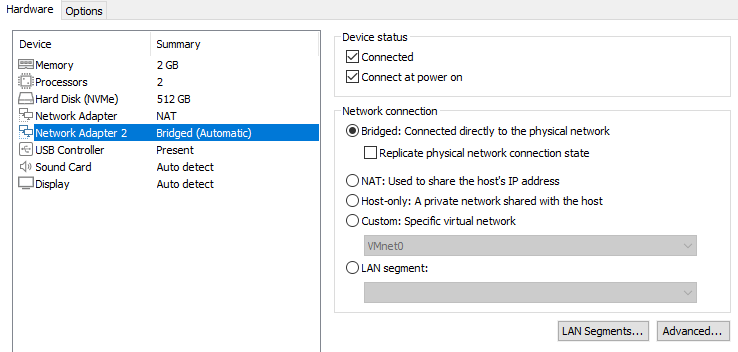
network bridge 추가
vi /etc/ansible/hosts
[someone]
10.0.2.195
ansible all -m ping
ansible all -m dnf -a 'name=nginx state=present'
ansible all -m copy -a "src=/root/index.html dest=/usr/share/nginx/html"
ansible all -m service -a 'name=nginx state=started'
ansible all -b -m firewalld -a "service=http permanent=true state=enabled immediate=yes"
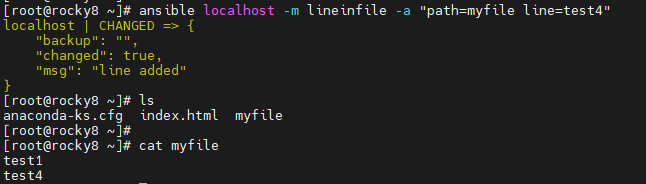
echo test1 > myfile
cat myfile
test1

ansible localhost -m lineinfile -a "path=myfile line=test4"
cat myfile
test1
test4
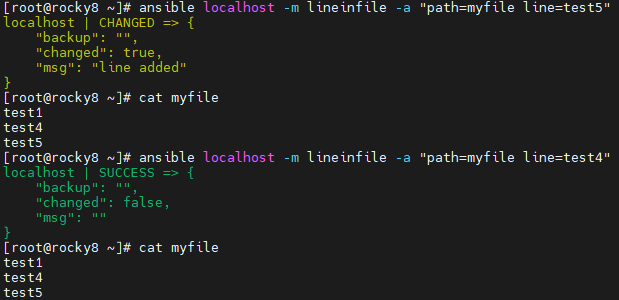
ansible localhost -m lineinfile -a "path=myfile line=test4"
ansible localhost -m lineinfile -a "path=myfile line=test5"
cat myfile
test1
test4
test5
한마디로 같은 명령어를 입력하면 추가적으로 입력되는것이 아니라는것을 알 수 있음
만약 같은걸 추가하고 싶다면 추가하는 옵션을 입력해야함
vi webhttpd.yaml (Tab X, 스페이스바로 들여쓰기 O)
---
- name: nginx install
  hosts: all

  tasks:

    - name: install nginx
      dnf: name=nginx state=latest

    - name: copy index.html
      copy: src=/root/index.html dest=/usr/share/nginx/html

    - name: start nginx
      service: name=nginx state=started

    - name: open firewall
      firewalld: service=http permanent=true state=enabled immediate=yes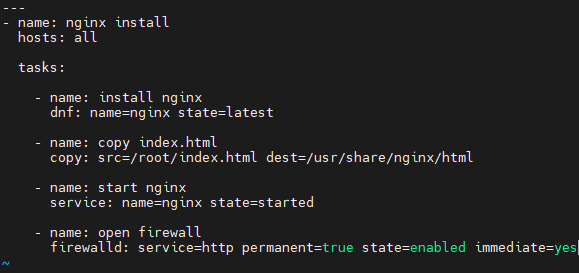
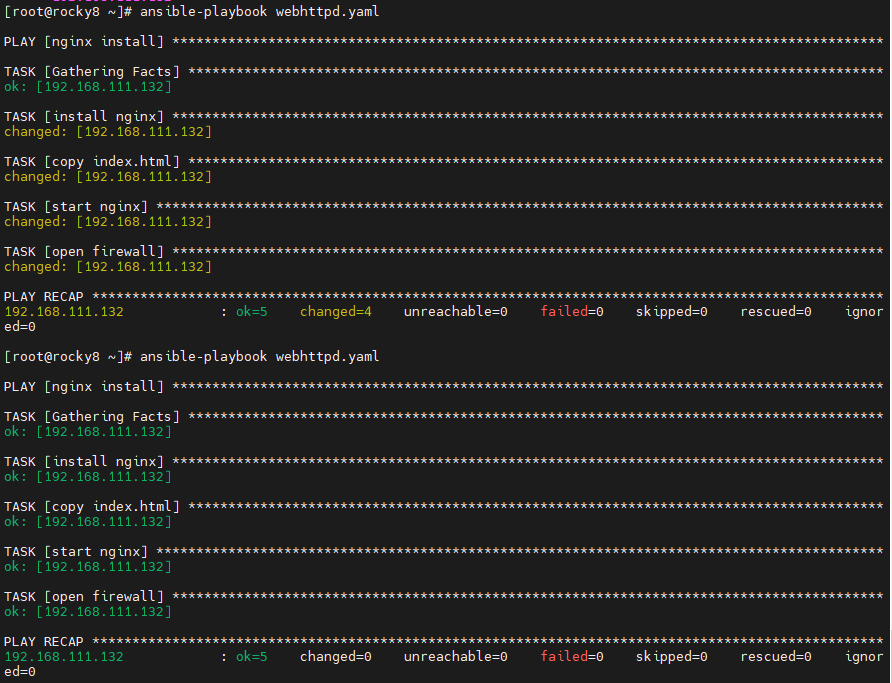
webhttpd.yaml에 지정된 작업이 실제로 서버에 적용될지 확인
ansible-playbook webhttpd.yaml --list-host
플레이북 실행 전 오류 체크
ansible-playbook webhttpd.yaml --check
플레이북 실행
ansible-playbook webhttpd.yaml
처음 실행하면 노란색으로 변경사항 있음으로 나오는데 한번 더 입력하면 다 초록색으로 변경사항 없음으로 나옴 (멱등성이 지켜진다고함)
이때 Server D에 키 교환이 이뤄지지 않았을 경우 키 교환하기
(server d - root 계정에 일시적으로 비밀번호 부여 후 교환)
ssh-keygen -t ed25519
ssh-copy-id root@192.168.111.132
ansible -m ping
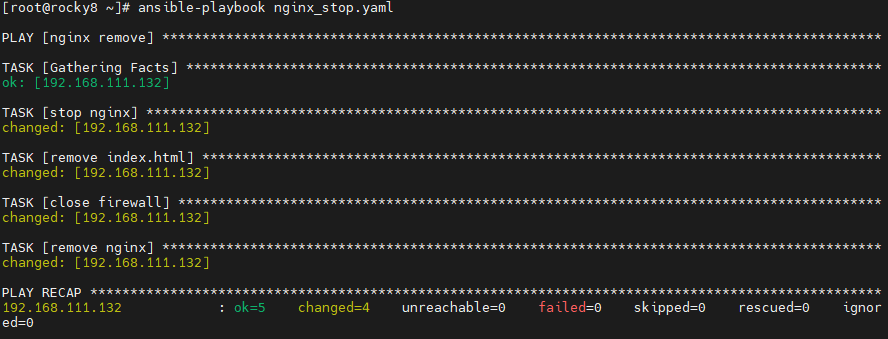
앤서블 플레이북으로 만들어진 D에 위치한 nginx 서버 및 index.html 파일, 방화벽을 자동으로 제거하는 플레이북을 생성하여 성공
방화벽을 먼저 닫아도 nginx가 살아 있으면 잠시라도 서비스가 남아 있을 수 있습니다.
index.html을 nginx가 실행 중일 때 삭제하면, 서비스는 잠깐이나마 빈 페이지를 제공할 수 있습니다.
nginx를 멈춘 뒤 파일과 방화벽을 처리하면, 외부에서 접근이 불가능해지니 더 안전합니다.
일반적으로 권장되는 삭제 순서
nginx 서비스 중지
index.html 등 관련 파일 삭제
방화벽 포트 닫기
nginx 패키지 삭제
vi nginx_stop.yaml
---
- name: nginx remove
  hosts: serverd

  tasks:

    - name: stop nginx
      service:
        name=nginx
        state=stopped

    - name: remove index.html
      file:
        path: /usr/share/nginx/html/index.html
        state: absent

    - name: close firewall
      firewalld:
        service=http
        permanent=true
        state=disabled
        immediate=yes

    - name: remove nginx
      dnf:
        name=nginx
        state=absent
ansible-playbook nginx_stop.yaml
vi webhttpd.yaml (Tab X, 스페이스바로 들여쓰기 O)
---
- name: nginx install
  hosts: all
  user: rockylinux
  #sudo 권한이 있을 경우에 sudo를 포함하여 명령어 실행한다는 의미
  become: yes

  tasks:

    - name: install nginx
      dnf: name=nginx state=latest

    - name: copy index.html
      copy: src=/root/index.html dest=/usr/share/nginx/html

    - name: start nginx
      service: name=nginx state=started

    - name: open firewall
      firewalld: service=http permanent=true state=enabled immediate=yes
ansible-playbook -u rockylinux webhttpd.yaml
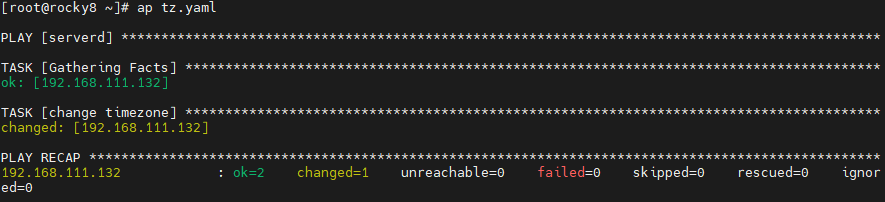
vi tz.yaml
---
- hosts: serverd
  tasks:
    - name: change timezone
      timezone:
        name: Asia/Dubai
alias ap=ansible-playbook
ap tz.yaml
/nfs 디렉터리를 공유하되 192.168.111.0/24 대역에 공유하고 읽기 쓰기 권한을 부여하며 외부의 root 접속 권한은 인정
서버 쪽 설정
vi nfs.yaml
---
- name: nfs server
  hosts: localhost
  vars:
    ansible_python_interpreter: /usr/libexec/platform-python

  tasks:

    - name: make directory
      file:
        path: /nfs
        state: directory
        mode: 0755

    - name: install nfs server
      dnf:
        name: nfs-utils
        state: latest

    - name: /etc/exports
      lineinfile:
        path: /etc/exports
        line: /nfs 192.168.111.0/24(rw,sync,no_root_squash)

    - name: start nfs server
      service:
        name: nfs-server
        state: started

    - name: open firewall
      firewalld:
        service: "{{ item }}"
        permanent: true
        state: enabled
        immediate: yes
      loop:
        - mountd
        - nfs
        - rpc-bind

- name: nfs client
  hosts: serverd
  user: rockylinux
  become: yes

  tasks:

    - name: make directory
      file:
        path: /nfsclient
        state: directory
        mode: 0755

    - name: install nfs server
      dnf:
        name: nfs-utils
        state: latest

    - name: mount nfs client
      mount:
        path: /nfsclient
        src: 192.168.111.129:/nfs
        fstype: nfs
        state: mounted
ap nfs.yaml
Server C, D를 초기화 후 작업하시오.
C에서 출발하여 상대방의 D 서버에 다음을 작업하시오.
- 원하는 도시로 시간대 변경
- myuser라는 사용자 생성
- httpd 웹 서버를 구축하고 즉시 접속 가능한 환경 구축 및 접속 테스트
- FTP 서버 구축하고 즉시 접속 가능한 환경 구축 및 접속 테스트
모든 작업을 하나의 파일로서 구현하시오.
Server C, D
dnf -y install epel-release
dnf -y install ansible
Server D
passwd root
1234
Server C
vi /etc/ansible/hosts
[serverd]
192.168.111.132ssh-keygen -t ed25519
ssh-copy-ip root@192.168.111.132
ansible all -m ping(Server C ➡ D 접속 상태에서 root 암호 삭제)
ssh root@192.168.111.132
passwd -d root
exitvi webhttp.yaml
---
- name: server setup
  hosts: serverd

  tasks:

    - name: change timezone
      timezone:
        name: Asia/Dubai

    - name: create user
      user:
        name: myuser
        state: present

    - name: install http
      dnf:
        name: httpd
        state: latest

    - name: start httpd
      service:
        name: httpd
        state: started

    - name: open http firewall
      firewalld:
        service: http
        permanent: true
        state: enabled
        immediate: yes

    - name: install ftp
      dnf:
        name: vsftpd
        state: latest

    - name: start ftp
        service: vsftpd
        state: started

    - name: enable anon_mkdir_write_enable
      lineinfile:
        path: /etc/vsftpd/vsftpd.conf
        regexp: '^anon_mkdir_write_enable'
        line: 'anon_mkdir_write_enable=YES'

    - name: enable anonymous_enable
      lineinfile:
        path: /etc/vsftpd/vsftpd.conf
        regexp: '^anonymous_enable'
        line: 'anonymous_enable=YES'

    - name: open ftp firewall
      firewalld:
        service: ftp
        permanent: true
        state: enabled
        immediate: yes
vi changessh.yaml
---
- name: blockinfile and replace
  hosts: serverd
  user: rockylinux
  become: yes

  tasks:

    - name: blockinfile
      blockinfile:
        path: /root/anaconda-ks.cfg
        block: |
          4gl123
          4gl456

    - name: replace
      replace:
        path: /etc/ssh/sshd_config
        regexp: '^#?PasswordAuthentication\s+yes'
        replace: 'PasswordAuthentication no'

    - name: restart sshd
      service:
        name: sshd
        state: restarted
ansible-playbook changessh.yaml
- FTP 서버를 상대방 d에 구축하되, 앤서블 작업 이후 즉시 익명 접속이 허용되는 상태로 구축하시오.
ssh-keygen (-t ed25519)
ssh-copy-id rockylinux@10.0.2.148
vi /etc/ansible/hosts
[sunghund]
10.0.2.148
vi ftpsetting.yaml
---
- name: ftp server setting
  hosts: sunghund
  user: rockylinux
  become: yes

  tasks:

    - name: install ftp
      dnf:
        name: vsftpd
        state: latest

    - name: anon_enable yes
      lineinfile:
        path: /etc/vsftpd/vsftpd.conf
        regexp: '^anonymous_enable=NO'
        line: 'anonymous_enable=YES'

    - name: anon_upload yes
      lineinfile:
        path: /etc/vsftpd/vsftpd.conf
        regexp: '^#anon_upload_enable=YES'
        line: 'anon_upload_enable=YES'

    - name: anon_mkdir_write yes
      lineinfile:
        path: /etc/vsftpd/vsftpd.conf
        regexp: '^#anon_mkdir_write_enable=YES'
        line: 'anon_mkdir_write_enable=YES'

    - name: create ftp upload dir
      file:
        path: /var/ftp/pub
        state: directory
        owner: ftp
        group: ftp
        mode: 0777

    - name: start ftp
      service:
        name: vsftpd
        state: started

    - name: open ftp firewall
      firewalld:
        service: ftp
        state: enabled
        permanent: true
        immediate: yes
ansible sunghund -u rockylinux -m ping
ansible-playbook ftpsetting.yaml
- DNS 서버를 앤서블로 완전 자동으로 구축하시오.
---
- name: dns server setting
  hosts: sunghund
  user: rockylinux
  become: yes

  tasks:

    - name: install bind
      dnf:
        name: bind
        state: latest

    - name: replace options block in named.conf1
      replace:
        path: /etc/named.conf
        regexp: 'listen-on port 53 { 127.0.0.1; };'
        replace: 'listen-on port 53 { any; };'

    - name: replace options block in named.conf2
      replace:
        path: /etc/named.conf
        regexp: 'allow-query     { localhost; };'
        replace: 'allow-query     { any; };'

    - name: start named
      service:
        name: named
        state: started

    - name: add zones
      blockinfile:
        path: /etc/named.rfc1912.zones
        block: |
          zone "slime.com" IN {
          type master;
          file "slime.com.zone";
          allow-update { none; };
          };
          zone "compose.com" IN {
          type master;
          file "compose.com.zone";
          allow-update { none; };
          };

    - name: copy zones slime
      copy:
        src: /var/named/named.localhost
        dest: /var/named/slime.com.zone
        owner: named
        group: named
        mode: '0644'

    - name: copy zones compose
      copy:
        src: /var/named/named.localhost
        dest: /var/named/compose.com.zone
        owner: named
        group: named
        mode: '0644'

    - name: slime zone file edit
      blockinfile:
        path: /var/named/slime.com.zone
        block: |
          www IN A 10.0.2.195

    - name: compose zone file edit
      blockinfile:
        path: /var/named/compose.com.zone
        block: |
          www IN A 10.0.2.148

    - name: restart named
      service:
        name: named
        state: restarted
선생님 .yaml
---
- hosts: serverd
  user: rockylinux
  become: yes
  vars:
    ansible_python_interpreter: /usr/libexec/platform-python
  tasks:

    - name: install bind
      yum:
        name: bind
        state: latest

    - name: named.conf 1
      replace:
        path: /etc/named.conf
        regexp: 'listen-on port 53 { 127.0.0.1; };'
        replace: 'listen-on port 53 { any; };'

    - name: named.conf 2
      replace:
        path: /etc/named.conf
        regexp: 'allow-query     { localhost; };'
        replace: 'allow-query     { any; };'

    - name: 4gl.com zone
      blockinfile:
        path: /etc/named.rfc1912.zones
        marker: "// {mark} Zone Here!"
        block: |
          zone "4gl.com" IN {
            type master;
            file "4gl.com.db";
            allow-update { none; };
          };

    - name: 4gl.com zone file create
      file:
        path: /var/named/4gl.com.db
        state: touch
        owner: root
        group: named
        mode: 0640

    - name: 4gl.com zone file configuration
      blockinfile:
        path: /var/named/4gl.com.db
        marker: "; {mark} 4gl Conf Here!"
        block: |
          $TTL 3H
          @       IN SOA  @ rname.invalid. (
                                        0       ; serial
                                        1D      ; refresh
                                        1H      ; retry
                                        1W      ; expire
                                        3H )    ; minimum
                  NS      @
                  A       127.0.0.1
                  AAAA    ::1
          ftp   IN   A   192.168.111.131

    - name: start named
      service:
        name: named
        state: started
        enabled: true

    - name: open firewalld
      firewalld:
        service: "{{ item }}"
        permanent: true
        state: enabled
        immediate: yes
      with_items:
        - dns
        - ftp


멋쟁이