1. 스푸핑 (Spoofing) - 해킹
속임수를 이용한 공격을 총칭하는 말로, 네트워크 통신과 관련된 모든 것을 대상으로 할 수 있음.
2. 스누핑 (Snoofing) - 보안
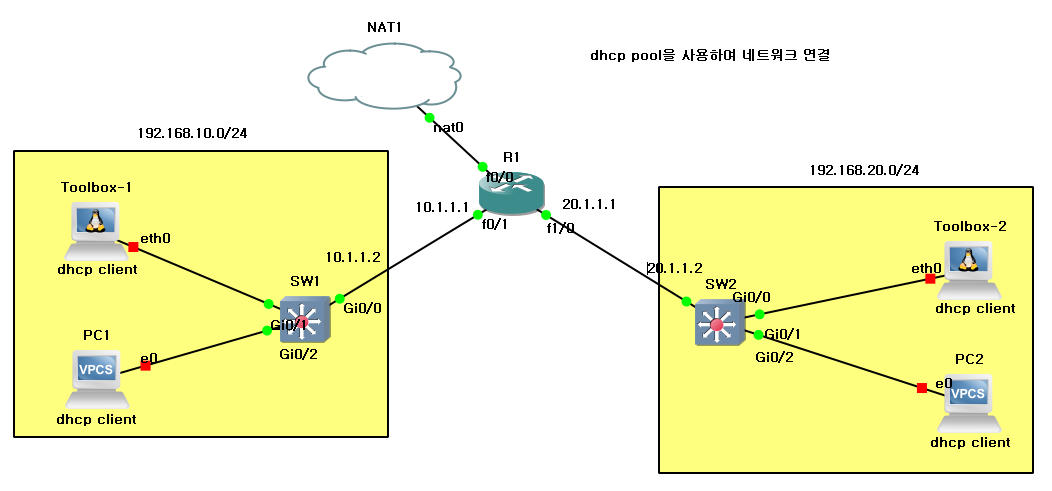
3. 스푸핑, 스누핑 네트워크 구성 실습
- Toolbox3 제외 모든 네트워크 연결 및 설정
SW3
conf t
int g0/0
no sh
no switchport
ip add 30.1.1.2 255.255.255.0
end
conf t
int vlan 1
no sh
ip add 192.168.30.1 255.255.255.0
ip helper-address 30.1.1.1
end
conf t
ip route 0.0.0.0 0.0.0.0 30.1.1.1
R2
conf t
int f0/0
ip add 192.168.30.254 255.255.255.0
no sh
R1
conf t
int f1/1
ip add 30.1.1.1 255.255.255.0
no sh
ip nat inside
end
conf t
ip dhcp pool DHCP3
network 192.168.30.0 255.255.255.0
default-router 192.168.30.1
dns-server 8.8.8.8
end
conf t
ip dhcp excluded-address 192.168.30.0 192.168.30.100
ip route 192.168.30.0 255.255.255.0 30.1.1.2
Ubuntudocker
- toolbox3 isc-dhcp-server로 구성 및 설정
toolbox3
dpkg -l | grep isc-dhcp
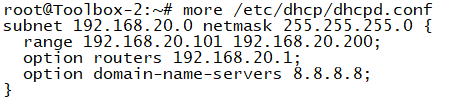
nano /etc/dhcp/dhcpd.conf
- subnet 192.168.30.0 netmask 255.255.255.0 {
range 192.168.30.101 192.168.30.200;
option routers 192.168.30.1;
option domain-name-servers 8.8.8.8;
}service isc-dhcp-server start
SW3
conf t
int vlan 1
no ip helper-address
ubuntudocker
stop ➡ start
pc
clear ip
ip dhcp
toolbox3
dhcp-lease-list
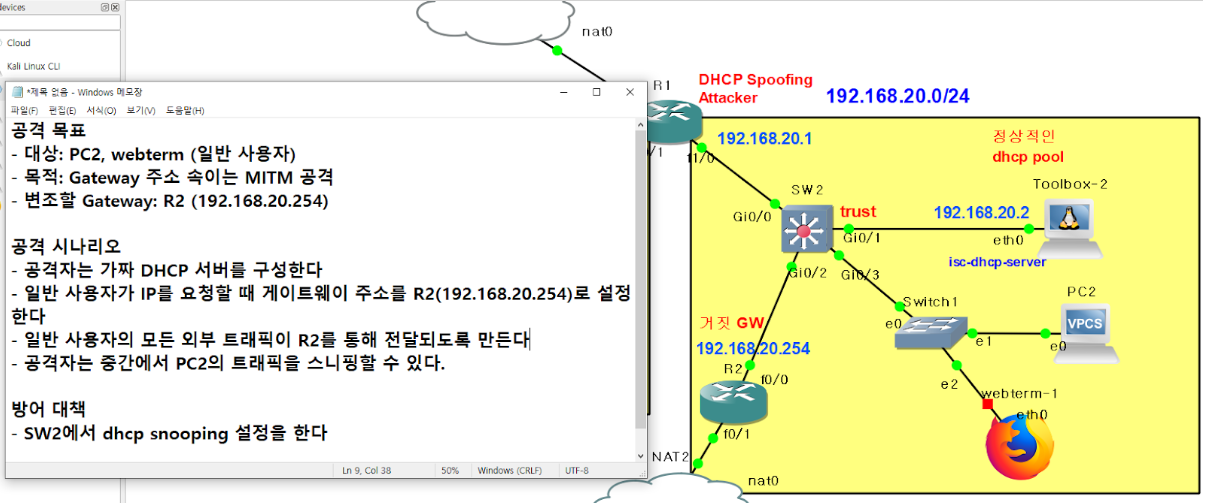
- SW3의 게이트웨이를 거짓GW인 R2로 변경
게이트 웨이 변경 거짓 GW 라우터로 설정
3-2. 실습 문제 2
SW2 지웠다가 새로운 SW로 연결 (SW2는 깡통상태)
toolbox2
nano /etc/dhcp/dhcpd.conf
service isc-dhcp-server start
ps -ef | grep dhcp
R1
sh run | s dhcp
conf t
ip dhcp pool DHCP2 - DHCP2 = 192.168.20.0 네트워크의 DHCP설정
default-router 192.168.20.254 - GW를 거짓 주소로 변경
end
conf t
int f1/0
ip add 192.168.20.1 255.255.255.0
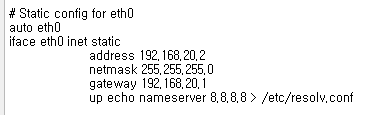
PC2
ip dhcp
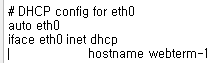
webterm
R2
conf t
int f0/0
ip add 192.168.20.254
no sh
ip nat inside
end
conf t
int f0/1
no sh
ip add dhcp
ip nat outside
end
conf t
ip nat inside source list 1 int f0/1
access-list 1 permit any
공격설정 완료
아래부터는 방어 대책으로 SW2에서 스누핑 설정
SW2
ip dhcp snooping
ip dhcp snooping vlan 1 - 열려있는 모든 포트
no ip dhcp snooping information option
int g0/2
ip dhcp snooping trust
g0/2 인터페이스로 하는 통신만 허용하고 그 외에는 차단을 하겠다는 의미
--
처음부터 복습 구성 연습..
구성 start
R1
conf t
int f0/0
no sh
ip add dhcp
ip nat outside
end
conf t
int f0/1
no sh
ip add 10.1.1.1 255.255.255.0
ip nat inside
end
conf t
int f1/0
no sh
ip add 20.1.1.1 255.255.255.0
ip nat inside
end
conf t
ip dhcp pool DHCP1
network 192.168.10.0 255.255.255.0
default-router 192.168.10.1
dns-server 8.8.8.8
end
conf t
ip dhcp excluded-address 192.168.10.0 192.168.10.100
end
conf t
ip dhcp pool DHCP2
network 192.168.20.0 255.255.255.0
default-router 192.168.20.1
dns-server 8.8.8.8
end
ip dhcp excluded-address 192.168.20.0 192.168.20.100
SW1
conf t
int g0/0
no switchport
no sh
ip add 10.1.1.2 255.255.255.0
end
int vlan 1
no sh
ip add 192.168.10.1 255.255.255.0
ip helper-address 10.1.1.1
SW2
conf t
int g0/0
no switchport
no sh
ip add 20.1.1.2 255.255.255.0
end
int vlan 1
no sh
ip add 192.168.20.1 255.255.255.0
ip helper-address 20.1.1.1
ARP
네트워크 주소(3계층 IP 주소)를 물리 주소(2계층 MAC 주소)로 변환하기 위해 사용
IP 주소 ➡ 변환 ➡ MAC 주소
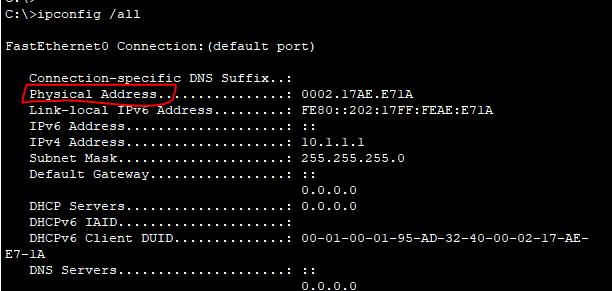
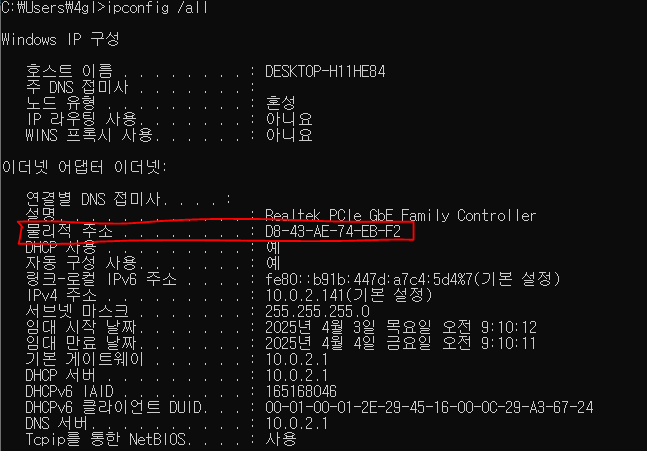
PC에서 내 아이피가 보고싶어서 IPCONFIG를 사용하여 내 주소를 봄
만약 내 맥주소까지 보고싶다면 ipconfig /all 을 사용하여 확인 - physical address (mac주소)
우리가 주로 사용하는 ping을 확인하는 ICMP는 3계층에서 (이유 : IP주소가 3계층이니까) 사용하는데
이때 2계층인 MAC 주소는 없을 수 없음
ROUTER - routing table
SWITCH - mac-address table
PC - arp table (ip를 이용할 수 있는 모든 장비들에 arp table이 존재함)
arp table 확인 명령어
arp -a : 내가 관리하고 있는 모든 arp table을 출력
arp -d : 내가 관리하고 있는 모든 내용을 초기화
ping 보내기 전까지는 내 컴퓨터가 같은 네트워크에 있는 다른 장비들의 ip 정보, mac 정보를 모름
하지만 ping 보내고 나서는 arp에 네트워크 주소가 표시되면서 내 pc가 해당 ip를 학습함