React는 Facebook에서 개발한 자바스크립트 라이브러리로, 사용자 인터페이스(UI)를 만들기 위해 사용됩니다.
Spring는 자바 기반의 웹 프레임워크로, 비즈니스 로직을 처리하는 서버측 프로그램을 작성하기 위해 사용됩니다.
RestAPI 방식이 기본
React는 node.js 와 사용(호환 더 잘됨)
Spring 이랑 같이 이용은 같이 안하는 편
React와 Spring을 같이 사용하는 이유
React는 UI를 만드는데 특화되어 있으며, Spring는 서버측 로직을 처리하는데 특화되어 있습니다. 이 두 기술을 함께 사용하면, 각각의 장점을 살려서 웹 애플리케이션을 개발할 수 있습니다.
React와 Spring을 같이 사용하는 방법
React와 Spring를 함께 사용하는 방법은 React를 프론트엔드로 사용하여 UI를 구축하고, Spring를 백엔드로 사용하여 데이터를 처리하고 API를 제공하는 방식입니다.
일반적으로 React와 Spring를 함께 사용하는 방법은 다음과 같습니다
- React 앱을 생성합니다.
- Create React App과 같은 도구를 사용하여 React 앱을 생성합니다.
- 터미널에서 다음 명령을 실행하여 새로운 React 프로젝트를 생성합니다.
$ yarn create react-app react-spring-app- React 앱과 Spring을 연결합니다.
- React 앱과 Spring 애플리케이션은 서로 다른 포트에서 실행됩니다.
- React는 일반적으로 3000번 포트를 사용하고, Spring은 8080(or 80)번 포트를 사용합니다.
- 이를 해결하기 위해, React 앱에서 API 요청을 보낼 때 프록시(proxy) 설정을 사용할 수 있습니다.
- React 프로젝트의 package.json 파일에 다음과 같이 프록시 설정을 추가합니다.
"proxy": "http://localhost:8080"
# 80포트를 사용한다면 80으로
위의 설정은 React 앱에서 API 요청을 보낼 때, 해당 요청을 http://localhost:8080 으로 프록시하여 Spring 서버로 전달하는 역할을
합니다.
- API 요청을 처리하는 Spring 컨트롤러 작성합니다.
- Spring 애플리케이션에서 API를 처리하기 위해 컨트롤러를 작성합니다.
- 컨트롤러는 요청을 처리하고 필요한 데이터를 가져와서 JSON 형식으로 응답합니다.
- React에서 API 요청을 보내고 데이터를 사용합니다.
- React 컴포넌트에서 API 요청을 보내기 위해 fetch 또는 axios와 같은 HTTP 클라이언트를 사용합니다.
- API 요청을 보내고 응답을 받은 후, 데이터를 React 컴포넌트에서 사용하여 UI를 업데이트합니다.
이렇게 함으로써 React와 Spring을 함께 사용할 수 있습니다.
React는 프론트엔드 UI를 구축하고 사용자와 상호작용하는 역할을 담당하고, Spring 은 백엔드에서 데이터를 처리하고 API를 제공하는 역할을 담당합니다.
실습
- Back-end 는 Spring 을 사용한다.
- Front-end는 React를 사용한다.
- RestAPI로 통신한다.
Spring 과 React는 별개의 프로젝트로 보아야하므로 두개의 서버 모두 켜진 상태여야 합니다.
Spring은 80 포트, React는 3000 포트를 사용합니다.

프론트 프로젝트
spring 3.3.0 버전에서 mybatis framework dependencies 추가 안됨 나중에 gradle 에 따로 추가해서 사용해야함
package.json
{
  "name": "react-spring-app",
  "version": "0.1.0",
  "private": true,
  "dependencies": {
    "@testing-library/jest-dom": "^5.14.1",
    "@testing-library/react": "^13.0.0",
    "@testing-library/user-event": "^13.2.1",
    "react": "^18.3.1",
    "react-dom": "^18.3.1",
    "react-scripts": "5.0.1",
    "web-vitals": "^2.1.0"
  },
  "scripts": {
    "start": "react-scripts start",
    "build": "react-scripts build",
    "test": "react-scripts test",
    "eject": "react-scripts eject"
  },
  "eslintConfig": {
    "extends": [
      "react-app",
      "react-app/jest"
    ]
  },
  "browserslist": {
    "production": [
      ">0.2%",
      "not dead",
      "not op_mini all"
    ],
    "development": [
      "last 1 chrome version",
      "last 1 firefox version",
      "last 1 safari version"
    ]
  },
  "proxy" : "http://localhost:80"
}
App.js
import logo from './logo.svg';
import './App.css';
import {useEffect, useState} from 'react';

function App() {

  const [message, setMessage] = useState([]);

  // react 에서 제공하는 hook
  useEffect(() => {

    // 요청 -> 서버로 요청 (yarn start 로 서버 돌리면 3000)
    // react(브라우저)        -> spring(서버)
    // http://localhost:3000 -> http://localhost:80
    // package.json 에서 포트 번호 설정해줘야함 (환경 설정해주는 곳)
    // -> fetch 요청이 서버로 들어감
    fetch("/test1")
    .then(resp => resp.json())
    .then(data => {
      setMessage(data);
    });

  }, []);
  // 빈 배열 안에 상태나 메세지 값 넣어주면 메세지 변할 때마다
  // 함수가 다시 돈다.
  // 안 써주면 처음 실행할 때만 읽어줌

  return (
    <ul>
      {message.map((el, idx) => <li key={idx}>{el}</li>)}
      {/* 브라우저에서 map 을 이용해서 만들 때 구분해줄 수 있는 key 값이 있는데
      안 써주면 error 가 나서 적어줌 */}
    </ul>
  );
}

export default App;
Controller
package edu.kh.project.main.controller;

import java.util.Arrays;
import java.util.List;

import org.springframework.web.bind.annotation.GetMapping;
import org.springframework.web.bind.annotation.RestController;

import lombok.extern.slf4j.Slf4j;

@RestController // 모든 비동기 요청을 받아주는 컨트롤러
@Slf4j
public class MainController {

	@GetMapping("/test1")
	public List<String> test1() {
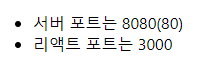
		return Arrays.asList("서버 포트는 8080(80)", "리액트 포트는 3000");
	}
}
서버와 프론트는 별개
서버 포트가 먼저 켜져있어야함
브라우저 화면
React 에서 server 로 POST 요청
App.js
import logo from './logo.svg';
import './App.css';
import {useEffect, useState} from 'react';

function App() {

  const [message, setMessage] = useState([]);

  const [message2, setMessage2] = useState("");

  // react 에서 제공하는 hook
  useEffect(() => {

    // 요청 -> 서버로 요청 (yarn start 로 서버 돌리면 3000)
    // react(브라우저)        -> spring(서버)
    // http://localhost:3000 -> http://localhost:80
    // package.json 에서 포트 번호 설정해줘야함 (환경 설정해주는 곳)
    // -> fetch 요청이 서버로 들어감
    fetch("/test1")
    .then(resp => resp.json())
    .then(data => {
      setMessage(data);
    });

  }, []);
  // 빈 배열 안에 상태나 메세지 값 넣어주면 메세지 변할 때마다
  // 함수가 다시 돈다.
  // 안 써주면 처음 실행할 때만 읽어줌

  const handleClick = () => {
    fetch("/test2", {
      method: "post",
      headers: {'Content-Type' : 'application/json'},
      body : JSON.stringify({
        name : "홍길동",
        age : 15
      })
    })
    .then(resp => resp.text())
    .then(data => setMessage2(data));
  }

  return (
    <ul>
      {message.map((el, idx) => <li key={idx}>{el}</li>)}
      {/* 브라우저에서 map 을 이용해서 만들 때 구분해줄 수 있는 key 값이 있는데
      안 써주면 error 가 나서 적어줌 */}

      <hr />

      <button onClick={handleClick}>fetch로 서버 통신</button>
      <br></br>
      <h1>{message2}</h1>
    </ul>
  );
}

export default App;
Controller
	@PostMapping("/test2")
	public String test2(@RequestBody Map<String, Object> map) {

		log.info("map {}", map);

		String message = null;

		int age = (int)map.get("age");

		if(age >= 20) {
			message = map.get("name") + "님은 성인 입니다.";
		} else {
			message = map.get("name") + "님은 미성년 입니다.";
		}

		return message;

	}
나이 20 으로 바꾸면

axios 이용하기
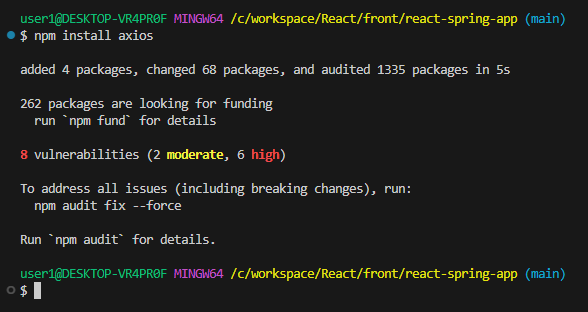
터미널 끈 다음에
터미널에서 설치
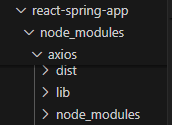
잘 깔렸는지 확인
App.js
import logo from './logo.svg';
import './App.css';
import {useEffect, useState} from 'react';
import axios from 'axios';

function App() {

  const [message, setMessage] = useState([]);

  const [message2, setMessage2] = useState("");

  const [message3, setMessage3] = useState("");

  // react 에서 제공하는 hook
  useEffect(() => {

    // 요청 -> 서버로 요청 (yarn start 로 서버 돌리면 3000)
    // react(브라우저)        -> spring(서버)
    // http://localhost:3000 -> http://localhost:80
    // package.json 에서 포트 번호 설정해줘야함 (환경 설정해주는 곳)
    // -> fetch 요청이 서버로 들어감
    fetch("/test1")
    .then(resp => resp.json())
    .then(data => {
      setMessage(data);
    });

  }, []);
  // 빈 배열 안에 상태나 메세지 값 넣어주면 메세지 변할 때마다
  // 함수가 다시 돈다.
  // 안 써주면 처음 실행할 때만 읽어줌

  const handleClick = () => {
    fetch("/test2", {
      method: "post",
      headers: {'Content-Type' : 'application/json'},
      body : JSON.stringify({
        name : "홍길동",
        age : 20
      })
    })
    .then(resp => resp.text())
    .then(data => setMessage2(data));
  }

  // ctrl + c 터미널 끄기

  // axios
  // 브라우저 및 node.js 환경에서
  // 비동기 요청을 쉽게 처리할 수 있게 해주는 JavaScript 라이브러리
  // * 터미널에서 npm / yarn 같은 패키지 매니저를 통해서 설치할 수 있음
  // 설치 방법
  // npm 이용 시
  // $ npm install axios
  // yarn 이용 시
  // $ yarn add axios
  const axiosTest = () => {

    axios.post("/test2", {
      name : "김유저",
      age : 17
    })
    .then(resp => {
      console.log(resp);

      setMessage3(resp.data);
    })
  }

  // 1. post 요청 시 데이터를 자동으로 JSON 데이터 형태로 처리해줌으로,
  //    fetch와 달리 JSON.stringify 를 명시적으로 호출할 필요가 없음
  // 2. 응답을 JSON 으로 자동 파싱해주기 때문에, fetch 처럼 두번째 then 으로 응답을 파싱할 필요가 없음
  // 3. headers와 body를 명시적으로 설정하지 않아도 된다.
  //    headers의 경우는 기본적으로 작성하지 않으면 Content-Type : application/json으로 설정되어 있음
  //    단, header 내용 변경 시 명시적으로 작성해야 함.
  //    ex) headers : {'Authorization' : 'Bearer {token}} 인증 관련 jwt 사용할 때 header 내용

  return (
    <ul>
      {message.map((el, idx) => <li key={idx}>{el}</li>)}
      {/* 브라우저에서 map 을 이용해서 만들 때 구분해줄 수 있는 key 값이 있는데
      안 써주면 error 가 나서 적어줌 */}

      <hr />

      <button onClick={handleClick}>fetch로 서버 통신</button>
      <br></br>
      <h1>{message2}</h1>

      <hr />

      <button onClick={axiosTest}>axios로 서버 통신</button>
      <br></br>
      <h1>{message3}</h1>

    </ul>
  );
}

export default App;
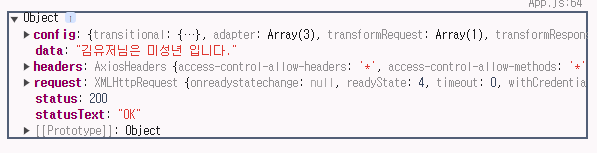
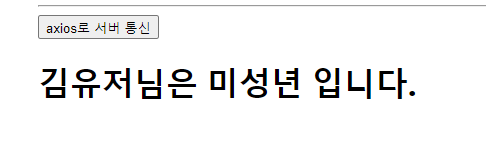
출력 화면
console