

@Vaild, BindingResult로 입력값 검증 및 에러메시지 표시
엔티티와는 별개로 EnrollRequestDto라는 클래스를 두어 단방향 @OneToOne 관계에 있는 Store와 Menu 두 엔티티에 대한 정보를 한번에 입력받아 등록하고자 하는 상황이었다.
여기서 겪었던 오류가 다음과 같았다.
(이것 저것 수정하다가 대부분 다음 두가지 중 하나였다.)
Exception evaluating SpringEL expressionError during execution of processor 'org.thymeleaf.spring5.processor.SpringInputGeneralFieldTagProcessor'
log를 확인해보면 storeForm.html의 특정 라인에서 에러의 원인이라고 나오는데 thymeleaf 엔진이 해당 구문을 분석하지 못하는 결과였다.
해당 Controller 코드는 다음과 같다.
// 등록 페이지 GET
@GetMapping("/stores/new")
public String createForm(Model model) {
    log.info("등록 페이지 호출");
    model.addAttribute("dto", EnrollRequestDto.builder().build());
    return "/admin/stores/storeForm";
}

// 등록 POST - Store, Menu 한번에 등록.
@PostMapping("/stores/new")
public String createStore(@Valid @ModelAttribute EnrollRequestDto dto, BindingResult result) {
    log.info("create store: ");
    if (result.hasErrors()) {
        log.info(result.toString());
        return "/admin/stores/storeForm";
    }

    service.enroll(dto);
    return "redirect:/admin";
}storeForm.html은 다음과 같다.
<form role="form" action="/admin/stores/new" th:object="${dto}" method="post">

    <div class="form-group">
        <label th:for="storeName">가게 이름</label>
        <input type="text" th:field="*{storeName}" th:errorclass="field-error" class="form-control" placeholder="가게 이름 입력">
        <td class="field-error" th:if="${#fields.hasErrors('storeName')}" th:errors="*{storeName}">StoreName Error</td>
    </div>
    <div class="form-group">
        <label th:for="location">위치</label>
        <input type="text" th:field="*{location}" th:errorclass="field-error" class="form-control" placeholder="도로명 주소 입력">
        <td class="field-error" th:if="${#fields.hasErrors('location')}" th:errors="*{location}">Location Error</td>
    </div>
    <div class="form-group">
        <label th:for="contactNum">전화번호</label>
        <input type="text" th:field="*{contactNum}" th:errorclass="field-error" class="form-control" placeholder="전화번호 입력">
        <td class="field-error" th:if="${#fields.hasErrors('contactNum')}" th:errors="*{contactNum}">ContactNum Error</td>
    </div>
    <div class="form-group">
        <label th:for="storeUrl">Url</label>
        <input type="text" th:field="*{storeUrl}" th:errorclass="field-error" class="form-control" placeholder="Url 입력">
        <td class="field-error" th:if="${#fields.hasErrors('storeUrl')}" th:errors="*{storeUrl}">StoreUrl Error</td>
    </div>
    <div class="form-group">
        <label th:for="imageUrl">이미지 링크</label>
        <input type="text" th:field="*{imageUrl}" th:errorclass="field-error" class="form-control" placeholder="이미지 링크 입력">
        <td class="field-error" th:if="${#fields.hasErrors('imageUrl')}" th:errors="*{imageUrl}">ImageUrl Error</td>
    </div>
    <div class="form-group">
        <label th:for="category">카테고리</label>
        <select name="category">
            <option th:each="category : ${T(me.ramos.dongmyeonselect.domain.enums.Category).values()}"
                        th:value="${category}" th:text="${category}"></option>
        </select>
    </div>
    <div class="form-group">
        <label th:for="foodName">대표 메뉴</label>
        <input type="text" th:field="*{foodName}" th:errorclass="field-error" class="form-control" placeholder="대표 메뉴 입력">
        <td class="field-error" th:if="${#fields.hasErrors('foodName')}" th:errors="*{foodName}">FoodName Error</td>
    </div>
    <div class="form-group">
        <label th:for="price">가격</label>
        <input type="text" th:field="*{price}" class="form-control">
    </div>
    <button type="submit" class="btn btn-primary">등록</button>
</form>
thymeleaf로 작성한 html 코드에는 문제가 없었고, Controller의 createStore() 의 인자를 조금 변경해서 해결할 수 있었다.
- dto대신 Form 전용 클래스를 만들어 이를 인자로 넣고
@Valid @ModelAttribute를 적용하자. - 이후 Form에서 받은 입력 데이터를 get으로 호출해 dto에 넣어 생성한 뒤 service 레이어를 호출한다.
먼저 Form 전용 클래스인 StoreCreateForm는 다음과 같다.
import lombok.Data;

import javax.validation.constraints.NotBlank;

@Data
public class StoreCreateForm {
    @NotBlank(message = "필수 입력 값입니다.")
    private String storeName;
    @NotBlank(message = "필수 입력 값입니다.")
    private String location;
    @NotBlank(message = "필수 입력 값입니다.")
    private String contactNum;
    @NotBlank(message = "필수 입력 값입니다.")
    private String storeUrl;
    @NotBlank(message = "필수 입력 값입니다.")
    private String imageUrl;
    private String category;

    // Menu
    @NotBlank(message = "필수 입력 값입니다.")
    private String foodName;
    private int price;
}
Controller를 리팩토링한 결과는 다음과 같다.
// 등록 페이지 GET
@GetMapping("/stores/new")
public String createForm(Model model) {
    log.info("등록 페이지 호출");
    model.addAttribute("dto", EnrollRequestDto.builder().build());
    return "/admin/stores/storeForm";
}

// 등록 POST - Store, Menu 한번에 등록.
@PostMapping("/stores/new")
public String createStore(@Valid @ModelAttribute("dto") StoreCreateForm form, BindingResult result) {
    log.info("create store: ");
    if (result.hasErrors()) {
        log.info(result.toString());
        return "/admin/stores/storeForm";
    }

    EnrollRequestDto dto = EnrollRequestDto.builder()
                .storeName(form.getStoreName())
                .location(form.getLocation())
                .contactNum(form.getContactNum())
                .storeUrl(form.getStoreUrl())
                .imageUrl(form.getImageUrl())
                .category(form.getCategory())
                .foodName(form.getFoodName())
                .build();

    service.enroll(dto);
    return "redirect:/admin";
}
번거러워 보일 수 있지만, 위와 같이 dto 대신 Form 전용 객체를 따로 두어 thymeleaf 엔진이 읽을 수 있도록 해주자.
@OneToOne 매핑
맛집 엔티티인 Store와 대표메뉴 엔티티인 Menu를 1:1 매핑으로 관리하고자 하였다. 여기서 고민한 사항들은 다음과 같았다.
- 단방향 vs 양방향?
→ Store를 중심으로 Menu를 가져오고, 동시에 등록,수정하고자 한다면 단방향 매핑으로 두는게 최선인 것 같았다. - 일단
@XxToOne관계에선FetchType.LAZY을 기본으로 두고 시작하자. Menu는 필요할 때만 가져오고 이 땐, fetch join으로 select 쿼리에 대한 최적화를 하자.
→ 특히 fetch join을 잘 사용하면 Controller 레이어에서EnrollRequestDto,UpdateRequestDto에 대한 명분이 제대로 주어진다. CascadeType.ALL을 하게 되면 Test 코드를 작성할 때 문제가 발생한다.
→ 영속성 전이는 다음과 같이CascadeType.REMOVE로 바꾸자.
→orphanRemoval = true까지 추가하면 Store만 delete해도 Menu까지 delete를 한번에 할 수 있다.
(이 내용은 자바 ORM 표준 JPA 프로그래밍의 영속성 전이와 고아객체에 대해 읽어보자)
@DeleteMapping 사용시 405 에러
다음 링크를 참고했다.
원래 Controller의 해당 메소드는 다음과 같았다.
@DeleteMapping("/stores/{storeId}/delete")
public String deleteStore(@PathVariable("storeId") Long storeId) {
    log.info("delete store: "+ storeId);
    service.delete(storeId);
    return "redirect:/admin/stores";
}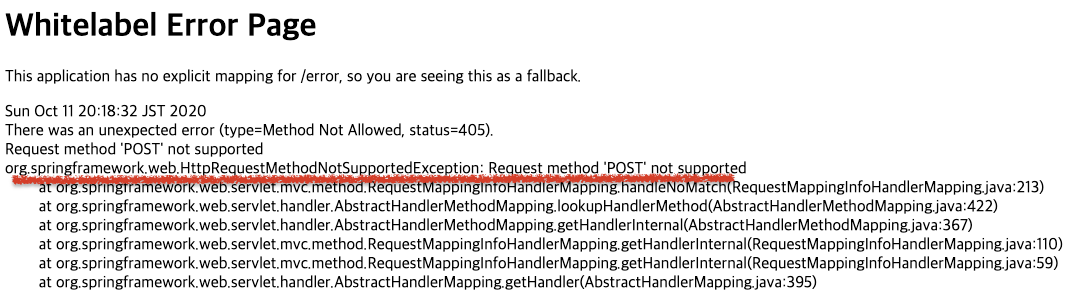
이 때 405 Method Not Allowed 관련 에러가 뜨면서 삭제 처리가 되지 않았다. 위에 첨부한 게시물을 참고하여 해결할 수 있는데 요약하자면, Spring Boot 2.2x 이상 버전에선 PUT, DELETE 메소드가 자동으로 구성되지 않고 히든 타입으로 되어있기 때문에 spring.mvc.hiddenmethod.filter.enabled=true를 application.properties 파일에 추가해줘야 한다.
그렇지 않다면 다음과 같이 @GetMapping으로도 해결이 가능하긴 하다.
@GetMapping("/stores/{storeId}/delete")
public String deleteStore(@PathVariable("storeId") Long storeId) {
    log.info("delete store: "+ storeId);
    service.delete(storeId);
    return "redirect:/admin/stores";
}