오늘은 기존의 xml 로 선언 한게 아닌 코드를 이용해 자신만의 view을 만드는 법을 블로그 해볼려고 합니다 .
왜 customview을 만들까 ?
아마 많은 프론트엔드 , 안드로이드 개발자 etc 등
서비스 프로그래머들이 많이 겪는 상황일겁니다.
디자이너 : Assist 님 이건 이렇게 생겼고 이런식으로 움직여요
Assist(저) : 예? 이걸 만들라고요?
디자이너 : 넵
Assist(저) : 안됩니다. 구현 불가입니다
디자이너 : 아 왜요.
실무에서 많이 오고가는 대화입니다.
개발자가 개발 못한다고 말하는 이유는 많이 있는데요.
저같은 경우는
- 개발 기간이 매우 짧고 그다지 큰 기능이 아닐떄
이게 가장 크지요.
??? : 그럼 그냥 외부 라이브러리 쓰자!!저도 그랬으면 좋겠네요.
많은 외부라이브러리가 있는 깃허브에 readme을 보면 저작권이 있습니다.
많은 라이브러리가 무료로 사용할수 있지만 상업적으로 사용시 저작권에 위배가 갈수 있습니다.
모든 회사는 이익 집단이지요.
그래서 외부 라이브러리르 쓰는것은 극도로 조심해야 합니다.
그래서 코드로 직접 만드는 겁니다
android 에서 자바 혹은 kotlin으로도 직접 view을 만들수 있습니다.
방법은 아주 쉽습니다
class seekbarCustom : View() {
}
View 만 상속 받으면 됩니다. 그럼 직접 한번 볼까요 ?
코드 자료
https://rrtutors.com/tutorials/circular-seekbar-in-android
Seekbar을 만들어 보자
참조 코드
https://rrtutors.com/tutorials/circular-seekbar-in-android
- 클래스 파일 생성
아주 쉽게 생각하면 라이브러리를 implementation 한다고 생각하면 저희는 class 을 xml에 implementation 직접 넣는다고 생각하시면 됩니다.
위의 코드를 살펴보면
해당 코드는 제가 url으로 가져와 직접 수정해서 만든 것 입니다.
하나하나 살펴보지요
    /**
     * Holds the color value for {@code mCirclePaint} before the {@code Paint} instance is created.
     */
        final int[] colors = {Color.parseColor("#00000000") , Color.parseColor("#FF0000"), Color.parseColor("#FF0000"),
                Color.parseColor("#FF0000"),
                Color.parseColor("#FF0000"), Color.parseColor("#00000000")};

    private int[]  mCircleColor = colors;
위 변수는 circle seekbar의 원형 형태의 배경색을 넣는 부분입니다.
     private static final float DEFAULT_POINTER_RADIUS = 6f;
    private static final float DEFAULT_POINTER_HALO_WIDTH = 1f;
    private static final float DEFAULT_POINTER_HALO_BORDER_WIDTH = 1f;
DEFAULT_POINTER_RADIUS 은 원형 seekbar progress 의 굵기
DEFAULT_POINTER_HALO_WIDTH, DEFAULT_POINTER_HALO_BORDER_WIDTH 은 원형 seekbar의 굵기 입니다
 private void initAttributes(TypedArray attrArray) {
       mCircleXRadius = (float) (attrArray.getFloat(R.styleable.CircularSeekBar_circle_x_radius, DEFAULT_CIRCLE_X_RADIUS) * DPTOPX_SCALE);
       mCircleYRadius = (float) (attrArray.getFloat(R.styleable.CircularSeekBar_circle_y_radius, DEFAULT_CIRCLE_Y_RADIUS) * DPTOPX_SCALE);
       mPointerRadius = (float) (attrArray.getFloat(R.styleable.CircularSeekBar_pointer_radius, DEFAULT_POINTER_RADIUS) * DPTOPX_SCALE);
       mPointerHaloWidth = (float) (attrArray.getFloat(R.styleable.CircularSeekBar_pointer_halo_width, DEFAULT_POINTER_HALO_WIDTH) * DPTOPX_SCALE);
       mPointerHaloBorderWidth = (float) (attrArray.getFloat(R.styleable.CircularSeekBar_pointer_halo_border_width, DEFAULT_POINTER_HALO_BORDER_WIDTH) * DPTOPX_SCALE);
       mCircleStrokeWidth = (float) (attrArray.getFloat(R.styleable.CircularSeekBar_circle_stroke_width, 6f) * DPTOPX_SCALE); -> progressw 의 굵기 init 하는곳
mMax = 250;
mProgress = attrArray.getInt(R.styleable.CircularSeekBar_progress, DEFAULT_PROGRESS);
mCustomRadii = attrArray.getBoolean(R.styleable.CircularSeekBar_use_custom_radii, DEFAULT_USE_CUSTOM_RADII);
mMaintainEqualCircle = attrArray.getBoolean(R.styleable.CircularSeekBar_maintain_equal_circle, DEFAULT_MAINTAIN_EQUAL_CIRCLE);
mMoveOutsideCircle = attrArray.getBoolean(R.styleable.CircularSeekBar_move_outside_circle, DEFAULT_MOVE_OUTSIDE_CIRCLE);
lockEnabled = attrArray.getBoolean(R.styleable.CircularSeekBar_lock_enabled, DEFAULT_LOCK_ENABLED);
// Modulo 360 right now to avoid constant conversion
mStartAngle = 155;
mEndAngle = 80;
if (mStartAngle == mEndAngle) {
//mStartAngle = mStartAngle + 1f;
mEndAngle = mEndAngle - .1f;
}
}여기서 mStartAngle 은 progress가 시작하는 위치 즉 progress는 0
mEndAngle은 progress가 끝나는 위치 입니다. 즉 progress 가 100(100이 최대라고 했을때 이야기입니다 전 250으로 잡았습니다)
private void initPaints() {
final int[] colors = {Color.parseColor("#00000000") , Color.parseColor("#FF0000"), Color.parseColor("#FF0000"),
Color.parseColor("#FF0000"),
Color.parseColor("#FF0000"), Color.parseColor("#00000000")};
final float[] positions = {0.1f, 0.3f, 0.45f, 0.6f, 0.75f, 0.85f}; -> 위 color을 어디에 배치할지를 결정하는곳 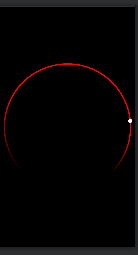
SweepGradient gradient = new SweepGradient(0, 0, colors, positions/*positions*/);
float rotate = 100f;
Matrix gradientMatrix = new Matrix();
gradientMatrix.preRotate(rotate, 0, 0);
gradient.setLocalMatrix(gradientMatrix);
mCirclePaint = new Paint();
mCirclePaint.setAntiAlias(true);
mCirclePaint.setDither(true);
mCirclePaint.setShader(gradient);
mCirclePaint.setStrokeWidth(mCircleStrokeWidth * 2 / 3);
mCirclePaint.setStyle(Paint.Style.STROKE);
mCirclePaint.setStrokeJoin(Paint.Join.ROUND);
mCirclePaint.setStrokeCap(Paint.Cap.ROUND);colors 는 배경색 입니다.
그 밑에는 배경을 그려주는 Paint 가 있습니다.
    @Override
    protected Parcelable onSaveInstanceState() {
        Parcelable superState = super.onSaveInstanceState();

        Bundle state = new Bundle();
        state.putParcelable("PARENT", superState);
        state.putInt("MAX", mMax);
        state.putInt("PROGRESS", mProgress);
        state.putIntArray("mCircleColor", mCircleColor);
        state.putInt("mCircleProgressColor", mCircleProgressColor);
        state.putInt("mPointerColor", mPointerColor);
        state.putInt("mPointerHaloColor", mPointerHaloColor);
        state.putInt("mPointerHaloColorOnTouch", mPointerHaloColorOnTouch);
        state.putInt("mPointerAlpha", mPointerAlpha);
        state.putInt("mPointerAlphaOnTouch", mPointerAlphaOnTouch);
        state.putBoolean("lockEnabled", lockEnabled);

        return state;
    }
해당 코드는 view가 다시 그려질때 혹시 개발자가 init 한 정보를 다시 불러오는 역활을 합니다.
자 그럼 만들었으니 한번 써봐야 지요
xml 입니다.

<androidx.constraintlayout.widget.ConstraintLayout xmlns:android="http://schemas.android.com/apk/res/android"
 android:layout_width="match_parent"
 android:layout_height="match_parent"
 xmlns:app="http://schemas.android.com/apk/res-auto"
 android:background="@color/black">

     <com.your.example.CircularSeekBar
         android:layout_width="match_parent"
         android:layout_height="match_parent"
         app:max="220"
         app:progress="175"   />


</androidx.constraintlayout.widget.ConstraintLayout>
자 그럼 결과물을 한번 보겠습니다.

ㅇ.ㅇ 음 잘 성공 한거 같습니다.
그럼 오늘도 읽어주셔서 감사합니다
-피드백와 비판은 언제나 환영입니다-
참조 코드
https://rrtutors.com/tutorials/circular-seekbar-in-android