안녕하세요! 소리입니다 👋
오늘은 가장 기초적인 자료구조인 스택과 큐, 덱에 대해 정리했어요.
스택과 큐, 덱을 어떻게 구현하는지, 어떤 곳에 사용할 수 있는지 알아볼게요.
⚠️ 참고해주세요!
이 글에서 설명하는 스택과 큐, 덱은 모두 추상 자료형이에요.
따라서 구현 방법은 여러 방법이 있죠.이 글에서는 연결 리스트와 유사한 방법을 사용해서 구현해요.
만약 삽입하는 데이터의 개수가 정해져 있고, 속도가 중요하다면 배열을 이용한 방법을 추천해요.
🤔 추상 자료형이란?
구현 방법의 정의 없이 기능만 정의된 자료구조를 추상 자료형(ADT)이라고 해요.
스택 (Stack)
스택은 후입선출(LIFO) 원칙을 따르는 자료구조예요.
데이터를 순서대로 넣으면, 다시 꺼낼 때는 역순으로 나와요.
뷔페에 직원이 그릇을 쌓아놓으면, 사람들은 그릇의 맨 위부터 가져가는 모습을 상상하면 이해가 쉬워요.
연산
대표적인 스택 연산은 push와 pop, peek 세 종류에요.
-
삽입 (push)
데이터를 스택에 넣는 연산이에요.
어떤 요소를 스택에 삽입하면, 스택의 맨 위에 오도록 상태를 변경해요. -
제거 (pop)
맨 위의 데이터를 스택에서 꺼내는 연산이에요.
보통 데이터 제거와 함께 제거한 데이터를 반환해요. -
확인 (peek)
스택의 맨 위에 어떤 데이터가 있는지 확인하는 연산이에요.
위 두 연산과 달리 상태의 변경을 일으키지 않아요.
예시
스택을 그림으로 설명해볼게요.
2, 1, 5를 포함하고 있는 스택에 삽입과 제거를 해 보았어요.
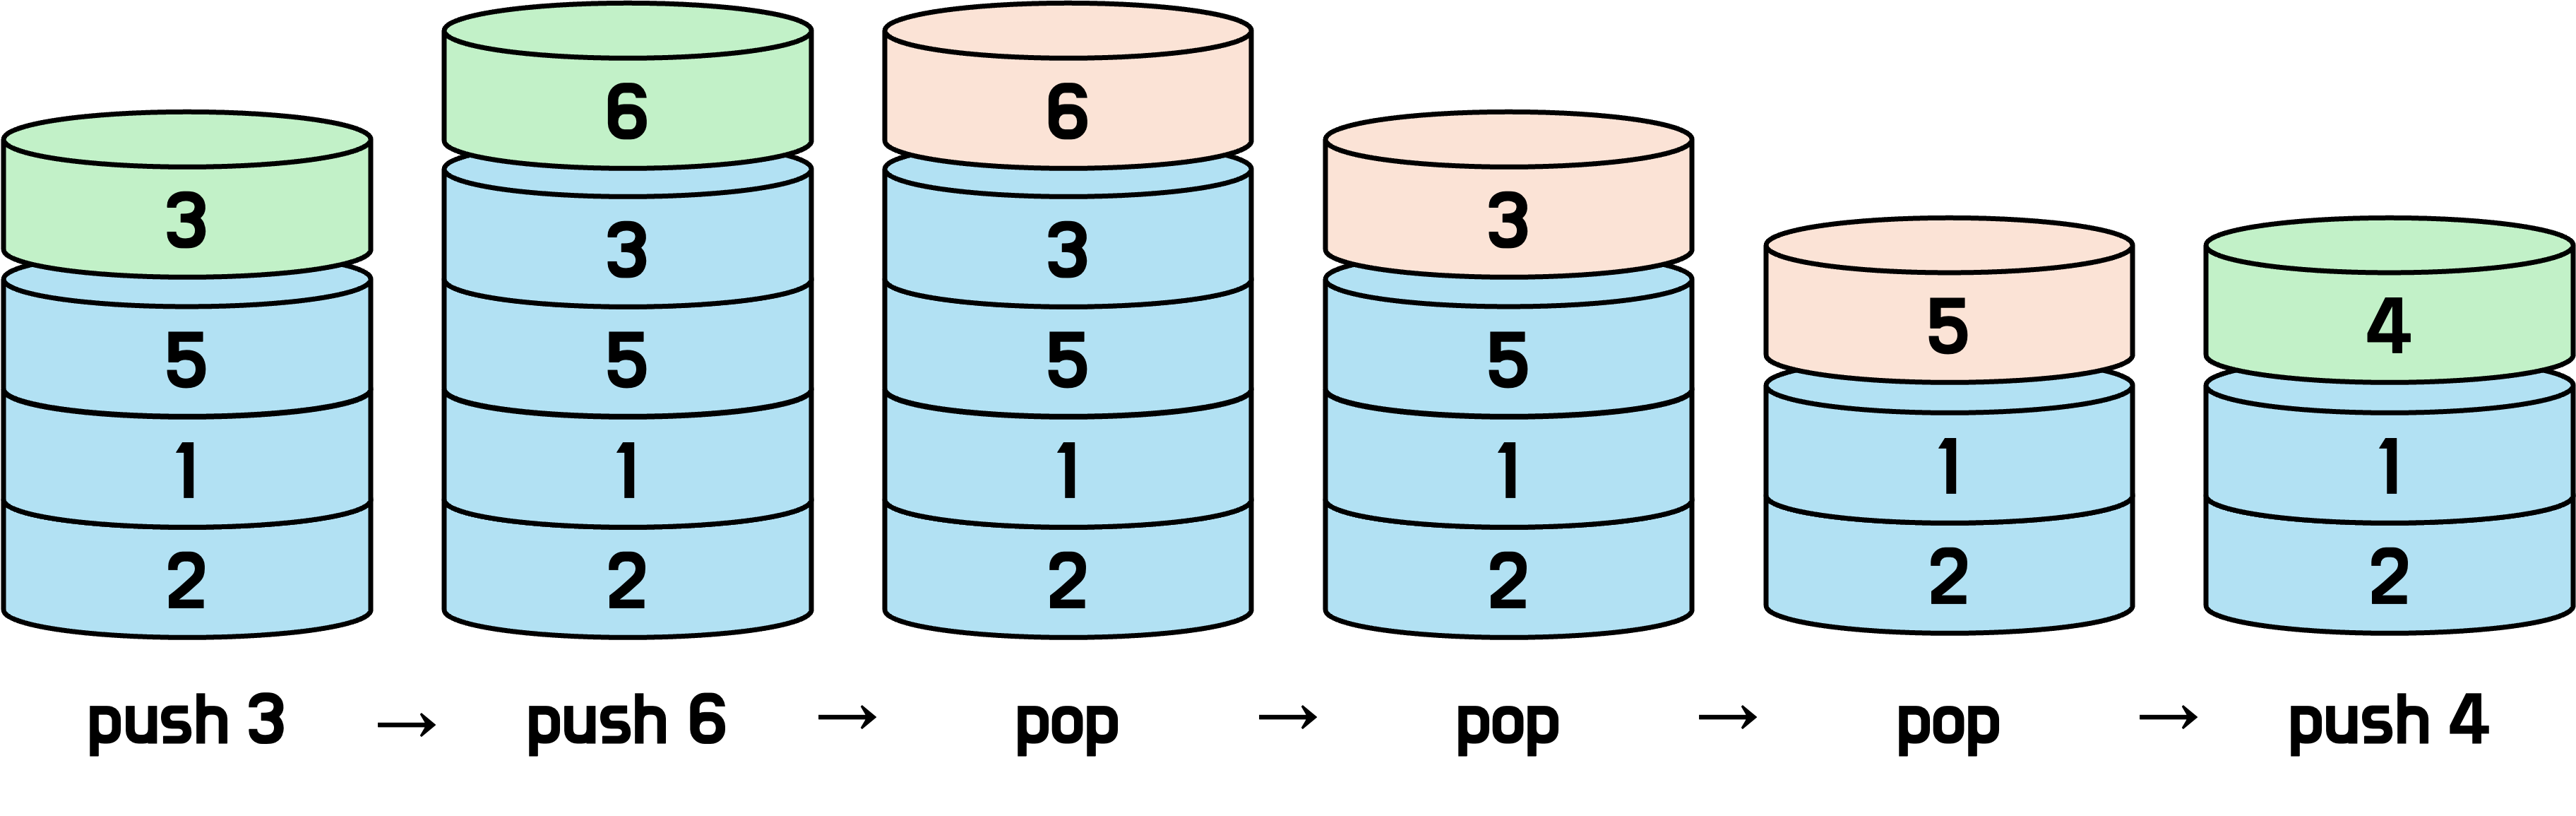
맨 처음, 3이 삽입 연산에 의해 스택의 맨 위에 올라가요.
다음 6에 대해서도 같은 동작이 일어나요.
이제 제거 연산이 이루어져요.
제거 연산에 의해 차례대로 6, 3, 5가 스택에서 꺼내져요.
마지막으로 다시 4가 삽입 연산에 의해 맨 위에 올라가요.
구현
Python
class Node:
    def __init__(self, data, link):
        self.data = data
        self.link = link

class Stack:
    def __init__(self):
        self.head = None

    def push(self, data):
        # 기존 head를 다음 노드로 하는 새 노드를 head로 지정
        self.head = Node(data, self.head)

    def pop(self):
        top = self.head

        # 스택에 아무 요소도 없었던 경우
        if top is None:
            raise IndexError("Stack is empty")

        # 스택에 요소가 있는 경우, 다음 노드를 새로운 head로 하고 기존 head의 값 반환
        self.head = self.head.link
        return top.data

    def peek(self):
        return self.head.data if self.head is not None else None
Rust
struct Node<T> {
    data: T,
    link: Option<Box<Node<T>>>
}

struct Stack<T> {
    head: Option<Box<Node<T>>>
}

impl<T> Stack<T> {
    fn new() -> Self {
        Self { head: None }
    }

    fn push(&mut self, data: T) {
        // head의 소유권을 가져와 node.next에 넣음
        let node = Box::new(Node { data, link: self.head.take() });

        // 새로 만든 노드를 head로 지정
        self.head = Some(node);
    }

    fn pop(&mut self) -> Option<T> {
        // head 노드를 가져와 다음 노드를 새로운 head로 만들고 기존 head의 값 반환
        self.head.take().map(|node| {
            self.head = node.link;
            node.data
        })
    }

    fn peek(&self) -> Option<&T> {
        // head 노드의 값 반환
        self.head.as_ref().map(|node| &node.data)
    }
}
큐 (Queue)
큐는 선입선출(FIFO) 원칙을 따르는 자료구조예요.
데이터를 꺼낼 때 처음 넣었던 순서 그대로 나와요.
큐는 식당에 줄 서는 것과 비슷해요.
먼저 선 사람이 먼저 식당에 들어가듯이, 큐에 먼저 들어간 데이터가 먼저 나와요.
연산
큐의 연산은 스택과 같은 이름이지만, 동작은 달라요.
-
삽입 (push)
데이터를 큐에 넣는 연산이에요.
어떤 요소를 큐에 삽입하면, 큐의 맨 뒤에 데이터를 붙여요. -
제거 (pop)
가장 오래된 데이터를 큐에서 꺼내는 연산이에요.
큐의 맨 앞 데이터를 제거해요. -
확인 (peek)
큐의 가장 앞 데이터를 확인해요.
스택에서의 연산과 마찬가지로 상태를 변경하지 않아요.
예시
큐의 동작을 그림으로 설명해볼게요.
2, 1, 5를 포함하고 있는 큐에 삽입과 제거를 해 보았어요.
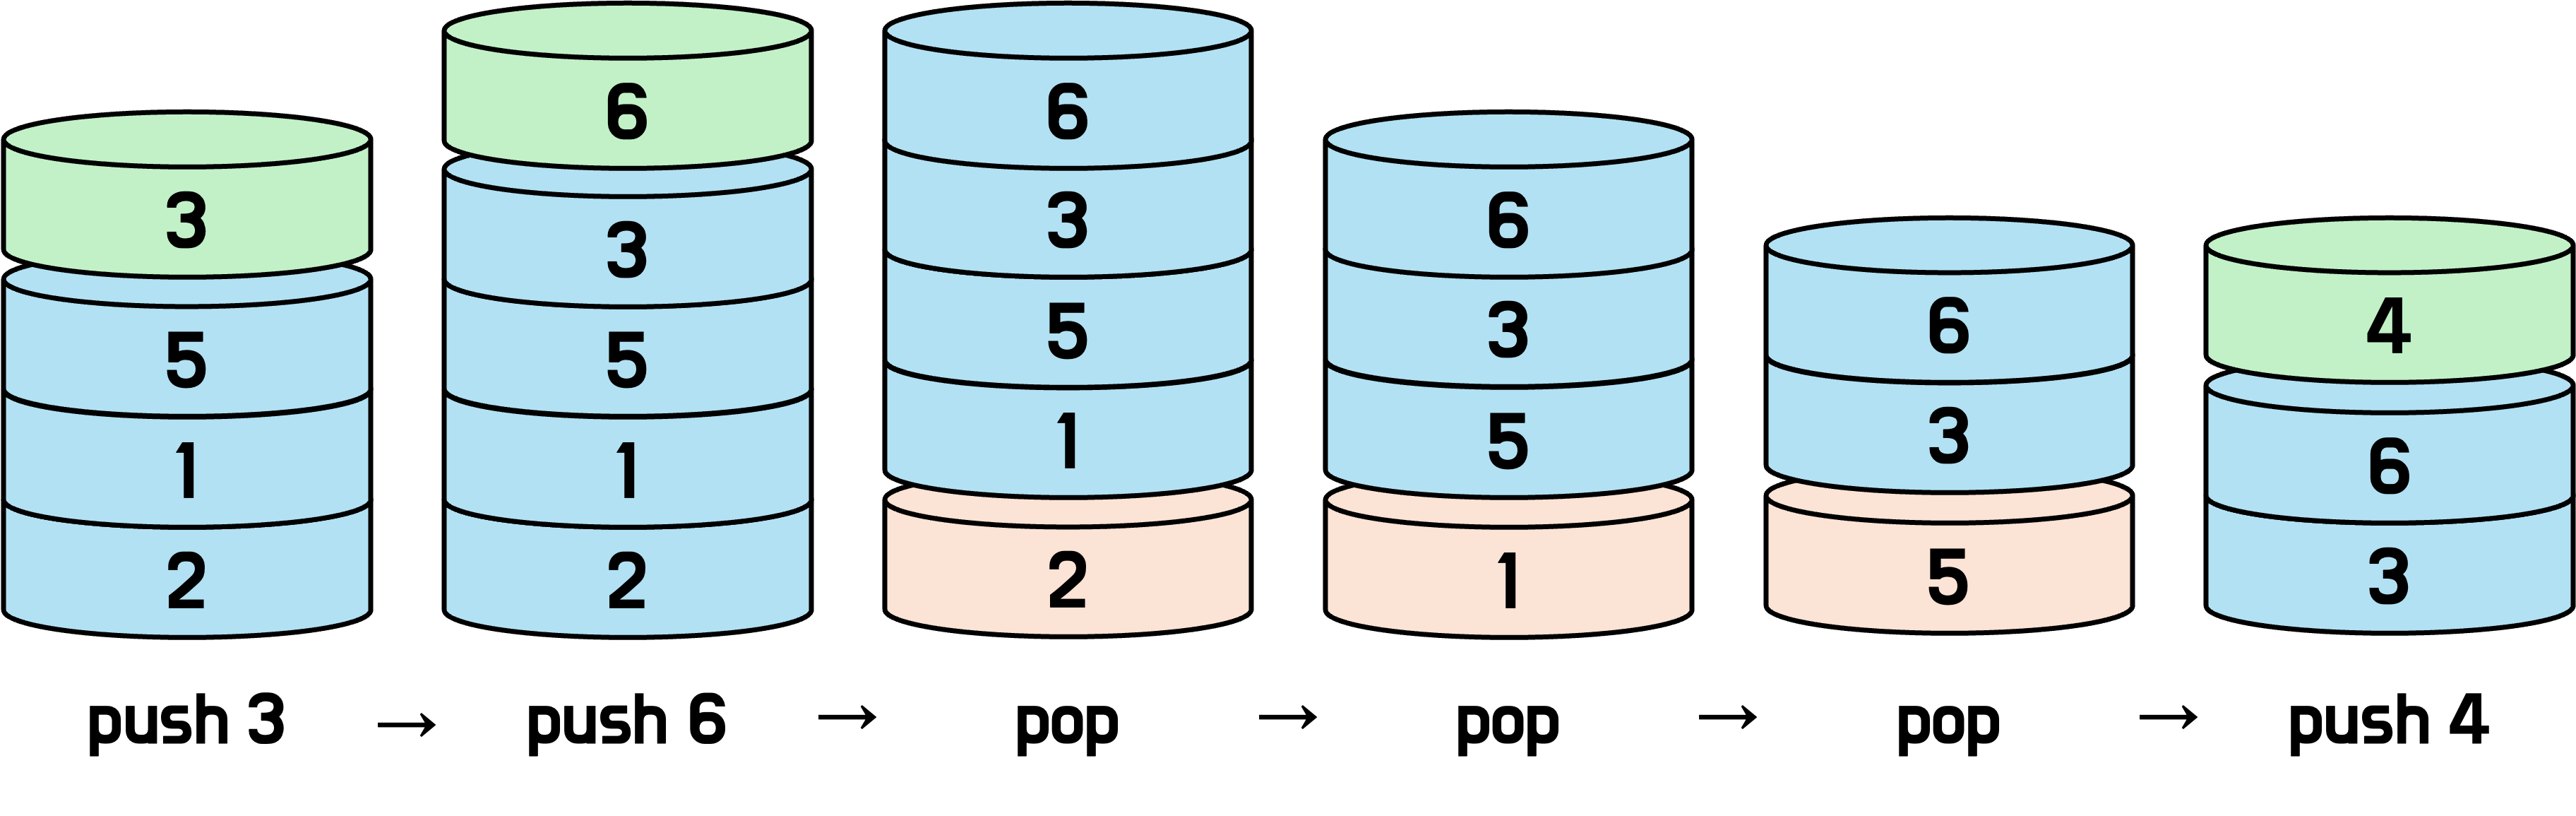
스택과 제거 연산이 다른 것을 확인할 수 있어요.
제거 연산으로 제거가 이루어지는 위치는 그림상 맨 아래에 있는, 큐의 맨 앞이에요.
구현
Python
class Node:
    def __init__(self, data, link):
        self.data = data
        self.link = link

class Queue:
    def __init__(self):
        self.head = None
        self.tail = None

    def push(self, data):
        node = Node(data, None)

        # 새 노드를 tail에 붙임
        if self.head is None:
            self.head = self.tail = node
        else:
            self.tail.link = node
            self.tail = node

    def pop(self):
        top = self.head

        # 큐에 아무 요소도 없었던 경우
        if top is None:
            raise IndexError("Queue is empty")

        # 큐에 요소가 있는 경우, 다음 노드를 새로운 head로 하고 기존 head의 값 반환
        self.head = self.head.link
        if self.head is None:
            self.tail = None
        return top.data

    def peek(self):
        return self.head.data if self.head is not None else None
Rust
🚨 주의!
Rust에서 원시 포인터를 사용하는 것은 매우 위험해요.
이미 Rust의 표준 라이브러리에 큐와 덱으로 활용 가능한 구현체VecDeque가 있어요.
구현 코드는 동작 학습용으로만 사용하고, 실제 사용은VecDeque사용을 권장해요.
struct Node<T> {
    data: T,
    link: Option<Box<Node<T>>>
}

struct Queue<T> {
    head: Option<Box<Node<T>>>,
    tail: *mut Option<Box<Node<T>>>
}

impl<T> Queue<T> {
    fn new() -> Self {
        Self { head: None, tail: std::ptr::null_mut() }
    }

    fn push(&mut self, data: T) {
        let node = Box::new(Node { data, link: None });

        // 새 노드를 tail에 붙임
        // 그 후, 새 노드의 link 필드를 tail을 통해 노출
        if self.head.is_none() {
            self.head = Some(node);
            self.tail = &mut self.head.as_mut().unwrap().link;
        }
        else {
            //
            unsafe {
                *self.tail = Some(node);
                self.tail = &mut (*self.tail).as_mut().unwrap().link;
            }
        }
    }

    fn pop(&mut self) -> Option<T> {
        // head 노드를 가져와 다음 노드를 새로운 head로 만들고 기존 head의 값 반환
        self.head.take().map(|node| {
            self.head = node.link;

            // 혹시 모를 오류를 방지하기 위해 댕글링 포인터 제거
            if self.head.is_none() {
                self.tail = std::ptr::null_mut();
            }

            node.data
        })
    }

    fn peek(&self) -> Option<&T> {
        // head 노드의 값 반환
        self.head.as_ref().map(|node| &node.data)
    }
}
덱 (Deque)
덱은 양 방향 큐(Double-ended queue)의 줄임말이에요.
덱은 양쪽 모두에서 삽입과 제거가 가능해요.
연산
덱의 연산은 스택이나 큐와 같지만, 각 방향마다 연산이 존재한다는 점이 달라요.
-
삽입 (push)
데이터를 덱에 넣는 연산이에요.
삽입 위치에 따라서push_front와push_back로 구분할 수 있어요. -
제거 (pop)
데이터를 덱에서 꺼내는 연산이에요.
제거 위치에 따라서pop_front와pop_back로 구분할 수 있어요. -
확인 (peek)
덱의 양 끝에 어떤 데이터가 있는지 확인하는 연산이에요.
확인 연산은 상태의 변경을 일으키지 않아요.
예시
덱의 동작을 그림으로 설명해볼게요.
2, 1, 5를 포함하고 있는 덱에 삽입과 제거를 해 보았어요.
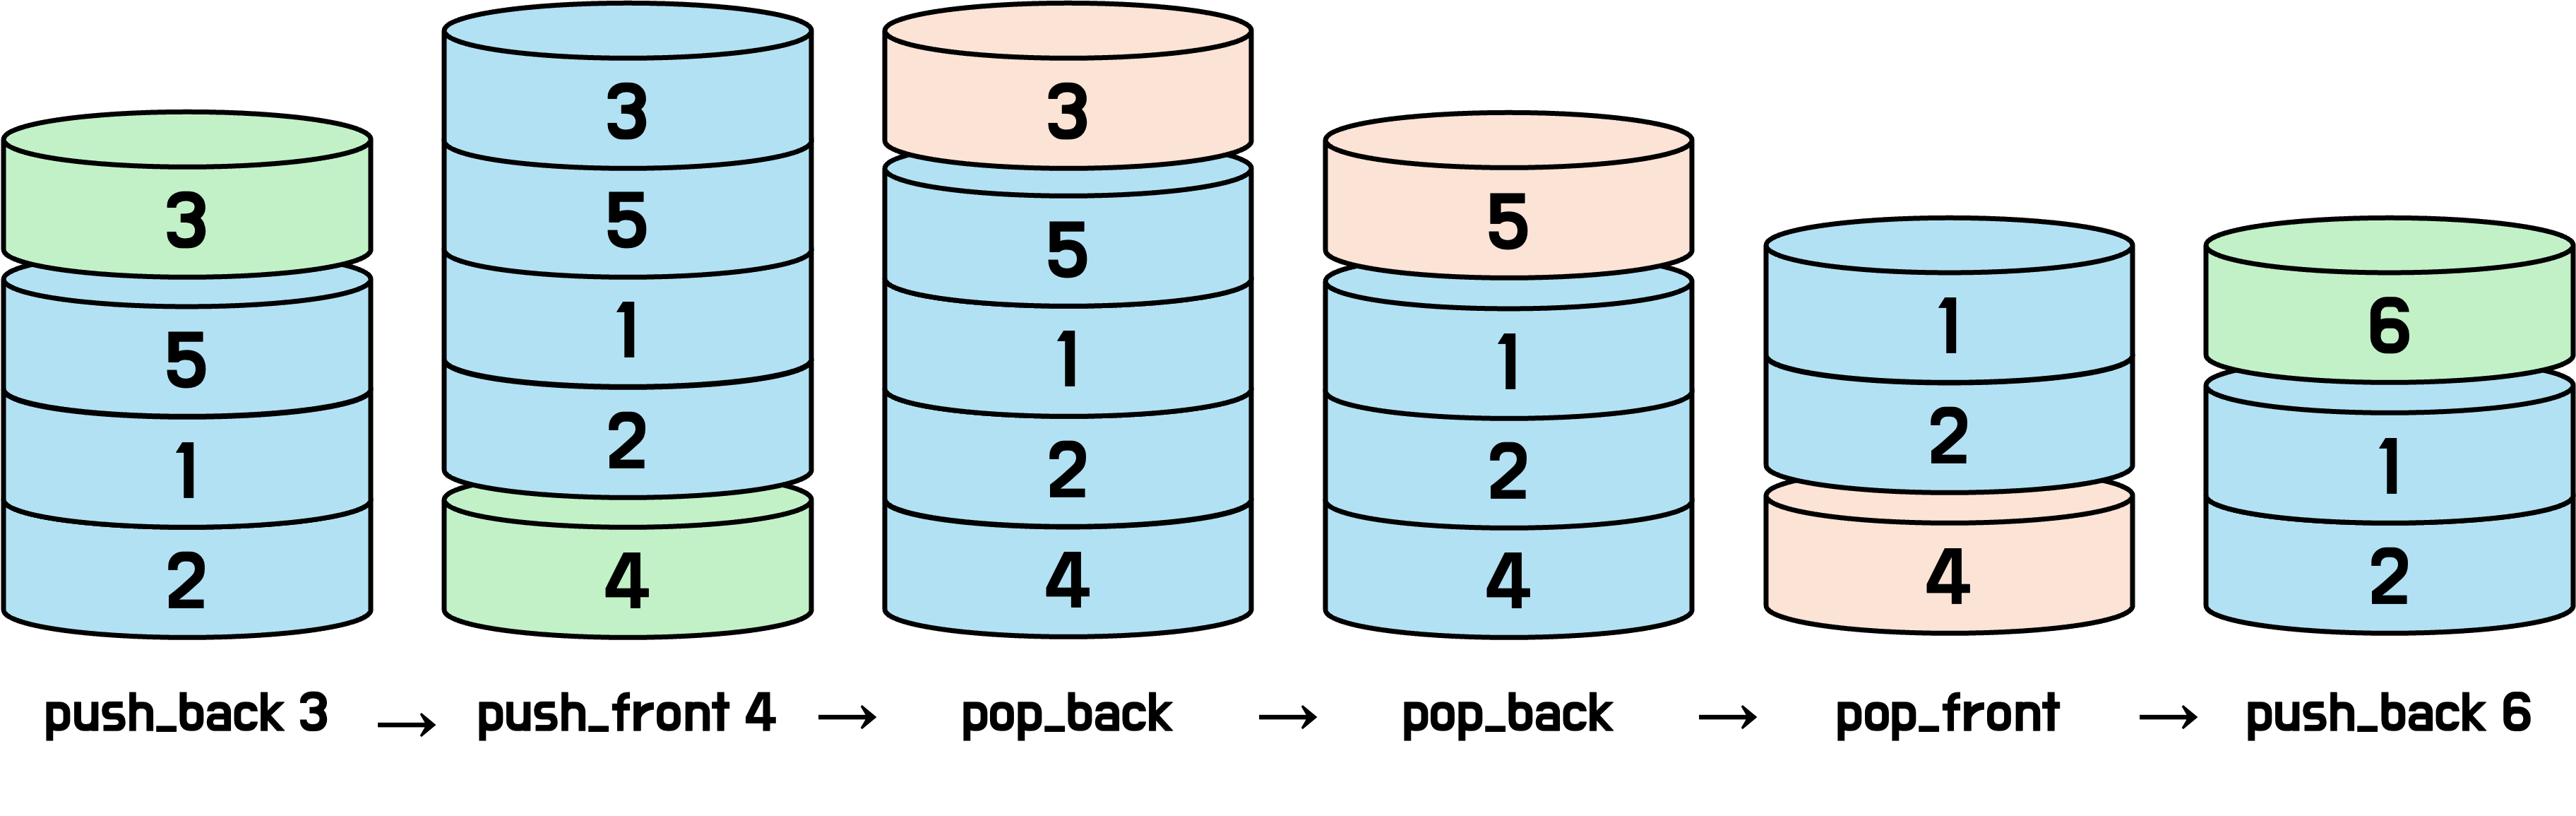
push_front와 pop_front 연산은 덱의 앞 부분을 바꾸고, push_back과 pop_back 연산은 덱의 뒷 부분을 바꾸는 것을 알 수 있어요.
구현
Python
class Node:
    def __init__(self, data, prev, next):
        self.data = data
        self.prev = prev
        self.next = next

class Deque:
    def __init__(self):
        self.head = None
        self.tail = None

    def push_front(self, data):
        node = Node(data, None, self.head)

        # 새로운 노드를 head에 붙임
        if self.head is None:
            self.head = self.tail = node
        else:
            self.head.prev = node
            self.head = node

    def push_back(self, data):
        node = Node(data, self.tail, None)

        # 새로운 노드를 tail에 붙임
        if self.tail is None:
            self.head = self.tail = node
        else:
            self.tail.next = node
            self.tail = node

    def pop_front(self):
        pop = self.head

        # 덱에 아무 요소도 없었던 경우
        if pop is None:
            raise IndexError("Deque is empty")

        # 다음 노드를 새로운 head로 하고 기존 head의 값 반환
        self.head = self.head.next
        if self.head is None:
            self.tail = None
        else:
            self.head.prev = None
        return pop.data

    def pop_back(self):
        pop = self.tail

        # 덱에 아무 요소도 없었던 경우
        if pop is None:
            raise IndexError("Queue is empty")

        # 이전 노드를 새로운 tail로 하고 기존 tail의 값 반환
        self.tail = self.tail.prev
        if self.tail is None:
            self.head = None
        else:
            self.tail.next = None
        return pop.data

    def peek_front(self):
        return self.head.data if self.head is not None else None

    def peek_back(self):
        return self.tail.data if self.tail is not None else None
Rust
🚨 주의!
Rust에서 원시 포인터를 사용하는 것은 매우 위험해요.
이미 Rust의 표준 라이브러리에 큐와 덱으로 활용 가능한 구현체VecDeque가 있어요.
구현 코드는 동작 학습용으로만 사용하고, 실제 사용은VecDeque사용을 권장해요.
struct Node<T> {
    data: T,
    prev: *mut Node<T>,
    next: *mut Node<T>,
}

struct Deque<T> {
    head: *mut Node<T>,
    tail: *mut Node<T>,
}

impl<T> Deque<T> {
    fn new() -> Self {
        Self { head: std::ptr::null_mut(), tail: std::ptr::null_mut() }
    }

    fn push_front(&mut self, data: T) {
        let node = Box::into_raw(Box::new(Node { data, prev: std::ptr::null_mut(), next: self.head }));

        // 새로운 노드를 head에 붙임
        if self.head.is_null() {
            self.head = node;
            self.tail = node;
        }
        else {
            unsafe {
                (*self.head).prev = node;
                self.head = node;
            }
        }
    }

    fn push_back(&mut self, data: T) {
        let node = Box::into_raw(Box::new(Node { data, prev: self.tail, next: std::ptr::null_mut() }));

        // 새로운 노드를 tail에 붙임
        if self.tail.is_null() {
            self.tail = node;
            self.head = node;
        }
        else {
            unsafe {
                (*self.tail).next = node;
                self.tail = node;
            }
        }
    }

    fn pop_front(&mut self) -> Option<T> {
        if self.head.is_null() {
            return None;
        }

        // head 노드를 가져와 다음 노드를 새로운 head로 만들고 기존 head의 값 반환
        unsafe {
            let node = Box::from_raw(self.head);
            self.head = node.next;
            if self.head.is_null() {
                self.tail = std::ptr::null_mut();
            }
            else {
                (*self.head).prev = std::ptr::null_mut();
            }
            Some(node.data)
        }
    }

    fn pop_back(&mut self) -> Option<T> {
        if self.tail.is_null() {
            return None;
        }

        // tail 노드를 가져와 이전 노드를 새로운 tail로 만들고 기존 tail의 값 반환
        unsafe {
            let node = Box::from_raw(self.tail);
            self.tail = node.prev;
            if self.tail.is_null() {
                self.head = std::ptr::null_mut();
            }
            else {
                (*self.tail).next = std::ptr::null_mut();
            }
            Some(node.data)
        }
    }

    fn peek_front(&self) -> Option<&T> {
        // head 노드의 값 반환
        unsafe { self.head.as_ref().map(|node| &node.data) }
    }

    fn peek_back(&self) -> Option<&T> {
        // tail 노드의 값 반환
        unsafe { self.tail.as_ref().map(|node| &node.data) }
    }
}

// 메모리 free
impl<T> Drop for Deque<T> {
    fn drop(&mut self) {
        while let Some(_) = self.pop_front() {}
    }
}
세 자료구조의 비교
스택과 큐, 덱의 특징을 연산의 발생 위치를 기준으로 비교했어요.
| 스택 | 큐 | 덱 | |
|---|---|---|---|
| 데이터 삽입 | 한쪽 끝 (Top) | 한쪽 끝 (Back) | 양쪽 끝 (Front, Back) |
| 데이터 삭제 | 한쪽 끝 (Top) | 다른쪽 끝 (Front) | 양쪽 끝 (Front, Back) |
지금까지 스택과 큐, 덱의 개념과 특징을 알아봤어요.
이 세 자료구조는 문제 해결 과정에서 탐색을 진행할 때 많이 사용되기 때문에 잘 알고 있어야 해요.
스택과 큐는 그래프 탐색(DFS·BFS)에서 활용되고, 덱은 투 포인터나 슬라이딩 윈도우를 사용할 때 응용될 수 있어요.
이 글이 여러분께 도움되었기를 바라며, 다음에 더욱 유용한 정보로 찾아올게요! 😁
