
초보개발자입니다. 틀린부분이 있다면 언제든지 말씀해주시면 감사합니다!
Model 동기화
Model을 define 할 때, DB의 테이블에 대해 sequelize에게 정보를 준다. 하지만 그 테이블이 DB에 실제로 존재하지 않는다면, 혹은 존재하지만 column이 다른 경우 Model의 동기화가 진행된다.
모델은 model.sync(options)는 Promise를 반환하는 함수인데 이를 이용하여 Model을 동기화한다.
이 함수를 호출함으로써 데이터베이스에 대한 SQL 쿼리를 자동으로 진행하는데 JS의 Model이 아닌 DB의 테이블을 변경하여 Model과 동기화 한다.
User.sync() -> 테이블이 존재하지 않을 경우, 테이블을 생성한다.(존재할 경우 아무것도 하지 않는다.)
User.sync({ force: true }) -> 테이블이 존재하지 않을 경우 테이블을 생성하고, 존재할 경우 테이블을 삭제한다.
User.sync({ alter: true }) -> 테이블이 존재하지 않을 경우 테이블을 생성하고, 존재할 경우 Model과 테이블이 같도록 테이블을 변경한다.
그리고 예시에 대해서 나오는데

어제 작성한 문서에 예시를 추가했다.
const { Sequelize, DataTypes, Model } = require("sequelize");

const sequelize = new Sequelize("sequelize_test", "root", "1234", {
  define: {
    freezeTableName: true,
  },
  host: "localhost",
  dialect: "mysql",
});

class User extends Model {}

User.init(
  {
    firstName: {
      type: DataTypes.STRING,
      allowNull: false,
    },
    lastName: {
      type: DataTypes.STRING,
    },
  },
  {
    sequelize,
    modelName: "User",
  }
);
sequelize.sync({ force: true });
console.log("All models were synchronized successfully.");

console.log(User === sequelize.models.User);
await가 아닌 이유는 async를 넣을 곳을 찾지못했기 때문이긴하다... 마이그레이션으로 해놓은 코드를 보니 cli 환경에서 사용할 수 있도록 up: async () => {await...} 형식으로 되어있는것을 확인했고 필요한 부분에만 작성하면 될거같다고 생각했다.
코드를 작성하고 node sequelizeTest.js를 Cli에서 실행한 결과

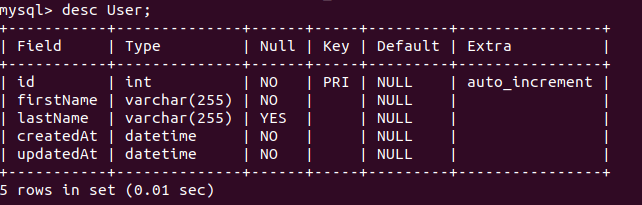
첫번째 스크린샷은 force를 집어넣은 .sync 였기에 User 테이블이 존재한다면 삭제한 뒤 Model과 테이블을 동기화했고 두번째 스크린샷에서 init에 집어넣은 User 테이블을 확인 할 수 있다.
그리고 테이블을 삭제하기 위해선
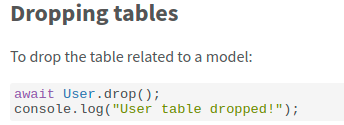
drop을 이용하여 User테이블을 없앨 수 있다.
한개의 Model 말고 전체 Model 을 동기화하거나 삭제하기 위해선
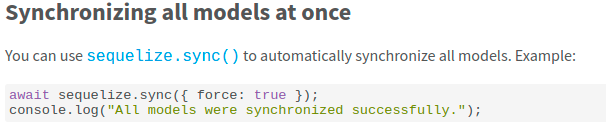

를 이용하면 데이터 전반에서 동기화와 삭제가 가능하다.
그리고 동기화와 삭제의 경우 destructive 하다고 한다. match 옵션을 통해 안전검사가 가능하다.
sequelize.sync({ force: true, match: /_test$/ });
위의 경우 DB이름 마지막에 _test가 있는 DB의 경우에만 동기화가 가능하고 drop역시 마찬가지일 것이라고 생각한다.
test가 아닌 production의 경우는 sequelize-cli 를 이용하여 작업하는것이 권장되고 있다.
Timestamps
위의 mysql 스크린샷을 보면 firstName, lastName 만을 넣었는데 id와 createdAt, updatedAt 세가지가 생겼다. sequelize 에서는 default로 3가지를 추가로 테이블에 구성하는데 이것중 createdAt, updatedAt 두가지가 Timestamps이다.
이 Timestamps 를 끄고 키는 방법은 공식문서에서 확인이 가능한데
class Foo extends Model {}
Foo.init({ /* attributes */ }, {
  sequelize,

  // don't forget to enable timestamps!
  timestamps: true,

  // I don't want createdAt
  createdAt: false,

  // I want updatedAt to actually be called updateTimestamp
  updatedAt: 'updateTimestamp'
});
위는 공식문서에 나온 예시이다. timestamps는 true가 기본 값이며 false를 넣을 경우 createdAt, updatedAt 두개 모두 꺼지게 된다. timestamps 를 true로 하고 createdAt: false를 하는 경우 createdAt은 나오지 않고 updataedAt 만 나오게 된다. 밑에 나오는 updatedAt: 'updateTimestamp'는 updatedAt의 컬럼 이름을 'updateTimestamp'로 바꿔준다는 의미의 코드이다.
Column declaration shorthand syntax
컬럼값을 넣을 때 좀 더 짧게 넣는 방법에 대해서 설명하고 있다.
// This:
sequelize.define('User', {
  name: {
    type: DataTypes.STRING
  }
});

// Can be simplified to:
sequelize.define('User', { name: DataTypes.STRING });
Default Values
컬럼에 기본값을 넣어주는 방법에 대해 설명하고 있다.
sequelize.define('User', {
  name: {
    type: DataTypes.STRING,
    defaultValue: "John Doe"
  }
});
이 외에도 특별한 기본값을 넣어줄 수 있다.
sequelize.define('Foo', {
  bar: {
    type: DataTypes.DATETIME,
    defaultValue: Sequelize.NOW
    // This way, the current date/time will be used to populate this column
    //(at the moment of insertion)
  }
});
번역해보면 현재시각을 기본값으로 넣어줄 수 있다고 한다.
Data Types
다음으로 데이터 타입에 대한 내용이 나오는데 데이터 타입은 각각 string, boolean, Number, 그리고 mysql과 mariaDB에서 사용할 수 있는 Unsigned & Zerofill integers 도 존재하며 Dates, UUID 도 존재한다.
Column Options
컬럼 옵션에 대한 예시를 다양하게 보여주고 있다.
const { Model, DataTypes, Deferrable } = require("sequelize");

class Foo extends Model {}
Foo.init({
  // instantiating will automatically set the flag to true if not set
  flag: { type: DataTypes.BOOLEAN, allowNull: false, defaultValue: true },

  // default values for dates => current time
  myDate: { type: DataTypes.DATE, defaultValue: DataTypes.NOW },

  // setting allowNull to false will add NOT NULL to the column, which means an error will be
  // thrown from the DB when the query is executed if the column is null. If you want to check that a value
  // is not null before querying the DB, look at the validations section below.
  title: { type: DataTypes.STRING, allowNull: false },

  // Creating two objects with the same value will throw an error. The unique property can be either a
  // boolean, or a string. If you provide the same string for multiple columns, they will form a
  // composite unique key.
  uniqueOne: { type: DataTypes.STRING,  unique: 'compositeIndex' },
  uniqueTwo: { type: DataTypes.INTEGER, unique: 'compositeIndex' },

  // The unique property is simply a shorthand to create a unique constraint.
  someUnique: { type: DataTypes.STRING, unique: true },

  // Go on reading for further information about primary keys
  identifier: { type: DataTypes.STRING, primaryKey: true },

  // autoIncrement can be used to create auto_incrementing integer columns
  incrementMe: { type: DataTypes.INTEGER, autoIncrement: true },

  // You can specify a custom column name via the 'field' attribute:
  fieldWithUnderscores: { type: DataTypes.STRING, field: 'field_with_underscores' },

  // It is possible to create foreign keys:
  bar_id: {
    type: DataTypes.INTEGER,

    references: {
      // This is a reference to another model
      model: Bar,

      // This is the column name of the referenced model
      key: 'id',

      // With PostgreSQL, it is optionally possible to declare when to check the foreign key constraint, passing the Deferrable type.
      deferrable: Deferrable.INITIALLY_IMMEDIATE
      // Options:
      // - `Deferrable.INITIALLY_IMMEDIATE` - Immediately check the foreign key constraints
      // - `Deferrable.INITIALLY_DEFERRED` - Defer all foreign key constraint check to the end of a transaction
      // - `Deferrable.NOT` - Don't defer the checks at all (default) - This won't allow you to dynamically change the rule in a transaction
    }
  },

  // Comments can only be added to columns in MySQL, MariaDB, PostgreSQL and MSSQL
  commentMe: {
    type: DataTypes.INTEGER,
    comment: 'This is a column name that has a comment'
  }
}, {
  sequelize,
  modelName: 'foo',

  // Using `unique: true` in an attribute above is exactly the same as creating the index in the model's options:
  indexes: [{ unique: true, fields: ['someUnique'] }]
});
자세한 내용이나 자주 쓰는 옵션을 확인해서 사용해야겠다.
마지막으로 Model을 클래스로 활용하는 법에 대해 나와있다.
class User extends Model {
  static classLevelMethod() {
    return 'foo';
  }
  instanceLevelMethod() {
    return 'bar';
  }
  getFullname() {
    return [this.firstname, this.lastname].join(' ');
  }
}
User.init({
  firstname: Sequelize.TEXT,
  lastname: Sequelize.TEXT
}, { sequelize });

console.log(User.classLevelMethod()); // 'foo'
const user = User.build({ firstname: 'Jane', lastname: 'Doe' });
console.log(user.instanceLevelMethod()); // 'bar'
console.log(user.getFullname()); // 'Jane Doe'
이것으로 Model Basic 을 모두 봤다.
어떻게 사용해야하는지는 자주 읽고 실제로 사용해가면서 데이터타입과 column option 에 대해 파악해야겠다.
