https 사용
-
인증서 파일들이 존재하는 경우 (cert.pem, key.pem)에만 https 프로토콜을 사용하는 서버를 실행합니다
-
만약 인증서 파일이 존재하지 않는경우, http 프로토콜을 사용하는 서버를 실행합니다
-
파일 존재여부를 확인하는 폴더는 서버 폴더의 package.json이 위치한 곳입니다
const HTTPS_PORT = process.env.HTTPS_PORT || 4000;

let server;
if(fs.existsSync("./key.pem") && fs.existsSync("./cert.pem")){

  const privateKey = fs.readFileSync(__dirname + "/key.pem", "utf8");
  const certificate = fs.readFileSync(__dirname + "/cert.pem", "utf8");
  const credentials = { key: privateKey, cert: certificate };

  server = https.createServer(credentials, app);
  server.listen(HTTPS_PORT, () => console.log("server runnning"));

} else {
  server = app.listen(HTTPS_PORT)
}
-
HTTPS_PORT
환경변수 안의 port 아니면 4000번대 port이용 -
createServer()
express 트랜잭션 해부 / 서버를 만드는 과정
https.createServer([options][, requestListener])
// curl -k https://localhost:8000/
const https = require('https');
const fs = require('fs');

const options = {
  key: fs.readFileSync('test/fixtures/keys/agent2-key.pem'),
  cert: fs.readFileSync('test/fixtures/keys/agent2-cert.pem')
};

https.createServer(options, (req, res) => {
  res.writeHead(200);
  res.end('hello world\n');
}).listen(8000);
Sequelize 생성
미리 생성된 파일
config/config.json
models/
migrations/
seeders/
login시 req의 정보와 database 정보와 같은지 비교
- req 정보는 req.body에 담겨 있다
- database 정보는 models의 user table을 통하여 가져올 수 있다
findAll, findOne 사용
const { Users } = require('../../models');

module.exports = (req, res) => {

// 입력받은 user 정보
  const { userId, password } = req.body;

// database의 user 정보
  const userInfo = Users.findAll({ userId, password })
};
const userInfo = Users.findAll({ userId, password })
findAll를 사용하게 되면
promise로 반환되기 때문에,
async,await를 사용하여 비동기 처리를 해주던가 또는
then으로 받아서 같을 받아 와야한다
jsonwebtoken (npm)
token 생성
jwt.sign(payload, secretOrPrivateKey, [options, callback])
첫번째인자 - payload
두번째인자 - 비밀키
세번째인자 - options (만료일 등)token 생성 사용법 예시
const jwt = require('jsonwebtoken');
const token = jwt.sign(토큰에_담을_값, ACCESS_SECRET, { 옵션1: 값, 옵션2: 값, ... });
const jwt = require('jsonwebtoken'); const accessToken = jwt.sign({ userId, password }, process.env.ACCESS_SECRET) // 결과 eyJhbGciOiJIUzI1NiIsInR5cCI6IkpXVCJ9.eyJ1c2VySWQiOiJraW1jb2RpbmciLCJwYXNzd29yZCI6IjEyMzQiLCJpYXQiOjE2Mzg2MDM1OTF9.Iuxkzz2gBqmwW-bADBVKPcGUZbn7ObqiaEqQCm4hjq4세번째 인자 expiresIn (만료일 지정)
expiresIn: expressed in seconds or a string describing a time span zeit/ms
expiresIn 사용법 예시
jwt.sign({
  data: 'foobar'
}, 'secret', { expiresIn: 60 * 60 });

//or even better:

jwt.sign({
  data: 'foobar'
}, 'secret', { expiresIn: '1h' });
token 검증
jwt.verify(token, secretOrPublicKey, [options, callback])
const jwt = require('jsonwebtoken');

const authorization = req.headers['authorization'];
// 왜 authorization.split을 사용하는지, 왜 1번째 인덱스의 값을 얻는지 console.log를
// 사용해 확인해보세요!
const token = authorization.split(' ')[1];
const data = jwt.verify(token, ACCESS_SECRET);
ex token이 만료일이 지났는지, 사용가능한 토큰인지 확인
const token = authorization.split(' ')[1];
const tokenVerify = jwt.verify(token, process.env.ACCESS_SECRET)

// tokenVerify 결과값
{
  id: 1,
  userId: 'kimcoding',
  email: 'kimcoding@codestates.com',
  createdAt: '2020-11-18T10:00:00.000Z',
  updatedAt: '2020-11-18T10:00:00.000Z',
  iat: 1638611076
}
cookie-parser (npm)
Example
var express = require('express')
var cookieParser = require('cookie-parser')

var app = express()
app.use(cookieParser())

app.get('/', function (req, res) {
  // Cookies that have not been signed
  console.log('Cookies: ', req.cookies)

  // Cookies that have been signed
  console.log('Signed Cookies: ', req.signedCookies)
})

app.listen(8080)

// curl command that sends an HTTP request with two cookies
// curl http://127.0.0.1:8080 --cookie "Cho=Kim;Greet=Hello"
Express (cookie)
res.cookie(name, value [, options])
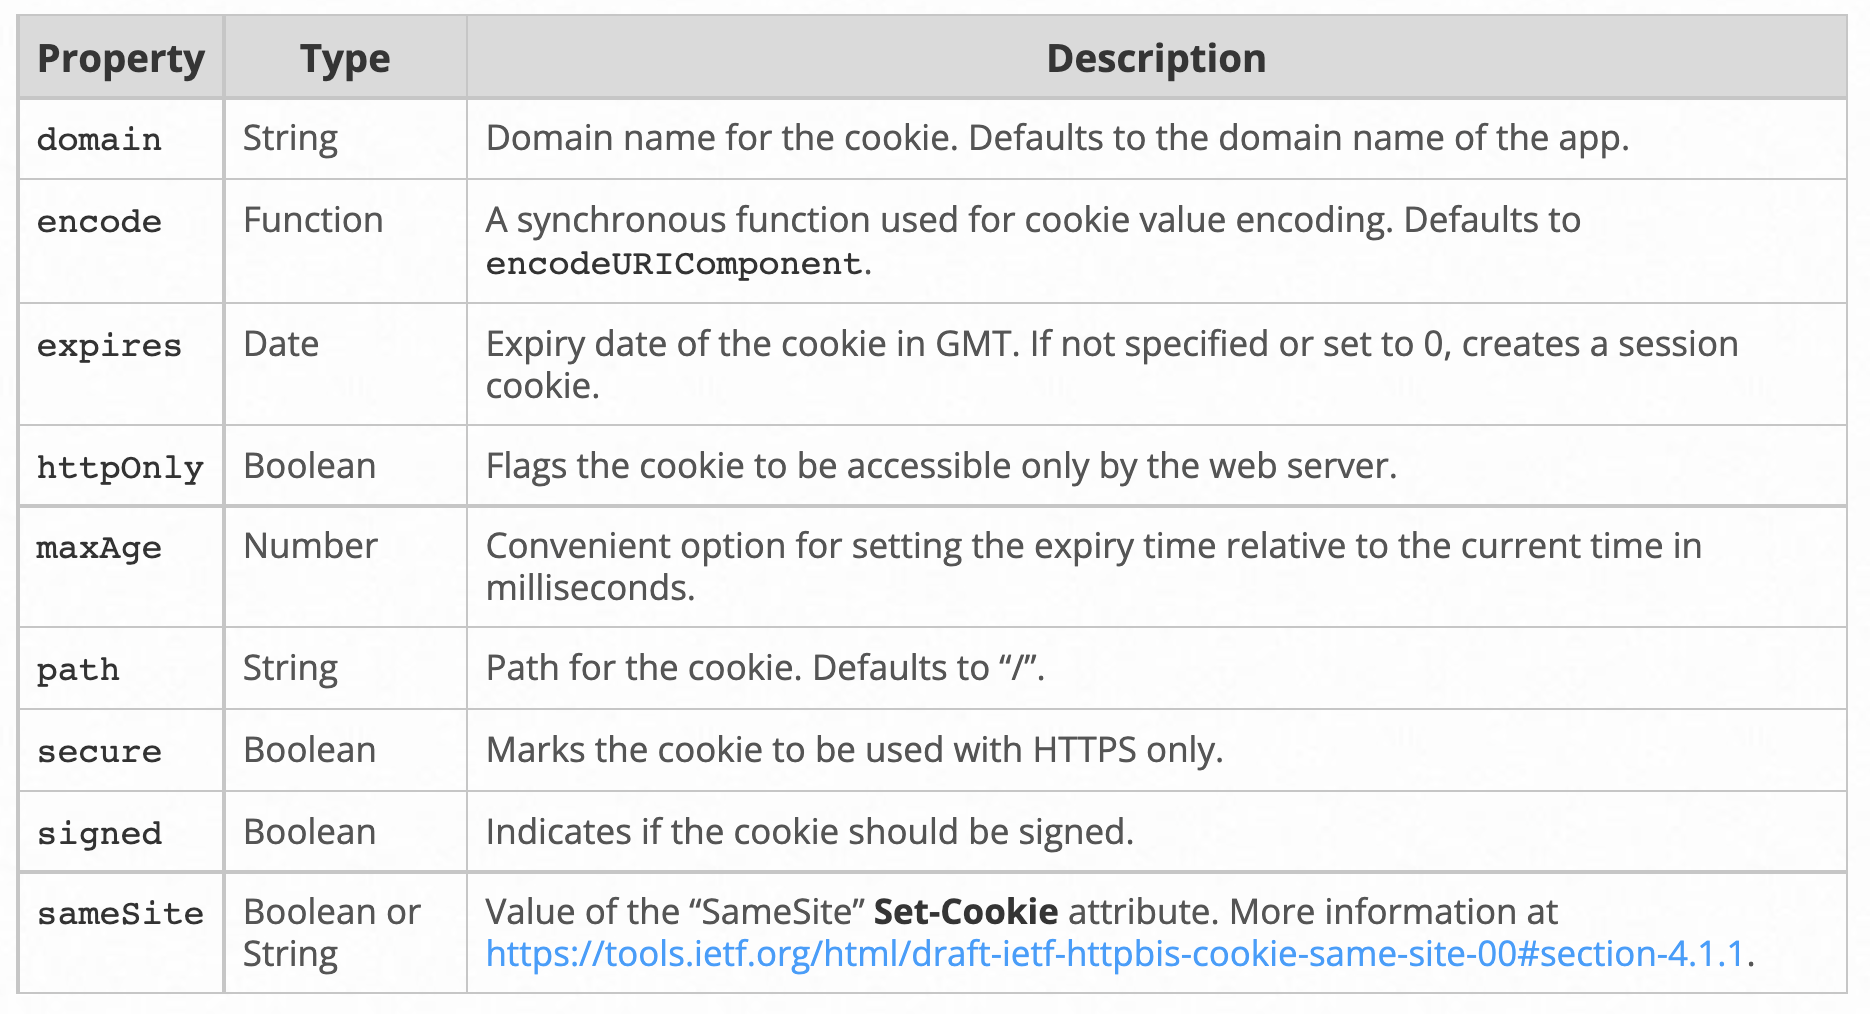
Sets cookie name to value. The value parameter may be a string or object converted to JSON.The options parameter is an object that can have the following properties.
login
로그인시 사용자 id, password가 맞으면,
accessToken, refreshToken 생성 후refresh token은 클라이언트의 쿠키에서 다루고 있기때문에
cookie에 refreshtoken을 담는다accessToken은 response에 담아서 전달 한다
accessTokenRquest
request에 받아온 토큰(authorization)이 있다면,
jwt.verify를 사용하여 Token이 유요한지 비교,
유요하다면, jwt.vertify에 담겨져 있는 고객 정보를 response에 담아서 전달 한다
refreshTokenRquest
쿠키속에 rerefreshToken이 있는지 확인,
있다면 refreshToken이 유효한지 확인
1. cookieInrefreshToken === 'invalidtoken'const refreshTokenVerify = jwt.verify(cookieInrefreshToken, process.env.REFRESH_SECRET)
- refreshTokenVerify 안에 고객정보가 들어 있는지확인
있다면,const accessToken = jwt.sign(payload, process.env.ACCESS_SECRET)다시 accessToken을 만들어서 response에 담아서 전달 한다


