Github Pages
- repository 생성
- remote로 repository에 추가
or push an existing repository from the command line
git remote add origin <레파지토리 이름>
Gitbub에 있는 원격의 주소를 나의 로컬에 있는 Git 파일과 연결 시켜준다
git add .또는git add *
모든 파일 추가
git commit -m<메세지>
git push origin <branch>
open ~/.gitconfig
user 정보 확인 가능
- github page의 settings
GitHub Pages목론에서 branch 설정 후 저장,
배포해서 얻게될 주소를 받을 수 있다
Step 1: Add homepage to package.json
Open your package.json and add a homepage field for your project:
"homepage": <"홈페이지 이름">,
Step 2: Install gh-pages and add deploy to scripts in package.json
Now, whenever you run npm run build, you will see a cheat sheet with instructions on how to deploy to GitHub Pages.
npm install --save gh-pages
yarn add gh-pages
Add the following scripts in your package.json:
"scripts": {
추가 -> + "predeploy": "npm run build",
추가 -> + "deploy": "gh-pages -d build",
"start": "react-scripts start",
"build": "react-scripts build",
yarn strt - 프로젝트 실행
yarn build - 사용자에게 배포할 수 있는 소스코드가 만들어 진다
만들어진 build를 github에 배포하게 된다
Step 3: Deploy the site by running npm run deploy
npm run deploy
Step 4: For a project page, ensure your project’s settings use gh-pages
Finally, make sure GitHub Pages option in your GitHub project settings is set to use the gh-pages branch:
 <이미지 출처 react 공식 홈페이지>
이 브렌치에는 내가 빌드한 것이 올라가 있기때문에 설정이 필요
master -> gh-pages 로 변경
주의사항
Notes on client-side routing
GitHub Pages doesn’t support routers that use the HTML5 pushState history API under the hood (for example, React Router using browserHistory). This is because when there is a fresh page load for a url like http://user.github.io/todomvc/todos/42, where /todos/42 is a frontend route, the GitHub Pages server returns 404 because it knows nothing of /todos/42. If you want to add a router to a project hosted on GitHub Pages, here are a couple of solutions:
- You could switch from using HTML5 history API to routing with hashes. If you use React Router, you can switch to hashHistory for this effect, but the URL will be longer and more verbose (for example, http://user.github.io/todomvc/#/todos/42?_k=yknaj). Read more about different history implementations in React Router.
- Alternatively, you can use a trick to teach GitHub Pages to handle 404s by redirecting to your index.html page with a custom redirect parameter. You would need to add a 404.html file with the redirection code to the build folder before deploying your project, and you’ll need to add code handling the redirect parameter to index.html. You can find a detailed explanation of this technique in this guide.
즉, 현재는 리엑트라우터에서 제공하는 브라우저 히스토리가 지원되지 않는다
히스토리 api를 hash로 바꾸거나,
에러페이지를 만들어서 수동적으로 redirection을 해줘야 한다
Netlify
netlify 글로벌로 설치
npm install netlify-cli -g
init과 deploy를 이용해서 설정하고 deploy 할 수 있다
netlify init
netlify deploy
netlify deploy 명령어 입력 후
가입창이 뜨면 가입 후 authorize (승인) 버튼 클릭

현재 디렉토리를 이미있는 사이트와 연결할 건지
새로운 것을 만들 건지 선택한다
Team, Site name, Publich derectory 설정
Team - project team 이름
Site name - 사이트 이름
Publich drectory - build 폴더 deploy
그 외 많이 사용되는 배포 Now, Heroku
임시 URL 완성
배포를 하고나면 확인 및 검증을 위한 임시 URL 이 완성 된다
임시 URL을 통하여 app을 확인 및 테스트를 하고 이상없으면 다시 공식 적으로 배포한다

draft URL에서 모든것이 잘 동작하면, site URL을 --prod flag를 이용해서 배포
--prod, production의 약자
netlify deploy --prod
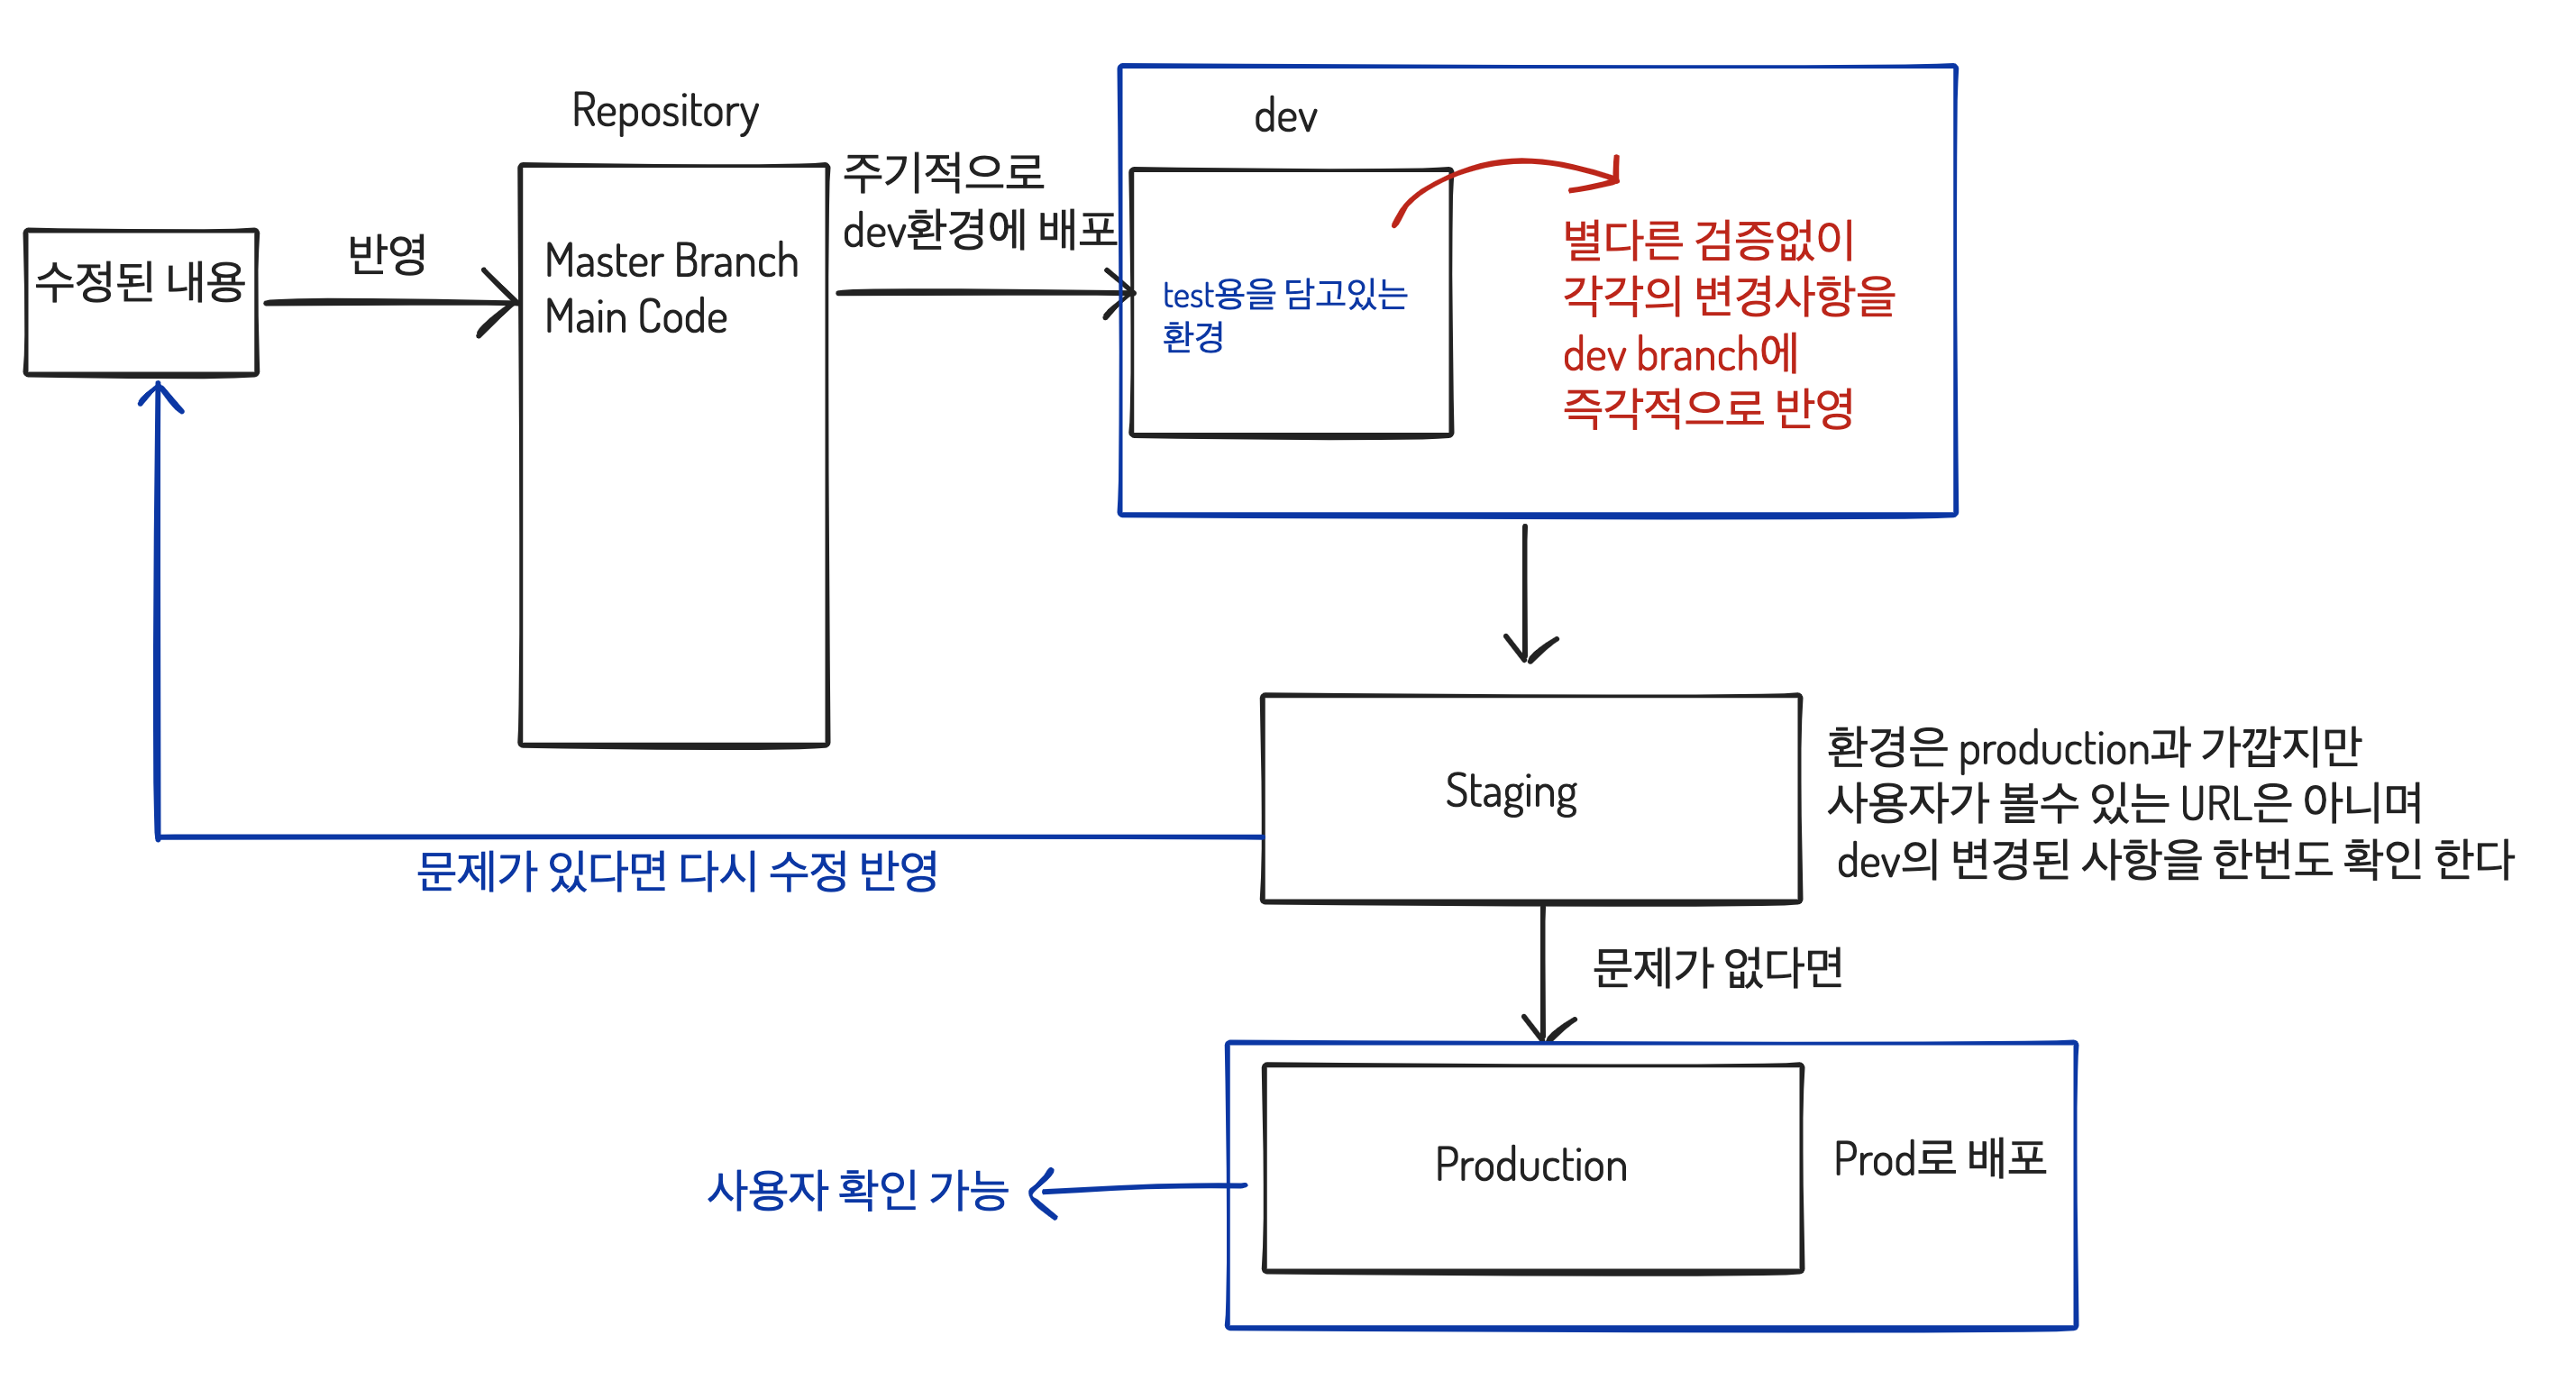
배포과정 흐름
소스버전 관리 툴이나 CI 어떤걸 이용하느냐에 따라서 다르지만 흐름은 정도를 정리해 본다