(나는) 좋은 구조를 위해 Clean Architecture를 적용해 계층을 나누고, Presentation 영역에서 관심사를 분리하기 위해 MVVM, Clean Swift 등의 아키텍처 디자인 패턴을 사용한다.
그런데 아직 ViewController 객체를 만들고 띄워주는 일은 ViewController에서 처리한다. 이곳 저곳에서 ViewController를 생성하고, 화면을 전환한다. 화면간 의존성 분리를 할 수 있는 방법은 없을까?
0. 기존 방법
Coordinator 패턴을 소개한 Soroush Khanlou의 블로그 예시를 살펴보자.
func tableView(_ tableView: UITableView, didSelectRowAt indexPath: IndexPath) {
    let object = self.dataSource[indexPath]
    let detailViewController = DetailViewController.init(object: object)
    self.navigationController?.pushViewController(detailViewController, animated: true)
}
이 코드는 tableView에서 한 아이템을 클릭했을 때, 새로운 화면을 띄워주게 하고 있다. ViewController에서 쉽게 볼 수 있는 이 코드를 한줄 한줄 해석해보자.
let object = self.dataSource[indexPath]첫번째 줄에서는 해당 ViewController의 local 변수인 dataSource에 indexPath로 접근해서 객체를 만든다. 여기까진 괜찮다.
let detailViewController = DetailViewController.init(object: object)두번째 줄에서는 해당 ViewController에서 DetailViewController 객체를 만든다. ViewController가 플로우상 다음에 어떤 ViewController가 만들어져야 하는지, 어떻게 구성해야하는지 "알고" 있다.
self.navigationController?.pushViewController(detailViewController, animated: true)Khanlou는 이 코드가 레일에서 완전히 벗어난다고 표현했다. ViewController는 이제 부모(self.navigationViewController)에게 어떤 일을 해야하는지 지시한다.
ViewController에서 일어나고 있던 이 문제를 Coordinator Pattern을 이용해 해결해보자.
1. Coordinator Pattern 개념
구글에 Coordinator Pattern을 검색하면 다양한 형태의 패턴을 찾을 수 있다. 여기서 내가 설명하고자하는 것은 raywenderlich에서 설명한 Coordinator Pattern이다.
Coordinator Pattern은 ViewController간의 flow 로직을 구성하기 위한 디자인 패턴이다.
아래 다이어그램은 Coordinator Pattern에 포함되는 컴포넌트를 나타낸다.

Router
Router는 실제로 ViewController를 present하고, dismiss 해주는 역할을 수행한다.
ViewController를 present하는 방법(navigation에 push한건지, modal로 띄운건지 등)은 알고 있지만, 다음에 어떤 ViewController가 present 될지는 알지 못한다.
public protocol Router: class {
    func present(_ viewController: UIViewController, animated: Bool)
    func present(_ viewController: UIViewController, animated: Bool, onDismissed: (() -> Void)?)
    func dismiss(animated: Bool)
}
위 코드는 Router protocol이고, Concrete Router는 다음과 같은 것들이 될 수 있다.
- NavigationController를 이용해 화면을 조작하고 싶다면 NavigationRouter를 만들어 사용
- 화면을 BottomSheet 형태로 띄우고 싶다면 BottomSheetRouter를 만들어 사용
Coordinator
Coordinator의 역할은 아래와 같다.
- ViewController 객체 생성
- ViewController가 present되는 순서(flow)를 결정
Coordinator는 자신의 하위에 속한 Coordinator를 children으로 가지고있고 router 하나를 가지고 있다.
그리고 present, dismiss, presentChild 함수를 가지고 있는데, 얘는 Router처럼 ViewController를 직접 보여주고 없애는 것이 아니라 router의 present와 dismiss를 호출해서 화면을 보여준다. (요거는 지금은 이해하기 힘들고, 코드를 보면서 알아보자 !)
public protocol Coordinator: class {

    var children: [Coordinator] { get set }
    var router: Router { get }

    func present(animated: Bool, onDismissed: (() -> Void)?)
    func dismiss(animated: Bool)
    func presentChild(_ child: Coordinator, animated: Bool, onDismissed: (() -> Void)?)
}
위 코드는 Coordinator protocol이고, Concrete Coordinator는 다음과 같은 것들이 될 수 있다.
- HomeViewController에서 다른 ViewController로 이동 시켜주는 HomeCoordinator
- 회원가입시 아이디와 비밀번호를 각각 다른 화면에서 입력할 때, 회원가입 내의 화면 전환을 처리해주는 SignUpCoordinator
2. 기본적인 코드
개념 부분에서 Router Protocol과 Coordinator Protocol 코드를 적어두긴 했지만, extension 까지 함께 봐보자.
Router
Router Protocol
public protocol Router: class {
    func present(_ viewController: UIViewController, animated: Bool)
    func present(_ viewController: UIViewController, animated: Bool, onDismissed: (() -> Void)?)
    func dismiss(animated: Bool)
}

extension Router {

    public func present(_ viewController: UIViewController, animated: Bool) {
        present(viewController, animated: animated, onDismissed: nil)
    }
}
Router protocol은 present, dismiss 함수를 가지고 있다.
Concrete Router
1) AppDelegateRouter
스토리보드로 첫 화면을 띄우지 말고, Coordinator 패턴을 적용해서 첫 화면을 띄워보자.
앱이 켜진 이후 화면을 그려줄 AppDelegateRouter가 필요하다.
아래 코드는 AppDelegate에서 코드로 초기 화면을 세팅해줄 때 많이 보았던 코드다.
public class AppDelegateRouter: Router {

    public let window: UIWindow	// (1)

    public init(window: UIWindow) {
        self.window = window
    }

    public func present(_ viewController: UIViewController,
                        animated: Bool,
                        onDismissed: (() -> Void)?) {
        window.rootViewController = viewController // (2)
        window.makeKeyAndVisible()
    }

    public func dismiss(animated: Bool) {

    }
}
(1) 화면은 UIWindow 안에서 그려져야하므로 UIWindow 객체 필요
(2) present 함수를 통해 전달된 ViewController를 window의 rootViewController로 지정
2) NavigationRouter
public class NavigationRouter: NSObject {

    private let navigationController: UINavigationController // (1)
    private let routerRootController: UIViewController? // (2)
    private var onDismissForViewController: [UIViewController: (() -> Void)] = [:]

    public init(navigationController: UINavigationController) {
        self.navigationController = navigationController
        self.routerRootController = navigationController.viewControllers.first

        super.init()

        navigationController.delegate = self
    }
}

extension NavigationRouter: Router {

    public func present(_ viewController: UIViewController, animated: Bool, onDismissed: (() -> Void)?) {  // (3)
        onDismissForViewController[viewController] = onDismissed
        navigationController.pushViewController(viewController, animated: animated)
    }

    public func dismiss(animated: Bool) {
        guard let routerRootController = routerRootController else {
            navigationController.popToRootViewController(animated: animated)
            return
        }

        performOnDismissed(for: routerRootController)
        navigationController.popToViewController(routerRootController, animated: animated)
    }

    private func performOnDismissed(for viewController: UIViewController) {
        guard let onDismiss = onDismissForViewController[viewController] else {
            return
        }

        onDismiss()
        onDismissForViewController[viewController] = nil
    }
}

extension NavigationRouter: UINavigationControllerDelegate {

    public func navigationController(_ navigationController: UINavigationController,
                                     didShow viewController: UIViewController, animated: Bool) { // (4)
        guard let dismissedViewController = navigationController.transitionCoordinator?.viewController(forKey: .from),
              !navigationController.viewControllers.contains(dismissedViewController) else {
            return
        }

        performOnDismissed(for: dismissedViewController)
    }
}
(1) NavigationRouter는 NavigationController 안에서의 화면 전환 처리를 위한 것이므로 NavigationController 객체 필요
(2) NavigationRouter dismiss시 Root ViewController로 돌아가야 하기 때문에 routerRootController 객체 필요
(3) present 함수를 통해 전달된 ViewController를 navigationController에 push
(4) NavigationController에 ViewController를 push하면 왼쪽 상단에 뒤로가기 버튼이 생기고, 해당 버튼을 클릭하면 화면이 dismiss된다.
해당 함수를 통해 뒤로가기 이벤트가 일어났을 때 performOnDismissed(for:) 함수를 호출해 dismiss 이벤트가 적절히 처리되도록 한다.
Coordinator
Coordinator Protocol
public protocol Coordinator: class {

    var children: [Coordinator] { get set }
    var router: Router { get }

    func present(animated: Bool, onDismissed: (() -> Void)?)
    func dismiss(animated: Bool)
    func presentChild(_ child: Coordinator, animated: Bool, onDismissed: (() -> Void)?)
}

extension Coordinator {

    public func dismiss(animated: Bool) {
        router.dismiss(animated: animated)
    }

    public func presentChild(_ child: Coordinator, animated: Bool, onDismissed: (() -> Void)? = nil) {
        children.append(child)
        child.present(animated: animated, onDismissed: { [ weak self, weak child] in
            guard let self = self,
                  let child = child else {
                return
            }
            self.removeChild(child)
            onDismissed?()
        })
    }

    private func removeChild(_ child: Coordinator) {
		children = children.filter { $0 !== child }
    }
}
Coordinator Protocol은 present, dismiss 함수와 presentChild 함수를 가지고 있다.
여기서 presentChild 함수는 본인(Coordinator)의 자식 Coordinator를 present 한다.
Concrete Coordinator
(아래 예제에서 다시 보겠지만) Home의 화면 전환을 담당하는 HomeCoordinator를 작성해보자.
public class HomeCoordinator: Coordinator, HomeViewControllerDelegate {

    public var children: [Coordinator] = []
    public let router: Router // (1)

    public init(router: Router) {
        self.router = router
    }

    public func present(animated: Bool, onDismissed: (() -> Void)?) {
        let viewController = HomeViewController(delegate: self) // (2)
        router.present(viewController, animated: animated, onDismissed: onDismissed) // (3)
    }

    // MARK: - HomeViewControllerDelegate (4)
    func homeViewControllerDidPressScheduleAppointment(_ viewController: HomeViewController) {

        let router = ModalNavigationRouter(parentViewController: viewController) // (5)
        let coordinator = PetAppointmentBuilderCoordinator(router: router) // (6)
        presentChild(coordinator, animated: true) // (7)
    }
}
(1) Home 화면이 들어갈 Router
- NavigationController 안에서 조작되면 NavigationRouter를 주입
- Modal 형태로 띄워진 NavigationController 안에서 조작되면 ModalNavigationRouter를 주입
(2) HomeCoordinator 객체를 present 하면 HomeViewController 객체를 생성한다.
- HomeViewController 객체를 만들 수 있는 곳은 여기 밖에 없다.
(3) router에 HomeViewController 객체를 전달하고 present 해준다.
(4) HomeViewController에서 특정 버튼을 클릭 했을 때 화면 전환을 위해 Delegate protocol을 만들어주고, HomeCoordinator에서 이를 구현한다.
(5) 버튼을 누르면 Modal 형태로 띄워지는 새로운 NavigationController에서 화면 전환을 처리 하기 때문에 ModalNavigationRouter 객체 생성
(6) PetAppointMent를 위한 ViewController 들의 화면 전환을 처리해주는 PetAppointMentBuilderCoordinator 객체 생성
- PetAppointMent를 위한 ViewController는 여러개가 있다. 각각 ViewController가 하나의 Coordinator를 가지지 않고, 하나의 연속되는 flow(그룹?)인 ViewController들이 하나의 Coordinator로 관리된다.
(7) Coordinator의 presentChild 함수에 coordinator 객체를 넘기면서 호출한다.
AppDelegate
위 코드들을 가지고 AppDelegate를 작성해보자.
class AppDelegate: UIResponder, UIApplicationDelegate {

    public lazy var coordinator = HomeCoordinator(router: router)
    public lazy var router = AppDelegateRouter(window: window!)
    public lazy var window: UIWindow? = UIWindow(frame: UIScreen.main.bounds)

    func application(_ application: UIApplication, didFinishLaunchingWithOptions launchOptions: [UIApplication.LaunchOptionsKey: Any]?) -> Bool {

        coordinator.present(animated: true, onDismissed: nil)

        return true
    }
}
3. 예제
동물 병원 예약 앱으로 Coordinator 패턴을 연습해보자. 먼저 Flow는 아래와 같다.
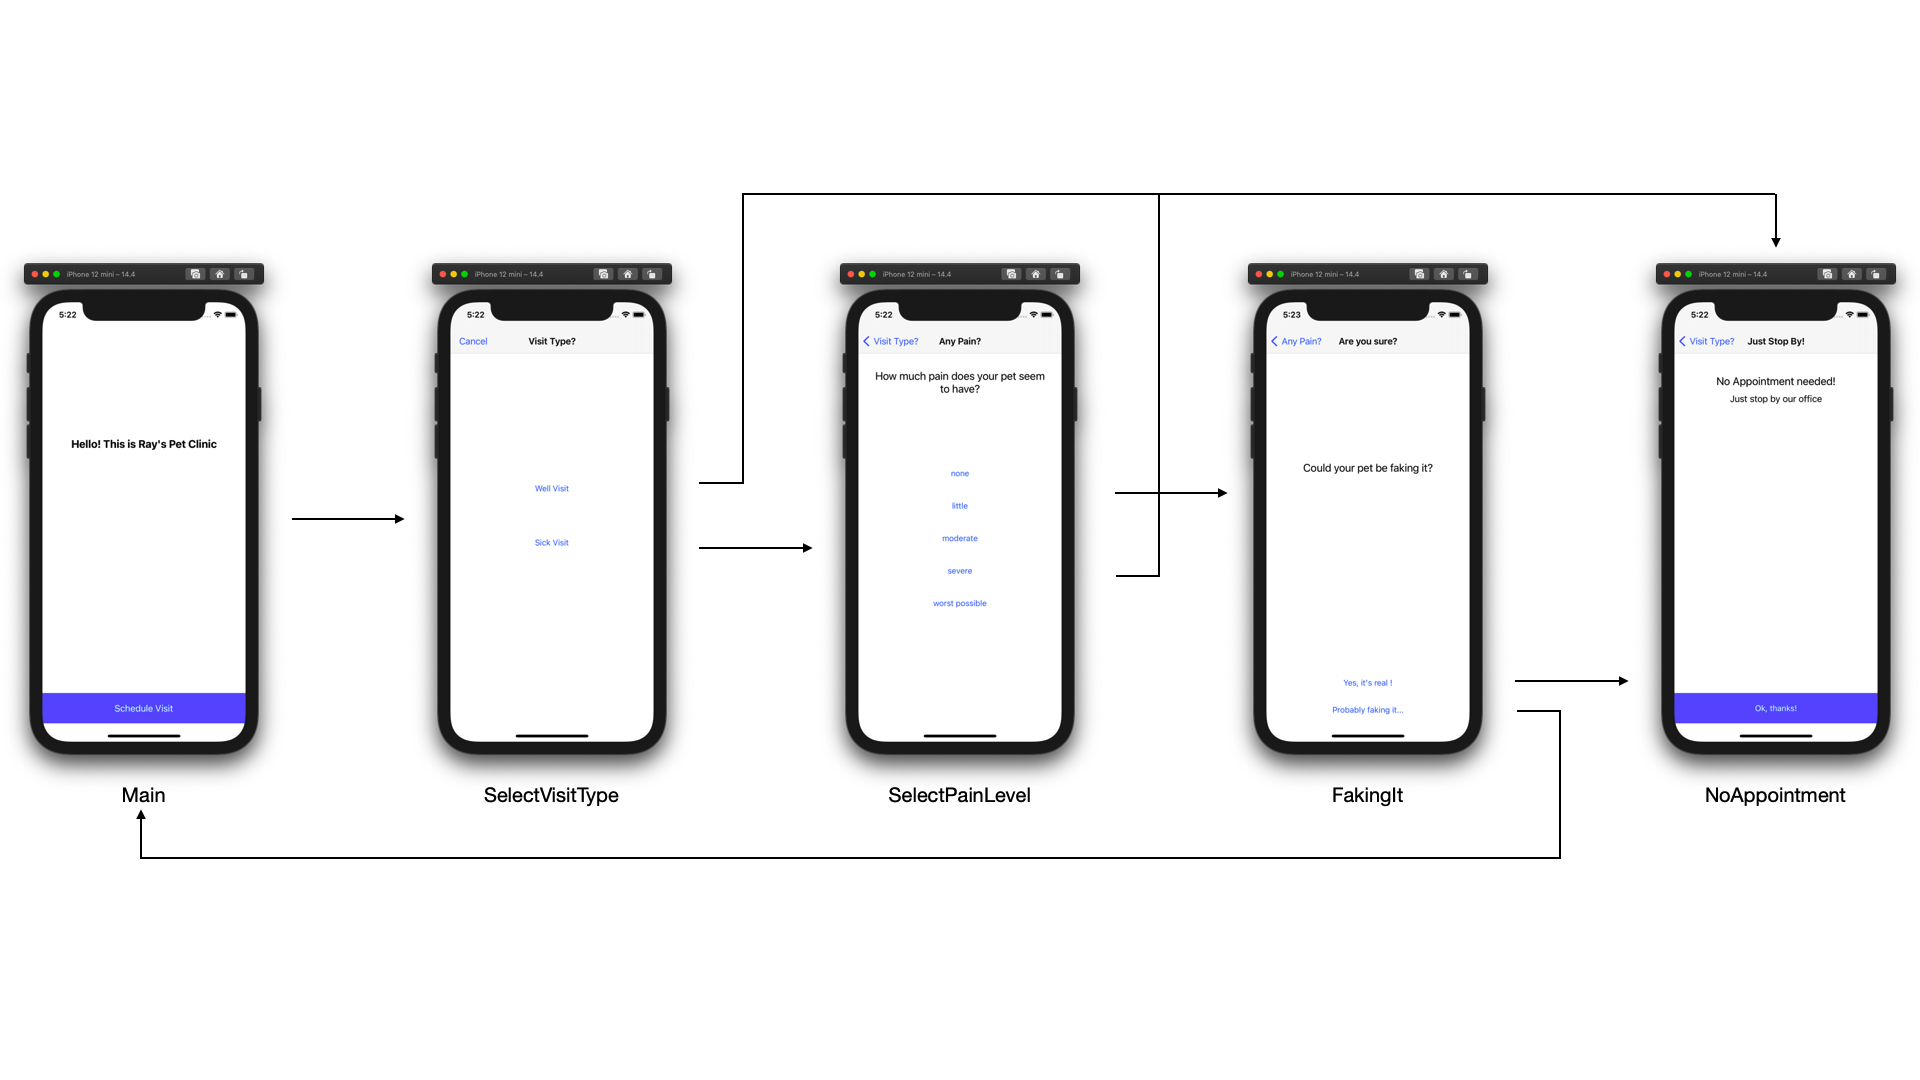
Scene은 Home과 PetAppointment(앗 오타)로 구성되어 있다.

SelectVisitType, SelectPainLevel, FakingIt, NoAppointment 화면은 PetAppointment 그룹으로 묶이고, 얘네들은 PetAppointmentBuilderCoordinator에서 처리된다. 코드는 아래와 같다.
public class PetAppointmentBuilderCoordinator: Coordinator, SelectVisitTypeControllerDelegate, SelectPainLevelViewControllerDelegate, FakingItViewControllerDelegate, NoAppointmentRequiredViewContorllerDelegate {

    public let builder = PetAppointmentBuilder()
    public var children: [Coordinator] = []
    public let router: Router

    public init(router: Router) {
        self.router = router
    }

    public func present(animated: Bool, onDismissed: (() -> Void)?) {
        let viewController = SelectVisitTypeViewController(delegate: self)
        router.present(viewController, animated: animated, onDismissed: onDismissed)
    }


    // MARK: - SelectVisitTypeControllerDelegate
    func selectVisitTypeViewController(_ controller: SelectVisitTypeViewController, didSelect visitType: VisitType) {

        builder.visitType = visitType

        switch visitType {
        case .well:
            presentNoAppointmentViewController()
        case .sick:
            presentSelecPainLevelCoordinator()
        }
    }

    // MARK: - SelectPainLevelViewControllerDelegate
    func selectPainLevelViewController(_ controller: SelectPainLevelViewController, didSelect painLevel: PainLevel) {

        builder.painLevel = painLevel

        switch painLevel {
        case .none, .little :
            presentFakingitViewController()
        case .moderate, .severe, .worstPossible:
            presentNoAppointmentViewController()
        }
    }


    // MARK: - FakingItViewControllerDelegate
    func fakingItViewControllerPressedIsFake(_ controller: FakingItViewController) {
        router.dismiss(animated: true)
    }

    func fakingItViewControllerPressedNotFake(_ controller: FakingItViewController) {
        presentNoAppointmentViewController()
    }


    // MARK: - NoAppointmentRequiredViewContorllerDelegate
    func noAppointMentViewControllerDidPressOkay(_ controller: NoAppointmentRequiredViewController) {
        router.dismiss(animated: true)
    }


    // MARK: - Present ViewController
    private func presentNoAppointmentViewController() {
        let viewController = NoAppointmentRequiredViewController(delegate: self)
        router.present(viewController, animated: true)
    }

    private func presentSelecPainLevelCoordinator() {
        let viewController = SelectPainLevelViewController(delegate: self)
        router.present(viewController, animated: true)
    }

    private func presentFakingitViewController() {
        let viewController = FakingItViewController(delegate: self)
        router.present(viewController, animated: true)
    }
}
이 그룹안에서 예약을 잡아야 하기 때문에 PetAppointmentBuilder를 Coordinator가 가지고 있고, ViewController에서 어떤 버튼을 누르면 builder에 값을 넣고 화면을 전환해야하기 때문에 Coordinator가 각 ViewController의 Delegate를 구현하고 있다.
실제로 ViewController 객체를 생성하고 router에 present로 넘기는 코드는 private 함수로 작성되어 필요한 곳에서 호출된다.
위 2. 기본적인 코드에서 설명한 내용을 조금만 응용하면 금방 예제 앱을 만들 수 있다.
Github에 소스코드 전체를 올려놨으니, 참고하면 될 것 같다.
참고