
오전문제 - 게시판 만들기
- 수정할때 제목을 수정할 건지, 내용을 수정할 것인지의 기능 추가
import java.sql.Connection;
import java.sql.DriverManager;
import java.sql.PreparedStatement;
import java.sql.ResultSet;
import java.sql.SQLException;
import java.sql.Statement;
import java.util.Scanner;

public class Project1 {
    public static void main(String[] args) {

        String name = null, title = null, contents = null, wTime = null, tableName = null;
        int no = 0, rCnt = 0, choice = 0, result = 0, updateChoice = 0;
        String url = "jdbc:mysql://localhost:3306/jdbctest?serverTimezone=UTC";
        String id = "root", pw = "1234";
        Scanner sc = new Scanner(System.in);

        try {
            Class.forName("com.mysql.cj.jdbc.Driver");
        } catch (ClassNotFoundException e) {
            e.printStackTrace();
        }
        try (Connection conn = DriverManager.getConnection(url, id, pw);
                Statement stmt = (Statement) conn.createStatement();
                PreparedStatement pstmtIns = conn
                        .prepareStatement("insert into board(name, title, contents) values(?, ?, ?)");
                PreparedStatement pstmtUpcon = conn.prepareStatement("update board set contents = ? where no = ?");
                PreparedStatement pstmtUptitl = conn.prepareStatement("update board set titl = ? where no = ?")) {

            while (true) {
                System.out.println("메뉴를 선택하세요.");
                System.out.println("1. 쓰기");
                System.out.println("2. 조회");
                System.out.println("3. 수정");
                System.out.println("4. 삭제");
                System.out.println("5. 테이블 생성");
                System.out.println("6. 테이블 삭제");
                System.out.println("7. 테이블 목록 불러오기");
                System.out.println("8. 종료");
                System.out.print("선택: ");
                choice = sc.nextInt();
                sc.nextLine();

                switch (choice) {

                case 1:
                    System.out.println("이름을 입력하세요.");
                    name = sc.nextLine();
                    System.out.println("쓰실 글의 제목을 입력하세요.");
                    title = sc.nextLine();
                    System.out.println("글의 내용을 입력하세요.");
                    contents = sc.nextLine();

                    pstmtIns.setString(1, name);
                    pstmtIns.setString(2, title);
                    pstmtIns.setString(3, contents);

                    result = pstmtIns.executeUpdate();
                    if (result > 0)
                        System.out.println(result + "건의 데이터 삽인 성공");
                    break;

                case 2:
                    try (ResultSet rs = stmt.executeQuery("select * from board order by no desc")) {
                        while (rs.next()) {
                            no = rs.getInt("no");
                            name = rs.getString("name");
                            title = rs.getString("title");
                            contents = rs.getString("contents");
                            wTime = rs.getString("wTime");
                            rCnt = rs.getInt("rCnt");

                            System.out.println("번호 : " + no);
                            System.out.println("이름 : " + name);
                            System.out.println("제목 : " + title);
                            System.out.println("내용 : " + contents);
                            System.out.println("시간 : " + wTime);
                            System.out.println("조회수 : " + rCnt);
                        }
                    } catch (SQLException e) {
                        e.printStackTrace();
                    }
                    break;

                case 3:
                    System.out.println("수정할 글의 번호를 입력하세요.");
                    no = sc.nextInt();
                    sc.nextLine();
                    System.out.println("제목을 변경하시고 싶다면 1번 , 글의 내용을 변경하시고 싶다면 2번을 입력하세요.");
                    updateChoice = sc.nextInt();
                    sc.nextLine();
                    if (updateChoice == 1) {
                        System.out.println("변경할 제목을 입력하세요.");
                        title = sc.nextLine();
                        pstmtUptitl.setString(1, title);
                        pstmtUptitl.setInt(2, no);

                        result = pstmtUptitl.executeUpdate();
                        if (result > 0)
                            System.out.println("제목 수정 완료.");
                        break;
                    } else {
                        System.out.println("변경할 내용을 입력하세요.");
                        contents = sc.nextLine();
                        pstmtUpcon.setString(1, contents);
                        pstmtUpcon.setInt(2, no);

                        result = pstmtUpcon.executeUpdate();
                        if (result > 0)
                            System.out.println("내용 수정 완료.");
                        break;
                    }

                case 4:
                    System.out.println("삭제할 글의 번호를 입력하세요.");
                    no = sc.nextInt();
                    sc.nextLine();

                    result = stmt.executeUpdate("delete from board where no = " + no);
                    if (result > 0)
                        System.out.println("삭제 성공");
                    break;

                case 5:
                    System.out.println("생성할 테이블의 이름을 입력하세요.");
                    tableName = sc.nextLine();
                    try {
                        stmt.executeUpdate("create table " + tableName + "(no int)");
                        System.out.println(tableName + "테이블 생성 성공");
                    } catch (SQLException e) {
                        System.out.println("테이블 생성 실패");
                        e.printStackTrace();
                    }
                    break;

                case 6:
                    System.out.println("삭제하시려는 테이블 명을 입력해주세요.");
                    tableName = sc.nextLine();
                    try {
                        stmt.executeUpdate("drop table " + tableName);
                        System.out.println("테이블 삭제 성공");
                    } catch (SQLException e) {
                        System.out.println("테이블 삭제 실패");
                        System.out.println("올바른 이름으로 다시 입력하세요.");
                    }
                    break;

                case 7:
                    System.out.println("JDBC DB의 테이블들을 불러오겠습니다.");
                    try (ResultSet rs = stmt.executeQuery(
                            "select table_name from information_schema.tables where table_schema = 'jdbctest'")) {
                        while (rs.next()) {
                            tableName = rs.getString("table_name");
                            System.out.println(tableName);
                        }
                    } catch (SQLException e) {
                        e.printStackTrace();
                    }
                    break;

                case 8:
                    System.out.println("프로그램을 종료합니다.");
                    if (sc != null)
                        sc.close();
                    return;
                }
            }
        } catch (SQLException e) {
            e.printStackTrace();
        } catch (Exception e) {
            e.printStackTrace();
        }
    }
}
HTML 글자 형태 문제
- 글자 크기
<!DOCTYPE html>
<html>
<head>
    <title>html 제목</title>
</head>
<body>
    <h1>제목 1</h1>
    <h2>제목 2</h2>
    <h3>제목 3</h3>
    <h4>제목 4</h4>
    <h5>제목 5</h5>
    <h6>제목 6</h6>
</body>
</html>- 개행 / 단락 / 선
<!DOCTYPE html>
<html>
<head>
    <title>HTML TEXT Basic Page</title>
</head>
<body>
    <h1>Lorem ipsum</h1>
    <h2>dolor sit amet</h2>
    <hr />
    <p>Lorem ipsum dolor sit amet, consectetur adipiscing elit.</p>
    <br />
    <p>In porttitor lorem at justo feugiat aliquet.</p>
    <br />
    <p>Nunc id massa at magna semper hendrerit.</p>
    <br />
    <p>Vivamus rhoncus eros vel ante suscipit non facilisis risus rutrum.</p>
</body>
</html>- 앵커 태그 - 하이퍼링크
<!DOCTYPE html>
<html>
<head>
    <title>HTML TEXT Basic Page</title>
</head>
<body>
<a href = "https://www.naver.com/?mobile">네이버</a><br />
<a href = "https://www.daum.net/">다음</a><br />
</body>
</html>
- 하이퍼 링크 및 선 생성
- hr : 수평선을 생성한다.
<!DOCTYPE html>
<html>
<head>
    <title>HTML5 Basic</title>
</head>
<body>
<a href = "#alpha">Move to Alpha</a>
<a href = "#beta">Move to Beta</a>
<a href = "#gamma">Move to Gamma</a>
<hr />
<h1 id = "alpha">Alpha</h1>
<p> Lorem ipsum dolor sit amet, consectetur adipiscing elit.</p>
<h1 id = "beta">Beta</h1>
<p>Duis nec risus a ante pellentesque rhoncus at et leo.</p>
<h1 id = "gamma">Gamma</h1>
<p>Nullam porta, felis sit amet porttitor vestibulum.</p>
</body>
</html>-
글자 형태
-
b : 굵게
-
i : 이탤릭체
-
small : 작게
-
sub : 아래에 약간 달라 붙는 글자
-
sup : 위에 달라 붙는 글자
-
ins : 밑줄 글자
-
del : 가운데 줄이 그어진 글자
-
<!DOCTYPE html>
<html>
<head>
    <title>HTML TEXT Page</title>
</head>
<body>
<h1><b>Lorem ipsum dolor sit amet</b> 굵게</h1>
<h1><i>Lorem ipsum dolor sit amet</i> 이탤릭</h1>
<h1><small>Lorem ipsum dolor sit amet</small> 작게 </h1>
<h1><sub>Lorem ipsum dolor sit amet</sub> 아래에 달라 붙는 글자</h1>
<h1><sup>Lorem ipsum dolor sit amet</sup>위에 달라 붙는 글자</h1>
<h1><ins>Lorem ipsum dolor sit amet</ins> 밑줄 글자</h1>
<h1><del>Lorem ipsum dolor sit amet</del> 가운데 줄이 그어진 글자</h1>
<hr />
<b>Lorem ipsum dolor sit amet</b><br/>
<i>Lorem ipsum dolor sit amet</i><br/>
<small>Lorem ipsum dolor sit amet</small><br/>
<sub>Lorem ipsum dolor sit amet</sub><br/>
<sup>Lorem ipsum dolor sit amet</sup><br/>
<ins>Lorem ipsum dolor sit amet</ins><br/>
<del>Lorem ipsum dolor sit amet</del><br/>
</body>
</html>-
숫자로 정렬, 점으로 정렬
-
ul : 순서가 없는 목록을 나타낸다.
-
li : 목록에서 각 항목을 나타낸다. >> 이는 ul 또는 ol안에 포함되어야 한다.
-
ol : 순서가 있는 목록을 나타낸다. >> li항목으로 이를 나타낸다.
-
<!DOCTYPE html>
<html>
<head>
    <title>HTML TEXT Basic Page</title>
</head>
<body>
    <ul>
        <li>HTML5
            <ol>
                <li>Mulimedia Tag</li>
                <li>Connectivity</li>
                <li>Device Access</li>
            <ol>
        </li>
    </ul>
    <ul>
        <li>CSS3
            <ul>
                <li>Animation</li>
                <li>3D Transform</li>
            </ul>
        </li>
    </ul>
</body>
</html>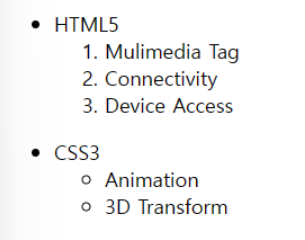
표 형태
-
표로 만들어서 색깔 넣기
-
tr : Tablel Row로 테이블의 한 행을 나타내는 요소이다. 행 안에는 하나 이상의 \ 또는 요소가 포함되어야 한다.
-
th : Table Header Cell로 테이블의 헤더 셀을 나타내는 요소이다. 일반적으로 테이블의 열 또는 행의 머리글을 나타내는데 사용된다.
-
td : Table Data Cell로 테이블의 각 행에서 특정 데이터 값을 나타낸다.
이러한 데이터 셀은 tr 요소 내에 위치하며, 테이블의 각 행에서 여러 개의 td 요소가 포함될 수 있다.
-
tfoot : Table footer테이블의 바닥글을 나타내는 요소다. >> 테이블의 하단 부분에 위치해 요약 정보나 설명을 포함할 수 있다.
-
colgroup : Column Group 열의 그룹을 정의하는 요소이다. 여러 열의 스타일을 동시에 적용하거나 열을 그룹화하는데 사용한다.
- colgroup요소의 span속성은 한 번에 여러 개의 열(col 태그를 정의하는데 사용된다.
-
caption : 테이블의 제목을 나타내는 요소이다. >> 테이블의 상단에 위치하며 테이블의 내용에 대한 간단한 설명을 제공한다.
-
<!DOCTYPE html>
<html lang="ko">
<head>
    <title>HTML5 Basic</title>
</head>
<body>
  <table border="1">
      <caption>Caption</caption>
      <colgroup>
        /*colgroup안에 span속성은 col을 정의하는데 사용해, 1번째와 2번째 열에 각각 <col>요소가 적용되도록 설정한다. 이렇게 함으로써 1, 2번째 열이 동일한 스타일을 가지게 된다.*/
          <col span="2" style="background: red" />
          <col style="background: blue" />
      </colgroup>
      <thead style="background: green" >
          <tr>
              <th>Table Header</th>
              <th>Table Header</th>
              <th>Table Header</th>
          </tr>
      </thead>
      <tbody>
          <tr>
              <td>Table Data</td>
              <td>Table Data</td>
              <td>Table Data</td>
          </tr>
          <tr>
              <td>Table Data</td>
              <td>Table Data</td>
              <td>Table Data</td>
          </tr>
          <tr>
              <td>Table Data</td>
              <td>Table Data</td>
              <td>Table Data</td>
          </tr>
      </tbody>
      <tfoot style="background: yellow" >
          <tr>
              <td>Table Data</td>
              <td>Table Data</td>
              <td>Table Data</td>
          </tr>
      </tfoot>
  </table>
</body>
</html>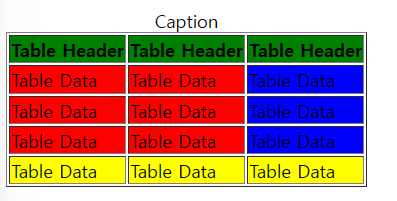
- 표로 만들기
<!DOCTYPE html>
<html lang="ko">
<head>
    <title>HTML5 Basic</title>
</head>
<body>
    <table border="1" >
        <tr>
            <th colspan="3">Table Data</th>
            <th rowspan="3">Table Data</th>
        </tr>
        <tr>
            <td>Table Data</td>
            <td rowspan="2">Table Data</td>
            <td>Table Data</td>
        </tr>
        <tr>
            <td>Table Data</td>
            <td>Table Data</td>
        </tr>
    </table>
</body>
</html>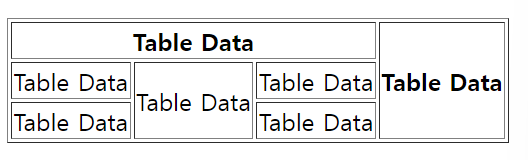
이미지 삽입
- 이미지 삽입
<!DOCTYPE html>
<html lang="ko">
<head>
    <title>HTML5 Basic</title>
</head>
<body>
   <img src ="funny.jpg" alt="밥" width="300" />
   <img src="Nothing" alt = "그림이 존재하지 않습니다." width="300"/>
</body>
</html>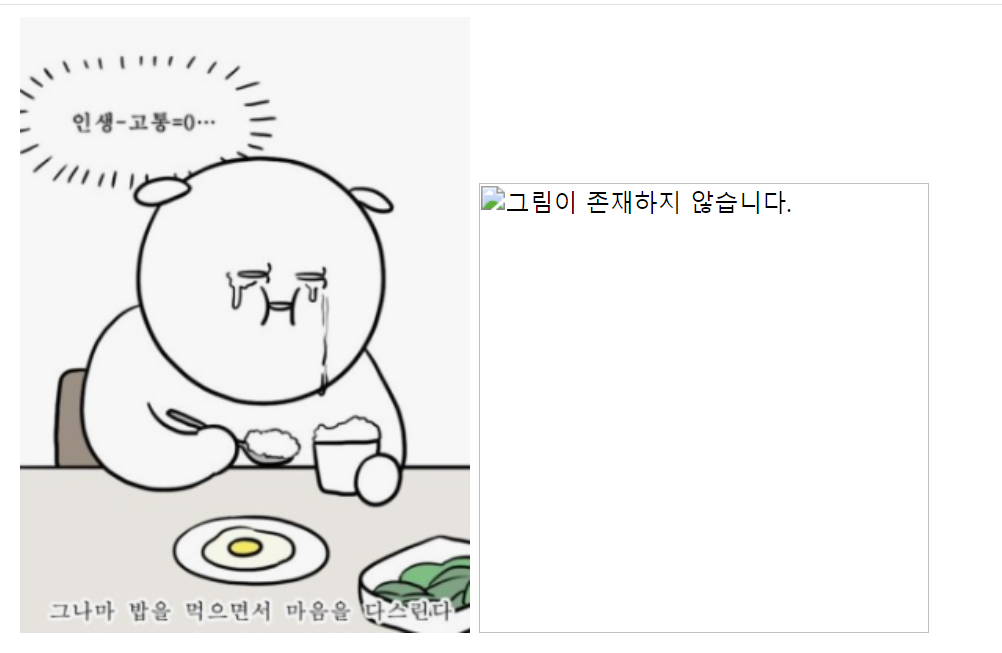
visual code 툴 설치
-
class 파일 안에 저장 - class-code-html안에 파일로 자동 저장 될것
korean을 치고 첫번째거 설치 - live server 검색해서 첫번째거 설치
-
ctrl + , : 설정 - emmet - emmet Vaiables - 값을 en에서 ko 로 변경
-
ctrl + s : 저장 >>저장부터 하고 시작
-
ctrl + n : 새로운 파일
-
! + tab : 자동완성
-
ctrl + +/- : 글자 크기 조절
-
글자를 쓰고 tab키하면 해당 단락의 더미 텍스트를 가져옴
-
lorem5 + tab : 5단어의 더미텍스트 가져옴 >> lorem3 + tab : 3단어 (그냥 숫자)
-
lorem*3 : 3단락의 더미텍스트 가져옴 (* 숫자-곱하기 숫자)
-
alt+L >> alt + O : 해당 코드를 싸이트로 보여줌
HTML 문제 2 - 오디오, 비디오등 / 폼 양식
- 오디오 태그 - 현재 넣어놓은 오디오 파일이 없어서 0:00이지만, html파일 안에 같이 넣어놓으면 다를것
<!DOCTYPE html>
<html lang="ko">
<head>
    <title>HTML5 Basic</title>
</head>
<body>
   <audio src=""Kalimba.mp3" controls="controls"></audio>
</body>
</html>

- 비디오 태그
<!DOCTYPE html>
<html lang="ko">
<head>
    <title>HTML5 Basic</title>
</head>
<body>
   <video controls="controls">
    <source src="exVideo.MP4" type="video/MP4"/>
    <source src="exVideo.MP4" type="video/webm"/>
   </video>
</body>
</html>
영상 사이즈 조절도 가능
<!DOCTYPE html>
<html lang="ko">
<head>
    <title>HTML5 Basic</title>
</head>
<body>
    <video poster="http://placehold.it/640x360" width="640" height="360" controls="controls">
    <source src="exVideo.MP4" type="video/MP4"/>
    <source src="exVideo.MP4" type="video/webm"/>
   </video>
</body>
</html>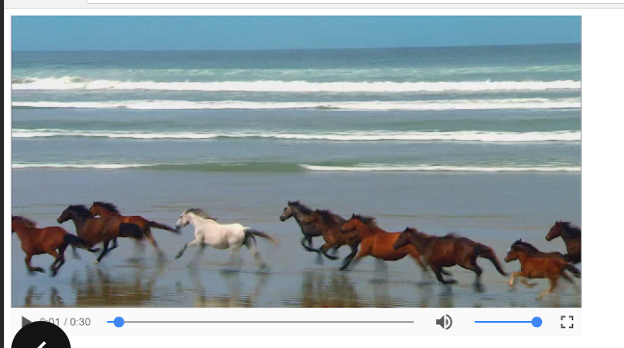
- 칸을 만들고, 파일 선택 / 제출 버튼 만들기
<!DOCTYPE html>
<html>
<head>
    <title>HTML5 Basic</title>
</head>
<body>
    <form>
        <input type="text" name="search" />
    </form>
    <form>
        <input type="password" name="pw" />
    </form>
    <form>
        <input type="file" name ="file"/>
    </form>
    <form>
        <input type="submit" />
    </form>
</body>
</html>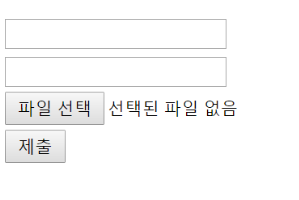
- form을 생성하고 그 안에는 해당 한 줄을 의미, 첫번째 form안에 submit을 넣으면 입력하는 공간 바로 옆에 제출이 붙는다.
3-3. 라디오 박스와 체크박스를 이용한 예시를 들어보자
-
label요소는 라디오 버튼 옆에 텍스트를 표시하며,for속성은 해당 라디오 버튼의 id 와 연결된다. >> 사용자가라벨을 클릭하면 해당 라디오 버튼을 선택할 수 있게끔 할 수 있다.
-
id, name, value속성은 각각 해당 라디오 버튼의 고유 식별자, 그룹화를 위한 이름, 해당 라디오 버튼의 값을 나타낸다.
<!DOCTYPE html>
<html>
<head>
<title>HTML5 Basic</title>
</head>
<body>
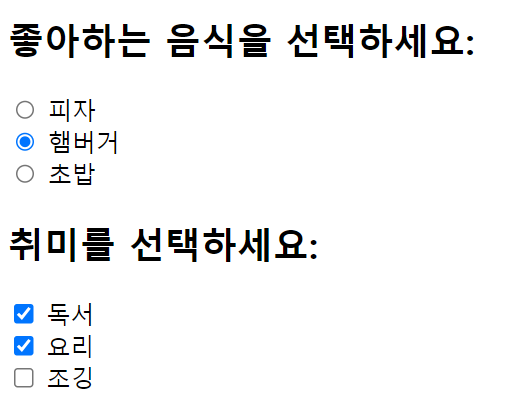
<h2>좋아하는 음식을 선택하세요:</h2>
<input type="radio" id="pizza" name="food" value="pizza">
<label for="pizza">피자</label><br>
<input type="radio" id="burger" name="food" value="burger">
<label for="burger">햄버거</label><br>
<input type="radio" id="sushi" name="food" value="sushi">
<label for="sushi">초밥</label><br>
<h2>취미를 선택하세요:</h2>
<input type="checkbox" id="reading" name="hobby" value="reading">
<label for="reading">독서</label><br>
<input type="checkbox" id="cooking" name="hobby" value="cooking">
<label for="cooking">요리</label><br>
<input type="checkbox" id="running" name="hobby" value="running">
<label for="running">조깅</label><br>
</body>
</html>type속성 다음에name, 그리고value순서로 속성을 작성하는 것을 선호
- input태그가 아닌 여러 문장을 입력할 때 넣는 태그
<!DOCTYPE html>
<html>
<head>
    <title>HTML5 Basic</title>
</head>
<body>
    <form>
       <textarea></textarea>
    </form>
</body>
</html>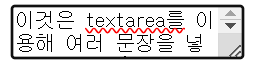
- select 태그 - 여러가지 목록에서 여러가지 옵션을 선택할 수 있는 목록을 만들어보자
1개만 선택
<!DOCTYPE html>
<html>
<head>
    <title>HTML5 Basic</title>
</head>
<body>
    <select>
        <option>김밥</option>
        <option>떡볶이</option>
        <option>순대</option>
        <option>오뎅</option>

    </select>
</body>
</html>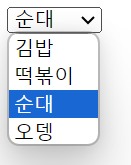
1개 이상 선택 - muliple 속성 이용 : 근데 왜 난 안되징
<!DOCTYPE html>
<html>
<head>
    <title>HTML5 Basic</title>
</head>
<body>
    <select multiple="multiple">
        <option>김밥</option>
        <option>떡볶이</option>
        <option>순대</option>
        <option>오뎅</option>

    </select>
</body>
</html>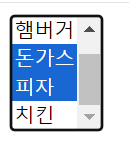
- 선택 옵션을 묶어서 보여주고 싶을때
<!DOCTYPE html>
<html>
<head>
    <title>HTML5 Basic</title>
</head>
<body>
    <select>
    <optgroup label="HTML5">
        <option>Multimedia Tag</option>
        <option>Connectivity</option>
        <option>Device Access</option>
    </optgroup>
    <optgroup label="CSS3">
        <option>Animation</option>
        <option>3D Transform</option>
    </optgroup>
</select>
</body>
</html>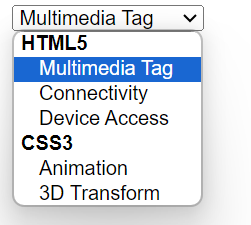
- 입력하는 부분을 표로 묶어서 이름과 이메일을 제출할 수 있는 폼을 작성하자.
<!DOCTYPE html>
<html>
<head>
    <title>HTML5 Basic</title>
</head>
<body>
    <fieldset>
        <legend>입력 양식</legend>
        <table>
            <tr>
                <td><label for="name">이름 </label></td>
                <td><input id="name" type="text"/></td>
            </tr>
            <tr>
                <td><label for="mail">이메일</label></td>
                <td><input id="mail" type="email"/></td>
            </tr>
        </table>
        <input type="submit">
    </fieldset>
</body>
</html>
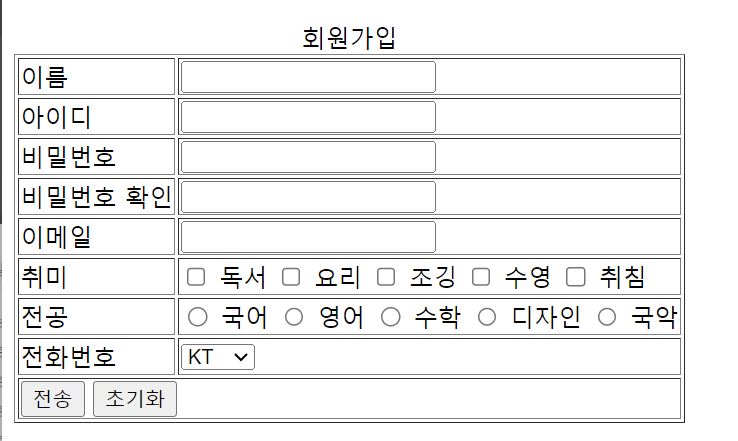
HTML 문제 3
- 아래 사진같이 만들어보자
<!DOCTYPE html>
<html>
<head>
    <title>회원가입</title>
</head>
<body>
    <form method="post" action="JSPTTest5Result.jsp">
        <table border="1">
            <caption>회원가입</caption>
            <tr>
                <td><label for="name">이름 </label></td> <!--Required를 속성으로 주면 반드시 속성을 입력해야한다. -->
                <td> <input type="text" name="name" id="name" required></td>
            </tr>                               <!--(중복x) 아이디를 줘서 이름을 누르면 for속성 레이 해당 칸으로 자동으로 입력이 옮겨간-->
            <tr>
                <td><label for="id">아이디 </label></td>
                <td> <input type="text" name="id" id="id" required></td>
            </tr>
            <tr>
                <td><label for="pw">비밀번호 </label></td>
                <td> <input type="password" name="pw" id="pw" required></td>
            </tr>
            <tr>
                <td><label for="pw2">비밀번호 확인 </label></td>
                <td> <input type="password" name="pw2" id="pw2" required></td>
            </tr>
            <tr>
                <td><label for="email">이메일 </label></td>
                <td> <input type="email" name="email" id="email" required></td>
            </tr>
            <tr>
                <td>취미</td>
                <td> <!--hobby라는 이름으로 가져오게되면 체크한 값이 배열로 넘어간다.-->
                    <input type="checkbox" name="hobby" value="reading" id="reading"><label for="reading">독서</label>
                    <input type="checkbox" name="hobby" value="cooking" id="cooking"><label for="cooking">요리</label>
                    <input type="checkbox" name="hobby" value="running" id="running"><label for="running">조깅</label>
                    <input type="checkbox" name="hobby" value="swimming" id="swimming"><label for="swimming">수영</label>
                    <input type="checkbox" name="hobby" value="sleeping" id="sleeping"><label for="sleeping">취침</label>
                </td> <!--레이블을 줬기 떄문에 체크박스가 아닌 이름을 클릭해도 포커스가 자동으로 넘어가서 선택된다. -->
            </tr>
            <tr>
                <td>전공 </td>
                <td>
                    <input type="radio" name="major" value="Korean" id="Korean" required><label for="Korean">국어</label>
                    <input type="radio" name="major" value="English" id="English"><label for="English">영어</label>
                    <input type="radio" name="major" value="Math" id="Math"><label for="Math">수학</label>
                    <input type="radio" name="major" value="Design" id="Design"><label for="Design">디자인</label>
                </td>
            </tr>
            <tr>
                <td><label for="mobileCarrier">전화번호</label> </td>
                <td>
                    <select name="mobileCarrier" id="mobileCarrier">
                        <option value="SKT">SKT</option>
                        <option value="KT">KT</option>
                        <option value="LG">LG</option>
                    </select>
                </td>
            </tr>
            <tr>
                <td colspan="2" id="submit"><input type="submit" value="전송"> <input type="reset" value="초기화"></td>
            </tr>
        </table>
    </form>
</body>
</html>-
required 속성을 주면 입력하지 않으면 다음 페이지로 이동할 수 x
-
id를 id라고 주면 for속성의 레이블을 클릭하면 자동으로 포커스가 이동
내가 하다 만거.. : input할때 form안에 하지 않으면 초기화나 이런게 작동 안함
<!DOCTYPE html>
<html lang="ko">
<head>
    <title>회원가입</title>
</head>
<body>
    <table border="1">
        <caption>회원가입</caption>
        <tr>
            <td>이름</td>
            <td>
                <form>
                    <input type="text" /><br/>
                </form>
            </td>
        </tr>
        <tr>
            <td>아이디</td>
            <td>
                <form>
                    <input type="text" /><br/>
                </form>
            </td>

        </tr>
        <tr>
            <td>비밀번호</td>
            <td>
                <form>
                    <input type="password" /><br/>
                </form>
            </td>
        </tr>
        <tr>
            <td>비밀번호 확인</td>
            <td>
                <form>
                    <input type="password" /><br/>
                </form>
            </td>
        </tr>
        <tr>
            <td>이메일</td>
            <td>
                <form>
                    <input type="email" /><br/>
                </form>
            </td>
        </tr>
        <tr>
            <td>취미</td>
            <td>
                <select multiple="multiple">
                    <option>독서</option>
                    <option>요리</option>
                    <option>조깅</option>
                    <option>수영</option>
                    <option>취침</option>
                </select>
            </td>
        </tr>
        <tr>
            <td>전공</td>
        </tr>
        <tr>
            <td>전화번호</td>
        </tr>
        <tr>
            <td colspan="2">
                <form>
                    <input type="submit"/>
                    <input type="reset"/>
                  </form>
            </td>
        </tr>
    </table>

</body>
</html>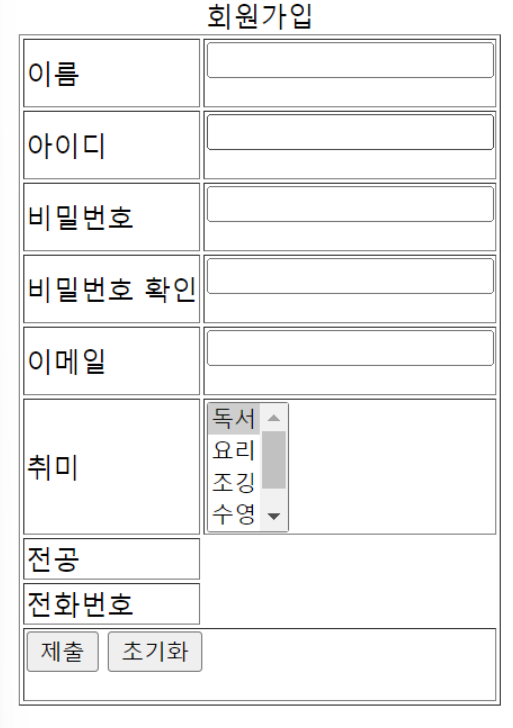
내가 다시 한거
<!DOCTYPE html>
<html>
<head>
    <title>회원가입</title>
</head>
<body>
<form>
   <table border="1">
    <caption>회원가입</caption>
    <tr>
        <td><label for="name">이름</label></td>
        <td><input type="text" name="name" id="name" required></td>
    </tr>
    <tr>
        <td><label for="id">아이디</label></td>
        <td><input type="text" name="id" id="id" required></td>
    </tr>
    <tr>
        <td><label for="pw">비밀번호</label></td>
        <td><input type="password" name="pw" id="pw" required></td>
    </tr>
    <tr>
        <td><label for="validPW">비밀번호 확인</label></td>
        <td><input type="password" name="validPW" id="validPW" required></td>
    </tr>
    <tr>
        <td><label for="eamil">이메일</td></label>
        <td><input type="email" name="eamil" id="eamil" required></td>
    </tr>
    <tr>
        <td>취미</td>
        <td>
            <input type="checkbox" name="hobby" value="reading" id="reading">
            <label for="reading">독서</label>

            <input type="checkbox" name="hobby" value="cooking" id="cooking">
            <label for="cooking">요리</label>

            <input type="checkbox" name="hobby" value="running" id="running">
            <label for="running">조깅</label>

            <input type="checkbox" name="hobby" value="swimming" id="swimming">
            <label for="swimming">수영</label>

            <input type="checkbox" name="hobby" value="sleeping" id="sleeping">
            <label for="sleeping">취침</label>
        </td>
    </tr>
    <tr>
        <td>전공</td>
        <td>
            <input type="radio" name="major" value="kor" id="kor">
            <label for="kor">국어</label>

            <input type="radio" name="major" value="eng" id="eng">
            <label for="eng">영어</label>

            <input type="radio" name="major" value="math" id="math">
            <label for="math">수학</label>

            <input type="radio" name="major" value="design" id="design">
            <label for="design">디자인</label>

            <input type="radio" name="major" value="music" id="music">
            <label for="music">국악</label>
        </td>
    </tr>
    <tr>
        <td>전화번호</td>
        <td>
            <select>
                <option>KT</option>
                <option>SKT</option>
                <option>KT</option>
                <option>LG</option>
            </select>
        </td>
    </tr>
    <tr>
        <td colspan="2" id="submit">
        <input type="submit" value="전송">
        <input type="reset" value="초기화">

        </td>
    </tr>
   </table>
</form>
</body>
</html>
CSS
Cascading Style Sheets
HTML과 함께 웹을 구성하는 기본 프로그래밍 요소다.
HTML이 텍스트나, 이미지, 표와 같은 구성요소를 웹 문서에 넣어 뼈대를 만드는 것이라면, CSS는 색상이나 크기, 이미지 크기나 위치, 배치 방법등 웹 문서의 디자인 요소를 담당한다.
- 웹 페이지의 스타일을 별도의 파일로 저장할 수 있어서 사이트의 전체 스타일을 손쉽게 제어할 수 있다.
- 스타일을 일관성 있게 유지할 수 있게 해, 그에 따른 유지보수 또한 쉽다.
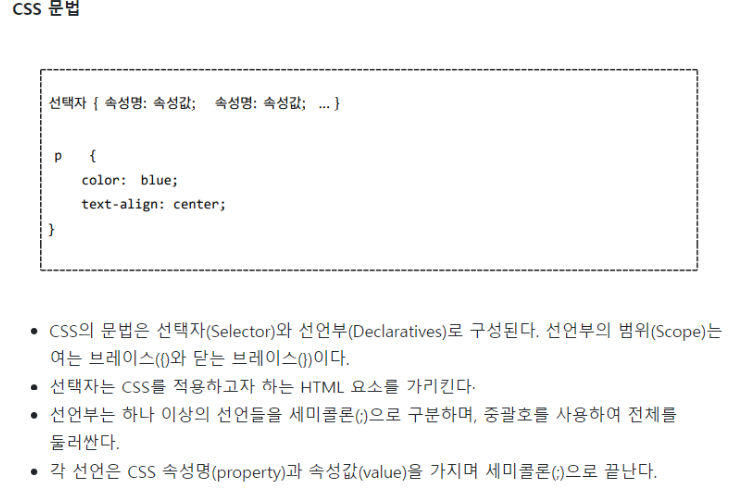
text-align: 가운데 정렬 - \만 가능
Mragin(마진)
-
마진은 요소의 외부 여백을 지정한다.
-
마진은 요소와 이웃한 다른 요소 사이의 간격을 조절한다.
-
마진은 외부 공간이므로 요소의 배경색이나 테두리를 포함하지 않는다.
-
음수 마진을 사용하여 요소를 다른 요소에 겹치도록 배치할 수 있다.
-
예시:
margin: 20px;(모든 방향에 대해 20px의 마진을 지정)
Padding(패딩)
-
패딩은 요소의 내부 여백을 지정한다.
-
패딩은 요소의 내부 콘텐츠와 테두리 사이의 간격을 조절한다.
-
패딩은 배경색을 적용할 때 요소 내부의 공간으로 사용된다.
-
요소의 크기를 결정할 때 패딩은 포함된다.
-
예시:
padding: 30px;(모든 방향에 대해 30px의 패딩을 지정)
CSS 스타일 적용
-
인라인 스타일(Inline Style)
- html태그의 style속성에 css코드를 넣는 방법이다.
-
내부 스타일 시트(Internal style sheet)
- HTML 문서 안의 안에 CSS 코드를 넣는 방법입니다.
-
외부 스타일 시트(External style sheet)
- 별도의 CSS 파일을 만들고 HTML 문서와 연결하는 방법입니다.
외부 스타일 시트 장점 - 주로 사용
-
코드 재활용에 좋다.
- 인라인 스타일이나, 내부 스타일 시트는 하나의 HTML 문서 안에 삽입되기 때문에, 새로운 html문서를 작성하면 또 style을 사용해야 한다. 똑같은 내용의 CSS를 페이지마다 반복적으로 작성하기는 귀찮으니 외부 스타일 시트를 사용하면 stylesheet를 링크해주는 한줄만으로 1억개 페이지에 완전히 같은 서식을 적용할 수 있게 된다.
-
일관된 웹 페이지를 제작할 수 있다.
- 외부 스타일 시트로 연결했다면, css문서 하나를 작성하고 수정하는 것 만으로 1억개 페이지를 동일하게 수정하는 효과를 가져온다.
- css내용을 하나하나 살피지 않고 그냥 그 기능을 원하면 css링크를 갖다 쓰는것 만으로 공통적인 효과를 가져올 수 있다는 것이다.
-
네트워크 사용량을 줄일 수 있다.
- 인라인 스타일, 내부 스타일의 경우 같은 내용의 css를 웹페이지 불러올 때마다 새롭게 읽어야 하니, 새로운 페이지를 열때 그만큼 데이터를 낭비하게 된다.
- 외부에서 css를 관리하면 내용변화 없는 css는 한번 받아서 캐시에 저장하고 웹 브라우저가 요청하면 저장되 ㄴ결과를 가져온다.
1. 배경과 글자에 색을 주고, margin을 이용해 글자 위치 조정
<!DOCTYPE html>
<html>
<head>
<style>
body {
  background-color: linen;
}

h1 {
  color: maroon;
  margin-left: 100px; /*px이  클수록 점점 오른쪽으로 밀려짐 문장이 */
}
</style>
</head>
<body>

<h1>This is a heading</h1>
<p>This is a paragraph.</p>

</body>
</html>
2. id속성을 이용해 색 주기
- 스타일 시트에서는 id 속성이 중복되어도 되지만, 자바스크립트에서는 id속성이 중복되면 안된다.
<!DOCTYPE html>
<html>
<head>
    <title>CSS3 Selector Basic Page</title>
    <style>
        #rint { color: red; }
    </style>
</head>
<body>
    <h1 id="rint">CSS3 선택자 기본</h1>
    <h2 id="rint">CSS3 선택자 기본</h2>
    <h3 id="rint">CSS3 선택자 기본</h3>
</body>
</html>
3. class속성을 이용해 글자 색 주기
<!DOCTYPE html>
<html>
<head>
    <title>CSS3 Selector Basic</title>
    <style>
        .select { color: red; }
    </style>
</head>
<body>
    <ul>
        <li class="select">사과</li>
        <li>바나나</li>
        <li class="select">오렌지</li>
        <li>감</li>
    </ul>
</body>
</html>
<!DOCTYPE html>
<html>
<head>
<title>CSS3 Selector Basic</title>
<style>
.item { color: red; }
.header { background-color: blue; }
</style>
</head>
<body>
<h1 class="item header">동해물과 백두산이</h1>
</body>
</html>
<!-- 여러 개의 클래스 선택자 사용
class 속성은 공백으로 구분하여 클래스를 여러 개 사용할 수 있다. -->4. 태그 선택자와 클래스 선택자
- class 속성이 서로 다른 태그에 적용되는 경우 태그 선택자와 클래스 선택자를 함께 사용해서 태그를 더 정확하게 선택할 수 있다.
<!DOCTYPE html>
<html>
<head>
    <title>CSS3 Selector Basic</title>
    <style>
        li.select { color: red; }
    </style>
</head>
<body>
    <h1 class="select">제목 글자</h1>
    <ul>
        <li class="select">사과</li>
        <li>바나나</li>
        <li>오렌지</li>
        <li>감</li>
    </ul>
</body>
</html>
5. 속성 선택자
- input 태그는 이름이 모두 같지만 type 속성에 따라 형태가 달라진다. 그래서 input 태그를 선택할 때는 선택자를 많이 사용한다.
<!DOCTYPE html>
<html>
<head>
    <title>CSS3 Selector Basic Page</title>
    <style>
        input[type="text"] { background: red; }
        input[type="password"] { background: blue; }
    </style>
</head>
<body>
    <form>
        <input type="text" />
        <input type="password" />
    </form>
</body>
</html>-
선택자[속성] : 특정한 속성이 있는 태그를 선택한다.
-
선택자[속성=값] : 특정한 속성 안의 값이 특정 값과 같은 태그를 선택한다.
6. 후손 선택자와 자손 선택자
-
후손 선택자는 띄어쓰기
-
자손 선택자는 >(꺽새)
-
table태그의 요소를 선택할 때는 자손 선택자를 사용하지 않는다.
- 그 이유는 웹 브라우저가 tbody태그를 자동으로 추가하기 때문에 스타일 속성이 적용되지 않기 때문이다.
<!DOCTYPE html>
<html>
<head>
    <title>CSS3 Selector Basic</title>
    <style>
        #header > h1  { color: red; }
        #section > h1 { color: orange; }
    </style>
</head>
<body>
    <div id="header">
        <h1 class="title">Lorem ipsum</h1>
        <div id="nav">
            <h1>Navigation</h1>
        </div>
    </div>
    <div id="section">
        <h1 class="title">Lorem ipsum</h1>
        <p>Lorem ipsum dolor sit amet, consectetur adipiscing elit. Sed nisi risus, sollicitudin eget vehicula sed, eleifend suscipit neque. Proin rhoncus, ante vitae mattis consequat, libero nunc posuere justo, ut laoreet dolor nunc at dolor. Lorem ipsum dolor sit amet, consectetur adipiscing elit. Maecenas dictum, lectus vestibulum laoreet tincidunt, nisi augue blandit risus, ut vestibulum erat dolor sit amet risus. Praesent semper consectetur mi eget auctor. Nulla facilisi. Duis bibendum massa in dui interdum sed tincidunt massa eleifend.</p>
    </div>
</body>
</html>
자손 선택자
<!DOCTYPE html>
<html>
<head>
    <title>CSS3 Selector Basic</title>
    <style>
        #header h1, #header h2 {color:red; }
    </style>
</head>
<body>
    <div id="header">
        <h1 class="title">Lorem ipsum</h1>
        <h2>Lorem ipsum2</h2>
        <div id="nav">
            <h1>Navigation</h1>
        </div>
    </div>
    <div id="section">
        <h1 class="title">Lorem ipsum</h1>
        <h2>Lorem ipsum2</h2>
        <p>Lorem ipsum dolor sit amet, consectetur adipiscing elit. Sed nisi risus, sollicitudin eget vehicula sed, eleifend suscipit neque. Proin rhoncus, ante vitae mattis consequat, libero nunc posuere justo, ut laoreet dolor nunc at dolor. Lorem ipsum dolor sit amet, consectetur adipiscing elit. Maecenas dictum, lectus vestibulum laoreet tincidunt, nisi augue blandit risus, ut vestibulum erat dolor sit amet risus. Praesent semper consectetur mi eget auctor. Nulla facilisi. Duis bibendum massa in dui interdum sed tincidunt massa eleifend.</p>
    </div>
</body>
</html>
후손 선택자
7. 반응 선택자
반응 선택자는 사용자의 반응으로 생성되는 특정한 상태를 선택한다.
특정 태그 위에 마우스 커서를 올리면 hover 상태이고, 특정 태그를 마우스로 클릭하면 active 상태이다.
-
:active > 사용자가 마우스로 클릭한 태그 선택
-
:hover > 사용자가 마우스 커서를 올린 태그 선택
<!DOCTYPE html>
<html lang="ko">
<head>
    <meta charset="UTF-8">
    <meta name="viewport" content="width=device-width, initial-scale=1.0">
    <title>Document</title>
    <style>
        h1:active{color: red;}
        h2:hover{color: aqua;}
    </style>
</head>
<body>
    <h1>안녕하세요.</h1>
    <h2>반갑습니다.</h2>
</body>
</html>
8. 상태 선택자
<!DOCTYPE html>
<html>
<head>
    <title>CSS3 Selector Basic</title>
    <style>
        /* input 태그가 사용 가능할 경우에
           background-color 속성에 white 키워드를 적용합니다. */
        input:enabled { background-color: white; }

        /* input 태그가 사용 불가능할 경우에
           background-color 속성에 gray 키워드를 적용합니다. */
        input:disabled { background-color: gray; }

        /* input 태그에 초점이 맞추어진 경우에
           background-color 속성에 orange 키워드를 적용합니다. */
        input:focus { background-color: orange; }

        input:checked{width: 50px; height: 50px;}
    </style>
</head>
<body>
    <h2>사용 가능</h2>
    <input />
    <h2>사용 불가능</h2>
    <input disabled="disabled"/><br>
    <input type="checkbox">
</body>
</html>-
:checked > 체크 상태의 input 태그 선택
-
:focus> 초점이 맞추어진 input 태그 선택
-
:enabled > 사용 가능한 input 태그 선택
-
:disabled > 사용 불가능한 input 태그 선택
9. 부모요소:first-child
- 특정 요소의 첫 번째 자식 요소를 선택하는데 사용된다.
<!DOCTYPE html>
<html>
<head>
    <title>CSS3 Selector Basic Page</title>
    <style>
        li > a:first-child { color: red; }
    </style>
</head>
<body>
    <ul>
        <li><a href="#">주의 사항</a></li>
        <li><a href="#">주의 사항</a></li>
        <li><a href="#">주의 사항</a></li>
        <li><a href="#">주의 사항</a></li>
        <li><a href="#">주의 사항</a></li>
    </ul>
</body>
</html>-
li의 자손 첫번째 자식 요소인 a를 선택한다. 그러나 이는 li의 첫번째 자식이 아닌 a의 첫번째 자식을 선택하기 때문에 모든 앵커태그가 빨간색으로 출력된다.
-
첫번째 앵커태그의 텍스트만 빨간색으로 하고싶다면 아래와 같이 출력해야 한다.
<!DOCTYPE html>
<html>
<head>
    <title>CSS3 Selector Basic Page</title>
    <style>
        li:first-child > a { color : red; }
    </style>
</head>
<body>
    <ul>
        <li><a href="#">주의 사항</a></li>
        <li><a href="#">주의 사항</a></li>
        <li><a href="#">주의 사항</a></li>
        <li><a href="#">주의 사항</a></li>
        <li><a href="#">주의 사항</a></li>
    </ul>
</body>
</html>