
오전문제
36일차 전화번호부 8단계 참조 >
Thread 1
-
프로그램의 실행요청은 컴퓨터 사용자에 의해 이뤄지지만, 실질적인 프로그램의 실행은
( )에 의해서 이뤄진다.
- 운영체제
- 프로그램의 실행이 요청 되면, 다음의 형태로 메모리 공간이 할당된다.
메모리에 대해 서술하시오.
-
메소드영역, 스택 영역, 힙 영역 으로 구성된다.
-
이렇듯 할당된 메모리 공간을 기반으로 실행 중에 있는 프로그램을 가리켜 ( )라 한다.
따라서 ( )를 간단히 '실행중인 프로그램'으로 설명하기도 한다.- 프로세스
- 하나의 프로세스에 둘 이상의 쓰레드를 실행시키자.
그리고 각각의 쓰레드 이름에 "멋진 쓰레드", 와 "예쁜 쓰레드"라는 이름을 주고 반복을 100번을 시키자
package com.test.memo;

class showThread extends Thread {
    String threadName;

    showThread(String threadName) {
        this.threadName = threadName;
    }

    @Override
    public void run() {
        for (int i = 0; i < 100; i++) {
            System.out.println(threadName);

            try {
                sleep(100); // Runnable을 구현했을때는 사용못하는 메서드
            } catch (InterruptedException e) {
                e.printStackTrace();
            }
        }
    }
}

class Practice {
    public static void main(String[] args) {
        showThread s1 = new showThread("멋진 쓰레드");
        showThread s2 = new showThread("이쁜 쓰레드");
        s1.start();
        s2.start();
    }
}-
Thread클래스를 상속받아 쓰레드를 생성하고, run()메서드를 재정의하여 각 쓰레드가 실행될 때 수행할 작업을 정의한다. > 각 쓰레드가 for루프를 돌며 0부터 99까지 숫자를 출력하고, sleep(100)메서드를 호출해 각 쓰레드가 출력하고 일정시간 멈추도록 한다.
- 따라서 첫 번째 쓰레드인 "멋진 쓰레드"가 0부터 99까지 출력하고, 그 후 잠시 멈추면서 다음 쓰레드인 "이쁜 쓰레드"가 0부터 99까지 출력하고 이를 반복한다. 이러한 번갈아가는 출력이
start()메서드로 각 쓰레드를 실행시킴으로써 이루어진다.
- 따라서 첫 번째 쓰레드인 "멋진 쓰레드"가 0부터 99까지 출력하고, 그 후 잠시 멈추면서 다음 쓰레드인 "이쁜 쓰레드"가 0부터 99까지 출력하고 이를 반복한다. 이러한 번갈아가는 출력이
-
쓰레드의 우선순위를 가져오는 메소드?
getPriority()
-
쓰레드의 우선순위를 설정하는 메소드?
setPriority()
-
쓰레드의 우선순위를 설정할 때 쓰는 상수는? > 최소1 ~ 최대 10
-
Thread.MAX_PRIORITY10 > 최대 우선순위 -
Thread.NORM_PRIORITY5 > 기본 우선순위 -
Thread.MIN_PRIORITY1 > 최소 우선순위4번 5번 메소드 괄호 안에 넣을 수 있다
myThread.setPriority(Thread.MAX_PRIORITY); // 쓰레드의 우선순위를 최대 우선순위로 설정
-
-
쓰레드의 라이프 사이클(Life Cycle)은?
-
New 상태
-
Runnable 상태
-
Blocked 상태
-
Dead 상태
-
- class Sum 이 있고 여기에는 숫자를 저장할 수 있는 Instance 변수와 숫자를 더하는 메소드 숫자를 반환하는 메소드가 있다
class AddThread 라는 클래스를 쓰레드를 돌리기 위해서 인터페이스를 구현해서 두 개의 숫자 인스턴스 변수와
이 두개의 숫자 인스턴스 변수를 시작 값부터 끝 값까지 더하도록 메소드를 만들자. 그리고 AddThread 클래스는 Sum을 상속받도록 하자.
그리고 메인메소드에서 쓰레드를 두 개 생성해서 하나는 1부터 50까지 더하고 하나는 51부터 100까지 더해서 두 개의 쓰레드 실행결과 그 더한 값을 출력하도록 하자.
package com.test.memo;

class Sum {
    private int num;

    Sum() {
        num = 0; // 숫자를 받으면 AddThread에서 super로 값을 받아줘야함
    }

   void addNum(int n) {
        num += n;
    }

    int getNum() {
        return num;
    }
}

class AddThread extends Sum implements Runnable {
    int start;
    int end;

    AddThread(int start, int end) {
        this.start = start;
        this.end = end;
    }

    @Override
    public void run() {
        for (int i = start; i <= end; i++) {
            addNum(i);
        }
    }

}

class Practice {
    public static void main(String[] args) {
        AddThread a1 = new AddThread(1, 50);
        AddThread a2 = new AddThread(51, 100);

        Thread t1 = new Thread(a1);
        Thread t2 = new Thread(a2);

        t1.start();
        t2.start();

        try {
            t1.join();
            t2.join();

        } catch (InterruptedException e) {
            e.printStackTrace();
        }
        System.out.println("1~100까지의 합 : " + (a1.getNum() + a2.getNum()));
    }
}
- 해당 쓰레드가 종료될 때까지 실행을 멈출 때 호출하는 메소드는?
- join();
Thread 2
- Thread1의 8번 문제를 Runnable이 아닌 Thread 클래스로 정의하는 방식으로 변경해보자.
package com.test.memo;

class AddThread extends Thread {
    int start;
    int end;
    int num;

    AddThread(int start, int end) {
        this.start = start;
        this.end = end;
        num = 0;
    }

    void addNum(int n) {
        num += n;
    }

    int getNum() {
        return num;
    }

    @Override
    public void run() {
        for (int i = start; i <= end; i++) {
            addNum(i);
        }
    }

}

class Practice {
    public static void main(String[] args) {
        AddThread a1 = new AddThread(1, 50);
        AddThread a2 = new AddThread(51, 100);

        Thread t1 = new Thread(a1);
        Thread t2 = new Thread(a2);

        t1.start();
        t2.start();

        try {
            t1.join();
            t2.join();

        } catch (InterruptedException e) {
            e.printStackTrace();
        }
        System.out.println("1~100까지의 합 : " + (a1.getNum() + a2.getNum()));
    }
}
Thread 3
- Increment라 이름의 클래스는 num이라는 인스턴스 변수를 가지고 있고 그 클래스는 1씩 증가시키는 메소드와 숫자 값을 가져오는 메소드가 있다. IncThread라는 클래스는 Increment라는 클래스의 참조변수를 인스턴스변수로 가지고 있고 쓰레드를 실행시키면 중첩된 반복문으로 각각 10000 씩 Increment의 1씩 증가시키는 메소드를 호출한다.
그리고 main메소드가 있는 클래스에서 Increment 인스턴스한개 IncThread 3개를 만들고 3개의 쓰레드를 실행한 후에 Increment의 num의 값을 출력해본다.
package com.test.memo;

import javax.xml.catalog.Catalog;

class Increment {
    private int num;

    void Increment() {
        num++;
    }

    int getNum() {
        return num;
    }
}

class IncThread extends Thread {
    Increment inc;

    IncThread(Increment inc) {
        this.inc = inc;
    }

    @Override
    public void run() {
        for (int i = 0; i < 10000; i++) {
            for (int j = 0; j < 10000; j++) { // 문제에서 중첩된 반복문이라 했으므로
                inc.Increment();
            }
        }
    }
}

class Practice {
    public static void main(String[] args) {
        Increment inc = new Increment();
        IncThread i1 = new IncThread(inc);
        IncThread i2 = new IncThread(inc);
        IncThread i3 = new IncThread(inc);

        i1.start();
        i2.start();
        i3.start();

        try {
            i1.join();
            i2.join();
            i3.join();
        } catch (InterruptedException e) {
            e.printStackTrace();
        }
        System.out.println(inc.getNum());
    }
}//출력값이 다 다르지만 3억이 넘지 않는다.-
6번 문제는 동기화가 제대로 되지 않아 잘못된 값을 출력할 확률이 높다. 이 것을 동기화 시키는 두 가지 방법으로 동기화가 제대로 이루어 지도록 하자.
동기화 메소드
public synchronized void increment()
{
 num++;
}
동기화블럭
public void increment()
{
    synchronized(this)//this객체 주소값을 열쇠로 사용
    {
        num++;
    }
}-
메소드보다 블럭으로 처리하는것이 더 좋다.
-
동기화 블럭만 다른 스레드들이 접근하지 못하는것이고, 다른 메서드에서 이 동기화블럭은 접근 가능하다.
풀이
  package com.test.memo;


class Increment {
    private int num;

    Increment() {
        num = 0;
    }

    synchronized void increment() { // 동기화 메소드
        // synchronized (this) { > 동기화 블럭
        num++;
        // }
    }

    int getNum() {
        return num;
    }

}

class IncThread extends Thread {
    private Increment inc;

    IncThread(Increment inc) {
        this.inc = inc;
    }

    @Override
    public void run() {
        for (int i = 0; i < 100000000; i++) {
            // for (int j = 0; j < 10000; j++) { // 동기화에 중첩 반복문을 사용하면 데드락 발생 가능 ( 무한루프에 빠)
            inc.increment();
            // }
        }
    }

}

class Practice {
    public static void main(String[] args) {
        Increment inc = new Increment();
        IncThread i1 = new IncThread(inc);
        IncThread i2 = new IncThread(inc);
        IncThread i3 = new IncThread(inc);

        i1.start();
        i2.start();
        i3.start();

        try {
            i1.join();
            i2.join();
            i3.join();
        } catch (InterruptedException e) {
            e.printStackTrace();
        }
        System.out.println(inc.getNum());
    }

}//300000000 출- 중첩된 반복문 내에서 동기화된 블록을 실행하면 여러 쓰레드가 해당 블록에 접근할 때 대기열에 추가되어 서로의 작업을 기다리는데, 이는 데드락으로 이어질 수 있기 때문에 중첩된 반복문 내에서 동기화된 블럭을 싱행하는건 피하는게 좋다.
- 데드락이란 두 개 이상의 작업이 서로 상대방의 작업이 끝나기를 기다리는 상황이다.
-
문제 8 폴더에 있는 SyncObjectKey.java를 적절하게 Key를 사용하여 동기화해보자.(두 가지 방법)
키를 이용해 동기화를 수행하려면, 동기화에 사용할 객체가 필요하다.
두 개의 키를 사용해서
package com.test.memo;

class IHaveTwoNum {
    int num1 = 0;
    int num2 = 0;

    // 동기화에 사용할 객체 생성
    private final Object key1 = new Object();
    private final Object key2 = new Object();

    public void addOneNum1() {
        synchronized (key1) {
            num1 += 1;
        }
    }

    public void addTwoNum1() {
        synchronized (key1) {
            num1 += 2;
        }
    }

    public void addOneNum2() {
        synchronized (key2) {
            num2 += 1;
        }
    }

    public void addTwoNum2() {
        synchronized (key2) {
            num2 += 2;
        }
    }

    public void showAllNums() {
        System.out.println("num1: " + num1);
        System.out.println("num2: " + num2);
    }
}

class AccessThread extends Thread {
    IHaveTwoNum twoNumInst;

    public AccessThread(IHaveTwoNum inst) {
        twoNumInst = inst;
    }

    public void run() {
        twoNumInst.addOneNum1();
        twoNumInst.addTwoNum1();

        twoNumInst.addOneNum2();
        twoNumInst.addTwoNum2();
    }
}

class Practice {
    public static void main(String[] args) {
        IHaveTwoNum numInst = new IHaveTwoNum();

        AccessThread at1 = new AccessThread(numInst);
        AccessThread at2 = new AccessThread(numInst);

        at1.start();
        at2.start();

        try {
            at1.join();
            at2.join();
        } catch (InterruptedException e) {
            e.printStackTrace();
        }
        numInst.showAllNums();
    }
}//num1 :6 / num2 : 6 출
this와 한개의 키만 사용해서
package com.test.memo;

class IHaveTwoNum {
    int num1 = 0;
    int num2 = 0;

    // 동기화에 사용할 객체 생성
    private final Object key1 = new Object();

    public void addOneNum1() {
        synchronized (this) {
            num1 += 1;
        }
    }

    public void addTwoNum1() {
        synchronized (this) {
            num1 += 2;
        }
    }

    public void addOneNum2() {
        synchronized (key1) {
            num2 += 1;
        }
    }

    public void addTwoNum2() {
        synchronized (key1) {
            num2 += 2;
        }
    }

    public void showAllNums() {
        System.out.println("num1: " + num1);
        System.out.println("num2: " + num2);
    }
}

class AccessThread extends Thread {
    IHaveTwoNum twoNumInst;

    public AccessThread(IHaveTwoNum inst) {
        twoNumInst = inst;
    }

    public void run() {
        twoNumInst.addOneNum1();
        twoNumInst.addTwoNum1();

        twoNumInst.addOneNum2();
        twoNumInst.addTwoNum2();
    }
}

class Practice {
    public static void main(String[] args) {
        IHaveTwoNum numInst = new IHaveTwoNum();

        AccessThread at1 = new AccessThread(numInst);
        AccessThread at2 = new AccessThread(numInst);

        at1.start();
        at2.start();

        try {
            at1.join();
            at2.join();
        } catch (InterruptedException e) {
            e.printStackTrace();
        }
        numInst.showAllNums();
    }
}- key1과 key2라는 두 개의 객체를 생성해 동기화 블록을 정의했다.
Thread4
쓰레드의 실행순서는 소스코드가 나열된 순서와 다를 수 있다.
- 문자열이 있는 신문 클래스
신문작가(쓰레드)는 신문을 쓰고
독자(쓰레드)는 신문을 읽는다.
독자 실행.
작가 실행.
쓰레드의 동시 접근을 막는 동기화
package com.test.memo;

class NewsPaper {
    String todayNews;

    void setTodayNews(String news) {
        todayNews = news;
    }

    String getTodayNews() {
        return todayNews;
    }
}

class NewsWriter extends Thread {
    NewsPaper paper;

    public NewsWriter(NewsPaper paper) {
        this.paper = paper;
    }

    @Override
    public void run() {
        paper.setTodayNews("자바의 열기가 뜨겁습니다.");
    }
}

class NewsReader extends Thread {
    NewsPaper paper;

    public NewsReader(NewsPaper paper) {
        this.paper = paper;
    }

    @Override
    public void run() {
        System.out.println("오늘의 뉴스: " + paper.getTodayNews());
    }
}

class Practice {
    public static void main(String[] args) {//쓰레드는 총 3개 > 메인, NewsReader, NewsWriter
        NewsPaper paper = new NewsPaper();
        NewsReader reader = new NewsReader(paper); //힙 메모리를 공유해서 쓸 수 있음
        NewsWriter writer = new NewsWriter(paper);

        reader.start(); //쓰레드는 실행흐름을 알 수 없기 때문에, reader가 먼저 실행될지, writer가 먼저 실행될지 알 수없다.
        writer.start();

        try {
            reader.join(); //reader가 종료될 때 까지 다른 쓰레드가 기다린다.
            writer.join(); //writer가 종료될 때 까지 다른 쓰레드가 기다린다.
        } catch (InterruptedException e) {
            e.printStackTrace();
        }
    }
}//오늘의 뉴스: null > reader가 먼저 실행된것 - 쓰레드의 실행흐름은 예상할 수 없기에 (소스코드의나열 순서를 가지고 순서를 예측할 수 없음) , 간혹가다 writer가 먼저 실행되서 writer의 run이 실행될 수도 있다.
- 쓰레드를 기다리게 하는 메소드의 원형
-
public final void **wait()** throws InterruptedException> 동기화처리를 반드시 해줘야 한다.final이므로, 메소드의 오버라이딩을 허용하지 않는다 > InterruptedException을 예외처리 해야한다.
- 하나의 쓰레드만 깨우는 메소드의 원형
public final void notify()
- 모든 쓰레드를 깨우는 메소드의 원형
public final void notifyAll()> 동기화처리를 반드시 해줘야한다.
- 9번문제를 동기화가 가능한 상태로 수정하자.(독자 두명 생성. 실행)
package com.test.memo;

class NewsPaper {
    String todayNews;
    boolean isTodayNews;

    void setTodayNews(String news) {
        todayNews = news;
        isTodayNews = true;

        synchronized (this) {
            notifyAll(); // 기다리고 있는 쓰레드를 모두 깨우는 메소드
            //notify(); 로 사용한다면, 하나만 깨우기 때문에, 출력이 한번만 나온다.
        }
    }

    String getTodayNews() {
        if (isTodayNews == false) { //작성된 뉴스가 없으면
            try {
                synchronized (this) { //동기화 블럭 필수
                    wait(); // 쓰레드를 기다리게 하는 메소드
                }
            } catch (InterruptedException e) {
                e.printStackTrace();
            }
        }
        return todayNews; //작성된 뉴스가 존재하면 바로 반환
    }
}

class NewsWriter extends Thread {
    NewsPaper paper;

    public NewsWriter(NewsPaper paper) {
        this.paper = paper;
    }

    public void run() {
        paper.setTodayNews("자바의 열기가 뜨겁습니다.");
    }
}

class NewsReader extends Thread {
    NewsPaper paper;

    public NewsReader(NewsPaper paper) {
        this.paper = paper;
    }

    public void run() {
        System.out.println("오늘의 뉴스: " + paper.getTodayNews());
    }
}

class Practice {
    public static void main(String[] args) {
        NewsPaper paper = new NewsPaper();
        NewsReader reader1 = new NewsReader(paper);// 독자 1
        NewsReader reader2 = new NewsReader(paper);// 독자 2
        NewsWriter writer = new NewsWriter(paper);

        try {
            reader1.start();
            reader2.start(); >> 작성된 뉴스가 없기때문에 위 코드에서 wait()상태에 있을 것

            Thread.sleep(1000); // 위 reader를 먼저 실행시키기 위해 강제로 1초란 시간을 쓰레드에 준것이다. > 1초동안 잠에듬
            writer.start(); //1초 후에 writer실행된다. > run()메소드가 자동 호출되서, NewsPaper에 todayNews에 문자열이 들어갈 것

           // > notifyAll()메소드로 멈췄던 reader1, reader2의  start() 가 마저 실행되면서, 출력
            reader1.join();
            reader2.join();
            writer.join();
        } catch (InterruptedException e) {
            e.printStackTrace();
        }
    }
}
//오늘의 뉴스: 자바의 열기가 뜨겁습니다.
//오늘의 뉴스: 자바의 열기가 뜨겁습니다.- wait와 notifyAll(notify) 메소드는 동기화 처리를 해서, 한 순간에 하나의 쓰레드만 호출이 가능하도록 해야 한다.
두 메소드 wait와 notifyAll(notify)이 서로 다른 두 쓰레드에 의해서 동시에 각각 호출되는 것 조차 허용되지 않아야 함을 뜻하는 것
- wait() 메소드는 연이은 호출이 가능하다 (동시 호출 x) > 그냥 잠에 든것이므로, 다른 쓰레드가 이 동기화 블록에 접근하는 것은 허용이 가능하다.
Threade 5
- main 메소드에서는 프로그램 사용자로부터 총 다섯 개의 정수를 입력 받아서 별도로 생성된 하나의 쓰레드에게 전달하고, 별도로 생성된 쓰레드는 전달받은 수의 총 합을 계산해서, 그 결과를 출력하는 프로그램을 작성해 보자. 이는 main 메소드를 실행하는 main 쓰레드와 main 쓰레드로부터 전달받은 수의 총 합을 계산하는 별도의 쓰레드간 동기화에 관련된 문제이다.
package com.test.memo;

import java.util.Scanner;

class IntegerCom { //정수를 저장하고 반환하는 기능
    int num = 0;
    boolean isNewNum = false;

    void setNum(int n) { //새로운 정수를 받아서 저장
        synchronized (this) {
            if (isNewNum == true) {
                try {
                    wait();
                } catch (InterruptedException e) {
                    e.printStackTrace();
                }
            }
            num = n;
            isNewNum = true;
            notify();
        }
    }

    int getNum() { //저장된 정수 반환
        int retNum;
        synchronized (this) {
            if (isNewNum == false) {
                try {
                    wait();
                } catch (InterruptedException e) {
                    e.printStackTrace();
                }
            }
            retNum = num;
            isNewNum = false;
            notify();
        }
        return retNum;
    }
}

class IntegerSum extends Thread {
    IntegerCom com;
    int sum;

    IntegerSum(IntegerCom com) {
        this.com = com;
    }

    @Override
    public void run() {
        for (int i = 0; i < 5; i++) {
            sum += com.getNum();
        }
        System.out.println("입력된 정수의 합 : " + sum);
    }
}

public class Practice {
    public static void main(String[] args) {
        IntegerCom com = new IntegerCom();
        IntegerSum sum = new IntegerSum(com);
        sum.start();

        Scanner sc = new Scanner(System.in);

        System.out.println("총 5개의 정수 입력 ...");
        for (int i = 0; i < 5; i++) {
            com.setNum(sc.nextInt());
        }
        try {
            sum.join(); //스레드의 작업이 완료될때 까지 대리
        } catch (InterruptedException e) {
            e.printStackTrace();
        }
    }
}-
사용자 입력을 받는 동안 스레드가 대기하고, 입력이 완료되면 스레드가 그 값을 읽어 합계를 계산하는 기능 제공
- 동기화 메커니즘을 사용해 스레드간의 안전한 데이터 공유를 보장
동기화 - 새로운 동기화 방식 ReentrantLock()
동기화와 같은 역할을 하지만 잠금 영역과 잠금을 푸는 영역을 수동적으로 설정할 수 있다.
synchronized 보다 유연하고 강력한 기능을 가지고 있다.
-
데드락을 방지하고, 스레드 간의 공정한 동시성을 제어할 수 있다.
-
RenntrantLock객체가 다른 스레드에서 변경되지 않도록 하려면 final로 선언하는게 좋다
- 다른 스레드에서 변경될 가능성이 있는 경우에만 해당 <> 변경될 필요가 있다면 final쓸 필요 x
-
synchronized 키워드의 대체
- 자바 버전 0.5에서 동기화 블록, 동기화 메소드를 대신해 사용할 수 있는
ReentrantLock()이 있다.
- 자바 버전 0.5에서 동기화 블록, 동기화 메소드를 대신해 사용할 수 있는
ReentrantLock()의 메소드
-
lock(): 다른 쓰레드가 진입하지 못하게 잠근다. -
unlock(): 다른 쓰레드의 진입이 가능하게 문을 연다.
lock()메소드는 한번 호출되면, unlock()이 호출되기 전까지 lock메소드의 호출이 불가능하다.
lock()을 걸었으면 반드시 unlock()되어야 하기때문에 filnally구문에서 unlock()을 호출할 수 있다.
-
tryLock(): 잠금을 시도합니다. 잠금을 즉시 획득할 수 없으면 즉시 실패합니다. -
tryLock(long timeout, TimeUnit unit): 일정 시간 동안 잠금을 시도합니다. 시간이 초과되면 실패합니다. -
newCondition():Condition객체를 생성합니다. 조건 변수를 사용하여 특정 조건에 대해 스레드를 대기시키고 깨울 수 있습니다.
예제
package com.test.memo;

import java.util.concurrent.locks.ReentrantLock;

class Num {
    private int num;
    private final ReentrantLock key = new ReentrantLock();

    void addNum() {
        key.lock();
        try {
            num++; // 잠금 시키고, 값을 증가시키고 잠금을 해제
        } finally {
            key.unlock();
        }
    }

    int getNum() { // 동기화되어 있지 않아 여러 스레드가 호출한다면 올바르지 않은 값 반환할 수 있음
        return num;
    }
//    int getNum() {
//        key.lock();
//        try {
//            return num;
//        } finally {
//            key.unlock();
//        }
//    }
}

class Apple extends Thread {
    Num num;

    public Apple(Num num) {
        this.num = num;
    }

    @Override
    public void run() {
        for (int i = 0; i < 1000; i++) {
            num.addNum();
        }
    }
}

public class Organize {

    public static void main(String[] args) {
        Num num = new Num();
        Apple a1 = new Apple(num);
        Apple a2 = new Apple(num);

        a1.start();
        a2.start();

        try {
            a1.join();
            a2.join();
        } catch (InterruptedException e) {
            e.printStackTrace();
        }
        System.out.println("사과 총 개수 : " + num.getNum());
    }
}//사과 총 개수 : 2000
Synchronized와 ReentrantLock
둘의 기능은 비슷하지만, 암묵적으로 동기화 구문을 지정하는 synchronized와 달리 ReentrantLock의 동기화 구문은 lock, unlock메소드를 통해 명시적으로 표현된다는 차이가 있다.
Condition 인터페이스 - ReentrantLock에서 사용할 수 있는 메소드
스레드 간의 통신과 스레드 실행을 조정하는 데 사용되는 Java의 인터페이스
-
Lock객체와 함께 사용되며,Lock객체를 통해 스레드의 잠금을 관리하고Condition을 사용하여 스레드 간의 신호를 주고받아, 스레드의 실행을 조절하고 동기화된 상태에서 특정 조건이 충족될 때 까지 스레드를 대기시킬 수 있다. -
synchronized에서 상태를 제어하는 메소드 > wait, notify등의 메소드들이 synchronized가 아닌 상태에서 사용하면 IlleglaMonitorStateException이 발생한다.
- 그래서 ReentrantLock에서 사용할 수 있는 메소드를 제공하는게 Condition이다.
Condition 메소드
아래 메소드들 역시 한번에 하나의 메소드만 호출될 수 있도록 동기화 처리를 해야한다.
단, 반드시 앞서보인 ReentrantLock 인스턴스 기반으로 동기화 처리가 되어야 한다(synchronized 기반이 아닌)
-
await(): 현재 스레드를 대기 상태로 전환하고, 다른 스레드가signal()또는signalAll()메서드를 호출할 때까지 기다립니다. 스레드는Lock객체를 소유하고 있는 상태에서 이 메서드를 호출해야 합니다.synchronized에서의 wait()메서드와 같다.
-
awaitUninterruptibly():await()와 동일하지만 인터럽트를 무시하고 대기합니다. -
await(long time, TimeUnit unit): 일정 시간 동안 대기하고, 시간이 경과하거나 다른 스레드가signal()또는signalAll()메서드를 호출할 때까지 기다립니다. -
awaitUntil(Date deadline): 지정된 시간까지 대기하고, 시간이 경과하거나 다른 스레드가signal()또는signalAll()메서드를 호출할 때까지 기다립니다. -
signal(): 대기 중인 하나의 스레드를 깨웁니다. 선택된 스레드는 대기 상태에서 벗어나서 실행 대기 상태로 전환됩니다.synchronized에서의 norify()와 같다.
-
signalAll(): 대기 중인 모든 스레드를 깨웁니다. 모든 스레드는 대기 상태에서 벗어나서 실행 대기 상태로 전환됩니다.synchronized에서의 notifyAll()과 같다.
예제 > Condition인스턴스 기반의 실행순서 동기화 사례
두 개의 쓰레드를 생성해, 하나는 프로그램 사용자로부터 문자열을 입력받고, 다른 하나는 입력받은 문자열을 출력하는 쓰레드다.
import java.util.concurrent.locks.ReentrantLock;
import java.util.concurrent.locks.Condition;
import java.util.Scanner;
class StringComm
{
String newString;
boolean isNewString=false;
private final ReentrantLock entLock=new ReentrantLock();//스레드의 동기화를 제어하기 위해
private final Condition readCond=entLock.newCondition();
private final Condition writeCond=entLock.newCondition();
public void setNewString(String news)
{
entLock.lock();
try
{
if(isNewString==true)
writeCond.await();
newString=news;
isNewString=true;
readCond.signal();
}
catch(InterruptedException e)
{
e.printStackTrace();
}
finally
{
entLock.unlock();
}
}
public String getNewString()
{
String retStr=null;
entLock.lock();
try
{
if(isNewString==false)
readCond.await();
retStr=newString;
isNewString=false;
writeCond.signal();
}
catch(InterruptedException e)
{
e.printStackTrace();
}
finally
{
entLock.unlock();
}
return retStr;
}
}
class StringReader extends Thread
{
StringComm comm;
public StringReader(StringComm comm)
{
this.comm=comm;
}
public void run()
{
Scanner keyboard=new Scanner(System.in);
String readStr;
for(int i=0; i<5; i++)
{
readStr=keyboard.nextLine();
comm.setNewString(readStr);
}
}
}
class StringWriter extends Thread
{
StringComm comm;
public StringWriter(StringComm comm)
{
this.comm=comm;
}
public void run()
{
for(int i=0; i<5; i++)
System.out.println("read string: "+comm.getNewString());
}
}
class ConditionSyncStringReadWrite
{
public static void main(String[] args)//쓰레드 1
{
StringComm strComm=new StringComm();
StringReader sr=new StringReader(strComm); //쓰레드 2
StringWriter sw=new StringWriter(strComm); //쓰레드 3
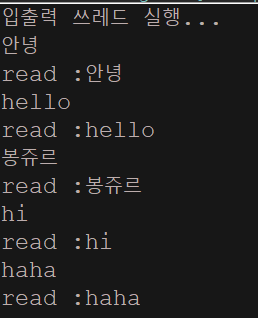
System.out.println("입출력 쓰레드의 실행...");
sr.start();
sw.start();
}
}Thread예제
예제 1 - 쓰레드의 스케줄링과 우선순위 컨트롤
class MessageSendingThread extends Thread
{
    String message;
    int priority;

    public MessageSendingThread(String str)
    {
        message=str;
    }
    public void run()
    {
        for(int i=0; i<1000000; i++)
            System.out.println(message+"("+getPriority()+")");//우선순위 가져오기
    }
}

class PriorityTestOne
{
    public static void main(String[] args)
    {
        MessageSendingThread tr1=new MessageSendingThread("First");
        MessageSendingThread tr2=new MessageSendingThread("Second");
        MessageSendingThread tr3=new MessageSendingThread("Third");
        tr1.start();
        tr2.start();
        tr3.start();
    }
}
스케줄링에 사용되는 알고리즘의 기본원칙
- 우선순위가 높은 쓰레드의 실행을 우선한다.
- 동일한 우선순위의 쓰레드가 둘 이상 존재할 때는 CPU의 할당시간을 분배해서 실행한다.
예제 2 - 우선순위
class MessageSendingThread extends Thread
{
    String message;

    public MessageSendingThread(String str, int prio)
    {
        message=str;
        setPriority(prio);
    }
    public void run()
    {
        for(int i=0; i<1000000; i++)
        {
            System.out.println(message+"("+getPriority()+")");

            try
            {
                sleep(1); //0.001초동안 스레드 정지
                // sleep은 Thread 클래스의 static 메소드로서, 실행흐름을 일시적으로 멈추는 역할을 한다.
            }
            catch (InterruptedException e)
            {
                e.printStackTrace();
            }
        }
    }
}

class PriorityTestThree
{
    public static void main(String[] args)
    {
        MessageSendingThread tr1
            =new MessageSendingThread("First", Thread.MAX_PRIORITY); //최대 우선순위 10
        MessageSendingThread tr2
            =new MessageSendingThread("Second", Thread.NORM_PRIORITY); //중간 우선순위 5
        MessageSendingThread tr3
            =new MessageSendingThread("Third", Thread.MIN_PRIORITY); //최소 우선순위 1
                                             //static상수로 가져다 쓰는게 좋다.(운영체제에 따른 차이를 최소하기 위해서)
        tr1.start();
        tr2.start();
        tr3.start();
    }
}- 실행결과를 보면, 높은 우선순위의 쓰레드가 둘씩이나 존재함에도 불구하고 꿋꿋이 실행되고 있는 가장 낮은우선순위의 쓰레드를 볼 수 있다. <> 우선순위가 가장 높은 쓰레드가 종료되어야, 그 다음 우선순위의 쓰레드가 실행된다.
- 비록 우선순위가 낮은 쓰레드라 하더라도 높은 우선순위의 쓰레드가 CPU를 양보해서 실행의 기회를 얻게 되면, 최소 단위의 실행 시간은 보장을 받는다.
- 결론적으로 낮은 우선순위의 쓰레드도 충분히 실행의 기회를 얻을 수 있고, 또 실제로 실행도 된다.
예제3 - 동기화처리
동기화처리를 하면 성능이 떨어진 > 느려짐 (Vector)
오전문제
class Increment
{
    int num=0;
    public void increment(){ num++; }
//    public synchronized void increment(){ num++; }
    public int getNum() { return num; }
}

class IncThread extends Thread
{
    Increment inc;

    public IncThread(Increment inc)
    {
        this.inc=inc;
    }
    public void run()
    {
        for(int i=0; i<10000; i++)
            for(int j=0; j<10000; j++)
                inc.increment();
    }
}

class ThreadSyncError
{
    public static void main(String[] args)
    {
        Increment inc=new Increment();
        IncThread it1=new IncThread(inc);
        IncThread it2=new IncThread(inc);
        IncThread it3=new IncThread(inc);

        it1.start();
        it2.start();
        it3.start();

        try
        {
            it1.join();
            it2.join();
            it3.join();
        }
        catch(InterruptedException e)
        {
            e.printStackTrace();
        }

        System.out.println(inc.getNum());
    }
}
예제 4 - 수학연산
class Calculator
{
    int opCnt=0;

    public int add(int n1, int n2)
    {
        opCnt++;
        return n1+n2;
    }
    public int min(int n1, int n2)
    {
        opCnt++;
        return n1-n2;
    }
    public void showOpCnt()
    {
        System.out.println("총 연산 횟수: "+opCnt);
    }
}

class AddThread extends Thread
{
    Calculator cal;

    public AddThread(Calculator cal) { this.cal=cal; }

    public void run()
    {
        System.out.println("1+2="+cal.add(1, 2));
        System.out.println("2+4="+cal.add(2, 4));
    }
}

class MinThread extends Thread
{
    Calculator cal;

    public MinThread(Calculator cal) { this.cal=cal; }

    public void run()
    {
        System.out.println("2-1="+cal.min(2, 1));
        System.out.println("4-2="+cal.min(4, 2));
    }
}

class ThreadSyncMethod
{
    public static void main(String[] args)
    {
        Calculator cal=new Calculator();
        AddThread at=new AddThread(cal);
        MinThread mt=new MinThread(cal);

        at.start(); //자동 run()호출
        mt.start();

        try
        {
            at.join();
            mt.join();
        }
        catch(InterruptedException e)
        {
            e.printStackTrace();
        }

        cal.showOpCnt();
    }
}
Thread6
문제 1
package com.test.memo;

import java.util.concurrent.locks.ReentrantLock;

class IHaveTwoNum {
    int num1 = 0;
    int num2 = 0;
//    Object key1 = new Object(); 이렇게 할 필요없이 아래처럼 객체 생성해서 lock
    private final ReentrantLock key1 = new ReentrantLock();
    private final ReentrantLock key2 = new ReentrantLock();

    public void addOneNum1() {
        key1.lock();
        try {
            num1 += 1;
        } finally {
            key1.unlock();
        }
    }

    public void addTwoNum1() {
        key1.lock();
        try {
            num1 += 2;
        } finally {
            key1.unlock();
        }
    }

    public void addOneNum2() {
        key2.lock();
        try {
            num2 += 1;
        } finally {
            key2.unlock();
        }
    }

    public void addTwoNum2() {
        key2.lock();
        try {
            num2 += 2;
        } finally {
            key2.unlock();
        }
    }

    public void showAllNums() {
        System.out.println("num1: " + num1);
        System.out.println("num2: " + num2);
    }
}

class AccessThread extends Thread {
    IHaveTwoNum twoNumInst;

    public AccessThread(IHaveTwoNum inst) {
        twoNumInst = inst;
    }

    public void run() {
        twoNumInst.addOneNum1();
        twoNumInst.addTwoNum1();

        twoNumInst.addOneNum2();
        twoNumInst.addTwoNum2();
    }
}

public class Organize {

    public static void main(String[] args) {
        IHaveTwoNum numInst = new IHaveTwoNum();

        AccessThread at1 = new AccessThread(numInst);
        AccessThread at2 = new AccessThread(numInst);

        at1.start();
        at2.start();

        try {
            at1.join();
            at2.join();
        } catch (InterruptedException e) {
            e.printStackTrace();
        }
        numInst.showAllNums();
    }
}-
ReentrantLock클래스는 명시적으로lock()및unlock()메서드를 호추랗여 잠금을 획득 및 해제할 수 있다. > Collection객체를 사용하지 않아도 스레드의 동기화를 제어할 수 있다.Condition은 주로ReentrantLock의 상태를 기다리거나 조정하기 위해 사용된다.
문제 2
-
ReentrantLock 인스턴스를 대상으로 newCondition이라는 이름의 메소드를 호출하면, Condition형 인스턴스가 반환된다(정확히는 Condition 인터페이스를 구현하는 인스턴스의 참조 값이 반환된다). 그리고 반환된 인스턴스를 대상으로 다음의 메소드를 호출할 수 있다.
- awit 낮잠을 취한다.(wait 메소드에 대응)
- signal 낮잠 자는 쓰레드 하나를 깨운다(notify 메소드에 대응)
- signalAll 낮잠 자는 모든 스레드를 깨운다(notifyAll 메소드에 대응)

이런 형태로 생성해 메서드 호출 가능
- 예제를 통해서 Condition 인스턴스 기반의 실행순서 동기화의 사례를 보여라. 이 예제에서는 두 개의 쓰레드가 생성되는데, 하나는 프로그램 사용자로부터 문자열을 입력 받는 쓰레드이고, 다른 하나는 입력 받은 문자열을 출력하는 쓰레드이다.
package com.test.memo;

import java.util.Scanner;
import java.util.concurrent.locks.Condition;
import java.util.concurrent.locks.ReentrantLock;

class Comm {
    String newString;
    boolean isNewString = false; // 새로운 문자열이 설정 되었는지

    private final ReentrantLock ent = new ReentrantLock();
    private final Condition read = ent.newCondition();
    private final Condition write = ent.newCondition();

    void setNewString(String input) {
        ent.lock();
        try {// if가 아닌 while로도 가능
            if (isNewString == true) {// 새로운 문자열이 있으면 write대기
                write.await();
            }
            newString = input;
            isNewString = true;
            read.signal(); // 대기중인 스레드에게 신호

        } catch (InterruptedException e) {
            e.printStackTrace();
        } finally {
            ent.unlock();
        }
    }

    String getNewString() {
        String str = null;

        ent.lock();
        try {
            if (!isNewString) { // 새로운 문자열이 없으면
                read.await(); // 새로운 문자열이 설정될때 까지 대기
            }
            str = newString;
            isNewString = false; // write에 보내줄거니까 flase로 변환
            write.signal(); // 대기중인 스레드에게 신호

        } catch (InterruptedException e) {
            e.printStackTrace();
        } finally {
            ent.unlock();
        }
        return str;
    }
}

class StringReader extends Thread {
    Comm com;

    StringReader(Comm com) {
        this.com = com;
    }

    @Override
    public void run() {
        Scanner sc = new Scanner(System.in);
        String read;

        for (int i = 0; i < 5; i++) {
            read = sc.nextLine();
            com.setNewString(read);
        }
    }
}

class StringWriter extends Thread {
    Comm com;

    StringWriter(Comm com) {
        this.com = com;
    }

    @Override
    public void run() {
        for (int i = 0; i < 5; i++) {
            System.out.println("read :" + com.getNewString());
        }
    }
}

public class Organize {

    public static void main(String[] args) {
        Comm strCom = new Comm();
        StringReader sr = new StringReader(strCom);
        StringWriter sw = new StringWriter(strCom);

        System.out.println("입출력 쓰레드 실행...");
        sr.start();
        sw.start();
    }
}
Callable & Future
Callable
-
Callable은 Runnable과 비슷한 인터페이스지만, 작업의 결과를 반환하고 예외를 던질 수 있다.
-
Callable은
java.util.concurrent패키지에 속해있다. -
call()메서드를 구현해야한다. > Functional Interface일반적으로 ExecutorService의 submit 메서드를 사용하여 Callable을 실행한다.
  import java.util.concurrent.Callable;


public class MyCallable implements Callable<Integer> {
    @Override
    public Integer call() throws Exception {
        // 비동기 작업을 수행하고 결과를 반환
        return 42;
    }
}
Future
- Future는 비동기 작업의 결과를 나타내는 인터페이스입니다.
- 비동기 작업이 완료되면 결과를 검색할 수 있습니다.
- java.util.concurrent 패키지에 속해 있습니다.
- 비동기 작업의 상태를 확인하고 작업이 완료될 때 결과를 가져오는 데 사용됩니다.
  import java.util.concurrent.*;

public class Main {
    public static void main(String[] args) throws Exception {
        ExecutorService executor = Executors.newSingleThreadExecutor();
        Callable<Integer> callable = new MyCallable();

        Future<Integer> future = executor.submit(callable);

        // 작업이 완료될 때까지 기다리고 결과를 가져옴
        Integer result = future.get();
        System.out.println("Result: " + result);

        executor.shutdown();
    }

}
Future는 비동기 작업의 상태를 추적하고 결과를 가져오는 데 사용된다.
예를 들어, get() 메서드를 호출하면 작업이 완료될 때까지 현재 스레드를 블록하고, 작업이 완료되면 결과를 반환한다.
Thread 기능 예제
쓰레드 실행 흐름(속도) 차이
class MakeThreadMultiDemo {
    public static void main(String[] args) {
        Runnable task1 = () -> {    // 20 미만 짝수 출력
            try {
                for(int i = 0; i < 20; i++) {
                    if(i % 2 == 0)
                        System.out.print(i + " ");
                    Thread.sleep(100);    // 0.1초간 잠을 잔다.
                }
            } catch(InterruptedException e) {
                e.printStackTrace();
            }
        };

        Runnable task2 = () -> {    // 20 미만 홀수 출력
            try {
                for(int i = 0; i < 20; i++) {
                    if(i % 2 == 1)
                        System.out.print(i + " ");
                    Thread.sleep(100);
                }
            } catch(InterruptedException e) {
                e.printStackTrace();
            }
        };

        Thread t1 = new Thread(task1);
        Thread t2 = new Thread(task2);

        t1.start();
        t2.start();
    }
}

/*
//실행 결과
0 1 2 3 4 5 6 7 8 9 10 11 12 13 14 15 16 17 18 19
*/- 보통 쓰레드 하나의 CPU의 코어 하나가 할당되어 동시에 실행이 이뤄진다. sleep()메소드로 값을 하나 출력할 때마다 0.1씩 잠이 들어서 두 개의 쓰레드가 번갈아 가면서 출력하게 된다.
synchronized
class Counter {
    int count = 0;

    public void increment() {
        synchronized(this) {
            count++;
        }
    }

    public void decrement() {
        synchronized(this) {
            count--;
        }
    }

    public int getCount() { return count; }
}

class MutualAccessSyncBlock {
    public static Counter cnt = new Counter();

    public static void main(String[] args) throws InterruptedException {
        Runnable task1 = () -> {
            for(int i = 0; i<1000; i++)
                cnt.increment();
        };

        Runnable task2 = () -> {
            for(int i = 0; i<1000; i++)
                cnt.decrement();
        };


        Thread t1 = new Thread(task1);
        Thread t2 = new Thread(task2);

        t1.start();
        t2.start();

        t1.join();
        t2.join();

        System.out.println(cnt.getCount());
    }
}

/*
실행결과
0
*/
동기화 필요성
class Counter {
    int count = 0;         // 두 쓰레드에 의해 공유되는 변수

    public void increment() {
        count++;        // 첫 번째 쓰레드에 의해 실행되는 문장
    }

    public void decrement() {
        count--;        // 또 다른 쓰레드에 의해 실행되는 문장
    }

    public int getCount() { return count; }
}

class MutualAccess {
    public static Counter cnt = new Counter();

    public static void main(String[] args) throws InterruptedException {
        Runnable task1 = () -> {
            for(int i = 0; i<1000; i++)
                cnt.increment();    // 값을 1 증가
        };

        Runnable task2 = () -> {
            for(int i = 0; i<1000; i++)
                cnt.decrement();    // 값을 1 감소
        };

        Thread t1 = new Thread(task1);
        Thread t2 = new Thread(task2);

        t1.start();
        t2.start();

        t1.join();        // t1이 참조하는 쓰레드의 종료를 기다림
        t2.join();        // t2가 참조하는 쓰레드의 종료를 기다림

        System.out.println(cnt.getCount());
    }
}

/*
실행결과
39
*/-
"둘 이상의 쓰레드가 동일한 변수에 접근하는 것은 문제를 일으킬 수 있다."
둘 이상의 쓰레드가 동일한 메모리 공간에 접근해도 문제가 발생하지 않도록 '동기화(synchoronization)'을 해야한다.
쓰레드 풀
import java.util.concurrent.Executors;
import java.util.concurrent.ExecutorService;

class ExecutorsDemo {
    public static void main(String[] args) {
        Runnable task = () -> {     // 쓰레드에게 시킬 작업 > run()인것이 된다.
            int n1 = 10;
            int n2 = 20;
            String name = Thread.currentThread().getName();
            System.out.println(name + ": " + (n1 + n2));
        };

        ExecutorService exr = Executors.newSingleThreadExecutor();
        exr.submit(task);    // 쓰레드 풀에 작업을 전달하면서 run()실행

        System.out.println("End " + Thread.currentThread().getName());

        exr.shutdown();    // 쓰레드 풀과 그 안에 있는 쓰레드의 소멸
    }
} newSingleThreadExecutor()풀 안에 하나의 쓰레드만 생성하고 유지한다.
newFixedThreadPool()풀 안에 인자로 전달된 수의 쓰레드를 생성하고 유지한다.newCachedThreadPool()풀 안의 쓰레드의 수를 작업의 수에 맞게 유동적으로 관리한다.
쓰레드 풀 여러개
import java.util.concurrent.Executors;
import java.util.concurrent.ExecutorService;

class ExecutorsDemo2 {
    public static void main(String[] args) {
        Runnable task1 = () -> {
            String name = Thread.currentThread().getName();
            System.out.println(name + ": " + (5 + 7));
        };

        Runnable task2 = () -> {
            String name = Thread.currentThread().getName();
            System.out.println(name + ": " + (7 - 5));
        };

        ExecutorService exr = Executors.newFixedThreadPool(2);
        exr.submit(task1);
        exr.submit(task2);
        exr.submit(() -> {
            String name = Thread.currentThread().getName();
            System.out.println(name + ": " + (5 * 7));
        });

        exr.shutdown();
    }
}

/*
실행결과
pool-1-thread-2: 2
pool-1-thread-1: 12
pool-1-thread-2: 35
*/- 쓰레드 2가 먼저 실행이 끝나고 3번째 스레드를 수행한다.
Collable & Future
Runnable 인터페이스의 run()메소드는 반환형이 void이므로 작업의 결과를 return할 수 없다.
-
Runnable과 비슷한 인터페이스지만, 작업의 결과를 반환하고 예외를 던질 수 있다.
Callable은 java.util.concurrent 패키지에 속해 있고, call()메서드를 구현해야한다 > 추상메서드가 한개 이므로 Functional Interface로 람다가 가능하다.
  import java.util.concurrent.Future;
  import java.util.concurrent.Callable;
  import java.util.concurrent.Executors;
  import java.util.concurrent.ExecutorService;
  import java.util.concurrent.ExecutionException;


class CallableDemo {
    public static void main(String[] args)
              throws InterruptedException, ExecutionException {
        Callable<Integer> task = () -> { //call()메소드 호출
            int sum = 0;
            for(int i = 0; i < 10; i++)
                sum += i;
            return sum;
        };

        ExecutorService exr = Executors.newSingleThreadExecutor();
        Future<Integer> fur = exr.submit(task);

        Integer r = fur.get();
        System.out.println("result: " + r);
        exr.shutdown();
    }

}

/*
실행결과
result: 45

*/
ReentrantLock()
import java.util.concurrent.Executors;
import java.util.concurrent.ExecutorService;
import java.util.concurrent.locks.ReentrantLock;
import java.util.concurrent.TimeUnit;

class Counter {
    int count = 0;
    ReentrantLock criticObj = new ReentrantLock();

    public void increment() {
        criticObj.lock(); //동기화 구조

        try {
            count++;
        } finally {
            criticObj.unlock();
        }
    }

    public void decrement() {
        criticObj.lock();

        try {
            count--;
        } finally {
            criticObj.unlock();
        }
    }

    public int getCount() { return count; }
}

class MutualAccessReentrantLock {
    public static Counter cnt = new Counter();

    public static void main(String[] args) throws InterruptedException {
        Runnable task1 = () -> {
            for(int i = 0; i < 1000; i++)
                cnt.increment();
        };

        Runnable task2 = () -> {
            for(int i = 0; i < 1000; i++)
                cnt.decrement();
        };

        ExecutorService exr = Executors.newFixedThreadPool(2);
        exr.submit(task1);
        exr.submit(task2);

        exr.shutdown(); //쓰레드 풀에 전달된 작업이 마무리되면 폐쇄하라고 명령을 하는데 바로 반환되기 때문에 아래 문장이 꼭 필요한 것이다.
        exr.awaitTermination(100, TimeUnit.SECONDS);//쓰레드 풀에 전달된 모든 작업이 100이내에 작업이 완료되면 true, 아니면 false반환

        System.out.println(cnt.getCount());
    }
}

/*
실행 결과
0
*/
일반적으로 ExecutorService의 작업을 실행한 후에 shutdown() 메서드를 호출하고 나서 awaitTermination() 메서드를 호출하여 모든 작업이 완료될 때까지 기다린다.
동기화된 ArrayList<>
ArraList<>인스턴스 대상으로는 둘 이상의 쓰레드가 동시에 접근하는 코드를 ㅁ나들면 안된다.
import java.util.List;
import java.util.ArrayList;
import java.util.Collections;
import java.util.ListIterator;
import java.util.concurrent.Executors;
import java.util.concurrent.ExecutorService;
import java.util.concurrent.TimeUnit;

class SyncArrayList {
    public static List<Integer> lst =
              Collections.synchronizedList(new ArrayList<Integer>());

    public static void main(String[] args) throws InterruptedException {
        for(int i = 0; i < 16; i++)
            lst.add(i);
        System.out.println(lst);

        Runnable task = () -> { //람다로 구현 Iterator()는 동기화처리되지 않는다.
            ListIterator<Integer> itr = lst.listIterator();
            //아래 주석처리 된 부분처럼 synchronized를 통해 따로 반복자를 동기화 해줘야한다.

            while(itr.hasNext())
                itr.set(itr.next() + 1); //itr가 가져온 값에 +1
        };
/*
        Runnable task = () -> { //이 코드로 해야 Iterator()까지 동기화 처리된것
            synchronized(lst) { //동기화 블록의 내부를 실행할 때 lst에 다른 쓰레드의 접근을 허용하지 않는다.
                ListIterator<Integer> itr = lst.listIterator();

                while(itr.hasNext())
                    itr.set(itr.next() + 1);
            }
        };
*/

        ExecutorService exr = Executors.newFixedThreadPool(3); //3개짜리 풀 생성
        exr.submit(task);
        exr.submit(task);
        exr.submit(task); //쓰레드 3개 실행

        exr.shutdown();
        exr.awaitTermination(100, TimeUnit.SECONDS);
        System.out.println(lst);
    }
}

/*
실행결과
[0, 1, 2, 3, 4, 5, 6, 7, 8, 9, 10, 11, 12, 13, 14, 15]
[2, 3, 4, 5, 6, 7, 8, 9, 10, 11, 13, 13, 14, 16, 17, 18]
*/- 쓰레드 3개를 실행시켰을 때 위에서 itr로 값에 +1 시켜줘서, 총 +3이 된거니까 3부터 출력이 되야하는데 출력값을 보면 2로, 동기화처리가 안된걸 알 수 있다.
- 그 이유는 ArrayList는 동기화 처리가 됐지만 Iterator()가 동기화처리가 되지 않았기 때문에 잘못된 값이 나온거다. 주석 처리된 부분 처럼 수정해줘야한다.
Thread 기능 문제
- main 쓰레드의 이름을 출력해 보자.
package com.test.memo;

public class Practice {
    public static void main(String[] args) {
        System.out.println(Thread.currentThread().getName());
    }
}//main 출력- 실행 결과가 다음과 같이 나오도록 람다를 완성하자.
0 2 4 6 8 10 12 14 16 18
package com.test.memo;

public class Practice {
    public static void main(String[] args) {

        Runnable task1 = () -> { // 쓰레드에게 시킬 작업
            for (int i = 0; i < 20; i += 2) {
                System.out.print(i + " ");
            }
        };
        Thread t1 = new Thread(task1);
        t1.start();
    }
}//0 2 4 6 8 10 12 14 16 18 - 람다 표현식으로 작성된 Runnable객체다. > 스레드가 실행할 작업을 정의하기 위한 인터페이스
- Runnable의 run()메서드를 람다 표현식으로 구현한 것이다. 이후 Runnable객체를 이용해 새로운 스레드를 생성해 start()메서드를 호출하여 스레드를 실행시킨다.
- 다음 task를 쓰레드풀을 생성한 후에 그 쓰레드풀을 이용해서 실행하자.그리고 쓰레드 풀을 소멸하도록 하자.
   import java.util.concurrent.Executors;
   import java.util.concurrent.ExecutorService;

class ExecutorsDemo {
    public static void main(String[] args) {
        Runnable task = () -> {     // 쓰레드에게 시킬 작업
            int n1 = 10;
            int n2 = 20;
            String name = Thread.currentThread().getName();
            System.out.println(name + ": " + (n1 + n2));
        };

        ExecutorService exr = Executors.newSingleThreadExecutor(); //단일 쓰레드 생성 (쓰레드 풀로 사용할 쓰레드 생성)
        exr.submit(task);    // 쓰레드 풀에 작업을 전달하면서 run()이 실행 > 위에서는 람다로 표현

        System.out.println("End " + Thread.currentThread().getName());

        exr.shutdown();    // 쓰레드 풀과 그 안에 있는 쓰레드의 소멸
    }

}-
submit(): 쓰레드 풀에 작업 전달 -
shutdown(): 생성된 스레드 풀과 그 안에 존재하는 스레드 소멸바로 종료되지 않고, 스레드가 실행 중이라면 해당 실행을 마치고 종료된다.(해당 실행이 끝나면 추가적으로 실행되지않음)
-
함수형 인터페이스는 람다로 구현 가능하다. > F3누르면 해당 코드 속성 볼 수 있다.
-
Runnable은 Functional Interface로 하나의 추상 메서드를 가지고 있는 인터페이스다.
Runnable은 run()메서드 하나만을 가지고 있기 때문에 Functional Interface다.
- 쓰레드풀을 만들고, Callable 인터페이스를 기반으로 1부터 10까지 더한 값을 반환 받도록 코드를 작성하자.
import java.util.concurrent.Future;
import java.util.concurrent.Callable;
import java.util.concurrent.Executors;
import java.util.concurrent.ExecutorService;
import java.util.concurrent.ExecutionException;

class CallableDemo {
    public static void main(String[] args)
              throws InterruptedException, ExecutionException {
        Callable<Integer> task = () -> {
            int sum = 0;
            for(int i = 0; i < 10; i++)
                sum += i;
            return sum;
        };

        ExecutorService exr = Executors.newSingleThreadExecutor(); //스레드 한 개 생성
        Future<Integer> fur = exr.submit(task); //task를 실행하고, 작어브이 결과를 나타내는 Future객체를 반환한다. > 작업의 상태 추척 및 완료되면 결과 얻을 수 있다.

        Integer r = fur.get();
        System.out.println("result: " + r);
        exr.shutdown();
    }
}- 단일 스레드로 작업을 실행하고, 해당 작업의 결과를 Future 객체를 통해 추적하는 방법을 보여준다.
- ArrayList의 동기화 처리 예시를 작성하자.
   import java.util.List;
   import java.util.ArrayList;
   import java.util.Collections;
   import java.util.ListIterator;
   import java.util.concurrent.Executors;
   import java.util.concurrent.ExecutorService;
   import java.util.concurrent.TimeUnit;

class SyncArrayList {
    public static List<Integer> lst =
              Collections.synchronizedList(new ArrayList<Integer>());

    public static void main(String[] args) throws InterruptedException {
        for(int i = 0; i < 16; i++)
            lst.add(i);
        System.out.println(lst);

        Runnable task = () -> {
            synchronized(lst) {
                ListIterator<Integer> itr = lst.listIterator();

                while(itr.hasNext())
                    itr.set(itr.next() + 1);
            }
        };

        ExecutorService exr = Executors.newFixedThreadPool(3);
        exr.submit(task);
        exr.submit(task);
        exr.submit(task);

        exr.shutdown();
        exr.awaitTermination(100, TimeUnit.SECONDS);
        System.out.println(lst);
    }

}
자바의 정석 Thread 예제
1번 - 싱글 스레드
package com.test.memo;

import javax.swing.JOptionPane;

public class Practice {
  public static void main(String[] args) {
      String input = JOptionPane.showInputDialog("아무값이나 입력하세요");
      System.out.println("입력한 값은 " + input + " 입니다.");

      for (int i = 0; i < 10; i++) {
          System.out.println(i);
      }
      try {
          Thread.sleep(1000);//사용자가 입력 후 숫자를 출력하고 1초뒤 종료
      } catch (InterruptedException e) {
          e.printStackTrace();
      }
  }
}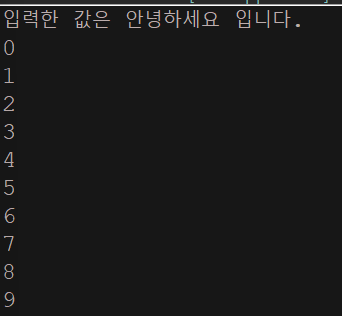
-
main쓰레드로 사용자의 입력을 받고, 화면에 출력하는 작업을 수행한다.
- 하나의 쓰레드이기 때문에 사용자가 입력을 마치기 전까지 화면에 숫자가 출력되지 않다가 사용자가 입력을 마치고 나서야 화면에 숫자가 출력된다.
2번 - 멀티 스레드
package com.test.memo;

import javax.swing.JOptionPane;

public class Practice {
    public static void main(String[] args) {
        ExThread t1 = new ExThread();
        t1.start();

        String input = JOptionPane.showInputDialog("아무값이나 입력하세요");
        System.out.println("입력한 값은 " + input + " 입니다.");

        for (int i = 0; i < 10; i++) {
            System.out.println(i);
        }
        try {
            Thread.sleep(1000);
        } catch (InterruptedException e) {
            e.printStackTrace();
        }
    }
}
class ExThread extends Thread{

    @Override
    public void run() {
        for(int i = 10; i > 0 ; i--) {
            System.out.println(i);
        }
        try {
            sleep(1000);
        } catch (InterruptedException e) {
            e.printStackTrace();
        }
    }
}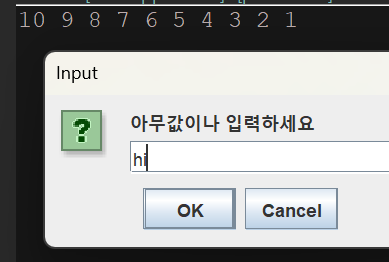
-
ExThread가 시작되면 main 스레드는 사용자 입력을 기다리는
JOptionPane.showInputDialog()메서드에서 블록되어 멈추게 된다.-
이렇게 되면 ExThread는 계속해서 실행되며 출력한다. 사용자가 입력을 완료하고 main 스레드가 다시 실행될 때, ExThread가 이미 시작되어 출력을 생성하고 있기 때문에 ExThread가 먼저 출력될 수 있다.
-
그래서 main 스레드가
JOptionPane.showInputDialog를 실행하는 동안ExThread가 먼저 실행되고 출력되는 것이다.
-

- 스레드간의 실행 순서가 항상 예측 가능한것은 아니다. 그러나. 독립적으로 실행되는 백그라운드 스레드로서 병행 실행되고, main스레드는 메인 프로그램 흐름을 실행하고 사용자 입력을 기다리는 역할을 수행하고, ExThread는 계속 실행되고 있기에 이는 예측가능한 스레드라고 할 수 있다.