
오전문제
- 다음과 같이 실행 결과가 나오도록 하자.
import java.util.*;
class HashMapEx4 {
public static void main(String[] args) {
String[] data = { "A","K","A","K","D","K","A","K","K","K","Z","D" };
HashMap map = new HashMap();
}
}
실행결과
A : ### 3
D : ## 2
Z : # 1
K : ###### 6
package com.test.memo;

import java.util.HashMap;

public class Practice2 {
    public static void main(String[] args) throws Exception {
        String[] data = { "A", "K", "A", "K", "D", "K", "A", "K", "K", "K", "Z", "D" };

        HashMap<String, Integer> map = new HashMap<>();

        // 데이터 배열에서 각 문자의 출현 빈도를 카운트하여 map에 저장
        for (String s : data) {
            // map에 해당 문자가 이미 있는 경우 기존 값에서 1을 증가시키고,
            // 없는 경우 1로 초기화하여 추가
            map.put(s, map.getOrDefault(s, 0) + 1);
        }

        // map을 이용하여 출력 형식에 맞게 결과 출력
        for (String key : map.keySet()) {
            System.out.print(key + " : ");
            for (int i = 0; i < map.get(key); i++) {
                System.out.print("#");
            }
            System.out.println(" " + map.get(key));
        }
    }
}-
map.put(s, map.getOrDefault(s, 0) +1getOrDefault(s, 0)메서드는 s값이(key)에 이미 존재하는 경우 해당 value가 반환되고, 존재하지 않은경우 기본값으로 설정한 0이 반환된다. >> 뒤에 +1을 하는 이유는, 해당값이 존재하면 +1시켜야하고 존재하지 않아도 새로 +1해야하기때문에 따로 +1시켜주는 것이다.
- 다음 실행결과를 보고 main메소드를 완성하시오. 필요하다면 추가적인 메소드랑 클래스도 만드시오.
class TreeMapEx1 {
public static void main(String[] args) {
String[] data = { "A","K","A","K","D","K","A","K","K","K","Z","D" };
TreeMap map = new TreeMap();
}
}
실행결과
= 기본정렬 =
A : ### 3
D : ## 2
K : ###### 6
Z : # 1
= 값의 크기가 큰 순서로 정렬 =
K : ###### 6
A : ### 3
D : ## 2
Z : # 1
package com.test.memo;

import java.util.Comparator;
import java.util.HashMap;
import java.util.Map;
import java.util.TreeMap;

public class Practice2 {
    public static void main(String[] args) throws Exception {
        String[] data = { "A", "K", "A", "K", "D", "K", "A", "K", "K", "K", "Z", "D" };

        HashMap<String, Integer> map = new HashMap<>();

        // 각 문자의 등장 횟수를 세어 HashMap에 저장
        for (String s : data) {
            map.put(s, map.getOrDefault(s, 0) + 1);
        }

        // 값의 크기가 큰 순서대로 정렬 - HashMap은 정렬된 키의 컬렉션이 아니기 때문에 TreeMap으로 생성해 정렬해준다.
        TreeMap<String, Integer> reverMap = new TreeMap<>(new Comparator<String>() {

            @Override
            public int compare(String o1, String o2) {
                return map.get(o2).compareTo(map.get(o1));
            }
        });
        reverMap.putAll(map);

        // 기본 정렬 결과 출력
        for (Map.Entry<String, Integer> ent : map.entrySet()) {
            String key = ent.getKey();
            String bar = "#".repeat(ent.getValue());
            System.out.println(key + " : " + bar + " " + ent.getValue());
        }
        System.out.println();
        // 크기가 순 순서대로 정렬
        for (Map.Entry<String, Integer> ent : reverMap.entrySet()) {
            String key = ent.getKey();
            String bar = "#".repeat(ent.getValue());
            System.out.println(key + " : " + bar + " " + ent.getValue());
        }
    }
}
for문으로 출력
package com.test.memo;

import java.util.Comparator;
import java.util.TreeMap;

public class Organize {

    public static void main(String[] args) throws Exception {
        String[] data = { "A", "K", "A", "K", "D", "K", "A", "K", "K", "K", "Z", "D" };
//         TreeMap<String, Integer> map = new TreeMap<>(new Comparator<String>() {
//
//            @Override
//            public int compare(String o1, String o2) {
//                return map.get(o2) - map.get(o1);
//            } > 아직 map 이 정의도지 않았기떄문에 Comparator안에서 에러
//    });

//            @Override > 키값으로 내림차순 Z K D A
//            public int compare(String o1, String o2) {
//                return o2.compareTo(o1);
//            }

        TreeMap<String, Integer> map = new TreeMap<>();

        for (String s : data) {
            map.put(s, map.getOrDefault(s, 0) + 1);
        }
        TreeMap<String, Integer> revMap = new TreeMap<>(new Comparator<String>() {

            @Override
            public int compare(String o1, String o2) {
//                return map.get(o2).compareTo(map.get(o1));이렇게도 가능
                return map.get(o2) - map.get(o1);
            }

        });
        revMap.putAll(map);
        for (String key : map.keySet()) {
            System.out.print(key + " : ");
            for (int i = 0; i < map.get(key); i++) {
                System.out.print("#");
            }
            System.out.println(" " + map.get(key));
        }

        System.out.println();
        for (String key : revMap.keySet()) {
            System.out.print(key + " : ");
            for (int i = 0; i < revMap.get(key); i++) {
                System.out.print("#");
            }
            System.out.println(" " + map.get(key));
        }
    }
}
열거형(enum)
서로 관련된 상수를 편하게 선언하기 위한 것으로, 상수를 여러개 정의해야 할 때 사용한다.
즉, 서로 연관된 상수들의 집합
-
모든 열거형은
java.lang.Enum<E> 클래스를 상속하고, Object클래스를 상속받는다.(그러나 Object메소드 toString()만 오버라이딩 가능) -
C언어에서는 enum클래스가 단순히 상수들의 집합으로 사용되지만, java에서는 타입까지 비교가 가능하다.
-
열거형은 주로 고정된 상수 집합을 정의할 떄 사용되며, 코드의 가독성과 유지보수성을 향상시킨다.
-
선언된 상수는 제일 왼쪽이나, 첫번째에 있는 상수부터 0번째 값을 가지고있다.
enum 선언
enum은 클래스 외부에도 선언할 수 있고, 클래스 내부에도 선언할 수 있다.
-
접근제어자 enum "enum클래스명"으로 선언하면 된다.- 이후 내부에 상수를 선언하는데 상수명을 대문자로 사용하는 것이 관례이며, 콤마(,)로 연결하여 상수를 선언하면 된다.
클래스 내부에서 선언
public class Cafe {

   public enum Coffee {  // Enum 클래스 선언
      AMERICANO, //0번쨰
      CAPPUCCINO, //1번째
      CAFELATTE, //2번째
   }

   public static void main(String[] args) {
   }
}
클래스 외부에서 선언
public enum Coffee {  // Enum 클래스 선언
   AMERICANO,
   CAPPUCCINO,
   CAFELATTE,
}
enum 객체 생성 - case문
"enum 클래스명{ 상수 이름 }"으로 객체를 생성할 수 있다.
enum Scale {
   DO, RE, MI, FA, SO, RA, TI
}

class SimpleEnum {
    public static void main(String[] args) {
        Scale sc = Scale.DO;
        System.out.println(sc);

        switch(sc) {
        case DO:
            System.out.println("도~ ");
            break;
        case RE:
            System.out.println("레~ ");
            break;
        case MI:
            System.out.println("미~ ");
            break;
        case FA:
            System.out.println("파~ ");
            break;
        default:
            System.out.println("솔~ 라~ 시~ ");
        }
    }
}-
위 예제는 열거형 Scale의 정의다. Scale안에 위치한 이름들을 가리켜 '열거형 값' 이라 한다.(Enumerated Values)
-
기본적으로 '열거형 값'은
Scale.DO와 같이 표현하지만 case문에서는 표현의 간결함을 위해 DO와 같이 '열거형 값'의 이름만 명시하기로 약속되어 있다.
enum Animal { DOG, CAT }

enum Person { MAN, WOMAN }

class SafeEnum {
    public static void main(String[] args) {
        System.out.println(Animal.DOG);
        // 정상적인 메소드 호출
        who(Person.MAN);

        // 비정상적 메소드 호출
//    who(Animal.DOG);
    }

    public static void who(Person man) {
        switch(man) {
        case MAN:
            System.out.println("남성 손님입니다.");
            break;
        case WOMAN:
            System.out.println("여성 손님입니다.");
            break;
        }
    }
}- 주석처리한 부분이 비정상적인 메소드 호출인 이유는 who메소드에서 인자값이 Person으로 되어있기 떄문이다.
public class Cafe {

   public enum Coffee {
      AMERICANO,
      CAPPUCCINO,
      CAFELATTE,
   }

   public int getCoffeeValue(Coffee type) {  //Enum 상수를 매개변수로 받음
      switch(type) {
      case AMERICANO:
         return 1500;
      case CAPPUCCINO:
         return 2300;
      case CAFELATTE:
         return 2000;
      default:
         return 0;
      }
   }

   public static void main(String[] args) {
      Cafe sample = new Cafe();
      System.out.println(sample.getCoffeeValue(Coffee.AMERICANO));
                                                  //만약 변수로 선언하고싶다면 Coffee TypeOfCoffee = Coffee.AMERICANO; 이렇게 선언해서 괄호 안에 TypeOfCoffee를 넣으면 된다..
   }
}
enum상수에 값 지정
enum 상수에 값을 지정함으로써 보다 간결하게 만들 수 있다.
public class Cafe {

   public enum Coffee {// 객체를 생성하면 컴파일러에서 자동으로 생성자를 실행해, 값을 생성자에 저장하고 getValue()를 실행하면 해당 값이 리턴되는 것이다.
      AMERICANO(1500),
      CAPPUCCINO(2300),
      CAFELATTE(2000);

      private final int value;
      Coffee(int i) { //enum 생성자
         this.value = i;
      }
      public int getValue() { //enum상수 값을 불러오기 위한 메소드
         return value;
      }
   }

   public static void main(String[] args) {
      System.out.println(Coffee.AMERICANO.getValue());
      // 1500 출력
   }
}-
값을 지정하기 위해선 소괄호() 안에 값을 적어주면 된다.
-
값을 지정하기 위해 반드시 생성자가 존재해야한다. > enum객체 생성 시 객체에 값을 저장하기 위한 용도로 사용된다.
접근제어자는 private, pacakage-private만 가능)
상수에 여러 값 저장 가능
public enum Coffee {
   AMERICANO(1500, true, "Y"),
   CAPPUCCINO(2300, true, "Y"),
   CAFELATTE(2000, false, "N");

   private final int value;
   private final boolean discount;
   private final String count;
   Coffee(int value, boolean discount, String count) {
      this.value = value;
      this.discount = discount;
      this.count = count;
   }
   public int getValue() {
      return value;
   }
   public boolean getDiscount() {
      return discount;
   }
   public String getCount() {
      return count;
   }
}- 생성자에 저장되어야하기 때문에 그에 맞는 final 변수를 선언해 저장해줘야 한다.
enum 메소드와 Object메소드 오버라이딩
- Object의 메소드인 hashCode(), equals() 메소드는 Override 할 수 없고,
toString() 메소드만 Override 하여 사용할 수 있다.
toString() 예제1
package com.test.memo;

class Customer {
    enum Gender {
        MALE, FEMALE
    }

    private String name;
    private Gender gen;

    Customer(String n, String g) {
        name = n;

        if (g.equals("man"))
            gen = Gender.MALE;
        else
            gen = Gender.FEMALE;
    }

    @Override
    public String toString() {
        if (gen == Gender.MALE)
            return "Thank you, Mr " + name;
        else
            return "Thank you, Mrs " + name;
    }

}

public class Organize {

    public static void main(String[] args) {
        Customer cus1 = new Customer("Brown", "man");
        Customer cus2 = new Customer("Susan Hill", "woman");

        System.out.println(cus1);
        System.out.println(cus2);
    }

}
//Thank you, Mr Brown
//Thank you, Mrs Susan Hill
toString() 예제2 일반 클래스로(열거형을 생성하는 과정 모방) > 잘못된 예제
package com.test.memo;

class Person {
  public static final Person MAN = new Person();//열거형 값의 실체를 설명하는 문장
  public static final Person WOMAN = new Person(); //생성자가 private이라 직접호출 불가

  @Override
  public String toString() {
      return "I am a dog person";
  }
}

public class Organize {

  public static void main(String[] args) {
      System.out.println(Person.MAN); //I am a dog person
      System.out.println(Person.WOMAN); //I am a dog person
  }
}-
위와같이 열거형 상수를 생성자를 통해 생성하는 것은 열거형의 의도와 맞지않다.
-
열거형을 정의할 때는 열거형 상수만을 열거형의 선언으로 사용해야한다.
-
java컴파일러는 열거형 구조를 강제하지 않기때문에 위와같은 구조가 컴파일은 된다.
위 예제는 일반 클래스를 사용해 비슷한 동작을 구현했기에 컴파일이 됐지만 만약 class Person을 enum Person으로 했다면 컴파일 오류가 발생한다.
예제 2를 enum클래스로 > 맞는 예제
enum Person {
  MAN, WOMAN;

  @Override
  public String toString() {
      return "I am a dog person";
  }
}

class EnumConst {
  public static void main(String[] args) {
      System.out.println(Person.MAN);
      System.out.println(Person.WOMAN);
  }
}-
두 열거형값은 Person 인스턴스를 참조하는 참조변수이다. 이에 대한 증거로 예제에서는
System.out.println(Person.MAN);문장을 통해 toString 메소드가 호출되었음을 보이고 있다. -
열거형 정의에도 생성자가 없으면 디폴트 생성자가 삽입된다. 다만 생성자는 private으로 선언되어 직접 인스턴스를 생성하는 것이 불가능해진다.
enum 클래스의 메소드
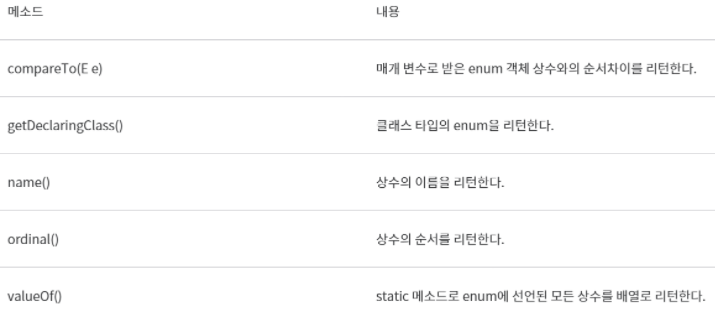
-
compareTo(E e): 이 메서드는 열거형 상수의 순서를 비교하는 데 사용된다. E는 해당 열거형 클래스를 가리키는 타입 매개변수다. 두 열거형 상수 사이의 순서 차이를 나타내는 정수를 반환한다.
-
getDeclaringClass(): 이 메서드는 해당 열거형 상수가 속한 클래스의 Class 객체를 반환한다.
-
name(): 이 메서드는 해당 열거형 상수의 이름을 문자열로 반환다.
-
ordinal(): 이 메서드는 해당 열거형 상수의 순서(0부터 시작)를 반환한다.
-
valueOf():이 메서드는 해당 문자열과 일치하는 열거형 상수를 반환하는 열거형 클래스에서 자동으로 생성되는 메서드로, 대부분의 경우 상수 이름을 기반으로 열거형 상수를 찾아 반환한다.
이 메서드는 static메서드로, enum클래스에서 상속받는 메서드는 아니다.
compareTo()
Enum은 선언된 순서대로 상수들의 순서가 정해진다. compareTo 메소드는 이 상수의 순서 차이를 리턴한다. 같은 상수라면 '0', 호출한 객체의 상수가 매개변수로 받은 상수보다 앞에있다면 음수(-)를 뒤에 있다면 양수를(+) 리턴한다.
public class Cafe {

   public enum Coffee {
      AMERICANO(1500),
      CAPPUCCINO(2300),
      CAFELATTE(2000);

      private final int value;
      Coffee(int i) {
         this.value = i;
      }
      public int getValue() {
         return value;
      }
   }

   public static void main(String[] args) {
      Coffee Cof1 = Coffee.AMERICANO;
      Coffee Cof3 = Coffee.CAFELATTE;
      System.out.println(Cof1.compareTo(Cof3));
      // -2 출력
   }
}
ordinal()
Enum 객체 상수의 순서를 리턴한다. 배열과 같이 첫번째 상수는 0부터 시작하여 1씩 커진다.
public class Cafe {

   public enum Coffee {
      AMERICANO(1500),
      CAPPUCCINO(2300),
      CAFELATTE(2000);

      private final int value;
      Coffee(int i) {
         this.value = i;
      }
      public int getValue() {
         return value;
      }
   }

   public static void main(String[] args) {
      Coffee Cof1 = Coffee.AMERICANO;
      Coffee Cof3 = Coffee.CAFELATTE;
      System.out.println(Cof1.ordinal());
      // 0 출력
      System.out.println(Cof3.ordinal());
      // 2 출력
   }
}
name
Enum 객체 상수를 리턴한다.
public static void main(String[] args) {
   Coffee Cof1 = Coffee.AMERICANO;
   System.out.println(Cof1.name());
   // AMERICANO 출력
}
value
Enum에 선언된 모든 상수를 Enum 자료형의 배열로 리턴한다.
public static void main(String[] args) {
   Coffee [] CofffeeArray = Coffee.values();
   for(Coffee cof: CofffeeArray) {
      System.out.print(cof+" ");
      // AMERICANO CAPPUCCINO CAFELATTE 출력
   }
}
Java enum의 특징
-
enum에 정의도니 상수들은 enum타입의 객체다. > 단순 정수 값이 아닌 해당 enum타입 객체다.
-
생성자와 메소드등을 추가할 수 있다.
-
enum은 다른 클래스와 비슷한 구조를 가져서 필드, 생성자, 메서드를 포함할 수 있다.
-
인터페이스(Interface): 열거형은 인터페이스를 구현할 수 있다. 이를 통해 열거형이 특정 인터페이스를 준수하도록 할 수 있습니다.
-
메서드(Method): 열거형은 메서드를 가질 수 있다. 이를 통해 각 열거형 상수에 대해 특정 동작을 정의할 수 있다.
-
Static 및 Final: 열거형의 필드는 기본적으로
public static final로 정의된다. 즉, 상수다. 또한 열거형의 메서드나 내부 클래스는static으로 선언될 수 있다.
-
제약 사항
-
상속(Inheritance): 열거형은 다른 클래스를 상속할 수 없다. Java는 단일 상속만을 지원하며 열거형은 이미
Enum클래스를 상속하고 있기 때문에 다른 클래스를 상속할 수 없다. -
인스턴스 생성(Instance Creation): 열거형의 인스턴스는 개발자가 직접 생성할 수 없다. 열거형 상수는 정의된 열거형 타입의 유일한 인스턴스이기 때문에 컴파일러가 자동으로 생성한다.
interface Scale {
 int DO = 0;    int RE = 1;
 int MI = 2;    int FA = 3;
 int SO = 4;    int RA = 5;
 int TI = 6;
}

class InterfaceBaseConst {
    public static void main(String[] args) {
        int sc = Scale.DO;

        switch(sc) {
        case Scale.DO:
            System.out.println("도~ ");
            break;
        case Scale.RE:
            System.out.println("레~ ");
            break;
        case Scale.MI:
            System.out.println("미~ ");
            break;
        case Scale.FA:
            System.out.println("파~ ");
            break;
        default:
            System.out.println("솔~ 라~ 시~ ");
        }
    }

}
열거형 메서드를 추가한 예제
interface AnimalSound {
    String makeSound();
}

enum Animal implements AnimalSound {
    DOG("Woof"),
    CAT("Meow"),
    COW("Moo");

    private final String sound;

    Animal(String sound) {
        this.sound = sound;
    }

    @Override
    public String makeSound() {
        return sound;
    }
}

public class Main {
    public static void main(String[] args) {
        for (Animal animal : Animal.values()) {
            System.out.println(animal + " makes " + animal.makeSound());
        }
    }
}
가변인자 ...
매개변수의 개수를 동적으로 지정하는 기능 > 컬렉션이나 배열을 사용한것과 비슷
타입 ... 변수명의 형식으로 선언한다.- 만약 가변인자 외에도 매개변수가 더 있다면, 가변인자를 매개변수 중 제일 마지막에 구현해야한다.
class Varargs {
    public static void showAll(String... vargs) {
        System.out.println("LEN: " + vargs.length);//length를 호출해 길이 확인

        for(String s : vargs)
            System.out.print(s + '\t');
        System.out.println();
    }
 /*  가변인자가 이렇게 처리하는 방식인것
    public static void showAll(String[] vargs) {...}
    public static void main(String[] args){
        showAll(new String[]{"Box"});
        showAll(new String[]{"Box", "Toy"});
        showAll(new String[]{"Box", "Toy", "Apple"});
    }
  */
    public static void main(String[] args) {
        showAll("Box");
        showAll("Box", "Toy");
        showAll("Box", "Toy", "Apple"); //이렇게 전달되면 가변인자에서 배열을 생성해 전달되는 인자를 담는다.(vargs에)
    }
}
/*
실행결과
LEN: 1
Box
LEN: 2
Box    Toy
LEN: 3
Box    Toy    Apple
*/
가변인자 오버로딩시 주의점
public class Main {
    public static void main(String[] args) {
        String[] strArr = {"100", "200", "300"};

        System.out.println(concatenate("", "100", "200", "300")); // 에러 발생
        System.out.println(concatenate("_", strArr));
        System.out.println(concatenate(",", new String[] {"1", "2", "3"}));
        System.out.println(concatenate(",", new String[0]));

    }

    static String concatenate(String... args) {
        return concatenate("", args);
    }

    static String concatenate(String delim, String... args) {
        String result = "";

        for(String str : args) {
            result += str + delim;
        }

        return result;
    }
}
concatenate메서드는 매개변수로 입력된 문자열에 구분자를 사이에 포함시켜 결갑해서 반환한다.
가변인자로 매개변수를 선언했기 때문에 문자열을 개수의 제약없이 매개변수로 지정할 수 있다.
String[] strArr = {"100", "200", "300"};System.out.println(concatenate("-", strArr));
위의 두 문장을 하나로 합치면 아래와 같이 쓸 수 있다.
System.out.println(concatenate("-", new String[] {"100", "200", "300"}));
그러나 아래와 같은 문장은 허용되지 않는다.
System.out.println(concatenate("-", {"100", "200", "300"}));System.out.println(concatenate("-", "100", "200", "300"));
에러 내용
java: reference to concatenate is ambiguous
both method concatenate(java.lang.String...) in Main and method concatenate(java.lang.String,java.lang.String...) in Main match
에러의 내용을 살펴보면 두 오버로딩된 메서드가 구분되지 않아서 발생하는 것임을 알 수 있다. 가변인자를 선언한 메서드를 오버로딩하면, 메서드를 호출했을 때 이와 같이 구별되지 못하는 경우가 발생하기 쉽기 때문에 주의해야 한다. 가능하면 가변인자를 사용한 메서드는 오버로딩 하지 않는 것이 좋다.
어노테이션 @
다른 프로그램에서 유용한 정보를 제공하기 위해 사용되는 것으로 주석과 같은 의미를 가진다.
어노테이션의 역할
- 컴파일러에게 문법 에러를 체크하도록 정보를 제공한다.
- 프로그램을 빌드할 때 코드를 자동으로 생성할 수 있도록 정보를 제공한다.
- 런타임에 특정 기능을 실행하도록 정보를 제공한다.
어노테이션의 종류
자바에서 기본적으로 제공하는 어노테이션이다.
@Override
컴파일러에게 메서드를 오버라이딩하는 것이라고 알린다.
@Deprecated
앞으로 사용하지 않을 대상임을 알린다.
@FunctionalInterface
함수형 인터페이스라는 것을 알린다.
@SuppressWarning
컴파일러가 경고 메시지를 나타내지 않는다.
@SafeVaragrs
제네릭과 같은 가변 인자의 매개변수를 사용할 때의 경고를 나타내지 않는다.
메타 어노테이션
어노테이션에 붙이는 어노테이션으로, 어노테이션을 정의하는 데 사용한다.
@Target
어노테이션을 정의할 때 적용 대상을 지정하는 데 사용한다.
@Documented
어노테이션 정보를 javadoc으로 작성된 문서에 포함시킨다.
@Inherited
어노테이션이 하위 클래스에 상속되도록 한다.
@Retention
어노테이션이 유지되는 기간을 정하기 위해 사용한다.
@Repeatable
어노테이션을 반복해서 적용할 수 있도록 한다.
사용자 정의 어노테이션
사용자가 직접 정의하여 사용하는 어노테이션이다.
람다식 (Lambda expression) ->
람다식(Lambda expression)은 간단히 말해서 메서드를 하나의 '식(expression)'으로 표현한 것이다. 메서드를 람다식으로 표현하면 메서드의 이름과 반환값이 없어지므로, 람다식을 '익명 함수(anonymous function)'이라고도 한다.
장점
- 코드의 간결함
- 컬렉션 요소(대용량 데이터)를 필터링 혹은 매핑하여 쉽게 데이터의 집계가 가능함
- 병렬처리의 가능과 안정적인 확장성
단점
- 일정 수준을 넘어가면 가독성에 영향을 미침
- 익숙하지 않은 사람에게는 쉽지 않은 호출 방식
[람다식의 사용 조건]
람다식은 함수적 인터페이스인 경우에만 사용이 가능하다.
- 여기서 함수적 인터페이스란 인터페이스가 단 한개의 추상 메소드를 정의하고 있는 인터페이스를 말한다. 이는 두개의 추상 메소드를 가지고 있다면, 람다식을 사용할 수 없다는 말이다. 이때 @FunctionalInterface 어노테이션을 인터페이스에 사용하면 해당 인터페이스는 하나의 메소드만 정의 할 수 있으면 두개 이상의 메소드를 정의하면 인터페이스에서 에러를 발생시킨다.
인터페이스를 구현하는 방식은 여러가지가 있다.
- 인터페이스를 작성하고 클래스로 구현해서 사용
- 인터페이스를 익명 함수로 구현해서 사용
- 람다식으로 사용
👉🏻 인터페이스를 익명 함수로 구현해서 사용하는 방법 👈🏻
public class Main {
    public static void main(String[] args) {
        //2. 익명함수로 메인 클래스 내에서 구현하여 호출
        MaxNumber maxNumber = new MaxNumber() {
            @Override
            public int getMaxNumber(int x, int y) {
                return x >= y ? x : y;
            }
        };
        System.out.println(maxNumber.getMaxNumber(3,1));
    }
}
MaxNumber Interface를 직접 메인 메소드 내에서 구현하여 호출한 방식이다.
똑같이 출력 결과가 3임을 알 수 있다.
👉🏻 람다식을 이용하여 호출하는 방법 👈🏻
public class Main {
    public static void main(String[] args) {
        //3. 람다식을 이용하여 호출 방식
        MaxNumber maxNumber = (x, y) -> x >= y ? x : y;
        System.out.println(maxNumber.getMaxNumber(3,1));
    }
}//3- MaxNumber Interface를 람다식으로 호출하고 메소드를 람다식 내 코드블록에서 구현해주었다.
[람다식의 생략 기법]
- 매개변수의 타입이 생략 가능하다.
MaxNumber maxNumber = (str) → {System.out.println(str);};
- 매개변수가 한개인 경우 소괄호 생략이 가능하다.
MaxNumber maxNumber = str → {System.out.println(str);};
- 코드블록 내 실행하는 코드가 한줄인 경우 중괄호 생략이 가능하다.
MaxNumber maxNumber = (str) → System.out.println(str);
- 코드블록 내 실행하는 코드가 return문만 있는 경우 중괄호와 return의 생략이 가능하다.
MaxNumber maxNumber = (str) → { return String.valueOf(str);};MaxNumber maxNumber = (str) → String.valueOf(str);
- 매개변수가 없는 경우 소괄호만 표시해준다.
MaxNumber maxNumber = () → System.out.println("매개변수 없음");
int[] arr = new int[5];
Arrays.setAll(arr, ()->(int)(Math.random()*5+1));    // arr=[1,5,2,1,1]

//위의 람다식을 메서드로 표현하면 다음과 같다.

int method() {
    return (int)(Math.random()*5 + 1;
}-
5개 배열을 선언했으니, 각 인덱스 요소마다 위 람다식이 실행되고, 람다식이 리턴한 값으로 요소가 채워진다.
-
람다식을 메서드로 표현한것이 아래
-
람다식을 인수로도 넣을 수 있고, 리턴값으로도 가능하다.(변수처럼 다룰 수 있음)
-
-
해당하는 함수형 인터페이스를 직접 명시해야한다.
-
Comparable인터페이스를 사용하려면 Comparable을 구현하는 클래스가 있어야한다. 그 후에 해당 클래스의 객체를 사용하여 람다식을 통해 정렬 수행을 할 수 있는 것이다.
-
반드시 추상 메서드는 한개만 존재해야 람다를 사용할수있다,
import java.util.*; class MyObject implements Comparable<MyObject> { private int value; public MyObject(int value) { this.value = value; } public int getValue() { return value; } @Override public int compareTo(MyObject other) { return this.value - other.value; } } public class Main { public static void main(String[] args) { List<MyObject> list = new ArrayList<>(); list.add(new MyObject(3)); list.add(new MyObject(1)); list.add(new MyObject(2)); Collections.sort(list, (obj1, obj2) -> obj1.compareTo(obj2)); for (MyObject obj : list) { System.out.println(obj.getValue()); } } } -
람다식 예제 1
//메서드
int max(int a, int b) {
    return a > b ? a : b;
}

//람다식
(1)
(int a, int b) -> { return a > b ? a : b?; }//한문장이면 중괄호 생략가능 > return도 반드시 생략
(2)
(int a, int b) -> a > b ? a : b//자료형도 생략 가
(3)
(a, b) -> a > b? a : b //이 형태를 제일 많이 씀 -
람다식이 한문장이면 중괄호 생략이 가능하고, return도 생략하고, 세미콜론도 생략해야한다.(위는 중괄호가 있어서 )
-
자료형 생략이 가능하다.
람다식 예제 2
//메서드
void printVar(String name, int i) {
    System.out.println(name + "=" + i);
}

//람다식
(1)
(String name, int i) -> { System.out.println(name + "=" + i); }
(2)
(name, i) -> { System.out.println(name + "=" + i); }//자료형을 생략할 수 있기 때문에 생략한 형태
(3)
(name,i) -> System.out.println(name + "=" + i)//중괄호 생략 가능- 반환타입과 메서드명을 제외하면 람다식이다.
람다식 예제 3
//메서드
int square(int x) {
    return x * x;
}

//람다식

(1)
(int x) -> x* x
(2)
(x) -> x * x
(3)
x -> x * x //인수가 하나면 소괄호 생략이 가능하다. - 인수가 하나면 소괄호 생략이 가능하다.
익명클래스와 람다식 문제
- 익명클래스로 바꿔보시오.
package com.test.memo;

interface Printable {
    void print();
}

class Papers {
    private String con;

    public Papers(String s) {
        con = s;
    }

    public Printable getPrinter() {
        return new Printable() {

            @Override
            public void print() {
                System.out.println(con);
            }
        };
    }
}

public class Practice {
    public static void main(String[] args) {
        Papers p = new Papers("서류 내용: 행복합니다.");
        Printable prn = p.getPrinter();
        prn.print();
    }
}- 주어진 소스코드 SortComparator.java를 익명 클래스로 바꿔 보시오.
package com.test.memo;

import java.util.ArrayList;
import java.util.Collections;
import java.util.Comparator;
import java.util.List;

public class Practice {
    public static void main(String[] args) {
        List<String> list = new ArrayList<>();
        list.add("ROBOT");
        list.add("APPLE");
        list.add("BOX");

        Collections.sort(list, new Comparator<String>() {

            @Override
            public int compare(String o1, String o2) {
                return o1.length() - o2.length();
            }

        }); // 정렬
        System.out.println(list);
    }
}- 익명클래스로 바꿔보시오.
package com.test.memo;

interface Printable {
    void print(String s);
}

public class Practice {
    public static void main(String[] args) {
        Printable prn = new Printable() {

            @Override
            public void print(String s) {
                System.out.println(s);
            }
        };
        prn.print("What is Lambda?");
    }
}- Lambda1.java를 람다로 바꿔보시오.
interface Printable {
    void print(String s);
}

class Lambda3 {
    public static void main(String[] args) {
        Printable prn = (s) -> { System.out.println(s); };
        prn.print("What is Lambda?");
    }
}

/*
What is Lambda?
*/- Printable인터페이스를 구현 안해놓고 하려해서 계속 오류난거였군..
-
interface Printable {
   void print(String s);
}
class Lambda4 {
   public static void ShowString(Printable p, String s) {

       p.print(s);

   }
   public static void main(String[] args) {

       ShowString(/* 코드 완성 */);

   }
}
/*
출력 결과가 다음과 같이 나오도록
ShowString에 적절한 인자를 전달하시오.
What is Lambda?
*/
1번
interface Printable {
    void print(String s);
}

class Lambda4 {
    public static void ShowString(Printable p, String s) {
        p.print(s);
    }

    public static void main(String[] args) {
        ShowString((s) -> { System.out.println(s); }, "What is Lambda?");
    }
}

/*
What is Lambda?
*/
2번
interface Printable {
    void print(String s);
}

class Lambda4 {
    public static void ShowString(Printable p, String s) {
        p.print(s);
    }

    public static void main(String[] args) {
        ShowString((s) -> { System.out.println(s); }, "What is Lambda?");
    }
}

/*
What is Lambda?
*/- 반드시 추상 메서드는 한개만 존재해야 람다를 사용할수있다.
람다식 문제
-
interface MyFunction{
    int max(int a, int b);
}

public class LambdaTest {

    public static void main(String[] args) {
        MyFunction f = new MyFunction() {
            public int max(int a, int b) {
                return a > b ? a : b;
            }
        };
        int big = f.max(5, 3);    // 익명 객체의 메소드 호출
        System.out.println(big);
    }
}
람다식으로 변경
package com.test.memo;

interface MyFunction {
    int max(int a, int b);
}

public class Practice {
    public static void main(String[] args) {
        MyFunction f = (a, b) -> a > b ? a : b;
        int big = f.max(5, 3); // 익명 객체의 메소드 호출
        System.out.println(big);
    }
}-
interface MyFunction2{
    void printVar(String name, int i);
}

public class LambdaTest2 {

    public static void main(String[] args) {
        MyFunction2 f = new MyFunction2() {
            public void printVar(String name, int i) {
                System.out.println(name + "=" + i);
            }
        };
        f.printVar("Hong", 100);    // 익명 객체의 메소드 호출
    }
}
람다식으로 변경
package com.test.memo;

interface MyFunction2 {
    void printVar(String name, int i);
}

public class Practice {
    public static void main(String[] args) {
        MyFunction2 f = (name, i) -> System.out.println(name + "=" + i);
        f.printVar("Hong", 100); // 익명 객체의 메소드 호출
    }
}-
interface MyFunction3{
    int square(int x);
}

public class LambdaTest3 {

    public static void main(String[] args) {
        MyFunction3 f = new MyFunction3() {
            public int square(int x) {
                return x * x;
            }
        };
        int num = f.square(5);    // 익명 객체의 메소드 호출
        System.out.println(num);
    }
}
람다식
 package com.test.memo;


interface MyFunction3 {
    int square(int x);
}

public class Practice {
    public static void main(String[] args) {
        MyFunction3 f = x -> x * x;
        int num = f.square(5); // 익명 객체의 메소드 호출
        System.out.println(num);
    }
}-
interface MyFunction4{
  int roll();
}

public class LambdaTest4 {

  public static void main(String[] args) {
      MyFunction4 f = new MyFunction4() {
          public int roll() {
              return (int) (Math.random() * 6);
          }
      };
      int num = f.roll();    // 익명 객체의 메소드 호출
      System.out.println(num);
  }
}
람다식
package com.test.memo;

interface MyFunction4 {
    int roll();
}

public class Practice {
    public static void main(String[] args) {
        MyFunction4 f = () -> (int) (Math.random() * 6);
        int num = f.roll(); // 익명 객체의 메소드 호출
        System.out.println(num);
    }
}-
interface MyFunction5{
    int sumArr(int[] arr);
}

public class LambdaTest5 {

    public static void main(String[] args) {
        MyFunction5 f = new MyFunction5() {
            public int sumArr(int[] arr) {
                int sum = 0;
                for(int i : arr)
                    sum += i;
                return sum;
            }
        };
        int num = f.sumArr(new int[] {1,2,3,4,5});    // 익명 객체의 메소드 호출
        System.out.println(num);
    }
}
람다식
package com.test.memo;

interface MyFunction5 {
    int sumArr(int[] arr);
}

public class Practice {
    public static void main(String[] args) {
        MyFunction5 f = arr -> {
            int sum = 0;
            for (int i : arr)
                sum += i;
            return sum;
        };
        int num = f.sumArr(new int[] { 1, 2, 3, 4, 5 }); // 익명 객체의 메소드 호출
        System.out.println(num);
    }
}-
import java.util.Arrays;
import java.util.Collections;
import java.util.Comparator;
import java.util.List;

public class LambdaTest6 {

    public static void main(String[] args) {
        List<String> list = Arrays.asList("abc", "aaa", "bbb", "ccc");
        Collections.sort(list, new Comparator<String>() {
            public int compare(String s1, String s2) {
                return s2.compareTo(s1);
            }
        });
        System.out.println(list);
    }
}
람다식
package com.test.memo;

import java.util.Arrays;
import java.util.Collections;
import java.util.List;

public class Practice {
    public static void main(String[] args) {
        List<String> list = Arrays.asList("abc", "aaa", "bbb", "ccc");
        Collections.sort(list, (s1, s2) -> s2.compareTo(s1));//내림차순
        System.out.println(list);
    }
}
파일 입출력
파일 입출력 메소드는 입력과 출력을 표준 입출력 장치가 아닌 파일로 처리하는 메소드다.
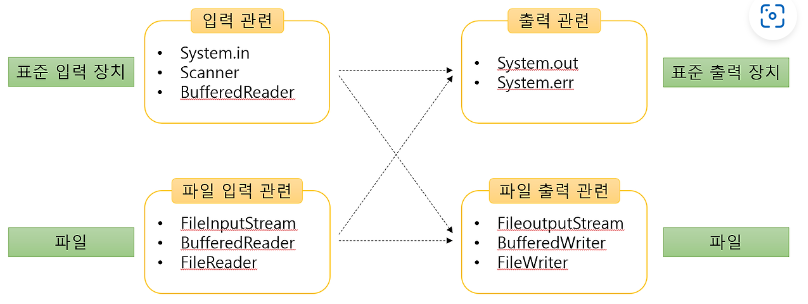
파일 입출력의 기본 과정
1단계 : 파일 열기
-
읽기용 :
FileInputStream 변수명 = new FileInputStream("파일명"); -
쓰기용 :
FileOutputStream 변수명 = new FileOuputStream("파일명");
2단계 : 파일 처리
- 데이터를 쓰거나 파일로부터 데이터를 읽어올 수 있는 상태
3단계 : 파일 닫기
- 변수명.close(); > try-with-resource문 이용해 자동으로 닫게 해줄 수 있음
스트림(Stream)이란?
스트림은 데이터를 송수신하기 위한 통로의 개념으로서 입력 혹은 출력, 한쪽 방향으로만 진행된다.
- 스트림에 데이터를 쓸 수 있고, 스트림에서 데이터를 읽을 수 있다.
특징
-
FIFO구조다.(컬렉션에서 큐와 동일)
- 먼저 들어간 데이터가 먼저 나오는 형태로, 데이터의 순서가 바뀌지 않는다.
-
스트림은 단방향이다.
- 읽기, 쓰기가 동시에 되지 않는다. > 읽는 스트림과 쓰는 스트림을 하나씩 열어 사용해야한다.
-
스트림은 지연될 수 있다.
-
넣어진 데이터가 처리되기 전까지는 스트림에 사용되는 스레드는 지연 상태에 빠진다.
- 따라서 네트워크 내에서는 데이터가 모두 전송되기 전까지 네트워크 스레드는 지연 상태가 된다.
-
스트림의 분류
1. 전송 방향에 의한 분류
-
입력 스트림 : 디바이스로부터 데이터를 읽어오는 스트림
-
출력 스트림 : 디바이스로 데이터를 출력하는 스트림
2. 전송 단위에 의한 분류
-
바이트스트림 : 1 Byte 단위로 입력, 출력하는 스트림
-
문자스트림 : 한 문자(2Byte) 단위로 입력, 출력하는 스트림
바이트 스트림(Byte Streams)
-
바이트 스트림은 데이터를 바이트(Byte)단위로 처리한다. > 1byte(영어, 특수기호)
- 주로 이진 데이터(이미지, 오디오, 비디오등)를 처리하는데 사용된다.
-
InputStream 및 OutputStream 클래스와 그 하위 클래스들이 이에 해당한다.
- 예시) FileInputStream . FileOutputStream , BufferedInputStream , BufferedOutputStream
FileInputStream은 예외처리가 꼭 필요하다.
main문에 throw Exception을 추가하거나, try catch문으로 IOException으로 예외처리를 해줘야 한다.
문자 스트림(Character Streams)
-
문자 스트림은 문자(char)단위로 데이터를 처리한다. > 2 byte(한글)
-
문자 데이터를 읽고 쓰는 데 사용되며, 문자의 인코딩 및 디코딩을 자동으로 처리한다.
-
텍스트 파일, 문자열, 문자열 표준 입력 및 출력 등에 사용된다.
-
Reader 및 Writer 클래스와 그 하위 클래스들이 이에 해당된다.
- FileReader, FileWriter, CharArrayReader, CharArrayWriter, PipedReader, PipedWriter, StringReader, StringWriter
- 문자 기반 보조 스트림
- BufferedReader/Writer, FilterReader/Writer, LineNumber Reader, PrintWriter, PushbackReader
fileWriter예제
package com.test.memo;

import java.io.FileWriter;
import java.io.IOException;
import java.io.Writer;

public class Practice1 {
    public static void main(String[] args) throws Exception {

        try (Writer out = new FileWriter("hyper.txt", true)) {
            out.write(65);
            out.write(66);
            out.close();
        } catch (IOException e) {
            e.printStackTrace();
        }
    }
}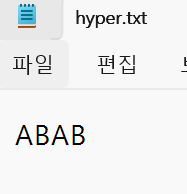
- 생성자에 파일명 옆에 true를 붙이면 추가해서 write가 들어가고, 아무것도 없다면 해당 파일이 존재해도 새로 생성해서 넣기 때문에 위와같이 추가적으로 들어가지 않는다.
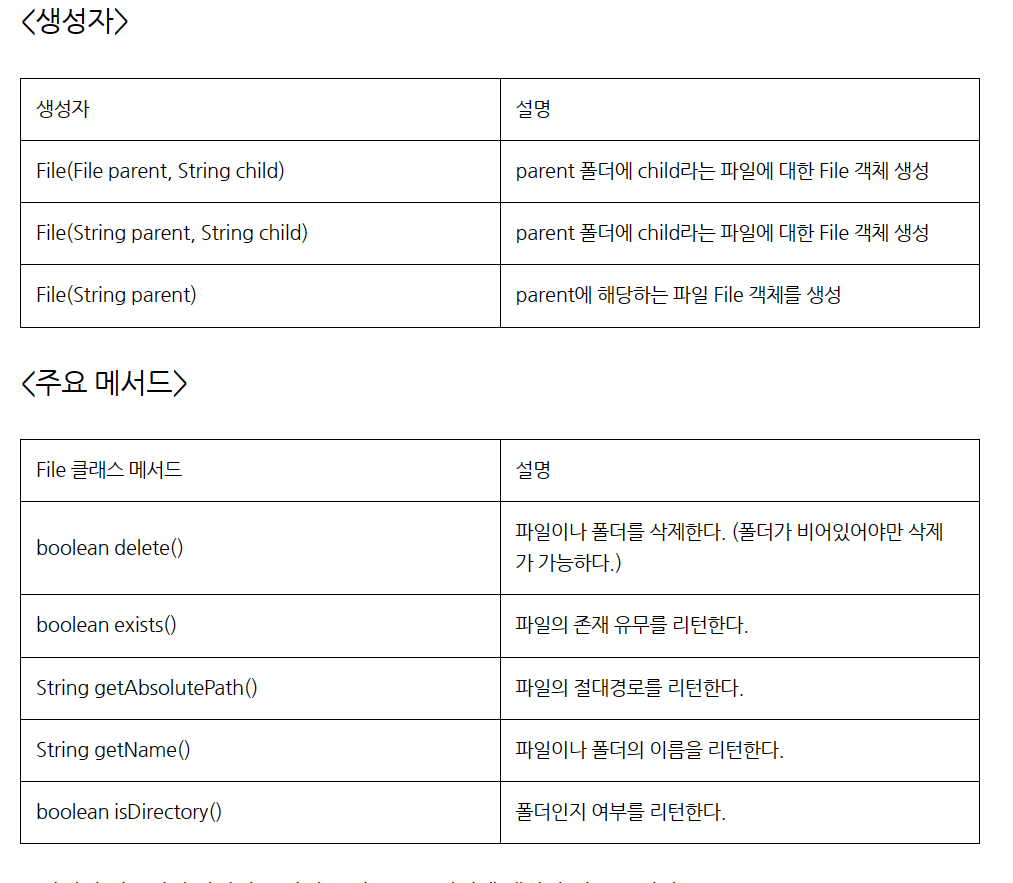
File 클래스
파일 시스템의 파일에 대한 경로명을 추상화한 클래스
-
File클래스는 파일 시스템의 파일에 대한 경로명을 추상화한 클래스다.
-
File 또는 dir의 경로를 나타내고, 속성을 읽고 변경할 수 있는 메서드를 제공한다.
-
파일이나 디렉토리를 생성, 삭제, 이름 변경 등의 작업을 수행할 때 사용된다.
-
주로 파일이나 디렉토리의 존재 여부를 확인하거나 파일의 속성(크기, 수정 일자 등)을 가져오는 데 사용된다.
-
파일 내용의 읽기 및 쓰기에 직접적으로 관여하지 않는다.
-
Buffered클래스
Buffered클래스들은 입출력 작업에서 버퍼링을 제공하여 입출력 효율을 높이는 데 사용된다. > 입출력 스트림이나 read() , writer()와 함께 사용된다.- 버퍼링은 데이터를 한 번에 조금씩 읽거나 쓰는 대신, 미리 버퍼에 읽어 놓거나 버퍼에 쓴 후에 한꺼번에 입출력하는 것을 의미한다.
- BufferedInputStream 및 BufferedOutputStream 클래스는바이트 스트림에 대한 버퍼링을 제공하고, BufferedReader 및 BufferedWriter 클래스는 문자 스트림에 대한 버퍼링을 제공한다.
- 버퍼링을 사용하면 입출력 작업이 더 효율적으로 이루어지므로, 작업의 성능을 향상시킬 수 있다.
따라서,
File클래스는 파일 시스템의 파일을 다루는 데 사용되고,Buffered클래스들은 입출력 작업에서 버퍼링을 통해 성능을 향상시키는 데 사용된다.종종 함께 사용되어 파일에 대한 입출력 작업을 수행하는 데 효율적으로 활용된다.
예제
InputStreamReader, FileInputStream(1바이트)
예제 1 - 파일 복사,개념
package com.test.memo;

import java.io.BufferedWriter;
import java.io.FileInputStream;
import java.io.FileOutputStream;
import java.io.FileWriter;
import java.io.IOException;
import java.io.InputStream;
import java.io.OutputStream;

public class Practice {
    public static void main(String[] args) throws IOException {
        try (BufferedWriter writer = new BufferedWriter(new FileWriter("org.txt"))) {
            writer.write("This is a new file created by Java program."); // 파일에 데이터 쓰기
        } catch (IOException e) {
            e.printStackTrace();
        }
        InputStream in = new FileInputStream("org.txt");
        OutputStream out = new FileOutputStream("cpy.txt");

        int copyByte = 0;
        int bData;

        while (true) {
            bData = in.read();
            if (bData == -1)
                break;

            out.write(bData);
            copyByte++;//1바이트씩 읽어들이는
        }

        if(in != null) in.close();
        if(out != null) out.close(); //안전성 up
        System.out.println("복사된 바이트 크기 " + copyByte);
    }
}//복사된 바이트 크기 43
위 예제처럼 코드를 짜지 않는다. 예외처리를 하지 않겠다고 메인메서드에서 던져주고있기 때문

- 위 사진을 보면 cpy.txt가 생성되었고, 해당 바이트의 크기를 출력하고 파일 안에 문장도 복사해있다.
예제 2 filterOut
필터 입력 스트림 클래스 - (FilterInputStream) 클래스를 상속한다.
필터 출력 스트림 클래스 - (FilterOutputStream) 클래스를 상속한다.
FilterInputStream 클래스와 FilterOutputStream 클래스도 각각 InputStream과 OutputStream을 상속하나, 최상위 클래스는 아니다.
import java.io.*;

class DataBufferFilterStream
{
    public static void main(String[] args) throws IOException
    {
        OutputStream out=new FileOutputStream("data.bin");//순서 중요
        BufferedOutputStream bufFilterOut=new BufferedOutputStream(out);
        DataOutputStream dataFilterOut=new DataOutputStream(bufFilterOut);

        dataFilterOut.writeInt(275);//4바이트 275로 읽어들임
        dataFilterOut.writeDouble(45.79);//8바이트 45.79로 읽어들임
        dataFilterOut.close();

        InputStream in=new FileInputStream("data.bin");
        BufferedInputStream bufFilterIn=new BufferedInputStream(in);
        DataInputStream dataFilterIn=new DataInputStream(bufFilterIn);
        int num1=dataFilterIn.readInt();
        double num2=dataFilterIn.readDouble();
        dataFilterIn.close();

        System.out.println(num1);//275 출력
        System.out.println(num2);//45.79 출력
    }
}- filterStream : 소스로부터 데이터를 읽는 기능이 아닌. 입력 스트림으로부터 읽혀진 데이터를 다양하게 가곡할 수 있는 기능이 존재
- DataOutputStream을 생성한 후에 데이터를 기록하는데, 이 과정에서 별도의 버퍼링을 수행하지 않는다.
- 이렇게 할 경우 매번 데이터를 쓸 때 마다 파일에 직접 쓰게되므로 파일 입출력 오버헤드가 발생
- BufferedOutputStream을 추가하여 버퍼링을 수행하는 것이다.
-BufferedOutputStream은 데이터를 일정한 크기의 버퍼에 임시로 저장한 후에 한 번에 파일에 쓰기 때문에 파일 입출력 횟수가 줄어들어 성능이 향상될 수 있습니다.
파일 입출력 문제1
-
I/O 모델의 핵심은 스트림을 이해하는데 있다. 본디 스트림이란 ( ), 또는 ( )를 의미한다.
- 일련의 연속적인 흐름 , 데이터의 흐름
- 스트림을 크게 둘로 나누면?
- 입력(Input) 스트림, 출력(Output) 스트림
- ( ) 클래스는 바이트 단위로 데이터를 읽어 들이는 모든 입력 스트림이 상속하는 최상위 클래스이다(Object 클래스 다음으로).
- InputeStream클래스
- 3번 클래스의 대표적인 메소드를 두개 꼽는다면?
public abstract int read() throws IOException: 입력 스트림으로 부터 1 바이트를 읽어들인다. 읽은 바이트를 반환하며, 파일의 끝에 도달하면 -1을 반환한다.public void close() throws IOException: 입력 스트림을 닫는다. 자원을 해제하고 연결된 파일이나 네트워크 등을 종료한다.
- ( ) 메소드는 1바이트의 데이터를 읽어서 반환하는 메소드이다.
- read()메소드
- read 메소드는 "더 이상 읽어 들일 데이터가 존재하지 않으면 ( )을 반환합니다."
- -1을 반환
- 입력 스트림의 형성을 위해 정의된 클래스와 출력 스트림의 형성을 위해 정의된 클래스는 서로 쌍(pair)을 이룬다.
-
InputStream <> OutputStream
-
FileInputStream <> FileOutputStream
InputStream에 대응하는 클래스는 OutputStream이다. 즉 OutputStream은 모든 출력 스트림이 상속하는 최상위 클래스이다. 그리고 FileOutputStream은 이를 상속하는 클래스이다.
- OutputStream의 대표적인 메소드 2가지?
-
public abstract void write (int b) throws IOException -
public void close() throws IOException
- 파일을 1바이트씩 복사하는 프로그램을 짜시오. 그리고 복사된 바이트를 출력하시오.
자바 7이전의 방법
package com.test.memo;


import java.io.FileInputStream;
import java.io.FileNotFoundException;
import java.io.FileOutputStream;
import java.io.IOException;
import java.io.InputStream;
import java.io.OutputStream;

public class Practice {
    public static void main(String[] args) {
        int r = 0;
        int cnt = 0;
        InputStream in = null;
        OutputStream out = null;

        try {
            in = new FileInputStream("Hi.txt");
            out = new FileOutputStream("HiCpy.txt");
            while ((r = in.read()) != -1) {
                cnt++;
                out.write(r);
            }
            System.out.println("복사된 byte는 " + cnt);
        } catch (FileNotFoundException e) {
            e.printStackTrace();
        } catch (IOException e) {
            e.printStackTrace();
        } finally {//이렇게 명시적으로 close()메서드를 호출하는 것은 예전 방법 아래 예제가 더 효율적
            try {
                if (in != null)
                    in.close();
                if (out != null)
                    out.close();
            } catch (IOException e) {
                e.printStackTrace();
            }
        }
    }

}
try-with-resources문을 이용 - 더 효율적
괄호()안에 객체를 생성하는 문장을 넣으면, 이 객체는 따로 close()를 호출하지 않아도 try블럭을 벗어나는 순간 자동적으로 close()가 호출된다.
package com.test.memo;

import java.io.FileInputStream;
import java.io.FileNotFoundException;
import java.io.FileOutputStream;
import java.io.IOException;

public class Practice {
   public static void main(String[] args) {
       int r = 0;
       int cnt = 0;
//        InputStream in = null;
//        OutputStream out = null;


       try (FileInputStream in = new FileInputStream("Hi.txt"); // 데이터를 읽어온다.
               FileOutputStream out = new FileOutputStream("Hicpy.txt")) { // 데이터를 쓴다.
           while ((r = in.read()) != -1) { // 파일의 끝에 도달하면 -1을 반환한다 그래서 그 전까지 반복문
               cnt++; // 몇바이트를 가져왔는지 센다.
               out.write(r); // 읽어온 바이트를 Hicpy에 쓴다.
           } // 파일 복사가 완료되면 try-with-resources구문이 자동으로 리소스를 닫는다.
           System.out.println("복사된 byte는 " + cnt);
       } catch (FileNotFoundException e) {
           e.printStackTrace();
       } catch (IOException e) {
           e.printStackTrace();
       }
//        } finally {
//            try {
//                if (in != null)
//                    in.close();
//                if (out != null)
//                    out.close();
//            } catch (IOException e) {
//                e.printStackTrace();
//            }
       }
   }
}FileInputStream은InputStream클래스를 상속받는 클래스다. 따라서 직접 사용할 수 있지만, 보통은 특정 유형의 스트림을 명시적으로 사용하는 것이 코드의 가독성을 높인다.FileInputStream은 파일로부터 데이터를 바이트 스트림으로 읽어오는 클래스다. > 문자 스트림도 존재
- . 1KB 정도되는 byte 배열을 생성해서 1KB 단위의 복사를 진행해 보려고 한다. 그 때 필요한 InputStream의 메소드는?
-
int read(byte[] b) throws IOException메소드의 인자로 byte형 배열의 참조를 전달 > 입력 스트림을 통해 읽어 들여진 데이터들이 배열에 저장
그리고 위 메소드는 실제 읽어 들인 데이터의 크기 반환더 이상 읽을 데이터가 존재하지 않으면 -1 반환
- 1KB 단위의 복사를 진행하려면 OutputStream 클래스의 어떤 메소드를 사용하나?
public void write(byte[] b, int off, int len) throws IOException- 위 메소드는 매개변수 b로 전달된 배열을 대상으로 off의 인덱스 위치서부터 시작해서 len 바이트를 출력 스트림을 통해서 전송하는 메소드이다.
- IKB 단위로 복사하는 파일 복사 프로그램을 완성하시오. 그리고 복사된 바이트를 출력하시오.
import java.io.FileInputStream;
import java.io.FileNotFoundException;
import java.io.FileOutputStream;
import java.io.IOException;

public class CopyTest2 {

    public static void main(String[] args) {

        byte[] r = new byte[1024];//1k가 1024byte
        int len = 0, total = 0;
        try(FileInputStream in = new FileInputStream("Grit.txt");
            FileOutputStream out = new FileOutputStream("GritCopy.txt")) {
            while( (len = in.read(r)) != -1)//읽어온 바이트 수 저장
            {
                total += len; //쓰여진 총 바이트 수
                out.write(r, 0, len);//r에 0부터 len까지 복
            }
            System.out.println(total + "바이트 배열 단위 파일 복사가 완료되었습니다.");
        } catch (FileNotFoundException e) {
            e.printStackTrace();
        } catch (IOException e) {
            e.printStackTrace();
        }
    }
}-
배열의 크기만큼 데이터를 읽어와 배열에 저장하고, 실제로 읽어온 바이트 수를 반환 > 잃어온 데이터의 수는 len에 저장된다.
-
read()메서드가 읽어온 바이트 수가 데이터의 실제 길이를 나타내는 것이다. > 이를 통해 배열에 저장된 데이터의 범위를 지정한다.
파일 입출력 문제 2
BufferedInputStream 버퍼 필터 입력 스트림
BufferedOutputStream 버퍼 필터 출력 스트림
- ('필터 스트림')은 그 자체로 파일과 같은 소스로부터 데이터를 읽는 기능은 지니고 있지 않다. 다만 입력 스트림으로부터 읽혀진 데이터를 다양하게 가공하는 기능만 있을 뿐이다. 이러한 필터 스트림도 다음과 같이 두 부류로 나뉜다.
-
필터 입력 스트림 입력 스트림에 연결하는 필터 스트림
-
필터 출력 스트림 출력 스트림에 연결하는 필터 스트림
- int, double과 같은 기본 자료형 데이터를 읽고 쓰는 게 생각만큼 간단한 일은 아니다. 하지만 필터 스트림인 (DataInputStream)과 (DataOutputStream)을 각각 입력 스트림과 출력 스트림에 연결하면, 기본 자료형 데이터의 입출력은 생각만큼 간단한 일이 되어 버린다.
- 정수 275와 실수 45.79를 파일에 저장하고 다시 읽어들여 출력해보자.
package com.test.memo;

import java.io.DataInputStream;
import java.io.DataOutputStream;
import java.io.FileInputStream;
import java.io.FileNotFoundException;
import java.io.FileOutputStream;
import java.io.IOException;
import java.io.InputStream;
import java.io.OutputStream;

public class Practice {
    public static void main(String[] args) {
        try (OutputStream out = new FileOutputStream("data.bin");
                DataOutputStream filterOut = new DataOutputStream(out)) {

            filterOut.writeInt(275);//파일에 275를 기록
            filterOut.writeDouble(45.79);//파일에 기록 > 바이트 형식으로 > 파일에 쓰기 전에는 바이트 배열에 임시로 저장되어있다.

        } catch (FileNotFoundException e) {
            e.printStackTrace();
        } catch (IOException e) {
            e.printStackTrace();
        }
        try (InputStream in = new FileInputStream("data.bin"); DataInputStream filterIn = new DataInputStream(in)) {
            //각각의 파일로부터 정수와 실수를 읽어온다.
            //파일에서 데이터를 읽어오면 해당하는 바이트 수를 해당하는 자료형으로 변환해 변수에 저장(이진 형식으로)
            int num1 = filterIn.readInt(); //이진 형식으로 저장된 값을 해당 자료형 형식으로 변환해 반환
            double num2 = filterIn.readDouble();

            System.out.println(num1);
            System.out.println(num2);

        } catch (FileNotFoundException e) {
            e.printStackTrace();
        } catch (IOException e) {
            e.printStackTrace();
        }
    }
}//275 45.79출력-
OutputStream은 바이트 단위로 데이터를 출력하는 스트림을 나타내는 추상 클래스다. -
FileOutputStream은 파일에 바이트 단위로 데이터를 출력하는 클래스입니다. -
DataOutputStream은 다양한 데이터 유형을 바이트 단위로 출력할 수 있는 스트림 클래스입니다."data.bin"이라는 파일에 데이터를 출력하기 위해
FileOutputStream을 생성하고, 이를DataOutputStream으로 감싸 데이터를 출력해준다.try-with-resources구문을 사용하여 자원을 자동으로 닫아줍니다.
- 버퍼 필터 스트림을 이용하여 파일 복사하는 프로그램 작성. 복사된 바이트도 출력해보자.
import java.io.BufferedInputStream;
import java.io.BufferedOutputStream;
import java.io.FileInputStream;
import java.io.FileNotFoundException;
import java.io.FileOutputStream;
import java.io.IOException;

public class JavaIO18 {

    public static void main(String[] args) {
        String inFileName = "Grit.txt";
        String outFileName = "cpy.txt";
        int readByte = 0;
        int byteCnt = 0;
        try(FileInputStream in = new FileInputStream(inFileName);
                BufferedInputStream bIn = new BufferedInputStream(in);
                FileOutputStream out = new FileOutputStream(outFileName);
                BufferedOutputStream bOut = new BufferedOutputStream(out))
        {
            while( (readByte=bIn.read()) != -1)
            {
                bOut.write(readByte);
                byteCnt++;
            }
            System.out.println(byteCnt+ "byte의 파일 복사가 완료되었습니다.");
        }
        catch(FileNotFoundException e)
        {
            System.out.println("파일이 존재하지 않습니다.");
            e.printStackTrace();
        }
        catch(IOException e)
        {
            e.printStackTrace();
        }
    }
}-
BufferedInputStream 데이터를 읽어 들이는 메소드 두개는?
-
public int read() throws IOException
-
public int read(byte[] b, int off, int len) throws IOException
-
-
데이터의 중요도가 높거나, 버퍼가 꽉차지 않아도 출력 스트림을 통해서 파일에 저장해야 할 데이터가 존재한다면 다음의 메소드를 호출해야 한다.
- public void flush() throws IOException
- 파일에 275와 45.79를 저장하는데, 버퍼링 기능도 추가하자. 그리고 다시 저장한 것을 읽어 들이자.
import java.io.BufferedInputStream;
import java.io.BufferedOutputStream;
import java.io.DataInputStream;
import java.io.DataOutputStream;
import java.io.FileInputStream;
import java.io.FileNotFoundException;
import java.io.FileOutputStream;
import java.io.IOException;

public class JavaIO21 {

    public static void main(String[] args) {
        String fileName="fbdTest.txt";

        try(FileOutputStream out = new FileOutputStream(fileName);
            BufferedOutputStream bOut = new BufferedOutputStream(out);
            DataOutputStream dataOut = new DataOutputStream(bOut))
        {
            dataOut.writeInt(275);
            dataOut.writeDouble(45.79);
        } catch (FileNotFoundException e) {
            e.printStackTrace();
        } catch (IOException e) {
            e.printStackTrace();
        }

        try(FileInputStream in = new FileInputStream(fileName);
            BufferedInputStream bIn = new BufferedInputStream(in);
            DataInputStream dataIn = new DataInputStream(bIn))
        {
            int intData = 0;
            double dblData = 0;
            intData = dataIn.readInt();
            dblData = dataIn.readDouble();
            System.out.println(intData + " " + dblData);
        } catch (FileNotFoundException e) {
            e.printStackTrace();
        } catch (IOException e) {
            e.printStackTrace();
        }
    }
}- 성능차이를 체크해보자. 처음에는 12.345를 중첩된 반복문 100000000 번씩을 통해 저장하고, 두번째로는 같은 동작을 하는데 버퍼링 필터 스트림이 추가된 상태로 체크해보자. 그래서 두 개의 성능차이를 비교해보자.
import java.io.*;

class DataBufferedFilterPerformance
{
    public static void performanceTest(DataOutputStream dataOut)
                                                throws IOException
    {
        long startTime=System.currentTimeMillis();
        for(int i=0; i<10000; i++)
            for(int j=0; j<10000; j++)
                dataOut.writeDouble(12.345);

        dataOut.flush();
        long endTime=System.currentTimeMillis();
        System.out.println("경과시간: "+ (endTime-startTime));
    }

    public static void main(String[] args) throws IOException
    {
        OutputStream out1=new FileOutputStream("data1.bin");
        DataOutputStream dataOut=new DataOutputStream(out1);
        performanceTest(dataOut);
        dataOut.close();

        OutputStream out2=new FileOutputStream("data2.bin");
        BufferedOutputStream bufFilterOut
                    =new BufferedOutputStream(out2, 1024*10);
        DataOutputStream dataBufOut=new DataOutputStream(bufFilterOut);
        performanceTest(dataBufOut);
        dataBufOut.close();
    }
}