onclick 으로 this보내기 id 값 출력
<!DOCTYPE html>
<html lang="en">
<head>
    <meta charset="UTF-8">
    <meta http-equiv="X-UA-Compatible" content="IE=edge">
    <meta name="viewport" content="width=device-width, initial-scale=1.0">
    <title>Document</title>
    <script>
        function hi(obj){
            console.log(obj.id);//hh
            console.log(obj.value);//g111
            console.log(obj.innerText);//good
            console.log(obj.tagName);//button
            obj.innerHTML = "Hello";
            console.dir(obj);
            console.log(obj);
            // document.write(document.getElementById("hh").value);
        }
    </script>
</head>
<body>
    <button id="hh" onclick="hi(this);" value="g111">good</button>
</body>
</html>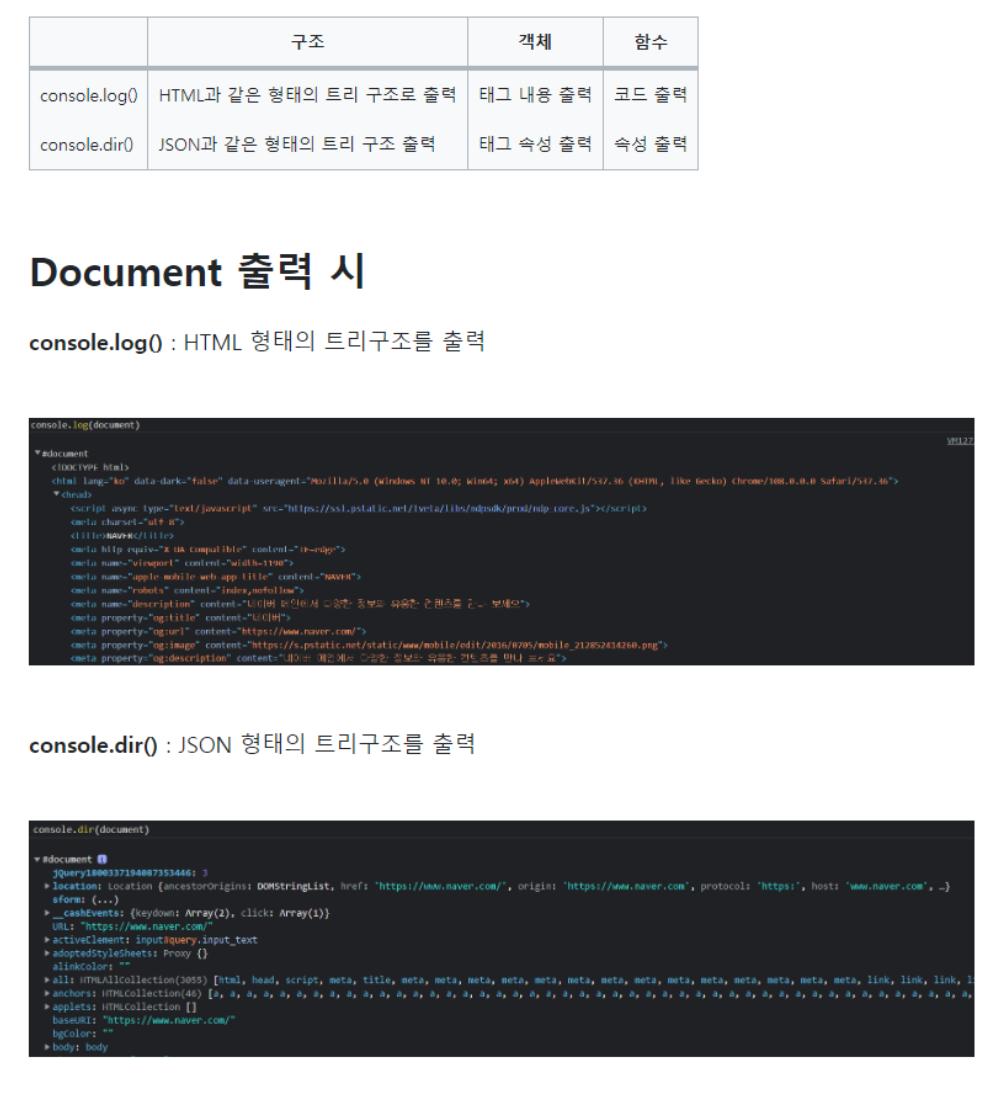
DOM의 특정 요소(element) 찾는 법
- getElementById()
- getElementsByClassName()
- getElementByTagName()
- querySelector() :하나를 선택
- querySelectorAll() :여러개를 선택
getElementById()
<!DOCTYPE html>
<html lang="en">
<head>
    <meta charset="UTF-8">
    <meta http-equiv="X-UA-Compatible" content="IE=edge">
    <meta name="viewport" content="width=device-width, initial-scale=1.0">
    <title>Document</title>
</head>
<body>
    <div id='div_1'>
        Div1입니다.
      </div>
      <div id='div_2'>
        Div2입니다.
      </div>
      <input type='button' value='getElementById() - id로 찾기' onclick='getDiv1()'/>
    <script>
        function getDiv1() {
            const div1 = document.getElementById('div_1');
            alert(div1.innerText);
        }

    </script>
</body>
</html>- document.getElementById();
- 파라미터로 찾으려는 id를 전달하여, 해당 element를 찾을 수 있습니다.
- id는 유일한 값이므로, 하나의 element만 리턴합니다.
getElementsByClassName()
<!DOCTYPE html>
<html lang="en">
<head>
    <meta charset="UTF-8">
    <meta http-equiv="X-UA-Compatible" content="IE=edge">
    <meta name="viewport" content="width=device-width, initial-scale=1.0">
    <title>Document</title>
</head>
<body>
    <div id='div_1' class='my_class'>
        Div1입니다.
      </div>
      <div id='div_2' class='my_class'>
        Div2입니다.
      </div>
      <div id='div_3' class='your_class'>
        Div3입니다.
      </div>
      <input type='button' value='getElementsByClassName() - class이름으로 찾기'
             onclick='getMyClass()'/>
    <script>
        function getMyClass() {
            const div_list
                = document.getElementsByClassName('my_class');

            // class가 'my_class'인 element 개수 출력
            const div_list_length = div_list.length;
            alert(div_list_length);

            // class가 'my_class'인 element 목록 출력
            for(let i = 0; i < div_list_length; i++)  {
                alert(div_list[i].innerText);
            }
        }
    </script>
</body>
</html>- document.getElementsByClassName('my_class');
- 클래스 이름으로 element를 찾아서, 이 클래스 이름을 가지는 모든 element 목록을 리턴합니다.
- 이 함수의 이름을 자세히 보면 getElementsByClassName으로 Element's'가 복수 형태인 것은 이 함수가 목록을 리턴하기 때문입니다.
<!DOCTYPE html>
<html lang="en">
<head>
    <meta charset="UTF-8">
    <meta http-equiv="X-UA-Compatible" content="IE=edge">
    <meta name="viewport" content="width=device-width, initial-scale=1.0">
    <title>Document</title>
</head>
<body>
    <div id='div_1' class='red blue yellow'>
        red blue yellow
    </div>
    <div id='div_2' class='green blue red'>
        green blue red
    </div>
    <div id='div_3' class='yellow green red'>
        yellow green red
    </div>
    <input type='button'
            value='getElementsByClassName() //class이름으로 찾기'
            onclick='getMyClass()'/>
    <script>
        function getMyClass() {
            const div_list
                = document.getElementsByClassName('red blue');

            // class가 'red blue'인 element 개수 출력
            const div_list_length = div_list.length;
            alert(div_list_length);

            // class가 'red blue'인 element 목록 출력
            for(let i = 0; i < div_list_length; i++)  {
                alert(div_list[i].innerText);
            }
        }
    </script>
</body>
</html>-
document.getElementsByClassName('red blue');
-
다수의 클래스 이름을 모두 포함하고 있는 element를 찾을 때는 파라미터로 클래스 이름을 스페이스로 구분하여 넘겨줍니다.
- 위 코드는 클래스 이름에 'red'와 'blue' 모두를 포함하는 element를 찾아준다.
getElementsByTagNameDiv()
<!DOCTYPE html>
<html lang="en">
<head>
    <meta charset="UTF-8">
    <meta http-equiv="X-UA-Compatible" content="IE=edge">
    <meta name="viewport" content="width=device-width, initial-scale=1.0">
    <title>Document</title>
</head>
<body>
    <div id='div_1' class='my_class'>
        Div1입니다.
    </div>
    <div id='div_2' class='my_class'>
        Div2입니다.
    </div>
    <div id='div_3' class='your_class'>
        Div3입니다.
    </div>
    <input type='button'
            value='getElementsByTagName() - Tag Name으로 찾기'
            onclick='getElementsByTagNameDiv()'/>
    <script>
        function getElementsByTagNameDiv() {
            const div_list
                = document.getElementsByTagName('div');

            // tag name이 'div'인 element 개수 출력
            const div_list_length = div_list.length;
            alert(div_list_length);

            // tag name이 'div'인 element 목록 출력
            for(let i = 0; i < div_list_length; i++)  {
                alert(div_list[i].innerText);
            }
        }

        // document.getElementsByTagName('div);
        // 위 코드는 'div' 태그를 가지는 모든 element 목록을 찾아줍니다.
        // 이 함수 역시, 다수의 element를 리턴하기 때문에
        // 함수명에 복수형의 'elements'가 포함되어 있습니다.

    </script>
</body>
</html>
querySelector()
<!DOCTYPE html>
<html lang="en">
<head>
    <meta charset="UTF-8">
    <meta http-equiv="X-UA-Compatible" content="IE=edge">
    <meta name="viewport" content="width=device-width, initial-scale=1.0">
    <title>Document</title>
</head>
<body>
    <div id='div_1' class='my_class'>
        Div1입니다.
    </div>
    <div id='div_2' class='my_class'>
        Div2입니다.
    </div>
    <div id='div_3' class='your_class'>
        Div3입니다.
    </div>
    <input type='button'
            value='querySelector() - ID로 찾기'
            onclick='querySelectorById()'/>

    <script>
        function querySelectorById() {
            const div
                = document.querySelector('#div_1');
            alert(div.innerText);
        }
    </script>
</body>
</html>-
querySelector(): DOM에서 원하는 element를 찾기 위해서 querySelector() 를 사용할 수도 있는데, 이 함수는 파라미터로 입력받은 CSS선택자를 사용해서, element를 찾아준다.
-
querySelector() 함수는, 파라미터로 입력받은 CSS 선택자로 찾은 여러개의 element 중 첫번째 element를 리턴합니다.
-
document.querySelector('#div_1');
-
id이름 앞에 '#'를 붙여서 파라미터로 넘겨줍니다.
-
위 예제는 id가 'div_1'인 element를 찾아서 리턴합니다.
<!DOCTYPE html>
<html lang="en">
<head>
    <meta charset="UTF-8">
    <meta http-equiv="X-UA-Compatible" content="IE=edge">
    <meta name="viewport" content="width=device-width, initial-scale=1.0">
    <title>Document</title>
</head>
<body>
    <div id='div_1' class='my_class'>
        Div1입니다.
    </div>
    <div id='div_2' class='my_class'>
        Div2입니다.
    </div>
    <div id='div_3' class='your_class'>
        Div3입니다.
    </div>
    <input type='button'
            value='querySelector() - Class로 찾기'
            onclick='querySelectorByClassName()'/>
    <script>
        function querySelectorByClassName() {
            const div
                = document.querySelector('.my_class');//첫번째를 반환하기 때문에 div_1출

            alert(div.innerText);
        }
       </script>
</body>
</html>- querySelector() - Class 이름으로 찾기
- document.querySelector('.my_class');
- 클래스 이름으로 element를 찾기위해서 클래스 이름 앞에 '.'을 붙여서 파라미터로 넘겨줍니다.
- 위 예제는 class가 'my_class'인 element 중 첫번째 element를 리턴합니다.
Tag이름으로 찾기
<!DOCTYPE html>
<html lang="en">
<head>
    <meta charset="UTF-8">
    <meta http-equiv="X-UA-Compatible" content="IE=edge">
    <meta name="viewport" content="width=device-width, initial-scale=1.0">
    <title>Document</title>
</head>
<body>
    <div id='div_1' class='my_class'>
        Div1입니다.
    </div>
    <div id='div_2' class='my_class'>
        Div2입니다.
    </div>
    <div id='div_3' class='your_class'>
        Div3입니다.
    </div>
    <input type='button'
            value='querySelector() - Tag Name으로 찾기'
            onclick='querySelectorByTagName()'/>

    <script>
    function querySelectorByTagName() {
        const div
        = document.querySelector('div');

        alert(div.innerText);
    }

    </script>
</body>
</html>- querySelector() - Tag 이름으로 찾기
- document.querySelector('div');
- 태그 이름으로 element를 찾을 때는 태그명을 문자열로 넘겨줍니다.
- 위 예제는 div태그를 가지는 element 중 첫번째 element를 리턴합니다.
선택자 ','로 구분하기
<!DOCTYPE html>
<html lang="en">
<head>
    <meta charset="UTF-8">
    <meta http-equiv="X-UA-Compatible" content="IE=edge">
    <meta name="viewport" content="width=device-width, initial-scale=1.0">
    <title>Document</title>
</head>
<body>
    <div id='div_1' class='red'>
        red
    </div>
    <div id='div_2' class='blue'>
        blue
    </div>
    <div id='div_3' class='green'>
        green
    </div>
    <input type='button'
            value='querySelector() - Class Name으로 찾기'
            onclick='querySelectorByClassName()'/>
    <script>
        function querySelectorByClassName() {
            const div
                = document.querySelector('.red, .green');

            alert(div.innerText);
        }

    </script>
</body>
</html>- querySelector() - 선택자 ','로 구분하기
- document.querySelector('.red, .green');
- 선택자를 ','로 구분하여 전달하면 여러개의 선택자 중 첫번째로 발견되는 element를 리턴합니다.
- 이때, 파라미터를 여러개 넘기는 것이 아니라, 선택자를 ','로 구분한 문자열 1개가 파라미터로 넘어간다는 것에 유의하세요.
querySelectorAll()
id로 찾기
<!DOCTYPE html>
<html lang="en">
<head>
    <meta charset="UTF-8">
    <meta http-equiv="X-UA-Compatible" content="IE=edge">
    <meta name="viewport" content="width=device-width, initial-scale=1.0">
    <title>Document</title>
</head>
<body>
    <div id='div_1' class='my_class'>
        Div1입니다.
    </div>
    <div id='div_2' class='my_class'>
        Div2입니다.
    </div>
    <div id='div_3' class='your_class'>
        Div3입니다.
    </div>
    <input type='button'
            value='querySelectorAll() - Id 전체 찾기'
            onclick='querySelectorAllById()'/>

    <script>
        function querySelectorAllById() {
            const div_list
                = document.querySelectorAll('#div_1');

            // id가 'div_1'인 element 개수 출력
            const div_list_length = div_list.length;
            alert(div_list_length);

            // id가 'div_1'인 element 목록 출력
            for(let i = 0; i < div_list_length; i++)  {
                alert(div_list[i].innerText);
            }
        }
    </script>
</body>
</html>- querySelectorAll()
- 사용법은 querySelector() 와 같습니다.
- 다만, querySelectorAll()은 이름에서 알수 있듯이, CSS선택자(파라미터로 넘겨준)로 찾은 모든 element 목록을 리턴합니다.
class 이름으로 찾기
<!DOCTYPE html>
<html lang="en">
<head>
    <meta charset="UTF-8">
    <meta http-equiv="X-UA-Compatible" content="IE=edge">
    <meta name="viewport" content="width=device-width, initial-scale=1.0">
    <title>Document</title>
</head>
<body>
    <div id='div_1' class='my_class'>
        Div1입니다.
    </div>
    <div id='div_2' class='my_class'>
        Div2입니다.
    </div>
    <div id='div_3' class='your_class'>
        Div3입니다.
    </div>
    <input type='button'
            value='querySelectorAll() - Class Name 전체 찾기'
            onclick='querySelectorAllByClassName()'/>

    <script>
        function querySelectorAllByClassName() {
            const div_list
                = document.querySelectorAll('.my_class');

            // class name이 'my_class'인 element 개수 출력
            const div_list_length = div_list.length;
            alert(div_list_length);

            // class name이 'my_class'인 element 목록 출력
            for(let i = 0; i < div_list_length; i++)  {
                alert(div_list[i].innerText);
            }
        }
    </script>
</body>
</html>
Tag Name 전체 찾기
<!DOCTYPE html>
<html lang="en">
<head>
    <meta charset="UTF-8">
    <meta http-equiv="X-UA-Compatible" content="IE=edge">
    <meta name="viewport" content="width=device-width, initial-scale=1.0">
    <title>Document</title>
</head>
<body>
    <div id='div_1' class='my_class'>
        Div1입니다.
    </div>
    <div id='div_2' class='my_class'>
        Div2입니다.
    </div>
    <div id='div_3' class='your_class'>
        Div3입니다.
    </div>
    <input type='button'
            value='querySelectorAll() - Tag Name 전체 찾기'
            onclick='querySelectorAllByTagName()'/>

    <script>
        function querySelectorAllByTagName() {
            const div_list
            = document.querySelectorAll('div');

            // tag name이 'div'인 element 개수 출력 - 3
            const div_list_length = div_list.length;
            alert(div_list_length);

            // tag name이 'div'인 element 목록 출력
            for(let i = 0; i < div_list_length; i++)  {
                alert(div_list[i].innerText);
            }
        }

        // querySelector() - Tag 이름으로 찾기
    </script>
</body>
</html>
querySelectorAll() - 선택자 ','로 구분하기
<!DOCTYPE html>
<html lang="en">
<head>
    <meta charset="UTF-8">
    <meta http-equiv="X-UA-Compatible" content="IE=edge">
    <meta name="viewport" content="width=device-width, initial-scale=1.0">
    <title>Document</title>
</head>
<body>
    <div id='div_1' class='red'>
        red
    </div>
    <div id='div_2' class='blue'>
        blue
    </div>
    <div id='div_3' class='green'>
        green
    </div>
    <input type='button'
            value='querySelectorAll() - Class Name 전체 찾기'
            onclick='querySelectorAllByClassName()'/>

    <script>
        function querySelectorAllByClassName() {
            const div_list
                = document.querySelectorAll('.red, .green');

            const div_list_length = div_list.length;
            alert(div_list_length);

            for(let i = 0; i < div_list_length; i++)  {
                alert(div_list[i].innerText);
            }
        }
    </script>
</body>
</html>- document.querySelectorAll('.red, .green');
- querySelect()와 마찬가지로 선택자를 ','로 구분한 문자열을 넘겨주면 각각의 선택자에 해당하는 모든 element를 리턴합니다.
- 위 예제는 클래스가 'red'인 element와 'green'인 element를 리턴합니다.
location, history
- 브라우저 창 : 윈도우 객체
- 사이트가 나와있는 바 : 도큐먼트 객체(location)
- 이전, 앞으로 가는 버튼 : history
클릭하면 웹페이지로 이동 - location
<!DOCTYPE html>
<html lang="ko">
<head>
    <meta charset="UTF-8">
    <meta http-equiv="X-UA-Compatible" content="IE=edge">
    <meta name="viewport" content="width=device-width, initial-scale=1.0">
    <title>Document</title>
</head>
<body>
    <input type="button" value="replace" onclick="javascript:location.replace('http://www.naver.com');">
    <input type="button" value="assign" onclick="javascript:location.assign('http://www.naver.com');">
</body>
</html>- replace : history객체가 활성화가 안된다. >> 뒤로가기 불가능
- assign : history객체 활성화 >> 뒤로가기 가능
뒤로가기 - history
<!DOCTYPE html>
<html lang="ko">

<head>
    <meta charset="UTF-8">
    <title>JavaScript BOM History Object</title>
</head>

<body>

    <h1>히스토리 목록의 갯수</h1>
    <p>아래 버튼을 눌러 새로운 문서를 연 후에 브라우저의 뒤로 가기 버튼을 눌러보세요!</p>
    <button onclick="openDocument()">새로운 문서 열기</button>
    <p id="text"></p>

    <script>
        function openDocument() {
            location.assign("3.History.html");
        }
        document.getElementById("text").innerHTML = "현재 브라우저의 히스토리 목록의 갯수는 " + history.length + "개 입니다.";
    </script>

</body>

</html>
go(), back(), forward()
<!DOCTYPE html>
<html lang="ko">
<head>
    <meta charset="UTF-8">
    <meta http-equiv="X-UA-Compatible" content="IE=edge">
    <meta name="viewport" content="width=device-width, initial-scale=1.0">
    <title>Document</title>
</head>
<body>
    <button onclick="goBack()">이전 페이지로 가기 back</button>
    <button onclick="go()">이전 페이지로 가기 go</button>
    <button onclick="goForward()">다음 페이지로 가기</button>
    <a href="http://www.naver.com">네이버</a>
    <script>

        function goBack() {
            window.history.back();
        }

        function go() {
            window.history.go(-1);//바로 전페이지로 이동 위 back()이랑 같음
        } //-2하면 전전, -3하면 전전전페이지로 이동. +1로 하면 앞에 페이지

        function goForward() {
            window.history.forward(); //다음 페이지로 이동
        }

    </script>
</body>
</html>
자바 스크립트 함수
- 아래 예제들은 세미콜론을 안붙였다(인터프리터 엔진이 자동으로 붙여줌) 그러나 세미콜론은 넣는게 좋다잉(사람마다 다름)
익명함수
<!DOCTYPE html>
<html>
  <head>
    <title></title>
    <script>
      // 변수를 선언합니다.
      const 함수 = function (num1, num2) {
        console.log(num1 + " " + num2)
      }

      // 함수를 호출합니다.
      함수() //undifined undefined출력
      함수(10)//10 undefined출력
      함수(10, 20) //10 20
      함수(10, 20, 30) //10 20 >> 30은 무시
      함수(10, 20, 30, 40)//10 20 >>30, 40은 무시

      // 출력합니다.
      console.log(typeof 함수)//function이라고 출력
      console.log(함수)
    </script>
  </head>
  <body></body>
</html>
예제 2
<!DOCTYPE html>
<html>
  <head>
    <title></title>
    <script>
      // 함수를 변수에 선언
      const 함수 = function () {
        console.log('함수 내부의 코드입니다 ... 1')
        console.log('함수 내부의 코드입니다 ... 2')
        console.log('함수 내부의 코드입니다 ... 3')
        console.log('')
      }

      // 함수를 호출합니다.
      함수()
      함수()

      // 출력합니다.
      console.log(typeof 함수)
      console.log(함수)
    </script>
  </head>
  <body></body>
</html>- 호이스팅 때문에 익명함수로 진행하는 것을 추천
선언적 함수
<!DOCTYPE html>
<html>
  <head>
    <title></title>
    <script>
      // 함수를 생성합니다.
      function 함수 () {
        console.log('함수 내부의 코드입니다 ... 1')
        console.log('함수 내부의 코드입니다 ... 2')
        console.log('함수 내부의 코드입니다 ... 3')
        console.log('')
      }

      // 함수를 호출합니다.
      함수()
      함수()

      // 출력합니다.
      console.log(typeof 함수)
      console.log(함수)
    </script>
  </head>
  <body></body>
</html>

 -->
예제 2
<!DOCTYPE html>
<html>
  <head>
    <title></title>
    <script>
      function isLeapYear(year) {
        return (year % 4 === 0) && (year % 100 !== 0) || (year % 400 === 0)
      }//윤년을 구하는 공식

      console.log(`2020년은 윤년일까? === ${isLeapYear(2020)}`)//boolean으로 출력
      console.log(`2010년은 윤년일까? === ${isLeapYear(2010)}`)
      console.log(`2000년은 윤년일까? === ${isLeapYear(2000)}`)
      console.log(`1900년은 윤년일까? === ${isLeapYear(1900)}`)
    </script>
  </head>
  <body></body>
</html>
예제 3 - sumAll
<!DOCTYPE html>
<html>
  <head>
    <title></title>
    <script>
      function sumAll(a,b) {
        let output = 0
        for (let i = a; i <= b; i++) {
          output += i
        }
      return output
      }

      console.log(`1부터 100까지의 합: ${sumAll(1, 100)}`)
      console.log(`1부터 500까지의 합: ${sumAll(1, 500)}`)
    </script>
  </head>
  <body></body>
</html>
가변 매개 변수
-
호출할 때 매개변수의 개수가 고정적이지 않은 함수를 가변 매개변수 함수라고 한다
- function 함수 이름(... 나머지 매개변수){} : 함수의 매개변수 앞에 마침표 3개(...)를 입력하면 매개변수들이 배열로 들어온다.
<!DOCTYPE html>
<html>
<head>
<title></title>
<script>
function sample(...items) {
console.log(items)
}

sample(1,2)
sample(1,2,3)
sample(1,2,3,4)
</script>
</head>
<body></body>
 </html>
예제 2
<!DOCTYPE html>
<html>
  <head>
    <title></title>
    <script>
      // 나머지 매개변수를 사용한 함수 만들기
      function min(...items) {
        // 매개변수 items는 배열처럼 사용합니다.
        let output = items[0]
        for (const item of items) {
          if (output > item) {
            output = item
          }
        }
        return output
      }

      // 함수 호출하기
      console.log('min(52,273,32,103,275,24,57)')
      console.log(`=${min(52,273,32,103,275,24,57)}`)
    </script>
  </head>
  <body></body>
</html>
예제 3 : 일반 매개변수와 나머지 매개변수 조합
-
function 함수 이름(매개변수, 매개변수, ...나머지 매개변수){}
- 나머지 매개변수는 반드시 인자의 마지막에 둬야한다. 아니면 앞에 매개변수 인식을 못함
 <!DOCTYPE html>
<html>
<head>
<title></title>
<script>
function sample(a,b, ...c) {
console.log(a, b, c)
}
sample(1, 2) //1, 2, 배열의크기가 0인 배열
sample(1, 2, 3)//1, 2, 배열의 크기가 1인 배열(값을 3만 가지고있으니까)
sample(1, 2, 3, 4)//1, 2, 배열읰 크기가 2인 배열(값을 3, 4를 가짐)
</script>
</head>
<body></body>
</html>
배열 확인 - isArray()
<!DOCTYPE html>
<html>
  <head>
    <title></title>
    <script>
      function min(first, ...rests) {
        // 변수 선언하기
        let output
        let items

        // 매개변수의 자료형에 따라 조건 분기하기
        if (Array.isArray(first)) {//52는 위에서 first에 들어가서 배열이 아님
          // 어떤 자료가 배열인지 확인할 때는 Array.isArray() 메소드를 사용한다.
          // 일반적인 typeof 연산자로는 배열을 확인할 수 없다.
          output = first[0]
          items = first
        } else if (typeof(first) === 'number') {
          output = first
          items = rests
        }

        // 이전 절에서 살펴보았던 최솟값 구하는 공식
        for (const item of items) {
          if (output > item) {
            output = item
          }
        }
        return output
      }

      console.log(`min(배열): ${min([52,273,32,103,275,24,57])}`)
      console.log(`min(숫자, ...): ${min(52,273,32,103,275,24,57)}`)
    </script>
  </head>
  <body></body>
</html>
min()함수
<!DOCTYPE html>
<html>
  <head>
    <title></title>
    <script>
      // 단순하게 매개변수를 모두 출력하는 함수
      function sample(...items) {
        console.log(items)
      }

      // 전개 연산자 사용 여부 비교하기
      const array = [1, 2, 3, 4]

      console.log('# 전개 연산자를 사용하지 않은 경우')
      sample(array)
      console.log('# 전개 연산자를 사용한 경우')
      sample(...array)
    </script>
  </head>
  <body></body>
</html>- min()함수는 매개변수로 배열을 넣는 경우와 숫자를 넣는 경우 모두 대응했다.
- 하지만 다른 사람들이 만든 함수도 모두 그럴 것이라는 보장은 없다.
- 배열을 전개해서 함수의 매개변수로 전달해주는 전개 연산자(spread operator)를 제공
- 함수 이름(... 배열) : 배열 앞에 마침표 3개(...)를 붙이는 형태로 사용
매개변수에 기본값
-
기본값은 오른쪽 끝에서부터 줘야한다.
- 여러개일 경우, 오른쪽에서 왼쪽으로 줘야함
<!DOCTYPE html>
<html>
<head>
<title></title>
<script>
// 기본 매개변수 ( 기본 매개변수는 오른쪽 끝에서 부터 채운다.)
function earnings (name, wage=8590, hours=40) {
console.log(`# ${name} 님의 급여 정보`)
console.log(`- 시급: ${wage}원`)
console.log(`- 근무 시간: ${hours}시간`)
console.log(`- 급여: ${wage * hours}원`)
console.log('')
}

// 최저 임금으로 최대한 일하는 경우
earnings('구름') //위에서 정의한 기본값으로 (wage, hours)

// 시급 1만원으로 최대한 일하는 경우
earnings('별', 10000)

// 시급 1만원으로 52시간 일한 경우
earnings('인성', 10000, 52) //다 정의 했으므로 기본값이 아닌 전달해준 인자 값으로 적용
</script>
</head>
<body></body>
</html>
<!DOCTYPE html>
<html>
<head>
<title></title>
<script>
function isLeapYear(year=new Date().getFullYear()) {
console.log(`매개변수 year: ${year}`)
return (year % 4 === 0) && (year % 100 !== 0) || (year % 400 === 0)
}
console.log(`올해는 윤년일까? === ${isLeapYear()}`)
console.log(`올해는 윤년일까? === ${isLeapYear(2020)}`)
</script>
</head>
<body></body>
</html>- 매개변수를 안보내게되면, 현재 년도로 기본값
구 버전 js에서 가변 매개변수 함수 구현
- argument라는 객체가 기적으로 존재
<!DOCTYPE html>
<html>
  <head>
    <title></title>
    <script>
      function sample() {
        console.log(arguments)
        for (let i = 0; i < arguments.length; i++) {
          console.log(`${i}번째 요소: ${arguments[i]}`)
        }
        console.log(`인수 개수 ${arguments.length}`)
      }

      sample(1, 2)
      sample(1, 2, 3)
      sample(1, 2, 3 ,4)
    </script>
  </head>
  <body></body>
</html>
구 버전 js에서 전개 연산자 구현
- apply를 이용해 전개 시킴
  <!DOCTYPE html>
  <html>
  <head>
    <title></title>
    <script>
      // 단순하게 매개변수를 모두 출력하는 함수
      function sample(...items) {
        console.log(items)
      }

      // 전개 연산자 사용 여부 비교하기
      const array = [1, 2, 3, 4]
      console.log(sample.apply(null, array))
    </script>
  </head>
  <body></body>
  </html>
문제
최대값을 찾는 max() 함수를 만드시오.
-
매개변수로 max([1, 2, 3, 4])와 같은 배열을 받는 max() 함수를 만드시오.
-
매개변수로 max(1, 2, 3, 4)와 같이 숫자를 받는 max() 함수를 만드시오.
-
max([1,2,3,4]) 형태와 max(1, 2, 3, 4) 형태를 모두 입력할 수 있는 max() 함수를 만드시오.
<!DOCTYPE html>
<html lang="en">
<head>
    <meta charset="UTF-8">
    <meta http-equiv="X-UA-Compatible" content="IE=edge">
    <meta name="viewport" content="width=device-width, initial-scale=1.0">
    <title>Document</title>
</head>
<body>
    <script>
        let max = function(array){
            let maxNum = array[0];
            for(const i of array){
                if(maxNum<i) maxNum = i;
            }
            return maxNum;
        }
        let max2 = function(...args){
            let maxNum = args[0];
            for(const i of args){
                if(maxNum<i) maxNum = i;
            }
            return maxNum;
        }
        let max3 = function(first, ... rest){
            let maxNum;
            let items;
            if(Array.isArray(first)){
                maxNum = first[0];
                items = first;
            }
            else{
                maxNum = first;
                items = rest;
            }
            for(const i of items){
                if(maxNum < i) maxNum = i;
            }
            return maxNum;
        }
        console.log(max([1,2,3,4]))
        console.log(max2(1, 2, 3, 4))
        console.log(max3([1,2,3,4]))
        console.log(max3(1, 2, 3, 4))

    </script>
</body>
</html>
화살표 함수
화살표 함수 연습 문제
- "Hi"를 출력하는 화살표 함수.
<!DOCTYPE html>
<html lang="ko">
<head>
    <meta charset="UTF-8">
    <meta http-equiv="X-UA-Compatible" content="IE=edge">
    <meta name="viewport" content="width=device-width, initial-scale=1.0">
    <title>Document</title>
</head>
<body>
    <script>
        // function hi(){
        //     console.log("Hi");
        // }
        let hi = () => console.log("Hi");
        hi();
    </script>
</body>
</html>- 매개변수를 두 개 받아서 그것을 더해서 반환하는 화살표 함수.
<!DOCTYPE html>
<html lang="ko">
<head>
    <meta charset="UTF-8">
    <meta http-equiv="X-UA-Compatible" content="IE=edge">
    <meta name="viewport" content="width=device-width, initial-scale=1.0">
    <title>Document</title>
</head>
<body>
    <script>
        // function add(num1, num2){
        //     return num1 + num2;
        // }
        // let add = (num1, num2) => { return num1 + num2; }
        // console.log(add(10, 20));

        // let add = (num1, num2) => return num1 + num2; // return을 쓰면 중괄호 생략 못함

        let add = (num1, num2) => num1 + num2;
        console.log(add(10, 20));

    </script>
</body>
</html>- 매개변수를 두 개 받아서 그것의 시작단 부터 끝단까지 출력하는 화살표 함수.
<!DOCTYPE html>
<html lang="ko">
<head>
    <meta charset="UTF-8">
    <meta http-equiv="X-UA-Compatible" content="IE=edge">
    <meta name="viewport" content="width=device-width, initial-scale=1.0">
    <title>Document</title>
</head>
<body>
    <script>
        // function timesTable(start, end)
        // {
        //     for(let i=start;i<=end;i++)
        //     {
        //         for(let j=1;j<=9;j++)
        //         {
        //             console.log(`${i}*${j}=${i*j}`);
        //         }
        //     }
        // }


        let timesTable = (start, end) =>{
            for(let i=start;i<=end;i++)
            {
                for(let j=1;j<=9;j++)
                {
                    console.log(`${i}*${j}=${i*j}`);
                }
            }
        };

        timesTable(3, 5);
    </script>
</body>
</html>- let arr = [1, 2, 3]; 배열의 각 요소를 두 배로 하는 새로운 배열을 만들자.
<!DOCTYPE html>
<html lang="ko">
<head>
    <meta charset="UTF-8">
    <meta http-equiv="X-UA-Compatible" content="IE=edge">
    <meta name="viewport" content="width=device-width, initial-scale=1.0">
    <title>Document</title>
</head>
<body>
    <script>
        // let arr = [1, 2, 3];
        // let pow = arr.map(function(x){
        //     return x * x;
        // });

        // console.log(pow);

        let arr = [1, 2, 3];
        let pow = arr.map(x=>x*x);

        console.log(pow);

    </script>
</body>
</html>
자바 스크립트 함수 2
예제 1
<!DOCTYPE html>
<html>
  <head>
    <title></title>
    <script>
      // 함수를 선언합니다.
      function callThreeTimes (callback) {
        for (let i = 0; i < 3; i++) {
          callback(i)
        }
      }

      function print (i) {
        console.log(`${i}번째 함수 호출`)
      }

      // 함수를 호출합니다.
      callThreeTimes(print)
    </script>
  </head>
  <body></body>
</html>
0번째 함수 호출
1번째 함수 호출
2번째 함수 호출
예제1 익명함수로
<!DOCTYPE html>
<html>
  <head>
    <title></title>
    <script>
      // 함수를 선언합니다.
      function callThreeTimes (callback) {
        for (let i = 0; i < 3; i++) {
          callback(i)
        }
      }

      // 함수를 호출합니다.
      callThreeTimes(function (i) {
        console.log(`${i}번째 함수 호출`)
      })
    </script>
  </head>
  <body></body>
</html>
콜백 함수
forEach()
-
콜백 함수를 활용하는 가장 기본적인 함수는 forEach() 메소드
-
forEach() 메소드는 배열이 갖고 있는 함수(메소드)로써 단순하게 배열 내부의 요소를 사용해서 콜백 함수를 호출해준다.
<!DOCTYPE html>
<html>
  <head>
    <title></title>
    <script>
      const numbers = [273, 52, 103, 32, 57]

      numbers.forEach(function (value, index, array) {
        console.log(`${index}번째 요소 : ${value}`)
      })
    </script>
  </head>
  <body></body>
</html>
예제 2
<!DOCTYPE html>
<html>
<body>

<h1>JavaScript Arrays</h1>
<h2>The forEach() Method</h2>

<p>forEach() calls a function for each element in an array:</p>

<p id="demo"></p>

<script>
let text = "";
const fruits = ["apple", "orange", "cherry"];
fruits.forEach(myFunction);

document.getElementById("demo").innerHTML = text;

function myFunction(item, index) {
  text += index + ": " + item + "<br>";
}
</script>

</body>
</html>
예제 3
<!DOCTYPE html>
<html>
<body>

<h1>JavaScript Arrays</h1>
<h2>The forEach() Method</h2>

<p>forEach() calls a function for each element in an array:</p>

<p>Compute the sum of the values in an array:</p>

<p id="demo"></p>

<script>
let sum = 0;
const numbers = [65, 44, 12, 4];
numbers.forEach(myFunction);

document.getElementById("demo").innerHTML = sum;

function myFunction(item) {
  sum += item;
}
</script>

</body>
</html>
예제 4
- map처럼 활용
<!DOCTYPE html>
<html>
<body>

<h1>JavaScript Arrays</h1>
<h2>The forEach() Method</h2>

<p>forEach() calls a function for each element in an array:</p>

<p>Multiply the value of each element with 10:</p>

<p id="demo"></p>

<script>
const numbers = [65, 44, 12, 4];
numbers.forEach(myFunction)

document.getElementById("demo").innerHTML = numbers;

function myFunction(item, index, arr) {
  arr[index] = item * 10;
}
</script>

</body>
</html>
map()
<!DOCTYPE html>
<htl>
  <head>
    <title></title>
    <script>
      // 배열을 선언합니다.
      let numbers = [273, 52, 103, 32, 57]

      // 배열의 모든 값을 제곱합니다.
      numbers = numbers.map(function (value, index, array) {
        return value * value
      })

      // 출력합니다.
      numbers.forEach(console.log)
    </script>
  </head>
  <body></body>
</html>
75076
2704
10609
1024
3249
forEach(), map() 함수의 완전한 형태를 보여드리고자 콜백 함수에 매개변수를 value, index, array로 3개를 모두 입력했지만, 일반적으로는 value만 또는
value와 index만 사용하는 경우가 많다.
콜백 함수의 매개변수는 모두 입력할 필요 없고, 사용하고자 하는 위치의 것만 순서에 맞춰 입력하면 된다.
filter()
-
filter() 메소드도 배열이 갖고 있는 함수이다.
-
filter() 메소드는 콜백 함수에서
리턴하는 값이 true인 것 들만 모아서 새로운 배열을 만드는 함수이다.- function(value, index, array){} 형태의 콜백 함수를 사용하는 것이 기본이지만, value만 활용하므로 value만 매개변수로 넣었다.
<!DOCTYPE html>
<html>
  <head>
    <title></title>
    <script>
      const numbers = [0, 1, 2, 3, 4, 5]
      const evenNumbers = numbers.filter(function (value) {
        return value % 2 === 0
      })

      console.log(`원래 배열: ${numbers}`)
      console.log(`짝수만 추출: ${evenNumbers}`)
    </script>
  </head>
  <body></body>
</html>-
JavaScript 코드는 웹 페이지가 로드될 때 자동으로 실행된다.
-
짝수만 필터링해서 출력
filter() 메소드는 배열을 리턴하므로 map() 메소드를 적용할 수 있고, map() 메소드도 배열을 리턴하므로 forEach() 메소드를 적용할 수 있다.
이렇게 어떤 메소드가 리턴하는 값을 기반으로 해서 함수를 줄줄이 사용하는 것을 메소드 체이닝(method chaining)라고 부른다.
화살표 함수
-
map(), filter() 함수처럼 단순한 형태의 콜백 함수를쉽게 입력하고자 화살표(arrow) 함수라는 함수 생성 방법이 있다.
-
화살표 함수는 function 키워드 대신 화살표(=>)를 사용한다.
<!DOCTYPE html>
<html>
  <head>
    <title></title>
    <script>
      // 배열을 선언합니다.
      let numbers = [0, 1, 2, 3, 4, 5, 6, 7, 8, 9]

      // 배열의 메소드를 연속적으로 사용합니다.
      numbers
        .filter((value) => value % 2 === 0)
        .map((value) => value * value)
        .forEach((value) => {
          console.log(value)
        })
    </script>
  </head>
  <body></body>
</html>
타이머 함수
- 특정 시간마다 또는 특정 시간 이후에 콜백 함수를 호출할 수 있는 타이머(timer) 함수들이 있다. >> 시간과 관련된 처리 가능
<!DOCTYPE html>
<html>
  <head>
    <title></title>
    <script>
      let count = 0;
      let func1 = function (){
        console.log(`1초 후에 실행됩니다.`);
      }
      let func2 = function (){
        console.log(`1초마다 실행됩니다.(${count}번째)`);
        count++;
      }
      setTimeout(func1, 1 * 1000);
      setInterval(func2, 1 * 1000);
    </script>
  </head>
  <body></body>
</html>
</body>
</html>-
setTimeout(함수, 시간) : 특정 시간 후에 함수를 한 번 호출합니다.
-
setInterval(함수, 시간) : 특정 시간마다 함수를 호출합니다.
타이머를 종료하고 싶을 때는 아래 함수를 사용
-
clearTimeout(타이머_ID) : setTimeout() 함수로 설정한 타이머를 제거합니다.
-
clearInterval(타이머_ID) : setInterval() 함수로 설정한 타이머를 제거합니다.
- 타이머 ID는 setTimeout() 함수와 setInterval() 함수를 호출할 때 리턴 값으로 나오는 숫자이다.
다른 형태
<!DOCTYPE html>
<html>
  <head>
    <title></title>
    <script>
      let count = 0;

      setTimeout(()=> console.log(`1초 후에 실행됩니다.`), 1 * 1000);
      setInterval(()=>{
        console.log(`1초마다 실행됩니다.(${count}번째)`);
        count++;
      }, 1 * 1000);
    </script>
  </head>
  <body></body>
</html>
타이머 제거
<!DOCTYPE html>
<html>
  <head>
    <title></title>
    <script>
      let id
      let count = 0
      id = setInterval(() => {
        console.log(`1초마다 실행됩니다(${count}번째)`)
        count++
      }, 1 * 1000)

      setTimeout(() => {
        console.log('타이머를 종료합니다.')
        clearInterval(id)
      }, 5 * 1000)
    </script>
  </head>
  <body></body>
</html>
즉시 호출 함수
스코프 (scope)
-
같은 단계에 있을 경우 무조건 충돌이 일어난다.
- 코프 단계를 변경하는 방법은 중괄호를 사용해서 블록을 만들거나, 함수를 생성해서 블록을 만드는 방법이 있다.
<!DOCTYPE html>
<html>
  <head>
    <title></title>
    <!-- 다른 곳에서 가져온 자바스크립트 코드 -->
    <script>
      let pi = 3.14
      console.log(`파이 값은 ${pi}입니다.`)
    </script>

    <!-- 내가 만든 자바스크립트 코드 -->
    <script>
      let pi = 3.141592
      console.log(`파이 값은 ${pi}입니다.`)
    </script>
  </head>
  <body></body>
</html>- 식별자가 이미 사용되고 있다는 오류를 발생하면서 "내가 만든 자바스크립트 코드" 라는 부분이 실행 되지 않는다.
쉐도잉 (shadowing)
- 블록이 다른 경우 내부 변수가 외부 변수를 가리는 현상
<!DOCTYPE html>
<html>
  <head>
    <title></title>
    <!-- 다른 곳에서 가져온 자바스크립트 코드 -->
    <script>
      let pi = 3.14
      console.log(`파이 값은 ${pi}입니다.`)//3.14

      // 블록을 사용한 스코프 생성
      {
        let pi = 3.141592
        console.log(`파이 값은 ${pi}입니다.`)//3.141592
      }
      console.log(`파이 값은 ${pi}입니다.`)//3.14

      // 함수 블록을 사용한 스코프 생성
      function sample() {
        let pi = 3.141592
        console.log(`파이 값은 ${pi}입니다`)//3.141592
      }

      sample()
      console.log(`파이 값은 ${pi}입니다.`)//3.14
    </script>
  </head>
  <body></body>
</html>- 코드를 실행하면 블록 내부에서는 변수 pi를 출력했을 때 3.141592가 나오고, 블록 외부에서는 3.14가 출력되는 것을 확인할 수 있습니다. 이름 충돌이 발생하지 않눈다.
즉시 호출
<!DOCTYPE html>
<html>
  <head>
    <title></title>
    <!-- 다른 곳에서 가져온 자바스크립트 코드 -->
    <script>
      let pi = 3.14
      console.log(`파이 값은 ${pi}입니다.`)
    </script>

    <!-- 내가 만든 자바스크립트 코드 -->
    <!-- 즉시 호출 함수를 사용해 변수 이름 충돌 문제를 해결합니다. -->
    <script>
      (function () {
        let pi = 3.141592
        console.log(`파이 값은 ${pi}입니다.`)
      })()
    </script>
  </head>
  <body></body>
</html>- 충돌문제를 해결하기 위해 사용하는 것이므로 함수를 만들자마자 즉시 호출할 수 있도록 위와 같이 작성하는게 좋다.
'use strict'
- 엄격 모드(strict mode)라고 부르는 기능으로 자바스크립트는 이러한 문자열을 읽어들인 순간부터 코드를 엄격하게 검사합니다.
<!DOCTYPE html>
<html>
  <head>
    <title></title>
    <script>
      'use strict'
      data = 10
      console.log(data)
    </script>
  </head>
  <body></body>
</html>- 변수를 let 키워드등으로 선언하지 않고 사용해서 오류 발생.
<script>
    (function(){
      'use strict'
      문장
      문장
    })()
</script>- 해당 블록 내부에만 엄격 모드가 적용
익명함수 / 선언적 함수
여러모로 안전을 위해 익명함수 추천
- 익명 함수는 순차적인 코드 실행에서 코드가 해당 줄을 읽을 때 생성
익명 함수
<!DOCTYPE html>
<html>
  <head>
    <title></title>
    <script>
      // 변수를 선언합니다.
      let 익명함수

      // 익명 함수를 2번 생성합니다.
      익명함수 = function () {
        console.log('1번째 익명 함수입니다.')
      }
      익명함수 = function () {
        console.log('2번째 익명 함수입니다.')
      }

      // 익명 함수를 호출합니다.
      익명함수()
    </script>
  </head>
  <body></body>
</html>- 2번째 익명 함수입니다가 출력
선언적 함수
- 선언적 함수도 입력한 순서대로 생성되고 같은 이름이라면
덮어쓰므로 코드를 실행했을 때 "2번째 선언적 함수입니다."를
출력하는 모습을 볼 수 있다.
<!DOCTYPE html>
<html>
  <head>
    <title></title>
    <script>
      // 선언적 함수를 호출합니다.
      선언적함수()

      // 선언적 함수를 2번 생성합니다.
      function 선언적함수 () {
        console.log('1번째 선언적 함수입니다.')
      }
      function 선언적함수 () {
        console.log('2번째 선언적 함수입니다.')
      }
    </script>
  </head>
  <body></body>
</html>- 2번째 선언적 함수 입니다. 출력
console.log()
<!DOCTYPE html>
<html>
<body>

<h1>The Console Object</h1>
<h2>The log() Method</h2>

<p>How to display an array in the console.</p>

<script>
console.log(document);
console.dir(document);
</script>

</body>
</html>- dir은 키와 밸류로 출력
ForEach 문제
- 익명함수들을 화살표 함수로 바꾸시오.
1번
<!DOCTYPE html>
<html>
<body>

<h1>JavaScript Arrays</h1>
<h2>The forEach() Method</h2>

<p>forEach() calls a function for each element in an array:</p>

<p id="demo"></p>

<script>
let text = "";
const fruits = ["apple", "orange", "cherry"];
fruits.forEach(myFunction);

document.getElementById("demo").innerHTML = text;

function myFunction(item, index) {
  text += index + ": " + item + "<br>";
}
</script>

</body>
</html>
화살표 함수
<!DOCTYPE html>
<html>
<body>

<h1>JavaScript Arrays</h1>
<h2>The forEach() Method</h2>

<p>forEach() calls a function for each element in an array:</p>

<p id="demo"></p>

<script>
let text = "";
const fruits = ["apple", "orange", "cherry"];
fruits.forEach((item, index) => {
  text += index + ": " + item + "<br>";
});

document.getElementById("demo").innerHTML = text;

let myFunction = (item, index) => {
  text += index + ": " + item + "<br>";
}
</script>
</body>
</html>
2번
<!DOCTYPE html>
<html>
<body>

<h1>JavaScript Arrays</h1>
<h2>The forEach() Method</h2>

<p>forEach() calls a function for each element in an array:</p>

<p>Compute the sum of the values in an array:</p>

<p id="demo"></p>

<script>
let sum = 0;
const numbers = [65, 44, 12, 4];
numbers.forEach(myFunction);

document.getElementById("demo").innerHTML = sum;

function myFunction(item) {
  sum += item;
}
</script>

</body>
</html>
화살표 함수
<!DOCTYPE html>
<html>
<body>

<h1>JavaScript Arrays</h1>
<h2>The forEach() Method</h2>

<p>forEach() calls a function for each element in an array:</p>

<p>Compute the sum of the values in an array:</p>

<p id="demo"></p>

<script>
let sum = 0;
const numbers = [65, 44, 12, 4];
numbers.forEach((item) => sum += item);

document.getElementById("demo").innerHTML = sum;

// function myFunction(item) {
//   sum += item;
// }
</script>
</body>
</html>
3번
<!DOCTYPE html>
<html>
<body>

<h1>JavaScript Arrays</h1>
<h2>The forEach() Method</h2>

<p>forEach() calls a function for each element in an array:</p>

<p>Multiply the value of each element with 10:</p>

<p id="demo"></p>

<script>
const numbers = [65, 44, 12, 4];
numbers.forEach(myFunction)

document.getElementById("demo").innerHTML = numbers;

function myFunction(item, index, arr) {
  arr[index] = item * 10;
}
</script>

</body>
</html>
화살표 함수
<!DOCTYPE html>
<html>
<body>

<h1>JavaScript Arrays</h1>
<h2>The forEach() Method</h2>

<p>forEach() calls a function for each element in an array:</p>

<p>Multiply the value of each element with 10:</p>

<p id="demo"></p>

<script>
const numbers = [65, 44, 12, 4];
numbers.forEach((item, index, arr) => arr[index] = item * 10);


document.getElementById("demo").innerHTML = numbers;

function myFunction(item, index, arr) {
  arr[index] = item * 10;
}
</script>
</body>
</html>
input값 가져오기
<!DOCTYPE html>
<html lang="ko">
<head>
    <meta charset="UTF-8">
    <meta http-equiv="X-UA-Compatible" content="IE=edge">
    <meta name="viewport" content="width=device-width, initial-scale=1.0">
    <title>Document</title>
</head>
<body>
    <input type="text" id="number">
    <input type="button" value="번호 출력" onclick="printNum()">
    <script>
        function printNum(){
            let num = Number(document.getElementById("number").value);
            console.log(num);
        }

    </script>
</body>
</html>
innerText / innerHTML /textContent
-
이 두 속성은 다루는 값이 text element인지, html element인지에 따라 차이가 난다.
-
element.innerText; : element 안의 text 값들만을 가져온다.
-
element.innerHTML; : element 안의 HTML이나 XML을 가져온다.
예제 1 : 값 가져오기
<!DOCTYPE html>
<html lang="ko">
<head>
    <meta charset="UTF-8">
    <meta http-equiv="X-UA-Compatible" content="IE=edge">
    <meta name="viewport" content="width=device-width, initial-scale=1.0">
    <title>Document</title>
</head>
<body>
    <div id='content'>
        <div>A</div>
        <div>B</div>
    </div>

    <input type='button' value='innerText' onclick='alertInnerText();' />
    <input type='button' value='innerHTML' onclick='alertInnerHTML()' />

    <script>
        function alertInnerText()  {
            const element = document.getElementById('content');
            // A
            // B
            alert(element.innerText);
        }

        function alertInnerHTML()  {
            const element = document.getElementById('content');
            // <div>A</div>
            // <div>B</div>
            alert(element.innerHTML);
        }
    </script>
</body>
</html>
값 설정하기
<!DOCTYPE html>
<html lang="ko">
<head>
    <meta charset="UTF-8">
    <meta http-equiv="X-UA-Compatible" content="IE=edge">
    <meta name="viewport" content="width=device-width, initial-scale=1.0">
    <title>Document</title>
</head>
<body>
    <div id='content'>
    </div>

    <input type='button' value='innerText()' onclick='setInnerText()' />
    <input type='button' value='innerHTML()' onclick='setInnerHTML()' />

    <script>
        function setInnerText()  {
          const element = document.getElementById('content');
          element.innerText = "<div style='color:red'>A</div>";
        }//element.innerText에 html을 포함한 문자열을 입력하면,
         //html코드가 문자열 그대로 element안에 포함된다.

        function setInnerHTML()  {
          const element = document.getElementById('content');
          element.innerHTML = "<div style='color:red'>A</div>";
        }//element.innerHTML 속성에 html코드를 입력하면,
         //html element가 element안에 포함되게 된다.
    </script>

</body>
</html>- 'innerHTML()'을 클릭하면, 입력된 html태그가 해석되어 빨간색A 가 나타나는 것을 확인 할 수 있다.
버튼눌러서 각 기능 확인
<!DOCTYPE html>
<html lang="ko">
<head>
    <meta charset="UTF-8">
    <meta http-equiv="X-UA-Compatible" content="IE=edge">
    <meta name="viewport" content="width=device-width, initial-scale=1.0">
    <title>Document</title>
</head>
<body>
    <div id='my_div'>
        안녕하세요?     만나서 반가워요.
        <span style='display:none'>숨겨진 텍스트</span>
    </div>
    <input type='button'
            value='innerHTML'
            onclick='alertInnerHTML()'/>
    <input type='button'
            value='innerText'
            onclick='alertInnerText()'/>
    <input type='button'
            value='textContent'
            onclick='alertTextContent()'/>
    <script>
        function alertInnerHTML() {
            const element = document.getElementById('my_div');
            alert(element.innerHTML);
        }

        function alertInnerText() {
            const element = document.getElementById('my_div');
            alert(element.innerText);
        }

        function alertTextContent() {
            const element = document.getElementById('my_div');
            alert(element.textContent);
        }
    </script>
</body>
</html>
inputTypeValue
속성으로 배경을 어둡고 하얗게
<!DOCTYPE html>
<html lang="ko">
<head>
<meta charset="UTF-8">
<meta http-equiv="X-UA-Compatible" content="IE=edge">
<meta name="viewport" content="width=device-width, initial-scale=1.0">
<title>Document</title>
</head>
<body>
<input type="button" id="night_day" value="night" onclick="
if(document.querySelector('#night_day').value === 'day'){
document.querySelector('body').style.backgroundColor = 'white';
document.querySelector('body').style.color = 'black';
this.value = 'night';
}
else{
document.querySelector('body').style.backgroundColor = 'black';
document.querySelector('body').style.color = 'white';
this.value = 'day';
}
">
</body>
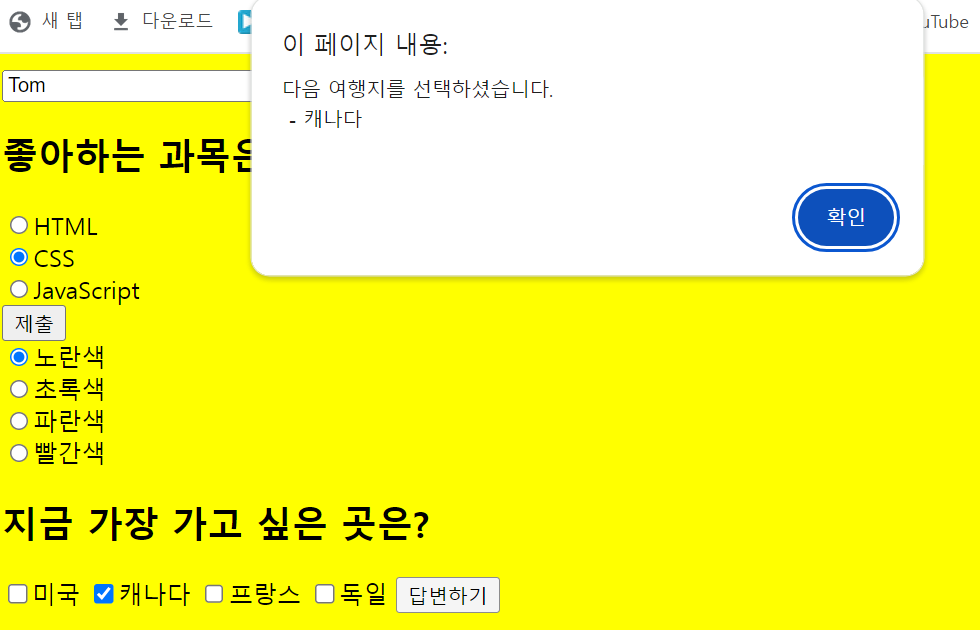
</html>폼 만들기
<!DOCTYPE html>
<html lang="ko">
<head>
    <meta charset="UTF-8">
    <meta http-equiv="X-UA-Compatible" content="IE=edge">
    <meta name="viewport" content="width=device-width, initial-scale=1.0">
    <title>Input Value 값 가져오기</title>
</head>
<body>
    <input type="text" id="myName" value="Tom">
    <input type="button" id="clickBtn" value="Click Me" onclick="hi();">

    <h2>좋아하는 과목은?</h2>
    <input type="radio" name="subject" value="HTML">HTML<br>
    <input type="radio" name="subject" value="CSS">CSS<br>
    <input type="radio" name="subject" value="JavaScript">JavaScript<br>

    <input type="button" value="제출" onclick="submitSubject()"><br>

    <input type="radio" name="bgColor" value="yellow" onclick="changeBg(this.value)">노란색<br>
    <input type="radio" name="bgColor" value="green" onclick="changeBg(this.value)">초록색<br>
    <input type="radio" name="bgColor" value="blue" onclick="changeBg(this.value)">파란색<br>
    <input type="radio" name="bgColor" value="red" onclick="changeBg(this.value)">빨간색<br>

    <h2>지금 가장 가고 싶은 곳은?</h2>
    <input type="checkbox" name="country" value="미국"/>미국
    <input type="checkbox" name="country" value="캐나다"/>캐나다
    <input type="checkbox" name="country" value="프랑스"/>프랑스
    <input type="checkbox" name="country" value="독일"/>독일
    <input type="button" value="답변하기" onclick="report()">

    <script>
        function hi()
        {
            let myName = document.getElementById("myName");
            let clickBtn = document.getElementById("clickBtn");

            alert("myName " + myName.value + " clickBtn " + clickBtn.value);
        }
        function submitSubject()
        {
            let arrRadio = document.getElementsByName('subject');
            console.log(arrRadio);
            for(let i=0;i<arrRadio.length;i++)
            {
                if(arrRadio[i].checked)
                {
                    alert(arrRadio[i].value + "과목을 좋아하는 군요");
                }
            }
        }
        function changeBg(myColor){
            document.bgColor = myColor;
        }

        function report(){
            let msg = "다음 여행지를 선택하셨습니다.\n";
            let checkBoxes = document.getElementsByName('country');

            for(let i=0;i<checkBoxes.length;i++)
            {
                console.log(i + "hi");
                if(checkBoxes[i].checked){
                    msg += ' - ' + checkBoxes[i].value + '\n';
                }
            }
            alert(msg);
        }
    </script>
</body>
</html>-
체크박스는 여러개 선택 가능 >> 관심주제 >> 다중 선택
-
라디오버튼은 그룹으로 묶여있고, 하나의 옵션만 선택 가능 >> 성별 >> 단일 선택
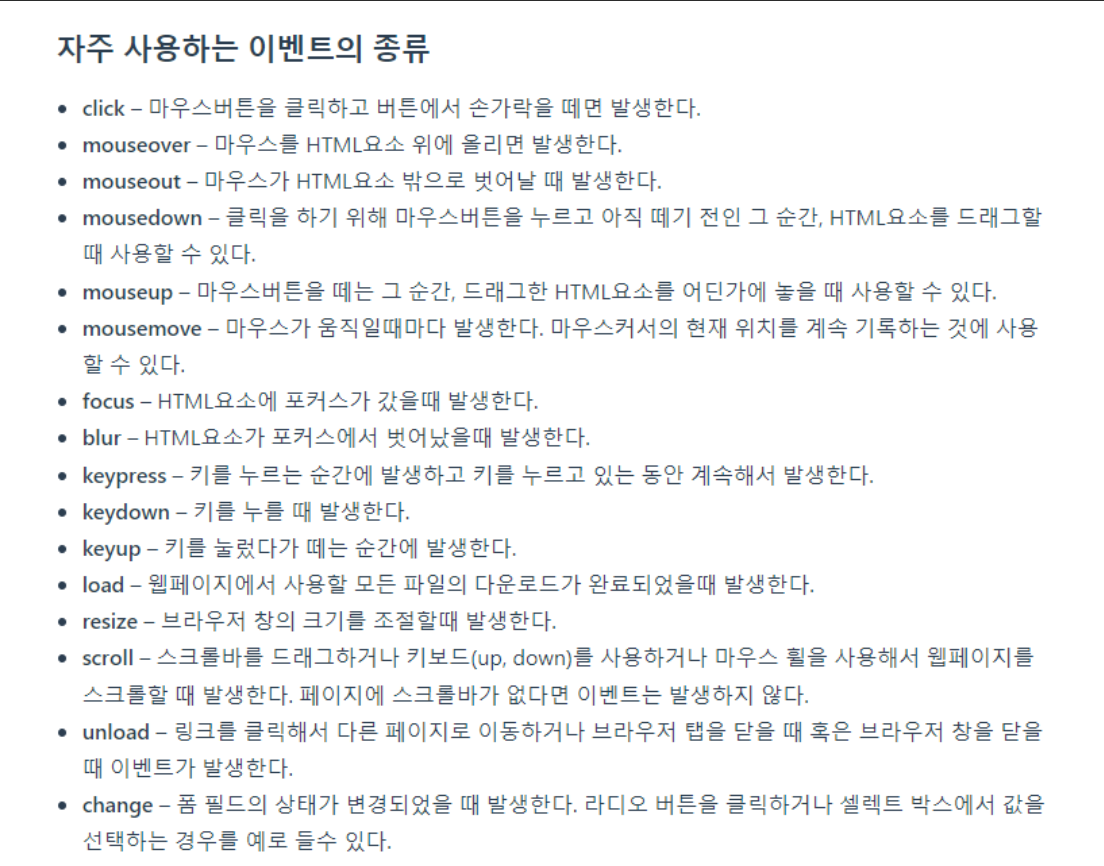
이벤트 등록
- 이벤트 리스너 : 이벤트가 발생했을 때 그 처리를 담당하는 함수
- 이벤트 핸들러 : 지정된 타입의 이벤트가 특정 요소에서 발생하면, 웹 브라우저는 그 요소에 등록된 이벤트 리스너를 실행 시킨다.
클릭하면 페이지 이동
<!DOCTYPE html>
<html>
<head>
<meta charset="UTF-8">
<title>Insert title here</title>
</head>
<body>
<button id="btn">ClickMe</button>
<script>
    var btn = document.getElementById("btn");
    btn.addEventListener('click', goLocation);
    function goLocation(event)
    {
        location.href="Hello.html";
    }
</script>
</body>
</html>
화살표 함수
<!DOCTYPE html>
<html>
<head>
<meta charset="UTF-8">
<title>Insert title here</title>
</head>
<body>
  <a href="Hello.html">Hello.html</a><br>
<a href="JavaScriptTest.html">JavaScriptTest.html</a><br>
<a href="JavaScriptTest2.html">JavaScriptTest2.html</a><br>
<a href="JavaScriptTest3.html">JavaScriptTest3.html</a><br>
<button id="btn">ClickMe</button>
<script>
    var btn = document.getElementById("btn");
    btn.addEventListener('click', event => location.href="Hello.html");
</script>
</body>
</html>- click이벤트가 발생했을 때 콜백 함수 호출하면 이벤트 객체가 들어감
<!DOCTYPE html>
<html lang="ko">
<head>
    <meta charset="UTF-8">
    <meta http-equiv="X-UA-Compatible" content="IE=edge">
    <meta name="viewport" content="width=device-width, initial-scale=1.0">
    <title>Document</title>
</head>
<body>
    <input type="button" id="target" value="button">
    <script>
        let t = document.getElementById('target');
        t.addEventListener('click', (event) => alert('Hello world, ' + event.target.value) );
    </script>
</body>
</html>
<!--
    addEventListener은 이벤트를 등록하는 가장 권장되는 방식이다.
    이 방식을 이용하면 여러개의 이벤트 핸들러를 등록할 수 있다.

-->
<!DOCTYPE html>
<html lang="ko">
<head>
<meta charset="UTF-8">
<meta http-equiv="X-UA-Compatible" content="IE=edge">
<meta name="viewport" content="width=device-width, initial-scale=1.0">
<title>Document</title>
</head>
<body>
<input type="button" id="target" value="button">
<script>
let t = document.getElementById('target');
t.addEventListener('click', (event)=>alert(1));
t.addEventListener('click', (event)=>alert(2));
</script>
</body>
</html>
<!--
이 방식의 중요한 장점은 하나의 이벤트 대상에 복수의 동일 이벤트
타입 리스터를 등록할 수 있다는 점이다.
--><!DOCTYPE html>
<html lang="ko">
<head>
<meta charset="UTF-8">
<meta http-equiv="X-UA-Compatible" content="IE=edge">
<meta name="viewport" content="width=device-width, initial-scale=1.0">
<title>Document</title>
</head>
<body>
<input type="button" id="target1" value="button1">
<input type="button" id="target2" value="button2">
<script>
let t1 = document.getElementById('target1');
let t2 = document.getElementById('target2');
function btnListener(event){
switch(event.target.id){
case 'target1':
alert(1);
break;
case 'target2':
alert(2);
break;
}
}
t1.addEventListener('click', btnListener);
t2.addEventListener('click', btnListener);
</script>
</body>
</html>