
오전문제
어제거 복습
- Product배열을 Vector 클래스로 바꾸고 refund메소드도 추가하자(환불)
package com.test.memo;
import java.util.Vector;
class Product {
int price; // 제품의 가격
int bonusPoint; // 제품구매 시 제공하는 보너스점수
Product(int price) {
this.price = price;
bonusPoint = (int) (price / 10.0);
}
Product() {
} // 기본 생성자
}
class Tv extends Product {
Tv() {
super(100);
}
public String toString() {
return "Tv";
}
}
class Computer extends Product {
Computer() {
super(200);
}
public String toString() {
return "Computer";
}
}
class Audio extends Product {
Audio() {
super(50);
}
public String toString() {
return "Audio";
}
}
class Buyer { // 고객, 물건을 사는 사람
int money = 1000; // 소유금액
int bonusPoint = 0; // 보너스점수
Vector<Product> item = new Vector<>();
void buy(Product p) {
if (money < p.price) {
System.out.println("잔액이 부족하여 물건을 살수 없습니다.");
return;
}
money -= p.price; // 가진 돈에서 구입한 제품의 가격을 뺀다.
bonusPoint += p.bonusPoint; // 제품의 보너스 점수를 추가한다.
item.add(p); // 제품을 item에 저장한다.
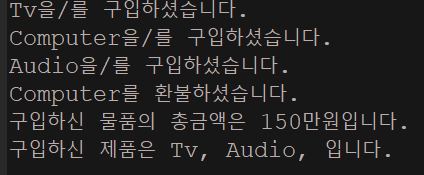
System.out.println(p + "을/를 구입하셨습니다.");
}
void summary() { // 구매한 물품에 대한 정보를 요약해서 보여 준다.
int sum = 0; // 구입한 물품의 가격합계
String itemList = ""; // 구입한 물품목록
// 반복문을 이용해서 구입한 물품의 총 가격과 목록을 만든다.
int size = item.size();
for (int i = 0; i < size; i++) {
if (item.isEmpty())
break;
sum += item.get(i).price;
itemList += item.get(i) + ", ";
}
System.out.println("구입하신 물품의 총금액은 " + sum + "만원입니다.");
System.out.println("구입하신 제품은 " + itemList + "입니다.");
}
void refund(Product p) {
if (item.remove(p)) {
money += p.price;
bonusPoint -= p.bonusPoint;
System.out.println(p + "를 환불하셨습니다.");
} else
System.out.println("해당하는 물품이 구매 내역에 없습니다.");
}
}
class Organize {
public static void main(String[] args) {
Buyer b = new Buyer();
Tv tv = new Tv();
Computer com = new Computer();
Audio audio = new Audio();
b.buy(tv);
b.buy(com);
b.buy(audio);
b.refund(com);
b.summary();
}
}
- 객체를 복사하는 메인 메서드를 만드세요
package com.test.memo;
class Person implements Cloneable {
private String name;
private int age;
public Person(String name, int age) {
this.name = name;
this.age = age;
}
public void show() {
System.out.println(name + " " + age);
}
protected Person clone() throws CloneNotSupportedException {
return (Person) super.clone();
}
}
class Practice {
public static void main(String[] args) {
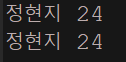
Person person = new Person("정현지", 24);
try {
Person cpyPerson = person.clone();
person.show();
cpyPerson.show();
} catch (CloneNotSupportedException e) {
e.printStackTrace();
}
}
}
- 전화번호부 배열 Vector 로 바꾸기
package com.test.memo;

import java.util.Scanner;
import java.util.Vector;

class MenuChoiceException extends Exception {
    private int choice;

    MenuChoiceException(int choice) {
        super("유효하지 않은 메뉴 값입니다.");
        this.choice = choice;
    }

    public void showWrongMenu() {
        System.out.println(choice + "에 해당하는 선택은 존재하지 않습니다.");
        System.out.println("메뉴 선택을 처음부터 다시 진행합니다.");
    }
}

class PhoneInfo {
    private String name;
    private String phone;

    PhoneInfo(String name, String phone) {
        this.name = name;
        this.phone = phone;
    }

    public String getName() {
        return name;
    }

    public void showPhoneInfo() {
        System.out.println("이름 : " + name);
        System.out.println("전화번호 : " + phone);
    }
}

class PhoneUnivInfo extends PhoneInfo {
    private String major;
    private int year;

    PhoneUnivInfo(String name, String phone, String major, int year) {
        super(name, phone);
        this.major = major;
        this.year = year;
    }

    public void showPhoneInfo() {
        super.showPhoneInfo();
        System.out.println("전공 : " + major);
        System.out.println("학년 : " + year);
    }
}

class PhoneCompanyInfo extends PhoneInfo {
    private String company;

    PhoneCompanyInfo(String name, String phone, String company) {
        super(name, phone);
        this.company = company;
    }

    public void showPhoneInfo() {
        super.showPhoneInfo();
        System.out.println("회사 : " + company);
    }
}

class PhoneBook {
    private static PhoneBook pb;
    private Vector<PhoneInfo> pInfoArr;

    private PhoneBook(int sizePhoneInfo) {
        pInfoArr = new Vector<>(sizePhoneInfo);

    }

    public static PhoneBook getPhoneBookInst(int sizePhoneInfo) {
        if (pb == null)
            pb = new PhoneBook(sizePhoneInfo);
        return pb;
    }

    public void inputPhoneInfo(PhoneInfo pInfo) {
        int i = 0, size = pInfoArr.size();
        for (i = 0; i < size; i++) {
            if (pInfoArr.get(i).getName().compareTo(pInfo.getName()) > 0) {
                break;
            }
        }
        pInfoArr.add(i, pInfo);
    }

    public void searchPhoneInfo(String name) {
        int result = search(name);
        if (result != -1)
            pInfoArr.get(result).showPhoneInfo();
        else
            System.out.println("찾으시는 데이터가 없습니다.");
    }

    public void deletePhoneInfo(int idx) {
        pInfoArr.remove(idx);
        System.out.println("삭제가 완료되었습니다.");
    }

    public int search(String name) {
        for (int i = 0; i < pInfoArr.size(); i++) {
            if (pInfoArr.get(i).getName().compareTo(name) == 0)
                return i;
        }
        return -1;
    }

    public void showAllPhoneInfo() {
        for (int i = 0; i < pInfoArr.size(); i++)
            pInfoArr.get(i).showPhoneInfo();
    }
}

interface PhoneMenuString {
    int INPUT_PHONEINFO = 1;
    int SEARCH_PHONEINFO = 2;
    int DELETE_PHONEINFO = 3;
    int SHOW_ALL_PHONEINFO = 4;
    int PROGRAM_QUIT = 5;

    int GENERAL = 1;
    int UNIVERCITY = 2;
    int COMPANY = 3;

    int YES = 1;
    int NO = 2;
}

class PhoneUI {
    private static final int MAX_CNT = 100;
    public static Scanner sc = new Scanner(System.in);
    private static PhoneBook pb = PhoneBook.getPhoneBookInst(MAX_CNT);

    public static void mainMenu() {
        System.out.println("선택하세요...");
        System.out.println("1. 데이터 입력");
        System.out.println("2. 데이터 검색");
        System.out.println("3. 데이터 삭제");
        System.out.println("4. 모든 데이터 보기");
        System.out.println("5. 프로그램 종료");
        System.out.print("선택 : ");
    }

    public static void inputMenu() {
        System.out.println("1. 일반, 2. 대학, 3. 회사");
    }

    public static void inputMenuChoice() throws MenuChoiceException {
        int choice = 0;
        choice = sc.nextInt();
        sc.nextLine();
        if (choice < PhoneMenuString.GENERAL || choice > PhoneMenuString.COMPANY)
            throw new MenuChoiceException(choice);
        switch (choice) {
        case PhoneMenuString.GENERAL:
            inputGeneralPhoneInfo();
            break;
        case PhoneMenuString.UNIVERCITY:
            inputUniversityPhoneInfo();
            break;
        case PhoneMenuString.COMPANY:
            inputCompanyPhoneInfo();
            break;
        }
    }

    public static void inputGeneralPhoneInfo() {
        String name;
        String phone;

        System.out.println("데이터 입력을 시작합니다.");
        System.out.print("이름 : ");
        name = sc.nextLine();
        System.out.print("전화번호 : ");
        phone = sc.nextLine();
        System.out.println("데이터 입력이 완료되었습니다.");
        pb.inputPhoneInfo(new PhoneInfo(name, phone));
    }

    public static void inputUniversityPhoneInfo() {
        String name;
        String phone;
        String major;
        int year;

        System.out.println("데이터 입력을 시작합니다.");
        System.out.print("이름 : ");
        name = sc.nextLine();
        System.out.print("전화번호 : ");
        phone = sc.nextLine();
        System.out.print("전공 : ");
        major = sc.nextLine();
        System.out.print("학년 : ");
        year = sc.nextInt();
        sc.nextLine();
        System.out.println("데이터 입력이 완료되었습니다.");
        pb.inputPhoneInfo(new PhoneUnivInfo(name, phone, major, year));
    }

    public static void inputCompanyPhoneInfo() {
        String name;
        String phone;
        String company;

        System.out.println("데이터 입력을 시작합니다.");
        System.out.print("이름 : ");
        name = sc.nextLine();
        System.out.print("전화번호 : ");
        phone = sc.nextLine();
        System.out.print("회사 : ");
        company = sc.nextLine();
        System.out.println("데이터 입력이 완료되었습니다.");
        pb.inputPhoneInfo(new PhoneCompanyInfo(name, phone, company));
    }

    public static void searchPhoneInfo() {
        String name;
        System.out.println("데이터 검색을 시작합니다.");
        System.out.println("검색하시고자 하는 이름을 입력하세요.");
        name = sc.nextLine();
        pb.searchPhoneInfo(name);
    }

    public static void deletePhoneInfo() {
        String name;
        int result = 0;
        int answer = 0;
        System.out.println("검색하시고자 하는 이름을 입력하세요.");
        name = sc.nextLine();
        result = pb.search(name);
        if (result != -1) {
            System.out.println("정말 삭제하시겠습니까? 1. Yes 2. No");
            answer = sc.nextInt();
            sc.nextLine();
            switch (answer) {
            case PhoneMenuString.YES:
                pb.deletePhoneInfo(result);
                break;
            case PhoneMenuString.NO:
                break;
            default:
                System.out.println("잘못 누르셨습니다.");
            }
        } else
            System.out.println("삭제하시려는 데이터가 없습니다.");
    }

    public static void showAllPhoneInfo() {
        pb.showAllPhoneInfo();
    }
}

public class Practice1 {
    public static void main(String[] args) {
        int choice = 0;

        while (true) {
            try {
                PhoneUI.mainMenu();
                choice = PhoneUI.sc.nextInt();
                PhoneUI.sc.nextLine();
                if (choice < PhoneMenuString.INPUT_PHONEINFO || choice > PhoneMenuString.PROGRAM_QUIT)
                    throw new MenuChoiceException(choice);

                switch (choice) {
                case PhoneMenuString.INPUT_PHONEINFO:
                    PhoneUI.inputMenu();
                    PhoneUI.inputMenuChoice();
                    break;
                case PhoneMenuString.SEARCH_PHONEINFO:
                    PhoneUI.searchPhoneInfo();
                    break;
                case PhoneMenuString.DELETE_PHONEINFO:
                    PhoneUI.deletePhoneInfo();
                    break;
                case PhoneMenuString.SHOW_ALL_PHONEINFO:
                    PhoneUI.showAllPhoneInfo();
                    break;
                case PhoneMenuString.PROGRAM_QUIT:
                    return;

                }
            } catch (MenuChoiceException e) {
                System.out.println(e.getMessage());
                e.showWrongMenu();
            }
        }
}
Chapter 8 예외처리 연습문제
- 예외처리의 정의와 목적에 대해서 설명하시오. 틀림 - 답 안써놔서
정답
-
정의 : 프로그램 실행 시 발생할 수 있는 예외의 발생에 대비한 코드를 작성하는 것
-
목적 : 프로그램의 비정상 종료를 막고, 정상적인 실행상태를 유지하는 것
프로그램의 실행도중에 발생하는 에러는 어쩔 수 없지만, 예외는 프로그래머가 이에 대한 처리를 미리 해주어야 한다.
에러 - 프로그램 코드에 의해서 수습될 수 없는 심각한 오류
예외 - 프로그램 코드에 의해서 수습될 수 있는 다소 미약한 오류
- 다음은 실행도중 예외가 발생하여 화면에 출력된 내용이다 이에 대한 설명 중 옳지 않은 것은? 정답
java.lang.ArithmeticException : / by zero
at ExceptionEx18.method2(ExceptionEx18.java:12)
at ExceptionEx18.method1(ExceptionEx18.java:8)
at ExceptionEx18.main(ExceptionEx18.java:4)
a. . 위의 내용으로 예외가 발생했을 당시 호출스택에 존재했던 메서드를 알 수 있다
b.예외가 발생한 위치는 method2 메서드이며 ExceptionEx18.java파일의 12번째 줄이다
c. , 발생한 예외 ArithmeticException는 이며 0 으로 나누어서 예외가 발생했다
d. method2 메서드가method1 메서드를 호출하였고 그 위치는 ExceptionEx18.java 파일의 8
번째 줄이다.
- d
- 다음 중 오버라이딩이 잘못된 것은? 틀림
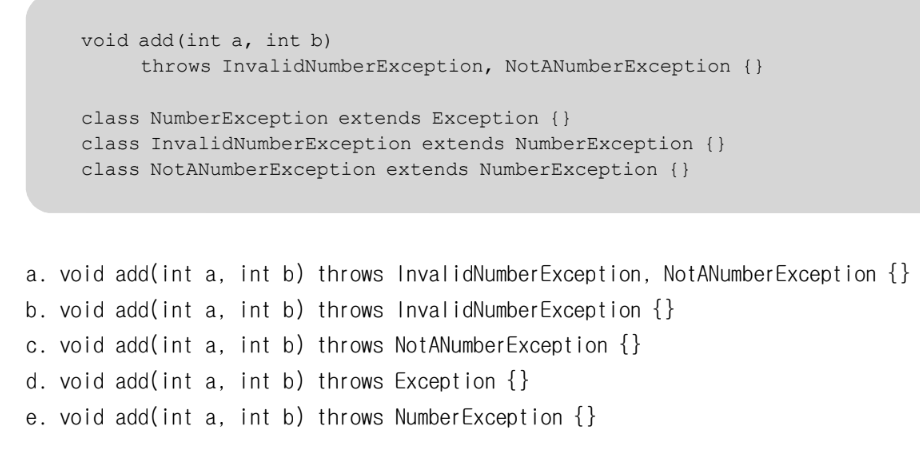
- d
-
위 해설처럼 Exception은 모든 예외의 최고 조상이므로 가장 많은 개수의 예외를 던질 수 있도록 선언한 것이다.
-
NumberException은 왜..??
- 2개의 클래스의 상위 클래스이므로, Parent클래스에서 던지는 저 예외들보다 조상이므로, 오버라이딩 할 수 없는것이다.
-
- 다음과 같은 메서드가 있을 때, 예외를 잘못 처리한 것은? 정답
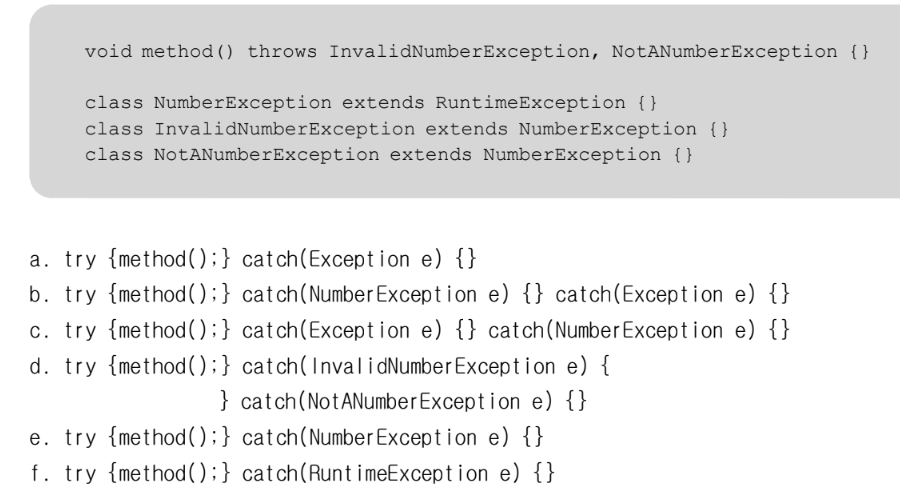
- c
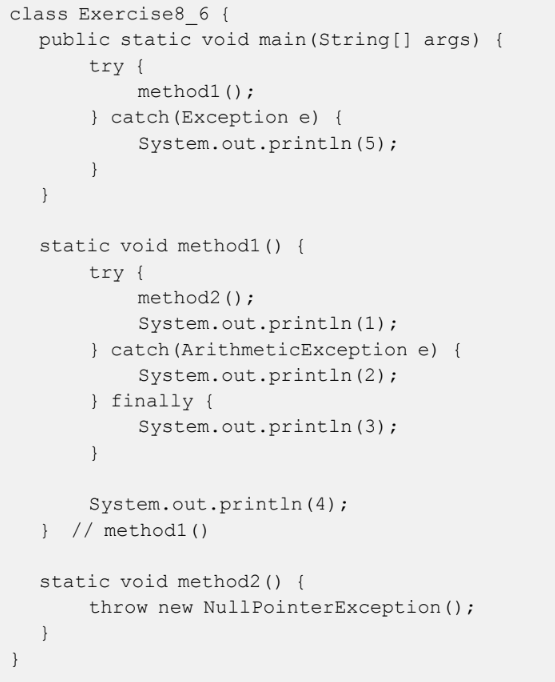
- 아래 코드가 수행되었을 때의 실행결과를 적으시오. true틀림
class Exercise8_5 {
    static void method(boolean b) {
        try {
            System.out.println(1);
            if (b)
                throw new ArithmeticException();
            System.out.println(2);
        } catch (RuntimeException r) {
            System.out.println(3);
            return;
        } catch (Exception e) {
            System.out.println(4);
            return;
        } finally {
            System.out.println(5);
        }
        System.out.println(6);
    }

    public static void main(String[] args) {
        method(true);
        method(false);
    } // main
}- true: 1 4 5 2 6 / false: 1 2 5 6
풀이
-
true면
ArithmeticException()이 발생되는데, 이는RuntimeException이므로 3이 출력되고 finally구문이 실행되서 5가 출력된다.- 그래서 true는 1 3 5 가 출력된다.
- 아래 코드가 수행되었을 때의 실행결과를 적으시오. 틀림 - checked / un-checked!!
- 던져짐을 명시하지 않았기때문에 에러가 나는 줄 알았다.
풀이
-
NullPointerException()은RuntimeException으로un-checked예외이다. 그러므로 명시를 반드시 할 필요는 없는것이다. > 예외를 잡아도되고, 안잡아도되기 때문이다. >> 던져짐을 명시해도 되고, 안해도 되는 것 -
지금이라도 다시 풀어보자면 출력 결과는 3 5
새로운 예외를 가지고 호출한 곳으로 돌아갔는데 catch블럭이 있긴 하지만 해당 예외를 처리해줄 블럭이 없으면 해당 메서드는 종료되고 finally가 있으면 실행되고, 종료된 후 해당 메서드를 호출 한 main으로 다시 돌아간다.
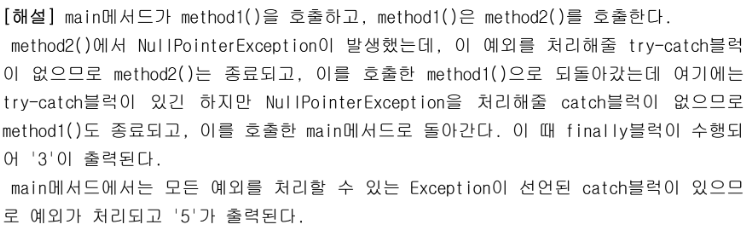
- 아래 코드가 수행되었을 때의 실행결과를 적으시오. false틀림
-
true: 1 / false: 1 2 5 6
-
exit하면 그냥 프로그램 종료 아닌가? 흠
-
바보야...종료니까 false 인 메서드가 실행될 수 없잖아..
-
풀이
- 변수 b의 값이 true이므로 System.exit(0);이 수행되어 프로그램이 즉시 종료된다. 이럴 때는 finally 블럭이 수행되지 않는다.
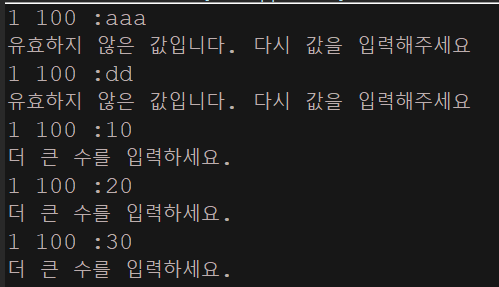
- 1~100사이의 숫자를 맞추는 게임을 실행하던 도중에 숫자가 아닌 영문자를 넣어서 발생한 예외이다 예외처리를 해서 숫자가 아닌 값을 입력했을 때는 다시 입력을 받도록 보완하라. 정답이긴 한데, 효율성 측면에서는 해설이 더 정답
1 과 100 사이의 값을 입력하세요:50
더 작은 수를 입력하세요.
1 과 100 사이의 값을 입력하세요:asdf
Exception in thread "main" java.util.InputMismatchException
at java.util.Scanner.throwFor(Scanner.java:819)
at java.util.Scanner.next(Scanner.java:1431)
at java.util.Scanner.nextInt(Scanner.java:2040)
at java.util.Scanner.nextInt(Scanner.java:2000)
at Exercise8_8.main(Exercise8_8.java:16)
package com.test.memo;

import java.util.InputMismatchException;
import java.util.Scanner;

class Practice2 {

    public static void main(String[] args) {

        int answer = (int) (Math.random() * 100) + 1;
        int input = 0; // 사용자입력을 저장할 공간
        int count = 0; // 시도횟수를 세기 위한 변수
        do {
            count++;
            System.out.print("1 100 :");

            try {
                input = new Scanner(System.in).nextInt();//메서드 체이닝한것, 근데 일반적으로 사용하는게 더 좋

                if (answer > input) {
                    System.out.println("더 큰 수를 입력하세요.");
                } else if (answer < input) {
                    System.out.println("더 작은 수를 입력하세요.");
                } else {
                    System.out.println("맞췄습니다..");
                    System.out.println("시도횟수는" + count + "번 입니다.");
                    break; // do-while문을 벗어난다
                }
            } catch (InputMismatchException e) {
                System.out.println("유효하지 않은 값입니다. 다시 값을 입력해주세요");

            }
        } while (true); // 무한반복문
    } // main
}
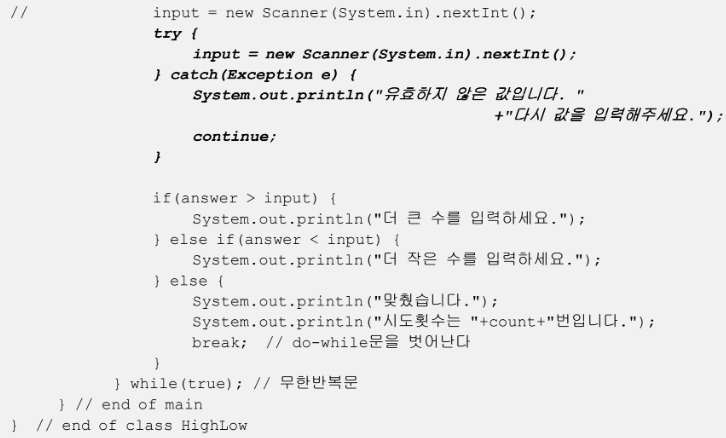
- try구문에 많은 문장이 들어가면, 많은 메모리를 소모? 하기 때문에 위같이 구문 작성하는게 더 효율적이다.
- 다음과 같은 조건의 예외클래스를 작성하고 테스트하시오. 틀림!!!!
생성자는 실행결과를 보고 알맞게 작성해야한다.
- 클래스명: UnsupportedFuctionException
- 조상클래스명: RuntimeException
- 멤버변수:
이 름 : ERR_CODE
저장값 에러코드 :
타 입 : int
기본값 : 100
제어자 : final private - 메서드:
- : getErrorCode 메서드명
기 능 에러코드 를 반환한다 : (ERR_CODE) .
반환타입 : int
매개변수 없음 :
제어자 : public - getMessage 메서드명:
기 능 메세지의 내용을 반환한다 클래스의 를 오버라이딩 : .(Exception getMessage() )
반환타입 : String
매개변수 없음 :
제어자 : public
package com.test.memo;

class UnsupportedFuctionException extends RuntimeException {
    final private int ERR_CODE;

    UnsupportedFuctionException(String message, int errorCode) {
        super(message);
        ERR_CODE = errorCode;
    }

    UnsupportedFuctionException(String message) {
        this(message, 100);
    }

    public int getErrorCode() {
        return ERR_CODE;
    }
    @Override
    public String getMessage() {    //매개변수를 넣으면 에러 > 상위 메서드에는 매개변수가 없으므로
        return "[" + getErrorCode() + "]" + super.getMessage();
    }//이런것은 alt + shift + s > alt + V 해서 선택하면 자동으로 오버라이딩 생성해준다.

}

class Practice2 {
    public static void main(String[] args)  {

       try {
            throw new UnsupportedFuctionException("지원하지 않는 기능입니다.", 100);
        } catch (UnsupportedFuctionException e) {
            e.printStackTrace();
        }

    } // main
}-
처음에 상수를 100으로 지정해주라는 줄 알고, 그러면 저 100은 무슨 소용인가 싶었고, 메인에서는 던져짐을 명시하면 안되는건 줄 알았다..클래스에서 다시 리턴받아오는데,, 바보같이
-
그리고 생성자 두개를 오버라이딩 시켜서 어떻게할지 몰랐다.
풀이
-
getMessage()의 상위는 Trowable 이므로 모든 예외는 getMessage()를 가지고 있다.
오버라이딩 같은 경우는 툴을 사용하는게 오류를 더 줄여준다.
- 아래 코드가 수행되었을 떄의 실행결과를 적으시오. 정답
class Exercise8_10 {
    public static void main(String[] args) {
        try {
            method1();
            System.out.println(6);
        } catch (Exception e) {
            System.out.println(7);
        }
    }

    static void method1() throws Exception {
        try {
            method2();
            System.out.println(1);
        } catch (NullPointerException e) {
            System.out.println(2);
            throw e;
        } catch (Exception e) {
            System.out.println(3);
        } finally {
            System.out.println(4);
        }
        System.out.println(5);
    } // method1()

    static void method2() {
        throw new NullPointerException();
    }
}- 2 4 7 출력
isEquals 문제
class IntNumber
{
    int num;

    public IntNumber(int num)
    {
        this.num=num;
    }
    public boolean isEquals(IntNumber numObj)
    {
    }
}

class ObjectEquality
{
    public static void main(String[] args)
    {
        IntNumber num1=new IntNumber(10);
        IntNumber num2=new IntNumber(12);
        IntNumber num3=new IntNumber(10);

        if(num1.isEquals(num2))
            System.out.println("num1과 num2는 동일한 정수");
        else
            System.out.println("num1과 num2는 다른 정수");

        if(num1.isEquals(num3))
            System.out.println("num1과 num3는 동일한 정수");
        else
            System.out.println("num1과 num3는 다른 정수");
    }
}- == 연산자는 참조변수의 참조 값을 비교한다. 인스턴스에 저장되어 있는 값 자체를 비교하려면 어떻게 해야하는지 isEqulas메소드를 정의하세요.
정답
package com.test.memo;

class IntNumber {
    int num;

    public IntNumber(int num) {
        this.num = num;
    }

    public boolean isEquals(IntNumber numObj) {
        return this.num == numObj.num;
    }
}

class Practice2 {
    public static void main(String[] args) throws Exception {

        IntNumber num1 = new IntNumber(10);
        IntNumber num2 = new IntNumber(12);
        IntNumber num3 = new IntNumber(10);

        if (num1.isEquals(num2))
            System.out.println("num1과 num2는 동일한 정수");
        else
            System.out.println("num1과 num2는 다른 정수");

        if (num1.isEquals(num3))
            System.out.println("num1과 num3는 동일한 정수");
        else
            System.out.println("num1과 num3는 다른 정수");
    } // main
}-
나는 instanceof()이용해서 풀어보려했는데, 실패했다.
-
그 이유는
instanceof연산자는 객체의 타입을 확인하는데 사용되는데, 지금은 같은 클래스 안에서 선언되었기 때문에 instanceof 연산자를 사용할 필요가 없는 것이다. -
대신 두 객체의 num필드를 직접 비교하여 두 객체의 값이 동일한지 확인할 수 있다.
-
ObjectEquals 문제
Object클래스에 있는 equals()메서드를 오버라이딩 해서 푸는 문제
내가 푼 코드
package com.test.memo;

class IntNumber {
    int num;

    public IntNumber(int num) {
        this.num = num;
    }
    @Override
    public boolean equals(Object numObj) {//매개변수를 Object로 놓지 않으면 , 값이 다르게나옴 꼭!!
        if (numObj.equals(this.num)) {
            return true;
        } else
            return false;
    }
}

class Practice2 {
    public static void main(String[] args) throws Exception {

        IntNumber num1 = new IntNumber(10);
        IntNumber num2 = new IntNumber(12);
        IntNumber num3 = new IntNumber(10);

        if (num1.equals(num2))
            System.out.println("num1과 num2는 동일한 정수");
        else
            System.out.println("num1과 num2는 다른 정수");

        if (num1.equals(num3))
            System.out.println("num1과 num3는 동일한 정수");
        else
            System.out.println("num1과 num3는 다른 정수");
    } // main
}-
alt + shift + s > v 단축키 사용해서 오버라이딩 하는것을 습관화 하자!
-
내가 한 방식도 정답이다.
-
대신 매개변수를 Object 자료형으로 두지 않으면, equals() 메서드는 Object타입이기 때문에 오류가 난다.
-
  @Override
    public boolean equals(Object obj) {
        if (obj instanceof IntNumber) {
            IntNumber other = (IntNumber) obj;
            return this.num == other.num;
        }
        return false;
    }//이렇게 사용도 가능하다.
-
선생님 풀이
class IntNumber {
    int num;

    public IntNumber(int num) {
        this.num = num;
    }

    public boolean equals(Object obj) {
        IntNumber other = (IntNumber) obj;
        return this.num == other.num;
    }
}

class ObjectEquality2 {
    public static void main(String[] args) {
        IntNumber num1 = new IntNumber(10);
        IntNumber num2 = new IntNumber(12);
        IntNumber num3 = new IntNumber(10);

        if (num1.equals(num2))
            System.out.println("num1과 num2는 동일한 정수");
        else
            System.out.println("num1과 num2는 다른 정수");

        if (num1.equals(num3))
            System.out.println("num1과 num3는 동일한 정수");
        else
            System.out.println("num1과 num3는 다른 정수");
    }
}
Rectangle 문제
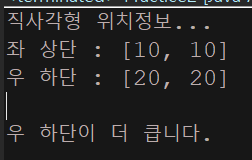
내가 푼 코드
package com.test.memo;

class Point {
    int xPos, yPos;

    public Point(int x, int y) {
        xPos = x;
        yPos = y;
    }

    public void showPosition() {
        System.out.printf("[%d, %d]", xPos, yPos);
    }
}

class Rectangle {
    Point upperLeft, lowerRight;

    public Rectangle(int x1, int y1, int x2, int y2) {
        upperLeft = new Point(x1, y1);// 좌상단
        lowerRight = new Point(x2, y2);// 우하단
    }

    @Override
    public boolean equals(Object obj) {
        if (obj.equals(lowerRight)) {
            return true;
        }
        return false;
    }

    public void showPosition() {
        System.out.println("직사각형 위치정보...");
        System.out.print("좌 상단 : ");
        upperLeft.showPosition();
        System.out.println("");
        System.out.print("우 하단 : ");
        lowerRight.showPosition();
        System.out.println("\n");

        if (equals(lowerRight)) {
            System.out.println("우 하단이 더 큽니다.");
        } else
            System.out.println("좌 상단이 더 큽니다.");

    }
}

class Practice2 {
    public static void main(String[] args) {
        Rectangle rectangle = new Rectangle(10, 10, 20, 20);
        rectangle.showPosition();
    } // main
}
- 뭘 비교하라는건지 모르겠어서..근데 여러개 객체 생성해서 서로 비교하는거래요 다시 해볼게욤..
다시
package com.test.memo;

class Point {
    int xPos, yPos;

    public Point(int x, int y) {
        xPos = x;
        yPos = y;
    }

    public void showPosition() {
        System.out.printf("[%d, %d]", xPos, yPos);
    }

    @Override
    public boolean equals(Object obj) {
        Point ex = (Point) obj;
        return this.xPos == ex.xPos && this.yPos == ex.yPos;
    }

}

class Rectangle {
    Point upperLeft, lowerRight;

    public Rectangle(int x1, int y1, int x2, int y2) {
        upperLeft = new Point(x1, y1);// 좌상단
        lowerRight = new Point(x2, y2);// 우하단
    }

    @Override
    public boolean equals(Object obj) {
        Rectangle ex = (Rectangle) obj;
        return this.upperLeft.equals(ex.upperLeft) && this.lowerRight.equals(ex.lowerRight);
    }

    public void showPosition() {
        System.out.println("직사각형 위치정보...");
        System.out.print("좌 상단 : ");
        upperLeft.showPosition();
        System.out.println("");
        System.out.print("우 하단 : ");
        lowerRight.showPosition();
        System.out.println("\n");

    }
}

class Practice2 {
    public static void main(String[] args) {
        Rectangle rec1 = new Rectangle(10, 10, 20, 20);
        Rectangle rec2 = new Rectangle(20, 20, 30, 30);
        Rectangle rec3 = new Rectangle(20, 20, 30, 30);
        System.out.println(rec1.equals(rec2));
        System.out.println(rec2.equals(rec3));

    } // main
}- 만든 객체들의 좌표가 서로 같은지 다른지 비교하는것이였다. 이런식이라면, 위에서 내가 한것보다 저렇게 형변환 시켜서
equals를 이용해서 같으면 true 다르면 false를 반환하게끔 해야할 것 같다.

얕은 복사 깊은 복사(clone()) 문제
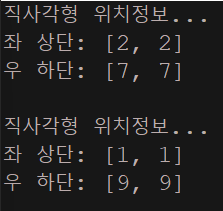
이것을 다음의 형태로 출력되게 바꾸자.
직사각형 위치정보...
좌 상단: [2, 2]
우 하단:[7, 7]
직사각형 위치정보...
좌 상단: [1, 1]
우 하단:[9, 9]
package com.test.memo;

class Point implements Cloneable {
    private int xPos;
    private int yPos;

    public Point(int x, int y) {
        xPos = x;
        yPos = y;
    }

    public void showPosition() {
        System.out.printf("[%d, %d]", xPos, yPos);
    }

    public void changePos(int x, int y) {
        xPos = x;
        yPos = y;
    }

    public Object clone() throws CloneNotSupportedException {
        return super.clone();
    }
}

class Rectangle implements Cloneable {
    Point upperLeft, lowerRight;

    public Rectangle(int x1, int y1, int x2, int y2) {
        upperLeft = new Point(x1, y1);
        lowerRight = new Point(x2, y2);
    }

    public void showPosition() {
        System.out.println("직사각형 위치정보...");
        System.out.print("좌 상단: ");
        upperLeft.showPosition();
        System.out.println("");
        System.out.print("우 하단: ");
        lowerRight.showPosition();
        System.out.println("\n");
    }

    public void changePos(int x1, int y1, int x2, int y2) {
        upperLeft.changePos(x1, y1);
        lowerRight.changePos(x2, y2);
    }

    public Object clone() throws CloneNotSupportedException {
        return super.clone();
    }
}

class Practice2 {
    public static void main(String[] args) {
        Rectangle org = new Rectangle(1, 1, 9, 9);
        Rectangle cpy;

        try {
            cpy = (Rectangle) org.clone();
            org.changePos(2, 2, 7, 7);// 기존의 길이를 변화시키는것
            org.showPosition();// 1,1/9,9
            cpy.showPosition();// 2,2/7,7 이 출력되도록
        } catch (CloneNotSupportedException e) {
            e.printStackTrace();
        }
    } // main
}
내가 푼 풀이
package com.test.memo;

class Point implements Cloneable {
    private int xPos;
    private int yPos;

    public Point(int x, int y) {
        xPos = x;
        yPos = y;
    }

    public void showPosition() {
        System.out.printf("[%d, %d]", xPos, yPos);
    }

    public void changePos(int x, int y) {
        xPos = x;
        yPos = y;
    }

    public Object clone() throws CloneNotSupportedException {
        return super.clone();
    }
}

class Rectangle implements Cloneable {
    Point upperLeft, lowerRight;

    public Rectangle(int x1, int y1, int x2, int y2) {
        upperLeft = new Point(x1, y1);
        lowerRight = new Point(x2, y2);
    }

    public void showPosition() {
        System.out.println("직사각형 위치정보...");
        System.out.print("좌 상단: ");
        upperLeft.showPosition();
        System.out.println("");
        System.out.print("우 하단: ");
        lowerRight.showPosition();
        System.out.println("\n");
    }

    public void changePos(int x1, int y1, int x2, int y2) {
        upperLeft.changePos(x1, y1);
        lowerRight.changePos(x2, y2);
    }

    public Object clone() throws CloneNotSupportedException {
        return super.clone();
    }

    @Override
    public boolean equals(Object obj) {
        Rectangle ex = (Rectangle) obj;
        if (this.upperLeft.equals(ex.upperLeft) && this.lowerRight.equals(ex.lowerRight)) {
            return true;
        } else
            return false;
    }

}

class Practice2 {
    public static void main(String[] args) {
        Rectangle org = new Rectangle(1, 1, 9, 9);
        Rectangle cpy;

        try {
            cpy = (Rectangle) org.clone();
            org.changePos(2, 2, 7, 7);// 기존의 길이를 변화시키는것
            if (org.equals(cpy)) {
                org = new Rectangle(1, 1, 9, 9);

                org.showPosition();
                cpy.showPosition();
            }
//            org.showPosition();// 1,1/9,9
//            cpy.showPosition();// 2,2/7,7 이 출력되도록
        } catch (CloneNotSupportedException e) {
            e.printStackTrace();
        }
    } // main
}- 야매로 했는데..이게 맞나 싶네유 결과는 같은데..하하 ㅋㅋㅋ
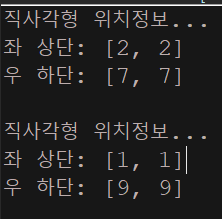
다시 한 풀이 - 정답
package com.test.memo;

class Point implements Cloneable {
    private int xPos;
    private int yPos;

    public Point(int x, int y) {
        xPos = x;
        yPos = y;
    }

    public void showPosition() {
        System.out.printf("[%d, %d]", xPos, yPos);
    }

    public void changePos(int x, int y) {
        xPos = x;
        yPos = y;
    }

    public Object clone() throws CloneNotSupportedException {
        return super.clone();
    }
}

class Rectangle implements Cloneable {
    Point upperLeft, lowerRight;

    public Rectangle(int x1, int y1, int x2, int y2) {
        upperLeft = new Point(x1, y1);
        lowerRight = new Point(x2, y2);
    }

    public void showPosition() {
        System.out.println("직사각형 위치정보...");
        System.out.print("좌 상단: ");
        upperLeft.showPosition();
        System.out.println("");
        System.out.print("우 하단: ");
        lowerRight.showPosition();
        System.out.println("\n");
    }

    public void changePos(int x1, int y1, int x2, int y2) {
        upperLeft.changePos(x1, y1);
        lowerRight.changePos(x2, y2);
    }

    public Object clone() throws CloneNotSupportedException {
        Rectangle cloned = (Rectangle) super.clone();//사진 4000번지가 1000번지를 복사한것
        cloned.upperLeft = (Point) upperLeft.clone();//2000번지가 5000번지에 복사된것
        cloned.lowerRight = (Point) lowerRight.clone(); //3000번지가 6000번지에 복사된것
        return cloned;
    }

}

class Practice2 {
    public static void main(String[] args) {
        Rectangle org = new Rectangle(1, 1, 9, 9);
        Rectangle cpy;

        try {
            cpy = (Rectangle) org.clone();
            org.changePos(2, 2, 7, 7);
            org.showPosition();
            cpy.showPosition();
        } catch (CloneNotSupportedException e) {
            e.printStackTrace();
        }
    } // main
}- 근데 난 왜 출력값이 org에 2277이 나오고 cpy에 1199가 나오는거지.. 아닌가 org를 바꿨으니까 저게 맞는건가 >> 맞는거인듯
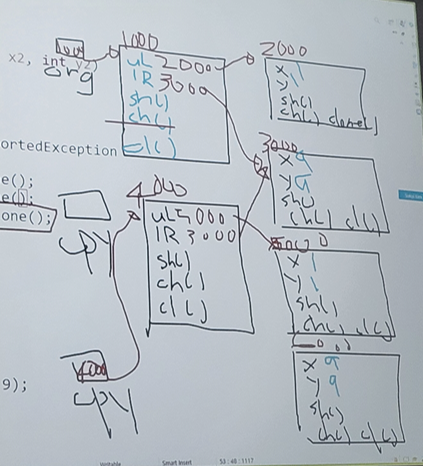
이렇게 clone()에서 복사를 하면
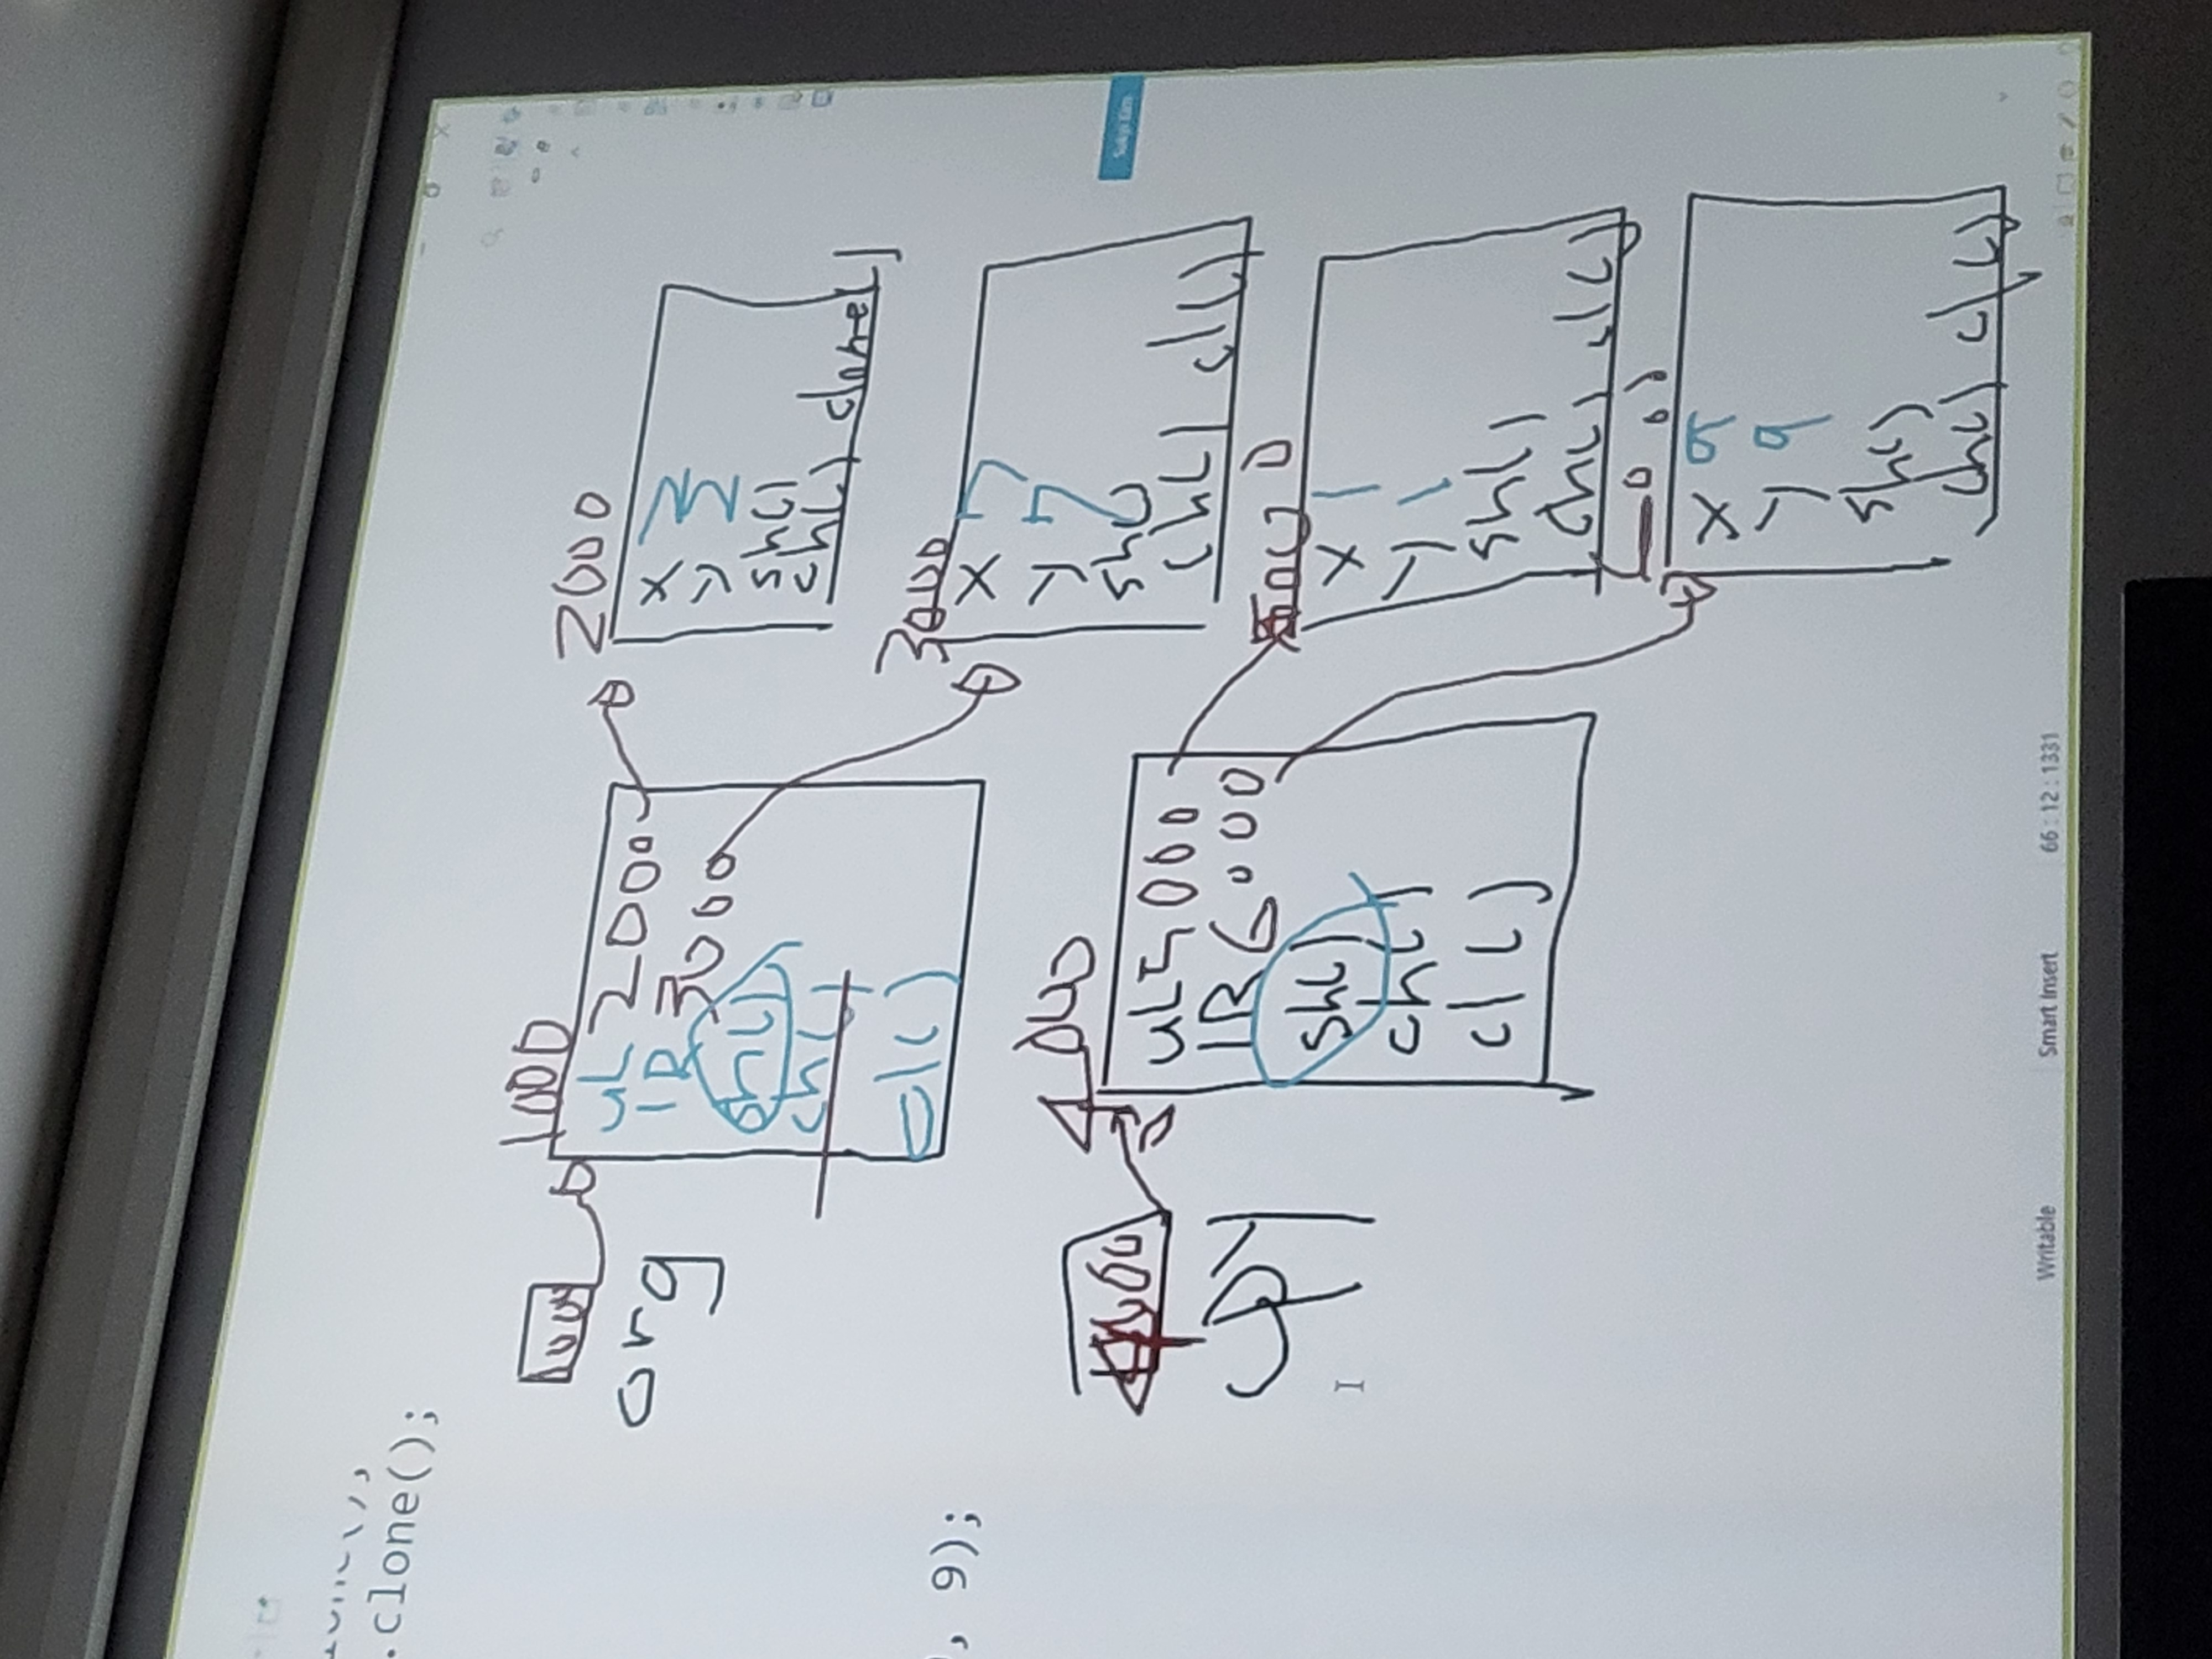
이런 형태로 되어있는 것이다.
얕은 복사 문제와 같은 예제
class Point implements Cloneable
{
    public int x;

    public Point(int x) {
        this.x = x;
    }

    @Override
    public Point clone() throws CloneNotSupportedException {
        return (Point)super.clone();
    }

    public void showInfo()
    {
        System.out.println("x = " + x);
    }
}

class Circle implements Cloneable
{
    public Point center;
    public int radius;
    public Circle(int x, int radius) {
        this.center = new Point(x);
        this.radius = radius;
    }
    @Override
    public Circle clone() throws CloneNotSupportedException {
        Circle cpy = (Circle)super.clone();
        cpy.center = center.clone();
        return cpy;
    }
    public void showInfo()
    {
        center.showInfo();
        System.out.println("radius : " + radius);
    }
}

public class CloneTest {
    public static void main(String[] args) {
        Circle c1 = new Circle(10, 20);
        try {
            Circle cpy = c1.clone();
            cpy.center.x = 100;
            cpy.radius = 200;
            c1.showInfo();
            cpy.showInfo();
        } catch (CloneNotSupportedException e) {
            e.printStackTrace();
        }
    }
}
예외처리 추가적 설명
-
메서드에 예외를 선언할 때 일반적으로 RuntimeException 클래스들은 적지 않는다.
-
이들을 예외처리를 해도되고, 안해도 되기 때문에 메서드 선언부의 throws에 명시를 해도되고, 하지 않아도 된다.
- Checked Excpetion경우는 반드시 예외처리 - IOExcpetion/SQLException
보통은 RuntimeException 클래스를 throws에 명시적으로 선언하는 것은 피하고, 반드시 처리해야 하는 예외들만 throws에 선언하는 것이 좋다.
-
-
printStackTrace() - 예외발생 당시의 호출스택(Call Stack)에 있었던 메서드의 정보와 예외 메시지를 화면에 출력한다.
-
getMessage() - 발생한 예외 클래스의 인스턴스에 저장된 메시지를 얻을 수 있다.
- 내가 이 메시지 인스턴스를 오버라이딩해서 원하는 메시지를 출력하게끔 지정 가능하다.
멀티 catch 블럭
-
JDK 1.7 부터 여러 catch 블럭을 '|' 기호를 이용해서, 하나의 catch 블럭으로 합칠 수 있게 되었으며, 이를 '멀티 catch 블럭' 이라 한다.
-
멀티 catch블럭에 선언된 참조변수 e는 상수이므로 값을 변경할 수 없다는 제약이 있다.
- 여러 catch 블럭이 하나의 참조변수를 공유하기 때문에 생기는 제약으로 실제로 참조변수의 값을 바꿀 일은 없을 것이다.
여러 catch블럭을 멀티 catch블럭으로 합치는 ㄱ여우는 대부분 코드를 간단히 하는 정도의 수준일 것이니 이런 제약에 대해 너무 깊은 고민 필요 x
-
-
'|' 기호로 연결할 수 있는 예외 클래스의 개수에는 제한이 없다.
멀티 catch 블럭에 사용되는 '|'는 논리 연산자가 아니라 기호이다.
예제 1
- 멀티 catch블럭 합치기 전
try{
    ...
    } catch(ExceptionA e) {
        e.printStackTrace();
    } catch(ExceptionB e2) {
        e2.printStackTrace();
}- 멀티 catch블럭 합친 후
try{
    ...
    } catch(ExceptionA | ExceptionB e){
        e.printStackTrace();
}-
만약 멀티 catch 블럭의 '|' 기호로 연결된 예외 클래스가 조상과 자손의 고나계에 있다면 컴파일 에러가 발생한다.
-
try{ ... } catch(ParentException | ChildException e) { // 에러 e.printStackTrace(); }-
왜냐하면, 두 예외 클래스가 조상과 자손의 관계에 있다면, 아래와 같이 조상 클래스만 써주는 것과 똑같기 때문이다. 불필요한 코드는 제거하라는 의미에서 에러가 발생하는 것이다.
-
try{ ... } catch(ParentException e){ e.printStackTrace(); }- 그리고 멀티 catch는 하나의 catch 블럭으로 여러 예외를 처리하는 것이기 때문에, 실제로 어떤 예외가 발생한 것인지 알 수 없다. 그래서 참조 변수 e로 catch블러게 '|'기호로 연결된예외 클래스들의 공통 분모인 조상 예외 클래스에 선언된 멤버만 사용할 수 있다.
-
try{//이렇게까지는 불필요
    ...
} catch(ExceptionA | ExceptionB e) {
    e.methodA();    // 에러. ExceptionA에 선언된 methodA()는 호출불가

    if(e instanceof ExceptionA) {
        ExceptionA e1 = (ExceptionA) e;
        e1.methodA();    // OK. ExceptionA에 선언된 메서드 호출가능
    } else{        // if(e instanceof ExceptionB)
        ...
    }
    e.printStackTrace();
}
필요하다면, 위와 같이
instanceof로 어떤 예외가 발생한 것인지 확인하고 개별적으로 처리할 수는 있다. 그러나 이렇게까지 해가면서 catch 블럭을 합칠 일은 거의 없다.
자동 자원 반환 - try~catch문의 변형
try - with - resources문
JDK1.7부터 try-with-resources문이라는 try-catch문의 변형이 새로 추가되었다.
-
이 구문은 주로 입출력(I/O)와 관련된 클래스를 사용할 때 유용하다.
- 주로 입출력에 사용되는 클래스 중에서는 사용한 후에 꼭 닫아 줘야 하는 것들이 있다.
그래야 사용했던 자원(resources)이 반환되기 때문이다.
DataInputStream을 사용해서 파일로부터 데이터를 읽는 코드(문제가 있는 코드)
try{
    fis = new FileInputStream("score.dat");
    dis = new DataInputStream(fis);
    ...
} catch(IOException ie) {
    ie.printStackTrace();
} finally{
    dis.close();    // 작업 중에 예외가 발생하더라도, dis가 닫히도록 finally 블럭에 넣음
}-
데이터를 읽는 도중에 예외가 발생하더라고 DataInputStream이 닫히도록 finally 블럭 안에 close()를 넣었다. > 여기까지는 문제가 없어보인다.
- 그러나 진짜 문제는 close()가 예외를 발생시킬 수 있다. 아래와 같이 해야 위보다 나은 코드
try{
    fis = new FileInputStream("score.dat");
    dis = new DataInputStream(fis);
    ...
} catch(IOException ie) {
    ie.printStackTrace();
} finally {
    try{
        if(dis != null)
            dis.close();
    } catch(IOException ie){
        ie.printStackTrace();
    }
}-
위처럼 finally블럭 안에 try-catch문을 추가해서 close()에서 발생할 수 있는 예외를 처리하도록 변경했다.
-
그러나 코드가 복잡해져서 별로 보기에 좋지 않다.
-
더 나쁜 것은 try블럭과 finally 블럭에서 모두 예외가 발생하면, try블럭의 예외는 무시된다는 것이다.
-
try-with-resources예제
위의 예제들을 개선하기 위해 자동 자원 반환문이 추가된 것이다.
위의 코드를 try-with-resources문으로 바꾸면 아래와 같다.
//괄호()안에 두 문장 이상 넣을 경우';'로 구분한다.
try(FileInputStream fis = new FileInputStream("score.dat");
    DataInputStream dis = new DataInputStream(fis)) {

    while(true){
        score = dis.readInt();
        System.out.println(score);
        sum += score;
    }
} catch(EOFException e) {
    System.out.println("점수의 총합은 " + sum + "입니다.");
} catch(IOException ie) {
    ie.printStackTrace();
}
FileInputStream과 DataStream을 생성한다. > 리소스를 사용한 후 자동으로 닫히도록 하는것이 주요 목적이다.
-
try-with-resources: 코드의 시작 부분에서try-with-resources문을 사용하여 FileInputStream과 DataInputStream을 생성합니다. 이것은 자바 7에서 도입된 기능으로, 리소스를 사용한 후 자동으로 닫히도록 하는 것이 주요 목적입니다. 따라서try블록을 빠져나갈 때 파일 스트림이나 데이터 스트림이 자동으로 닫힙니다. -
while(true): 무한 루프를 시작합니다. 파일에서 데이터를 계속 읽어와야 하므로 무한 루프가 필요합니다. -
score = dis.readInt(): DataInputStream의 readInt() 메서드를 사용하여 파일에서 정수 데이터를 읽어옵니다. 이 코드는 파일에서 한 번에 한 정수씩 읽어오는 것을 의미합니다. -
System.out.println(score): 읽어온 정수를 출력합니다. -
sum += score;: 읽어온 점수를 총합에 더합니다. -
catch(EOFException e): 파일의 끝(End Of File)에 도달하면 발생하는 예외를 잡습니다. 이때 무한 루프를 탈출하고, 총합을 출력합니다. -
catch(IOException ie): 파일 읽기 도중에 발생할 수 있는 일반적인 입출력 예외를 처리합니다. 예외가 발생하면 스택 추적을 출력합니다.
-
try문의 괄호()안에 객체를 생성하는 문장을 넣으면, 이 객체는 따로 close()를 호출하지 않아도 try블럭을 벗어나는 순간 자동적으로 close()가 호출된다. 그 다음에 catch블럭 또는 finally블럭이 수행된다.
-
try블럭의 괄호()안에 변수를 선언하는 것도 가능하며, 선언된 변수는 try블럭 내에서만 사용할 수 있다.
이처럼try-with-resources문에 의해 자동으로 객체의 close()가 호출될 수 있으려면, 클래스가 AutoCloseable이라는 인터페이스를 구현한 것이어야만 한다.
public interface AutoCloseable{
    void close() throws Exception;
}- 위의 인터페이스는 각 클래스에서 적절히 자원 반환작업을 하도록 구현되어 있다. 그런데, 잘 보면 close()도 Exception을 발생시킬 수 있다.
- 만일 자동 호출된 close()에서 예외가 발생하면 어떻게 될까??
class TryWithResourceEx {
    public static void main(String args[]) {

        try (CloseableResource cr = new CloseableResource()) {
            cr.exceptionWork(false); // 예외가 발생하지 않는다.
         } catch(WorkException e) {
            e.printStackTrace();
        } catch(CloseException e) {
            e.printStackTrace();
        }
        System.out.println();

        try (CloseableResource cr = new CloseableResource()) {
            cr.exceptionWork(true); // 예외가 발생한다.
         } catch(WorkException e) {
            e.printStackTrace();
        } catch(CloseException e) {
            e.printStackTrace();
        }
    } // main의 끝
}

class CloseableResource implements AutoCloseable {
    public void exceptionWork(boolean exception) throws WorkException {
        System.out.println("exceptionWork("+exception+")가 호출됨");

        if(exception)
            throw new WorkException("WorkException발생!!!");
    }

    public void close() throws CloseException {
        System.out.println("close()가 호출됨");
        throw new CloseException("CloseException발생!!!");
    }
}

class WorkException extends Exception {
    WorkException(String msg) { super(msg); }
}

class CloseException extends Exception {
    CloseException(String msg) { super(msg); }
}
실행결과
exceptionWork(false)가 호출됨
close()가 호출됨
CloseException: CloseException발생!!!
at CloseableResource.close(TryWithResourceEx.java:33)
at TryWithResourceEx.main(TryWithResourceEx.java:6)
exceptionWork(true)가 호출됨
close()가 호출됨
WorkException: WorkException발생!!!
at CloseableResource.exceptionWork(TryWithResourceEx.java:28)
at TryWithResourceEx.main(TryWithResourceEx.java:14)
Suppressed: CloseException: CloseException발생!!!
at CloseableResource.close(TryWithResourceEx.java:33)
at TryWithResourceEx.main(TryWithResourceEx.java:15)
- main메서드에 두 개의 try-catch문이 있는데, 첫 번째 것은 close()에서만 예외를 발생시고, 두 번째 것은 exceptionWork()와 close()에서 모두 예외를 발생시킨다.
-
첫번째는 일반적인 예외가 발생했을 때와 같은 형태로 출력되었지만, 두 번째는 출력 형태가 다르다.
- 먼저 exceptionWork()에서 발생한 예외에 대한 내용이 출력되고, close()에서 발생한 예외는 '억제된(suppressed)' 이라는 의미의 머리말과 함께 출력되었다.
-
두 예외가 동시에 발생할 수는 없기 때문에, 실제 발생한 예외를 WorkException으로 하고, CloseException은 억제된 예외로 다룬다. 억제된 예외에 대한 정보는 실제로 발생한 예외인 WorkException에 저장된다.
-
Throwable에는 억제된 예외와 관련된 다음과 같은 메서드가 정의되어있다.
void addSuppressed(Throwable exception)    //억제된 예외를 추가
Throwable[] getSuppressed() //억제된 예외(배열)를 반환- 만일 기존의 try-catch문을 사용했다면, 먼저 발생한 WorkException은 무시되고, 마지막으로 발생한 CloseException에 대한 내용만 출력되었을 것이다.
사용자 정의 예외 클래스 예제 및 설명(추가적인 예외처리 기능)
class NewExceptionTest {
    public static void main(String args[]) {
        try {
            startInstall();        // 프로그램 설치에 필요한 준비를 한다.
            copyFiles();            // 파일들을 복사한다.
        } catch (SpaceException e)    {
            System.out.println("에러 메시지 : " + e.getMessage());
            e.printStackTrace();
            System.out.println("공간을 확보한 후에 다시 설치하시기 바랍니다.");
        } catch (MemoryException me)    {
            System.out.println("에러 메시지 : " + me.getMessage());
            me.printStackTrace();
            System.gc();    //  Garbage Collection을 수행하여 메모리를 늘려준다.
            System.out.println("다시 설치를 시도하세요.");
        } finally {
            deleteTempFiles();    // 프로그램 설치에 사용된 임시파일들을 삭제한다.
        } // try의 끝
    } // main의 끝

   static void startInstall() throws SpaceException, MemoryException {
        if(!enoughSpace())         // 충분한 설치 공간이 없으면...
            throw new SpaceException("설치할 공간이 부족합니다.");
        if (!enoughMemory())        // 충분한 메모리가 없으면...
            throw new MemoryException("메모리가 부족합니다.");
   } // startInstall메서드의 끝

   static void copyFiles() { /* 파일들을 복사하는 코드를 적는다. */ }
   static void deleteTempFiles() { /* 임시파일들을 삭제하는 코드를 적는다.*/}

   static boolean enoughSpace()   {
        // 설치하는데 필요한 공간이 있는지 확인하는 코드를 적는다.
        return false;
   }
   static boolean enoughMemory() {
        // 설치하는데 필요한 메모리공간이 있는지 확인하는 코드를 적는다.
        return true;
   }
} // ExceptionTest클래스의 끝

class SpaceException extends Exception {
    SpaceException(String msg) {
       super(msg);
   }
}

class MemoryException extends Exception {
    MemoryException(String msg) {
       super(msg);
   }
}
실행결과
에러 메시지 : 설치할 공간이 부족합니다.
SpaceException: 설치할 공간이 부족합니다.
at NewExceptionTest.startInstall(NewExceptionTest.java:22)
at NewExceptionTest.main(NewExceptionTest.java:4)
공간을 확보한 후에 다시 설치하시기 바랍니다.
예외 되던지기(Exception re-throwing)
-
한 메서드에서 발생할 수 있는 예외가 여럿인 경우,
-
몇 개는 try-catch문을 통해서 메서드 내에서 자체적으로 처리하고, 그 나머지는 선언부에 지정하여 호출한 메서드에서 처리하도록 함으로써, 양쪽에서 나눠서 처리되도록 할 수 있다.
-
심지어, 단 하나의 예외에 대해서도 예외가 발생한 메서드와 호출한 메서드, 양쪽에서 처리하도록 할 수 있다.
예외를 처리한 후에 인위적으로 다시 발생시키는 방법을 통해서 가능한데, 이를 예외 되던지기(Exception re-throwing) 라고한다.
-
-
- 먼저 예외가 발생할 가능성이 있는 메서드에서 try-catch문을 사용해서 예외를 처리해주고 ,
- catch문에서 필요한 작업을 행한 후에
- throw문을 사용해서 예외를 다시 발생시킨다.
- 다시 발생한 예외는 이 메서드를 호출한 메서드에게 전달되고 호출한 메서드의 try-catch문에서 예외를 또다시 처리한다.
하나의 예외에 대해서 예외가 발생한 메서드와 이를 호출한 메서드 양쪽 모두에서 처리해줘야 할 작업이 있을 때 사용
주의할 점
예외가 발생할 메서드에서는
try-catch문을 사용해서 예외처리를 해줌과 동시에 메서드의 선언부에 발생할 예외를
throws에 지정해줘야 한다는 것이다.
class ExceptionEx17 {
	public static void main(String[] args)
	{
		try  {
			method1();
		} catch (Exception e)	{
			System.out.println("main메서드에서 예외가 처리되었습니다.");
		}
	}	// main메서드의 끝

	static void method1() throws Exception {
		try {
			throw new Exception();
		} catch (Exception e) {
			System.out.println("method1메서드에서 예외가 처리되었습니다.");
			throw e;			// 다시 예외를 발생시킨다.
		}
	}	// method1메서드의 끝
}
// 실행결과
method1메서드에서 예외가 처리되었습니다.
main메서드에서 예외가 처리되었습니다.
연결된 예외(chained exception)
한 예외가 다른 예외를 발생시킬 수도 있다.
- 예외 A가 예외 B를 발생시켰다면, A를 B의 '원인 예외(cause Exception)'라고 한다.
아래의 코드는 SpaceException을 원인 예외로 하는 InstallException을 발생시키는 방법을 보여준다.
try{
	startInstall();	// SpaceException 발생
	copyFiles();
} catch(SpaceException e) {
	InstallException ie = new InstallException("설치중 예외발생");	// 예외 생성
	ie.initCause(e);	// InstallException의 원인 예외를 SpaceException으로 지정
	throw ie;		// InstallException을 발생시킨다.
} catch(MemoryException me) {
...-
InstallException을 생성한 후에, initCause()로 SpaceException을 InstallException의 원인 예외로 등록한다. 그리고 'throw'로 이 예외를 던진다.
-
initCause()는 Exception 클래스의 조상인 Throwable 클래스에 정의되어 있기 때문에 모든 예외에서 사용가능하다.
Throwable initCause(Throwable cause) 지정한 예외를 원인 예외로 등록
Throwable getCause() 원인 예외를 반환
-
- 발생한 예외를 그냥 처리하면 될 텐데, 원인 예외로 등록해서 다시 예외를 발생시키는 이유는, 여러가지 예외를 하나의 큰 분류의 예외로 묶어서 다루기 위해서이고, checked예외를 unchecked예외로 바꿀 수 있도록 하기 위해서이다.
//변경전
static void startInstall() throws SpaceException, MemoryException {
	if(!enoughSpace() )		// 충분한 설치 공간이 없으면 ...
		throw new SpaceException("설치할 공간이 부족합니다.");
	if(!enoughMemory())
		throw new MemoryException("메모리가 부족합니다.");
}

//변경후
static void startInstall() throws SpaceException{
	if(!enoughSpace())		// 충분한 설치 공간이 없으면 ...
		throw new SpaceException("설치할 공간이 부족합니다.");

	if(!enougMemory())
		throw new RuntimeException(new MemoryException("메모리가 부족합니다."));
} // startInstall 메서드의 끝-
MemoryException은 Exception의 자손이므로 반드시 예외를 처리해야하는데, 이 예외를 RuntimeException으로 감싸버렸기 때문에 unchecked예외가 되었다.
-
그래서 더 이상 startInstall()의 선언부에 MemoryException을 선언하지 않아도 된다.
-
참고로 위의 코드에서는 initCause()대신 RuntimeException의 생성자를 사용했다.
- RuntimeException(Throwable cause) // 원인 예외를 등록하는 생성자
-
예외처리 기본 선언 및 에러 예제
class ExceptionEx3 {
    public static void main(String args[]) {
        int number = 100;
        int result = 0;

        for(int i=0; i < 10; i++) {
            try {
                result = number / (int)(Math.random() * 10);
                System.out.println(result);
            } catch (ArithmeticException e)    {
                System.out.println("0");
            } // try-catch의 끝
        } // for의 끝
    }
}- 난수가 0~9이기 때문에 0은 나눌 수 없기에 예외처리를 해야한다.
class ExceptionEx7 {
    public static void main(String args[]) {
        System.out.println(1);
        System.out.println(2);
        try {
            System.out.println(3);
            System.out.println(0/0);
            System.out.println(4);         // 실행되지 않는다.
        } catch (ArithmeticException ae)    {
            if (ae instanceof ArithmeticException)
                System.out.println("true");
            System.out.println("ArithmeticException");
        } catch (Exception e)    {
            System.out.println("Exception");
        }    // try-catch의 끝
        System.out.println(6);
    }    // main메서드의 끝
}
1 2 3 true ArithmeticException 6 출력
class ExceptionEx9 {
    public static void main(String args[]) {
        try {
            Exception e = new Exception("고의로 발생시켰음.");
            throw e;     // 예외를 발생시킴
        //  throw new Exception("고의로 발생시켰음.");

        } catch (Exception e)    {
            System.out.println("에러 메시지 : " + e.getMessage());
             e.printStackTrace();
        }
        System.out.println("프로그램이 정상 종료되었음.");
    }
}-
던졌으니까 catch 로 받아서
에러메시지: 고의로 발생시켰음이 출력되고, 예외가 발생시킨 라인 출력되고 프로그램이 정상 종료되었음이 출력된다. -
Exception은 checked예외
class ExceptionEx10 {
    public static void main(String[] args) {
        throw new Exception();        // Exception을 고의로 발생시킨다.
    }
}- checked 예외로 컴파일 자체가 실행안됨
class ExceptionEx12 {
    public static void main(String[] args) throws Exception {
        method1();     // 같은 클래스내의 static멤버이므로 객체생성없이 직접 호출가능.
      }    // main메서드의 끝

    static void method1() throws Exception {
        method2();
    }    // method1의 끝

    static void method2() throws Exception {
        throw new Exception();
    }    // method2의 끝
}- throw했는데 잡는곳이 없으면 던져짐은(throws)를 명시해야한다. > checked 예외이므로
import java.io.*;

class ExceptionEx15 {
    public static void main(String[] args) {
        // command line에서 입력받은 값을 이름으로 갖는 파일을 생성한다.
        File f = createFile(args[0]);    //밑에서 만든 객체를 이용한 파일생성을 리턴해서 받는곳이다.
        System.out.println( f.getName() + " 파일이 성공적으로 생성되었습니다.");
    } // main메서드의 끝

    static File createFile(String fileName) {
        try {
            if (fileName==null || fileName.equals("")) //만약 입력한 문장이 null이나 공백일경우
                throw new Exception("파일이름이 유효하지 않습니다.");
        } catch (Exception e) {
             // fileName이 부적절한 경우, 파일 이름을 '제목없음.txt'로 한다.
            fileName = "제목없음.txt"; //입력한 문장에 저 문장을 대입
        } finally {
            File f = new File(fileName); // File클래스의 객체를 만든다.
            createNewFile(f);             // 생성된 객체를 이용해서 파일을 생성한다.
            return f;
        }
    }    // createFile메서드의 끝

    static void createNewFile(File f) {
        try {
            f.createNewFile();        // 파일을 생성한다.
        } catch(Exception e){ }
    }    // createNewFile메서드의 끝
}
컴파일할때 args배열에 넣을 문장을 넣으면 해당 배열을 가지고 예외처리하는 예제
-
cmd에서 입력받은 문자열을 가지고 새로운 파일을 만드는 예제이다. > 만약 빈문자열이라면 예외처리를 이용해 파일객체의 제목을 예외처리로 처리하는 것이다.
- 새로운 메서드를 생성해서 예외를 처리해 리턴시켜서 메인메서드로 주는것이다. > 새로운 메서드에서 잡아줬기 때문에 명시적으로 던져짐을 표현할 필요는 없다.
import java.io.*;

class ExceptionEx16 {
    public static void main(String[] args)
    {
        try {
            File f = createFile(args[0]);
            System.out.println( f.getName()+"파일이 성공적으로 생성되었습니다.");
        } catch (Exception e) {
            System.out.println(e.getMessage()+" 다시 입력해 주시기 바랍니다.");
        }
    }    // main메서드의 끝

    static File createFile(String fileName) throws Exception {
        if (fileName==null || fileName.equals(""))
            throw new Exception("파일이름이 유효하지 않습니다.");
        File f = new File(fileName);        //  File클래스의 객체를 만든다.
        // File객체의 createNewFile메서드를 이용해서 실제 파일을 생성한다.
        f.createNewFile();
        return f;        // 생성된 객체의 참조를 반환한다.
    }    // createFile메서드의 끝
}    // 클래스의 끝
위의 예제와 같은 내용이지만 다른 형태로 예외를 잡는 모습
-
새로운 메서드에서 만약 args배열에 null이나 공백이 들어있다면 예외를 던져 메인메서드에서 처리한다.
- 새로운 메서드에는 잡는 것이 없기 떄문에 throws를 넣어 던져짐을 명시해야한다.
- checked 예외이므로 명시해야하는것, un-checked예외면 명시하지 않아도 된다.
class FinallyTest3 {
    public static void main(String args[]) {
        // method1()은 static메서드이므로 인스턴스 생성없이 직접 호출이 가능하다.
        FinallyTest3.method1();
        System.out.println("method1()의 수행을 마치고 main메서드로 돌아왔습니다.");
    }    // main메서드의 끝

    static void method1() {
        try {
            System.out.println("method1()이 호출되었습니다.");
            return;        // 현재 실행 중인 메서드를 종료한다.
        }    catch (Exception e)    {
            e.printStackTrace();
        } finally {
            System.out.println("method1()의 finally블럭이 실행되었습니다.");
        }
    }    // method1메서드의 끝
}- try구문에 return이 있어도 return하기 전에 finally구문이 실행된 후 return되어서 돌아간다.
class ExceptionEx17 {
    public static void main(String[] args)
    {
        try  {
            method1();
        } catch (Exception e)    {
            System.out.println("main메서드에서 예외가 처리되었습니다.");
        }
    }    // main메서드의 끝

    static void method1() throws Exception {
        try {
            throw new Exception();
        } catch (Exception e) {
            System.out.println("method1메서드에서 예외가 처리되었습니다.");
            throw e;            // 다시 예외를 발생시킨다.
        }
    }    // method1메서드의 끝
}- catch 문 안에서 다시 throw하니까 결국 그 메서드는 던져짐을 명시해야한다.
- checked예외여서 > un-checked면 명시를 하던 말던 상관 없다.