오전 문제
예외 처리 문법 문제
- try catch 예시를 작성하시오.
<!DOCTYPE html>
<html lang="ko">
<head>
  <meta charset="UTF-8">
  <meta name="viewport" content="width=device-width, initial-scale=1.0">
  <title>Document</title>
</head>
<body>
  <script>
    try {
      throw '에러 발생이요~';
    } catch (e) {
      console.log(e); //에러 발생이요~
    }
  </script>
</body>
</html>- try catch finally 예시를 작성하시오.
<!DOCTYPE html>
<html lang="ko">
<head>
  <meta charset="UTF-8">
  <meta name="viewport" content="width=device-width, initial-scale=1.0">
  <title>Document</title>
</head>
<body>
  <script>
    try {
      throw '에러 발생이요~';
    } catch (e) {
      console.log(e); //에러 발생이요~
    }finally{
      console.log('finally 구문이요 ~'); //finally 구문이요 ~
    }
  </script>
</body>
</html>- 다음 코드의 실행 결과를 유추하여 작성하시오.
 function test() {
        try {
          alert('A 위치입니다.')
          throw "예외 강제 발생"
        } catch (exception) {
          alert('B 위치입니다.')
          return
        }
        alert('C 위치입니다.')
      }

      // 함수를 호출합니다.
test()- A위치 입니다. B 위치 입니다.
- 다음 코드의 실행 결과를 유추하여 작성하시오.
function test() {
        try {
          alert('A 위치입니다.')
          throw "예외 강제 발생"
        } catch (exception) {
          alert('B 위치입니다.')
          return
        } finally {
          alert('C 위치입니다.')
        }
      }

      // 함수를 호출합니다.
test()- A 위치 입니다. B 위치 입니다. C 위치 입니다.
- 배열의 크기가 허용되는 크기 이상을 주고 예외 처리를 하자.
그리고 예외의 이름과 메세지를 출력하자.
<!DOCTYPE html>
<html lang="ko">
<head>
  <meta charset="UTF-8">
  <meta name="viewport" content="width=device-width, initial-scale=1.0">
  <title>Document</title>
</head>
<body>
  <script>
    try {
      const arr = [999999999];
      throw new Error('배열의 크기가 최대 범주를 넘어섰습니다.');
    } catch (e) {
      console.log(e.name); //Error
      console.log(e.message); //배열의 크기가 최대 범주를 넘어섰습니다.
    }
  </script>
</body>
</html>- 예외를 강제로 발생시킬때 throw 라는 키워드를 쓴다.
throw 키워드를 썼을 때 다음 두 가지 경우의 차이에 대해서 설명하자.
-
throw '보여줄 메시지': 해당 메시지만 보여준다. -
throw new Error('보여줄 메시지): 에러 메시지와 몇번 째 줄 무슨 파일에서 에러가 났는지 표시해준다.
- 예외가 강제로 발생되는 예시를 들어보자.
<!DOCTYPE html>
<html lang="ko">
<head>
  <meta charset="UTF-8">
  <meta name="viewport" content="width=device-width, initial-scale=1.0">
  <title>Document</title>
</head>
<body>
  <script>
    function division(num1, num2){
      try{
        if(num1 < 1 || num2 < 1){
          throw new Error('0 또는 음수로 나눌 수 없습니다. 1 이상의 값을 입력하세요');
        }
        return num1 / num2;
      }catch(e){
        console.log(e);
      }
    }
    console.log(division(100, 5)); //20
    console.log(division(100, 0)); //Error: 0 또는 음수로 나눌 수 없습니다. 1 이상의 값을 입력하세요
                                    // at division (Example.html:13:17)
                                    // at Example.html:21:17
  </script>
</body>
</html>
class 문법 문제
- 추상화란 무엇인가?
- 객체들 간의 공통된 기능을 하나로 묶어 클래스 형태로 만든 것을 의미한다.
- 다음 코드에서 객체에 getSum 메소드와 getAverage 메소드를 추가하여 실행결과가 다음과 같이 나오게 하자.
<!DOCTYPE html>
<html lang="ko">
<head>
  <meta charset="UTF-8">
  <meta name="viewport" content="width=device-width, initial-scale=1.0">
  <title>Document</title>
</head>
<body>
  <script>
     // 객체를 선언합니다.
     const students = []
      students.push({ 이름: '구름', 국어: 87, 영어: 98, 수학: 88, 과학: 90})
      students.push({ 이름: '별이', 국어: 92, 영어: 98, 수학: 96, 과학: 88})
      students.push({ 이름: '겨울', 국어: 76, 영어: 96, 수학: 94, 과학: 86})
      students.push({ 이름: '바다', 국어: 98, 영어: 52, 수학: 98, 과학: 92})

      // 코드 추가
      for(const student of students){
        student.getSum = function(){
          return this.국어 + this.영어 + this.수학 + this.과학;
        }

        student.getAverage = function(){
          return this.getSum() / 4;
        }
      }

      // 출력합니다.
      let output = '이름\t총점\t평균\n'
      for (const s of students) {
        output += `${s.이름}\t${s.getSum()}점\t${s.getAverage()}점\n`
      }
      console.log(output);
      // 이름    총점    평균
      // 구름    363점    90.75점
      // 별이    374점    93.5점
      // 겨울    352점    88점
      // 바다    340점    85점
  </script>
</body>
</html>- 다음 소스코드에 createStudent 함수를 완성해서, 실형결과와 같이 나오도록 하자.
<!DOCTYPE html>
<html lang="ko">
<head>
  <meta charset="UTF-8">
  <meta name="viewport" content="width=device-width, initial-scale=1.0">
  <title>Document</title>
</head>
<body>
  <script>
     // 객체를 선언합니다.
     const students = []
      students.push(createStudent('구름', 87, 98, 88, 90))
      students.push(createStudent('별이', 92, 98, 96, 88))
      students.push(createStudent('겨울', 76, 96, 94, 86))
      students.push(createStudent('바다', 98, 52, 98, 92))

    function createStudent(이름, 국어, 영어, 수학, 과학){
     return{
      이름 : 이름, 국어 : 국어, 수학 : 수학, 영어 : 영어, 과학 : 과학

      ,getSum(){
        return this.국어 + this.영어 + this.수학 + this.과학;
      },
      getAverage(){
        return this.getSum() / 4;
      },
      toString(){
        return `${this.이름}\t${this.getSum()}점\t${this.getAverage()}점\n`;
      }
     }
    }
      // 출력합니다.
      let output = '이름\t총점\t평균\n'
      for (const s of students) {
        output += s.toString()
      }
      console.log(output);
      // 이름    총점    평균
      // 구름    363점    90.75점
      // 별이    374점    93.5점
      // 겨울    352점    88점
      // 바다    340점    85점

  </script>
</body>
</html>- return값 안에서 속성 지정과 함수를 생성했기 때문에 컴마를 이용해 연결해야한다.
- 다음 코드가 실행될 수 있도록 Student 클래스를 만들고, 그 안에 생성자를 만들자.
<!DOCTYPE html>
<html lang="ko">
<head>
  <meta charset="UTF-8">
  <meta name="viewport" content="width=device-width, initial-scale=1.0">
  <title>Document</title>
</head>
<body>
  <script>

    class Student{
      constructor(이름, 국어, 영어, 수학, 과학){//생성자
        this.이름 = 이름;
        this.국어 = 국어;
        this.영어 = 영어;
        this.수학 = 수학;
        this.과학 = 과학;
      }
    }


    // 객체를 선언합니다.
     const students = []
      students.push(new Student('구름', 87, 98, 88, 90))
      students.push(new Student('별이', 92, 98, 96, 88))
      students.push(new Student('겨울', 76, 96, 94, 86))
      students.push(new Student('바다', 98, 52, 98, 92))

  </script>
</body>
</html>- 다음과 같은 실행결과 나오도록 Student 클래스에 생성자와 getSum, getAverage, toString 메소드를 추가하자.
<!DOCTYPE html>
<html lang="ko">
<head>
  <meta charset="UTF-8">
  <meta name="viewport" content="width=device-width, initial-scale=1.0">
  <title>Document</title>
</head>
<body>
  <script>

    class Student{
      constructor(이름, 국어, 영어, 수학, 과학){//생성자
        this.이름 = 이름;
        this.국어 = 국어;
        this.영어 = 영어;
        this.수학 = 수학;
        this.과학 = 과학;
      }
      getSum(){
        return this.국어 + this.영어 + this.수학 + this.과학;
      }
      getAverage(){
        return this.getSum() / 4;
      }
      toString(){
        return `${this.이름}\t${this.getSum()}점\t${this.getAverage()}점\n`;
      }
    }


    // 객체를 선언합니다.
     const students = []
      students.push(new Student('구름', 87, 98, 88, 90))
      students.push(new Student('별이', 92, 98, 96, 88))
      students.push(new Student('겨울', 76, 96, 94, 86))
      students.push(new Student('바다', 98, 52, 98, 92))

       //출력합니다.
       let output = '이름\t총점\t평균\n'
       for(const s of students){
        output += s.toString();
       }
       console.log(output);
        // 이름    총점    평균
        // 구름    363점    90.75점
        // 별이    374점    93.5점
        // 겨울    352점    88점
        // 바다    340점    85점
  </script>
</body>
</html>- Rectangle 클래스를 만들자.
생성자에서 밑변과 높이를 초기화해주자.
사각형의 둘레를 구해서 리턴하는 메소드
사각형의 넓이를 구해서 리턴하는 메소드
밑변이 10, 높이가 20인 사각형 객체를 만들자.
사각형의 둘레와 사각형의 넓이를 구해서 콘솔에 출력하자.
<!DOCTYPE html>
<html lang="ko">
<head>
  <meta charset="UTF-8">
  <meta name="viewport" content="width=device-width, initial-scale=1.0">
  <title>Rectangle</title>
</head>
<body>
  <script>
    class Rectangle{
      constructor(width, height){ //생성자에서 밑변과 높이 초기화
        this.width = width; this.height = height;
      }
      round(){
        return 2 * (this.width +this.height);
      }
      area(){
        return this.width * this.height;
      }
    }
    const rec1 = new Rectangle(10, 20);
    console.log(`사각형의 둘레 : ${rec1.round()} , 사각형의 넓이 : ${rec1.area()}`);//사각형의 둘레 : 60 , 사각형의 넓이 : 200
  </script>
</body>
</html>- 1번에서만든 Rectangle 클래스를 상속하는 Square 클래스를 만들자.
Square 클래스는 정사각형을 형상화한 클래스이다.
생성자를 만드는데 매개변수를 하나받고 상위클래스의 생성자를 호출하도록 하자.
한변의 길이가 10인 Square 객체를 만들자.
그 객체의 둘레와 넓이를 구해서 출력하자.
<!DOCTYPE html>
<html lang="ko">
<head>
  <meta charset="UTF-8">
  <meta name="viewport" content="width=device-width, initial-scale=1.0">
  <title>Rectangle</title>
</head>
<body>
  <script>
    class Rectangle{
      constructor(width, height){ //생성자에서 밑변과 높이 초기화
        this.width = width; this.height = height;
      }
      round(){
        return 2 * (this.width +this.height);
      }
      area(){
        return this.width * this.height;
      }
    }

    class Square extends Rectangle{
      constructor(length){
        super(length, length);
      }
    }
    const rec = new Rectangle(10, 20);
    const square = new Square(10);
    console.log(`사각형의 둘레 : ${rec.round()} , 사각형의 넓이 : ${rec.area()}`);//사각형의 둘레 : 60 , 사각형의 넓이 : 200
    console.log(`정사각형의 둘레 : ${square.round()} , 정사각형의 넓이 : ${square.area()}`);//정사각형의 둘레 : 40 , 정사각형의 넓이 : 100
  </script>
</body>
</html>- 길이가 0보다 작으면 생성자에서 예외를 발생시키도록 하자
- 예외처리는 에러가 발생했을 때 코드의 실행을 중지시키지 않고, 프로그램이 계속해서 실행될 수 있도록 하는 것을 목적으로 한다.
예외 처리는 했지만 코드는 진행 >> 이게 맞는듯
<!DOCTYPE html>
<html lang="ko">
<head>
  <meta charset="UTF-8">
  <meta name="viewport" content="width=device-width, initial-scale=1.0">
  <title>Rectangle</title>
</head>
<body>
  <script>
   // 정사각형 클래스
   class Square {
        constructor (length) {
            // 예외발생 코드 추가
            try{
              if(length < 1) throw '길이가 0보다 작을 수 없습니다.';
            }catch(e){
              console.log(e); //길이가 0보다 작을 수 없습니다.
            }
          this.length = length
        }
        getPerimeter () { return 4 * this.length }
        getArea () { return this.length * this.length }
      }

      // 클래스 사용하기
      const square = new Square(-10)
      console.log(`정사각형의 둘레: ${square.getPerimeter()}`) //정사각형의 둘레: -40
      console.log(`정사각형의 넓이: ${square.getArea()}`) //정사각형의 넓이: 100
  </script>
</body>
</html>
예외가 발생되면 코드 중단
<!DOCTYPE html>
<html lang="ko">
<head>
  <meta charset="UTF-8">
  <meta name="viewport" content="width=device-width, initial-scale=1.0">
  <title>Rectangle</title>
</head>
<body>
  <script>
    // 정사각형 클래스
    class Square {
      constructor (length) {
        // 예외발생 코드 추가
        if (length < 1) {
          throw new Error('길이가 0보다 작을 수 없습니다.');
        }
        this.length = length;
      }
      getPerimeter () { return 4 * this.length; }
      getArea () { return this.length * this.length; }
    }

    // 클래스 사용하기
    try {
      const square = new Square(-10);
      console.log(`정사각형의 둘레: ${square.getPerimeter()}`);
      console.log(`정사각형의 넓이: ${square.getArea()}`);
    } catch (error) {
      console.error('에러:', error.message);
    }
  </script>
</body>
</html>- 정사각형 클래스 Square를 만들자.
한 변의 길이를 나타내는 속성을 private으로 선언하자.
생성자와 사각형의 둘레를 리턴하는 메소드, 사각형의 면적을 리턴하는 메소드를 만들자.
한변의 길이가 10인 정사각형 객체를 만들고 정사각형의 둘레와 넓이를 구하여 출력하자.
<!DOCTYPE html>
<html lang="ko">
<head>
  <meta charset="UTF-8">
  <meta name="viewport" content="width=device-width, initial-scale=1.0">
  <title>Rectangle</title>
</head>
<body>
  <script>
   // 정사각형 클래스
   class Square {
    #length; //private 속성 사용하겠다고 외부에 선언

        constructor (length) {
            // 예외발생 코드 추가
            try{
              if(length < 1) throw '길이가 0보다 작을 수 없습니다.';
            }catch(e){
              console.log(e);
            }
          this.#length = length
        }
        getPerimeter () { return 4 * this.#length }
        getArea () { return this.#length * this.#length }


      }

      // 클래스 사용하기
      const square = new Square(10);
      console.log(`정사각형의 둘레: ${square.getPerimeter()}`) //정사각형의 둘레: 40
      console.log(`정사각형의 넓이: ${square.getArea()}`) //정사각형의 넓이: 100
  </script>
</body>
</html>- 정사각형 클래스를 만들자
정사각형의 변의 길이를 private으로 선언한자.
생성자에서 변의 길이를 초기화하자.세터메소드가 호출되도록 하자.
게터메소드와 세터메서드로 변의 길이를 반환하고 변의 길이를 대입하도록하자.
세터메소드에서 변의 길이가 0보다 작으면 예외를 발생시키자.
변의 길이가 10인 사각형 객체를 만들자. 변의 길이, 둘레, 넓이를 출력하자.
한변의 길이가 -10인 객체를 만들자.그리고 예외가 발생하도록 하자.
<!DOCTYPE html>
<html lang="ko">
<head>
  <meta charset="UTF-8">
  <meta name="viewport" content="width=device-width, initial-scale=1.0">
  <title>Rectangle</title>
</head>
<body>
  <script>
   // 정사각형 클래스
   class Square {
    #length; //private 속성 사용하겠다고 외부에 선언

        constructor (length) {
            // 예외발생 코드 추가 set length안에 들어가는게 더 좋음
            try{
              if(length < 1) throw '길이가 0보다 작을 수 없습니다.';
            }catch(e){
              console.log(e);
            }
          this.length = length
        }

        get perimeter () { return 4 * this.#length }
        get area () { return this.#length * this.#length }
        set length(length) { this.#length = length; }


      }

      // 클래스 사용하기
      const square1 = new Square(10);
      const square2 = new Square(-10);//길이가 0보다 작을 수 없습니다. 예외 발생
      console.log(`정사각형의 둘레: ${square1.perimeter}`) //정사각형의 둘레: 40
      console.log(`정사각형의 넓이: ${square1.area}`) //정사각형의 넓이: 100
  </script>
</body>
</html>- Square 클래스를 만든다.(정사각형을 형상화한 클래스)
length를 private으로 선언한다.
counter를 정적 private으로 선언한다.
counter를 반환하는 정적 메소드를 만든다.
생성자에서 length를 초기화한다.
생성자에서 counter를 1증가시킨다.
정사각형의 둘레를 구하는 정적 메소드를 만든다.
정사각형의 면적을 구하는 정적 메소드를 만든다.
길이를 반환하는 메소드를 만든다.
둘레를 반환하는 메소드를 만든다.
면적을 반환하는 메소드를 만든다.
길이값을 설정하는 세터메소드를 만든다. 길이가 0보다 작으면 예외를 발생시킨다.
Square 객체 3개를 생성한다.
객체의 갯수를 출력한다.
정적메소드로 길이가 20인 사각형의 둘레를 구한다.
정적메소드로 길이가 30인 사각형의 면적을 구한다.
<!DOCTYPE html>
<html lang="ko">
<head>
  <meta charset="UTF-8">
  <meta name="viewport" content="width=device-width, initial-scale=1.0">
  <title>Rectangle</title>
</head>
<body>
  <script>
   // 정사각형 클래스
   class Square {
    #length; //private 속성 사용하겠다고 외부에 선언
    static #counter = 0; //정적 private으로 선언

        constructor (length) {

          this.length = length
          Square.#counter += 1;
        }

        get perimeter () { return 4 * this.#length }
        get area () { return this.#length * this.#length }
        get length() { return this.#length }

        set length(length) {
          // 예외발생 코드 추가
          try{
              if(length < 1) throw '길이가 0보다 작을 수 없습니다.';
            }catch(e){
              console.log(e);
            }
            this.#length = length;
        }

        static get counter(){ return Square.#counter; } //모든 객체의 counter이므로 this가 아닌 Square로 설정

        static perimeterOf(length){
          return length * 4
        }
        static areaOf(length){
          return length * length;
        }
    }

      //static 속성 사용하기
      const square1 = new Square(10);
      const square2 = new Square(20);
      const square3 = new Square(30);
      console.log(`지금까지 생성된 Square 인스턴스는 ${Square.counter}개입니다.`)//static get counter()호출
      //지금까지 생성된 Square 인스턴스는 3개입니다.

      // static 메소드 사용하기 >> 클래스 이름으로 호출
      console.log(`한 변의 길이가 20인 정사각형의 둘레는 ${Square.perimeterOf(20)}입니다.`)//한 변의 길이가 20인 정사각형의 둘레는 80입니다.
      console.log(`한 변의 길이가 30인 정사각형의 둘레는 ${Square.areaOf(30)}입니다.`)//한 변의 길이가 30인 정사각형의 둘레는 900입니다.
  </script>
</body>
</html>- 다음 코드의 실행 결과를 적으시오.
 // 클래스를 선언합니다.
      class LifeCycle {
        call () {
          this.a()
          this.b()
          this.c()
        }

        a () { console.log('a() 메소드를 호출합니다.')}
        b () { console.log('b() 메소드를 호출합니다.')}
        c () { console.log('c() 메소드를 호출합니다.')}
      }

      class Child extends LifeCycle {
        a () {
          console.log('자식의 a() 메소드입니다.')
        }
      }

      // 인스턴스를 생성합니다.
new Child().call()- 자식의 a()메소드 입니다. b()메소드를 호출합니다. c() 메소드를 호출합니다.
- 다음 코드의 실행결과를 적으시오.
// 클래스를 선언합니다.
      class LifeCycle {
        call () {
          this.a()
          this.b()
          this.c()
        }

        a () { console.log('a() 메소드를 호출합니다.')}
        b () { console.log('b() 메소드를 호출합니다.')}
        c () { console.log('c() 메소드를 호출합니다.')}
      }

      class Child extends LifeCycle {
        a () {
          super.a()
          console.log('자식의 a() 메소드입니다.')
        }
      }

      // 인스턴스를 생성합니다.
new Child().call() - a()메소드를 호출합니다. 자식의 a()메소드 입니다. b()메소드를 호출합니다. c()메소드를 호출합니다.
- 모든 클래스의 최상위 클래스는?
- object
- 10번 클래스의 toString() 메소드를 메소드 오버라이딩하는 예시를 작성하시오.
<!DOCTYPE html>
<html>
  <head>
    <title></title>
    <script>
       class Example{
        constructor(num){
          this.num = num;
        }
        toString(){
          return `당신이 입력한 숫자는 ${this.num} 입니다`;
        }
       }

      // 인스턴스를 생성합니다.
      const ex = new Example(30);
      console.log(ex.toString()); //당신이 입력한 숫자는 30 입니다
    </script>
  </head>
  <body>
  </body>
</html>
Jquery 문제
- 아이디가 txt인 것의 글자 색상을 빨간색으로
$("#txt")
<!DOCTYPE html>
<html lang="ko"

<head>
  <meta charset="UTF-8">
  <title> 선택자 </title>
  <script src="js/jquery.js"></script>
  <script>
    $(function () { //html이 모두 로드된 후에 실
      $("#txt").css("color", "red");
    })
  </script>
</head>

<body>
  <p id="txt">내용</p>
</body>

</html>- 전체 선택자를 이용하여 보더를 1px solid blue로 주자.
$("*")
<!DOCTYPE html>
<html lang="ko">

<head>
  <meta charset="UTF-8">
  <title> 선택자 </title>
  <script src="js/jquery.js"></script>
  <script>
    $(function () {
      $("*").css("border", "1px solid blue");
    });
  </script>
</head>

<body>
  <h1>제이쿼리</h1>
  <h2>선택자</h2>
  <h3>직접 선택자</h3>
</body>

</html>
- 아이디 선택자를 이용하여 아이디가 tit인 것의 배경색을 "#ff0", border를 2px solid #f00으로 주자.
$("#tit").css()
<!DOCTYPE html>
<html lang="ko">

<head>
  <meta charset="UTF-8">
  <title> 선택자 </title>
  <script src="js/jquery.js"></script>
  <script>
    $(function () {
      $("#tit").css({
        "background": "#ff0", "border": "2px solid #f00"
      });
    });
  </script>
</head>

<body>
  <h1>제이쿼리</h1>
  <h2 id="tit">선택자</h2>
  <h3>직접 선택자</h3>
</body>

</html>
- 클래스 선택자를 이용하여 클래스가 tit인 것의 배경색을 "#ff0", border를 2px dashed #f00으로 주자.
$(".tit")
<!DOCTYPE html>
<html lang="ko">

<head>
  <meta charset="UTF-8">
  <title> 선택자 </title>
  <script src="js/jquery.js"></script>
  <script>
    $(function () {
      $(".tit").css({
        "backgroundColor": "#ff0", "border": "2px dashed #f00"
      });
    });
  </script>
</head>

<body>
  <h1>제이쿼리</h1>
  <h2 class="tit">선택자</h2>
  <h3>직접 선택자</h3>
</body>

</html>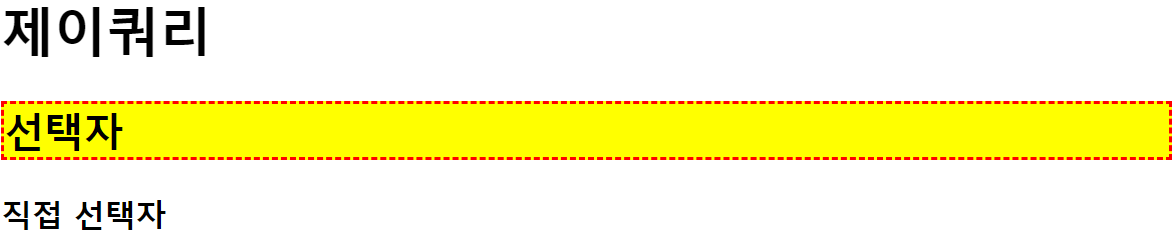
- 태그 선택자를 이용하여 h2 태그를 선택 배경색을 "#ff0", border를 2px dashed #f00으로 주자.
$("h2")
<!DOCTYPE html>
<html lang="ko">

<head>
  <meta charset="UTF-8">
  <title> 선택자 </title>
  <script src="js/jquery.js"></script>
  <script>
    $(function () {
      $("h2").css("background-color", "#0ff").css("border", "2px dashed #f00");
    });
  </script>
</head>

<body>
  <h1>제이쿼리</h1>
  <h2>선택자</h2>
  <h3>직접 선택자</h3>
</body>

</html>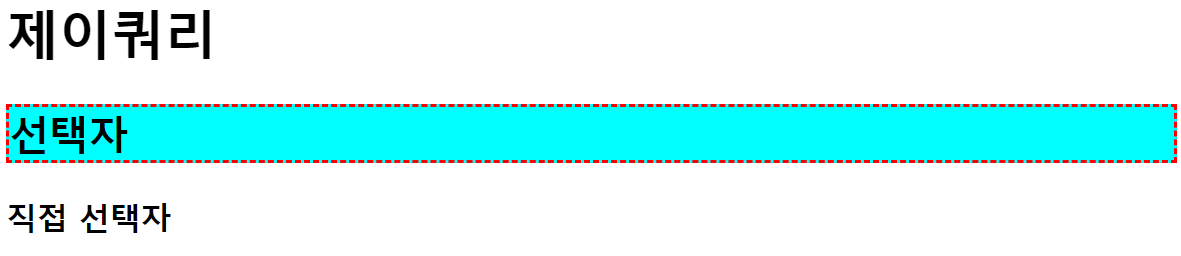
- 태그가 h3이면서 아이디가 tit3인것의 배경색을 "#ff0", border를 2px dashed #f00으로 주자.
$("h3#tit3")
<!DOCTYPE html>
<html lang="ko">

<head>
  <meta charset="UTF-8">
  <title> 선택자 </title>
  <script src="js/jquery.js"></script>
  <script>
    $(function () {
      $("h3#tit3").css("background-color", "#0ff").css("border", "2px dashed #f00");
    });
  </script>
</head>

<body>
  <h1>제이쿼리</h1>
  <h2>선택자</h2>
  <h3 id="tit3">직접 선택자</h3>
  <h3>인접 선택자</h3>
</body>

</html>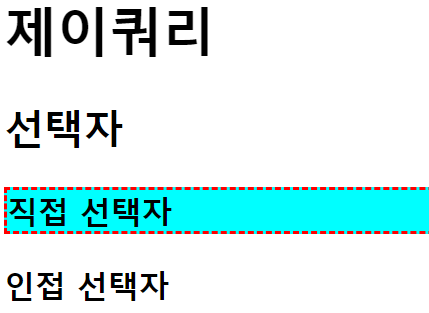
- 태그가 h3이면서 클래스가 tit인 요소의 배경색을 "#0ff", border를 2px dashed #f00으로 주자.
$("h3.tit")
<!DOCTYPE html>
<html lang="ko">

<head>
  <meta charset="UTF-8">
  <title> 선택자 </title>
  <script src="js/jquery.js"></script>
  <script>
    $(function () {
      $("h3.tit").css("background-color", "#0ff").css("border", "2px dashed #f00");
    });
  </script>
</head>

<body>
  <h1 class="tit">제이쿼리</h1>
  <h2>선택자</h2>
  <h3 class="tit">직접 선택자</h3>
</body>

</html>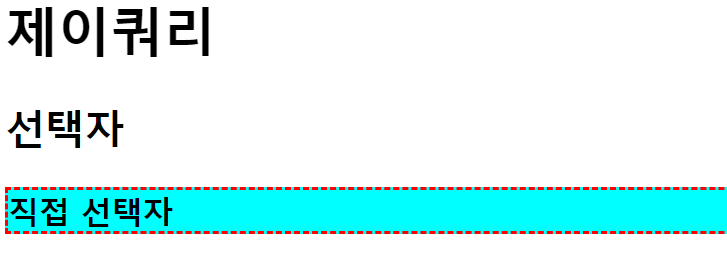
- 아이디가 list_1인 것의 부모요소에 border를 2px dashed #f00으로 주자.
$("#list_1")
<!DOCTYPE html>
<html lang="ko">

<head>
  <meta charset="UTF-8">
  <title> 선택자 </title>
  <script src="js/jquery.js"></script>
  <script>
    $(function () {
      $("#list_1").css("border", "2px dashed #f00");
    });
  </script>
</head>

<body>
  <h1>인접 관계 선택자</h1>
    <ul id="wrap">
        <li>리스트1
            <ul>
                <li id="list_1">리스트1-1</li>
                <li>리스트1-2</li>
            </ul>
        </li>
        <li>리스트2</li>
        <li>리스트3</li>
    </ul>
</body>

</html>
- 아이디가 wrap인 요소의 후손 h1을 선택하여 배경색을 노랑색으로 border를 2px dashed #f00주자
<!DOCTYPE html>
<html lang="ko">

<head>
  <meta charset="UTF-8">
  <title> 선택자 </title>
  <script src="js/jquery.js"></script>
  <script>
    $(function () {
      $("#wrap h1").css("background-color", "yellow").css("border", "2px dashed #f00");
    });
  </script>
</head>

<body>
  <div id="wrap">
    <h1>인접 관계 선택자</h1>
    <p>내용1</p>
    <section>
      <h1>하위 요소 선택자</h1>
      <p>내용2</p>
    </section>
  </div>
</body>

</html>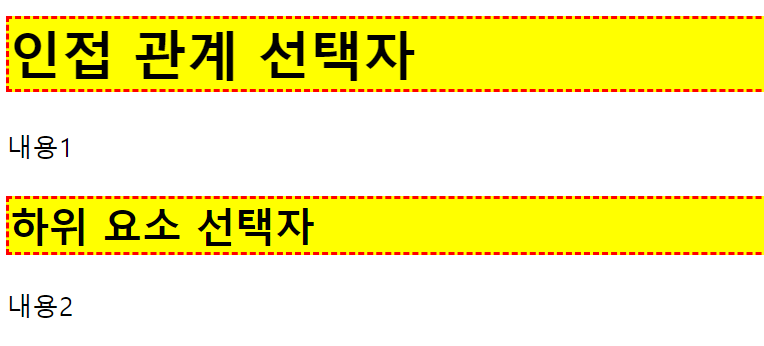
- 아이디가 wrap인 요소의 자손 h1을 선택하여 border를 2px dashed #f00주자.
아이디가 wrap인 요소의 자손 section의 자손들을 배경색 노랑색, border를 2px dashed #f00주자.
<!DOCTYPE html>
<html lang="ko">

<head>
  <meta charset="UTF-8">
  <title> 선택자 </title>
  <script src="js/jquery.js"></script>
  <script>
    $(function () {
      $("#wrap > h1").css("border", "2px dashed #f00");

      $("#wrap > section").children()
        .css({
          "background-color": "yellow",
          "border": "2px solid #f00"
        });
    });
  </script>
</head>

<body>
  <div id="wrap">
    <h1>인접 관계 선택자</h1>
    <p>내용1</p>
    <section>
      <h1>자식 요소 선택자</h1>
      <p>내용2</p>
    </section>
  </div>
</body>

</html>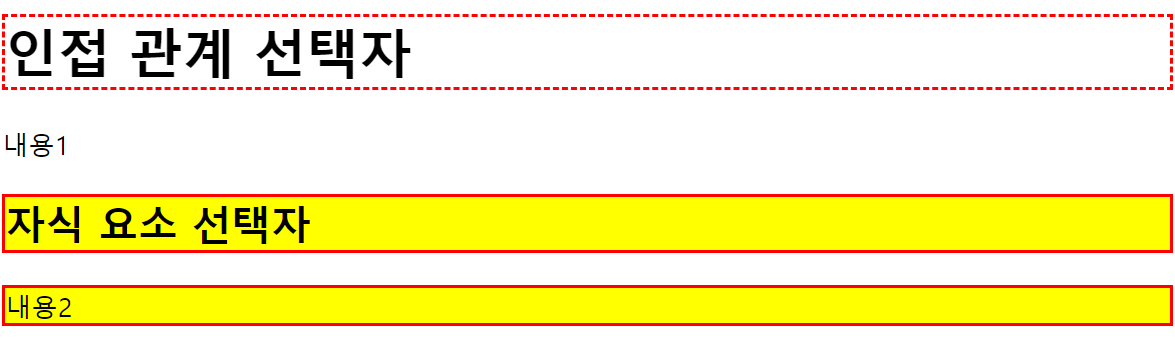
- 클래스txt의 이전 형제요소에 저장되어있는 style_1을 적용하자.
클래스txt의 다음 형제요소에 저장되어있는 style_2를 적용하자.
클래스txt의 다음 형제요소에 저장되어있는 style_2를 적용하자.(위와는 다른 방법).
클래스txt의 다음, 다음 형제 요소에 저장되어 있는 style_2를 적용하자.
<!DOCTYPE html>
<html lang="ko">

<head>
  <meta charset="UTF-8">
  <title> 선택자 </title>
  <script src="js/jquery.js"></script>
  <script>
    $(function () {
      var style_1 = {
        "background-color": "#0ff",
        "border": "2px solid #f00"
      }
      var style_2 = {
        "background-color": "#ff0",
        "border": "2px dashed #f00"
      }
      //txt 이전 형제 요소
      $(".txt").prev().css(style_1);

      //txt 다음 형제 요소
      $(".txt").next().css(style_2);
      //다른 방법
      $(".txt + p").css(style_2);

      //txt다음 다음 요소
      $(".txt").next().next().css(style_2);

    });
  </script>
</head>

<body>
  <div id="wrap">
    <h1>인접 관계 선택자</h1>
    <p>내용1</p>
    <p class="txt">내용2</p>
    <p>내용3</p>
    <p>내용4</p>
  </div>
</body>

</html>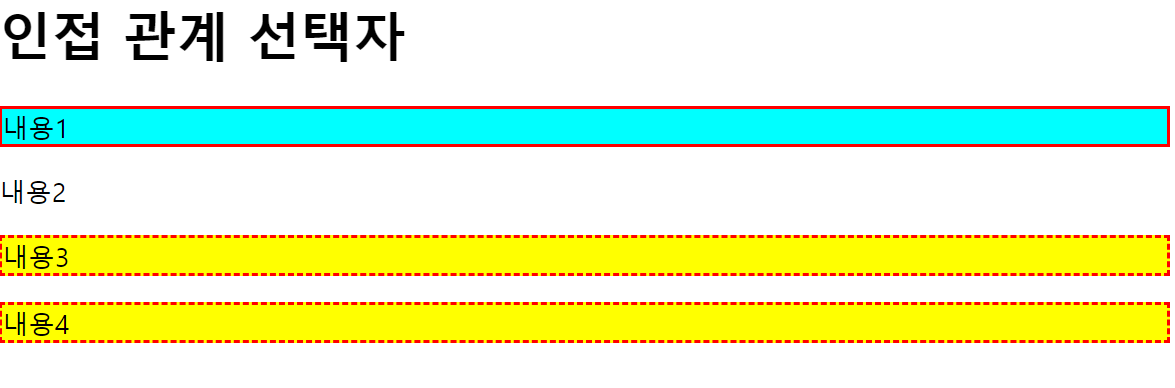
- 클래스가 txt인 것의 이전 형제요소들을 모두 선택하여 저장되어 있는 style_1을 적용하자.
클래스가 txt인 것의 다음 형제요소들을 모두 선택하여 저장되어 있는 style_2를 적용하자.
<!DOCTYPE html>
<html lang="ko">

<head>
  <meta charset="UTF-8">
  <title> 선택자 </title>
  <script src="js/jquery.js"></script>
  <script>
    $(function () {
      var style_1 = {
        "background-color": "#0ff",
        "border": "2px solid #f00"
      }
      var style_2 = {
        "background-color": "#ff0",
        "border": "2px dashed #f00"
      }
      //txt 이전 형제 요소 전체 선택
      $(".txt").prevAll().css(style_1);

      //txt 다음 형제 요소 전체 선택
      $(".txt").nextAll().css(style_2);


    });
  </script>
</head>

<body>
  <div id="wrap">
    <h1>인접 관계 선택자</h1>
    <p>내용1</p>
    <p class="txt">내용2</p>
    <p>내용3</p>
    <p>내용4</p>
  </div>
</body>

</html>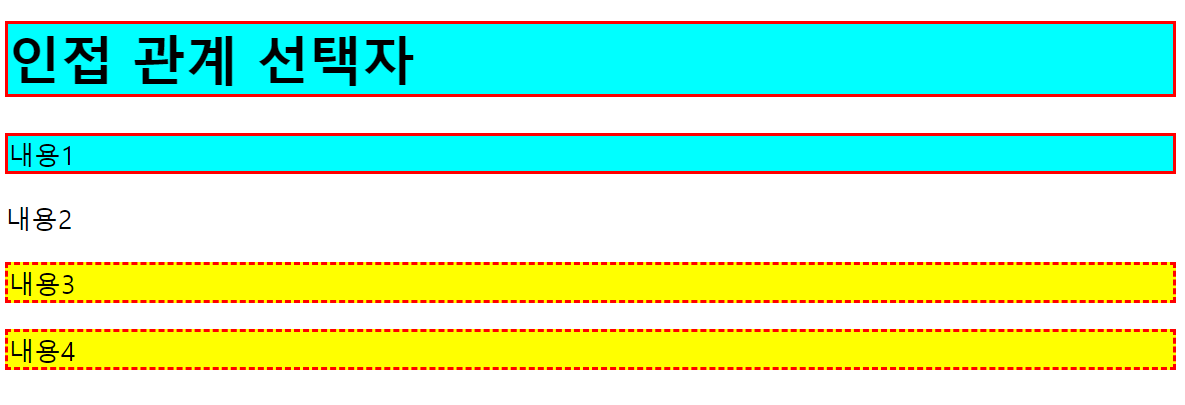
- 클래스가 txt인 요소의 모든 형제를 선택하여. css에 저장되어 있는 style_1을 적용하자.
<!DOCTYPE html>
<html lang="ko">

<head>
  <meta charset="UTF-8">
  <title> 선택자 </title>
  <script src="js/jquery.js"></script>
  <script>
    $(function () {
      var style_1 = {
        "background-color": "#0ff",
        "border": "2px solid #f00"
      }

      //txt의 모든 형제 선택
      $(".txt").siblings().css(style_1);

    });
  </script>
</head>

<body>
  <div id="wrap">
    <h1>인접 관계 선택자</h1>
    <p>내용1</p>
    <p class="txt">내용2</p>
    <p>내용3</p>
    <p>내용4</p>
  </div>
</body>

</html>
- 클래스가 txt3 이전형제들 중에 클래스 title 전까지 css에 저장된 style_1을 적용한다.
클래스가 txt3 다음형제들 중에 클래스가 txt6 전까지 css에 저장된 style_1을 적용한다.
<!DOCTYPE html>
<html lang="ko">

<head>
  <meta charset="UTF-8">
  <title> 선택자 </title>
  <script src="js/jquery.js"></script>
  <script>
    $(function () {
      var style_1 = {
        "background-color": "#0ff",
        "border": "2px solid #f00"
      }

      //txt3 이전 형제들 부터 title전 까지
      $(".txt3").prevUntil(".title").css(style_1);

      //txt3 다음 형제들부터 txt6전 까지
      $(".txt3").nextUntil(".txt6").css(style_1);

    });
  </script>
</head>

<body>
  <div id="wrap">
    <h1 class="title">선택자</h1>
    <p>내용1</p>
    <p>내용2</p>
    <p class="txt3">내용3</p>
    <p>내용4</p>
    <p>내용5</p>
    <p class="txt6">내용6</p>
  </div>
</body>

</html>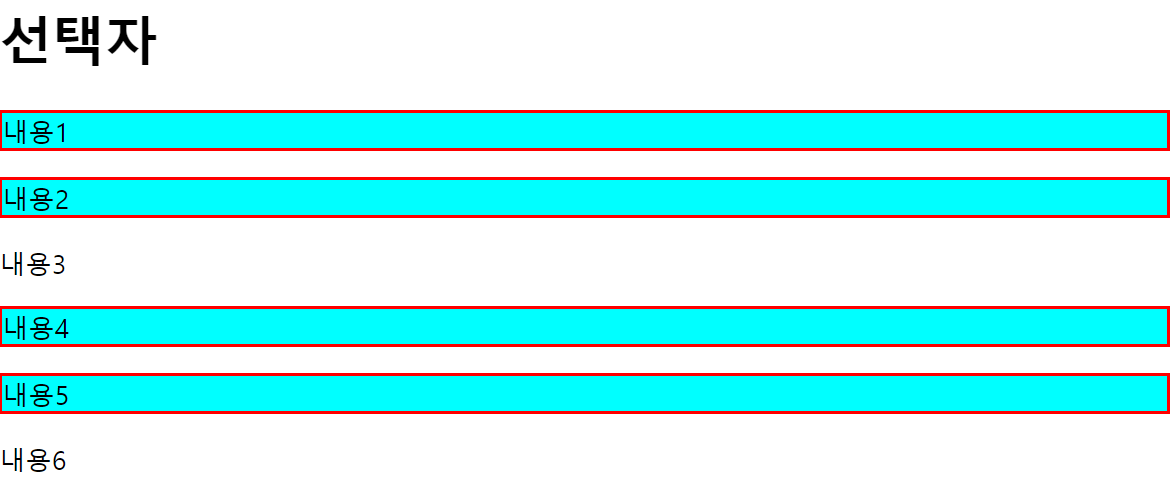
- 클래스가 txt1인 요소의 전체 상위 요소를 선택 하여 border를 2px dashed #00f로 하자.
클래스가 txt2인 요소의 상위 요소인 div를 선택 하여 border를 2px solid #f00으로 하자.
<!DOCTYPE html>
<html lang="ko">

<head>
  <meta charset="UTF-8">
  <title> 선택자 </title>
  <script src="js/jquery.js"></script>
  <script>
    $(function () {
      $(".txt1").parents().css("border", "2px dashed #00f");

      $(".txt2").parents("div").css("border", "2px solid #f00");//상위 요소중 선택한 요소만 선택

    });
  </script>
</head>

<body>
  <h1 class="title">선택자</h1>
    <section>
        <div>
            <p class="txt1">내용</p>
        </div>
    </section>
    <section>
        <div>
            <p class="txt2">내용</p>
        </div>
    </section>
</body>

</html>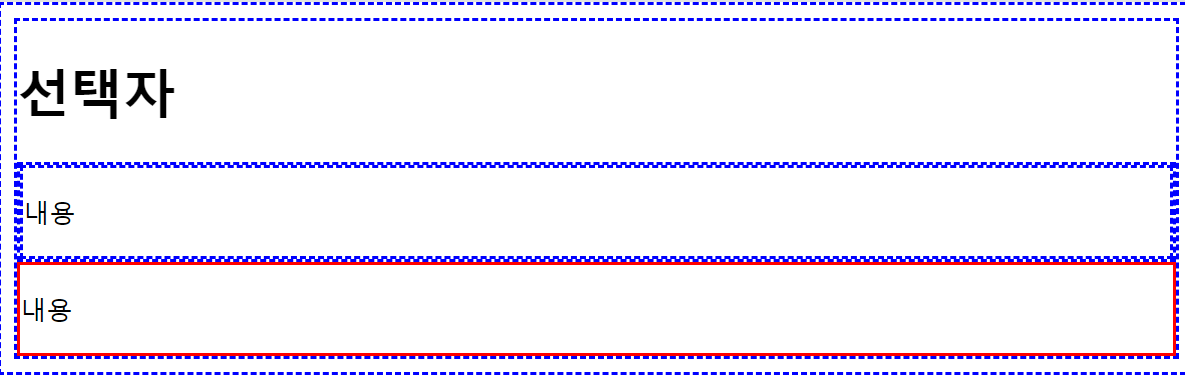
- 클래스가 txt1인 것의 가장 가까운 div를 선택 하여 border를 2px solid #f00으로 하자
<!DOCTYPE html>
<html lang="ko">

<head>
  <meta charset="UTF-8">
  <title> 선택자 </title>
  <script src="js/jquery.js"></script>
  <script>
    $(function () {
      $(".txt1").closest("div").css("border", "2px solid #f00");

    });
  </script>
</head>

<body>
  <h1 class="title">선택자</h1>
    <div>
        <div>
            <p class="txt1">내용</p>
        </div>
    </div>
</body>

</html>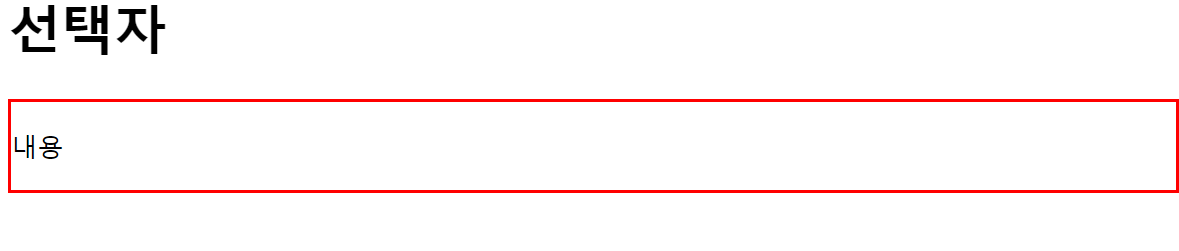
Jquery 2
예제 1 : 탐색 선택자
-
기본 선택자로 선택한 요소 중 원하는 요소를 한 번 더 탐색해서 좀 더 정확하게 선택할 수 있다.
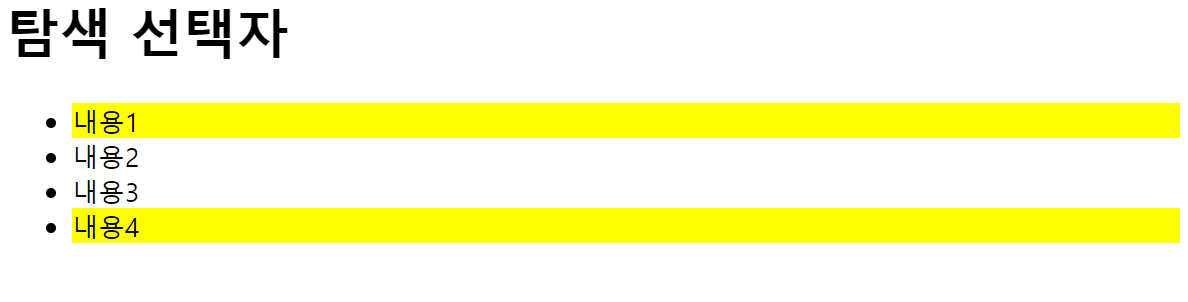
<!DOCTYPE html>
<html lang="ko">
<head>
<meta charset="UTF-8">
<title> 탐색 선택자 </title>
<script src="js/jquery.js"></script>
<script>
  $(function(){
      $("#menu li:first")
      .css({"background-color":"#ff0"});

      $("#menu li:last")
      .css({"background-color":"#0ff"});
  });
</script>
</head>
<body>
  <h1>탐색 선택자</h1>
  <ul id="menu">
      <li>내용1</li>
      <li>내용2</li>
      <li>내용3</li>
      <li>내용4</li>
  </ul>
</body>
</html>
<!--
1. 아이디가 menu인 요소의 후손 중에 첫 번째 li에 배경색을 #ff0로 준다.
아이디가 menu인 요소의 후손 중에 마지막 li에 배경색을 #0ff로 준다.
-->
예제 2 : even/odd선택자
- even 선택자 : 선택한 요소 중 홀수 번째(짝수 인덱스) 요소만 선택 >>
$("요소선택:even") - odd 선택자 : 짝수 번째(홀수 인덱스) 요소만 선택 >>
$("요소선택:odd")- index기준으로
<!DOCTYPE html>
<html lang="ko">
<head>
<meta charset="UTF-8">
<title> 탐색 선택자 </title>
<script src="js/jquery.js"></script>
<script>
    $(function(){
        $("#menu li:even")
        .css({"background-color":"#ff0"});//홀수 1, 3

        $("#menu li:odd")
        .css({"background-color":"#0ff"});//짝수, 2, 4
    });
</script>
</head>
<body>
    <h1>탐색 선택자</h1>
    <ul id="menu">
        <li>내용1</li>
        <li>내용2</li>
        <li>내용3</li>
        <li>내용4</li>
    </ul>
</body>
</html>
<!--
2. 아이디가 menu인 요소의 후손 중에 짝수 인데스 li에 배경색을 #ff0으로 주자.
아이디가 menu인 요소의 후손 중에 홀수 인덱스 li에 배경색을 #0ff로 주자.
-->
예제 3 : eq/lt/gt 탐색 선택자
- eq(index) 탐색 선택자 : 선택한 요소 중 지정한 인덱스가 참조하는 요소만 선택
$("요소선택:eq(index)")또는$("요소선택").eq(index)
- lt(index) 선택자 : 선택한 요소 중 지정한 인덱스보다 작은(lt, Less Than) 인덱스를 참조하는 요소만 선택
$("요소선택:lt(index)")
- gt(index) 선택자 : 선택한 요소 중 지정한 인덱스보다 큰(gt, Greater Than) 인덱스를 참조하는 요소만 선택
$("요소선택:gt(index)")
<!DOCTYPE html>
<html lang="ko">
<head>
<meta charset="UTF-8">
<title> 탐색 선택자 </title>
<script src="js/jquery.js"></script>
<script>
    $(function(){
        $("#menu li").eq(2) //아래와 같이해도, 얘처럼 해도 상관 x >> 내용 3 css적
        .css({"background-color":"#ff0"});

        $("#menu li:lt(2)") //인덱스 2보다 작은 1, 2 해당
        .css({"background-color":"#0ff"});

        $("#menu li:gt(2)")//인덱스 2보다 큰 3, 4 해당
        .css({"background-color":"#f0f"});
    });
</script>
</head>
<body>
    <h1>탐색 선택자</h1>
    <ul id="menu">
        <li>내용1</li>
        <li>내용2</li>
        <li>내용3</li>
        <li>내용4</li>
        <li>내용5</li>
    </ul>
</body>
</html>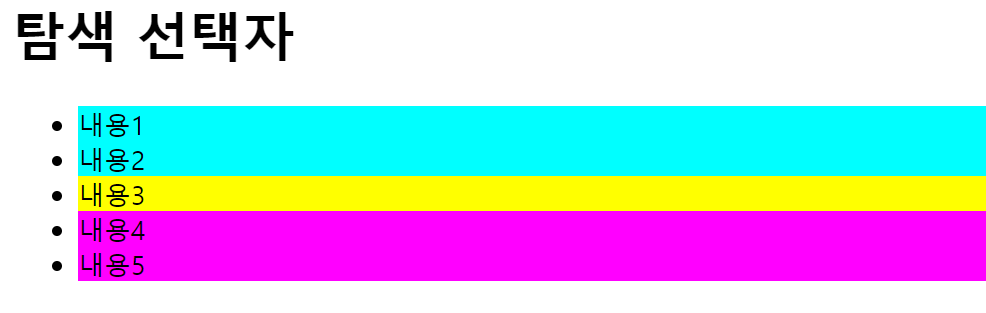
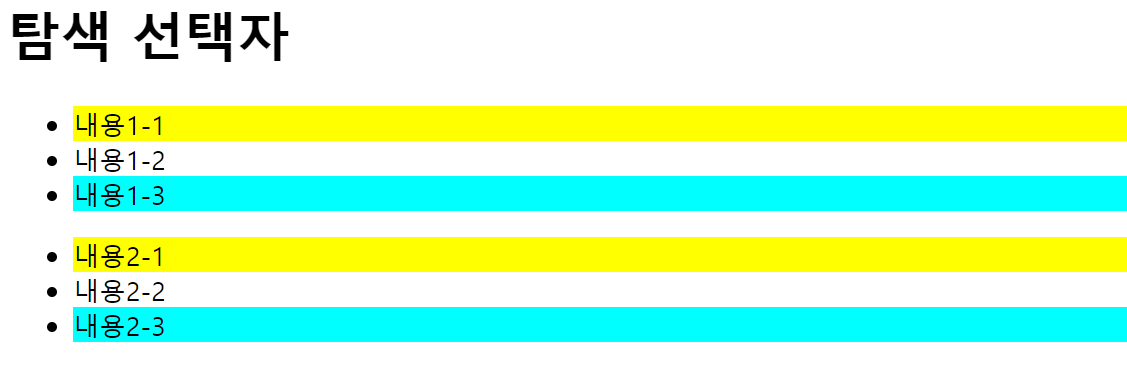
예제 4: first-of-type/last-of-type 선택자
- first-of-type 선택자 : 선택한 요소의 무리 중 첫 번째 요소만 선택 >>
$("요소선택:first-of-type") - last-of-type 선택자 : 선택한 요소의 무리 중 마지막에 위치한 요소만 선택 >>
$("요소선택:last-of-type")
<!DOCTYPE html>
<html lang="ko">
<head>
<meta charset="UTF-8">
<title> 선택자 </title>
<script src="js/jquery.js"></script>
<script>
    $(function(){
        $("li:first-of-type")
        .css({"background-color":"#ff0"});

        $("li:last-of-type")
        .css({"background-color":"#0ff"});
    });
</script>
</head>
<body>
    <h1>탐색 선택자</h1>
    <ul>
        <li>내용1-1</li>
        <li>내용1-2</li>
        <li>내용1-3</li>
    </ul>
    <ul>
        <li>내용2-1</li>
        <li>내용2-2</li>
        <li>내용2-3</li>
    </ul>
</body>
</html>- 각 항목의 첫번째 li와 마지막 li
예제 5:nth-child(숫자n)/nth-last-child(숫자) 선택자
- nth-child(숫자) 선택자 : 선택한 요소의 무리 중 지정한 숫자의 요소를 선택
$("요소선택:nth-child(숫자)")>> 선택한 요소 중 지정한 숫자에 위치한 요소를 선택- li:nth-child(2)는 선택한 요소의 무리 중 두 번째의 li태그를 가리킨다.
- li:nth-child(2n)은 선택한 요소의 무리 중 2의 배수의 li태그를 가리킨다.
$("요소선택:nth-child(숫자n)")>> 선택한 요소 중 지정한 배수에 위치한 요소를 선택
- nth-last-child(숫자) 선택자 : 선택한 요소의 무리 중 마지막에서 지정한 숫자의 요소를 선택
$("요소선택:nth-last-child(숫자)")>> 선택한 요소 중 마지막 위치에서 지정한 숫자에 위치한 요소를 선택
  <!DOCTYPE html>
<html lang="ko">
<head>
<meta charset="UTF-8">
<title> 선택자 </title>
<script src="js/jquery.js"></script>
<script>
    $(function(){
        $("#menu1 li:nth-child(1)")
        .css({"background-color":"#ff0"});

        $("#menu1 li:nth-child(2n)")
        .css({"border":"2px dashed #f00"});

        $("#menu2 li:nth-last-child(2)")
        .css({"background-color":"#0ff"});
    });
</script>
</head>
<body>
    <h1>탐색 선택자</h1>
    <ul id="menu1">
        <li>내용1-1</li>
        <li>내용1-2</li>
        <li>내용1-3</li>
        <li>내용1-4</li>
    </ul>
    <ul id="menu2">
        <li>내용2-1</li>
        <li>내용2-2</li>
        <li>내용2-3</li>
    </ul>
</body>
</html>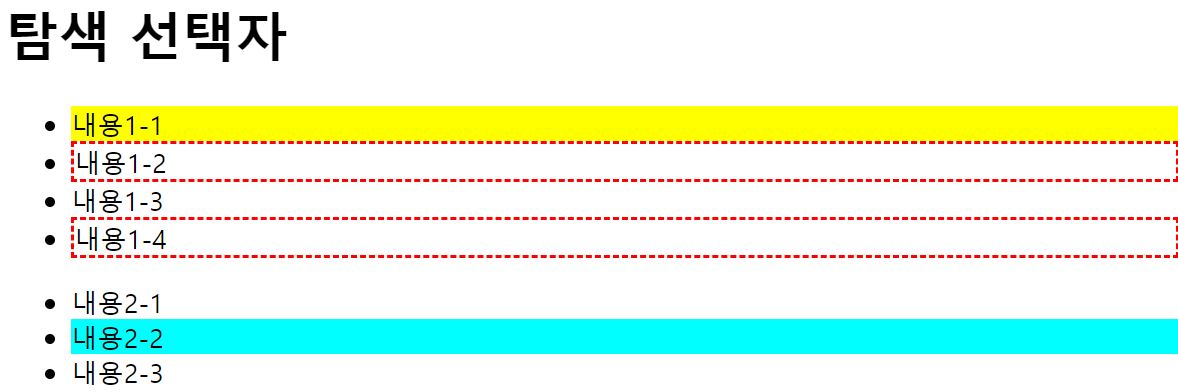
예제 6 : only-child/slice(index) 선택자
- only-child 선택자 : 선택한 요소가 '부모 요소에게 하나뿐인 자식 요소'인 경우에 선택
$("요소선택:only-child")>> 선택한 요소가 부모 요소에게 하나뿐인 자식 요소면 선택
- slice(start index, end index) 선택자 : 선택한 요소의 지정 구간 인덱스의 요소를 선택
$("요소선택").slice(start index, end index)>> 지정 구간 인덱스의 요소를 선택- slice(1, 3)은 1 이상 3 미만의 요소를 선택
  <!DOCTYPE html>
<html lang="ko">
<head>
<meta charset="UTF-8">
<title> 선택자 </title>
<script src="js/jquery.js"></script>
<script>
    $(function(){
        $("#menu1 li").slice(1,3)
        .css({"background-color":"#ff0"});

        $("li:only-child")//html 전체에서 하나뿐인 자식의 li요소 선
        .css({"background-color":"#0ff"});
    });
</script>
</head>
<body>
    <h1>탐색 선택자</h1>
    <ul id="menu1">
        <li>내용1-1</li>
        <li>내용1-2</li>
        <li>내용1-3</li>
        <li>내용1-4</li>
    </ul>
    <ul id="menu2">
        <li>내용2-1</li>
    </ul>
</body>
</html>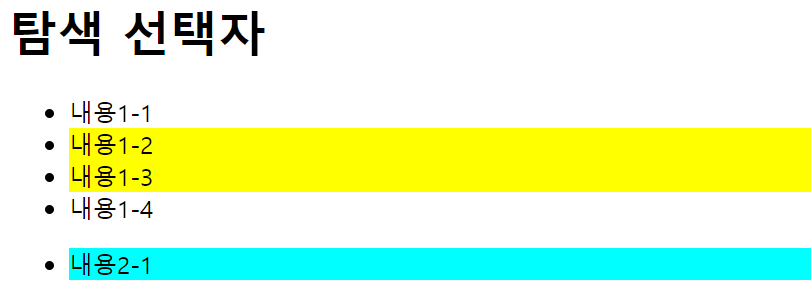
예제 7 : each() / $.each() 배열 관련 메서드
배열에 저장된 요소를 순서대로 하나씩 선택하면서 인덱스 정보를 가져온다.
$("요소선택").each(function(매개변수1, 매개변수2){})$.each($("요소선택"), function(매개변수1, 매개변수2){})- 배열에 저장된 요소의 개수만큼 메서드를 반복 실행합니다. 메서드를 실행할 때마다 매개변수1, 매개변수2에는 배열에 저장된 요소와 인덱스의 값이 배열에 오름차순으로 대입된다.
$("요소선택").each(function() { $(this) })$.each($("요소선택"), function() {$(this)})- 배열에 저장된 요소의 개수만큼 메서드를 반복 실행합니다. 메서드를 실행할 때마다 $(this)에는 배열에 저장된 요소가 오름차순으로 대입된다.
  <!DOCTYPE html>
<html lang="ko">
<head>
<meta charset="UTF-8">
<title> 선택자 </title>
<script src="js/jquery.js"></script>
<script>
    $(function(){
        var obj = [
            {"area":"서울"},//area 라는 키와 해당 지역을 값으로 가지고 있다. 객체 배
            {"area":"부산"},
            {"area":"전주"}
        ];
        //아래는 자바스크립트의 객체인 obj를 jquery를 이용해 o로만 출력하려하면 에러나고 o.area라고 해야 object가 아닌 제 값이 출력된다.
        $(obj).each(function(i, o){
                console.log(i + ":", o.area);//i에는 인덱스 o에 요소
       });
        console.log("==== The End 1 ====");

         //$는 jQuery단축키로, jQuery.each()로 사용해도 된다.
        $.each($("#menu2 li"), function(i, o){
                console.log(i + ":", o);
        });
        console.log("==== The End 2 ====");

        $.each($("#menu2 li"), function(i){
                console.log(i + ":", $(this)); //jquery 형태의 this객체가 들어간다.
        });
    });
</script>
</head>
<body>
    <h1>탐색 선택자</h1>
    <ul id="menu1">
        <li>내용1-1</li>
        <li>내용1-2</li>
        <li>내용1-3</li>
    </ul>
    <ul id="menu2">
        <li>내용2-1</li>
        <li>내용2-2</li>
        <li>내용2-3</li>
    </ul>
</body>
</html>
예제 8 : $.map()/ (달러).grep() 메서드
$.map() 메서드: 배열에 저장된 데이터 수만큼 메서드를 반복 실행 + 메서드에서 반환된 데이터는 새 배열에 저장되고 그 배열 객체를 반환 >> 만약 boolean으로 데이터값을 주면 boolean값으로 배열 객체 반환$.grep() 메서드: 배열에 저장된 데이터 수만큼 메서드를 반복 실행하며 인덱스 오름차순으로 배열의 데이터를 불러온다. + 메서드의 반환값이 true인 데이터만 새 배열에 저장되고 배열을 반환
기본형
 // $.map() 메서드
$.map(Array, function(매개변수1, 매개변수2){
    return 데이터;
});

//$.grep() 메서드
$.grep(Array, function(매개변수1, 매개변수2){
    return [true|false];
});
<!DOCTYPE html>
<html lang="ko">
<head>
<meta charset="UTF-8">
<title> 선택자 </title>
<script src="js/jquery.js"></script>
<script>
$(function(){
var arr1 = [{
"area":"서울",
"name":"무대리"
},{
"area":"부산",
"name":"홍과장"
},{
"area":"대전",
"name":"박사장"
},{
"area":"서울",
"name":"빅마마"
}];
var arr2 = $.map(arr1, function(a, b){//매개변수를 하나만 줘도 됌 현재 하나만 사용하니까
if(a.area == "서울") {//매개변수에 해당 요소의 인덱스 전달
return a;//area가 서울인 요소만 선택해 새로운 배열 생성
}
});
console.log(arr2);
console.log("==== first End ====");
var arr3 = $.grep(arr1, function(a, b){
if(a.area == "서울") {//배열을 필터링해 원하는 요소만 남김
return true; //해당 요소는 새로운 배열에 포함
} else {
return false;//해당 요소는 새로운 배열에 불포
}
});
console.log(arr3);
console.log("==== Second End ====");
});
</script>
</head>
<body>
</body>
</html>
예제 9 : $.inArray()/ (달러).merge()메서드
- inArray() 메서드 : 배열에 저장된 데이터 중 지정한 데이터를 찾아 인덱스값을 반환한다.
- 지정한 데이터가 배열 객체면 true를, 배열 객체가 아니면 false를
반환
- 지정한 데이터가 배열 객체면 true를, 배열 객체가 아니면 false를
- merge() 메서드 : 두 배열 객체를 하나의 객체로 묶는다.
기본형
 //배열에 저장된 데이터 중 지정한 데이터를 인덱스 오름차순으로 찾아 먼저 찾은 데이터의 인덱스 값을 반환
 $.inArray(data, Array, start index)

// 지정한 객체가 배열 객체면 true를, 아니면 false를 반환
 $.isArray(object)

//두 배열 객체를 하나의 배열 객체로 묶는다.
$.merge(Array1, Array2)
<!DOCTYPE html>
<html lang="ko">
<head>
<meta charset="UTF-8">
<title> 탐색 선택자 </title>
<script src="js/jquery.js"></script>
<script>
$(function(){
var arr1 = ["서울", "대전", "부산", "전주"];
var arr2 = ["한국", "미국", "일본", "중국"];
var obj = {
"name":"정부장",
"area":"서울"
}//배열이 아닌 객체 상태
var idxNum = $.inArray("부산", arr1);//해당 데이터의 인덱스 값 반환
console.log(idxNum);
var okArray1 = $.isArray(arr1);
var okArray2 = $.isArray(obj);//대괄호를 사용한 배열 선언이 아닌 객체 이므로, False다.
console.log(okArray1);
console.log(okArray2);
$.merge(arr2, arr1); //하나의 객체로 합친다.
console.log(arr2);//첫번째 매개변수 객체에 두번째 매개변수 객체가 추가되는 알고뤼뜸
});
</script>
</head>
<body>
</body>
</html> 
예제 10 : index() 메서드
-
$.index() 메서드: 지정 선택 요소를 찾아서 인덱스값을 반환-
$("요소선택").index("지정선택요소");>> 지정요소 선택할 때 달러 다시 넣어줘야하는 것 잊지 말기!<!DOCTYPE html> <html lang="ko"> <head> <meta charset="UTF-8"> <title> 탐색 선택자 </title> <script src="js/jquery.js"></script> <script> $(function(){ var idxNum = $("li").index($("#list3")); console.log(idxNum); }); </script> </head> <body> <h1>배열 관련 메서드</h1> <ul> <li>내용1</li> <li>내용2</li> <li id="list3">내용3</li> <li>내용4</li> </ul> </body> </html>
-
예제 11 : 속성과 값에 따른 탐색 선택자
- 선택한 요소 중 지정한 속성과 일치하는 속성이 있는지, 없는지의 포함 여부를 따져 요소를 선택 >> 특정 속성을 포함하는 요소를 선택할 때 주로 사용
기본형
//선택한 요소 중 지정한 속성이 포함된 요소만 선택
 $("요소선택[속성]")

//선택한 요소 중 속성값이 명시한 값으로 시작하는 요소만 선택 ^
 $("요소선택[속성^=값]")

//선택한 요소 중 속성값이 명시한 값으로 끝나는 요소만 선택 $
 $("요소선택[속성$=값]")

//선택한 요소 중 속성값이 명시한 값을 포함하는 요소만 선택 *
 $("요소선택[속성*=값]")

 //input 요소 중 type 속성값이 일치하는 요소만 선택
 $(":type 속성값")
<!DOCTYPE html>
<html lang="ko">
<head>
<meta charset="UTF-8">
<title> 탐색 선택자 </title>
<script src="js/jquery.js"></script>
<script>
$(function(){
$("#wrap a[target]")
.css({"color":"#f00"});//,로 해서 소괄호만으로 사용 가능
$("#wrap a[href^=https]")
.css({"color":"#0f0"});
$("#wrap a[href$=net]")
.css({"color":"#00f"});
$("#wrap a[href*=google]")
.css({"color":"#000"});
$("#member_f :text") //input요소 중 type속성값이 일치하는 애만
.css({"background-color":"#ff0"});
$("#member_f :password") //input요소는 :속성 으로 줘야함
.css({"background-color":"#0ff"});
});
</script>
</head>
<body>
<div id="wrap">
<p><a href="http://easyspub.co.kr" target="_blank">EasysPub</a></p>
<p><a href="https://naver.com">Naver</a></p>
<p><a href="http://daum.net">Daum</a></p>
<p><a href="http://google.co.kr">Google</a></p>
</div>
<form action="#" method="get" id="member_f">
<p>
<label for="user_id">아이디</label>
<input type="text" name="user_id" id="user_id">
</p>
<p>
<label for="user_pw">비밀번호</label>
<input type="password" name="user_pw" id="user_pw">
</p>
</form>
</body>
</html> 예제 12 : 속성 상태에 따른 탐색 선택자
- 선택한 요소 중 속성 상태에 따라 요소를 선택
기본형
  //선택한 요소 중 숨겨진 상태 또는 보이는 상태의 요소만 선택
  $("요소선택:[visible | hidden]")


// 선택 상자 중 선택된 옵션 요소만 선택
 $(":selected")

//체크 박스(checkbox) 또는 라디오(radio) 버튼 요소 중 체크된 요소만 선택
 $(":checked")
<!DOCTYPE html>
<html lang="ko">
<head>
<meta charset="UTF-8">
<title> 탐색 선택자 </title>
<script src="js/jquery.js"></script>
<script>
$(function(){
$("#wrap p:hidden").css({
"display":"block",
"background":"#ff0"
});
var z1 = $("#zone1 :selected").val( );//val() : JQuery에서 요소의 값(value)을 가져오거나 설정하는 메소드
console.log(z1);//opt2
var z2 = $("#zone2 :checked").val( );
console.log(z2);//등산
var z3 = $("#zone3 :checked").val( );
console.log(z3);//female
});
</script>
</head>
<body>
<div id="wrap">
<p>내용1</p>
<p style="display:none">내용2</p>//display:none으로 hidden되었으므로 css적용
<p>내용3</p>
</div>
<form action="#">
<p id="zone1">
<select name="course" id="course">
<option value="opt1">옵션1</option>
<option value="opt2" selected>옵션2</option>
<option value="opt3">옵션3</option>
</select>
</p>
<p id="zone2">
<input type="checkbox" name="hobby1" value="독서"> 독서
<input type="checkbox" name="hobby2" value="자전거"> 자전거
<input type="checkbox" name="hobby3" value="등산" checked> 등산
</p>
<p id="zone3">
<input type="radio" name="gender" value="male"> 남성
<input type="radio" name="gender" value="female" checked> 여성
</p>
</form>
</body>
</html>예제 13 : contains()/contents()/has()/not()/end() 탐색 선택자
- :contains() 탐색 선택자 : 선택한 요소 중 지정한 텍스트를 포함하는 요소만 선택
$("요소선택:contains(텍스트)")
- .contents() 탐색 선택자 : 선택한 요소의 하위 요소 중 1 깊이의 텍스트와 태그 노드를 선택 >> 선택된 요소의 모든 자식 노드를 반환(텍스트, html요소 노드, 주석 모두 포함)
$("요소선택").contents()
- :has() 탐색 선택자 : 선택한 요소 중 지정한 태그를 포함하는 요소만 선택
$("요소선택:has(요소명)")/$("요소선택").has("요소명")
- .not() 탐색 선택자 : 선택한 요소 중 지정한 요소만 제외한 채 선택
$("요소선택:not(제외할요소선택)")/$("요소선택").not(제외할요소선택)
- .end() 탐색 선택자 : 필터링되기 이전의 선택자가 적용되도록 한다.
$("요소선택").탐색선택자().end()
 <!DOCTYPE html>
<html lang="ko">
<head>
<meta charset="UTF-8">
<title> 탐색 선택자 </title>
<script src="js/jquery.js"></script>
<script>
    $(function(){
          //아이디가 inner_1인 것의 후손 p가 "내용 1"이라는 텍스트를 포함하고 있는 요소를 선택
        $("#inner_1 p:contains(내용1)")//p태그 중에 내용1이 있는 애한테 css적용
        .css({"background-color":"#ff0"});

          //아이디가 inner_1인 것의 후손 p가 strong 태그를 갖고 있는 것을 선택
        $("#inner_1 p:has(strong)")
        .css({"background-color":"#0ff"});

          //아이디가 outer_wrap인 것의 가장 가까운 후손 선택 >> h1, section부분 모두 포함
        $("#outer_wrap").contents( )
        .css({"border":"1px dashed #00f"});

          //아이디가 inner_2인 것의 후손 p태그에 첫번째를 제외하고 선택
        $("#inner_2 p").not(":first")
        .css({"background-color":"#0f0"});

          //아이디가 inner_2인 것의 후손 p태그에서 인덱스가 2인 요소 전 태그를 선택
        $("#inner_2 p").eq(2).end() //마지막 선택을 무시하고 그 이전의 선택자 적용 >> 아이디가 inner_2의 후손 p 모두에게 css적용
        .css({"color":"#f00"});//#inner_2 p 가 적용되므로, 내용4, 5, 6에 빨간 글자 적용
        /*
            id 값이 "inner_2"인 요소의 하위 <p> 요소에서 인덱스가 2인 요소를 선택합니다.
            그러나 다시 end() 메서드를 적용하기 때문에 인덱스를 선택하기 전의 선택지가
            적용됩니다.
        */
    });
</script>
</head>
<body>
    <div id="outer_wrap">
        <h1>콘텐츠 탐색 선택자</h1>
        <section id="inner_1">
            <h1>contains( ), contents( ), has( )</h1>
            <p><span>내용1</span></p>
            <p><strong>내용2</strong></p>
            <p><span>내용3</span></p>
        </section>
        <section id="inner_2">
            <h1>not( ), end( )</h1>
            <p>내용4</p>
            <p>내용5</p>
            <p>내용6</p>
        </section>
    </div>
</body>
</html>
예제 14 : find() / filter() 탐색 선택자
- find() 탐색 선택자 : 선택한 하위 요소 중에서 find()로 필터링한 요소만 선택
$("요소선택").find("하위요소중 필터링할 요소 선택")
- filter() 탐색 선택자 : 선택한 요소 중에서 filter()로 필터링한 요소만 선택
$("요소선택").filter("선택한 요소 중 필터링할 요소 선택")
둘의 차이점은 필터링 대상이 선택 요소를 기준으로 '하위 요소'인지, '선택한 요소'인지로 구분한다는 것
<!DOCTYPE html>
<html lang="ko">
<head>
<meta charset="UTF-8">
<title> 탐색 선택자 </title>
<script src="js/jquery.js"></script>
<script>
    $(function(){
        $("#inner_1").find(".txt1")
        .css({"background-color":"#ff0"});

        $("#inner_1 p").filter(".txt2")
        .css({"background-color":"#0ff"});

        $("#inner_2 p").filter(function(idx, obj){
            console.log(idx);//0 1 2 3 출
            return idx % 2 == 0;
        })
        .css({"background-color":"#0f0"});
    });
</script>
</head>
<body>
    <div id="outer_wrap">
        <h1>콘텐츠 탐색 선택자</h1>
        <section id="inner_1">
            <h2>find( ), filter( )</h2>
            <p class="txt1">내용1</p>
            <p class="txt2">내용2</p>
        </section>

        <section id="inner_2">
            <h2>filter(function)</h2>
            <p>index 0</p>
            <p>index 1</p>
            <p>index 2</p>
            <p>index 3</p>
        </section>
    </div>
</body>
</html>
예제 15 : 선택자와 함께 알아두면 유용한 메서드
is(":요소상태")>>$(".txt").is(":visible"): 선택한 요소가 보이면 true를 반환$.noConflict()>>var 변수 = $.noConflict();: 현재 제이쿼리에서 사용중인 변수("요소 선택") $메서드 사용을 중단하고 새로 지정한 변수명 메서드를 사용- get() >>
$("요소선택").get(0).style.color = "#f00": 선택자에 get(0)을 적용하면 자바스크립트 DOM 방식의 스타일을 사용할 수 있다. - is() : 선택한 요소의 상태가 지정한 속성과 일치하면 true를 반환하고, 그렇지 않으면 false를 반환 >> 입력 요소의 체크박스, 선택장사즤 선택 여부 와 보이는지의 여부를 알아볼 때 주로 사용한다.
$("요소선택").is(:[checked | selected | visible | hidden | animated]")- checked: 선택한 체크 박스(checkbox) 또는 라디오(radio) 버튼 요소가 체크된(checked) 상태면 true를, 아니면 false를 반환
- selected : 선택한 선택상자(select)에 옵션(option)요소가 선택된(selected) 상태면 true를, 아니면 false를 반환
- visible : 선택한 요소가 보이면(visible) true를, 아니면 false를 반환
- hidden : 선택한 요소가 숨겨진(hidden) 상태면 true를, 아니면 false를 반환
- animated : 선택한 요소가 애니메이션 동작(animated) 상태면 true를, 아니면 false를 반환
  <!DOCTYPE html>
<html lang="ko">
<head>
<meta charset="UTF-8">
<title> 탐색 선택자 </title>
<script src="js/jquery.js"></script>
<script>
    $(function(){
        var result_1 = $("#inner_1 p")
        .eq(0).is(":visible"); //eq(0) 은 인덱스가 0과 같은애 라는 의미
        console.log(result_1);

        var result_2 = $("#inner_1 p")
        .eq(1).is(":visible");
        console.log(result_2);

        var result_3 = $("#chk1").is(":checked");
        console.log(result_3);

        var result_4 = $("#chk2").is(":checked");
        console.log(result_4);
    });
</script>
</head>
<body>
    <div id="outer_wrap">
        <h1>is( )</h1>
        <section id="inner_1">
            <h2>문단 태그 영역</h2>
            <p>내용1</p>
            <p style="display:none;">내용2</p>
        </section>

        <section id="inner_2">
            <h2>폼 태그 영역</h2>
            <p>
                <input type="checkbox" name="chk1" id="chk1" checked>
                <label for="chk1">체크1</label>

                <input type="checkbox" name="chk2" id="chk2">
                <label for="chk2">체크2</label>
            </p>
        </section>
    </div>
</body>
</html>
JQuery 3
예제 1 : 객체 조작 메서드
-
속성 조작 메서드와 수치 조작 메서드 그리고 객체 편집 메서드로 나눌 수 있다.
- 속성 조작 메서드 : 요소의 속성을 바꿀 때 사용하고, 수치 조작 메서드는 요소의 너빗값 또는 높잇값 같은 수치를 바꿀 때 사용 >> 선택한 요소의 속성을 바꾸는 메서드
- 객체 편집 메서드 : 객체를 생성하거나 삭제 또는 복제할 때 사용
-
html() : 선택한 요소의 하위 요소를 가져와 문자열로 반환하거나 하위 요소를 전부 제거하고 새 요소를 바꿀 때 사용
-
text() : 선택한 요소에 포함되어 있는 전체 텍스트를 가져오거나 선택한 하위 요소를 전부 제거하고 새 텍스트를 생성할 때 사용
기본형
//선택한 요소의 하위 요소를 가져와 문자열로 반환합니다.
$("요소선택").html();

//선택한 요소의 하위 요소를 전부 제거하고 지정한 새 요소를 생성합니다.
 $("요소선택").html("새요소");

//선택한 요소의 텍스트만 가져옵니다.
 $("요소선택").text();

// 선택한 요소의 하위 요소를 전부 제거하고 지정한 텍스트를 생성합니다.
 $("요소선택").text("새 텍스트");
<!DOCTYPE html>
<html lang="ko">
<head>
<meta charset="UTF-8">
<title> 객체 조작 및 생성 </title>
<script src="js/jquery.js"></script>
<script>
$(function(){
var result_1 = $("#sec_1").html( );
console.log(result_1);
$("#sec_1 p").html("<a href=\"#\">Text1</a>");
var result_2 = $("#sec_2").text( );
console.log(result_2);
$("#sec_2 h2").text("text()");
});
</script>
</head>
<body>
<h1><strong>객체 조작 및 생성</strong></h1>
<section id="sec_1">
<h2><em>html()</em></h2><!--하위 요소를 문자열로 변환 -->
<p>내용1</p>
</section>
<section id="sec_2">
<h2><em>텍스트()</em></h2> <!--text()로 변환-->
<p>내용2</p>
</section>
</body>
</html>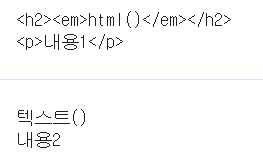
예제 2 : attr()/removeAttr() 메서드
- attr() : 선택한 요소에 새 속성을 생성하거나, 기존의 속성을 변경할 때, 또는 요소의 속성 값을 불러올 때 사용
- removeAttr() : 선택한 요소에서 기존의 속성을 삭제할 때 사용
기본형
//선택한 요소의 지정한 속성값을 가져옵니다.
 $("요소선택").attr("속성명");

 // 요소를 선택하여 지정한 속성값을 적용합니다.
 $("요소선택").attr("속성명", "새값");

 // 요소를 선택하여 지정한 여러 개의 속성값을 적용합니다.
 $("요소선택").attr({"속성명1" :  "새 값1", "속성명2" : "새 값2", ... "속성명n":"새 값n"});

//removeAttr() 메서드의 기본형은 다음과 같습니다.
//선택한 요소에서 지정한 속성을 삭제합니다.
 $("요소선택").removeAttr("속성");
<!DOCTYPE html>
<html lang="ko">
<head>
<meta charset="UTF-8">
<title> 객체 조작 및 생성 </title>
<script src="js/jquery.js"></script>
<script>
$(function( ){
var srcVal = $("#sec_1 img").attr("src");
console.log(srcVal);
$("#sec_1 img")
.attr({
"width":200,
"src": srcVal.replace("1.jpg","2.jpg"),//1.jpg에서 2.jpg로 바꿈
"alt": "바위"
})
.removeAttr("border");//border속성 삭제
});
</script>
</head>
<body>
<h1><strong>객체 조작 및 생성</strong></h1>
<section id="sec_1">
<h2>이미지 속성</h2>
<p><img src="images/math_img_1.jpg" alt="바위" border="2"></p>
</section>
</body>
</html>예제 3 : addClass()/removeClass()/toggleClass()/hasClass() 메서드
-
addClass() : 선택한 요소에 클래스를 생성한다.
-
removeClass() : 선택한 요소에서 지정한 클래스를 삭제한다.
-
toggleClass() : 선택한 요소에 지정한 클래스가 없으면 생성한다. 존재하면 삭제
-
hasClass() : 선택한 요소에 지정한 클래스가 있으면 true, 없으면 false반환
기본형
  //요소를 선택하여 지정한 class 값을 생성합니다.
  $("요소선택").addClass("class 값");


//요소를 선택하여 지정한 class 값을 삭제합니다.
$("요소선택").removeClass("class 값");

//요소를 선택하여 지정한 class 값이 있으면 삭제하고, 없으면 생성합니다.
$("요소선택").toggleClass("class 값");

//선택한 요소에 지정한 class 값이 있으면 true, 없으면 false를 반환합니다.
$("요소선택").hasClass("class 값");
<!DOCTYPE html>
<html lang="ko">
<head>
<meta charset="UTF-8">
<title> 객체 조작 및 생성 </title>
<script src="js/jquery.js"></script>
<script>
$(function( ){
$("#p1").addClass("aqua");//p1에 aqua클래스 생성
$("#p2").removeClass("red");//p2에 red클래스 삭제
$("#p3").toggleClass("green");//p3에 green클래스가 있으면 삭제, 없으면 생성
$("#p4").toggleClass("green");//위와 같이 p4에도
$("#p6").text($("#p5").hasClass("yellow"));//p5에 yellow클래스가 있으면 true, 없으면 false
});
</script>
<style>
.aqua{background-color:#0ff;}
.red{background-color:#f00;}
.green{background-color:#0f0;}
.yellow{background-color:#ff0;}
</style>
</head>
<body>
<p id="p1">내용1</p>
<p id="p2" class="red">내용2</p>
<p id="p3">내용3</p>
<p id="p4" class="green">내용4</p>
<p id="p5" class="yellow">내용5</p>
<p id="p6"></p>
</body>
</html>
예제 4 : val() 메서드
-
val() : 선택한 폼 요소의 value 속성값을 가져오거나 새 값을 적용할 때 사용한다.
-
prop("defaultValue") : value 속성의 변경되기 전 초기값을 가져오는 메서드(예제 5에서 자세히)
기본형
  // 선택한 폼 요소의 value 속성값을 가져옵니다.
  $("요소선택").val();


//요소를 선택하여 value 속성에 새 값을 적용합니다.
$("요소선택").val("새 값");
<!DOCTYPE html>
<html lang="ko">
<head>
<meta charset="UTF-8">
<title> 객체 조작 및 생성 </title>
<script src="js/jquery.js"></script>
<script>
$(function( ){
var result_1 = $("#user_name").val();
console.log(result_1);//용대리
$("#user_id").val("javascript");//아이디가 user_id인 value를 javascript로 변경
var result_2 = $("#user_id").prop("defaultValue");
console.log(result_2);//위에서 변경되기 전 값 hello
});
</script>
</head>
<body>
<h1>객체 조작 및 생성</h1>
<form action="#" id="form_1">
<p>
<label for="user_name">이름</label>
<input type="text" name="user_name"
id="user_name" value="용대리">
</p>
<p>
<label for="user_id">아이디</label>
<input type="text" name="user_id"
id="user_id" value="hello">
</p>
</form>
</body>
</html>예제 5 : prop() 메서드
- prop() : 선택한 폼 요소(선택 상자, 체크 박스, 라디오 버튼)의 상태 속성값을 가져오거나 새롭게 설정할 때 사용 >> 태그명, 노드타입, 선택 상자의 선택된 옵션의 인덱스 값도 알 수 있다.
기본형
  //선택한 폼 요소(체크 박스, 라디오 버튼, 선택 상자)가 체크된(checked) 상태인지, 선택된(selected) 상태인지 알 수 있다. >> boolean으로 반환
  $("요소선택").prop("[checked | selected]");

//폼 요소(체크 박스, 라디오 버튼, 선택 상자)를 선택하여 체크 또는 선택 상태를 바꿀 수 있다.
$("요소선택").prop("[checked | selected]", [true | false]);

// 선택한 요소의 태그명(tagName)이나 노드 타입(nodeType), 선택된 옵션의 인덱스값을 구한다.
$("요소선택").prop("[tagName | nodeType | selectedIndex | defaultValue]");
//prop("defaultValue")를 사용하면 사용자가 value 속성값을 바꿔도 초기의 value 속성값을
가져온다.
<!DOCTYPE html>
<html lang="ko">
<head>
<meta charset="UTF-8">
<title> 객체 조작 및 생성 </title>
<script src="js/jquery.js"></script>
<script>
$(function( ){
var result_1 = $("#chk1").prop("checked");
console.log(result_1);//false >> #chk1이 checked되어 있지 않아서
var result_2 = $("#chk2").prop("checked");
console.log(result_2);//true >> #chk2는 checked되어 있어서
var result_2 = $("#chk3").prop("checked", true);//#chk3을 checked로 변경
var result_3 = $("#se_1").prop("selectedIndex");
console.log(result_3);//2 >> selected되어 있는 option의 인덱스 값
});
</script>
</head>
<body>
<h1><strong>객체 조작 및 생성</strong></h1>
<form action="#" id="form_1">
<p>
<input type="checkbox" name="chk1" id="chk1">
<label for="chk1">chk1</label>
<input type="checkbox" name="chk2" id="chk2" checked>
<label for="chk2">chk2</label>
<input type="checkbox" name="chk3" id="chk3">
<label for="chk3">chk3</label>
</p>
<p>
<select name="se_1" id="se_1">
<option value="opt1">option1</option>
<option value="opt2">option2</option>
<option value="opt3" selected>option3</option>
</select>
</p>
</form>
</body>
</html>예제 6 : 수치 조작 메서드
- height() / width()
- innerHeight() / innerWidth() : heigth + padding . width + padding >> padding은 상하이므로 x2해서 더해줘야함
- outerHeight() / outerWidth() : height + padding + border / width + padding + border >> padding과 border은 상하이므로 각각 2번씩 더해줘야 한다.
기본형
//요소의 높잇값과 너빗값을 반환 또는 변경합니다.
$("요소선택").height(); / $("요소선택").width();
$("요소선택").height(값);/$("요소선택").width(값);

//여백을 포함한 요소의 높잇값과 너빗값을 반환 또는 변경합니다.
$("요소선택").innerHeight(); / $("요소선택").innerWidth();
$("요소선택").innerHeight(값); / $("요소선택").innerWidth(값);

//여백 및 선 두께를 포함한 요소의 높잇값과 너빗값을 반환 또는 변경합니다.
$("요소선택").outerHeight(); / $("요소선택").outerWidth();
$("요소선택").outerHeight(값); / $("요소선택").outerWidth(값);
<!DOCTYPE html>
<html lang="ko">
<head>
<meta charset="UTF-8">
<title> 객체 조작 및 생성 </title>
<script src="js/jquery.js"></script>
<script>
$(function( ){
var w1 = $("#p1").height();
console.log(w1);//50
var w2 = $("#p1").innerHeight();
console.log(w2);//90 >> 50(heigth) + 20(padding) + 20(padding)
var w3 = $("#p1").outerHeight();
console.log(w3);//100 >> 50(heigth) + 20(padding) + 20(padding) + 5(border) + 5(border)
$("#p2")
.outerWidth(100)
.outerHeight(100);
});
</script>
<style>
*{padding: 0;}
#p1, #p2{
width: 100px;
height: 50px;
padding:20px;
border: 5px solid #000;
background-color: #ff0;
}
</style>
</head>
<body>
<h1>수치 조작 메서드</h1>
<p id="p1">내용1</p>
<p id="p2">내용2</p>
</body>
</html>예제 7 : 요소 위치 메서드 position(), offset()
-
position() : 포지션 기준이 되는 요소를 기준으로 선택한 요소에서 가로/세로로 떨어진 위치의 좌푯값을 반환하거나 변경할 때 사용
-
offset() : 문서(Document)를 기준으로 선택한 요소의 가로/세로로 떨어진 위치의 좌푯값을 반환하거나 변경할 때 사용
기본형
  //포지션 기준이 되는 요소를 기준으로 선택한 요소의 위치 좌푯값을 반환합니다.
  $("요소선택").position().[left | right | top | bottom]


//문서(Document)를 기준으로 선택한 요소의 위치 좌푯값을 반환합니다.
$("요소선택").offset().[left | top]
<!DOCTYPE html>
<html lang="ko">
<head>
<meta charset="UTF-8">
<title> 객체 조작 및 생성 </title>
<script src="js/jquery.js"></script>
<script>
$(function( ){
var $txt1 = $(".txt_1 span"),
$txt2 = $(".txt_2 span"),
$box = $(".box");
var off_t = $box.offset().top; //100
var pos_t = $box.position().top; //50
$txt1.text(off_t);
$txt2.text(pos_t);
});
</script>
<style>
*{margin:0;padding:0;}
#box_wrap{
width:300px;
height:200px;
margin:50px auto 0;
position: relative;
background-color:#ccc;
}
.box{
width:50px;height:50px;
position:absolute;
left:100px;top:50px;
background-color:#f00;
}
</style>
</head>
<body>
<div id="box_wrap">
<p class="box">박스</p>
</div>
<p class="txt_1">절대 top위칫값: <span></span></p>
<p class="txt_2">상대 top위칫값: <span></span></p>
</body>
</html>예제 8 : 스크롤바 위치 메서드 scrollTop()
- scrollTop() : 브라우저의 스크롤바가 수직/수평으로 이동한 위칫값을 불러오거나 변경할 때 사용
기본형
//스크롤바가 수직 또는 수평으로 이동한 위칫값을 반환합니다.
 $(요소선택).scrollTop();
 $(요소선택).scrollLeft();

// 입력한 수치만큼 수직 또는 수평으로 스크롤바를 이동시킵니다.
$(요소선택).scrollTop(새값);
$(요소선택).scrollLeft(새값);
<!DOCTYPE html>
<html lang="ko">
<head>
<meta charset="UTF-8">
<title> 객체 조작 및 생성 </title>
<script src="js/jquery.js"></script>
<script>
$(function( ){
var topNum = $("h1").offset().top;
$(window).scrollTop(topNum);//h1이 padding-top 2000px에 있기때문에 스크롤 또한 해당 위치에 존재한다.(브라우저를 키자마자)
var sct = $(window).scrollTop();
console.log(sct); //2000
});
</script>
<style>
*{margin:0;padding:0;}
body{line-height:1;} /* line-height는 텍스트 라인의 높이를 의미하는 것으로 주로 행간을 제어할 때 사용됩니다. */
#wrap{
height:5000px;
padding-top:2000px;
}
</style>
</head>
<body>
<div id="wrap">
<h1>위치 메서드</h1>
</div>
</body>
</html>예제 9 : 객체 편집 메서드 before() / insertBefore() / after() /insertAfter()
- before() / insertBefore() : 선택한 요소의 이전 위치에 새 요소를 생성
- after() / insertAfter() : 선택한 요소의다음 위치에 새 요소를 생성
기본형
//선택한 요소 이전에 새 요소 생성 >> 서로 사용법만 다르고, 기능은 같다.
$("요소선택").before("새요소");
$("새요소").insertBefore("요소선택");

//선택한 요소 다음에 새 요소 생성
$("요소선택").after("새요소");
$("새요소").insertAfter("요소선택");
<!DOCTYPE html>
<html lang="ko">
<head>
<meta charset="UTF-8">
<title> 객체 조작 및 생성 </title>
<script src="js/jquery.js"></script>
<script>
$(function( ){
$("#wrap p:eq(2)").after("<p>After</p>");
$("<p>insertAfter</p>").insertAfter("#wrap p:eq(1)");
$("#wrap p:eq(1)").before("<p>Before</p>");
$("<p>insertBefore</p>").insertBefore("#wrap p:eq(0)");
});
</script>
</head>
<body>
<div id="wrap">
<p>내용1</p>
<p>내용2</p>
<p>내용3</p>
</div>
</body>
</html>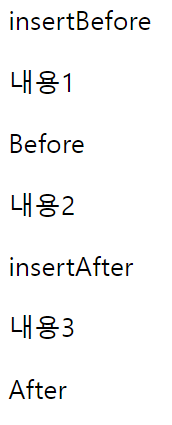
예제 10 : append() / appendTo() / prepend() / prependTo() 메서드
- append() / appendTo() : 선택한 요소 내의 마지막 위치에 새 요소를 생성하고 추가
- prepend() / prependTo() : 선택한 요소 내의 앞 위치에 새 요소를 생성하고 추가
기본형
//선택한 요소 내의 마지막 위치에 새 요소를 생성하고 추가합니다.
$("요소선택").append("새요소");
$("새요소").appendTo("요소선택");


//선택한 요소 내의 앞 위치에 새 요소를 생성하고 추가합니다.
$("요소선택").prepend("새요소");
$("새요소").prependTo("요소선택");
<!DOCTYPE html>
<html lang="ko">
<head>
<meta charset="UTF-8">
<title> 객체 조작 및 생성 </title>
<script src="js/jquery.js"></script>
<script>
$(function( ){
$("<li>appendTo</li>").appendTo("#listZone");
$("#listZone").prepend("<li>prepend</li>");
});
</script>
</head>
<body>
<ul id="listZone">
<li>리스트</li>
</ul>
</body>
</html>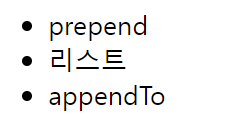
예제 11 : clone() / empty() / remove() 메서드
-
clone() : 선택한 요소를 복제한다. >> [true | false]를 인자안에 넣으면 선택한 요소의 이벤트까지 복제할 것인지 아닌지 선택 가능하다.
- true를 넣으면, 복제하는 내용의 이벤트까지 복제한다. false를 넣으면 이벤트는 복제하지 않고 내용만 복제한다. 기본값은 False이므로, 아무것도 넣지않으면 false로, 이벤트를 제외한 내용만 복제한다.
-
empty() : 선택한 요소의 모든 하위 요소를 삭제한다.
-
remove() : 선택한 요소를 삭제한다.
기본형
$("요소선택").clone([true | false]);
$("요소선택").empty();
$("요소선택").remove();
<!DOCTYPE html>
<html lang="ko">
<head>
<meta charset="UTF-8">
<title> 객체 조작 및 생성 </title>
<script src="js/jquery.js"></script>
<script>
$(function( ){
var copyObj = $(".box1").children().clone();
$(".box2").remove( );//class box2 삭제
$(".box3").empty( ); //class box3안에 p태그 모두 삭제
$(".box3").append(copyObj); //class box3 안에 copyObj추가
});
</script>
</head>
<body>
<div class="box1">
<p>내용1</p>
<p>내용2</p>
</div>
<div class="box2">
<p>내용3</p>
<p>내용4</p>
</div>
<div class="box3">
<p>내용5</p>
<p>내용6</p>
</div>
</body>
</html>
예제 12 : replaceAll() / replaceWith() 메서드
-
replaceAll() :주어진 선택자로 선택한 요소를 현재 선택한 요소로 교체, 선택한 요소는 DOM에서 그대로 유지되며, 대상 요소를 대체한다. >> 새로운 요소 반환 x 호출된 JQuery 객체 자체 반환
- 주로 특정 요소를 다른 요소나 HTML 문자열로 교체해야 할 때 사용된다.
- 선택한 요소를 완전히 대체하고자 할 때 유용하다.
- 예를 들어, 동적으로 DOM을 조작하거나 특정 요소의 내용을 동적으로 변경할 때 사용된다.
-
replaceWith() : 택한 요소를 다른 요소나 HTML 문자열로 교체 >> 이 메서드를 호출한 요소는 DOM에서 완전히 제거되고, 새로운 요소로 대체된다. >> 새로운 요소 반환 x
- 주로 새로운 요소를 기존의 요소로 대체해야 할 때 사용된다.
- 선택한 요소를 그대로 유지하면서 다른 요소로 교체하고자 할 때 유용하다.
- 예를 들어, 새로운 요소를 생성하고 기존의 요소에 추가하는 대신, 기존의 요소를 새로운 요소로 대체하고자 할 때 사용된다.
기본형
$("새 요소").replaceAll("요소선택");
$("요소선택").replaceWith("새요소");
<!DOCTYPE html>
<html lang="ko">
<head>
<meta charset="UTF-8">
<title> 객체 조작 및 생성 </title>
<script src="js/jquery.js"></script>
<script>
$(function( ){
$("h2").replaceWith("<h3>replace method</h3>");//h2태그를 h3태그로
$("<p>Change</p>").replaceAll("div"); //모든 div태그를 p태그로 변경
});
</script>
</head>
<body>
<section class="box1">
<h2>제목1</h2>
<div>내용1</div>
<div>내용2</div>
</section>
<section class="box2">
<h2>제목2</h2>
<div>내용3</div>
<div>내용4</div>
</section>
</body>
</html>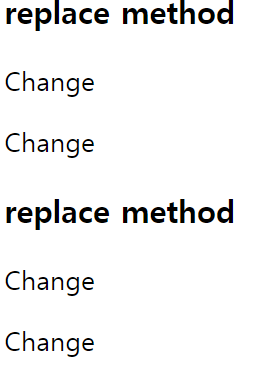
예제 13 : unwrap() / wrap() / wrapAll() / wrapInner() 메서드
- unwrap() : 선택한 요소의 부모 요소를 삭제
- wrap() : 선택한 요소를 각각 새 요소로 감싼다.
- wrapAll() : 선택한 요소를 한꺼번에 하나의 새 요소로 감싼다.
- wrapInner() : 선택한 요소의 모든 하위 요소를 새 요소로 감싼다.
<!DOCTYPE html>
<html lang="ko">
<head>
<meta charset="UTF-8">
<title> 객체 조작 및 생성 </title>
<script src="js/jquery.js"></script>
<script>
    $(function( ){
        $("strong").unwrap( ); //strong의 부모요소인 h1 #tit_1을 삭제
        $(".ct1").wrap("<div />");//class ct1을 div로 각각 감쌈
        $(".ct2").wrapAll("<div />");// p 내용 3, 4 를 div로 감쌈
        $("li").wrapInner("<h3 />");//li 내용 3, 4를 li안에 h3로 감쌈
    });
</script>
<style>
    div{background-color:aqua;}
</style>
</head>
<body>
    <h1 id="tit_1">
    <strong>객체 조작 및 생성</strong>
    </h1>
    <p class="ct1">내용1</p>
    <p class="ct1">내용2</p>
    <p class="ct2">내용3</p>
    <p class="ct2">내용4</p>
    <ul>
        <li>내용3</li>
        <li>내용4</li>
    </ul>
</body>
</html>
jQuery 문제
클래스 wrap_1의 첫번째 후손의 텍스트를 내용1로 바꾸시오.
클래스 wrap_1의 후손 p태그이면서 클래스가 active인것의 클래스 active를 없애고, 클래스 on을 추가하시오.
클래스 wrap_1의 후손 인덱스상 두번째 p에 후손 a태그에 href속성을 "http://www.naver.com"으로 주시오.
클래스 wrap_1의 후손 인덱스상 세번째 p에 후손 input에 value를 "Korea"로 주시오.
클래스 wrap_2의 후손 첫번째 p 뒤에 "
After(추가1)
"를 추가하시오.클래스 wrap_2의 후손 첫번째 p 앞에 "
Before(추가2)
"를 추가하시오.클래스 wrap_3의 후손 p의 부모요소를 삭제하고, 각각의 p 요소의 내부를 strong태그로 감싸자.
<!DOCTYPE html>
<html lang="ko">
<head>
<meta charset="UTF-8">
<title> 선택자 </title>
<script src="js/jquery.js"></script>
<script>
$(function(){

});
</script>
</head>
<body>
    <div class="wrap_1">
        <p>텍스트1</p>
        <p class="active">내용2</p>
        <p><a href="#">네이버</a></p>
        <p>
                <input type="text" value="Hello">
        </p>
    </div>
    <div class="wrap_2">
        <p>내용5</p>
        <p>내용6</p>
    </div>
    <div class="wrap_3">
        <div>
                        <p>내용7</p>
                        <p>내용8</p>
        </div>
    </div>
</body>
</html>
풀이
<!DOCTYPE html>
<html lang="ko">
<head>
<meta charset="UTF-8">
<title> 선택자 </title>
<script src="js/jquery.js"></script>
<script>
    $(function(){
        $(".wrap_1 p:first")
        .text("내용1");

        $(".wrap_1 p.active")
        .removeClass("active")
        .addClass("on");

        $(".wrap_1 p:eq(2) a")
        .attr("href","http://www.naver.com");

        $(".wrap_1 p:eq(3) input").val("Korea");

        $(".wrap_2 p:first").after("<p>After(추가1)</p>");
        $(".wrap_2 p:first").before("<p>Before(추가2)</p>");

        $(".wrap_3 p")
        .unwrap()
        .wrapInner("<strong/>");
    });
</script>
</head>
<body>
    <div class="wrap_1">
        <p>텍스트1</p>
        <p class="active">내용2</p>
        <p><a href="#">네이버</a></p>
        <p>
            <input type="text" value="Hello">
        </p>
    </div>
    <div class="wrap_2">
        <p>내용5</p>
        <p>내용6</p>
    </div>
    <div class="wrap_3">
        <div>
            <p>내용7</p>
            <p>내용8</p>
        </div>
    </div>
</body>
</html>- 제이쿼리 not() 메서드를 이용하여 첫 번째
- 요소만 제외시킨
- 의 배경에 노란색을 적용해 보세요.
<!DOCTYPE html>
<html lang="ko">
<head>
<meta charset="UTF-8">
<title> 선택자 </title>
<script src="js/jquery.js"></script>
<script>
$(function(){
    $("#myList li").not(":first")
    .css("background-color","yellow");
});
</script>
</head>
<body>
    <ul id="myList">
        <li>내용1</li>
        <li>내용2</li>
        <li>내용3</li>
        <li>내용4</li>
    </ul>
</body>
</html>- 제이쿼리 위치 탐색자를 이용해 세 번째
- 태그만 선택하여 배경을 노란색으로 적용해 보세요.
<!DOCTYPE html>
<html lang="ko">
<head>
<meta charset="UTF-8">
<title> 선택자 </title>
<script src="js/jquery.js"></script>
<script>
$(function(){
    $("#myList li").eq(2)
    .css("background-color","yellow");
});
</script>
</head>
<body>
    <ul id="myList">
        <li>내용1</li>
        <li>내용2</li>
        <li>내용3</li>
        <li>내용4</li>
    </ul>
</body>
</html>
jQuery 이벤트
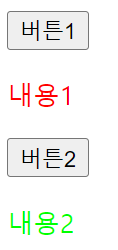
예제 1 : 이벤트 등록 방식
- 이벤트 : 사이트에서 방문자가 취하는 모든 행위를 말한다.
- 이벤트 핸들러 : 이벤트가 발생했을 때 실행되는 코드
- 이벤트 등록 메서드 : .on() 을 이용해 이벤트를 등록한다.(addEventListner와 같은 기능)
- 단독 이벤트 등록 >> 1개의 이벤트만 등록 가능
- 그룹 이벤트 등록 >> 여러개 이벤트 등록 가능
기본형
//단독 이벤트 등록
$("이벤트 대상 선택").on("이벤트 종류1 이벤트 종류2 ... 이벤트 종류n",
function(){
    자바스크립트 코드;
});

//그룹 이벤트 등록
$("이벤트 대상 선택").on({
    "이벤트 종류1" : function() {자바스크립트 코드;1},
    "이벤트 종류2" : function() {자바스크립트 코드;2},
    ...
    "이벤트 종류n" : function() {자바스크립트 코드;n}
});
<!DOCTYPE html>
<html lang="ko">
<head>
<meta charset="UTF-8">
<title> 이벤트 </title>
<script src="js/jquery.js"></script>
<script>
$(function( ) {
$(".btn1").on('click', function(){
$(this).parent().next().css("color", "#f00");
});
$(".btn2").on('mouseover focus', function(){
$(this).parent().next().css("color", "#0f0");
});
$(".btn2").on('mouseout blur', function(){
$(this).parent().next().css("color", "#000");
});
});
</script>
</head>
<body>
<p>
<button class="btn1">버튼1</button>
</p>
<p>내용1</p>
<p>
<button class="btn2">버튼2</button>
</p>
<p>내용2</p>
</body>
</html> 예제 2 : 강제 이벤트 실행 trigger()
이벤트가 강제로 발생했다는 말은 사용자에 의한 이벤트 발생이 아닌, 핸들러에 의한 이벤트 발생이란 의미다.
- trigger() : 강제로 이벤트 발생 시킴
기본형
$("이벤트 대상").trigger("이벤트 종류"); <!DOCTYPE html>
<html lang="ko">
<head>
<meta charset="UTF-8">
<title> 이벤트 </title>
<script src="js/jquery.js"></script>
<script>
$(function( ) {
$(".btn1").on('click', function(){
$(this).parent().next().css("color", "#f00");
});
$(".btn2").on('mouseover focus', function(){
$(this).parent().next().css("color", "#0f0");
});
$(".btn1").trigger("click");
$(".btn2").trigger("mouseover");
});
</script>
</head>
<body>
<p>
<button class="btn1">버튼1</button>
</p>
<p>내용1</p>
<p>
<button class="btn2">버튼2</button>
</p>
<p>내용2</p>
</body>
</html> - 강제로 이벤트를 발생시켜 이미 css가 적용되어 있는 것이다.
예제 3 : 이벤트 제거 off()
-
off() : 이벤트를 제거한다.
$("이벤트 대상").off("제거할 이벤트 종류");
<!DOCTYPE html>
<html lang="ko">
<head>
<meta charset="UTF-8">
<title> 이벤트 </title>
<script src="js/jquery.js"></script>
<script>
$(function( ) {
    $(".btn1").on('click', function(){
        $(this).parent().next().css("color", "#f00");
    });
    $(".btn2").on('mouseover focus', function(){//btn2에 포인터를 올리거나 포커스가 있으면
        $(this).parent().next().css("color", "#0f0");
    });
    $(".btn1").off("click");
    $(".btn2").off("mouseover focus");
});
</script>
</head>
<body>
    <p>
    <button class="btn1">버튼1</button>
    </p>
    <p>내용1</p>
    <p>
        <button class="btn2">버튼2</button>
    </p>
    <p>내용2</p>
</body>
</html>- off()를 이용해 이벤트를 제거했기 때문에, 클릭 또는 마우스를 호버 해도, 글자 색은 변경되지 않는다.
예제 4 : 로딩 이벤트 ready() / load()
사용자가 브라우저에서 HTML 문서를 요청하여 HTML 문서의 로딩이 완료되면 이벤트 핸들러를 실행
- ready() : 사용자가 사이트를 방문할 때 요청한 HTML 문서객체(Document)의 로딩이 완료되면 이벤트 핸들러를 실행
$(document).on("ready", function() {자바스크립트 코드;});
- load() : 외부에 연동된 소스(iframe, img, video)의 로딩이 끝나면 이벤트를 발생시킨다.
$(window).on("load", function() { 자바스크립트 코드; });
<!DOCTYPE html>
<html lang="ko">
<head>
<meta charset="UTF-8">
<title> 이벤트 </title>
<script src="js/jquery.js"></script>
<script>
$(function( ) {
    $(document).on("ready", function(){
        console.log($(".img1").height());
    });
    $(window).on("load", function(){
        console.log($(".img1").height());
    })
});
</script>
</head>
<body>
    <p>
        <img src="http://place-hold.it/300X300" class="img1">
    </p>
</body>
</html>
예제 5 : 마우스 이벤트 click(), dbclick() / 기본 이벤트 차단 방식
- click() : 선택하나 요소를 클릭했을 때 이벤트를 발생시킨다.
$("이벤트 대상 선택").on("click", function() { 자바스크립트 코드; });
- dbclick() : 선택한 요소를 연속해서 두 번 클릭했을 때 이벤트를 발생시킨다.
$("이벤트 대상 선택").on("dblclick", function() { 자바스크립트 코드; });
기본 이벤트 차단 방식
//return false를 이용한 차단 방식
$("a 또는 form").이벤트 메서드(function() {
    자바스크립트 코드;
    return false;
});

// preventDefault() 메서드를 이용한 차단 방식
$("a 또는 form").이벤트 메서드(function(e){
    e.preventDefault();
    자바스크립트 코드;
});
<!DOCTYPE html>
<html lang="ko">
<head>
<meta charset="UTF-8">
<title> 이벤트 </title>
<script src="js/jquery.js"></script>
<script>
$(function( ) {
$(".btn1").on("click", function(e){
e.preventDefault(); //btn1을 눌러도 해당 싸이트로 이동되지 않고, css적용
$(".txt1").css("backgroundColor", "#ff0");
});
$(".btn2").on("click", function(){//btn2를 누르면 해당 싸이트로 이동하고, css적용
$(".txt2").css("backgroundColor", "#0ff");
});
$(".btn3").on("dblclick", function(){//btn3을 더블클릭하면 css적용
$(".txt3").css("backgroundColor", "#0f0");
});
});
</script>
</head>
<body>
<p><a href="http://www.easyspub.co.kr/" class="btn1">버튼1</a></p>
<p class="txt1">내용1</p>
<p><a href="http://www.easyspub.co.kr/" class="btn2">버튼2</a></p>
<p class="txt2">내용2</p>
<p><button class="btn3">버튼3</button></p>
<p class="txt3">내용3</p>
</body>
</html> 예제 6 : 마우스 이벤트 mouseover() /mouseout()
- mouseover() : 선택한 요소에 마우스 포인터를 올릴 때마다 이벤트를 발생
- mouseout() : 선택한 요소에서 마우스 포인터가 벗어날 때마다 이벤트를 발생
- hover() 는 존재는 하지만 deprecated 되서 권장 x
기본형
//mouseover
$("이벤트 대상 선택").on("mouseover", function() { 자바스크립트 코드; });

//mouseout
$("이벤트 대상 선택").on("mouseout", function() { 자바스크립트 코드; });
<!DOCTYPE html>
<html lang="ko">
<head>
<meta charset="UTF-8">
<title> 이벤트 </title>
<script src="js/jquery.js"></script>
<script>
$(function( ) {
$(".btn1").on({
"mouseover" : function(){
$(".txt1").css("backgroundColor", "yellow");
},
"mouseout" : function(){
$(".txt1").css("background", "none");
}
});
$(".btn2").on({
"mouseover" : function(){
$(".txt2").css("backgroundColor", "aqua");
},
"mouseout" : function(){
$(".txt2").css("background", "none");
}
});
});
</script>
</head>
<body>
<p><button class="btn1">Mouse Over/Mouse Out</button></p>
<p class="txt1">내용1</p>
<p><button class="btn2">Hover</button></p>
<p class="txt2">내용2</p>
</body>
</html> 예제 7 : mouseenter() / mouseleave() 이벤트 메서드
- mouseenter() : 대상 요소의 경계 범위에 마우스 포인터가 들어오면 이벤트를 발생
- mouseleave() : 대상 요소의 경계 범위에서 마우스 포인터가 완전히 벗어나면 이벤트를 발생
- mouseout : 요소를 벗어났을 때 / mouseleave : 경계 범위를 벗어났을 때
<!DOCTYPE html>
<html lang="ko">
<head>
<meta charset="UTF-8">
<title> 이벤트 </title>
<script src="js/jquery.js"></script>
<script>
$(function( ) {
    $("#box_1").on("mouseout", function(){//box1 요소를 벗어났을 때
        $(this).css("backgroundColor", "yellow");
    });
    $("#box_2").on("mouseleave", function(){//box2의 경계범위를 벗어났을 때
        $(this).css("backgroundColor", "pink");
    });
});
</script>
</head>
<body>
<h1>mouseout</h1>
<div id="box_1">
                <p><a href="#">내용1</a></p>
                <p><a href="#">내용2</a></p>
                <p><a href="#">내용3</a></p>
</div>

<h1>mouseleave</h1>
<div id="box_2">
                <p><a href="#">내용4</a></p>
                <p><a href="#">내용5</a></p>
                <p><a href="#">내용6</a></p>
</div>
</body>
</html>
예제 8 : mousemove 이벤트
- mousemove() : 마우스가 움직일때마다 이벤트를 발생
pageX: 문서 전체를 기준으로 마우스 커서의 X 좌표를 나타낸다.pageY: 문서 전체를 기준으로 마우스 커서의 Y 좌표를 나타낸다.clientX,clientY: 브라우저 창을 기준으로 마우스 커서의 X 및 Y 좌표를 나타낸다.screenX,screenY: 전체 화면을 기준으로 마우스 커서의 X 및 Y 좌표를 나타낸다.target: 이벤트가 발생한 요소를 나타낸다.type: 발생한 이벤트의 종류를 나타낸다.
<!DOCTYPE html>
<html lang="ko">
<head>
<meta charset="UTF-8">
<title> 이벤트 </title>
<script src="js/jquery.js"></script>
<script>
$(function( ) {
    $(document).on("mousemove", function(e){    // e 매개 변수(이벤트 객체)
        $(".posX").text(e.pageX); //마우스 커서의 x좌표
        $(".posY").text(e.pageY); //마우스 커서의 y좌표
    });
});
</script>
</head>
<body>
<h1>mousemove</h1>
<p>X : <span class="posX">0</span>px</p>
<p>Y : <span class="posY">0</span>px</p>
</body>
</html>
예제 9 : scroll 이벤트
- scroll() : 대상 요소의 스크롤바가 이동할 때마다 이벤트를 발생시키거나 강제로 이벤트를 발생
target: 이벤트가 발생한 요소를 나타낸다.type: 발생한 이벤트의 종류를 나타낸다.scrollTop: 요소의 세로 스크롤바의 위치를 나타낸다. 페이지의 위쪽에서부터 스크롤한 픽셀의 수다.scrollLeft: 요소의 가로 스크롤바의 위치를 나타낸다. 페이지의 왼쪽에서부터 스크롤한 픽셀의 수다.
$("이벤트 대상 선택").on("scroll", function() { 자바스크립트 코드; });
<!DOCTYPE html>
<html lang="ko">
<head>
<meta charset="UTF-8">
<title> 이벤트 </title>
<script src="js/jquery.js"></script>
<script>
$(window).on("scroll",function(e){
$(".top").text($(this).scrollTop()); //아래로 스크롤 할때 위치
$(".left").text($(this).scrollLeft()); //왼쪽 오른쪽으로 스크롤 할 때 스크롤바 위치
});
</script>
<style>
body{
height:10000px; //크기를 일부러 엄청 많이 줘서 스크롤 할 수 있게끔..
width:5000px;
}
#wrap{
position: fixed;
left: 10px; top: 10px;
}
</style>
</head>
<body>
<div id="wrap">
<p>scrollTop: <span class="top">0</span>px</p>
<p>scrollLeft: <span class="left">0</span>px</p>
</div>
</body>
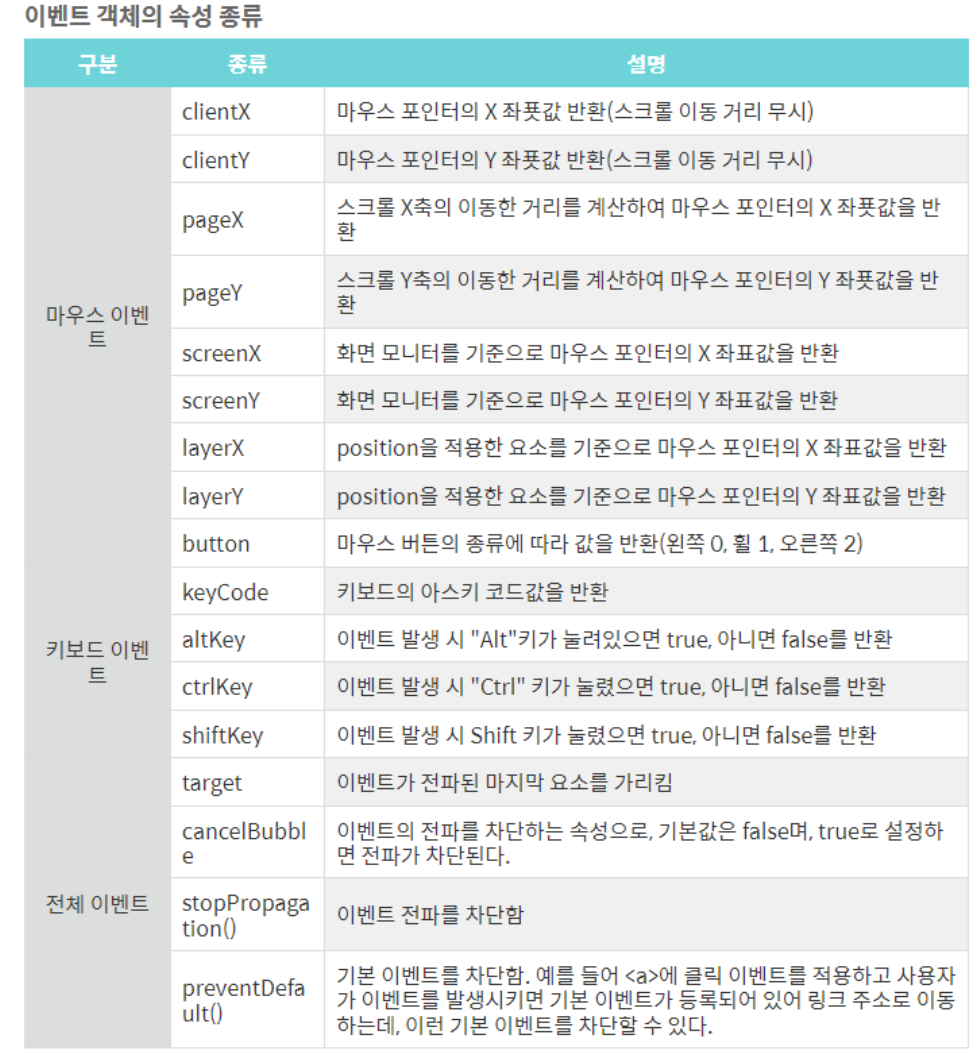
</html>jQuery 이벤트 객체의 속성 종류
키보드 이벤트에서 keyCode(디프리케이트 됐음)보다는 key이벤트 쓰는게 더 좋다.