Key point
- 객체지향 프로그래밍과 클래스의 정의
- 클래스 선언과 객체 생성
- 인스턴스 멤버, 정적 멤버
- 객체 복사
- 접근 한정자의 종류, 역할
- 클래스 상속
- 메소드 오버라이딩과 다형성
7.1 객체지향 프로그래밍 & 클래스
7.1.1 객체지향 프로그래밍(OOP, Object Oriented Programming)
- 코드 내의 모든 것을 객체(Object)로 표현하고자 하는 프로그래밍 패러다임(사고의 틀)
- 객체지향 프로그래밍은 세상의 모든 것을 주요 특징(속성, 기능)만 뽑아내 표현한다.
- 객체 = 속성(데이터) + 기능(메소드)
ex) 사람 = 피부색, 키, 몸무게(속성, 데이터) + 걷기, 뛰기, 보기, 듣기(기능, 메소드)프로그램을 바라보는 관점
- 절차적 프로그래밍 : 코드의 순차적인 실행
- 객체지향 프로그래밍 : 객체간의 상호 작용
7.1.2 클래스(class)
클래스는 객체를 만들기 위한 청사진(설계도)

인스턴스(Instance)
string a = "123";
string b = "Hello";
- 클래스 : string
- 객체 : a, b
- 여기서 a와 b는 실제로 데이터를 담을 수 있는 실제 객체로 string의 실체/인스턴스라 불린다.
7.2 클래스의 선언 & 객체의 생성
7.2.1 클래스 선언
-
class키워드 이용class 클래스 이름 { // 데이터와 메소드 } -
class 구성
// Cat의 청사진 //
class Cat
{
	// 속성 = 클래스의 변수 = 필드(Field)
	public string Name;
   public string Color;

   // 기능 = 메소드
   public void Meow()
   {
   	Console.WriteLine("{0} : 야옹", Name);
   }
}
// 멤버(Member) : 필드와 메소드를 비롯해 프로퍼티, 이벤트 등 클래스 내에 선언된 요소들


// Cat의 실체(인스턴스) //
Cat kitty = new Cat();  // kitty 객체 생성
kitty.Color = "하얀색";
kitty.Name = "키티";
kitty.Meow();
Console.WriteLine("{0} : {1}", kitty.Name, kitty.Color);

Cat nero = new Cat()  // nero 객체 생성
kitty.Color = "검은색";
kitty.Name = "네로";
kitty.Meow();
Console.WriteLine("{0} : {1}", nero.Name, nero.Color);
7.2.2 객체의 생성
- 객체는 new 연산자와 생성자를 이용해 힙에 객체를 생성하고,
생성된 객체(실체, 인스턴스)는 참조로써 힙에 생성한 객체를 가리킨다.- 생성자(Constructor) : 클래스의 이름과 동일한 이름을 가지며, 객체를 생성하는 역할
- new 연산자 : 생성자를 호출해서 객체를 생성하는 데 사용하는 연산자
- 객체의 멤버(필드 및 메소드 등등)에 접근할 때는
.연산자 사용
Cat kitty; // null
/* kitty는 참조로써 힙에 생성한 객체를 가리키는데
객체 생성 없이 위 코드만 실행할 경우 생성된 객체가 없으므로 null이 된다. */

// 객체 생성
Cat kitty = new Cat() // new 연산자 + 생성자
예제 프로그램
using System;

namespace BasicClass
{
    class Cat
    {
        public string Name;
        public string Color;

        public void Meow()
        {
            Console.WriteLine($"{Name} : 야옹");
        }
    }

    class MainApp
    {
        static void Main(string[] args)
        {
            Cat kitty = new Cat();
            kitty.Color = "하얀색";
            kitty.Name = "키티";
            kitty.Meow();
            Console.WriteLine($"{kitty.Name} : {kitty.Color}");

            Cat nero = new Cat();
            nero.Color = "검은색";
            nero.Name = "네로";
            nero.Meow();
            Console.WriteLine($"{nero.Name} : {nero.Color}");
        }
    }
}
7.3 생성자, 종료자
- 생성자 : 객체가 생성될 때 호출됨
- 종료자 : 객체가 소멸될 때 호출됨
- 생성자와 종료자의 명시적 구현은 선택사항
7.3.1 생성자(Constructor)
// 생성자 선언 //
class Cat
{
	// 생성자 버전 1
	public Cat()  // 한정자 + 생성자
    {
    	Name = "";
        Color = "";
    }

    // 생성자 버전 2
    public Cat( string _Name, string _Color) // 객체 생성시 이름과 색을 입력받아 초기화
    {
    	Name = _Name;
        Color = _Color;
    }

    public string Name;
    public string Color;

    //...
 }

 // 생성자 호출 및 사용 //

 // 생성자 버전 1 호출
 Cat kitty = new Cat(); // Cat()
 kitty.Name = "키티";
 kitty.color = "하얀색";


 // 생성자 버전 2 호출
Cat nabi = new Cat("나비", "갈색"); // Cat(string _Name, string _Color)- 클래스를 선언할 때 위처럼 명시적으로 생성자를 구현하지 않아도
컴파일러에서 기본 생성자(Default Constructor)를 만들어준다. - 그럼에도 생성자를 명시적으로 구현하는 경우는
객체의 상태를, 다시 말해 객체의 필드를 프로그래머가 원하는 값으로 초기화하고 싶은 경우다.
이렇게 명시적으로 생성자를 구현하는 경우 컴파일러는 기본 생성자를 제공하지 않는다. - 생성자도 여느 메소드와 마찬가지로 오버로딩이 가능해 다양한 버전의 생성자를 준비해놓을 수 있다.
7.3.2 종료자(Finalizer)
-
~로 선언class 클래스 이름 { ~클래스 이름() // 종료자 { // } // 필드 // 메소드 } -
종료자는 CLR의 가비지 컬렉터에게 맡기고 되도록 사용하지 않는 것이 좋다.
예제 프로그램
using System;

namespace Constructor
{
    class Cat
    {
        public Cat()
        {
            Name = "";
            Color = "";
        }

        public Cat(string _Name, string _Color)
        {
            Name = _Name;
            Color = _Color;
        }

        ~Cat()
        {
            Console.WriteLine($"{Name} : 잘가");
        }

        public string Name;
        public string Color;

        public void Meow()
        {
            Console.WriteLine($"{Name} : 야옹");
        }
    }

    class MainApp
    {
        static void Main(string[] args)
        {
            Cat kitty = new Cat("키티", "하얀색");
            kitty.Meow();
            Console.WriteLine($"{kitty.Name} : {kitty.Color}");

            Cat nero = new Cat("네로", "검은색");
            nero.Meow();
            Console.WriteLine($"{nero.Name} : {nero.Color}");
        }
    }
}
☞ 객체의 소멸을 담당하는 가비지 컬렉터는 쓰레기의 양이 어느 선을 넘어야만 동작하는데
이것이 언제 동작할지는 누구도 알 수 없다. 따라서 위 프로그램 출력 결과는 매 실행 시마다 달라질 수 있다.
// 가비지 컬렉터가 동작할 경우 실행 결과
키티 : 야옹
키티 : 하얀색
네로 : 야옹
네로 : 검은색
네로 : 잘가
키티 : 잘가
7.4 정적 필드 & 메소드
7.4.1 정적 필드(Static Field)
-
static- 정적(靜的) : 움직이지 않음
- 메소드나 필드가 클래스의 인스턴스가 아닌 클래스 자체에 소속되도록 지정하는 한정자
- static으로 한정하지 않은 필드는 자동으로 인스턴스에 소속
static으로 한정한 필드는 클래스에 소속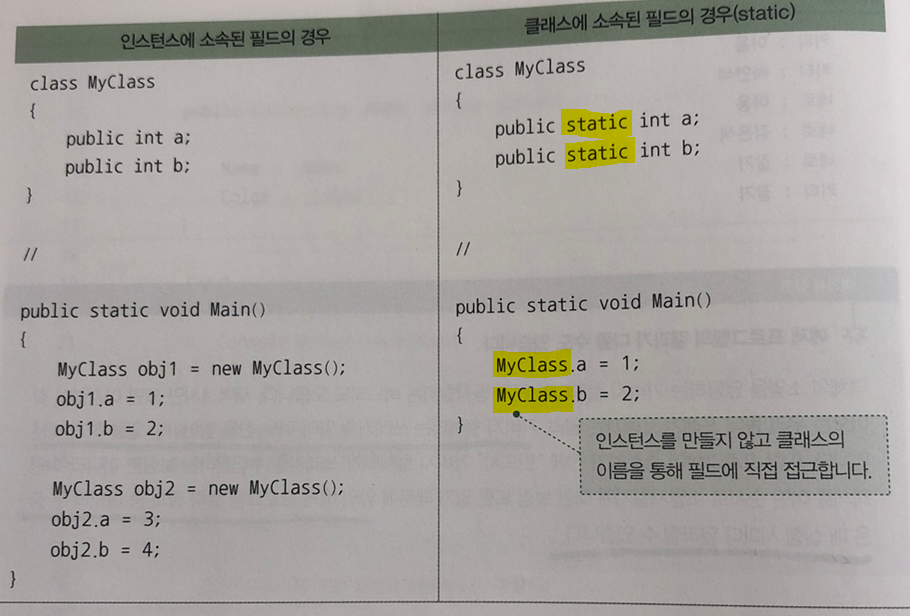
- static으로 한정한 필드는 프로그램 전체에 걸쳐 하나밖에 존재하지 않는다. (클래스에 소속되는데 클래스는 인스턴스와는 달리 단 하나만 존재하므로)
-
예제 프로그램
using System;

class Global
{
   public static int Count = 0; // 정적 필드 선언
}

class ClassA
{
   public ClassA()
   {
       Global.Count++; // 정적 필드 접근
   }
}

class ClassB
{
   public ClassB()
   {
       Global.Count++; // 정적 필드 접근
   }
}

class MainApp
{
   static void Main()
   {
       Console.WriteLine($"Global.Count : {Global.Count}");

       new ClassA();
       new ClassA();
       new ClassB();
       new ClassB();

       Console.WriteLine($"Global.Count : {Global.Count}");
   }
}
7.4.2 정적 메소드(static method)
-
클래스 자체에 소속되는 메소드
-
클래스의 인스턴스를 생성하지 않아도 호출이 가능한 메소드
// 정적 메소드 //
class MyClass
{
	public static void StaticMethod() // static 사용
   {
   	    // ...
   }
}

//...

MyClass.StaticMethod();  // 인스턴스 만들지 않고도 바로 호출 가능


// 인스턴스 메소드 //
class MyClass
{
	public void StaticMethod() // static 사용X
   {
   	    // ...
   }
}

//...

MyClass obj = new MyClass(); // 인스턴스 생성
obj.InstanceMethod(); // 인스턴스를 만들어야 호출 가능
7.5 객체 복사
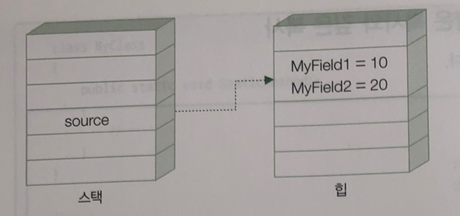
클래스는 태생이 참조 형식으로,
힙 영역에 객체를 할당하고 스택에 있는 참조가 힙 영역에 할당된 메모리를 가리킨다.
얕은 복사(Shallow Copy)
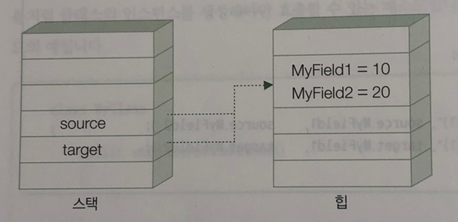
객체를 복사할 때 실제 객체가 아닌 스택에 있는 참조만 살짝 복사하는 것
깊은 복사(Deep Copy)

-
힙에 보관되어 있는 내용을 복사해 받아 별도의 힙 공간에 객체를 보관하는 것
-
C#에는 이와 같은 일을 자동으로 해주는 구문이 없어 직접 수행 코드를 만들어야 함
class MyClass { public int MyField1; public int MyField2; // 객체를 힙에 새로 할당해서 그곳에 자신의 멤버를 일일이 복사해 넣는다. public MyClass DeepCopy() { MyClass newCopy = new MyClass(); newCopy.MyField1 = this.Myfield1; // this= MyClass newCopy.MyField2 = this.Myfield2; return newCopy; } } -
예제 프로그램
using System;

namespace DeepCopy
{
   class MyClass
   {
       public int MyField1;
       public int MyField2;

       public MyClass DeepCopy()
       {
           MyClass newCopy = new MyClass();
           newCopy.MyField1 = this.MyField1;
           newCopy.MyField2 = this.MyField2;

           return newCopy;
       }
   }

   class MainApp
   {
       static void Main(string[] args)
       {
           Console.WriteLine("Shallow Copy");

           {
               MyClass source = new MyClass();
               source.MyField1 = 10;
               source.MyField2 = 20;

               MyClass target = source;
               target.MyField2 = 30; // 참조를 복사하므로 MyField2값이 변경된다.

               Console.WriteLine($"source : {source.MyField1} {source.MyField2}");
               Console.WriteLine($"target : {target.MyField1} {target.MyField2}");
           }

           Console.WriteLine("Deep Copy");

           {
               MyClass source = new MyClass();
               source.MyField1 = 10;
               source.MyField2 = 20;

               MyClass target = source.DeepCopy();
               target.MyField2 = 30; // 별도의 힙 공간에 복사본을 만드므로 target의 MyField2값만 변경된다.

               Console.WriteLine($"source : {source.MyField1} {source.MyField2}");
               Console.WriteLine($"target : {target.MyField1} {target.MyField2}");
           }
       }
   }
}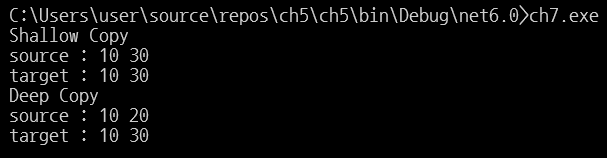
ICloneable.Clone() 메소드
- 클래스가 구현해야 하는 메소드 목록
- 깊은 복사기능을 가질 클래스가 .NET의 다른 유틸리티 클래슨 다른 프로그래머가 작성한 코드와 호환되도록 하고 싶다면 ICloneable을 상속하는 것이 좋다.
- Clone() 메소드 하나만 갖고 있다.
class MyClass : ICloneable
{
	public int MyField1;
    public int MyField2;
    public MyClass Clone()
    {
    	MyClass newCopy = new MyClass();
        newCopy.MyField1 = this.MyField1;
        newCopy.MyField2 = this.MyField2;
        return newCopy;
    }
}
7.6 this 키워드
7.6.1 나
-
객체가 자신을 지칭할 때 사용하는 키워드
-
객체 외부에서는 객체의 필드나 메소드에 접근할 때 객체의 이름(변수 또는 식별자)을 사용한다면, 객체 내부에서는 자신의 필드나 메소드에 접근할 때 this 키워드를 사용한다.
-
예제 프로그램
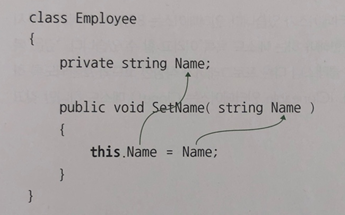
using System;

namespace This
{
   class Employee
   {
       private string Name;
       private string Position;

       public void SetName(string Name)
       {
           this.Name = Name;
       }

       public string GetName()
       {
           return Name;
       }

       public void SetPosition(string Position)
       {
           this.Position = Position;
       }

       public string GetPosition()
       {
           return this.Position;
       }
   }

   class MainApp
   {
       static void Main(string[] args)
       {
           Employee pooh = new Employee();
           pooh.SetName("Pooh");
           pooh.SetPosition("Waiter");
           Console.WriteLine($"Employee pooh - name :{pooh.GetName()}, position : {pooh.GetPosition()}");

           Employee tigger = new Employee();
           tigger.SetName("Tigger");
           tigger.SetPosition("Cleaner");
           Console.WriteLine($"Employee tigger - name:{tigger.GetName()}, position : {tigger.GetPosition()}");
       }
   }
}
7.6.2 this() 생성자
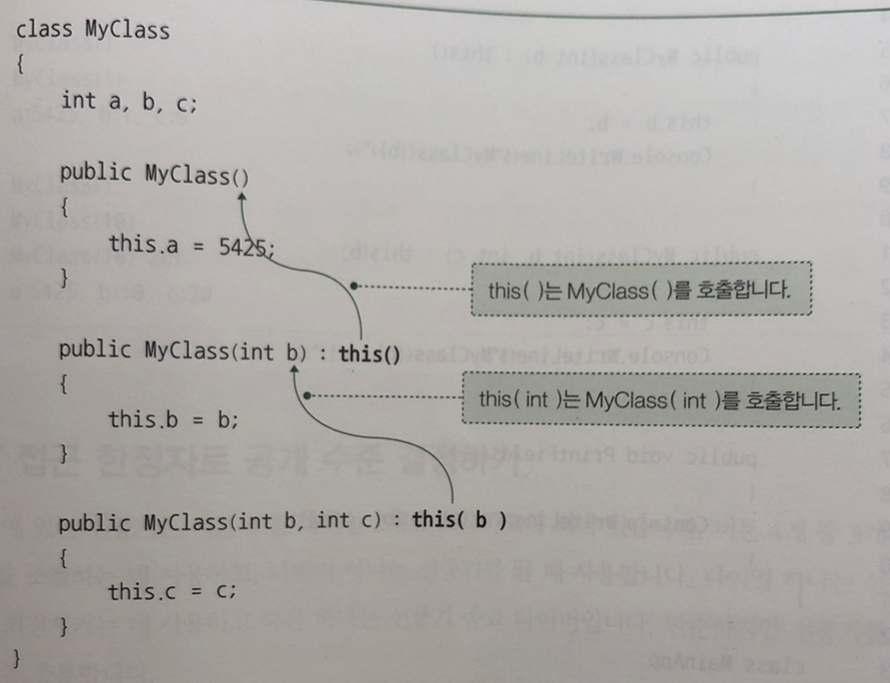
- 자기 자신의 생성자를 가리키며 생성자의 코드 블록 내부가 아닌 앞쪽에서만 사용이 가능하다.
using System;
namespace ThisConstructor
{
class MyClass
{
int a, b, c;
public MyClass()
{
this.a = 5425;
Console.WriteLine("MyClass()");
}
public MyClass(int b) : this()
{
this.b = b;
Console.WriteLine($"MyClass({b})");
}
public MyClass(int b, int c) : this(b)
{
this.c = c;
Console.WriteLine($"MyClass({b}. {c})");
}
public void PrintFields()
{
Console.WriteLine($"a:{a}, b:{b}, c:{c}");
}
}
class MainApp
{
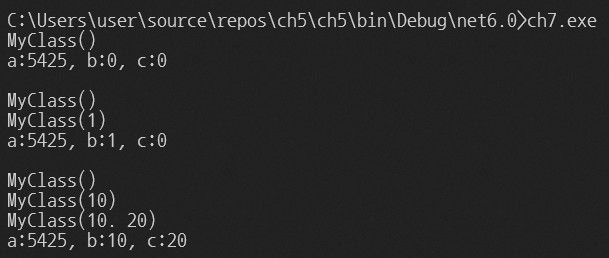
static void Main(string[] args)
{
MyClass a = new MyClass();
a.PrintFields();
Console.WriteLine();
MyClass b = new MyClass(1);
b.PrintFields();
Console.WriteLine();
MyClass c = new MyClass(10, 20);
c.PrintFields();
}
}
}
7.7 접근 한정자로 공개 수준 결정하기
- 접근 한정자(Access Modifier) : 멤버(필드, 메소드 등등)를 외부에 어떤 수준으로 공개할 지 지정
- 은닉성(Encapsulation) : 객체지향 프로그래밍에서는 객체간의 상호 작용이 중심이므로 필요한 최소의 기능만 노출하고 내부를 감춘다.
- 필드는 상수를 제외하고는 "무조건" 감추는 것이 좋다.
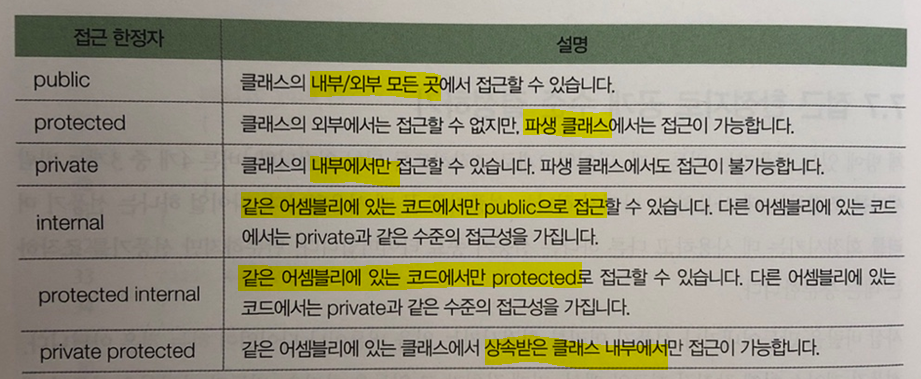
- 접근 한정자로 수식하지 않은 클래스의 멤버는 무조건 private으로 접근 수준이 자동 지정됨
using System;

namespace AccessModifier
{
    class WaterHeater
    {
        protected int temperature;

        public void SetTemperature(int temperature)
        {
            if (temperature < -5 || temperature > 42)
            {
                throw new Exception("Out of temperature range");
            }

            this.temperature = temperature;
            // 이 필드는 protected로 수식되었으므로 외부에서 직접 접근할 수 없다. 이렇게 public 메소드를 통해 접근해야 한다.
        }

        internal void TurnOnWater( )
        {
            Console.WriteLine($"Turn on water : {temperature}");
        }
    }

    class MainApp
    {
        static void Main(string[] args)
        {
            try
            {
                WaterHeater heater = new WaterHeater();
                heater.SetTemperature(20);
                heater.TurnOnWater();

                heater.SetTemperature(-2);
                heater.TurnOnWater();

                heater.SetTemperature(50); // 예외가 발생하며, 실행되지 않고 catch블록으로 실행 위치가 이동한다.
                heater.TurnOnWater();
            }
            catch (Exception e)
            {
                Console.WriteLine(e.Message);
            }
        }
    }
}
7.8 상속
-
상속 : 다른 클래스로부터 코드를 물려받는 것
-
상속 대상 : 클래스의 멤버(필드, 메소드, 프로퍼티 등등)
-
새로 선언하는 클래스 이름 뒤에
콜론(:)+기반 클래스 이름표기하여 상속 -
물려주는 클래스 : 기반/부모 클래스, 물려받는 클래스 : 파생/자식 클래스
class 기반 클래스 { // 멤버 선언 } class 파생 클래스 : 기반 클래스 { // 아무 멤버를 선언하지 않아도 기반 클래스의 모든 것을 물려받아 갖게 됨 // 단, private으로 선언된 멤버는 예외 } -
파생 클래스 = 자신만의 고유한 멤버 + 기반 클래스로부터 물려받은 멤버
-
파생 클래스 생성 과정
- 내부적으로 기반 클래스의 생성자 호출
- 자신의 생성자 호출
- 객체 소멸 시 반대의 순서로(파생→기반) 종료자 호출
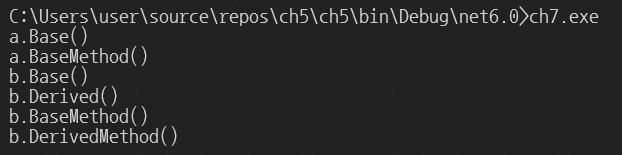
Base()
 Derived()
~Derived()
~Base()
-
base: 기반 클래스의 생성자// 기반 클래스 메서드 접근 // class Base { public void BaseMethod() {/*···*/} } class Derived : Base { public void DerivedMethod() { base.BaseMethod(); // base 키워드를 통해 기반 클래스인 Base 클래스에 속한 메서드에 접근할 수 있다. } } // 기반 클래스 필드 초기화 // class Base { protected string Name; public Base(string Name) { this.Name = Name; } } class Derived : Base { public Derived(string Name) : base(Name) // Base(string Name) 호출해 Name 필드 초기화 { Console.WriteLine("{0}.Derived()", this.Name); } } -
예제 프로그램
using System;

namespace Inheritance
{
   class Base
   {
       protected string Name;
       public Base(string Name)
       {
           this.Name = Name;
           Console.WriteLine($"{this.Name}.Base()");
       }

       ~Base()
       {
           Console.WriteLine($"{this.Name}.~Base()");
       }

       public void BaseMethod()
       {
           Console.WriteLine($"{Name}.BaseMethod()");
       }
   }

   class Derived : Base  // Base 상속
   {
       public Derived(string Name) : base(Name)
       {
           Console.WriteLine($"{this.Name}.Derived()");
       }

       ~Derived()
       {
           Console.WriteLine($"{this.Name}.~Derived()");
       }

       public void DerivedMethod()
       {
           Console.WriteLine($"{Name}.DerivedMethod()");
       }
   }

   class MainApp
   {
       static void Main(string[] args)
       {
           Base a = new Base("a");
           a.BaseMethod();

           Derived b = new Derived("b");
           b.BaseMethod();
           b.DerivedMethod();
       }
   }
}
sealed한정자 : 상속이 불가능하도록 클래스 선언
아래와 같이sealed한정자로 클래스를 수식하면, 이 클래스는 '상속 봉인'이 되어 이로부터 상속받으려는 시도가 컴파일러로부터 발견됐을 때 에러 메시지가 출력된다.sealed class Base { // } class Derived : Base // 컴파일 에러 발생 { // }
7.9 기반 클래스 & 파생 클래스 사이 형식 변환, is & as
-
기반 클래스와 파생 클래스 사이에서는 족보를 오르내리는 형식 변환이 가능하다.
-
파생 클래스의 인스턴스는 기반 클래스의 인스턴스로서도 사용할 수 있다.
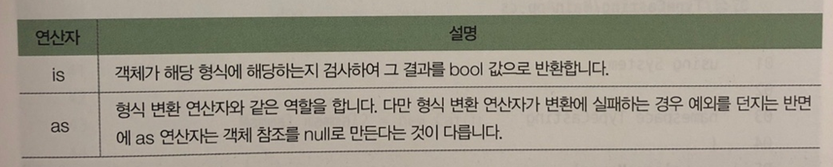
// is 연산자 // Mammal mammal = new Dog(); Dog dog; if (mammal is Dog) // mammal 객체가 Dog 형식임을 확인 { dog = (Dog)mammal; // 안전하게 형식 변환 dog.Bark(); } // as 연산자 // Mammal mammal2 = new Cat(); Cat cat = mammal2 as Cat; // mammal2의 Cat 형식 변환 if (cat != null) // mammal2가 Cat 형식 변환에 실패했다면 cat은 null이 됨 { cat.Meow(); } -
as연산자는 참조 형식에 대해서만 사용이 가능하므로 값 형식의 객체는 기존의 형식 변환 연산자를 사용해야 함
-
예제 프로그램
using System;

namespace TypeCasting
{
   class Mammal
   {
       public void Nurse()
       {
           Console.WriteLine("Nurse()");
       }
   }

   class Dog : Mammal
   {
       public void Bark()
       {
           Console.WriteLine("Bark()");
       }
   }

   class Cat : Mammal
   {
       public void Meow()
       {
           Console.WriteLine("Meow()");
       }
   }

   class MainApp
   {
       static void Main(string[] args)
       {
           Mammal mammal = new Dog();
           Dog    dog;

           if (mammal is Dog)
           {
               dog = (Dog)mammal;
               dog.Bark();
           }

           Mammal mammal2 = new Cat();

           Cat cat = mammal2 as Cat;
           if (cat != null)
               cat.Meow();

           Cat cat2 = mammal as Cat;
           if (cat2 != null)
               cat2.Meow();
           else
               Console.WriteLine("cat2 is not a Cat");
       }
   }
}
7.10 오버라이딩 & 다형성
-
다형성(Polymorphism) : 객체가 여러 형태를 가질 수 있음을 의미
-
오버라이딩(Overriding)
-
기반 클래스에서 선언된 메소드를 자식 클래스에서 재정의하는 것
-
기반 클래스에서 오버라이딩할 메소드를 미리 virtual로 한정 (미리 준비)
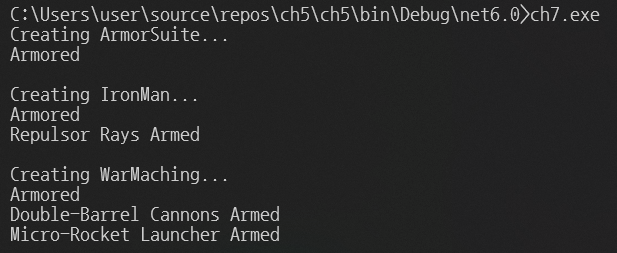
// 기반 클래스 // class ArmorSuite { public virtual void Initialize() { Console.WriteLine("Armored"); } } -
파생 클래스는 virtual 메소드를 override 한정자를 이용하여 재선언(재정의)
// 파생 클래스 //
class IronMan : ArmorSuite // ArmorSuite 상속
{
    public override void Initialize()
    {
        base.Initialize();  // ArmorSuite로부터 장갑 물려받기
        console.WriteLine("Repulsor Rays Armed");
    }
}

class WarMachine : ArmorSuite // ArmorSuite 상속
{
    public override void Initialize()
    {
        base.Initialize();  // ArmorSuite로부터 장갑 물려받기
        console.WriteLine("Double-Barrel Cannons Armed");
        console.WriteLine("Micro-Rocket Launcher Armed");
    }
}
-
-
private으로 선언한 메소드는 오버라이딩할 수 없다. -
예제 프로그램
using System;

namespace Overriding
{
   class ArmorSuite
   {
       public virtual void Initialize()
       {
           Console.WriteLine("Armored");
       }
   }

   class IronMan : ArmorSuite
   {
       public override void Initialize()
       {
           base.Initialize();
           Console.WriteLine("Repulsor Rays Armed");
       }
   }

   class WarMachine : ArmorSuite
   {
       public override void Initialize()
       {
           base.Initialize();
           Console.WriteLine("Double-Barrel Cannons Armed");
           Console.WriteLine("Micro-Rocket Launcher Armed");
       }
   }

   class MainApp
   {
       static void Main(string[] args)
       {
           Console.WriteLine("Creating ArmorSuite...");
           ArmorSuite armorsuite = new ArmorSuite();
           armorsuite.Initialize();

           Console.WriteLine("\nCreating IronMan...");
           ArmorSuite ironman = new IronMan();
           ironman.Initialize();

           Console.WriteLine("\nCreating WarMaching...");
           ArmorSuite warmachine = new WarMachine();
           warmachine.Initialize();
       }
   }
}
7.11 메소드 숨기기(Method Hiding)
-
CLR에게 기반 클래스에서 구현된 버전의 메소드를 감추고 파생 클래스에서 구현된 버전만 보여주는 것
-
파생 클래스 버전의 메소드를
new한정자로 수식함으로써 숨길 수 있다. (생성자 호출 시 사용하는 new 연산자와는 완전 다르다) -
예제 프로그램
using System;

namespace MethodHiding
{
   class Base
   {
       public void MyMethod()
       {
           Console.WriteLine("Base.MyMethod()");
       }
   }

   class Derived : Base
   {
       public new void MyMethod()
       {
       	   // Base.MyMethod()를 감추고 Derived 클래스에서 구현된 MyMethod()만 노출
           Console.WriteLine("Derived.MyMethod()");
       }
   }

   class MainApp
   {
       static void Main(string[] args)
       {
           Base baseObj = new Base();
           baseObj.MyMethod();

           Derived derivedObj = new Derived();
           derivedObj.MyMethod();

           Base baseOrDerived = new Derived();
           baseOrDerived.MyMethod();
       }
   }
}
7.12 오버라이딩 봉인
-
클래스를 (상속이 안 되도록) 봉인하는 것처럼 메소드도 (오버라이딩되지 않도록)
sealed키워드를 이용해 봉인할 수 있다. -
단
virtual로 선언된 가상 메소드를 오버라이딩한 버전의 메소드만 가능하다. -
예제 프로그램
using System;

class  Base
{
   public virtual void SealMe()  // virtual 선언
   {
   }
 }

class Derived : Base
{
   public sealed override void SealMe() // 이 메서드만 봉인 가능
   {
   }
 }

class WantToOverride : Derived
{
   public override void SealMe()  // 오버라이딩 불가
   {
   }
 }

class MainApp
{
   static void Main(string[] args)
   {
   }
 }
7.13 읽기 전용 필드
-
읽기만 가능한 필드
-
클래스나 구조체의 멤버로만 존재할 수 있으며 생성자 안에서 한 번 값을 지정하면, 그 후로는 값을 변경할 수 없는 것 (읽기 전용 필드는 생성자 안에서만 초기화가 가능)
-
readonly키워드를 이용해 선언 -
예제 프로그램
using System;

namespace ReadonlyFields
{
   class Configuration
   {
   	// redonly를 이용해 읽기 전용 필드 선언
       readonly int min;
       readonly int max;

       public Configuration(int v1, int v2)
       {
       	// 읽기 전용 필드는 생성자 안에서만 초기화 가능
           min = v1;
           min = v2;
       }

       public void ChangeMax(int newMax)
       {
       	// 생성자가 아닌 곳에서 값을 수정하려하면 컴파일 에러가 발생한다.
           max = newMax;
       }
   }

   class MainApp
   {
       static void Main(string[] args)
       {
           Configuration c = new Configuration(100, 10);
       }
   }
}
7.14 중첩 클래스(Nested Class)
- 클래스 안에 클래스를 선언하는 것
private멤버에도 접근할 수 있음class OuterClass { private int OuterMember; class NestedClass; { public void DoSomething() { OuterClass outer = new OuterClass(); outer.OuterMember = 10; // private 멤버에 접근하여 값을 할당하거나 읽을 수 있다. } } }- 사용 목적
- 클래스 외부에 공개하고 싶지 않은 형식을 만들고자
- 현재 클래스의 일부분처럼 표현할 수 있는 클래스를 만들고자
- 예제 프로그램
using System;
using System.Collections.Generic;

namespace NestedClass
{
    class Configuration
    {
        List<ItemValue> listConfig = new List<ItemValue>();

        public void SetConfig(string item, string value)
        {
            ItemValue iv = new ItemValue();
            iv.SetValue(this, item, value);
        }

        public string GetConfig(string item)
        {
            foreach (ItemValue iv in listConfig)
            {
                if (iv.GetItem() == item)
                    return iv.GetValue();
            }

            return "";
        }

        private class ItemValue // 중첩 클래스, private으로 선언하여 Configuration 클래스 밖에서는 보이지 않는다.
        {
            private string item;
            private string value;

			// 중첩 클래스는 상위 클래스의 멤버에 자유롭게 접근할 수 있음
            public void SetValue(Configuration config, string item, string value)
            {
                this.item  = item;
                this.value = value;

                bool found = false;
                for (int i = 0; i < config.listConfig.Count; i++)
                {
                    if (config.listConfig[i].item == item)
                    {
                        config.listConfig[i] = this;
						found = true;
                        break;
                    }
                }

                if (found == false)
                    config.listConfig.Add(this);
            }

            public string GetItem()
            { return item; }
            public string GetValue()
            {   return value;   }
        }
    }

    class MainApp
    {
        static void Main(string[] args)
        {
            Configuration config = new Configuration();
            config.SetConfig("Version", "V 5.0");
            config.SetConfig("Size", "655,324 KB");

            Console.WriteLine(config.GetConfig("Version"));
            Console.WriteLine(config.GetConfig("Size"));

            config.SetConfig("Version", "V 5.0.1");
            Console.WriteLine(config.GetConfig("Version"));
        }
    }
}
7.15 분할 클래스(Partial Class)
-
여러 번에 나눠서 구현하는 클래스
- 클래스의 구현이 길어질 경우 여러 파일에 나눠서 구현할 수 있게함으로써 소스 코드 관리의 편의를 제공하는 데 그 의미가 있음
-
선언 :
partial + class + 클래스이름// 클래스 이름은 동일해야 한다. partial class MyClass { public void Method1(){} public void Method2(){} } partial class MyClass { public void Method3(){} public void Method4(){} } // ... MyClass obj = new MyClass(); // C# 컴파일러는 위와 같이 분할 구현된 코드를 하나의 MyClass로 묶어 컴파일한다. // 외와 같이 선언된 MyClass를 사용할 때는 그냥 하나의 클래스인 것처럼 사용하면 됨 obj.Method1(); obj.Method2(); obj.Method3(); obj.Method4(); -
예제 프로그램
using System;

namespace PartialClass
{
   partial class MyClass
   {
       public void Method1()
       {
           Console.WriteLine("Method1");
       }

       public void Method2()
       {
           Console.WriteLine("Method2");
       }
   }

   partial class MyClass
   {
       public void Method3()
       {
           Console.WriteLine("Method3");
       }

       public void Method4()
       {
           Console.WriteLine("Method4");
       }
   }

   class MainApp
   {
       static void Main(string[] args)
       {
           MyClass obj = new MyClass();
           obj.Method1();
           obj.Method2();
           obj.Method3();
           obj.Method4();
       }
   }
}
7.16 확장 메소드 (Extension Method)
-
기존 클래스의 기능을 확장하는 기법으로 상속과는 다르다.
-
선언
- 메소드 선언시,
static한정자로 수식 - 메소드 첫 번째 매개변수 :
this + 확장하고자 하는 클래스/형식의 인스턴스
namespace 네임스페이스이름 { public static class 클래스이름 { public static 반환_형식 메소드이름( this 대상형식 식별자, 매개변수_목록 ) { // } } } - 메소드 선언시,
-
예제 프로그램
using System;
using MyExtension;  // 확장 메소드 사용시, 확장메소드를 담는 클래스의 네임스페이스 사용

// 확장 메소드 선언
namespace MyExtension
{
   public static class IntegerExtension
   {
       public static int Square(this int myInt)
       {
           return myInt * myInt;
       }

       public static int Power(this int myInt, int exponent)
       {
           int result = myInt;
           for (int i = 1; i < exponent; i++)
               result = result * myInt;

           return result;
       }
   }
}

// 확장 메소드 사용
namespace ExtensionMethod
{
   class MainApp
   {
       static void Main(string[] args)
       {
           Console.WriteLine($"3^2 : {3.Square()}"); // 3 x 3 = 3^2
           // Power가 원래 int형식의 메소드였던 것처럼 사용할 수 있다.
           Console.WriteLine($"3^4 : {3.Power(4)}"); // 3 x 3^3 = 3^4
           Console.WriteLine($"2^10 : {2.Power(10)}"); // 2 x 2^9 = 2^10
       }
   }
}
비타민 퀴즈
string 클래스에 문자열 매개변수를 입력받아 기존의 문자열 뒤에 붙여 반환하는 Append() 확장 메소드를 추가해보세요. 이 확장 메소드의 사용 예는 다음과 같습니다.string hello = "Hello"; Console.WriteLine(hello.Append(", World!")); // "Hello, World!" 출력// Answer code using System; using MyExtension; namespace MyExtension { public static class StringExtension { public static string String(this string myString) { return myString; } public static string Append(this string myString, string extension) { string first = myString; string result = first + extension; return result; } } } namespace ExtensionMethod { class MainApp { static void Main(string[] args) { string hello = "Hello"; Console.WriteLine($"string hello : {hello}"); Console.WriteLine($"Append : {hello.Append(", World!")}"); } } }

7.17 구조체(Structure)
- C#의 복합 데이터 형식
- 선언
struct 구조체이름 { // 필드 public int MyField1 public int MyField2 // 메소드 public void MyMethod() { // ... } } - 클래스가 실세계의 객체를 추상화하려는 데 그 존재의 이유가 있는 반면 구조체는 데이터를 담기 위한 자료구조로 사용되어 은닉성을 비롯한 객체지향의 원칙을 강하게 적용하지 않아 필드를
public으로 선언해서 사용하는 경우가 많다. - 클래스 vs 구조체
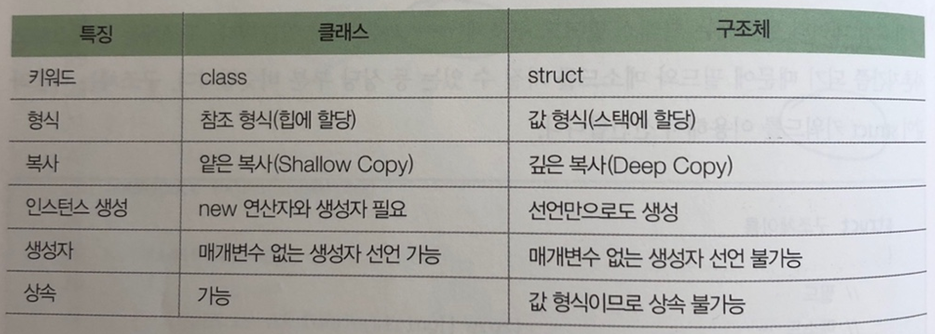
- 구조체는 값 형식으로 그 인스턴스가 스택(자동메모리)에 할당된다. 인스턴스는 선언 블록이 끝나면 즉시 메모리에서 제거되어 가비지 콜렉터를 덜 귀찮게 한다는 점에서 클래스에 비해 성능의 이점을 가진다.
- 값 형식이므로 할당 연산자
=를 통해 모든 필드가 그대로 복사된다. - 생성자를 호출할 때가 아니면 굳이 new 연산자를 사용하지 않아도 인스턴스를 만들 수 있다.
using System;

namespace Structure
{
    struct Point3D
    {
        public int X;
        public int Y;
        public int Z;

        public Point3D(int X, int Y, int Z)
        {
            this.X = X;
            this.Y = Y;
            this.Z = Z;
        }

        public override string ToString()  // System.Object 형식의 ToString() 메소드를 오버라이딩
        {
            return string.Format($"{X}, {Y}, {Z}");
        }
    }

    class MainApp
    {
        static void Main(string[] args)
        {
            Point3D p3d1; // 선언만으로 인스턴스 생성 (new 연산자 필요 X)
            p3d1.X = 10;
            p3d1.Y = 20;
            p3d1.Z = 40;

            Console.WriteLine(p3d1.ToString());

            Point3D p3d2 = new Point3D(100, 200, 300); // 생성자를 이용한 인스턴스 생성 가능 (단, 매개변수 필수)
            Point3D p3d3 = p3d2;  // 구조체의 인스턴스를 다른 인스턴스에 할당하면 깊은 복사
            p3d3.Z = 400;

            Console.WriteLine(p3d2.ToString());
            Console.WriteLine(p3d3.ToString());
        }
    }
}
-
구조체는
readonly를 통해 모든 필드와 프로퍼티의 값을 수정할 수 없는, 변경불가능 구조체로 선언할 수 있다. (클래스는 불가능)-
선언
readonly struct 구조체이름 { } -
readonly로 선언된 구조체 안에서readonly로 선언되지 않은 필드와 프로퍼티를 만들거나readonly로 선언된 필드를 수정하려하면 컴파일 에러가 발생한다.// readonly로 선언되지 않은 필드와 프로퍼티 readonly struct ImmutableStruct { public readonly int ImmutableField; // OK public int MutableField; // 컴파일 에러! } // readonly로 선언된 필드 수정 시도 readonly struct ImmutableStruct { public readonly int ImmutableField; // OK public ImmutableStruct(int initValue) { immutableField = initValue; // 생성자에서만 초기화 가능 } } // ... class SomeClass { public void SomeMethod() { ImmutableStruct is = new Immutable(123); is.immutableField = 456; // 컴파일 에러! } }
-
-
readonly로 선언한 메소드도 구조체에서만 선언할 수 있다.using System; namespace ReadonlyMothod { struct ACSetting { public double currentInCelsius; // 현재 온도(°C) public double target; // 희망 온도 // readonly로 한정한 메소드에서 객체의 필드를 바꾸려 들면 컴파일 에러가 발생함 public readonly double GetFahrenheit() { target = currentInCelsius * 1.8 + 32; // 화씨(°F) 계산 결과를 target에 저장 return target; // target 반환 } } class MainApp { static void Main(string[] args) { ACSetting acs; acs.currentInCelsius = 25; acs.target = 25; Console.WriteLine($"{acs.GetFahrenheit()}"); Console.WriteLine($"{acs.target}"); } } }
7.18 튜플(Tuple)
- 형식 이름이 없어 즉석에서 사용할 복합 데이터 형식을 선언할 때 적합
- 튜플은 구조체로 값 형식이다.
- 선언 :
var tuple = (Item1, Item2)- 컴파일러가 튜플의 모양을 보고 직접 형식을 결정하도록
var를 이용하여 선언 - 괄호 사이에 두 개 이상의 필드를 지정하면 C# 컴파일러는
Item1,Item2...ItemN라는 필드에 값을 담는다. (이는 튜플이 System.ValueTuple 구조체를 기반으로 만들어지기 때문이다.)
- 컴파일러가 튜플의 모양을 보고 직접 형식을 결정하도록
- 명명되지 않은 튜플(Unnamed Tuple) : 필드의 이름을 지정하지 않는 튜플
- 명명된 튜플(Named Tuple) :
필드명:의 꼴로 필드의 이름을 지정한 튜플 - 튜플은 분해가 가능한데 이때 특정 필드를 무시하고 싶다면
_를 이용하면 된다. 튜플 분해는 여러 변수를 단번에 생성하고 초기화할 수 있게 해준다. - 명명되지 않은 튜플과 명명된 튜플끼리는 필드의 수와 형식이 같으면 할당이 가능하다.
using System;

namespace Tuple
{
    class MainApp
    {
        static void Main(string[] args)
        {
            // 명명되지 않은 튜플
            var a = ("슈퍼맨", 9999);
            Console.WriteLine($"{a.Item1}, {a.Item2}");

            // 명명된 튜플 | 필드명 지정
            var b = (Name: "박상현", Age: 17);
            Console.WriteLine($"{b.Name}, {b.Age}");

            // 분해
            var (name, age) = b; // (var name, var age) = b;
            Console.WriteLine($"{name}, {age}");

            // 분해2 | 여러 변수 생성 및 초기화
            var (name2, age2) = ("박문수", 34);
            Console.WriteLine($"{name2}, {age2}");

            // 할당 | 명명된 튜플 = 명명되지 않은 튜플
            b = a;
            Console.WriteLine($"{b.Name}, {b.Age}");

        }
    }
}-
패턴 매칭(Positional Pattern Matching)
-
튜플의 분해자(Deconstructor)를 구현하고 있는 객체를 분해한 결과를 switch문이나 switch식의 분기 조건에 활용할 수 있다.
-
식별자나 데이터 형식이 아닌 분해된 요소의 위치에 따라 값이 일치하는지 판단
-
예제 프로그램
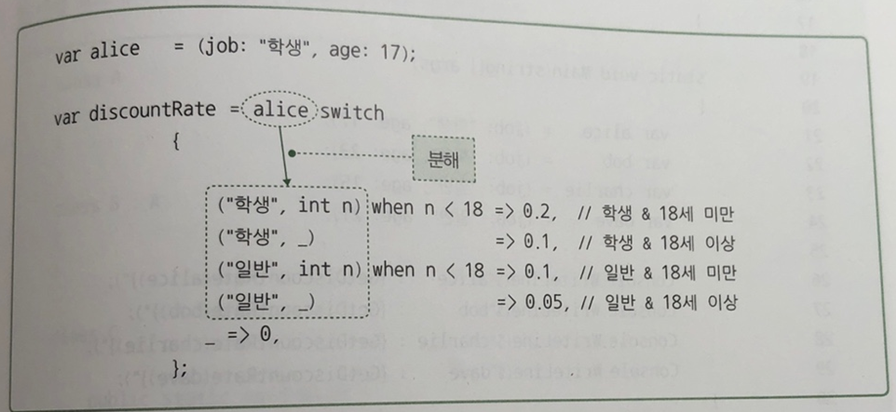
using System;

namespace PosisionalPattern
{
 class MainApp
 {
     private static double GetDiscountRate(object client)
     {
         return client switch  // 패턴 매칭
         {
             ("학생", int n) when n < 18 => 0.2,  // 학생 & 18세 미만
             ("학생", _) => 0.1,  // 학생 & 18세 이상
             ("일반", int n) when n < 18 => 0.1,  // 일반 & 18세 미만
             ("일반", _) => 0.05, // 일반 & 18세 이상
             _ => 0,
         };
     }

     static void Main(string[] args)
     {
         var alice   = (job: "학생", age: 17);
         var bob     = (job: "학생", age: 23);
         var charlie = (job: "일반", age: 15);
         var dave    = (job: "일반", age: 21);

         Console.WriteLine($"alice   : {GetDiscountRate(alice)}");
         Console.WriteLine($"bob     : {GetDiscountRate(bob)}");
         Console.WriteLine($"charlie : {GetDiscountRate(charlie)}");
         Console.WriteLine($"dave    : {GetDiscountRate(dave)}");
     }
 }
}
-

연습 문제
-
클래스와 객체, 인스턴스는 서로 어떤 점이 다른가요?
: 컴퓨터는 세상의 모든 것을 코드 안에 표현하는데 이때 코드로 표현 된 세상의 모든 사물을 객체라고 한다. 이 객체는 클래스라는 청사진/설계도에 의해 만들어지며 이러한 청사진을 기반으로 실제 데이터를 담을 수 있는 실제 객체가 만들어진다고해서 이러한 실체를 인스턴스(Instance)라고 부른다.
클래스가 자동차 설계도라면 객체와 인스턴스는 생산된 실제 자동차인 셈이다. -
다음 코드에서 오류를 찾고, 오류의 원인을 설명하세요.
class A
{
}

class B : A
{
}

class C
{
   public static void Main()
   {
       A a = new A();
       B b = new B();
       A c = new B();
       B d = new A();  // error
   }
}
C#에서는 암시적으로 자식 클래스의 형식을 통해 부모 클래스를 개체화하는 것이 불가능하다. 이를 다운캐스팅이라고 부른다.
B d = new A();에서 A는 B의 정보를 모른다.
-
this 키워드와 base 키워드에 대해 설명하세요.
- this는 객체 자기 자신을 지칭하는 키워드다. 객체는 내부에서 자신의 필드나 메소드에 접근할 때 this 키워드를 사용한다.
- base는 자신이 상속 받은 기반 클래스(부모 클래스)를 가리키는 키워드다.
-
구조체에 대한 다음 설명 중 틀린 것을 모두 찾으세요. → ②, ③
① struct 키워드를 이용하여 선언한다.
② 복사할 때 얕은 복사가 이루어진다. → 깊은 복사
③ 참조 형식이다. → 값 형식으로 스택에 메모리가 쌓인다
④ 메소드를 가질 수 있다. -
다음 코드를 컴파일 및 실행이 가능하도록 수정하세요.
using System; namespace ReadonlyMothod { struct ACSetting { public double currentInCelsius; // 현재 온도(°C) public double target; // 희망 온도 public readonly double GetFahrenheit() { target = currentInCelsius * 1.8 + 32; // error : 읽기 전용이므로 값이 바뀌지 않게 아래 코드를 바꾸면 된다. return target; // → return currentInCelsius * 1.8 + 32; } } class MainApp { static void Main(string[] args) { ACSetting acs; acs.currentInCelsius = 25; acs.target = 25; Console.WriteLine($"{acs.GetFahrenheit()}"); Console.WriteLine($"{acs.target}"); } } } -
다형성은 무엇이며, 오버라이딩과 무슨 관계가 있는지 설명하세요.
: 다형성은 객체가 여러 형태를 가질 수 있음을 의미하는 것으로 본래 하위 형식 다형성의 준말이다. 자신으로부터 상속받아 만들어진 파생 클래스를 통해 다형성을 실현한다는 것이다. 오버라이딩은 상속받은 자식 클래스에서 부모 클래스의 메소드를 재정의 하는 것으로 다형성을 실현하는 방법이라 할 수 있다.
-
다음 코드에서 switch 식을 제거하고 switch 문으로 동일한 기능을 작성하세요.
private static double GetDiscountRate(object client)
{
   switch (client)
   {

   	case("학생", int n) when n <18:
           return 0.2;
       case("학생", _):
           return 0.1;
       case ("일반", int n) when n < 18:
           return 0.1;
       case ("일반", _):
           return 0.05;
       default:
           return 0;

   };
}