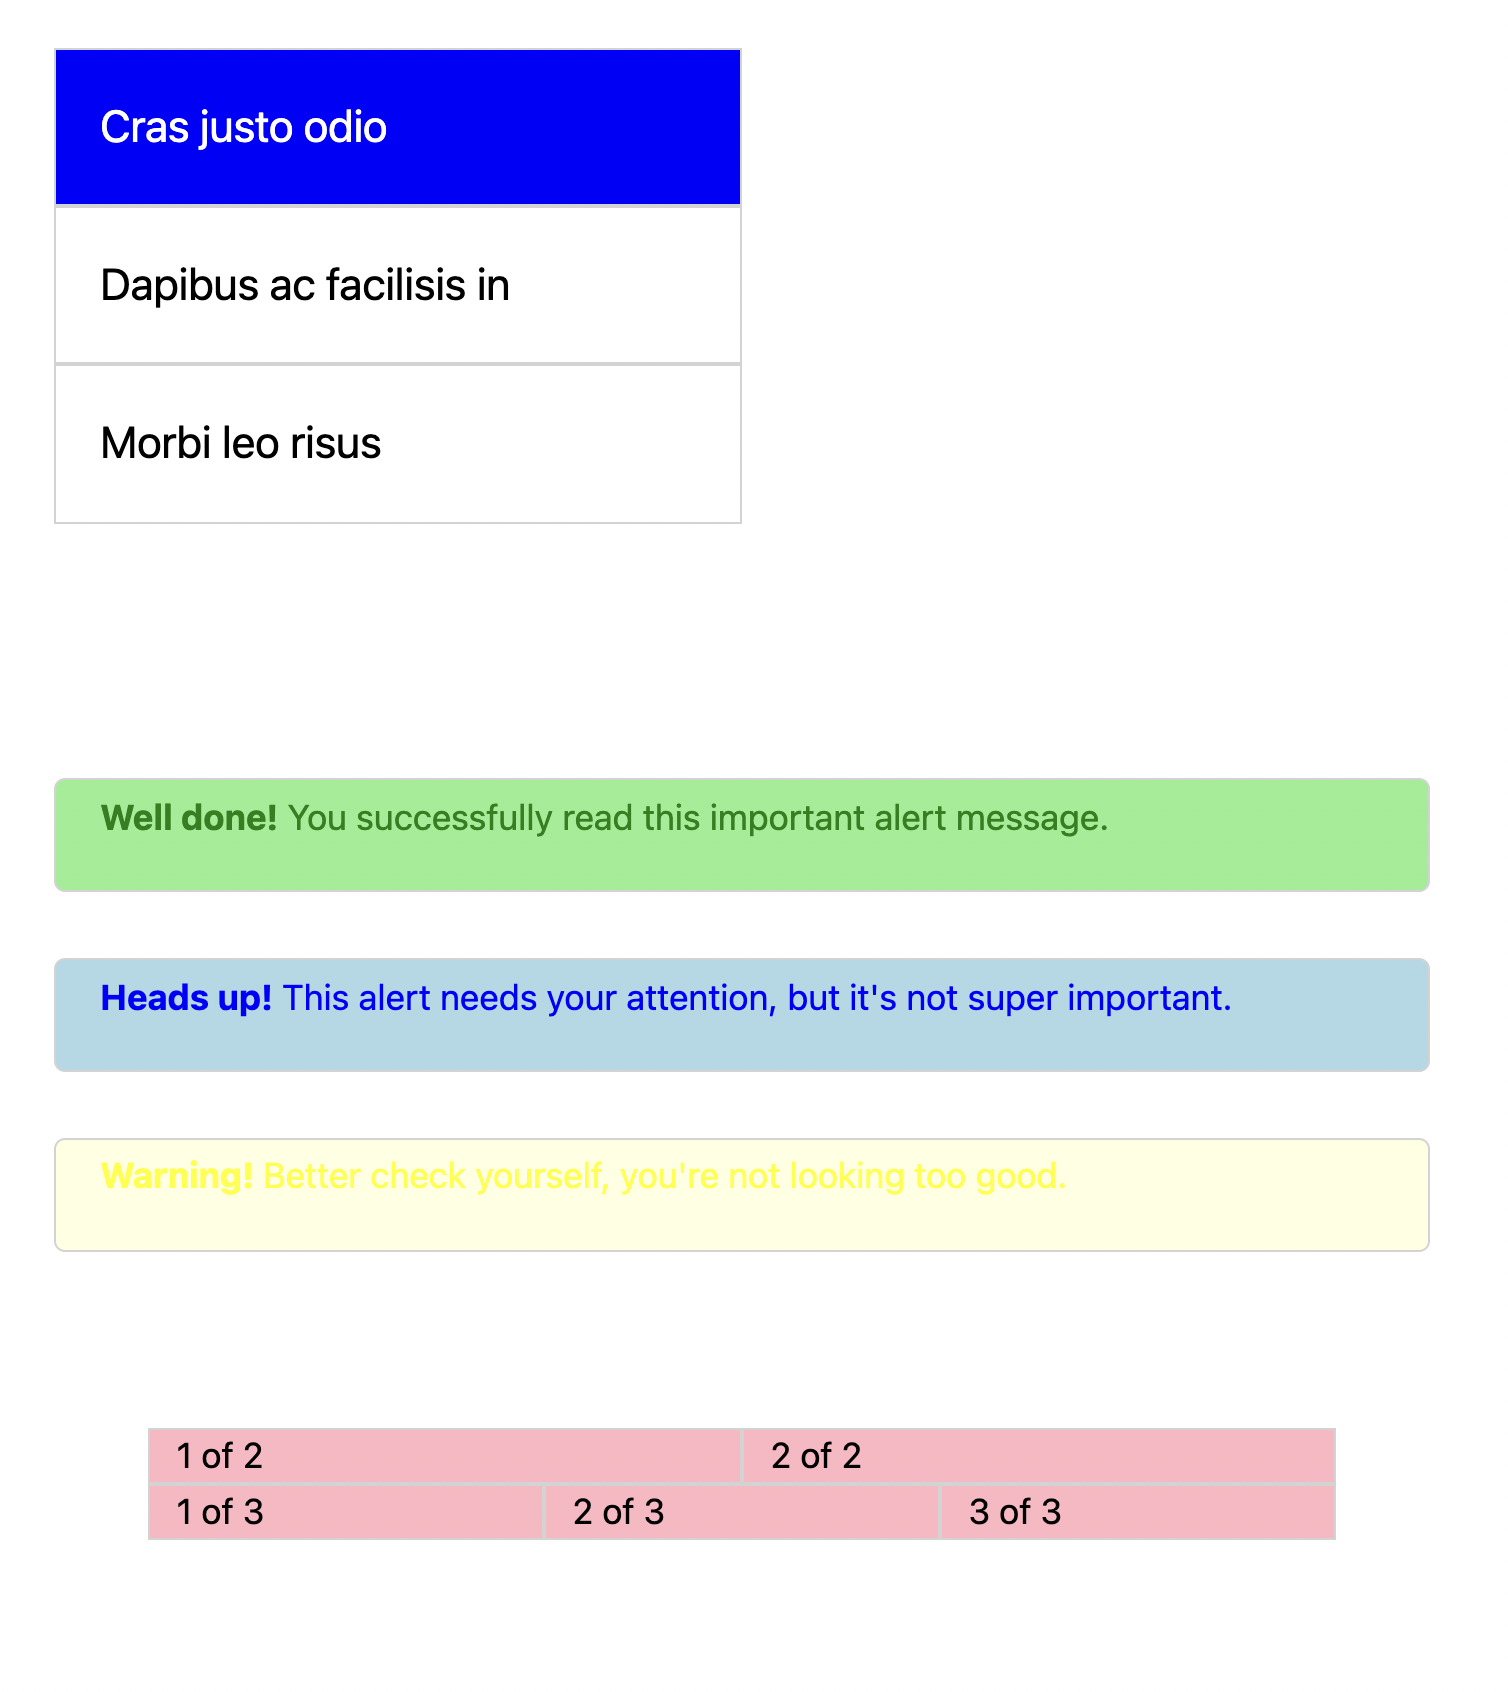
약간씩 다른 박스들 구현하기
기존 CSS문법 토대로 Sass, Bootstrap문법을 적재적소에 활용하려고 노력했다.
셀렉터를 사용할 때도 최대한 간격하게 서로 중복이 없게 작성하려고 했다.
자주 사용되는 속성들은 미리 변수에 할당해서 최대한 재사용이 용이하게 작성했다.
코드
index.html
<!DOCTYPE html>
<html lang="en">
<head>
  <meta charset="UTF-8">
  <meta http-equiv="X-UA-Compatible" content="IE=edge">
  <meta name="viewport" content="width=device-width, initial-scale=1.0">
  <title>Sass intro</title>
  <link href="https://cdn.jsdelivr.net/npm/bootstrap@5.1.3/dist/css/bootstrap.min.css" rel="stylesheet" integrity="sha384-1BmE4kWBq78iYhFldvKuhfTAU6auU8tT94WrHftjDbrCEXSU1oBoqyl2QvZ6jIW3" crossorigin="anonymous">
  <link rel="stylesheet" href="./style.css">
</head>
<body>

<!-- 1. 리스트 만들기   -->

  <ul class="layout1">
    <li class="row1 active">Cras justo odio</li>
    <li class="row2">Dapibus ac facilisis in</li>
    <li class="row3">Morbi leo risus</li>
  </ul>


<!-- alert 박스 만들기 -->

  <div class="layout2">
    <div class="alert1"><p><b>Well done!</b> You successfully read this important alert message.</p></div>
    <div class="alert2"><p><b>Heads up!</b> This alert needs your attention, but it's not super important.</p></div>
    <div class="alert3"><p><b>Warning!</b> Better check yourself, you're not looking too good.</p></div>
  </div>


<!-- column layout -->
  <div class="container">
    <div class="row one">
      <div class="col-6">1 of 2</div>
      <div class="col-6">2 of 2</div>
    </div>

    <div class="row two">
      <div class="col-4">1 of 3</div>
      <div class="col-4">2 of 3</div>
      <div class="col-4">3 of 3</div>
    </div>
  </div>

  <script src="https://cdn.jsdelivr.net/npm/bootstrap@5.1.3/dist/js/bootstrap.bundle.min.js" integrity="sha384-ka7Sk0Gln4gmtz2MlQnikT1wXgYsOg+OMhuP+IlRH9sENBO0LRn5q+8nbTov4+1p" crossorigin="anonymous"></script>
</body>
</html>
style.scss
@use './color';

$blue-color: blue;
$white-color: white;
$black-color: black;
$green-color: green;
$yellow-color: yellow;
$light-green: lightgreen;
$light-blue: lightblue;
$light-yellow: lightyellow;
$light-pink: lightpink;
$font-medium: 20px;
$border-style1: 1px solid lightgray;


.layout1 {
  color: $black-color;
  padding: 50px;
  font-size: $font-medium;

  li {
    width: 50%;
    padding: 20px;
    list-style: none;
    border: $border-style1;
  }

  li.active {
    color: $white-color;
    background-color: $blue-color;
  }
}


.layout2 {
  padding: 50px;

  div {
    padding: 5px 20px;
    border: $border-style1;
    border-radius: 5px;
    margin-bottom: 30px;
  }

  .alert1 {
    @include color.color($light-green, $green-color);
  }

  .alert2 {
    @include color.color($light-blue, $blue-color);
  }

  .alert3 {
    @include color.color($light-yellow, $yellow-color);
  }
}

.container {

  .one {
    @include color.color($light-pink, $black-color);
  }

  .two {
    @include color.color($light-pink, $black-color);
  }

  .col-6 {
    @include color.border($border-style1);
  }

  .col-4 {
    @include color.border($border-style1);
  }
}
style.css
.layout1 {
  color: black;
  padding: 50px;
  font-size: 20px;
}
.layout1 li {
  width: 50%;
  padding: 20px;
  list-style: none;
  border: 1px solid lightgray;
}
.layout1 li.active {
  color: white;
  background-color: blue;
}

.layout2 {
  padding: 50px;
}
.layout2 div {
  padding: 5px 20px;
  border: 1px solid lightgray;
  border-radius: 5px;
  margin-bottom: 30px;
}
.layout2 .alert1 {
  background-color: lightgreen;
  color: green;
}
.layout2 .alert2 {
  background-color: lightblue;
  color: blue;
}
.layout2 .alert3 {
  background-color: lightyellow;
  color: yellow;
}

.container .one {
  background-color: lightpink;
  color: black;
}
.container .two {
  background-color: lightpink;
  color: black;
}
.container .col-6 {
  border: 1px solid lightgray;
}
.container .col-4 {
  border: 1px solid lightgray;
}/*# sourceMappingURL=style.css.map */
_color.scss
@mixin color($back, $txtcolor) {
  background-color: $back;
  color: $txtcolor;
}

@mixin border($bd) {
  border: $bd;
}
웹 프론트엔드 개발자