
들어가며
이전 글에서는 외부 Google 신원과 내부 계정, Provider Token과 우리 JWT, OAuth state용
session과 STATELESS API를 분리해서 살펴보았습니다.
이번 글에서는 Google Auth Platform에서 Web OAuth Client를 만든 뒤,
05-answer브랜치를 실행해 Google 로그인 → 내부 계정 생성 → 우리 JWT 발급 →
/auth/me확인 → 선택적 LOCAL 비밀번호 등록까지 직접 확인합니다.
이번 글의 코드는 아래 브랜치를 기준으로 합니다.
https://github.com/stdiodh/spring-boot-db-access-lab/tree/05-answer이번 실습에서 확인할 계약
1. Google Client Secret을 소스에 작성하지 않는다.
2. Google profile의 sub, email, email_verified를 검증한다.
3. 내부 사용자는 provider + providerId로 먼저 찾는다.
4. 같은 email의 LOCAL 계정을 자동 연결하지 않는다.
5. Google 로그인 뒤 우리 API용 JWT를 별도로 발급한다.
6. JWT는 query가 아니라 fragment로 전달한 뒤 URL에서 제거한다.
7. callback metadata가 아니라 /auth/me 응답으로 내부 신원을 확정한다.
8. Google identity를 유지한 채 LOCAL 비밀번호를 최초 한 번만 추가한다.
9. OAuth state용 session을 보호 API 인증으로 사용하지 않는다.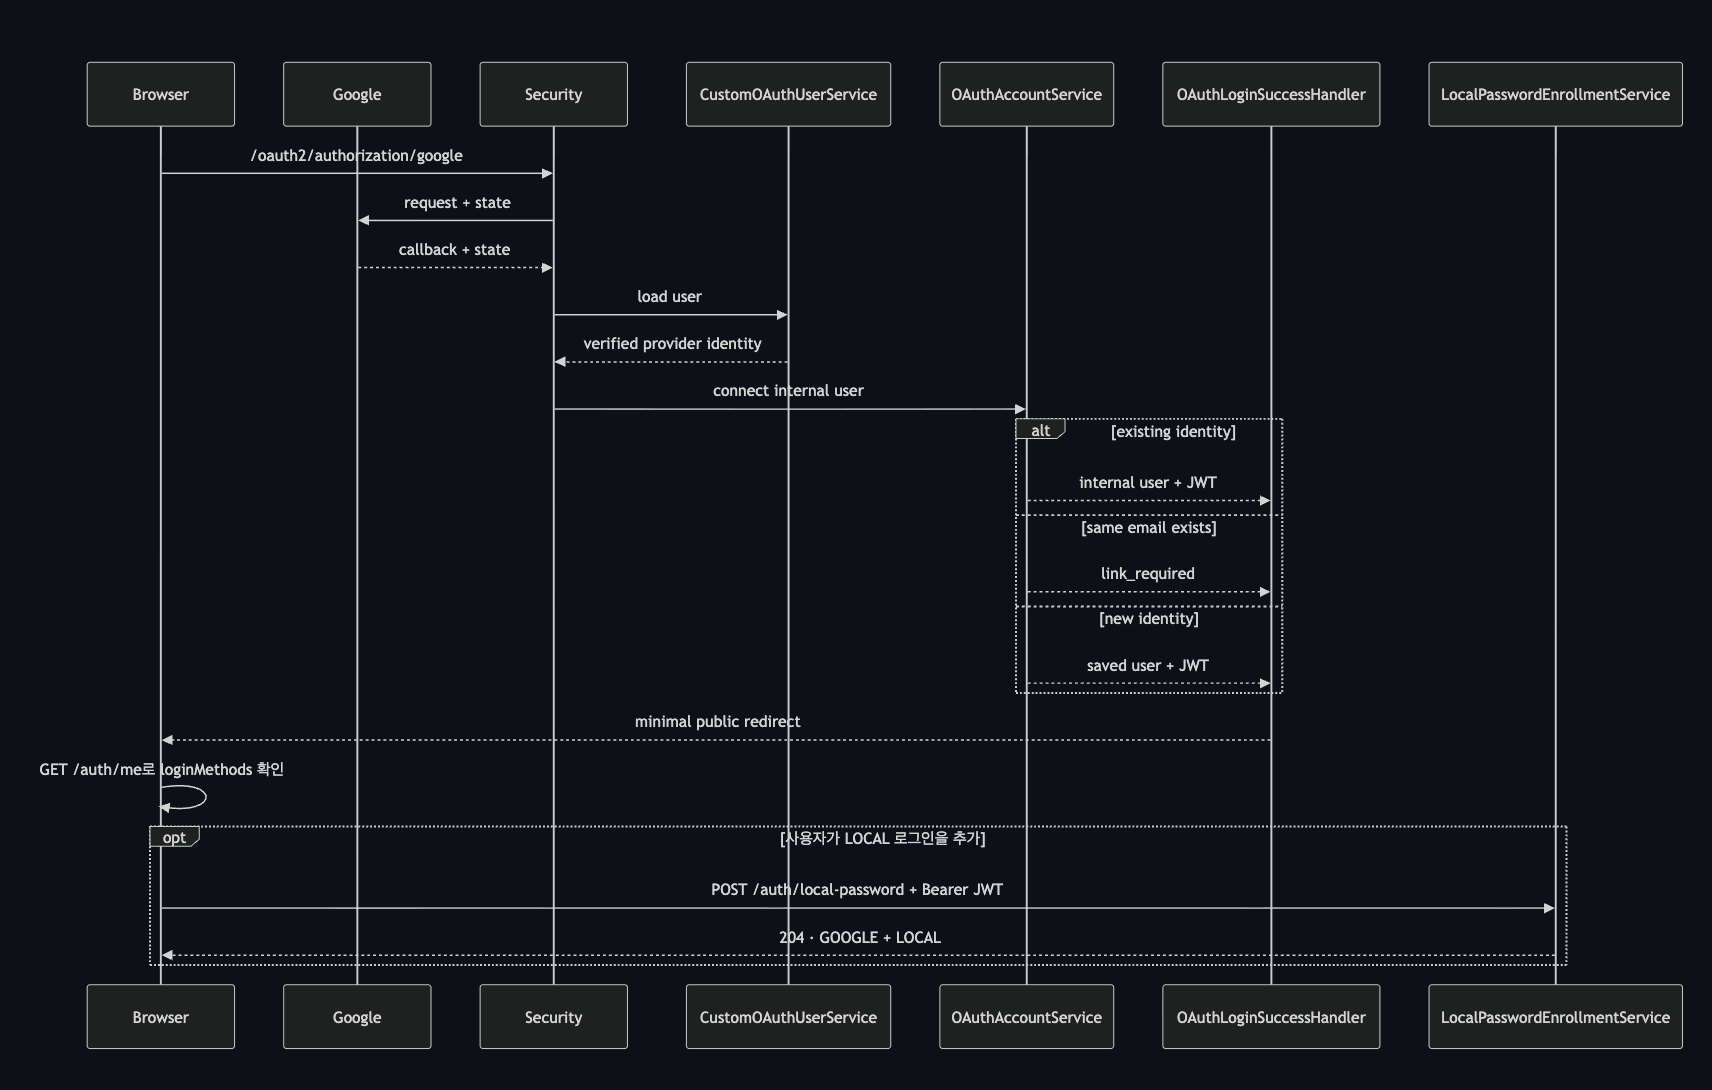
전체 흐름은 다음과 같습니다.
Google로 계속하기
  ↓ /oauth2/authorization/google
Google 로그인·동의
  ↓ /login/oauth2/code/google
CustomOAuthUserService
  ↓ profile 검증
OAuthAccountService
  ↓ 내부 사용자 조회·생성 + 우리 JWT
OAuthLoginSuccessHandler
  ↓ oauth.html?공개상태#access_token=JWT
oauth.html
  ↓ URL 정리
  ↓ GET /auth/me
GOOGLE loginMethods 확인
  ↓ 선택 사항
POST /auth/local-password
  ↓ 204
GOOGLE + LOCAL
실습 환경 준비
✍ 0. 로컬 MySQL 데이터베이스 준비
이 글은 MySQL이 로컬 PC에 이미 설치되어 실행 중인 환경을 전제로 합니다.
먼저 로컬 MySQL에 접속합니다.
mysql -h 127.0.0.1 -P 3306 -u root -p실습용 데이터베이스를 만듭니다.
CREATE DATABASE IF NOT EXISTS aandi_lab
    CHARACTER SET utf8mb4
    COLLATE utf8mb4_unicode_ci;

SHOW DATABASES LIKE 'aandi_lab';
저장소의 application.yaml fallback은 Compose 환경에 맞춰 localhost:3307을 사용합니다.
이번 실습은 로컬 MySQL 기본 포트 3306을 사용하므로 .env에서 반드시 덮어씁니다.
DB_URL=jdbc:mysql://localhost:3306/aandi_lab?useSSL=false&allowPublicKeyRetrieval=true&serverTimezone=Asia/Seoul&characterEncoding=UTF-8
DB_USERNAME=root
DB_PASSWORD=<로컬 MySQL 비밀번호>
✍ 1. 05-answer 브랜치와 .env 준비
git clone https://github.com/stdiodh/spring-boot-db-access-lab.git
cd spring-boot-db-access-lab
git switch 05-answer

cp .env.example .env
OAuth 실습에 필요한 값은 다음과 같습니다.
# Local MySQL
DB_URL=jdbc:mysql://localhost:3306/aandi_lab?useSSL=false&allowPublicKeyRetrieval=true&serverTimezone=Asia/Seoul&characterEncoding=UTF-8
DB_USERNAME=root
DB_PASSWORD=<로컬 MySQL 비밀번호>

# JWT
JWT_SECRET=<32바이트 이상 임의의 로컬 개발용 Secret>
JWT_EXPIRATION_MS=3600000

# Google OAuth2
GOOGLE_CLIENT_ID=<Google OAuth Client ID>
GOOGLE_CLIENT_SECRET=<Google OAuth Client Secret>

# OAuth 성공·실패 처리 뒤 보여줄 우리 화면
APP_OAUTH_RESULT_URL=http://localhost:8080/auth-practice/oauth.html.env는 Git에 커밋하지 않습니다.
.env
.env.*
!.env.example
Google Auth Platform 설정
✍ 2. Google Cloud 프로젝트 만들기
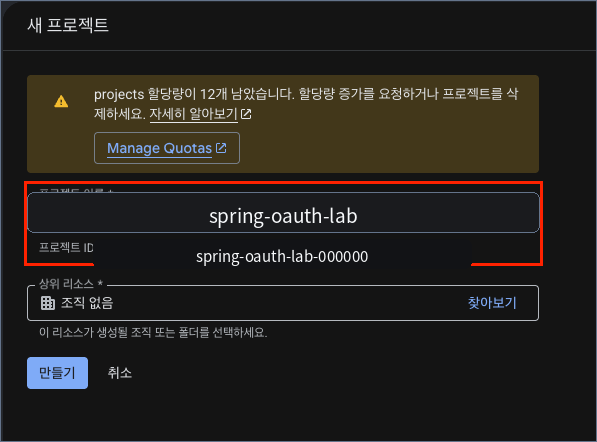
Google Cloud Console에서 OAuth 실습용 프로젝트를 만듭니다. 프로젝트 이름은 실제 서비스명이나 개인정보 대신 spring-oauth-lab처럼 용도가 드러나는 일반적인 이름을 사용합니다.
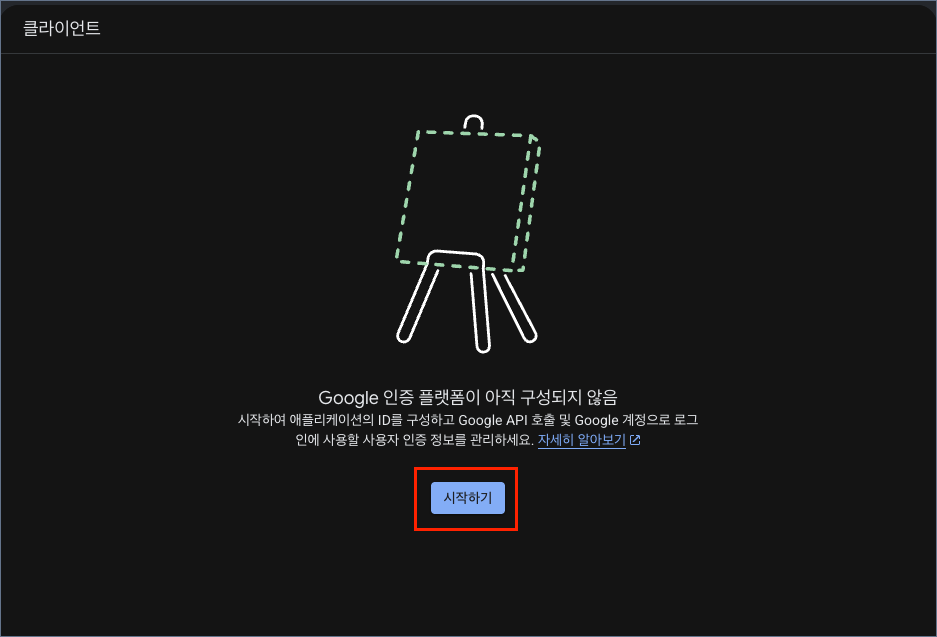
프로젝트를 만든 뒤 Google Auth Platform으로 이동해 구성을 시작합니다.
✍ 3. 앱 정보와 사용자 대상을 설정한다
Branding 또는 프로젝트 구성 화면에서 사용자에게 표시할 앱 정보를 입력합니다.
앱 이름: spring-oauth-lab
사용자 지원 이메일: 테스트 전용 Google 계정
개발자 연락처 이메일: 테스트 전용 Google 계정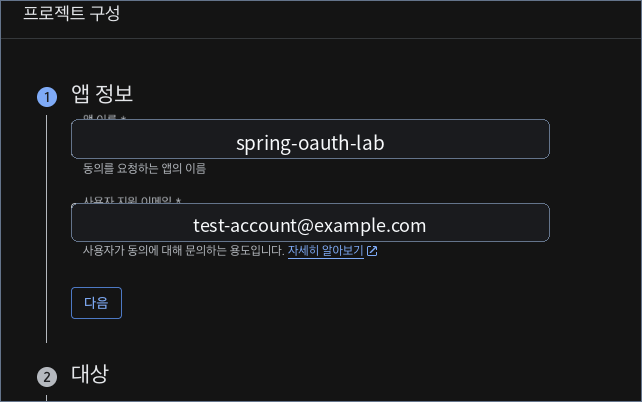
Audience에서는 실습 범위에 맞게 외부를 선택합니다.
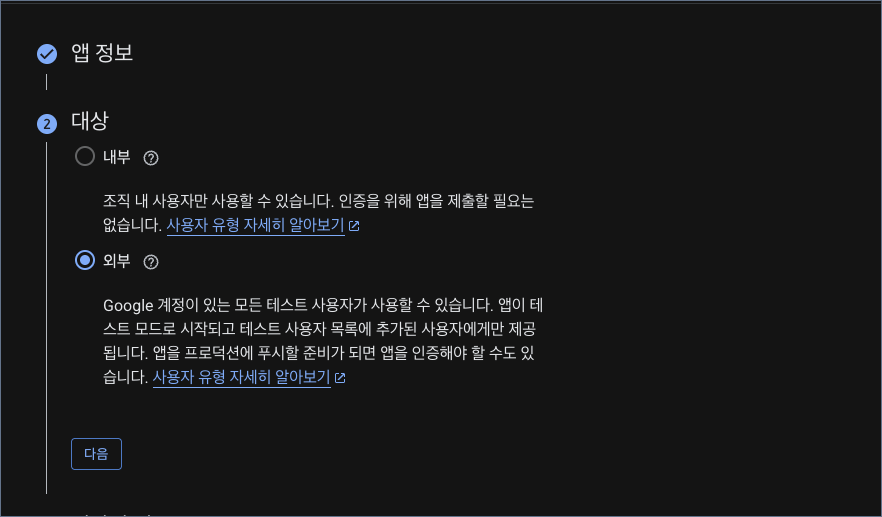
앱이 테스트 상태라면 실제 로그인에 사용할 Google 계정을 테스트 사용자로 등록해야 할 수 있습니다.
조직 전용 계정만 사용하는 경우에는 내부 대상 정책이 달라질 수 있습니다.
✍ 4. Web OAuth Client를 만든다
Clients 메뉴에서 OAuth Client 생성을 시작합니다.
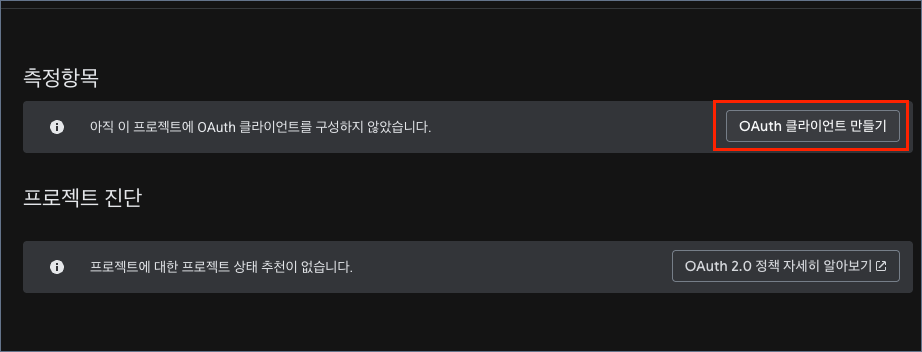
애플리케이션 유형은 웹 애플리케이션을 선택합니다. 이름은 spring-oauth-local처럼 로컬 실습용임을 알 수 있게 작성합니다.
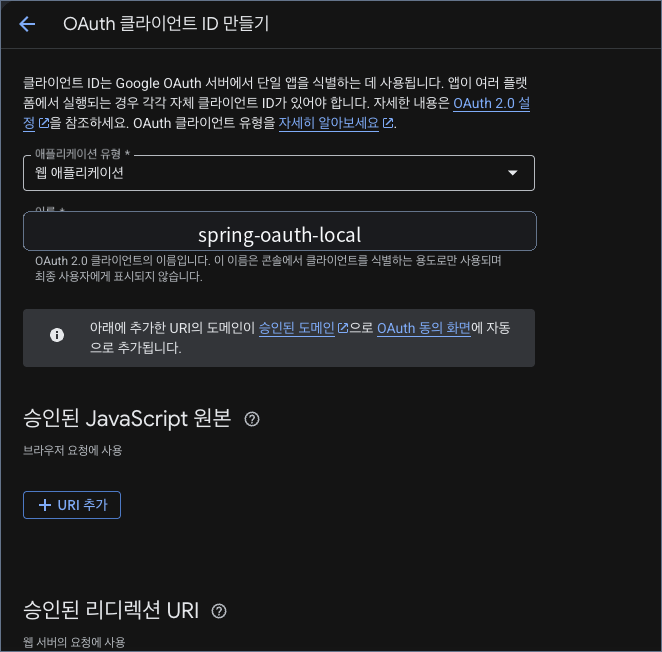
✍ 5. Authorized Redirect URI를 정확히 등록한다
이번 Spring Security Google callback은 다음 주소입니다.
http://localhost:8080/login/oauth2/code/googleGoogle Auth Platform의 승인된 리디렉션 URI에 정확히 입력합니다.
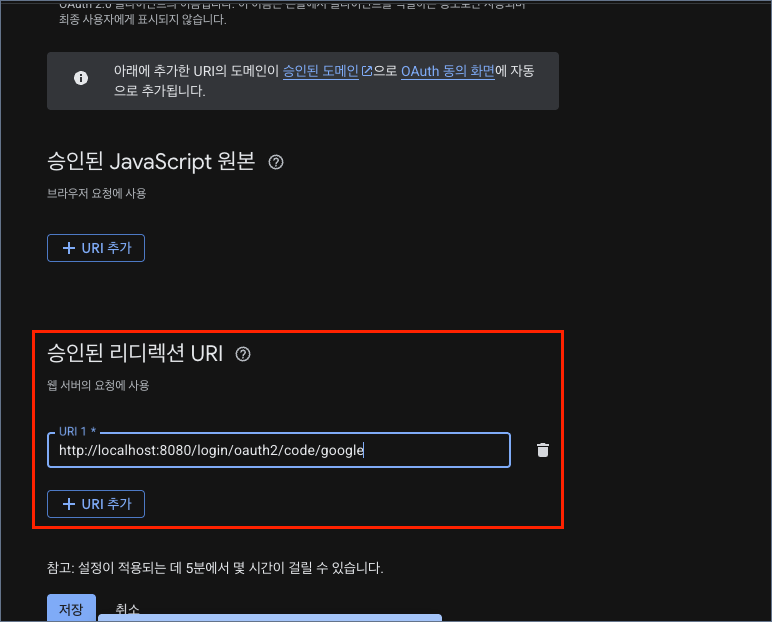
Redirect URI는 다음 요소가 모두 같아야 합니다.
scheme  : http
host    : localhost
port    : 8080
path    : /login/oauth2/code/google
마지막 /가 추가되거나 port가 달라져도 다른 URI로 판단될 수 있습니다.
여기서 두 주소를 혼동하면 안 됩니다.
Google에 등록하는 callback URI
http://localhost:8080/login/oauth2/code/google

우리 Handler가 callback 처리 뒤 돌려보내는 결과 화면
http://localhost:8080/auth-practice/oauth.htmlAPP_OAUTH_RESULT_URL은 Google callback URI가 아닙니다.
Google callback을 Spring Security가 처리한 뒤, 우리 성공·실패 Handler가 결과를 보여주기 위해 사용하는 화면입니다.
⚠ 6. Client ID와 Client Secret을 .env에 넣는다
Client가 생성되면 Client ID와 Client Secret을 확인할 수 있습니다.
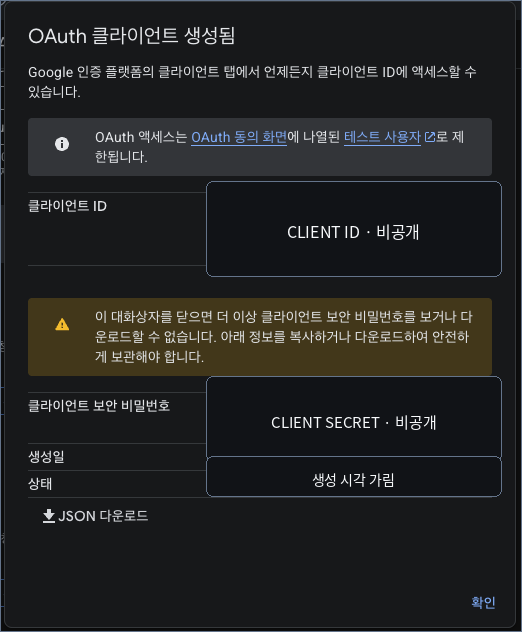
GOOGLE_CLIENT_ID=<새로 발급한 Client ID>
GOOGLE_CLIENT_SECRET=<새로 발급한 Client Secret>
Client ID는 브라우저 OAuth 요청에서도 사용되는 식별값이지만,
실제 프로젝트를 불필요하게 노출하지 않도록 블로그 이미지에서는 가렸습니다.
Client Secret은 서버 비밀값이므로 반드시 비공개로 유지합니다.
Spring Boot 설정과 구현
✍ 7. OAuth2 Client 의존성 확인
build.gradle.kts에는 Spring Security와 OAuth2 Client 의존성이 필요합니다.
dependencies {
    implementation("org.springframework.boot:spring-boot-starter-oauth2-client")
    implementation("org.springframework.boot:spring-boot-starter-security")
}
Google 로그인 뒤 우리 API용 JWT를 발급하므로 프로젝트의 JWT 의존성도 함께 사용합니다.
✍ 8. Google Client 등록 설정
application.yaml은 실제 값을 직접 쓰지 않고 환경변수를 참조합니다.
spring:
  config:
    import: "optional:file:.env[.properties]"
  security:
    oauth2:
      client:
        registration:
          google:
            client-id: ${GOOGLE_CLIENT_ID}
            client-secret: ${GOOGLE_CLIENT_SECRET}
            scope:
              - profile
              - email

app:
  frontend-url: ${APP_OAUTH_RESULT_URL:${APP_FRONTEND_URL:http://localhost:8080/auth-practice/oauth.html}}
현재 브랜치는 openid scope를 포함하지 않습니다. 따라서 Spring Security의 DefaultOAuth2UserService가
Google UserInfo를 읽고, 애플리케이션은 sub, email, email_verified를 검증합니다.
✍ 9. SecurityFilterChain에 OAuth2 Login 연결
OAuth 시작 URL과 callback URL은 인증 전에도 접근할 수 있어야 합니다.
반면 /auth/me와 POST /auth/local-password는 우리 JWT를 요구합니다.
@Bean
fun securityFilterChain(http: HttpSecurity): SecurityFilterChain {
    http
        .csrf { it.disable() }
        .sessionManagement {
            it.sessionCreationPolicy(SessionCreationPolicy.STATELESS)
        }
        .authorizeHttpRequests { auth ->
            auth
                .requestMatchers(
                    "/auth-practice/**",
                    "/oauth2/**",
                    "/login/oauth2/**"
                ).permitAll()
                .requestMatchers(HttpMethod.POST, "/auth/local-password").authenticated()
                .requestMatchers("/auth/me").authenticated()
                .anyRequest().authenticated()
        }
        .oauth2Login { oauth2 ->
            oauth2
                .userInfoEndpoint { userInfo ->
                    userInfo.userService(customOAuthUserService)
                }
                .successHandler(oauthLoginSuccessHandler)
                .failureHandler(oauthLoginFailureHandler)
        }
        .httpBasic { it.disable() }
        .formLogin { it.disable() }
        .addFilterBefore(
            jwtAuthenticationFilter,
            UsernamePasswordAuthenticationFilter::class.java
        )

    return http.build()
}STATELESS는 보호 API가 session의 Authentication을 사용하지 않는다는 뜻입니다.
OAuth 시작과 callback 사이의 state 확인에는 짧은 session이 생길 수 있지만,
그 session만으로 /auth/me에 접근할 수는 없습니다.
✍ 10. Google profile을 검증하고 정규화한다
외부 호출은 DefaultOAuth2UserService에 맡기고, 받은 attributes를 내부 식별 형식으로 정리합니다.
@Service
class CustomOAuthUserService :
    OAuth2UserService<OAuth2UserRequest, OAuth2User> {

    private val delegate = DefaultOAuth2UserService()

    override fun loadUser(userRequest: OAuth2UserRequest): OAuth2User {
        return normalizePrincipal(
            userRequest.clientRegistration.registrationId,
            delegate.loadUser(userRequest)
        )
    }
}
검증할 핵심 값은 다음과 같습니다.
val provider = registrationId.trim()
    .takeIf { it.isNotEmpty() }
    ?: reject("missing_provider", "OAuth provider를 확인할 수 없습니다.")

val email = (oauthUser.attributes["email"] as? String)
    ?.trim()
    ?.takeIf { it.isNotEmpty() }
    ?: reject("missing_email", "OAuth email을 확인할 수 없습니다.")

val providerId = (oauthUser.attributes["sub"] as? String)
    ?.trim()
    ?.takeIf { it.isNotEmpty() }
    ?: reject("missing_provider_id", "OAuth provider id를 확인할 수 없습니다.")

if (oauthUser.attributes["email_verified"] != true) {
    reject("unverified_email", "검증된 OAuth email만 사용할 수 있습니다.")
}
정규화된 profile은 provider를 대문자로, email을 소문자로 정리합니다.
Handler 이후의 계층은 원본 attributes 대신 검증된 provider, providerId, email, emailVerified를 사용합니다.
✍ 11. 내부 계정을 연결하고 우리 JWT를 발급한다
OAuthAccountService는 email보다 provider + providerId를 먼저 확인합니다.
@Transactional
fun handleOAuthLogin(profile: OAuthUserProfile): OAuthLoginResponse {
    val normalizedProfile = validateAndNormalize(profile)

    val existingOAuthUser = userRepository
        .findByAuthProviderAndProviderId(
            normalizedProfile.provider,
            normalizedProfile.providerId
        )
        .orElse(null)

    if (existingOAuthUser != null) {
        return createSuccessResponse(existingOAuthUser, isNewUser = false)
    }

    if (userRepository.existsByEmail(normalizedProfile.email)) {
        throw OAuthAccountLinkRequiredException()
    }

    val newUser = User(
        email = normalizedProfile.email,
        password = passwordEncoder.encode(UUID.randomUUID().toString()),
        authProvider = normalizedProfile.provider,
        providerId = normalizedProfile.providerId,
        localPasswordEnabled = false
    )

    return createSuccessResponse(
        userRepository.saveAndFlush(newUser),
        isNewUser = true
    )
}
기존 Google 사용자는 DB에 저장된 내부 email로 우리 JWT를 발급합니다.
이번 Google profile에 다른 email이 들어왔다고 자동 갱신하지 않습니다.
동일 email의 LOCAL 계정이 이미 있으면 자동 연결하지 않고 link_required로 끝냅니다.
✍ 12. 공개 상태와 JWT를 분리해 redirect한다
성공 Handler는 화면 설명용 상태는 query에, 우리 JWT는 fragment에 넣습니다.
private fun successRedirectUrl(
    frontendUrl: String,
    result: OAuthLoginResponse
): String {
    return UriComponentsBuilder.fromUriString(frontendUrl)
        .queryParam("oauth", "success")
        .queryParam("provider", result.provider)
        .queryParam("isNewUser", result.isNewUser)
        .fragment("access_token=${result.accessToken}")
        .build()
        .encode()
        .toUriString()
}
결과 URL의 형태는 다음과 같습니다.
http://localhost:8080/auth-practice/oauth.html
?oauth=success&provider=GOOGLE&isNewUser=true
#access_token=<우리 JWT>
실패나 계정 연결 필요 상태에는 email, token, 내부 예외를 넣지 않습니다.
?oauth=failed
?oauth=link_required
✍ 13. 페이지가 열리기 전에 URL에서 token을 제거한다
redirect-bootstrap.js는 HTML 본문 처리보다 먼저 실행됩니다.
const query = new URLSearchParams(window.location.search);
const fragment = new URLSearchParams(
  window.location.hash.replace(/^#/, "")
);

const payload = {
  oauth: query.get("oauth"),
  provider: query.get("provider"),
  isNewUser: query.get("isNewUser"),
  access_token: fragment.get("access_token")
};

window.history.replaceState(
  null,
  document.title,
  window.location.pathname
);
JWT는 JavaScript 메모리에만 남기고 localStorage, sessionStorage, cookie에 저장하지 않습니다.
이유는 발급된 토큰에 대한 관리가 미흡할 경우, 탈취되거나 공격자에 의해 악용될 위험이 존재하기 때문입니다.
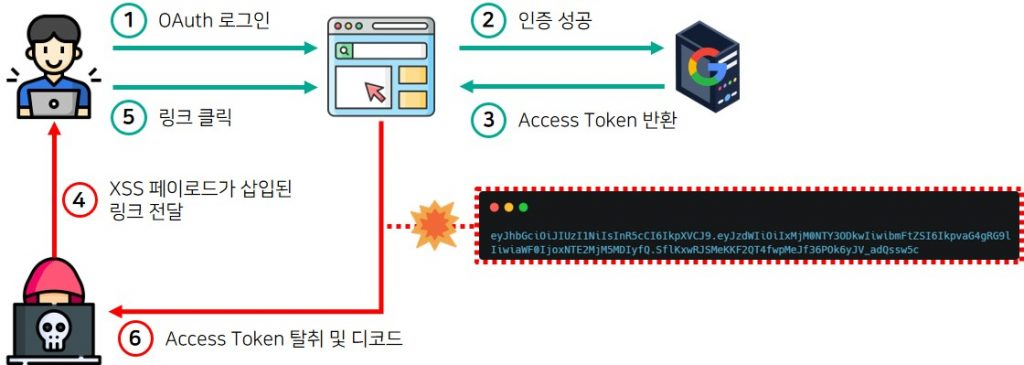
사진 출처 : https://www.igloo.co.kr/security-information/spring-security-part2-oauth-2-0-%EC%95%84%ED%82%A4%ED%85%8D%EC%B2%98-%EC%9D%B4%ED%95%B4%EC%99%80-%EB%B3%B4%EC%95%88-%EC%B7%A8%EC%95%BD%EC%A0%90-%EC%82%AC%EB%A1%80/
✍ 14. /auth/me로 내부 신원과 로그인 방식을 확인한다
callback query의 provider, isNewUser만 믿지 않고, 우리 JWT로 보호 API를 호출합니다.
GET /auth/me
Authorization: Bearer <우리 JWT>
응답 예시는 다음과 같습니다.
{
  "email": "student@example.com",
  "loginMethods": ["GOOGLE"]
}oauth.html은 loginMethods에 GOOGLE만 있으면 LOCAL 비밀번호 등록 form을 엽니다.
이미 LOCAL 자격을 추가한 계정은 GOOGLE + LOCAL 상태를 표시합니다.
✍ 15. Google 계정에 LOCAL 비밀번호를 선택적으로 추가한다
요청 body에는 email을 넣지 않습니다. Bearer JWT로 검증한 Principal의 email만 사용합니다.
POST /auth/local-password
Authorization: Bearer <우리 JWT>
Content-Type: application/json

{
  "newPassword": "new-local-password"
}
Service는 사용자 행을 잠금 조회한 뒤 최초 등록만 허용합니다.
@Transactional
fun enroll(
    principalEmail: String,
    request: LocalPasswordEnrollmentRequest
) {
    val normalizedEmail = principalEmail.lowercase(Locale.ROOT)
    val user = userRepository.findByEmailForUpdate(normalizedEmail)
        .orElseThrow(::InvalidCredentialsException)

    if (user.authProvider != "GOOGLE" || user.localPasswordEnabled) {
        throw LocalPasswordEnrollmentConflictException()
    }

    user.password = passwordEncoder.encode(request.newPassword)
    user.localPasswordEnabled = true
    userRepository.saveAndFlush(user)
}
성공은 204 No Content입니다.
등록 전: GOOGLE
등록 후: GOOGLE + LOCALauthProvider와 providerId는 그대로 유지합니다.
Google 비밀번호를 복사하거나 변경하는 기능도 아닙니다.
브라우저에서 실제 흐름 확인
✍ 16. 애플리케이션 실행
로컬 MySQL이 실행 중인지 확인한 뒤 Spring Boot를 실행합니다.
./gradlew bootRun실습 화면을 엽니다.
http://localhost:8080/auth-practice/oauth.html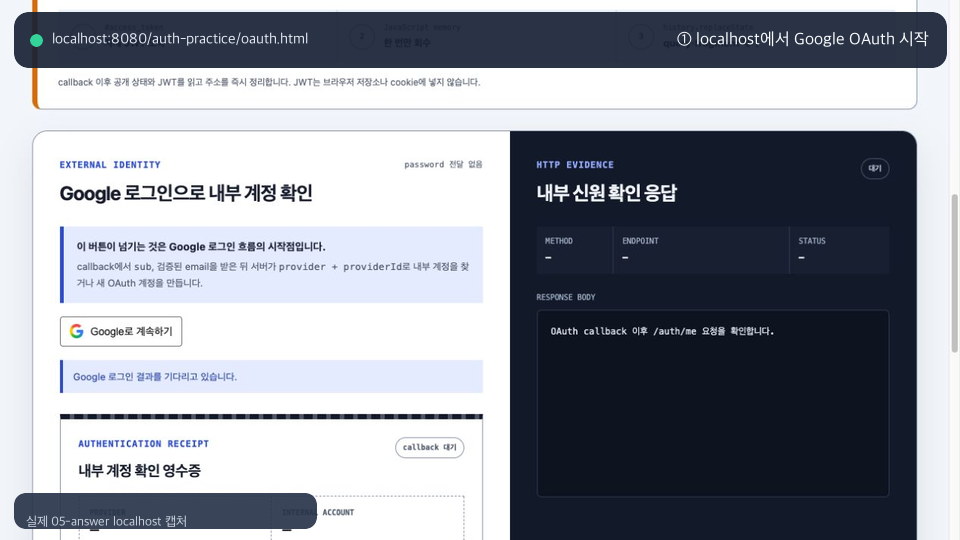
Google 계정을 선택하고 동의합니다.
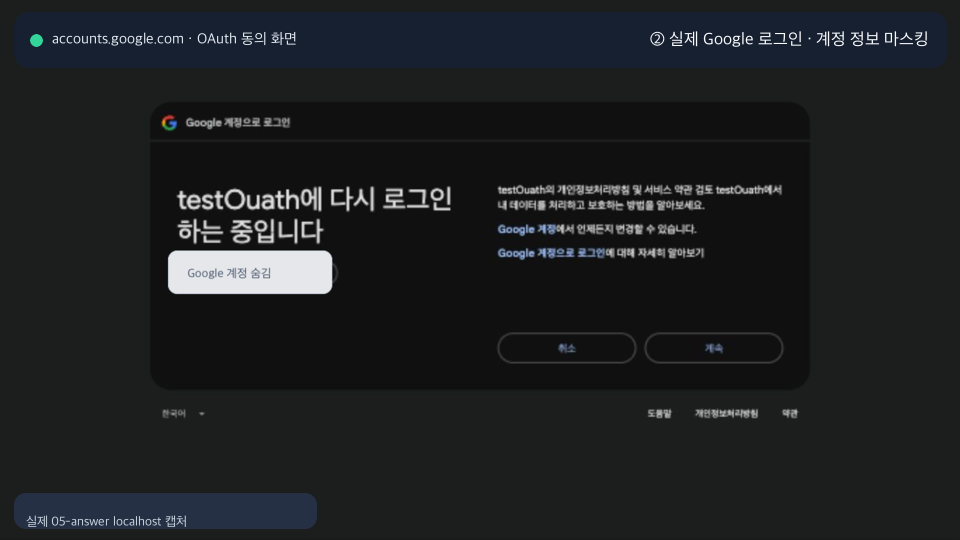
✍ 17. 신규 Google 계정과 /auth/me 200 확인
Google callback이 성공하면 oauth.html로 돌아옵니다. 화면은 다음을 확인합니다.
- Google 신원 확인
- 새 내부 OAuth 계정 생성 또는 기존 계정 재사용
- URL query·fragment 정리 완료
- 우리 JWT 메모리 회수
- GET /auth/me 200
- 내부 email과 loginMethods=GOOGLE
- Google password 전달되지 않음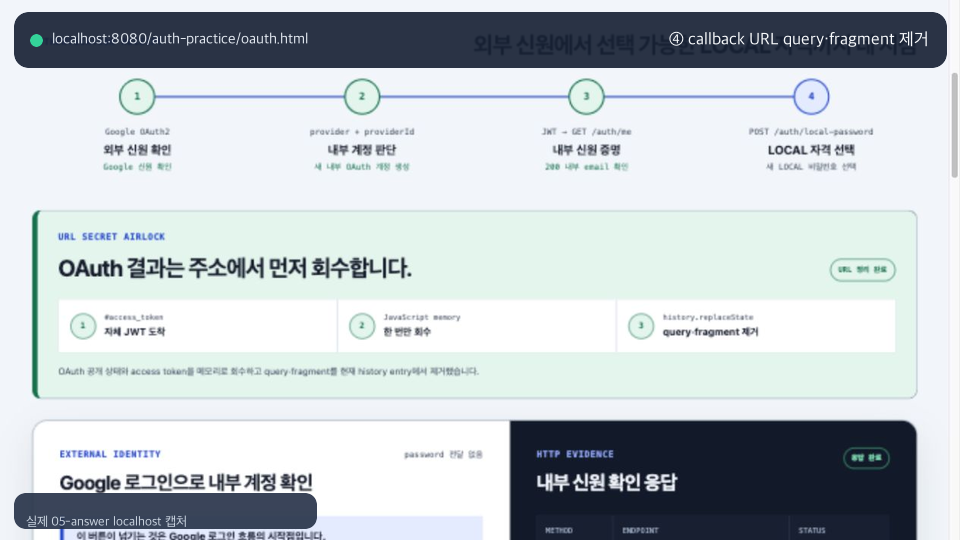
✍ 18. MySQL에서 Google 사용자 상태 확인
email과 providerId 원문을 조회하지 않고 상태만 확인합니다.
SELECT
    id,
    auth_provider,
    provider_id IS NOT NULL AS has_provider_id,
    local_password_enabled
FROM users
ORDER BY id DESC
LIMIT 1;
신규 Google 계정 직후 기대값은 다음과 같습니다.
auth_provider         = GOOGLE
has_provider_id       = 1
local_password_enabled = 0
✍ 19. LOCAL 비밀번호 등록과 204 확인
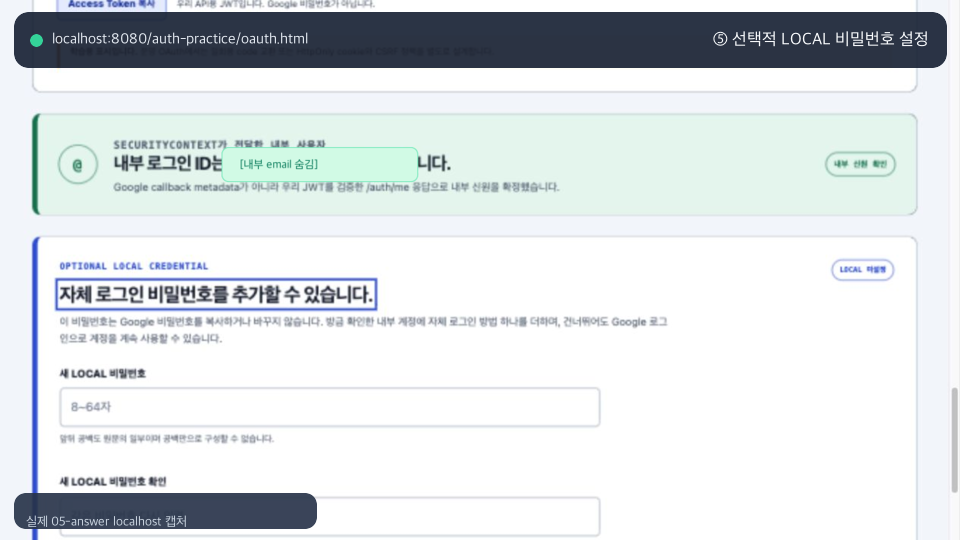
loginMethods=GOOGLE인 계정은 같은 화면에서 새 LOCAL 비밀번호를 선택할 수 있습니다.
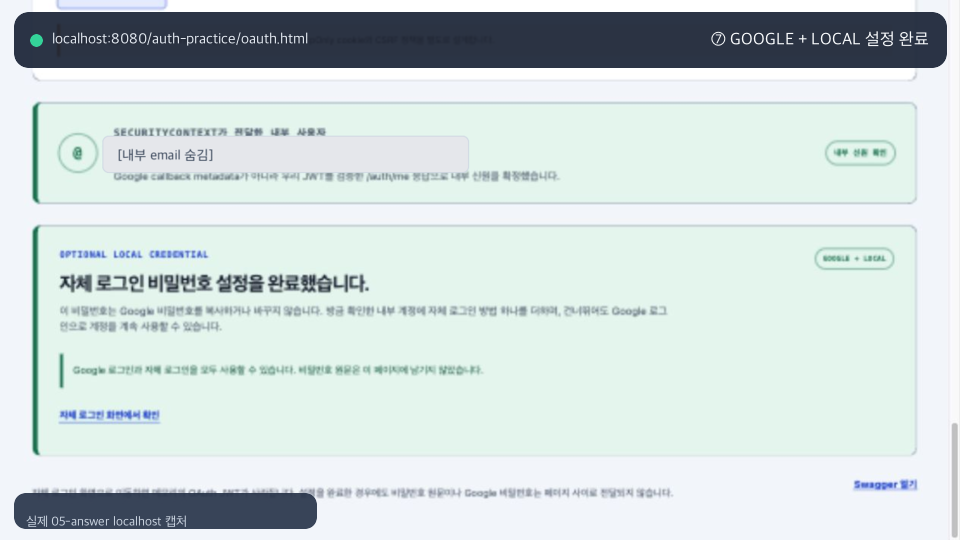
비밀번호 등록이 성공하면 204 No Content가 반환되고 영수증이 GOOGLE + LOCAL로 바뀝니다.
MySQL에서도 provider identity가 유지되는지 확인합니다.
SELECT
    id,
    auth_provider,
    provider_id IS NOT NULL AS has_provider_id,
    local_password_enabled
FROM users
ORDER BY id DESC
LIMIT 1;
기대값은 다음과 같습니다.
auth_provider          = GOOGLE
has_provider_id        = 1
local_password_enabled = 1
✍ 20. 자체 로그인과 기존 Google 계정 재사용 확인
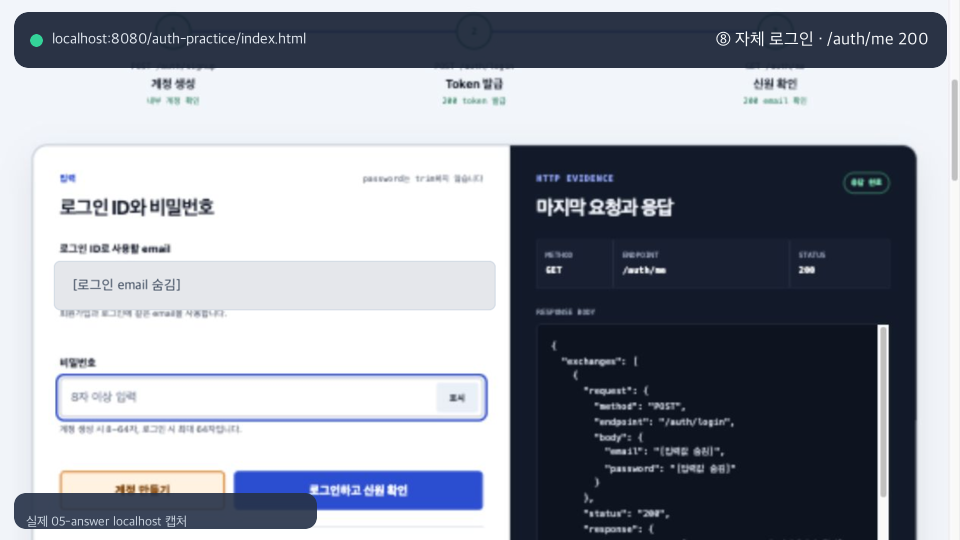
자체 로그인 화면으로 이동해 방금 정한 비밀번호로 로그인합니다.
http://localhost:8080/auth-practice/index.html로그인 뒤 /auth/me에서 동일한 내부 계정과 GOOGLE + LOCAL을 확인합니다.
다시 Google 로그인도 진행합니다. (GOOGLE, providerId)가 같으므로 새 사용자를 만들지 않고 기존 내부 계정을 재사용해야 합니다.
✍ 21. 같은 email의 LOCAL 계정은 자동 연결하지 않는다
Google identity가 아직 없는데 같은 email의 기존 LOCAL 계정이 있으면 다음 상태로 돌아옵니다.
?oauth=link_required화면은 기존 계정과 외부 identity를 자동으로 합치지 않았다는 사실만 보여줍니다. email이나 내부 오류는 URL에 넣지 않습니다.
✍ 22. OAuth session만으로 보호 API가 열리지 않는지 확인
Google callback 과정에서 OAuth state용 session cookie가 생길 수 있습니다.
그러나 Bearer JWT 없이 /auth/me를 호출하면 401이어야 합니다.
curl -i http://localhost:8080/auth/meHTTP/1.1 401 Unauthorized
WWW-Authenticate: Bearer브라우저 저장소도 확인합니다.
Local Storage  : JWT 없음
Session Storage: JWT 없음
Cookie         : 우리 API 로그인 JWT 없음
자주 만나는 문제
redirect_uri_mismatch
Google Auth Platform에 등록한 URI와 실제 callback이 다릅니다.
정확한 값
http://localhost:8080/login/oauth2/code/google
scheme, host, port, path, 마지막 슬래시를 확인합니다.
Google 로그인 뒤 oauth=failed
다음 항목을 확인합니다.
- GOOGLE_CLIENT_ID와 GOOGLE_CLIENT_SECRET
- OAuth Client 유형이 웹 애플리케이션인지
- 테스트 사용자가 허용됐는지
- email scope와 profile scope가 포함됐는지
- Google UserInfo에 sub, email, email_verified가 있는지
원본 Provider 오류는 공개 URL에 싣지 않으므로 서버 로그와 Google 설정을 함께 확인해야 합니다.
로그에도 Client Secret이나 Provider Token 원문을 남기지 않습니다.
link_required
실패가 아니라 자동 연결을 의도적으로 중단한 결과입니다.
같은 email의 LOCAL 또는 다른 외부 계정을 외부 로그인 결과만으로 합치지 않습니다.
/auth/me 401
callback에서 받은 우리 JWT가 없거나 만료됐습니다. Google 로그인을 다시 진행합니다.
OAuth session cookie만으로는 보호 API에 접근할 수 없습니다.
LOCAL 비밀번호 등록 409
이미 LOCAL 비밀번호를 등록했거나, 현재 계정이 Google 계정이 아니거나, 먼저 다른 요청이 상태를 변경했습니다.
화면은 /auth/me를 다시 호출해 최신 loginMethods를 확인합니다.
정리
이번 실습에서는 Google Auth Platform의 Web OAuth Client를 Spring Security OAuth2 Login과 연결했습니다.
Google profile에서sub,email_verified를 검증하고,provider + providerId로 내부 사용자를 찾거나 만들었습니다.
동일 email의 기존 계정은 자동으로 연결하지 않았고, Google 로그인 성공 뒤 우리 API용 JWT를 별도로 발급했습니다.브라우저는 JWT를 fragment에서 메모리로 옮긴 뒤 URL을 정리하고
/auth/me로 내부 email과loginMethods를 확인합니다. 사용자가 원하면 Google identity를 유지한 채 LOCAL 비밀번호를 최초 한 번 추가해GOOGLE + LOCAL로 전환할 수 있습니다.
참고 자료
- Spring Security Reference — OAuth2 Login: https://docs.spring.io/spring-security/reference/servlet/oauth2/login/
- Spring Security Reference — OAuth2 Client: https://docs.spring.io/spring-security/reference/servlet/oauth2/client/
- Google OAuth 2.0 for Web Server Applications: https://developers.google.com/identity/protocols/oauth2/web-server
- Google OpenID Connect: https://developers.google.com/identity/openid-connect/reference
- 실습 구현 가이드: https://github.com/stdiodh/spring-boot-db-access-lab/blob/05-answer/docs/implementation.md