
회고 리스트
1. 자바스크립트에서의 데이터 타입 6가지는?
자바스크립트에는 원시 타입(Primitive Type)과 객체 타입(Reference Type, Object Type)이 있다.
- 원시 타입은 변경 불가능한 값(immutable value)를 갖고 값을 복사하여 전달하는 pass by value 방식이다.
- 숫자형 (Number)
- 문자열형 (String)
- 불린형 (Boolean)
- null : 의도적으로 변수에 값이 없다는 것을 명시할 때 사용
- undefined : 선언 이후 값을 할당하지 않은 변수
- symbol : ES6에서 추가되었고 이름의 충돌 위험이 없는 유일한 객체의 Property Key를 만들기 위해 사용
-
원시 타입을 제외한 거의 모든 것(객체, 배열, 함수 등)은 객체이다.
객체는 값을 전달할 때 값을 복사하지 않고 참조에 의한 전달하는 pass by reference 방식이다.- object
수업에서는 6가지 데이터 타입에 대해서 배웠다.
- 숫자형
<script>
	let num = 123;
    console.log(typeof num);
</script>- 문자형
<script>
	let str = '안녕하세요';
    console.log(typeof str);
</script>- 불린형
<script>
  let boo = true;
  console.log(typeof boo);
</script>- 함수형
<script>
	let fun = function fun(){
  		document.write("<h1>안녕하세요</h1>")
  	}

  console.log(typeof fun);
  console.log(fun());
</script>- 객체형
<script>
	let obj = {
  		name: "홍길동",
        age: 20
	}

	console.log(typeof obj);
    console.log(obj);
    console.log(obj.name);
    console.log(obj.age);
</script>- undefined
<script>
	let undef = undefined;
    console.log(typeof undef)
    console.log(undef)
</script>
2. cosnt 상수와 let 변수의 차이는?
1) const는 재할당이 불가능하지만 let은 가능하다.
2) const는 선언과 동시에 값을 할당해야 하지만 let은 나중에 할당 가능하다.
(객체(object)나 배열(array)을 const로 선언하면 내부 값 변경은 가능하다.)
따라서 변경할 필요가 없는 값은 기본적으로 const를 사용하고 값을 변경해야 하는 경우엔 let을 사용하는 것이 좋다.
3. 자바스크립트로 구구단을 작성하시오.
<script>
  for (let i=2; i<10; i++) {
              for (let j=1; j<10; j++) {
                 document.write(`${i} x ${j} = ${i*j} <br>`);
              }
              document.write('<br>')
          }
</script>
document.write(i + 'x' + j + '='+ ij +' <br>'); 이라고 해도 되고 document.write(`${i} x ${j} = ${ij} <br>`); 라고 해도 된다.
${}을 사용하면 좀 더 깨끗한 느낌이 들지만 작은 따옴표나 큰 따옴표가 아닌 백틱( ` )을 사용해야 한다.
4. 국어 영어 수학을 입력 받아, 수우미양가를 출력하시오.
<script>
	let kor = prompt('국어');
    let eng = prompt('영어');
    let math = prompt('수학');

    let avg = (Number(kor) + Number(eng) + Number(math)) / 3;
    document.write('평균은 ' +String(avg) + '입니다.' );

	if (avg >= 90) {
    	document.write('수')
    }
    else if (avg >= 80) {
    	document.write('우')
	}
    else if (avg >= 70) {
        document.write('미')
    }
    else if (avg >= 60) {
        document.write('양')
    }
    else {
        document.write('가')
        }
</script>
5. 배열을 생성하는 2가지 방법은?
1) 배열 생성과 데이터 저장을 동시에
<script>
	let arr = [1, 2, 3, 4, 5];

    console.log(arr);
    console.log(arr[0]);
    console.log(arr[1]);
</script>
2) 배열 객체를 활용하여 생성
<script>
	let arr2 = new Array(1, 2, 3, 4, 5);

    console.log(arr2);
    console.log(arr2[0]);
    console.log(arr2[1]);
</script>
6. 배열에서 아래의 함수를 예를 들어 설명하시오.
- forEach()
: 배열의 모든 요소를 순회하며 특정 작업을 수행할 때 사용한다.
<script>
	let fruits = ["사과", "바나나", "포도"];
	fruits.forEach(function(fruit) {
		console.log(fruit);
	});
// 출력 : 사과 바나나 포도
</script>- pop()
: 배열의 마지막 요소를 제거하고 그 값을 반환한다.
<script>
	let arr = [1, 2, 3];
	let last = arr.pop();

	console.log(arr);		// 출력 : [1, 2]
	console.log(last);		// 출력 : 3
</script>- sort()
: 배열의 요소를 정렬한다.
기본적으로 문자열 정렬이므로 숫자를 제대로 정렬하려면 compare 함수를 사용해야 한다.
<script>
	let arr = [3, 1, 4, 2];
	arr.sort();
	console.log(arr);		// 출력 : [1, 2, 3, 4]

	arr.sort((a, b) => a - b);
	console.log(arr);		// 출력 : [1, 2, 3, 4]
</script>- find()
: 조건을 만족하는 첫 번째 요소를 찾는다.
<script>
  let arr = [10, 20, 30, 40];
  let result = arr.find(num => num > 15);
  console.log(result);		// 출력 : 20
</script>- filter()
: 조건을 만족하는 모든 요소를 배열로 반환한다.
<script>
  let arr = [10, 20, 30, 40];
  let result = arr.filter(num => num > 15);
  console.log(result);		// 출력 : [20, 30, 40]
</script>- map()
: 배열의 모든 요소를 변환하여 새로운 배열을 만든다.
<script>
  let arr = [1, 2, 3];
  let doubled = arr.map(num => num * 2);
  console.log(doubled);		// 출력 : [2, 4, 6]
</script>- for of
: 배열을 순회하면서 요소를 하나씩 가져온다.
<script>
let arr = ["a", "b", "c"];
for (let item of arr) {
console.log(item);
}
// 출력 : a b c
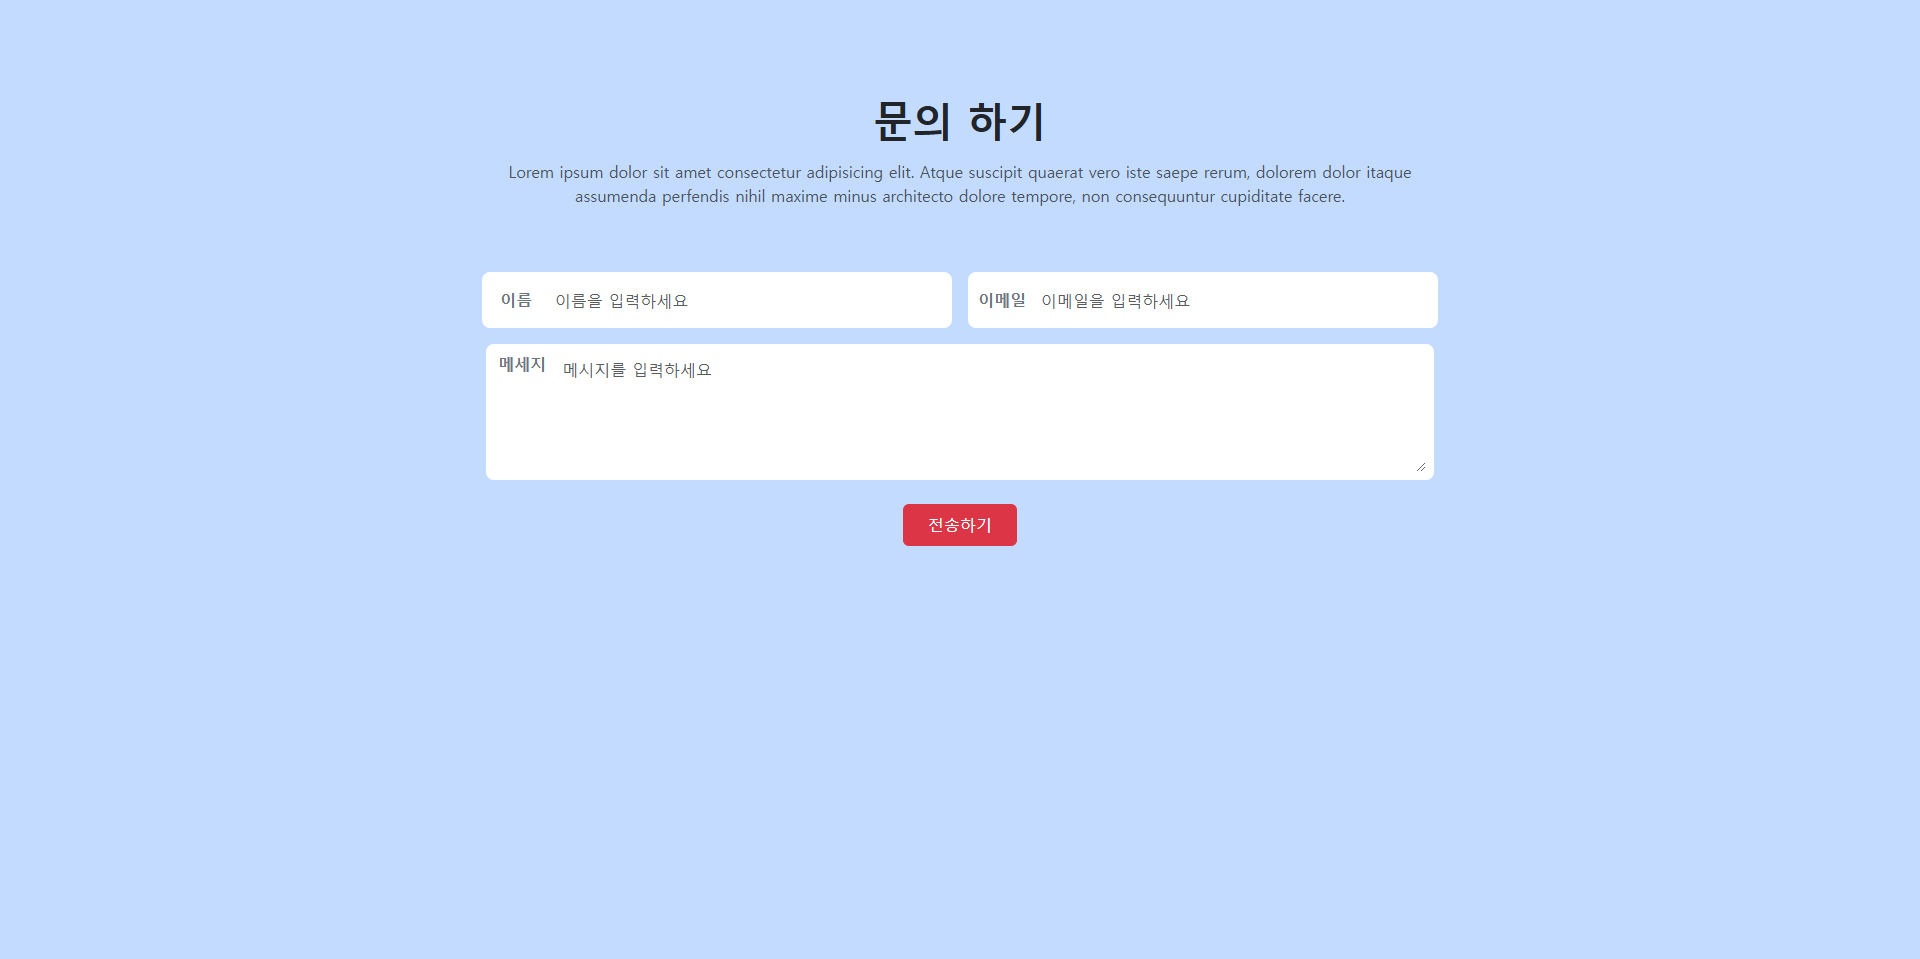
</script>7. 입력양식 폼을 만들어 보시오.
예시 사진 ↓
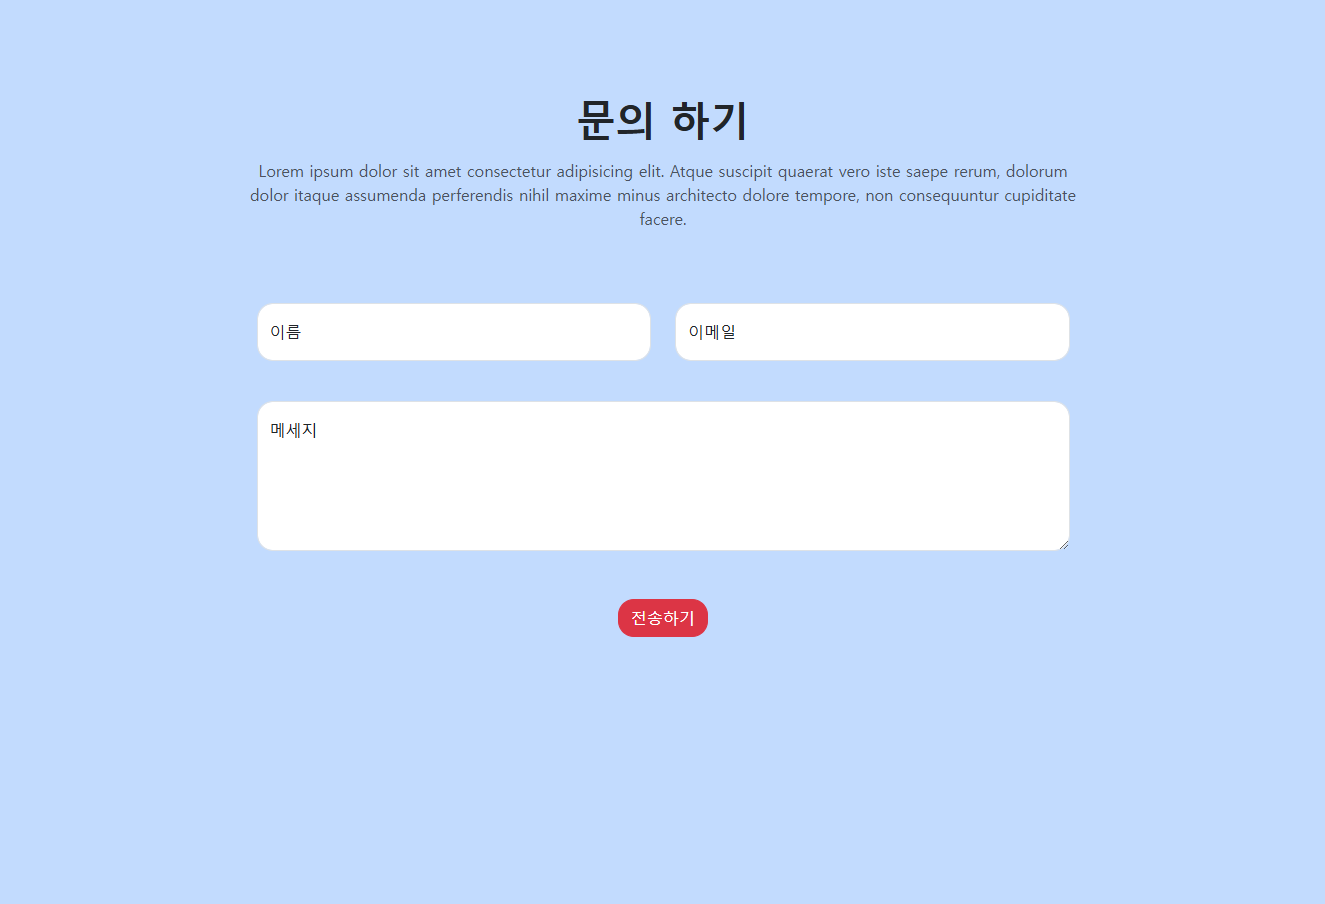
<!DOCTYPE html>
<html lang="en">
<head>
    <meta charset="UTF-8">
    <meta name="viewport" content="width=device-width, initial-scale=1.0">
    <title>Document</title>
    <link href="https://cdn.jsdelivr.net/npm/bootstrap@5.3.2/dist/css/bootstrap.min.css" rel="stylesheet" integrity="sha384-T3c6CoIi6uLrA9TneNEoa7RxnatzjcDSCmG1MXxSR1GAsXEV/Dwwykc2MPK8M2HN" crossorigin="anonymous">
    <link rel="stylesheet" href="https://cdn.jsdelivr.net/npm/bootstrap-icons@1.11.3/font/bootstrap-icons.min.css">
    <link rel="stylesheet" href="style.css">
    <script>
    </script>
</head>
<body class="bg-primary bg-opacity-25">
    <div class="container text-center" style="width: 70%;">
        <header>
            <div class="mt-5 py-5">
                <h1 class="fw-bold">문의 하기</h1>
                <p class="text-muted w-75 m-auto mt-3">
                    Lorem ipsum dolor sit amet consectetur adipisicing elit.
                    Atque suscipit quaerat vero iste saepe rerum, dolorem dolor
                    itaque assumenda perfendis nihil maxime minus architecto
                    dolore tempore, non consequuntur cupiditate facere.
                </p>
            </div>
        </header>

        <form action="#" method="post">

            <div class="row g-3 w-75 m-auto">
                <div class="col-12 col-md-6">
                    <div class="d-flex align-items-center p-2 bg-white rounded-3">
                        <div class="fw-bold text-secondary" style="width: 60px;">이름</div>
                        <input type="text" name="uname"
                            class="form-control border-0 shadow-none" placeholder="이름을 입력하세요" style="height: 40px;">
                    </div>
                </div>

                <div class="col-12 col-md-6">
                    <div class="d-flex align-items-center p-2 bg-white rounded-3">
                        <div class="fw-bold text-secondary" style="width: 60px;">이메일</div>
                        <input type="email" name="uemail"
                            class="form-control border-0 shadow-none" placeholder="이메일을 입력하세요" style="height: 40px;" required>
                    </div>
                </div>
            </div>


            <div class="row w-75 m-auto mt-3">
                <div class="col-12">
                    <div class="d-flex align-items-start p-2 bg-white rounded-3">
                        <div class="fw-bold text-secondary" style="width: 60px;">메세지</div>
                        <textarea name="emessage" class="form-control border-0 shadow-none"
                            placeholder="메시지를 입력하세요" style="height: 120px;"></textarea>
                    </div>
                </div>
            </div>


            <div class="mt-4">
                <button type="submit" class="btn btn-danger px-4 py-2">전송하기</button>
            </div>

        </form>
    </div>
</body>

</html>
내가 한 결과 ↓
화면이 작아지면 입력창들이 세로로 배열된다.
3줄 요약:
1. do while 문과 swithc 문은 파이썬에서 제공하지 않는다.
2. 자바스크립트의 데이터 타입은 6개이고, 변수선언에는 3가지가 있다
3. 부트스트랩의 row 는 flex-row flex-wrap 이다.