ThreeJs+React로 마인크래프트 만들기 번역(by Daniel Bark from freeCodeCamp) - Cubes
react-threeJs-minecraft
이번에는 블록과 관련된 작업을 진행할 것이다.
먼저 블록에 대한 3d 물리적 처리를 진행할 컴포넌트를 만들어 보자
src/components 경로에 Cube.js 파일을 생성하자
// src/components/Cube.js
import { useBox } from "@react-three/cannon";
import * as textures from "../images/textures";
export const Cube = ({ position, texture }) => {
  const [ref] = useBox(() => ({
    type: "Static",
    position,
  }));

  const activeTexture = textures[texture + "Texture"];

  return (
    <mesh ref={ref}>
      <boxBufferGeometry attach="geometry" />
      <meshStandardMaterial map={activeTexture} attach="material" />
    </mesh>
  );
};
이제는 소스코드가 어느정도 익숙해졌다.
Cube는 위치를 위한 position과 질감을 구분할 texture를 인자로 받는다.
useBox는 Box 형태의 물리적 충돌을 계산하기 위해 사용한다.
여기서 우리는 type을 Static으로 주었는데,
Static은 움직이지 않으며 무한한 질량을 가진 것처럼 동작한다. position에 대한 수정을 통해 움직일 수는 있지만, 속도는 항상 0이다.
우리는 정적인 블록 상태로 사용할 것이기에 중요한 요소는 아니다.
Box 형태의 물리적 요소가 준비되면 실제 물체에 매핑을 시킨다.
mesh를 통해 물체를 만들고, geometry, material을 활용해 부피와 질감을 선언한다.
질감을 선언할때 map을 통해 파라미터를 통해 들어온 현재 텍스쳐를 등록한다.
물리적인 블록을 생성하는 컴포넌트를 생성했으니 다수의 블록을 그려주는 컴포넌트와 그 블록들을 전역으로 관리할 hook을 만들어주자
먼저 전역 상태관리를 위해 src/hooks/ 경로에 useStore.js라는 파일을 생성하자
// src/hooks/useStore.js
import { nanoid } from "nanoid";
import create from "zustand";

export const useStore = create((set) => ({
  texture: "dirt",
  cubes: [
    {
      key: nanoid(),
      pos: [1, 1, 1],
      texture: "dirt",
    },
  ],
  addCube: (x, y, z) => {
    set((prev) => ({
      cubes: [
        ...prev.cubes,
        {
          key: nanoid(),
          pos: [x, y, z],
          texture: prev.texture,
        },
      ],
    }));
  },
  removeCube: () => {},
  setTexture: () => {},
  saveWorld: () => {},
  resetWorld: () => {},
}));
처음에 우리가 받아놓고 사용하지 않고있던 라이브러리를 쓰게 되었다.
nanoid는 단순히 중복되지 않는 string key를 만들기 위한 라이브러리다.
zustand는 전역관리를 위해 사용하며, create로 생성되어 set을 통해 전역 상태를 관리한다.
3D 관련된 요소는 지금은 이정도로 간략히 설명하고 넘어가겠다.
현재 선택된 texture를 관리하기 위해 texture의 상태를 관리한다.(기본값 "dirt")
cube는 key,pos,texture로 구성된다.
pos는 좌표값의 위치인 position을 뜻하며, texture는 해당 cube의 질감을 담는다.
addCube는 좌표값을 받고 set을 통해 기존 cubes 상태에 기존값 + 새로운 {객체}를 추가로 할당한다.
나머지 기능은 나중에 만들자
이제 src/components/ 경로에 Cubes.js 파일을 추가하자
// src/components/Cubes.js
import { useStore } from "../hooks/useStore";
import { Cube } from "./Cube";
export const Cubes = () => {
  // 전역으로 관리되고 있는 cubes를 가져온다.
  const [cubes] = useStore((state) => [state.cubes]);
  // 현재 등록된 cubes 만큼 반복하며 물체 Cube를 그려준다.
  return cubes.map(({ key, pos, texture }) => {
    return <Cube key={key} position={pos} texture={texture} />;
  });
};
이 부분에 대해서는 별다른 부가 설명은 불필요 하기 때문에 넘어가고,
우리가 추가한 cubes를 App.js을 통해서 반영시켜주자
import { Canvas } from "@react-three/fiber";
import { Sky } from "@react-three/drei";
import { Physics } from "@react-three/cannon";
import { Ground } from "./components/Ground";
import { Player } from "./components/Player";
import { FPV } from "./components/FPV";
import { Cubes } from "./components/Cubes"; // + Cubes 가져오기

function App() {
  return (
    <>
      <Canvas>
        <Sky sunPosition={[100, 100, 20]} />
        <ambientLight intensity={0.5} />
        <FPV />
        <Physics>
          <Player />
          <Cubes /> // + 물리적 영향을 받기에 Physics에 등록
          <Ground />
        </Physics>
      </Canvas>
      <div className="absolute centered cursor">+</div>
    </>
  );
}

export default App;
우리는 useStore에 cubes에 초기값을 1개 넣어주었고, 실행을 시켜보면 1개의 흙 블록을 확인할 수 있다.
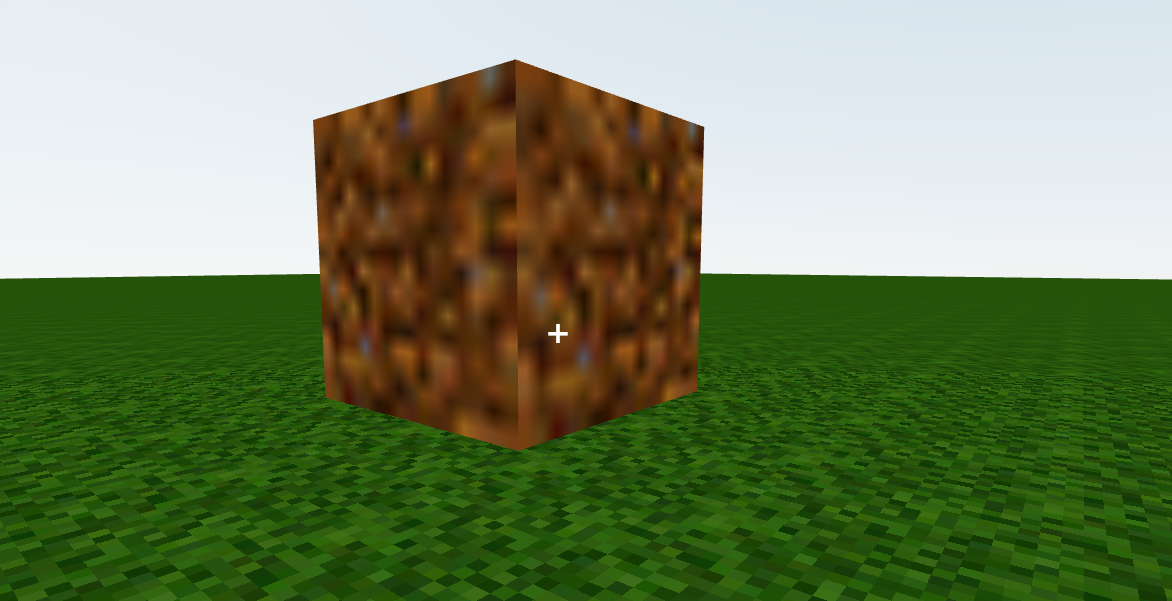
첫번째로, 처음에 우리가 지면을 만들때와 같이 도트가 흐릿해 보이는데, 텍스쳐에 별도로 필터 적용이 필요하기 때문이다.
두번째로, 블럭이 지면에서 약간 뜬 상태로 생성되는데, 이 부분은 지면에 대한 높이값 조정을 통해서 맞춰 줄 수 있다.
먼저 texture에 대해 수정을 해보자
// src/images/textures.js
import { NearestFilter, TextureLoader, RepeatWrapping } from "three"; // + RepeatWrapping를 추가해주자
import { dirtImg, logImg, glassImg, grassImg, woodImg } from "./images";

const dirtTexture = new TextureLoader().load(dirtImg);
const logTexture = new TextureLoader().load(logImg);
const grassTexture = new TextureLoader().load(grassImg);
const glassTexture = new TextureLoader().load(glassImg);
const woodTexture = new TextureLoader().load(woodImg);
const groundTexture = new TextureLoader().load(grassImg);

// 아래의 모든 텍스쳐에 대해서 Filter를 적용시켜주자
dirtTexture.magFilter = NearestFilter;
logTexture.magFilter = NearestFilter;
grassTexture.magFilter = NearestFilter;
glassTexture.magFilter = NearestFilter;
woodTexture.magFilter = NearestFilter;
groundTexture.magFilter = NearestFilter;
groundTexture.wrapS = RepeatWrapping;
groundTexture.wrapT = RepeatWrapping;

export {
  dirtTexture,
  logTexture,
  grassTexture,
  glassTexture,
  woodTexture,
  groundTexture,
};
Texture.js에서 wrapS, wrapT, Filter 적용을 했으니 기존 Ground에 Filter 내용은 지워주어야 한다.
Ground를 작업하는 김에 지면의 높이를 재 조정해서 블록과 일치시키고, 새롭게 만든 addCube를 사용하기 위해 onClick 이벤트를 추가해주자.
// src/components/Ground.js
import { usePlane } from "@react-three/cannon";
import { NearestFilter, RepeatWrapping } from "three";
import { groundTexture } from "../images/textures";
import { useStore } from "../hooks/useStore"; // + addCube를 위해 hook을 가져오자

export const Ground = () => {
  const [ref] = usePlane(() => ({
    rotation: [-Math.PI / 2, 0, 0],
    position: [0, -0.5, 0], // 지면의 높이를 조정해 블록과 일치시키자.
  }));
  const [addCube] = useStore((state) => [state.addCube]); // + 가져온 hook에서 addCube 기능을 꺼내주자

  // - Texture와 곂치는 부분 제거
  // groundTexture.magFilter = NearestFilter;
  // groundTexture.wrapS = RepeatWrapping;
  // groundTexture.wrapT = RepeatWrapping;
  groundTexture.repeat.set(100, 100);

  return (
    <mesh
    // + 기존에 만든 지면 물체에 OnClick 이벤트를 할당하자.
      onClick={(e) => {
    	// 이벤트 버블링을 막아 이벤트의 의도치 않은 동작을 막는다.
        e.stopPropagation();
    	// 마우스로 좌표를 클릭하면 세밀한 소수점 단위의 좌표가 선택된다. 우리는 블록 단위로 좌표를 구하기 때문에 반올림 해서 x, y, z를 각각 추출한다.
        const [x, y, z] = Object.values(e.point).map((val) => Math.ceil(val));
        addCube(x, y, z);
      }}
      ref={ref}
    >
      <planeBufferGeometry attach="geometry" args={[100, 100]} />
      <meshStandardMaterial attach="material" map={groundTexture} />
    </mesh>
  );
};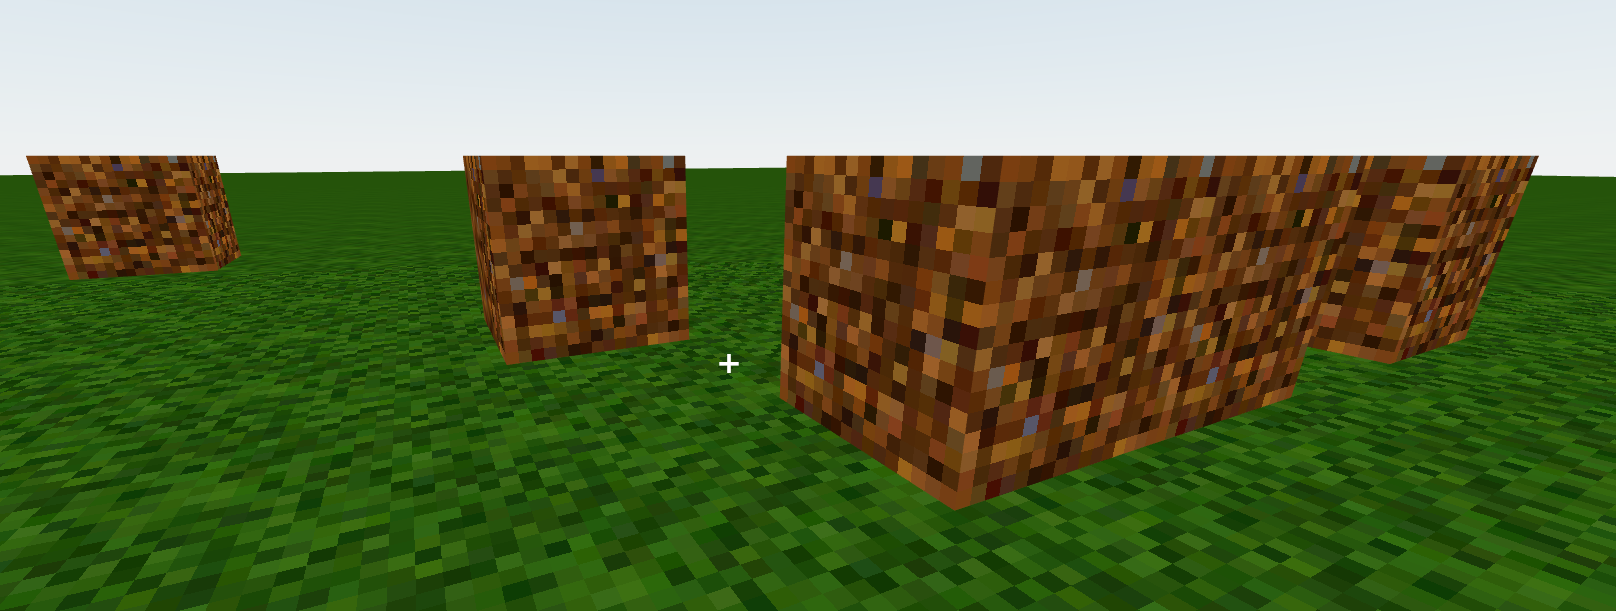
자 이제 우리가 원하는 대로 마우스를 클릭하면 블록이 생성되고, 텍스쳐가 잘 적용되었다.
하지만 오로지 지면에서만 추가가 되며, 다른 블록에 연속적으로 설치는 안된다.
Cube.js와 useStore.js를 수정해서 큐브 이어 붙이기와 큐브 삭제 기능을 만들어보자
// src/hooks/useStore.js
import { nanoid } from "nanoid";
import create from "zustand";

export const useStore = create((set) => ({
  texture: "dirt",
  cubes: [
    {
      key: nanoid(),
      pos: [1, 1, 1],
      texture: "dirt",
    },
  ],
  addCube: (x, y, z) => {
    set((prev) => ({
      cubes: [
        ...prev.cubes,
        {
          key: nanoid(),
          pos: [x, y, z],
          texture: prev.texture,
        },
      ],
    }));
  },
  // removeCube는 position 값을 받아와 filter를 이용해 삭제 대상 위치값을 가진 cubes 항목을 걸러준다.
  removeCube: (x, y, z) => {
    set((prev) => ({
      cubes: prev.cubes.filter((cube) => {
        const [X, Y, Z] = cube.pos;
        return X !== x || Y !== y || Z !== z;
      }),
    }));
  },
  setTexture: () => {},
  saveWorld: () => {},
  resetWorld: () => {},
}));
remove Cube에 대해서는 간단한 기능이기에 설명은 넘어가고, useStore 수정이 끝났다면 Cube.js를 수정해보자
// src/components/Cube.js
import { useBox } from "@react-three/cannon";
import { useStore } from "../hooks/useStore"; // + useStore를 호출
import * as textures from "../images/textures";
export const Cube = ({ position, texture }) => {
  const [ref] = useBox(() => ({
    type: "Static",
    position,
  }));

  // + hook을 통해 addCube와 removeCube 기능을 가져오자
  const [addCube, removeCube] = useStore((state) => [
    state.addCube,
    state.removeCube,
  ]);

  const activeTexture = textures[texture + "Texture"];

  return (
    <mesh
      // + cube 물체에 onClick 이벤트를 부여
      onClick={(e) => {
        e.stopPropagation();
    	// 현재 물체의 이벤트가 발생한 면 Number를 가져온다.
        const clickedFace = Math.floor(e.faceIndex / 2);
    	// 물체의 위치값을 가져온다.
        const { x, y, z } = ref.current.position;
        // 만약 이벤트가 alt가 눌린채로 발생했다면 현재 이벤트 발생 위치의 cube를 지워준다.
        if (e.altKey) {
          removeCube(x, y, z);
          return;
        // 이후부터는 이벤트가 발생한 면 Number에 따라서 각 위치에 맞춰 addCube를 발생시킨다.
        } else if (clickedFace === 0) {
          addCube(x + 1, y, z);
          return;
        } else if (clickedFace === 1) {
          addCube(x - 1, y, z);
          return;
        } else if (clickedFace === 2) {
          addCube(x, y + 1, z);
          return;
        } else if (clickedFace === 3) {
          addCube(x, y - 1, z);
          return;
        } else if (clickedFace === 4) {
          addCube(x, y, z + 1);
          return;
        } else if (clickedFace === 5) {
          addCube(x, y, z - 1);
          return;
        }
      }}
      ref={ref}
    >
      <boxBufferGeometry attach="geometry" />
      <meshStandardMaterial map={activeTexture} attach="material" />
    </mesh>
  );
};
새로운 개념이 나왔다.
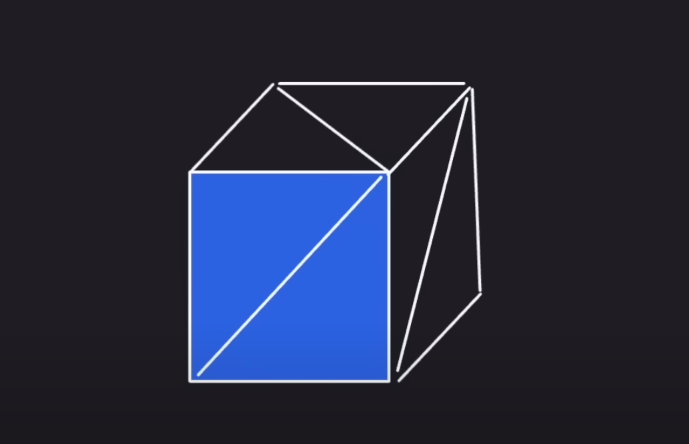
faceIndex
우리가 만드는 블록은 6개의 면을 가지고 있다고 생각하겠지만, threeJs에는 면을 3개의 꼭지점을 가진 삼각형으로 처리한다.
즉 블록의 면 구성은 다음과 같다.

우리가 한 면이라고 생각하는 면은 2개의 face로 구성되어있다.
그래서 소스코드 상으로는 faceIndex를 받아 2로 나눠준 뒤 Math.floor()를 통해서 반내림을 시켜준다.
각 Face의 순서는 지금 이해하려할 필요는 없는 것 같다.
지금은 주어진 소스코드를 그대로 적용시키며 face에 대한 이해만 해두자

자 이제 실행을 해보고 Cube를 설치해보고, 삭제해보자
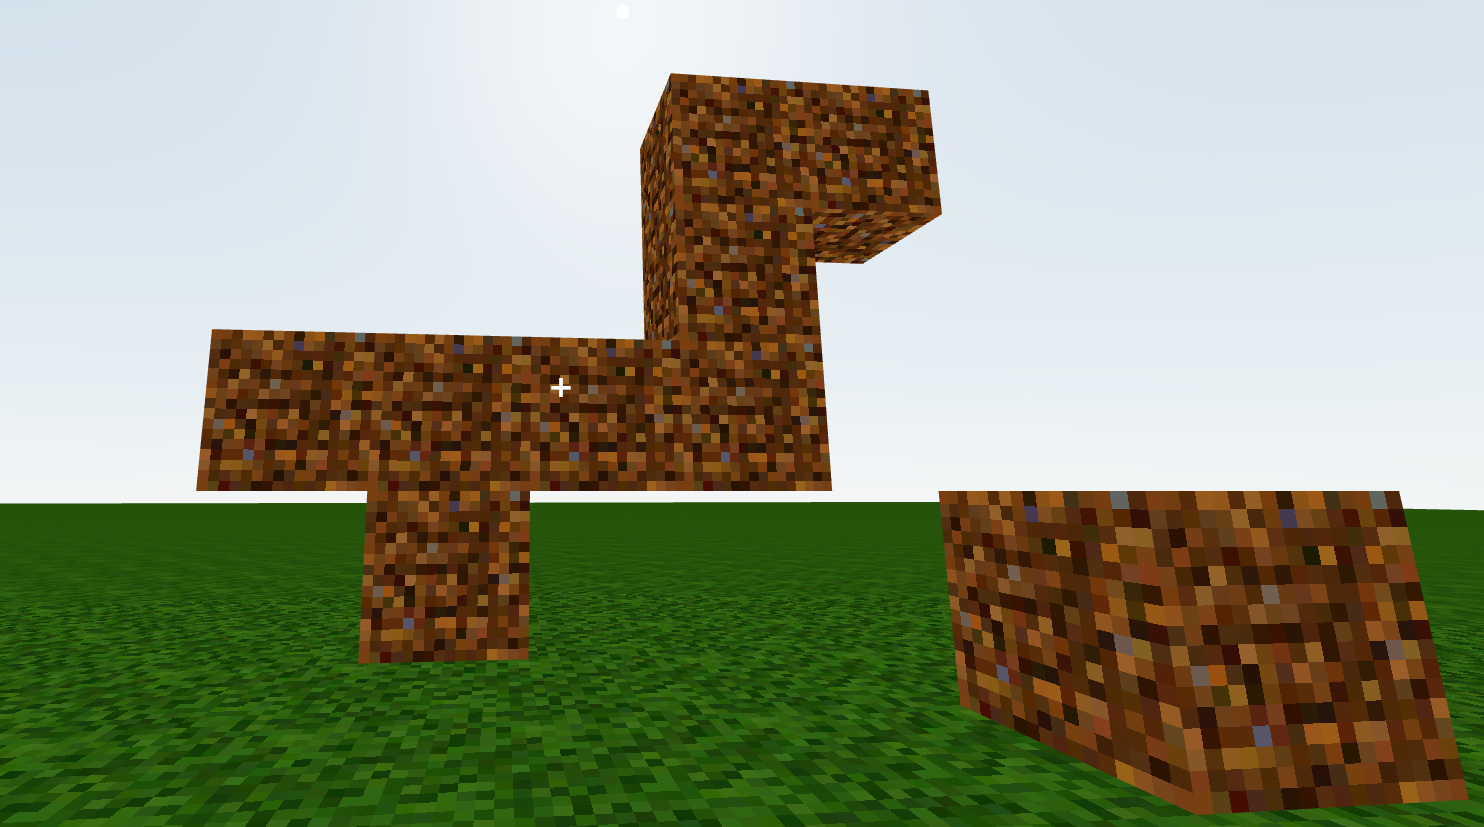
이제 Cube에 연속적으로 반영이 되는것을 확인 할 수 있다.
다음번에는 마지막으로 텍스쳐를 선택해 반영하고, localStorege에 world 정보를 반영하는 부분으로 마무리 지어보자