ThreeJs+React로 마인크래프트 만들기 번역(by Daniel Bark from freeCodeCamp) - Textures and images & Ground
react-threeJs-minecraft
이번에는 기존 images 폴더에 존재하는 이미지 파일을 이용해 3D 환경에서 표현될 질감으로 만들고자 한다.
이미 ThreeJS에서 이미지->질감으로 만들기 위한 기능을 제공하기에 코드 자체는 단순하다
먼저 images 폴더에 기본 제공되는 images.js를 열어보자
// src/images/images.js
import dirtImg from './dirt.jpg';
import grassImg from './grass.jpg';
import glassImg from './glass.png';
import logImg from './log.jpg';
import woodImg from './wood.png';

const images = {
	dirtImg,
	grassImg,
	glassImg,
	woodImg,
	logImg,
}

export default imagesimages라는 이름으로 export 되고있는 코드 구성을 좀더 단순하게 변경해보자
// src/images/images.js
// 내 환경에서는 ESLint를 사용하기에 기존 '으로 구성된 문자열이 "으로 변경됨(필수는 아님)
import dirtImg from "./dirt.jpg";
import grassImg from "./grass.jpg";
import glassImg from "./glass.png";
import logImg from "./log.jpg";
import woodImg from "./wood.png";

export { dirtImg, grassImg, glassImg, woodImg, logImg }; // images라는 통합된 이름 대신 구성요소를 개별로 분할
image 파일들이 export 되었다면 images 폴더에 textures.js 파일을 생성해주고 다음과 같이 구성하자
// src/images/textures.js
import { TextureLoader } from "three"; // 이미지 파일을 Texture로 변환하기 위한 기능
import { dirtImg, logImg, glassImg, grassImg, woodImg } from "./images";

const dirtTexture = new TextureLoader().load(dirtImg); // load()를 호출해 이미지를 할당하고 만들어진 texture 결과를 변수에 할당
const logTexture = new TextureLoader().load(logImg);
const grassTexture = new TextureLoader().load(grassImg);
const glassTexture = new TextureLoader().load(glassImg);
const woodTexture = new TextureLoader().load(woodImg);
const groundTexture = new TextureLoader().load(grassImg);

export {
  dirtTexture,
  logTexture,
  grassTexture,
  glassTexture,
  woodTexture,
  groundTexture,
};
TextureLoader를 통해 각 Texture 변수들에는 각각의 이미지를 활용한 텍스쳐가 담겨있다.
텍스쳐를 생성하고, 이 텍스쳐를 활용한 지면(Ground)을 만들어보자
src 경로에 components 폴더를 만들고 Ground.js 파일을 생성한뒤 다음과 같이 구성하자
import { usePlane } from "@react-three/cannon"; // 평면을 구성하기 위한 기능
import { groundTexture } from "../images/textures";

export const Ground = () => {
  // usePlane을 통해 평면을 구성하고 ref를 통해 접근한다.
  const [ref] = usePlane(() => ({
    rotation: [0, 0, 0], // 평면의 기울기
    position: [0, 0, 0], // 평면의 위치값
  }));
  return (
    // 다음에 mesh, planeBufferGeometry, meshStandardMaterial는 three-types.d.ts에 정의되어 있다.
    <mesh ref={ref}> //mesh는 3D 화면을 구성하는 물체이며 ref를 통해 cannon을 통해 구성한 평면의 물리적인 속성을 적용한다.
    // 물체(mesh)는 부피(Geometry)와 질감(Material)의 정보로 구성된다.
      <planeBufferGeometry attach="geometry" args={[100, 100]} />
      <meshStandardMaterial attach="material" map={groundTexture} />
    </mesh>
  );
};
모든것을 code에서 주석으로 설명하는 대신 중요 구성요소에 대해서 별도로 진행하고자 한다.
먼저 usePlane에 대해서 알아보자
cannon 라이브러리 ReadMe를 참조하면, API에 대해 명시가 되어있다.
API 링크
API에는 반환값이 API로 표시되어 있기에 react-three-cannon에 명시되어 있는 usePlane 선언부를 가져와보자
// react-three-cannon/src/hooks.ts
export function usePlane<O extends Object3D>(
  fn: GetByIndex<PlaneProps>,
  fwdRef?: Ref<O>,
  deps?: DependencyList,
) {
  return useBody('Plane', fn, () => [], fwdRef, deps)
}usePlane은 함수를 인자로 받으며, 해당 구성은 PlaneProps를 따른다.
PlaneProps는 @pmndrs/cannon-worker-api package로부터 import 되었다.
export type PlaneProps = BodyPropsPlaneProps는 BodyProps를 interface 형식으로 export한 개념이며, 실질적인 타입은 다음과 같다.
export type BodyProps<T extends any[] = unknown[]> =
  Partial<AtomicProps> &
  Partial<VectorProps> & {
    args?: T
    onCollide?: (e: CollideEvent) => void
    onCollideBegin?: (e: CollideBeginEvent) => void
    onCollideEnd?: (e: CollideEndEvent) => void
    quaternion?: Quad
    rotation?: Triplet
    type?: 'Dynamic' | 'Static' | 'Kinematic'
  }
우리가 넘기고자 했던 rotation에 대한 정보를 받고, position 정보에 대해서는 Partial<VectorProps> 내부에 선언되어 있다.
이러한 과정은 지금 중요한건 아니지만
readMe 상으로는 간략한 정보만 제공되고 상세 document가 안보였기에 잠시 구조를 알아보는 연습을 했다
지금은 간단히 개념만 이해하고 추가로 threeJS 자체에 대한 공부가 선행이 필요할 것 같다.
다음으로 mesh는 실제 3D 환경에서 구현될 물체를 나타낸다. ref를 연결해 cannon을 통한 평면의 물리적 정보를 연결시켜 주었고 추가로 부피(Geometry)와 질감(Material)의 정보를 구성한다.
planeBufferGeometry과meshStandardMaterial은 모두 threeJS document를 통해 그 구성을 확인 할 수 있다.
threeJS 코드를 확인하면 planeBufferGeometry에 대해 다음과 같이 명시되어있다.
class PlaneBufferGeometry extends PlaneGeometry {
	constructor(width, height, widthSegments, heightSegments) {
		console.warn('THREE.PlaneBufferGeometry has been renamed to THREE.PlaneGeometry.');
		super(width, height, widthSegments, heightSegments);
	}

} // r144
threeJs document를 통해 PlaneGeometry에 대한 내용을 확인해보자
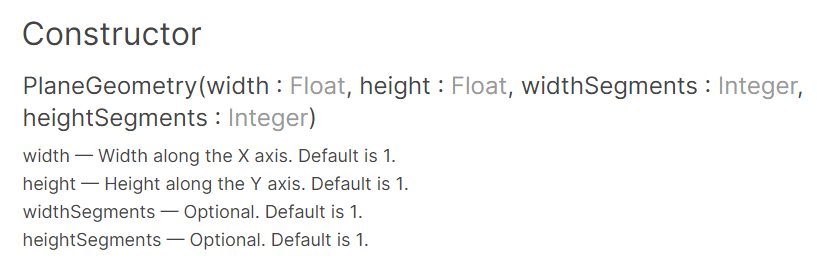
생성자를 통해 받는 인자값을 확인할 수 있으며
우리가 넘겨준 값은 [100,100]으로 각각 width(100)와 height(100)를 구성한다는 것을 알 수 있다.
즉 물체의 크기 100x100(폭x높이)의 구성을 가지게 된다.
MeshStandardMaterial에 대해서는 다음과 같이 Object를 파라미터로 받는다.
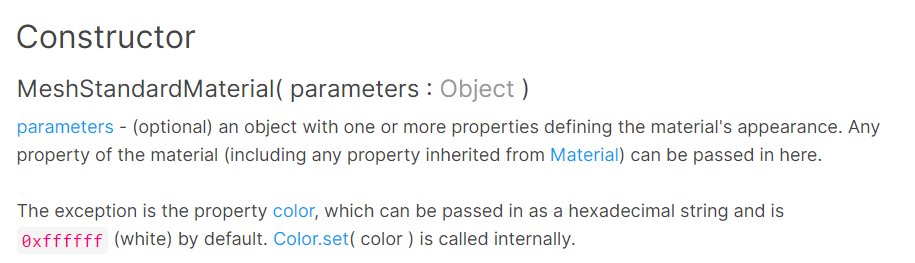
우리가 넘겨준 Object는 TextureLoader를 통해 Texture로 변환된 grassImg(잔디)를 넘겨준다.
각각의 PlaneBufferGeometry과 meshStandardMaterial에는 attach라는 속성이 붙어있다.
해당 속성은 react-three-fiber를 통한 속성이며 document에서 확인해 볼 수 있다.
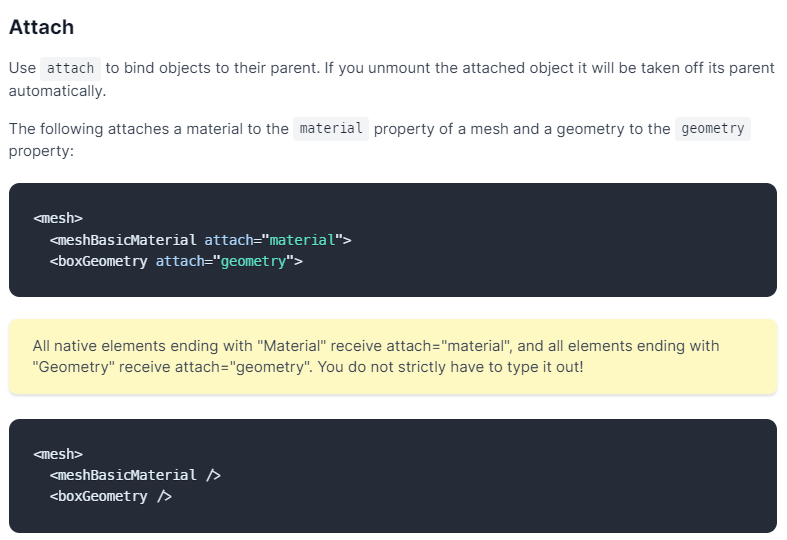
해당 부피와 질감 등의 객체들을 원형이 되는 부모에 연결하기 위한 속성이지만, material 및 geometry로 끝나는 객체는 자동으로 연결이 되기 때문에 생략이 가능하다.
설명이 좀 길어졌지만, 지면을 구성했으면 반영을 위해 App.js에 추가를 해줘야한다.
// src/App.js
import { Canvas } from "@react-three/fiber";
import { Sky } from "@react-three/drei";
import { Physics } from "@react-three/cannon"; // 물리적 계산 범위을 지정하기 위한 요소
import { Ground } from "./components/Ground"; // 새롭게 만든 Ground 컴포넌트를 import

function App() {
  return (
    <>
      <Canvas>
        <Sky sunPosition={[100, 100, 20]} />
        <ambientLight intensity={0.5} /> // 물체에 적용될 광원에 밝기
        <Physics> // 물리적인 계산이 필요한 요소는 Physics 내부에 선언한다.
          <Ground /> // 지면은 플레이어 및 블록들과 물리적인 연산이 필요함으로 Physics 내부에 선언
        </Physics>
      </Canvas>
    </>
  );
}

export default App;
새롭게 추가된 코드 중에 ambientLight가 존재한다.
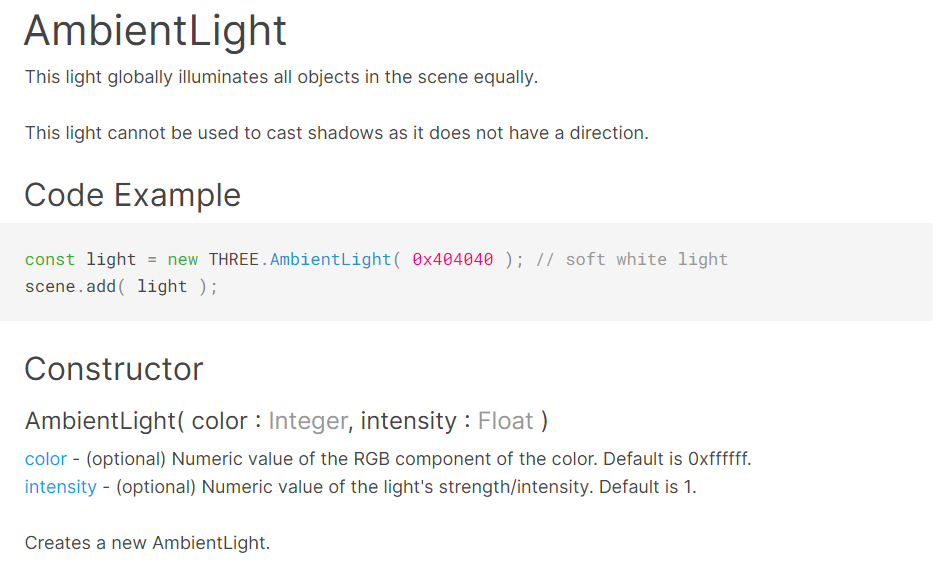
우리는 Sky를 통해 광원을 추가했지만, 광원이 물체에 작용하기 위해서는 빛의 속성을 정의해주어야 한다.
AmbientLight는 빛의 방향과는 관계 없이 빛 자체가 물체에 반영되는 작용을 정의한다.
우리는 color에 대해서 지정하지 않고 intensity의 값을 0.5로 주었다.
즉 빛의 강도를 0.5를 기준으로 각 물체에 균일하게 적용시켜준다.
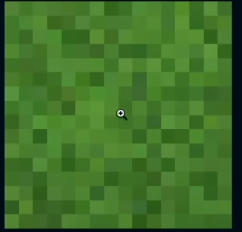
모든 소스코드를 작성하고 반영하면 우리는 다음과 같은 초록색 화면을 보게 된다.

우리가 원했던 것은 다음과 같은 잔디 이미지가 반영이 되는 것이다.
우리가 반영한 잔디 텍스쳐가 100x100에 사이즈에 맞춰서 확장이 되었기 때문에 텍스쳐를 반복시키는 작업이 필요하다.
다시 Ground.js로 돌아가 몇가지 소스코드를 추가해주자.
// src/components/Ground.js
import { usePlane } from "@react-three/cannon";
import { RepeatWrapping } from "three"; // + 텍스쳐 반복을 위해 추가
import { groundTexture } from "../images/textures";

export const Ground = () => {
  const [ref] = usePlane(() => ({
    rotation: [0, 0, 0],
    position: [0, 0, 0],
  }));

  // 아래 3줄의 코드를 추가
  groundTexture.wrapS = RepeatWrapping;
  groundTexture.wrapT = RepeatWrapping;
  groundTexture.repeat.set(100, 100);

  return (
    <mesh ref={ref}>
      <planeBufferGeometry attach="geometry" args={[100, 100]} />
      <meshStandardMaterial attach="material" map={groundTexture} />
    </mesh>
  );
};groundTexture는 기존에new TextureLoader().load()를 통해 Texture화 되었다.
그렇기에 wrapS와 wrapT의 정보는 threeJs document에 Texture 항목에서 찾을 수 있다.
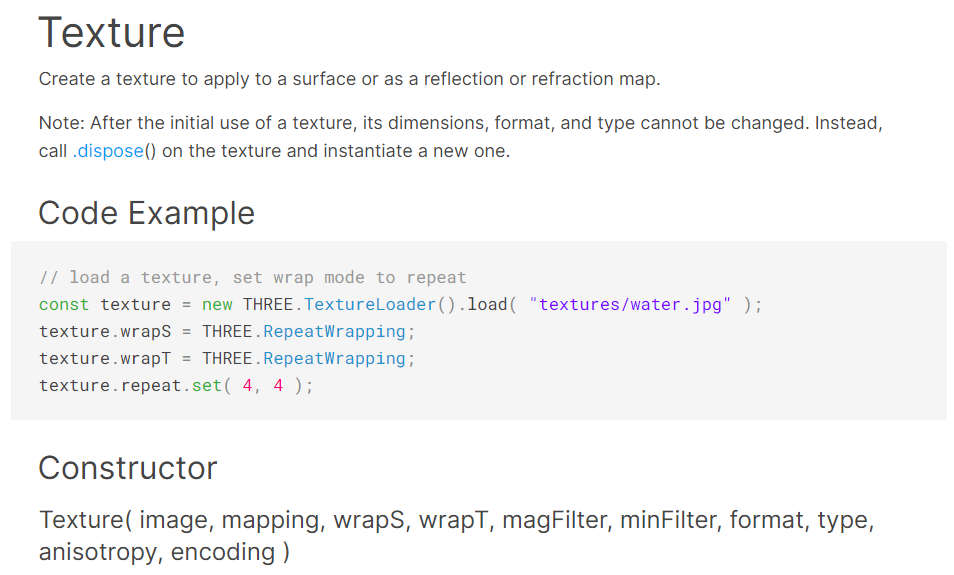
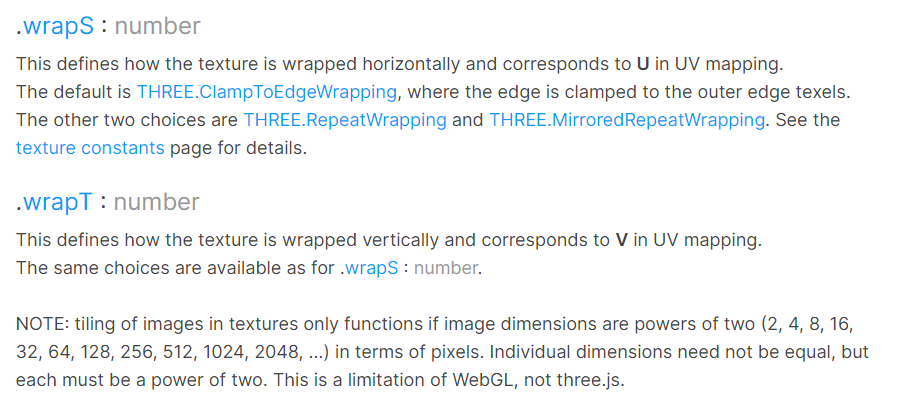
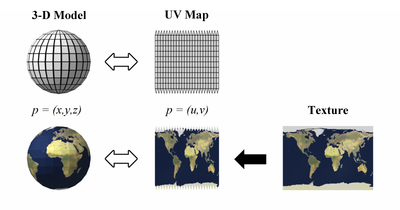
wrap은 텍스쳐가 래핑되는 방식을 지정하며, S는 수평이자 U, T는 수직이자 V를 뜻한다
UV는 2차원 그림을 3차원 모델로 만드는 UV 매핑을 의미한다.
UV 매핑
우리가 지정한 RepeatWrapping은 wrapS와 wrapT를 정의하는 속성으로 텍스쳐를 무한대로 반복시키며 매핑을 하는 방식이다.
groundTexture.repeat.set(100, 100);텍스쳐를 매핑하는 방식에 대해 정의를 했으면, repeat를 통해서 얼마나 반복을 진행할 것인지 알려준다.
우리는 Geometry를 통해 평면의 부피를 100x100으로 정의해 주었고 그 기준에 맞추어 텍스쳐의 반복을 수평 수직 100,100으로 진행해준다.
코드가 어떻게 동작하는지 실제로 확인해보자

이제 좀더 입체적인 패턴이 보이기 시작했다.
하지만 우리가 원한 네모 도트의 느낌보다는 약간 섞여버린 무언가가 나타났다.
다시 Ground.js로 돌아가 소스코드를 수정해보자
// src/components/Ground.js
import { usePlane } from "@react-three/cannon";
import { NearestFilter, RepeatWrapping } from "three"; // + NearestFilter 추가
import { groundTexture } from "../images/textures";

export const Ground = () => {
  const [ref] = usePlane(() => ({
    rotation: [0, 0, 0],
    position: [0, 0, 0],
  }));

  groundTexture.magFilter = NearestFilter; // Filter를 추가
  groundTexture.wrapS = RepeatWrapping;
  groundTexture.wrapT = RepeatWrapping;
  groundTexture.repeat.set(100, 100);

  return (
    <mesh ref={ref}>
      <planeBufferGeometry attach="geometry" args={[100, 100]} />
      <meshStandardMaterial attach="material" map={groundTexture} />
    </mesh>
  );
};
새롭게 magFilter가 추가되었다.
magFilter는 텍스쳐가 중첩되었을 때 샘플링 되는 방식으로 기본값은 4개의 가까운 픽셀을 이용해 보간된다.
NearestFilter를 사용하면 가장 가까운 텍스쳐 요소의 값을 반환한다.
그 결과는 다음과 같다.
좀더 자연스러운 픽셀이 표현되었고, 이것으로 지면이 구성되었다.
하지만 우리는 지면을 정면으로 마주보고 있는데, 평면 지면을 위해서 우리는 지면을 회전시켜야한다.
Ground.js의 소스코드를 수정해보자
// src/components/Ground.js
import { usePlane } from "@react-three/cannon";
import { NearestFilter, RepeatWrapping } from "three";
import { groundTexture } from "../images/textures";

export const Ground = () => {
  const [ref] = usePlane(() => ({
    rotation: [-Math.PI / 2, 0, 0], // rotation 값을 수정해 기울기를 조절하자
    position: [0, 0, 0],
  }));

  groundTexture.mapFilter = NearestFilter;
  groundTexture.wrapS = RepeatWrapping;
  groundTexture.wrapT = RepeatWrapping;
  groundTexture.repeat.set(100, 100);

  return (
    <mesh ref={ref}>
      <planeBufferGeometry attach="geometry" args={[100, 100]} />
      <meshStandardMaterial attach="material" map={groundTexture} />
    </mesh>
  );
};
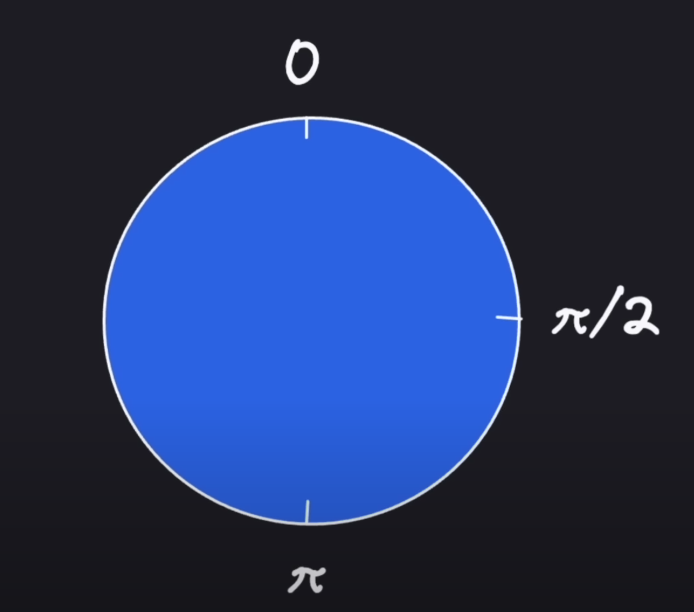
각도를 구할때 기준점은 π(파이)를 사용한다.
π/2 는 90도, π는 180도 로 계산할 수 있다.
지면을 회전시킬때, 우리는 x 축을 기준으로 한다.
즉 우리가 정면에서 바라볼때 x축의 각도를 조절하면 앞으로 넘어지거나 뒤로 넘어가는 형식으로 회전할 것이다.
다만 우리는 앞으로 넘어져 뒤집어 지기 보다는, 우리가 보는 그대로 뒤로 넘어져 깔리기를 원한다.
그러니 Math.PI에 -를 주고 /2로 나눠주자
그럼 지면은 뒤로 90도 만큼 누울 것이다.
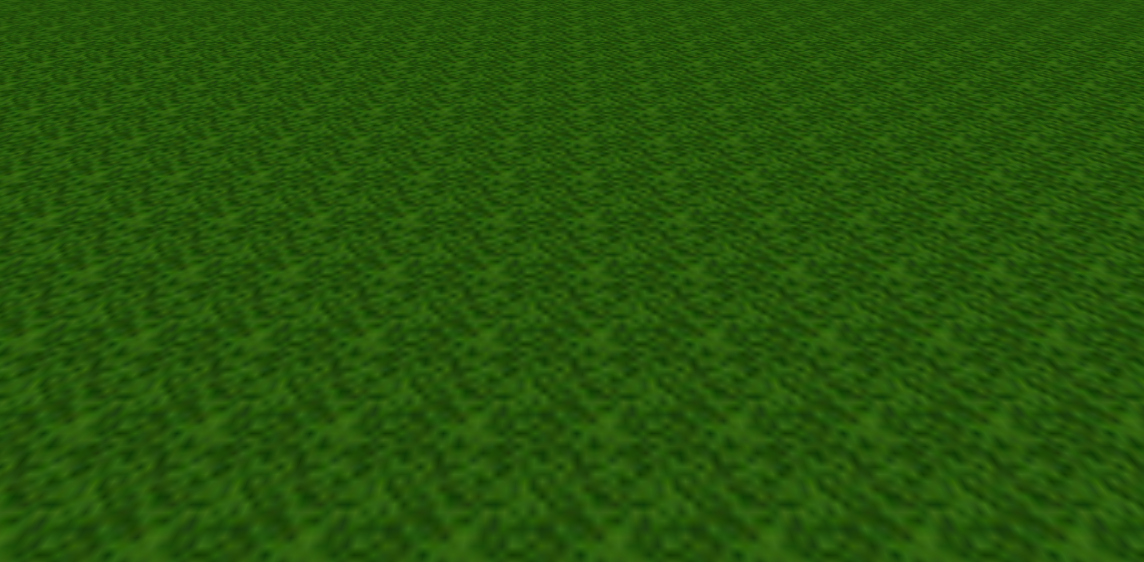
결과를 보면 지면이 사라진 것처럼 보이지만, 그저 회전을 했을 뿐 지면이라는 요소는 존재한다.
만약 각도를 -Math.PI / 4 정도로 살짝 덜 기울게 한다면 우리는 결과를 볼 수 있다.
이것으로 지면은 끝났다.
다음은 Player에 대한 처리를 진행해보자.