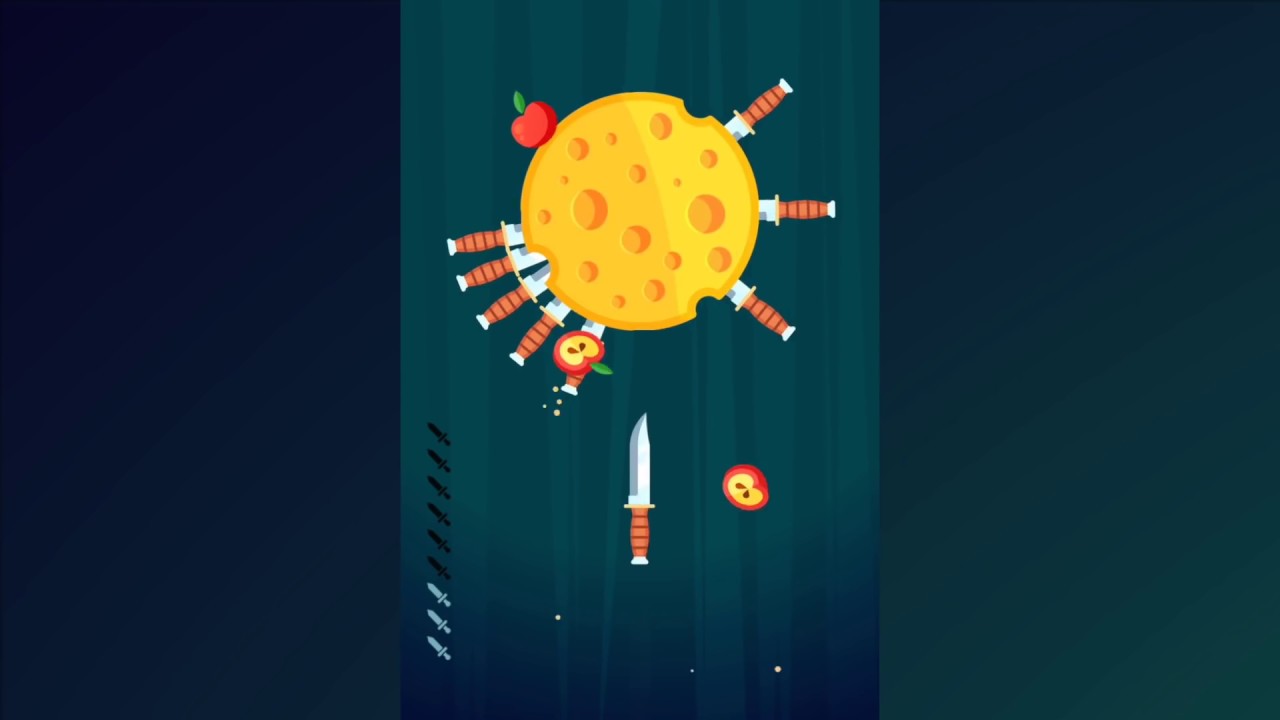
Knife Hit?
칼을 던져서 칼끼리 충돌시키지 않고 모두 오브젝트에 꽂으면 되는 간단한 게임이다.
Assets
시작하기 전에 DOTween Pro와 Odin Inspector를 임포트해줬다.
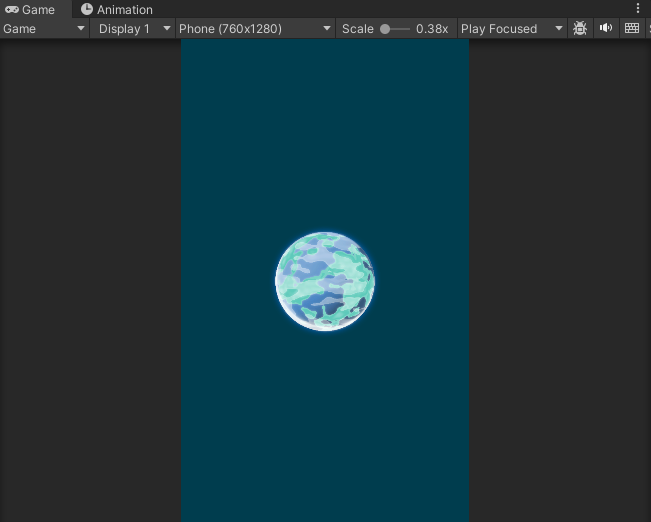
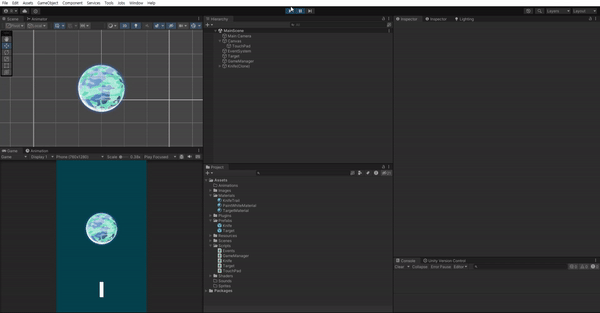
Target Object
일단 목표 오브젝트를 만들어줬다. 원래 그냥 Unity의 Circle 을 쓰려고했는데 그렇게 하니까 단색이라서 회전하는지를 모르겠어서 간단한 원형으로 된 스프라이트를 하나 가져왔다.
이제 회전을 시킬 차롄데 위 게임 영상을 보면 알다시피 회전이 불규칙하다는 점을 깔고 구현해보자. 일단 간단하게 아래 처럼 구현해줬다.
Target.cs
using System.Collections;
using System.Collections.Generic;
using DG.Tweening;
using Sirenix.OdinInspector;
using UnityEngine;

public class Target : MonoBehaviour
{
    public float minRotation = 0f;
    public float maxRotation = 720f;
    public float duration = 1f;

    [Button("Rotate Target")]
    public void RotateTarget() {
        float randomZRotation = Random.Range(minRotation, maxRotation);

        transform.DORotate(new Vector3(0f, 0f, randomZRotation), duration, RotateMode.FastBeyond360)
            .SetEase(Ease.InOutSine)
            .OnComplete(() => Debug.Log("Rotation Complete!"));
    }
}
근데 이렇게 하니 너무 최소각이 작게 나오면 회전하는거 같지가 않고, 회전 시간이 고정이다 보니깐 회전각이 커지면 너무 빠르게 회전해서 난이도가 너무 높았다. 또한 한쪽 방향으로만 거의 도는 것 같아서 회전 각에 -1 또는 1을 랜덤하게 곱해주고 회전각에 따라 회전 시간을 바꿔주도록 아래와 같이 수정했다.
[Button("Rotate Target")]
public void RotateTarget() {
    float randomZRotation = Random.Range(minRotation, maxRotation);
    float rotationDirection = Random.Range(0, 2) * 2 - 1;
    float targetRotation = transform.eulerAngles.z + rotationDirection * randomZRotation;
    float calculatedDurtaion = Mathf.Clamp(Mathf.Abs(rotationDirection * randomZRotation) / maxRotationSpeed, minDuration, maxDuration);

    transform.DORotate(new Vector3(0f, 0f, targetRotation), calculatedDurtaion, RotateMode.FastBeyond360)
        .SetEase(Ease.InOutSine);
}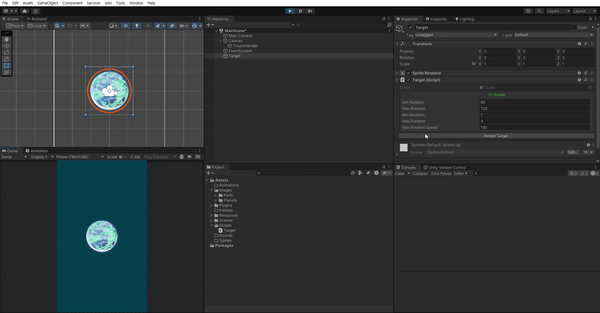
이제 충돌을 감지할 수 있게 circle Collider 2D를 만들어놓고 IsTrigger를 설정해준다. 칼이 꽂히는 듯한 효과를 주어야하기 때문에 Collider 2D의 Radius를 0.8 정도로 해준다.

이제 알아서 회전하도록 수정하자.
[Button("Rotate Target")]
IEnumerator RotateTarget() {
    float randomZRotation = Random.Range(minRotation, maxRotation);
    float rotationDirection = Random.Range(0, 2) * 2 - 1;
    float targetRotation = transform.eulerAngles.z + rotationDirection * randomZRotation;
    float calculatedDurtaion = Mathf.Clamp(Mathf.Abs(rotationDirection * randomZRotation) / maxRotationSpeed, minDuration, maxDuration);

    transform.DORotate(new Vector3(0f, 0f, targetRotation), calculatedDurtaion, RotateMode.FastBeyond360)
        .SetEase(Ease.InOutSine);

    yield return new WaitForSeconds(calculatedDurtaion);;
}

IEnumerator RotateTargetObject() {
    while (true) {
        yield return StartCoroutine(RotateTarget());

        float waitTime = Random.Range(0.5f, 2f);
        yield return new WaitForSeconds(waitTime);
    }
}
리소스 적으로 효율적인 코드는 아니다. WaitForSeconds를 new로 계속 찍어내기 때문에 성능상 당연히 효율적이지 않다. UniTask에 대해 다룬 내용이 있는데 해당 문서를 참고하자.
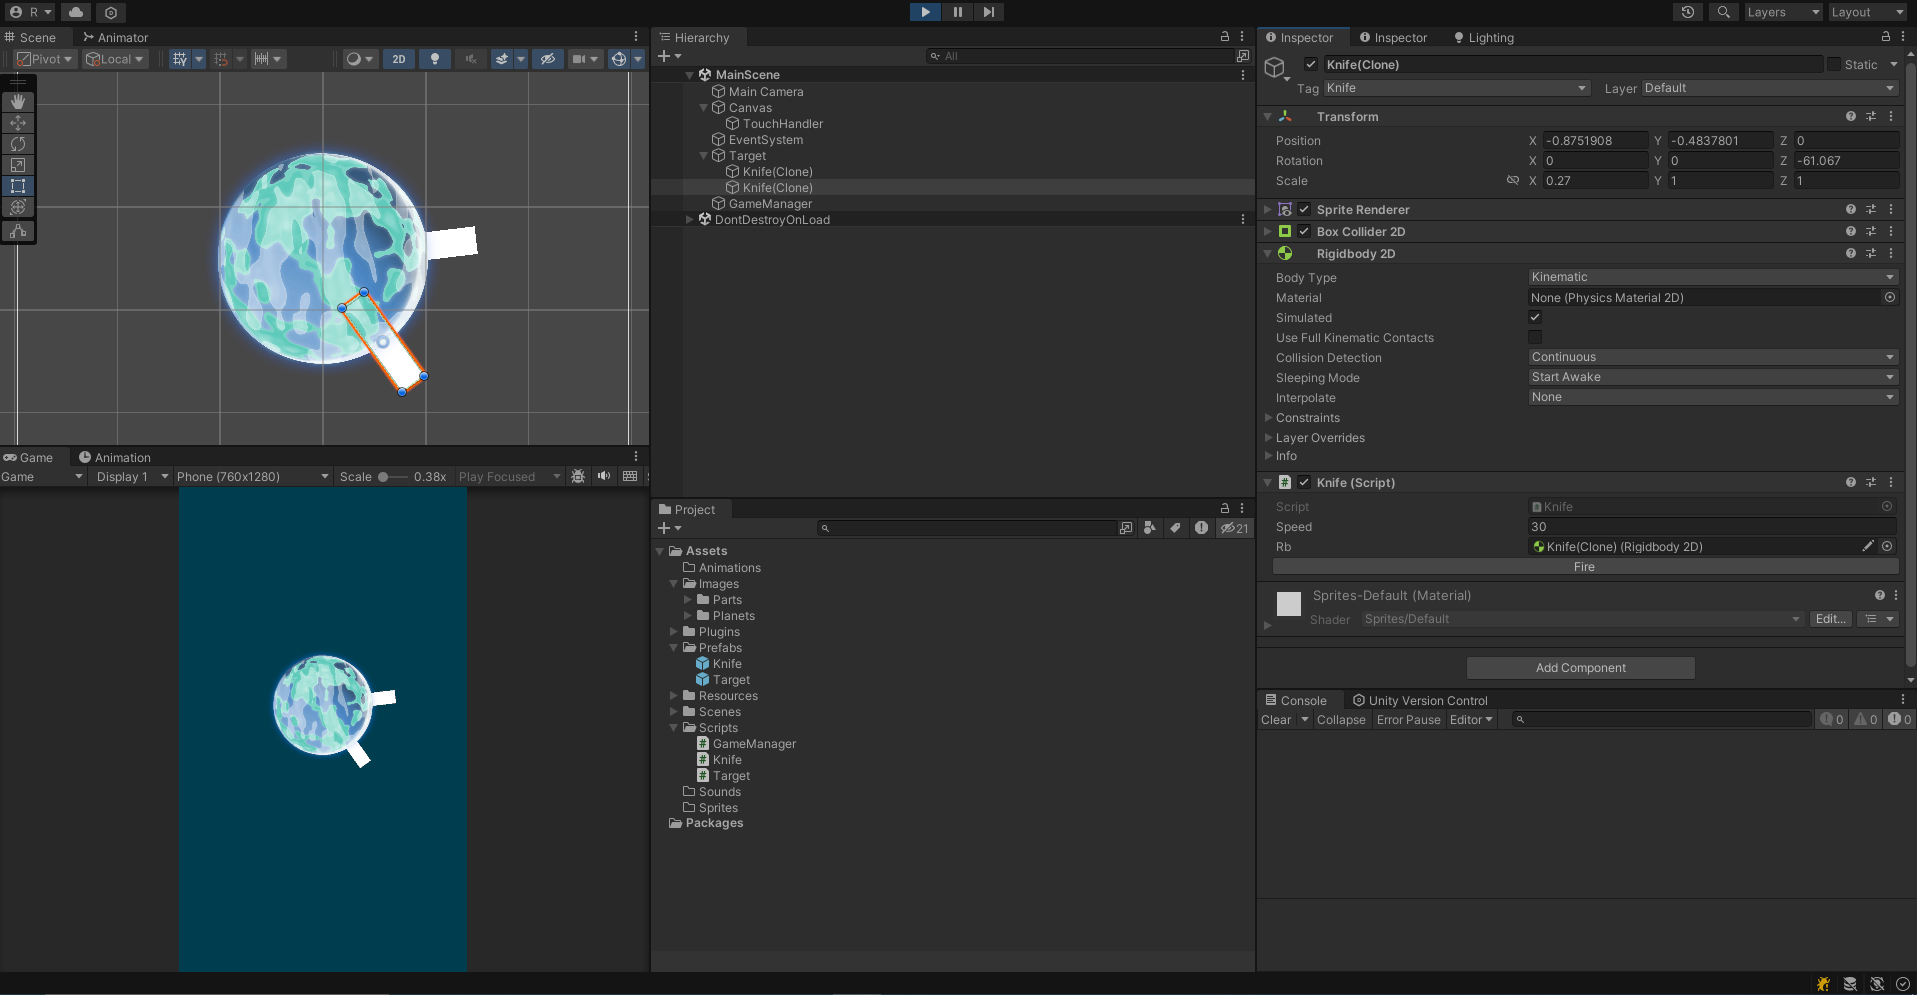
Knife Object
나이프 오브젝트는 상단으로 발사되는 로직을 먼저 구현하고 충돌 이벤트를 처리하자.
using System.Collections;
using System.Collections.Generic;
using Sirenix.OdinInspector;
using UnityEngine;

public class Knife : MonoBehaviour
{
    public float speed = 30f;

    [Button("Fire")]
    public void FireKnife() {
        Rigidbody2D rb = GetComponent<Rigidbody2D>();
        rb.velocity = Vector3.up * speed;
    }
}
그 다음에 Target과 Knife에 각각 Tag를 설정해주고 난 후 충돌 이벤트를 처리해보자. 충돌하면 그 자리에서 멈추고 이제 Target에 꽂힌 상태이기 때문에 회전의 영향을 받도록 Target의 자식 오브젝트로 넣어보자.
private void OnTriggerEnter2D(Collider2D collision) {
    if (collision.gameObject.CompareTag("Target")) {
        rb.velocity = Vector3.zero;
        transform.SetParent(collision.transform, false);
    }
    else if(collision.gameObject.CompareTag("Knife")) {
        //TODO - GameOver
    }
}
Knife의 속도가 너무 빨라서 Enter2D를 했을때 균일하게 위치하지를 않는다. 좌표를 보완해주도록 하자.
Collision Detection의 Continous에 대해서도 알고 있으면 좋다. 오브젝트가 빠르게 움직일때의 충돌 감지를 도와준다. 공식 문서를 참고하자.
private void OnTriggerEnter2D(Collider2D collision) {
    if (collision.gameObject.CompareTag("Target")) {
        rb.velocity = Vector3.zero;
        transform.position = new Vector3(0f, -0.5f, 0f);
        transform.SetParent(collision.transform, true);
    }
    else if(collision.gameObject.CompareTag("Knife")) {
        //TODO - GameOver
    }
}
잘 작동한다. 칼이 꽂히면 새로운 칼이 생성되도록 해보자. 그냥 간단히 GameManager에 SpawnKnife를 만들어서 호출해주도록 했다.
GameManager.cs
using System.Collections;
using System.Collections.Generic;
using Sirenix.OdinInspector;
using UnityEngine;

public class GameManager : MonoBehaviour
{
    private static GameManager instance;

    public static GameManager Instance
    {
        get
        {
            if (instance == null)
            {
                instance = new GameManager();
            }
            return instance;
        }
    }

    public GameObject knife;

    [Button("SpawnKnife")]
    public void SpawnKnife() {
        GameObject currentKnife = Instantiate(knife);
    }
}
Knife.cs
private void OnTriggerEnter2D(Collider2D collision) {
    if (collision.gameObject.CompareTag("Target")) {
        rb.velocity = Vector3.zero;
        transform.position = new Vector3(0f, -0.5f, 0f);
        transform.SetParent(collision.transform, true);

        GameManager.Instance.SpawnKnife();
    }
    else if(collision.gameObject.CompareTag("Knife")) {
        //TODO - GameOver
    }
}
TouchPad
터치를 인식하도록 TouchPad를 만들어주었다. Button을 꽉차게 설정해주고, 투명도를 설정해주면 터치패드를 쉽게 구현할 수 있다.
Events.cs
using System;

public static class Events
{
    public static Action OnTouchScreen;
}
TouchPad.cs
using UnityEngine;

public class TouchPad : MonoBehaviour
{
    public void OnTouch() {
        Events.OnTouchScreen?.Invoke();
    }
}
Knife.cs
public class Knife : MonoBehaviour
{
    public float speed = 30f;
    public Rigidbody2D rb;

    private void OnEnable() {
        Events.OnTouchScreen += FireKnife;
    }
    private void OnDisable() {
        Events.OnTouchScreen -= FireKnife;
    }

    private void Start() {
        rb = GetComponent<Rigidbody2D>();
    }

    [Button("Fire")]
    public void FireKnife() {
        rb.velocity = Vector3.up * speed;
    }

    private void OnTriggerEnter2D(Collider2D collision) {
        if (collision.gameObject.CompareTag("Target")) {
            rb.velocity = Vector3.zero;
            transform.position = new Vector3(0f, -0.5f, 0f);
            transform.SetParent(collision.transform, true);

            Events.OnTouchScreen -= FireKnife;

            GameManager.Instance.SpawnKnife();
        }
        else if(collision.gameObject.CompareTag("Knife")) {
            //TODO - GameOver
        }
    }
}
위와 같이 Events를 정적으로 선언해서 모든 스크립트에서 이벤트를 구독하고 해제하고 실행할 수 있도록 해주었다. (물론 실행은 한 곳에서만 하는게 좋다.) 그 이후에 Knife에서 칼이 생성될 때 OnTouchScreen 이벤트를 구독하고 칼이 꽂히면 OnTouchScreen 구독이 해제되도록 해주었다.
이렇게 이벤트로 구현하지 않고 단순히 버튼을 클릭할 때마다
GameManager의currentKnife의FireKnife메소드를 실행시켜도 된다. 그런데 추후에 터치할 때 마다 보유한 칼의 개수를 줄여나가는 이벤트를 같이 처리하기 위해서 이벤트로 만들어두었다. 그러면 그냥 OnTouchScreen 이벤트에 구독시켜놓고 한번에 실행시킬 수 있어서.
Effect
추가적인 로직을 개발하기 전에 간단한 애니메이션들을 추가해보자.
Target Hit Animation
칼이 Target 오브젝트에 꽂히면 Target 오브젝트가 잠깐 흔들리면서 피격 느낌이 나도록 반짝하는 애니메이션을 만들어보자.
[Button("OnHit")]
public void OnHit() {
    Shake(Random.Range(0, shakeStrength));
    Flash();
}

private void Shake(float shakeStrength) {
    transform.DOPunchPosition(Vector3.right * shakeStrength, shakeDuration, vibrato, randomness);
}

private void Flash() {
    //Color originalColor = SpriteRenderer.color;
}
반짝이는 효과를 만들어보려고 하는데 원래는 Color를 흰색으로 순간적으로 바꿨다가 돌아오도록 하려했는데 이미 SpriteRenderer의 기본 Color가 흰색이라 다른 방법으로 구현해야한다. 구글링 중에 좋은 문서를 찾아서 이를 토대로 구현했다.
아래처럼 흰색 세이더를 작성해준다.
PaintWhite.shader
 Shader "PaintWhite"
 {
    Properties
    {
    	_MainTex ("Particle Texture (Alpha8)", 2D) = "white" {}
    }

    Category
    {
    	Tags { "Queue"="Transparent" "IgnoreProjector"="True" "RenderType"="Transparent" }
    	Blend SrcAlpha One
    	Cull Off Lighting Off ZWrite Off Fog { Color (0,0,0,0) }

    	BindChannels
    	{
    		Bind "Color", color
    		Bind "Vertex", vertex
    		Bind "TexCoord", texcoord
    	}

    	SubShader
    	{
    		Pass
    		{
    			SetTexture [_MainTex]
    			{
    				combine primary, texture * primary
    			}
    		}
    	}
    }
 }
그 다음 해당 세이더로 PaintWhiteMaterial을 하나 만들어준다.

이후에 아래와 같이 스크립트를 작성한다.
private IEnumerator FlashCoroutine()
{
    spriteRenderer.material = paintWhiteMaterial;
    yield return new WaitForSeconds(flashDuration);
    spriteRenderer.material = originalMaterial;
}
완전 간단히 Damage Flash를 구현한 것이고 실제로 더 자세히 스프라이트에 Damage Flash를 입히고 싶다면 아래 영상을 참고하자.
Knife Trail Renderer
칼이 날라갈 때 궤적이 어느 정도 보이도록 Trail Renderer을 추가해보자.

Particle System
대강 게임과 유사하게 파티클 시스템을 구현해주었다. 그 다음에 칼이 Target에 꽂힐 때 해당 Particle System이 Play 되도록 해주었다.
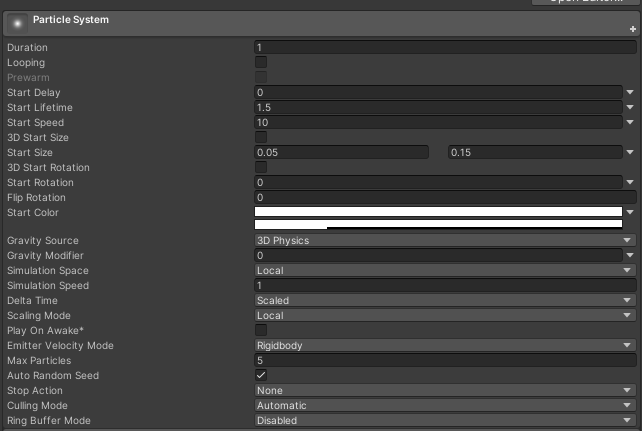

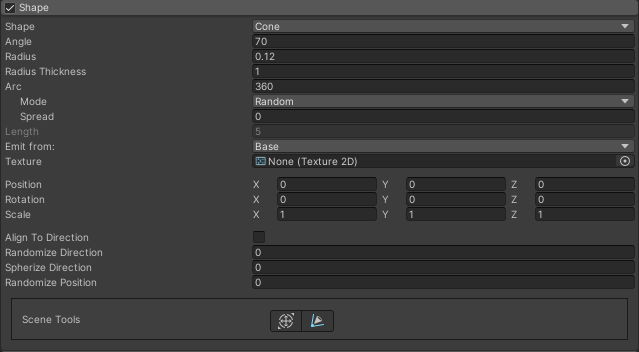
Cone으로 설정한 다음에 Rotation X = 90으로 설정해서 아래쪽 방향으로 Cone이 바라보도록 해주었다.
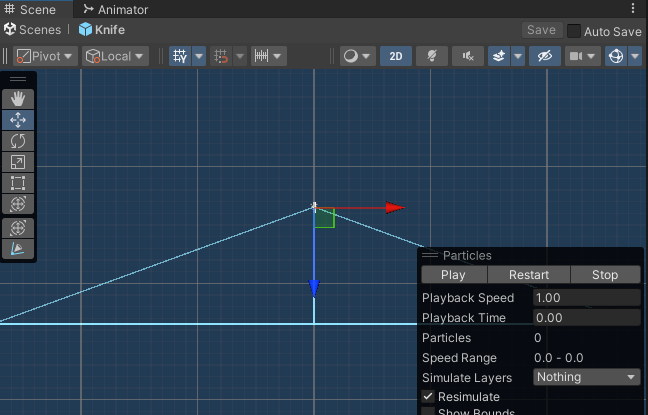

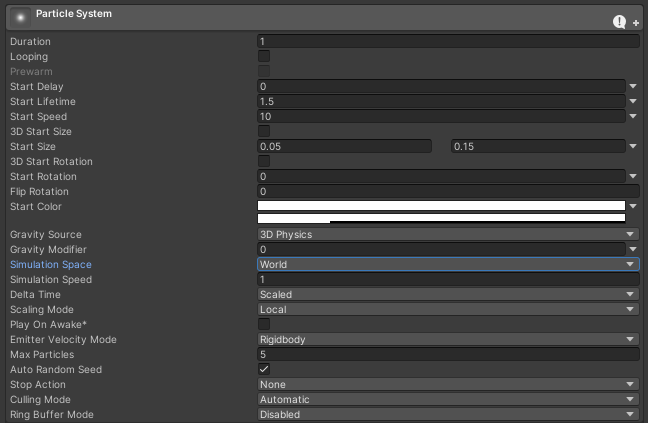
위와 같이 설정해주었다. 하지만 문제점이 있는데 Particle System이 Target의 자식으로 같이 들어가면서 Particle도 같이 회전하게 되었다. 단순히 Particle System의 Simulation Space를 World로 설정해주면 된다.
4개의 댓글

이제 알아서 회전하도록 수정하자.
이부분에
void Start() 함수추가해서
IEnumerator RotateTargetObject() 를 호출해야되는거지여?
Target Hit Animation
칼이 Target 오브젝트에 꽂히면 Target 오브젝트가 잠깐 흔들리면서 피격 느낌이 나도록 반짝하는 애니메이션을 만들어보자.
[Button("OnHit")]
public void OnHit() {
Shake(Random.Range(0, shakeStrength));
Flash();
}
private void Shake(float shakeStrength) {
transform.DOPunchPosition(Vector3.right * shakeStrength, shakeDuration, vibrato, randomness);
}
private void Flash() {
//Color originalColor = SpriteRenderer.color;
}
이 코드는 따로 스크립트를 만들어서 타겟에 붙이던가, Target.cs 에 넣어야 되는걸까여?
TouchPad.cs 는 게임매니저에 넣어서 버튼에서 호출해서 쓰는걸까여?
private IEnumerator FlashCoroutine() 도 Target.cs 에서 호출할거 같은데.
knife 에서 OnTriggerEnter 하면 Target.cs 의 OnHit() 을 호출하는 식일까여?
안녕하세요.
좋은 튜토 감사합니다.
근데 이렇게 하니 너무 최소각이 작게 나오면 회전하는거 같지가 않고, 회전 시간이 고정이다 보니깐 회전각이 커지면 너무 빠르게 회전해서 난이도가 너무 높았다. 또한 한쪽 방향으로만 거의 도는 것 같아서 회전 각에 -1 또는 1을 랜덤하게 곱해주고 회전각에 따라 회전 시간을 바꿔주도록 아래와 같이 수정했다.
이쪽에 gif가 있는데
maxRotationSpeed, minDuration, maxDuration
이건
public float maxRotationSpeed;
public float minDuration ;
public float maxDuration;
선언하면될거 같은데.
수치는 몇정도 이실까여?