- preview Link : -
- gitHub Link : https://github.com/suhan0304/Planet-Generation
PlanetGeneration
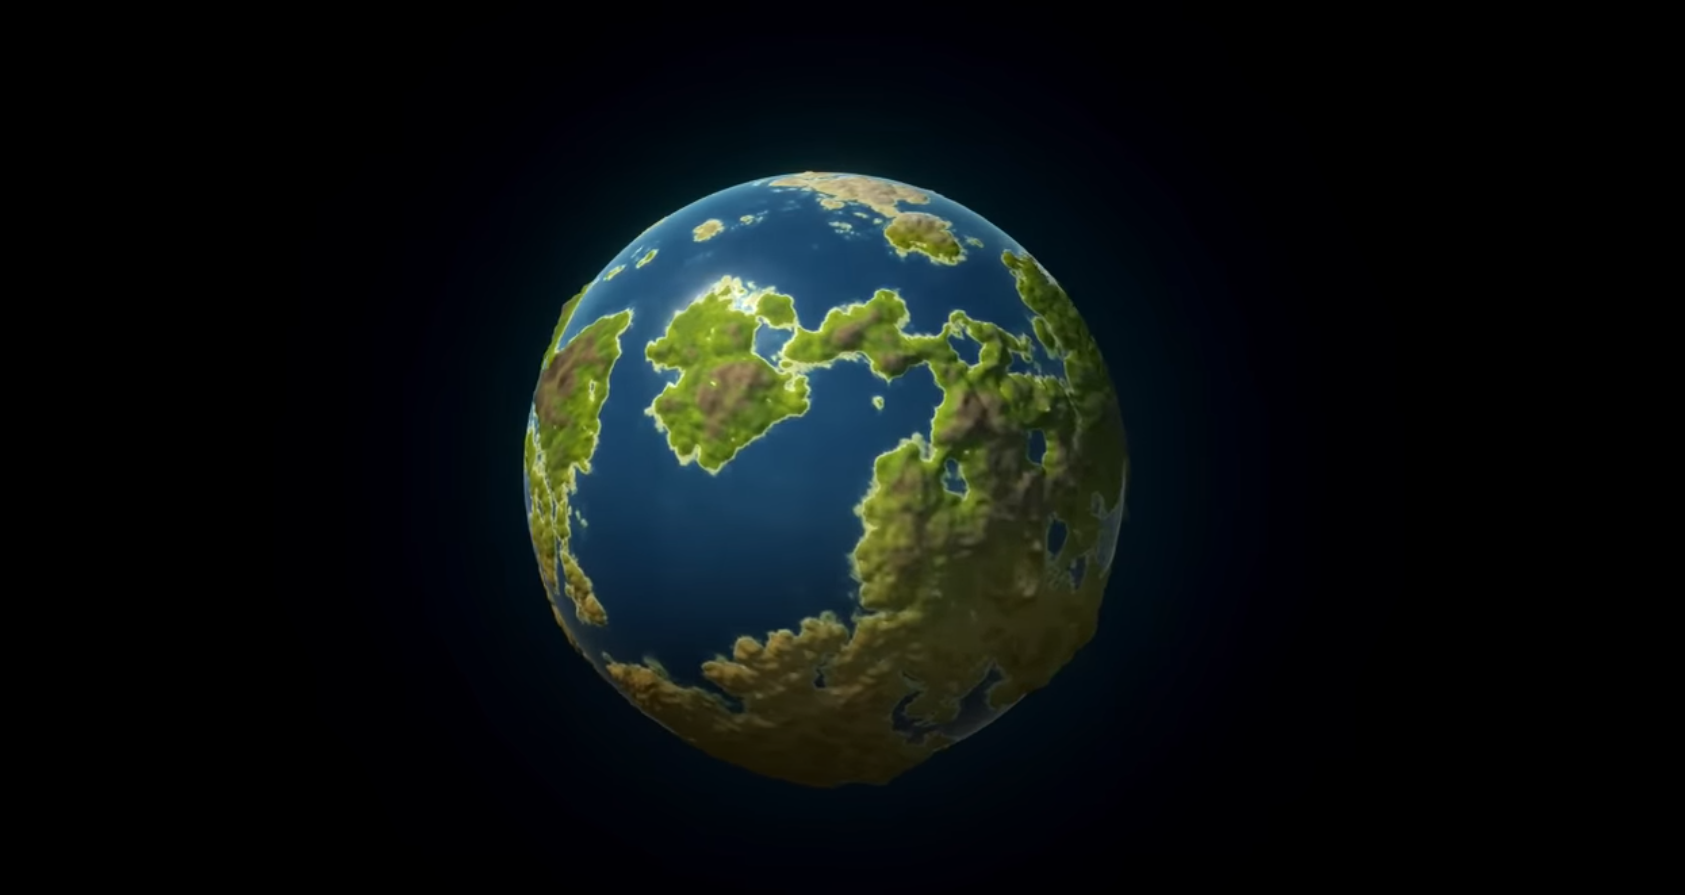
갑자기 뜬금없이 유니티로 실제 지구를 만들어보고 싶다는 생각이 들어서 일단 행성을 먼저 만들어보기 위해 해당 프로젝트를 진행하게 되었다.
스크립트
Planet과 TerrainFace라는 스크립트를 생성해준다. Planet은 실제로 우리가 만들게 될 행성을 담당하는 스크립트이고 TerrainFace는 해당 행성의 지표면을 책임질 스크립트이다.
지표면(TerrainFace)
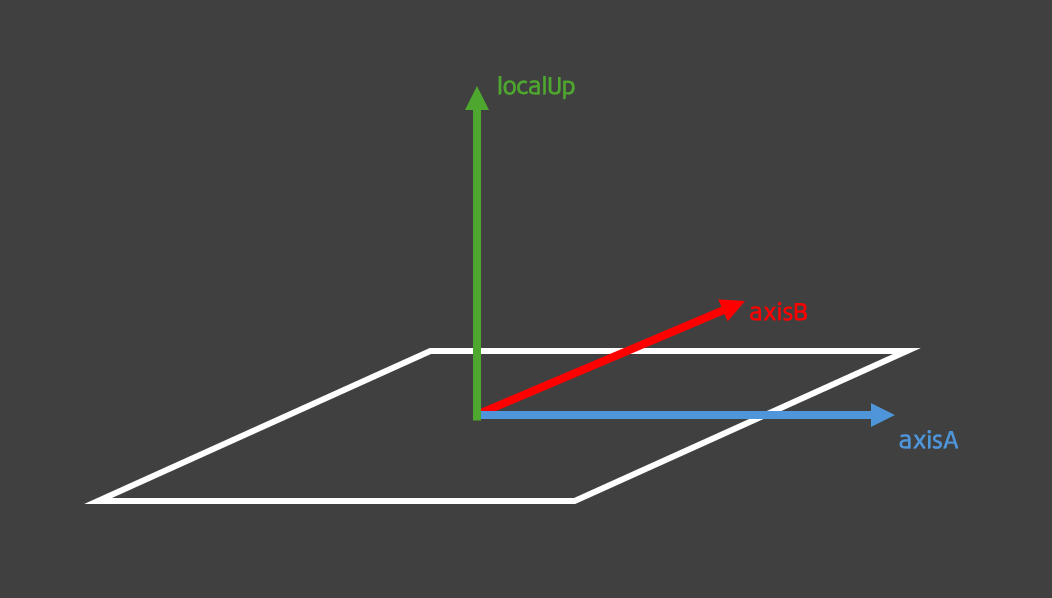
localUp은 지표면이 어디를 향하는지를 나타내는 벡터이다. localUp으로 axisA와 axisB를 구해준다.
public TerrainFace(Mesh mesh, int resolution, Vector3 localUp)
{
    this.mesh = mesh;
    this.resolution = resolution;
    this.localUp = localUp;

    axisA = new Vector3(localUp.y, localUp.z, localUp.x);
    axisB = Vector3.Cross(localUp, axisA);
}
해상도(resolution)
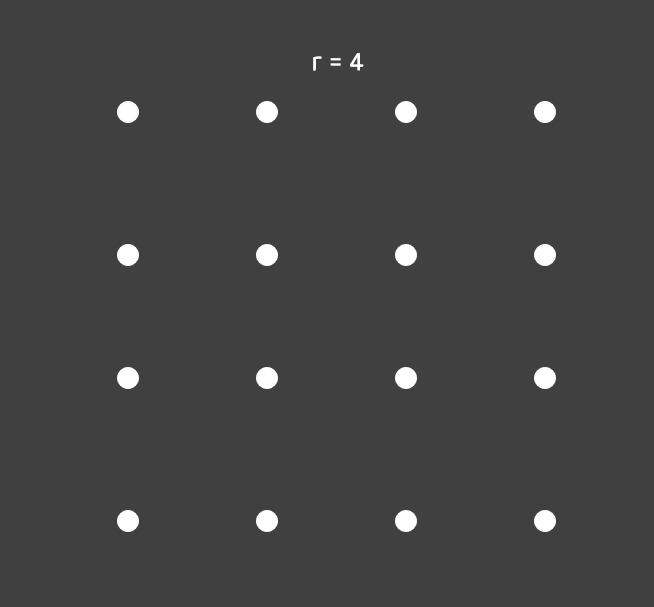
해상도(resolution)인 r = 4라고 할 때 다음과 같이 정점을 16개, r의 제곱 만큼 만들어준다.
그러면 각 점 4개를 이은 영역을 삼각형으로 쪼개면 총 18개의 삼각형을 쪼갤 수 있다.
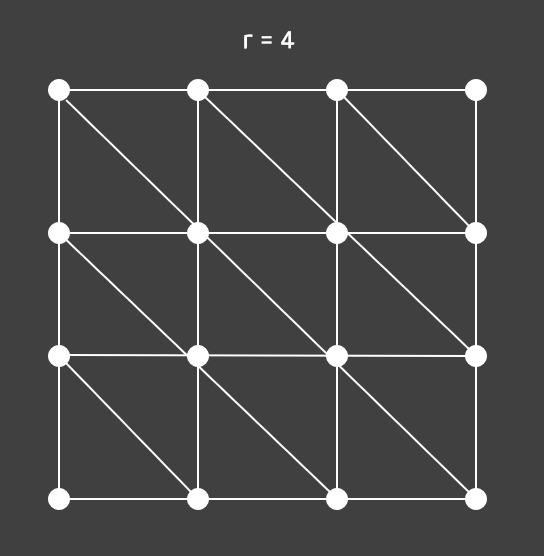
이를 수식으로 정리하면 해상도에 따른 정점(vertices)과 삼각형(triangles)의 갯수는 아래와 같다.
Vector3[] vertices = new Vector3[resolution * resolution];
int[] triangles = new int[(resolution - 1) * (resolution - 1) * 6];
이제 만든 정점을 만들어 위치를 정해주고 만들어준 정점으로 삼각형을 만들어보자.
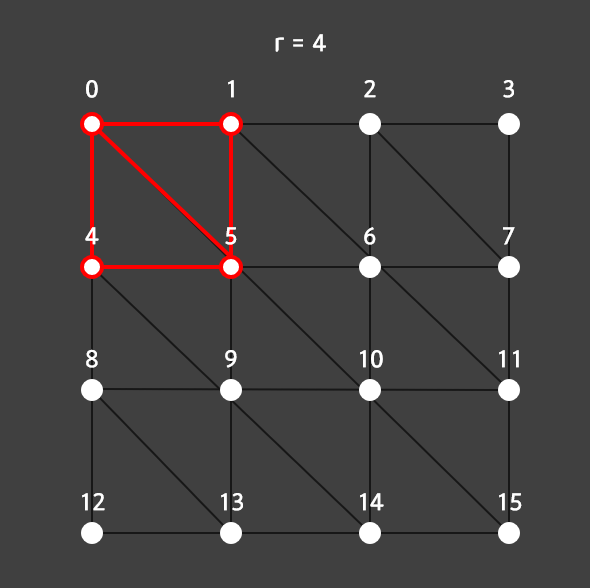
아래 그림을 보면 각 정점 (0, 5, 4), (0, 1, 5)가 삼각형을 2개 생성하는 것을 알 수 있고 이를 정리하면 와 같이 점 4개당 삼각형을 2개 만들어줄 수 있다.
이후에 pointOnCube를 정규화 시켠서 pointOnUnitSphere로 저장해준 후에 vertices의 위치에 적용시켜준다. 그러면 정점이 같은 거리에 위치하게 되면서 구체형태가 만들어진다.
using System.Collections;
using System.Collections.Generic;
using UnityEngine;

public class TerrainFace {

    Mesh mesh;
    int resolution;
    Vector3 localUp;
    Vector3 axisA;
    Vector3 axisB;

    public TerrainFace(Mesh mesh, int resolution, Vector3 localUp)
    {
        this.mesh = mesh;
        this.resolution = resolution;
        this.localUp = localUp;

        axisA = new Vector3(localUp.y, localUp.z, localUp.x);
        axisB = Vector3.Cross(localUp, axisA);
    }

    public void ConstructMesh()
    {
        Vector3[] vertices = new Vector3[resolution * resolution];
        int[] triangles = new int[(resolution - 1) * (resolution - 1) * 6];
        int triIndex = 0;

        for (int y = 0; y < resolution; y++)
        {
            for (int x = 0; x < resolution; x++)
            {
                int i = x + y * resolution;
                Vector2 percent = new Vector2(x, y) / (resolution - 1);
                Vector3 pointOnUnitCube = localUp + (percent.x - .5f) * 2 * axisA + (percent.y - .5f) * 2 * axisB;
                Vector3 pointOnUnitSphere = pointOnUnitCube.normalized;
                vertices[i] = pointOnUnitSphere;

                if (x != resolution - 1 && y != resolution - 1)
                {
                    triangles[triIndex] = i;
                    triangles[triIndex + 1] = i + resolution + 1;
                    triangles[triIndex + 2] = i + resolution;

                    triangles[triIndex + 3] = i;
                    triangles[triIndex + 4] = i + 1;
                    triangles[triIndex + 5] = i + resolution + 1;
                    triIndex += 6;
                }
            }
        }
        mesh.Clear();
        mesh.vertices = vertices;
        mesh.triangles = triangles;
        mesh.RecalculateNormals();
    }
}
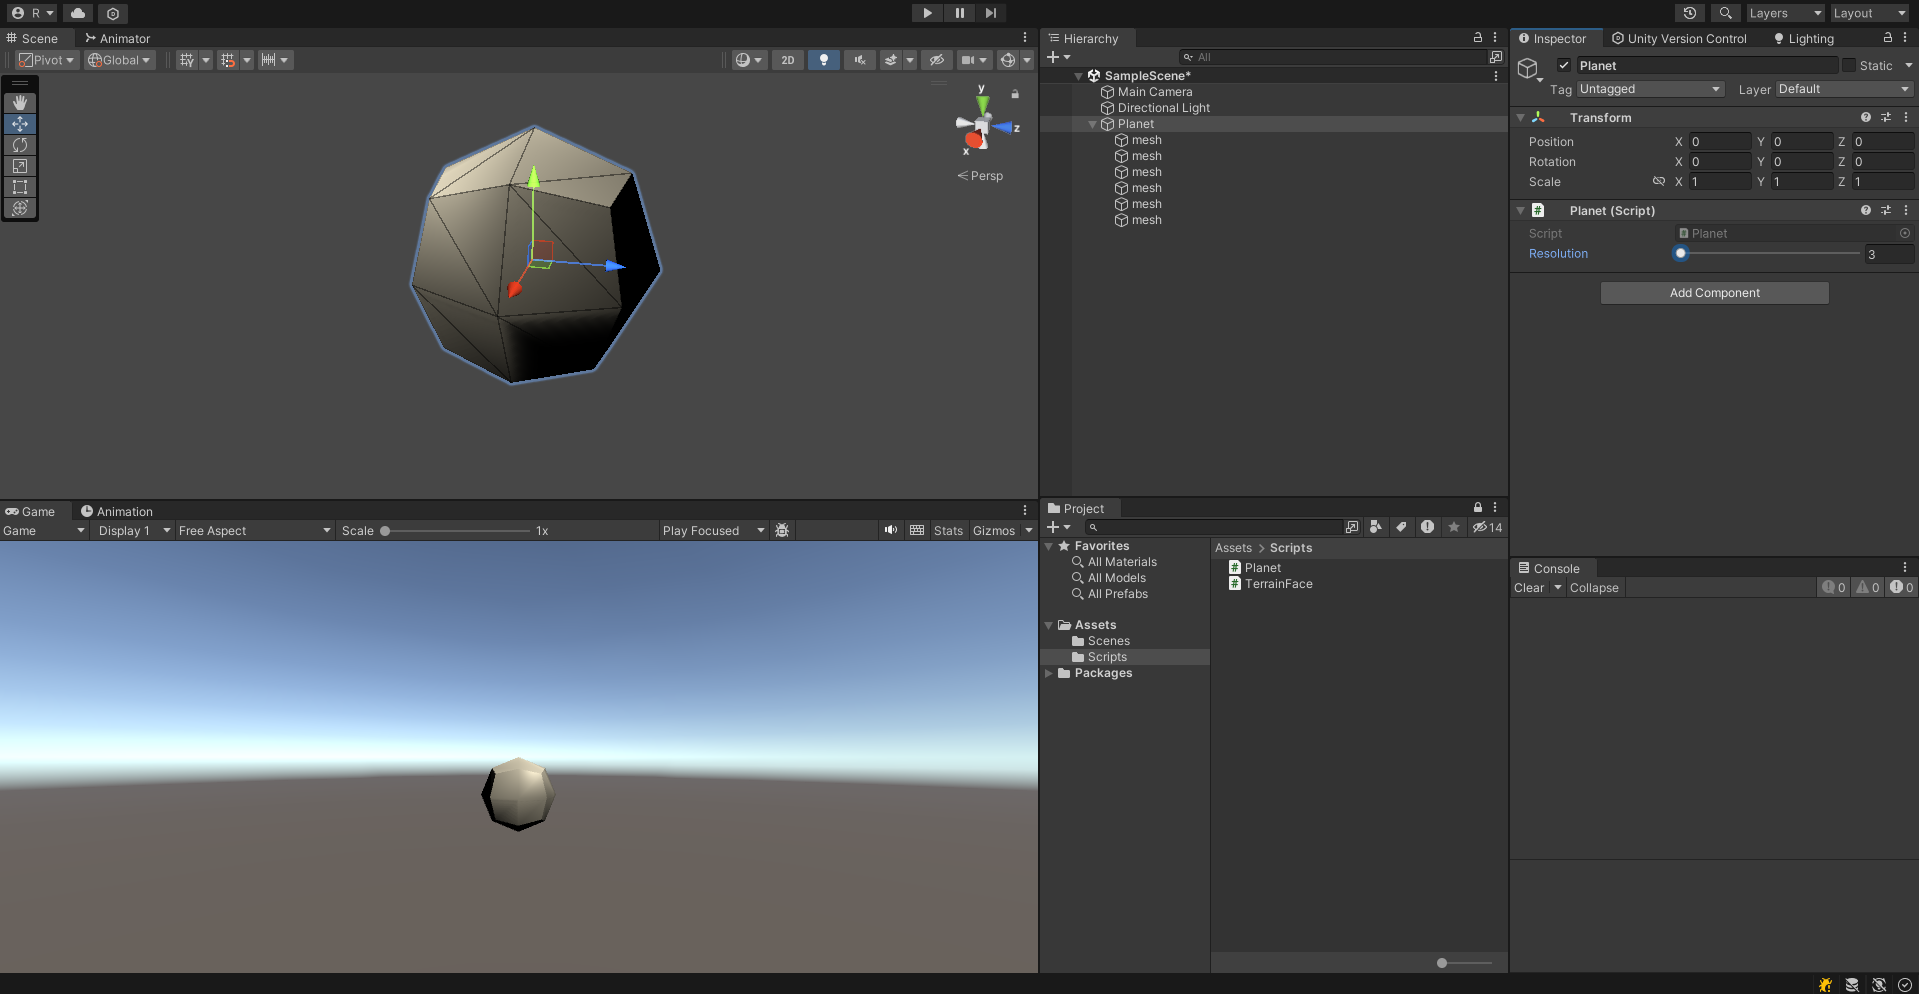
행성(Planet)
이제 작성한 TerrainFace의 mesh를 표현해보자. 6개의 면을 mesh라는 오브젝트로 새로 생성한다.
using System.Collections;
using System.Collections.Generic;
using UnityEngine;

public class Planet : MonoBehaviour {

    [Range(2,256)]
    public int resolution = 10;

    [SerializeField, HideInInspector]
    MeshFilter[] meshFilters;
    TerrainFace[] terrainFaces;

	private void OnValidate()
	{
        Initialize();
        GenerateMesh();
	}

	void Initialize()
    {
        if (meshFilters == null || meshFilters.Length == 0)
        {
            meshFilters = new MeshFilter[6];
        }
        terrainFaces = new TerrainFace[6];

        Vector3[] directions = { Vector3.up, Vector3.down, Vector3.left, Vector3.right, Vector3.forward, Vector3.back };

        for (int i = 0; i < 6; i++)
        {
            if (meshFilters[i] == null)
            {
                GameObject meshObj = new GameObject("mesh");
                meshObj.transform.parent = transform;

                meshObj.AddComponent<MeshRenderer>().sharedMaterial = new Material(Shader.Find("Standard"));
                meshFilters[i] = meshObj.AddComponent<MeshFilter>();
                meshFilters[i].sharedMesh = new Mesh();
            }

            terrainFaces[i] = new TerrainFace(meshFilters[i].sharedMesh, resolution, directions[i]);
        }
    }

    void GenerateMesh()
    {
        foreach (TerrainFace face in terrainFaces)
        {
            face.ConstructMesh();
        }
    }
}
이제 Planet이라는 오브젝트를 만들고 스크립트를 생성하면 6개의 mesh 오브젝트가 자식 오브젝트로 자동으로 생성되면서 구체가 생성되는 것을 확인할 수 있다. 이제 Planet의 해상도 값을 조절하면서 어떻게 오브젝트가 변하는지 확인할 수 있다.
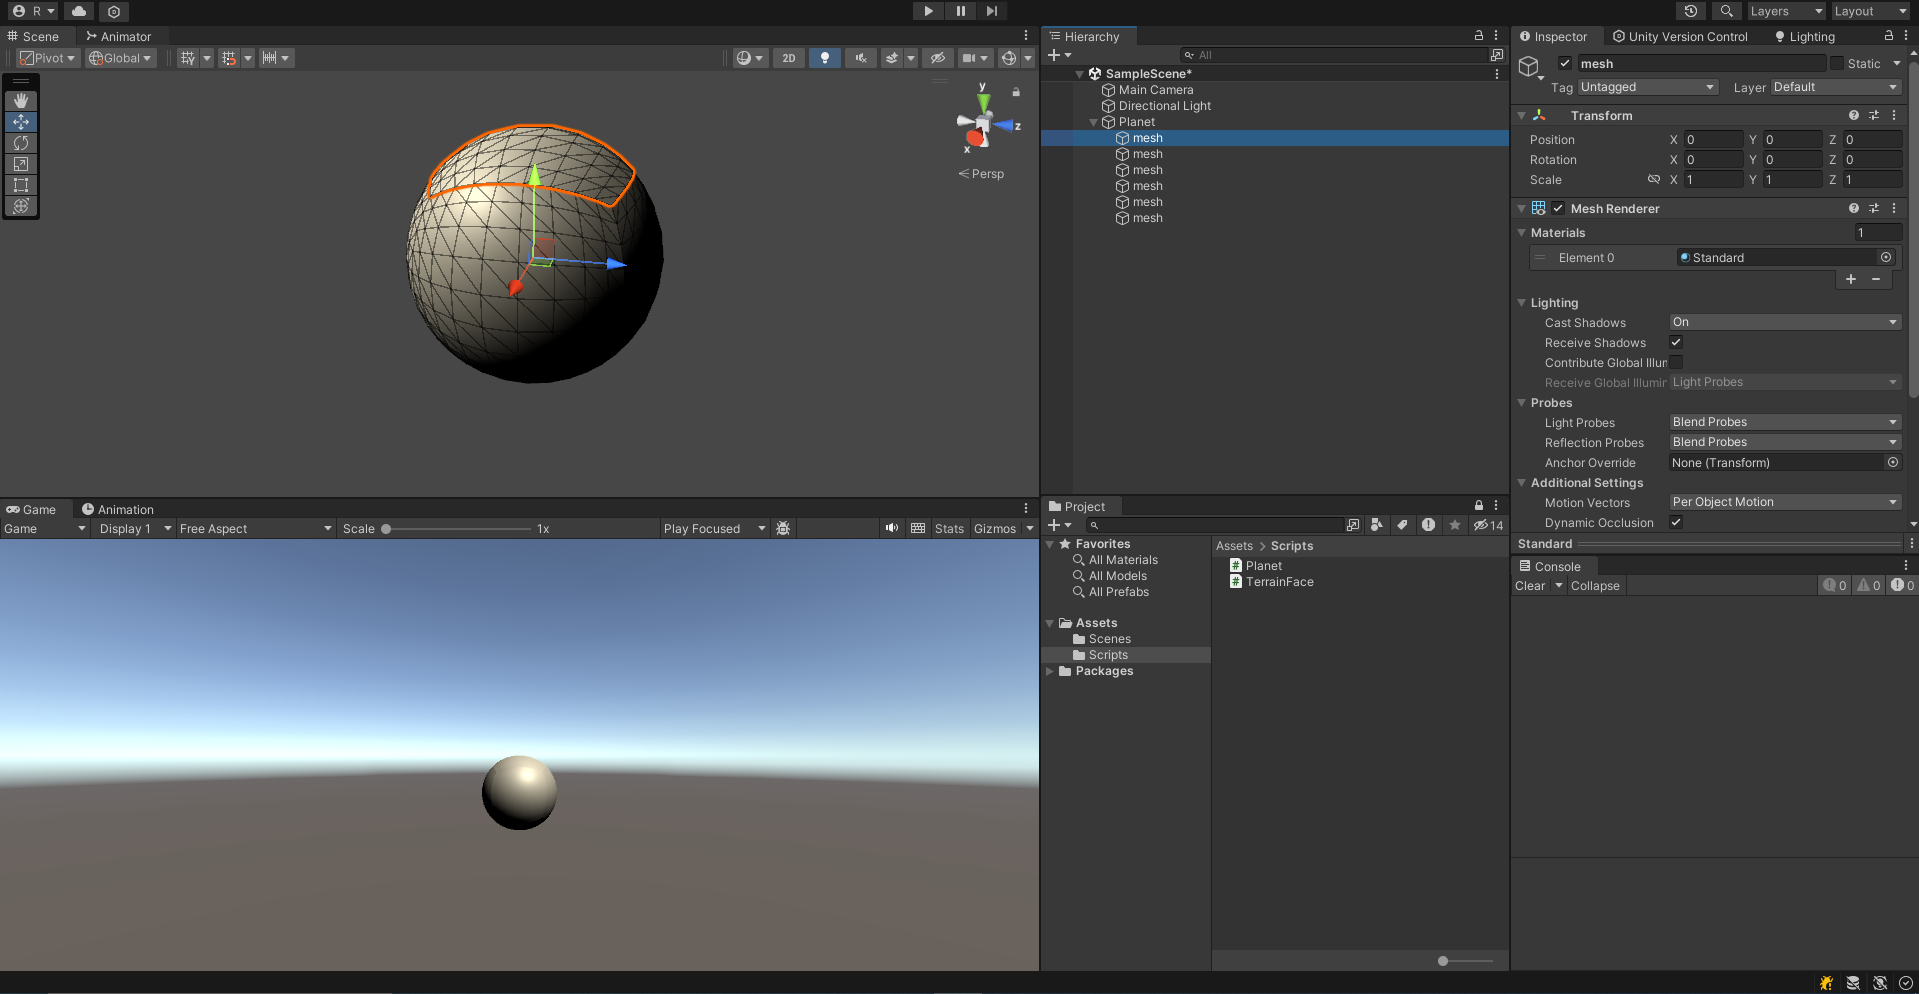
간단하게 요약하자면 정육면체를 먼저 만들어준 후에 해상도에 맞게 정점을 위치시킨다. 각 정점의 위치를 정해주고 규칙에 맞게 정점을 3개씩 묶어서 삼각형을 만들어준다. 이 때 각 정점을 정규화를 해서 같은 거리에 위치하도록 한다. 그러면 해상도에 맞게 더 작고 많은 삼각형으로 쪼개지면서 완벽한 구체에 가까워지는 것을 확인할 수 있다.
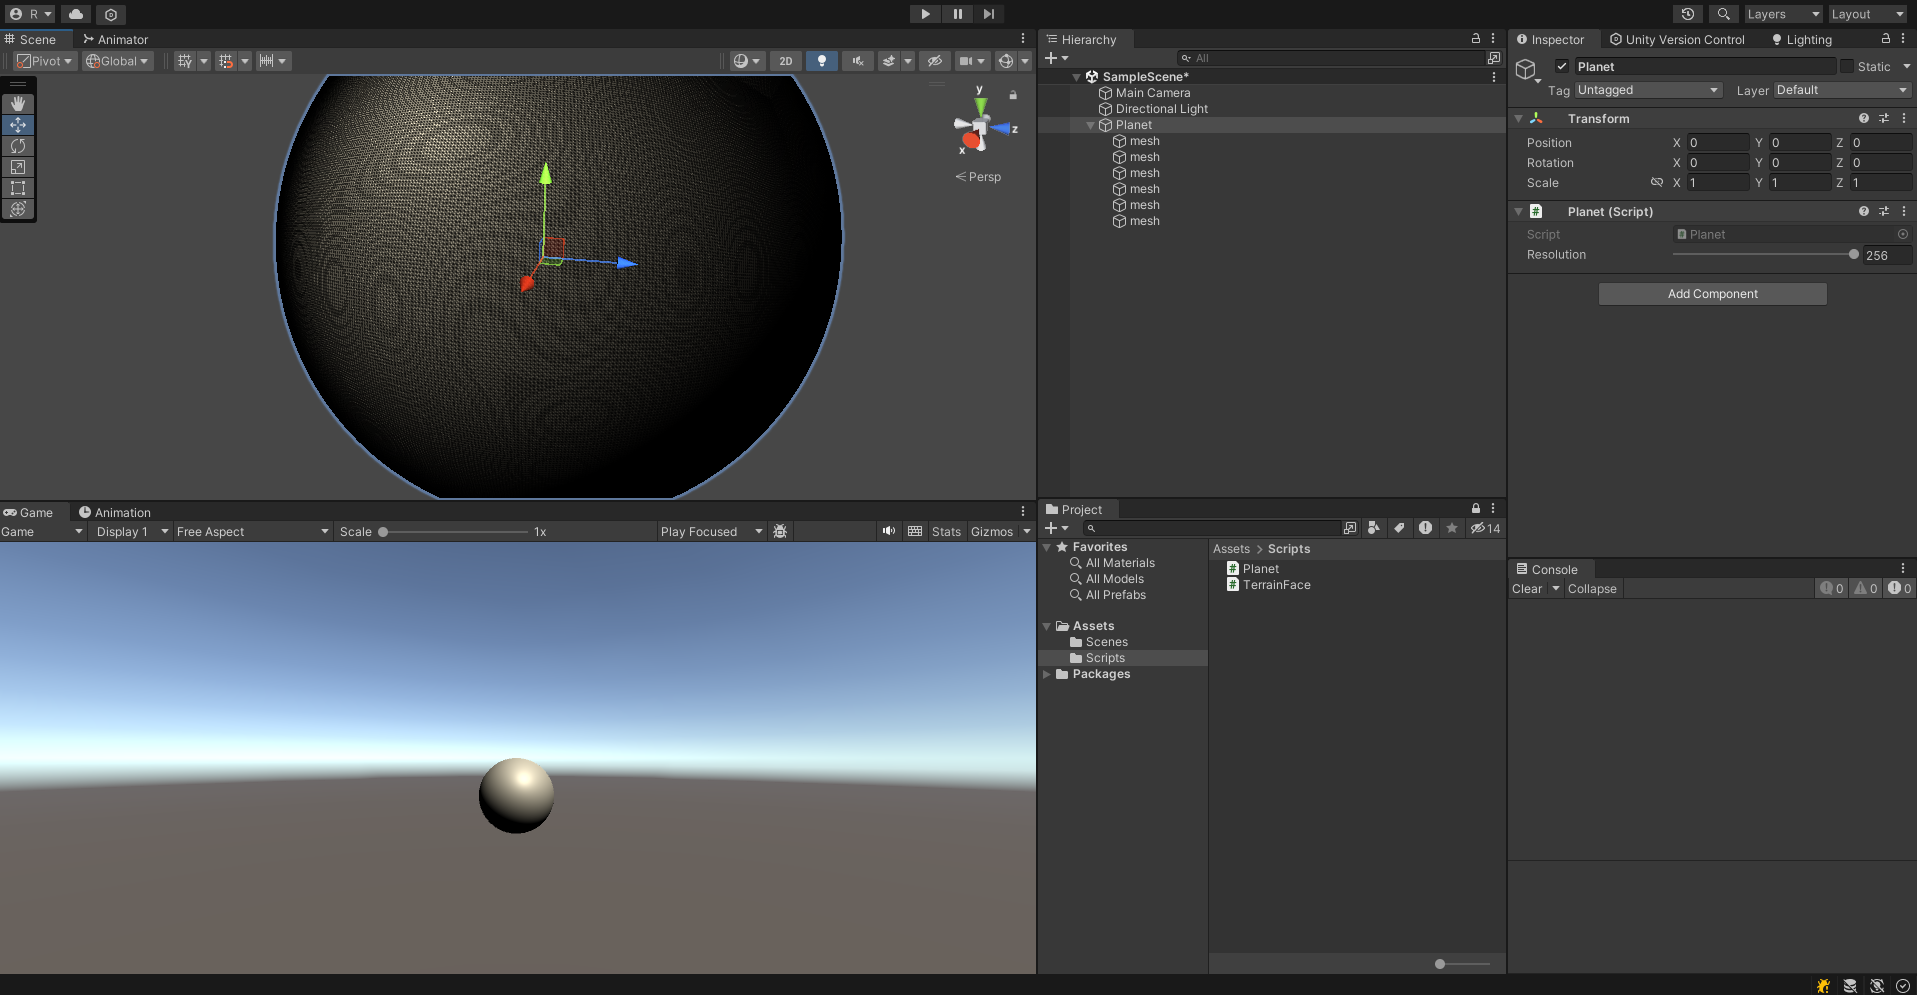
해상도를 늘릴 수록 구체에 더 가까워 지지만 당연하게도 정점, 삼각형 배열이 거의 제곱으로 늘어나기 때문에 리소스가 더 많이 필요해진다. 위 사진은 설정한 최고 해상도 256일 때이다. 정점과 삼각형이 매우 많은 것을 확인할 수 있다.