- preview Link : https://velog.io/@suhan0304/Unity-Space-Shooter-4
- gitHub Link : https://github.com/suhan0304/SpaceShooter\
Updates
GameManager.cs
- 아래 Scripts 참고
- 싱글톤 패턴
Monster 생성
- 오브젝트 풀링 적용
- Raycast 피격 로직으로 변경
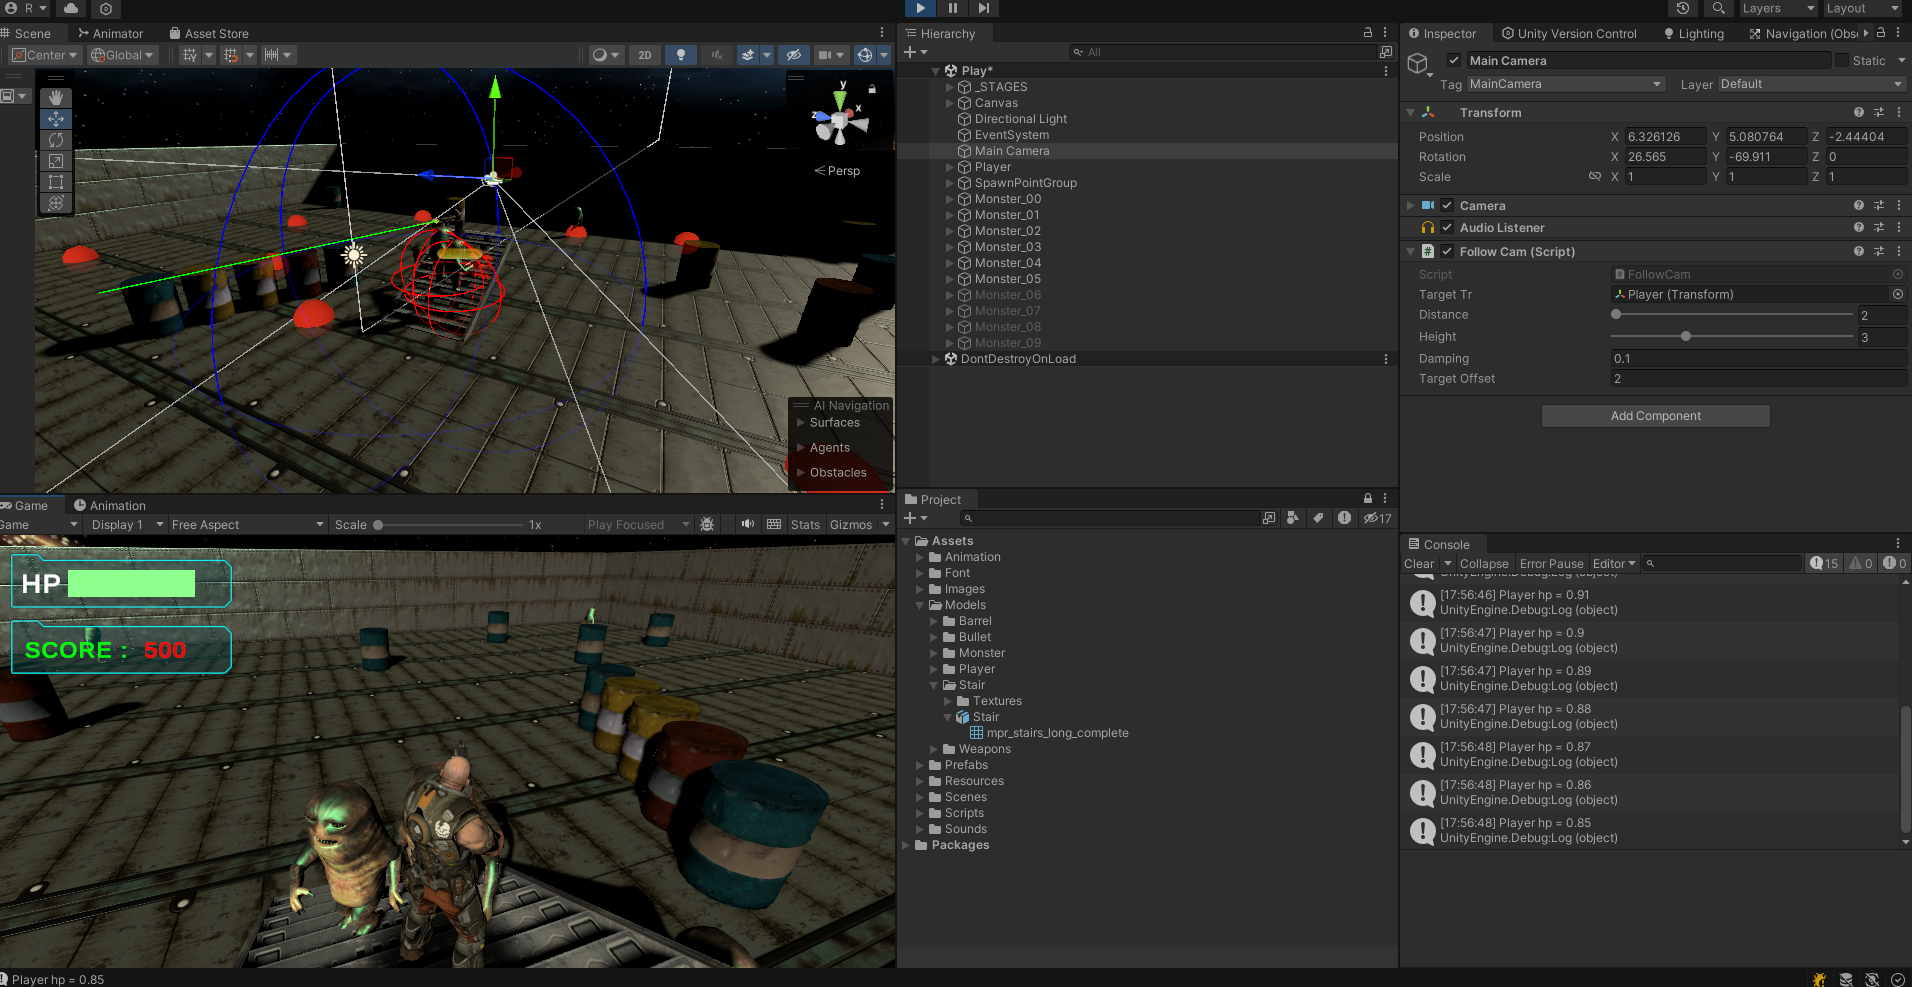
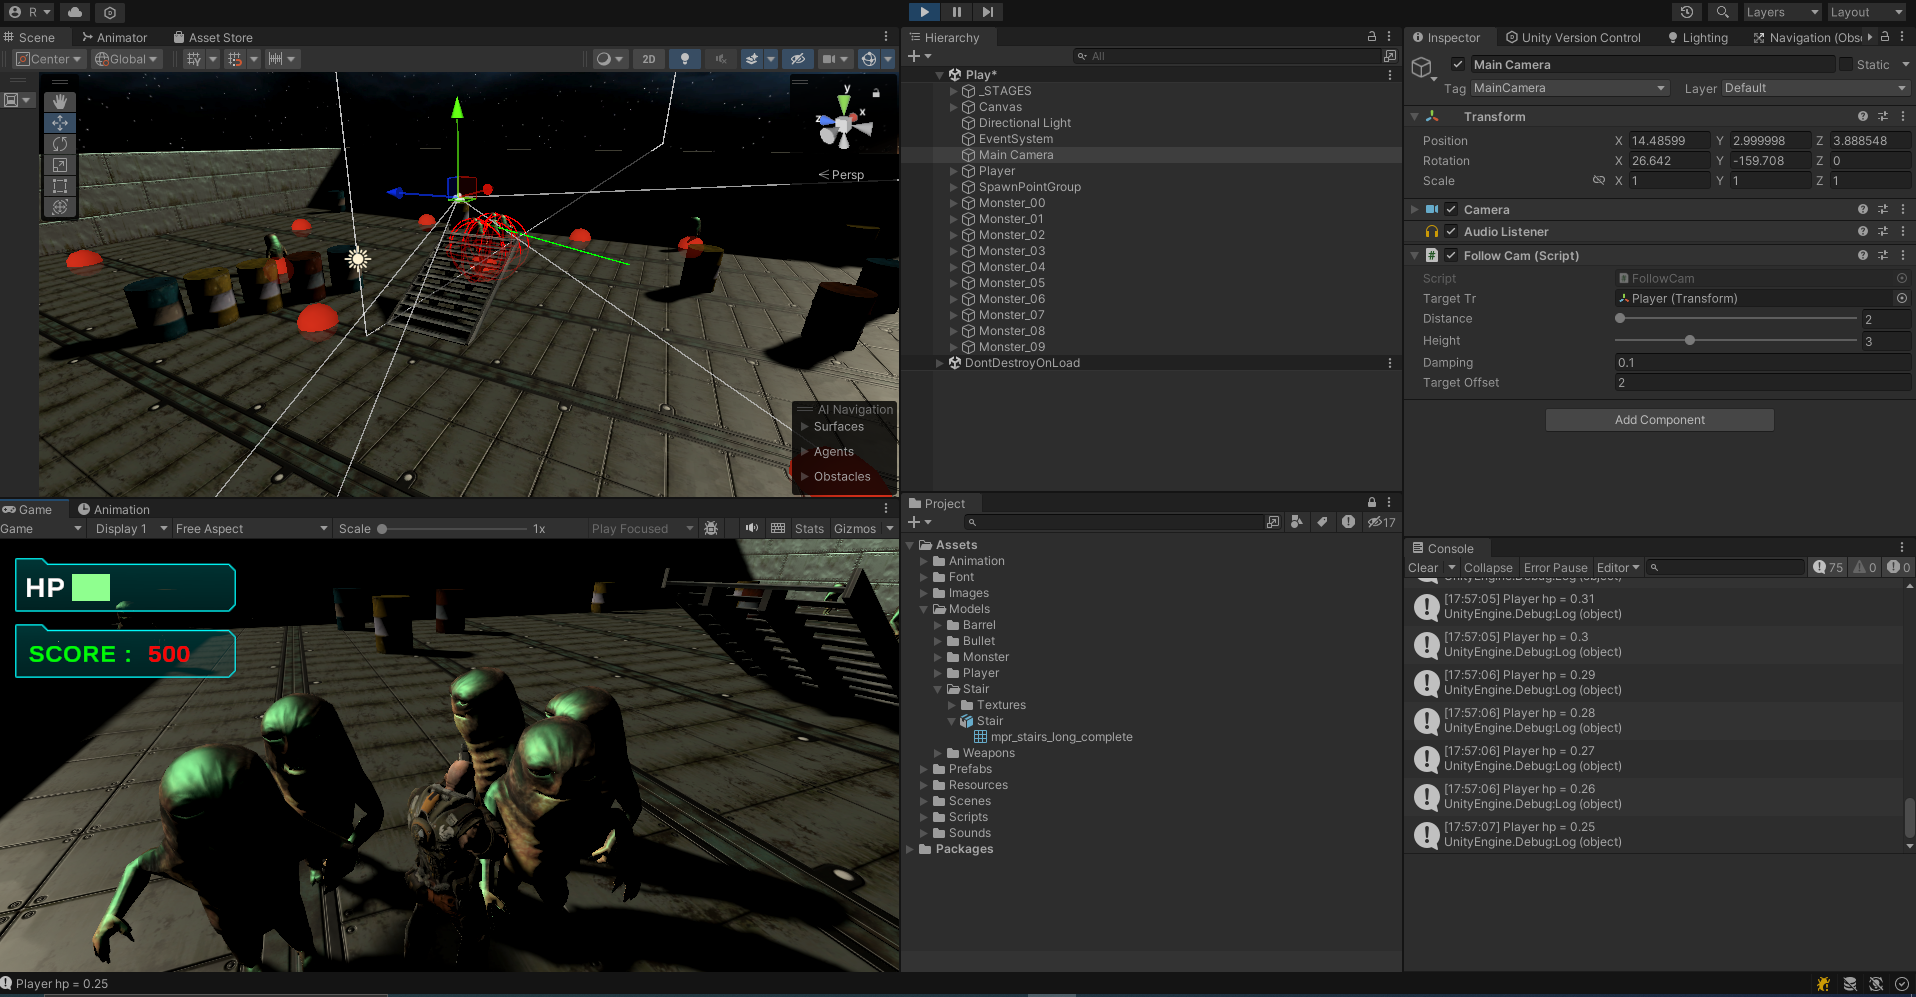
UI

- 체력 UI 반영
- PlayerPrefs로 간단하게 누적 점수 저장
( 게임 플레이 정지했다가 다시 시작해도 Score가 유지됨 )
Off Mesh Link 적용
Points
배열보다 List
List는 배열과 유사하지만 추가, 삭제 및 검색과 같은 기능을 쉽게 처리할 수 있는 특성이 있어 배열보다 유연한 작업이 가능하다.
public List<Transform> points = new List<Transform>();

void Start()
{
    Transform spawnPointGroup = GameObject.Find("SpawnPointGroup")?.transform;

    spawnPointGroup?.GetComponentsInChildren<Transform>(points);
}
List 타입의 변수는 반드시 new 키워드로 생성해야 한다.
GetComponentsInChildern 함수는 다양한 인자와 반환 값을 제공한다.

includeInactive 인자의 기본값은 false 값이 반영되서, 비활성화된 게임 오브젝트의 컴포넌트는 반환하지 않는다. 비활성화 여부 상관 없이 모두 다 추출하려면 아래와 같이 작성하면 된다.

본인을 제외하고 Child만 받고 싶다면?
transform은 게임 오브젝트의 transform 컴포넌트를 참조하는 속성이지만 하위에 차일드 게임오브젝트가 있다면 하위의 모든 Transform 컴포넌트에 접근할 수 있다.
foreach (Transform item in transform) {
	points.Add(item)
}
C#프로퍼티의 문법
외부에서 프로퍼티를 읽을 때 실행되는 영역은 get 부분이고 값을 대입할 때 실행되는 영역은 set 부분이다. 프로퍼티에 값을 대입하면 그 값은 value 키워드를 통해 전달된다.
public bool IsGameOver {
    get {return isGameOver;}
    set {
        isGameOver = value;
        if (isGameOver) {
            CancelInvoke("CreateMonster");
        }
    }
}getter만 선언하면 읽기 전용 프로퍼티가 된다.
Invoke
Invoke 함수는 일정 시간이 지난 후에 특정 함수를 호출할 때 사용한다. 이 때 호출 간격까지 파라미터로 넘겨주면 정해진 간격으로 반복해서 특정 함수를 호출한다.
InvokeRepeating("CreateMonster", 2.0f, createTime);오브젝트 풀링
몬스터 생성 시에 오브젝트 풀링을 사용해보자.
public List<GameObject> monsterPool = new List<GameObject>();

public int maxMonsters = 10;
void Start()
{
    CreateMonsterPool();

    Transform spawnPointGroup = GameObject.Find("SpawnPointGroup")?.transform;

    foreach(Transform point in spawnPointGroup) {
        points.Add(point);
    }

    InvokeRepeating("CreateMonster", 2.0f, createTime);
}

void CreateMonster() {
    int idx = Random.Range(0, points.Count);

    GameObject _monster = GetMonsterInPool();

    _monster?.transform.SetPositionAndRotation(points[idx].position, points[idx].rotation);
    _monster?.SetActive(true);
}

void CreateMonsterPool() {
    for(int i = 0; i < maxMonsters; i++) {
        var _monster = Instantiate<GameObject>(monster);

        _monster.name = $"Monster_{i:00}";

        _monster.SetActive(false);

        monsterPool.Add(_monster);
    }
}

public GameObject GetMonsterInPool() {
    foreach (var _monster in monsterPool) {
        if (_monster.activeSelf == false) {
            return _monster;
        }
    }
    return null;
}- CreateMonsterPool : 미리 maxMonsters 만큼 몬스터 오브젝트 만들어놓기
- CreateMonster : Pool에서 비활성화인 몬스터 오브젝트 가져와서 위치 설정 + 활성화
- GetMonsterInPool : Pool에서 몬스터 하나 전달해주기 (사용중이지 않은)
중요한 것은 몬스터가 죽으면 다시 Pool에 돌려줘야 한다는 점이기 때문에 반환하는 코드도 작성한다.
case State.DIE :
isDie = true;
agent.isStopped = true;
anim.SetTrigger(hashDie);
GetComponent<CapsuleCollider>().enabled = false;
yield return new WaitForSeconds(3.0f);
hp = 100;
isDie = false;
GetComponent<CapsuleCollider>().enabled = true;
this.gameObject.SetActive(false);
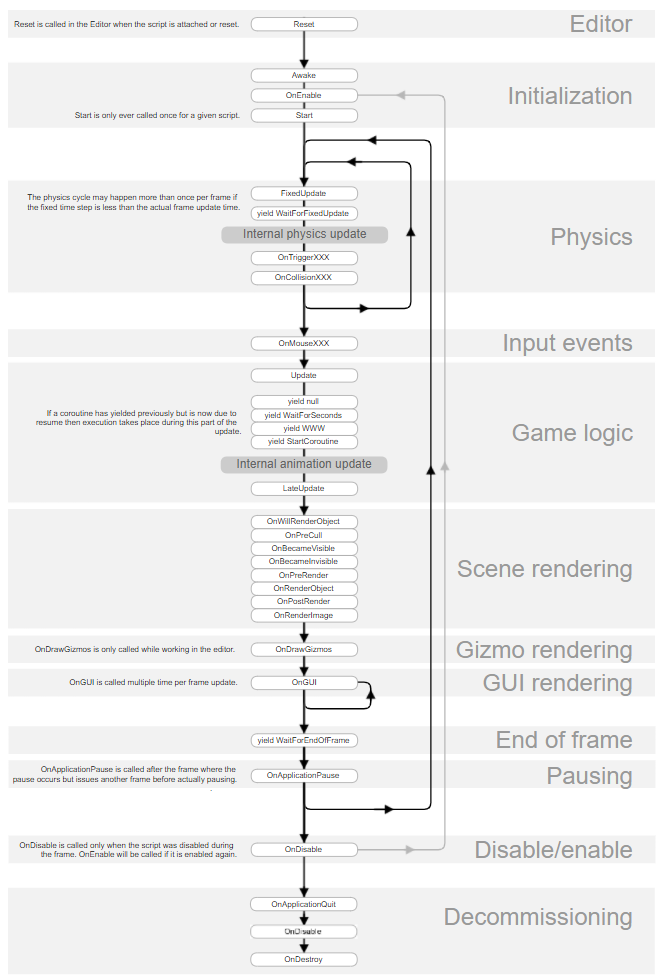
break;중요한 점은 start 함수를 Awake로 바꾸고 코루틴 시작을 OnEnable로 옮겨 주어야한다.
코루틴을 오브젝트가 활성화 될 때마다 시작되도록 한다. (OnEnable은 비활성화 -> 활성화 될 때마다 발생하는 유니티 콜백 함수이다.) 그렇기 때문에 Start를 Awake로 바꿔줘야하는데, OnEnable 함수가 Start 함수보다 먼저 수행되어 각종 컴포넌트가 연결되기 이전에 코루틴 함수가 수행되기 때문에 참조오류가 발생한다.
PlayerPrefs
PlayerPrefs의 Get, Set을 이용해 누적 스코어를 저장할 수 있다.
PlayerPrefs의 보안성은 없다. PlayerPrefs 클래스를 이용해 저장된 데이터는 보안성이 없다. 저장 경로의 plist 또는 xml 파일만 열면 바로 조회 및 수정이 되기 때문에 중요한 게임 데이터는 절대로 PlayerPrefs로 관리해서는 안 된다. 암호화해서 저장하거나 해서 보안성을 조금이나마 유지할 수 있다.
Raycast
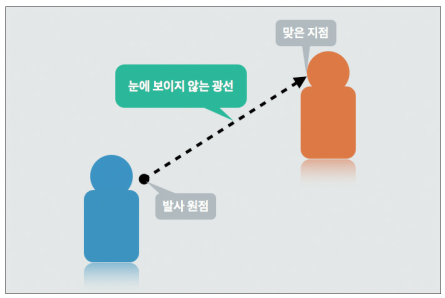
실제로 FPS에서는 발사체가 보이고 충돌이 일어나게끔 하는 Projectile 방식보다는 Raycast 방식을 주로 이용하기도 한다.
레이캐스트는 눈에 보이지 않는 광선을 쏘아서 해당 광선에 맞은 물체가 적인지 여부를 판단한 뒤 여러 가지 후처리를 하는 방식이다. 다음 그림과 같이 발사 원점과 발사각, 거리 등의 인자로 광선을 발사할 수 있다.
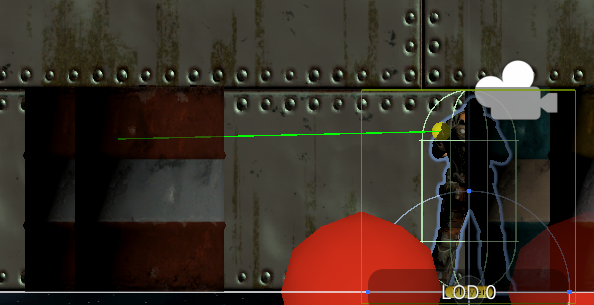
DrawRay
레이캐스트는 씬 뷰에서 시각적으로 표시되지 않기 때문에 개발할 때는 DrawRay 함수를 이용해 시각적으로 표시하고 개발을 진행해야 한다.
// Update is called once per frame
void Update()
{

    Debug.DrawRay(firePos.position, firePos.forward * 10.0f , Color.green);

    if (Input.GetMouseButtonDown(0)) {
        Fire();
    }
}
레이캐스트는 Collider 컴포넌트를 갖고 있는 모든 객체에 반응한다. 따라서 투시하고 있는 모든 오브젝트가 아닌 특정 오브젝트에만 반응하여 물리 엔진의 부하를 덜어주기 위해서 레이어를 설정해준다.
이제 RaycastHit으로 충돌을 감지할 수 있다. RaycastHit 구조체의 주요 속성은 아래와 같다.
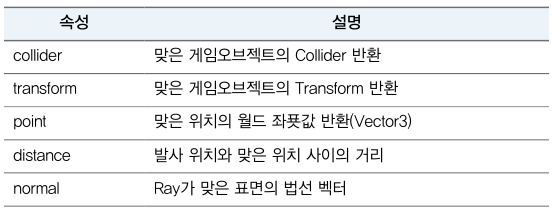
그 다음에 Physics.Raycast 함수 Ray를 투사해 조건에 맞는 객체에 닿으면 true 값을 반환한다. 즉, 적 캐릭터에 닿았을 때 true 값을 반환한다.

void Update()
{

    Debug.DrawRay(firePos.position, firePos.forward * 10.0f , Color.green);

    if (Input.GetMouseButtonDown(0)) {
        Fire();

        if (Physics.Raycast(firePos.position, firePos.forward, out hit, 10.0f, 1<<6)) {
            Debug.Log($"Hit={hit.transform.name}");
        }
    }
}
내베게이션 고급 기법
기존에원래 현재 Barrel을 회피하면서 주인공을 추적하도록 햿는데 드럼통이 폭파되면 드럼통의 위치가 바뀌면서 Navi Mesh가 바뀌어야한다. 이와 같은 문제는 동적으로 변경되는 장애물에 NavMeshObstacle 컴포넌트를 활요하면 쉽게 해결할 수 있다.
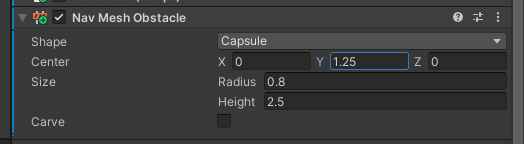
단순히 이렇게만 설정하면 드럼통이 촘촘히 있으면 관통해 지나가려고 한다.
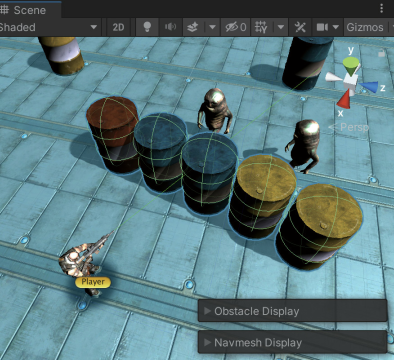
Carve 속성을 활용해 이런 현상을 해결할 수 있다.
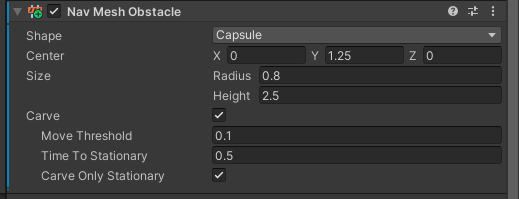

Navi Mesh가 아래와 같이 실시간으로 변경된다.
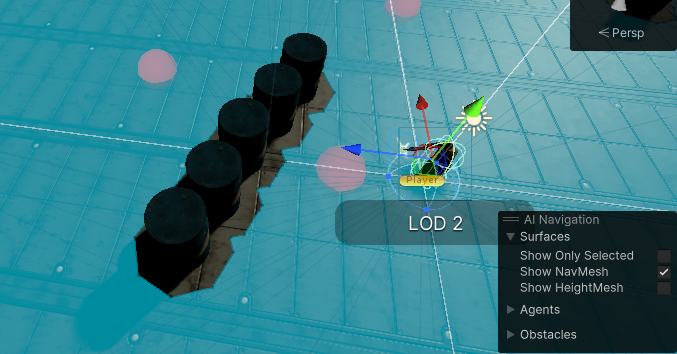
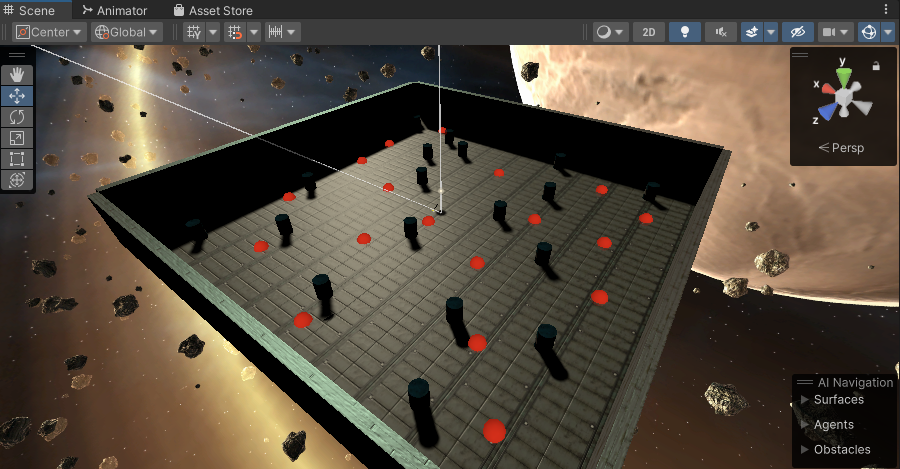
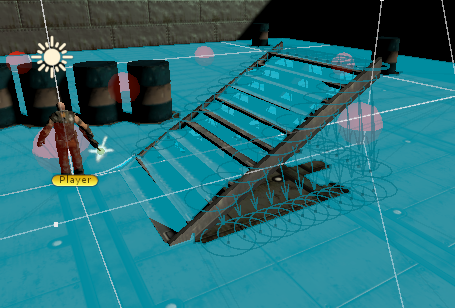
Off Mesh Link Generation
3D 메시의 정보를 기반으로 내비메시를 생성하는데 서로 분리된 메시를 추적하고 싶으면 Off Mesh Link를 통해 연결할 수 있다.
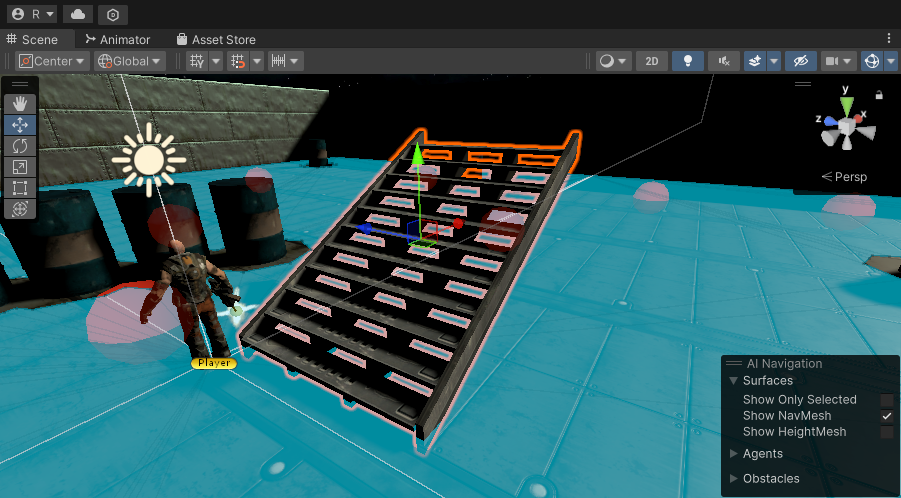
Generate Off Mesh Links를 체크한 다음 Drop Height 속성을 5 정도로 해준다. Drop Height은 Off Mesh Link가 생성되는 최대 높이를 지정하는 것으로 Drop Height 이하에서만 링크가 생성된다. 반면 Jump Distance 속성은 같은 높이에서 장애물을 뛰어넘을 수 있는 거리를 설정하는 옵션이다. 베이크를 하면 아래처럼 연결선이 보인다.
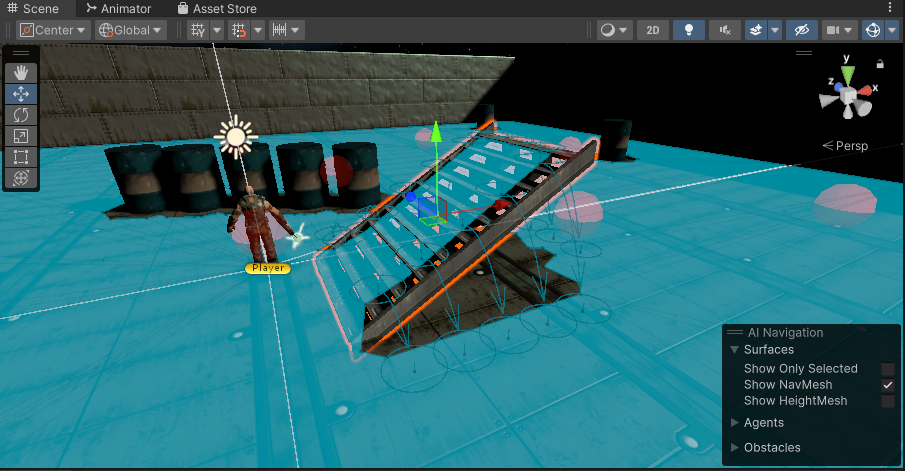
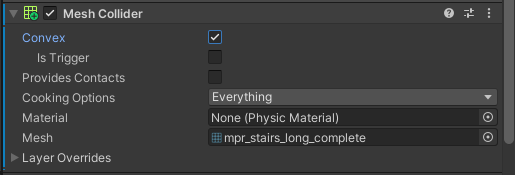
플레이어가 올라갈 수 있게 Mesh Collider를 추가해준 다음 Convex 속성을 체크해 폴리곤 수를 낮춘다.
이제 적들이 계단 위까지 따라 올라오고, 뛰어내리면 적 캐릭터도 가장 가까운 Off Mesh Link를 통해 뛰어내린다.
뛰어내려서 따라온다.
Agent Radius를 0.2로 줄여서 베이크해서 Off Mesh Link의 간격을 조절할 수 있다.
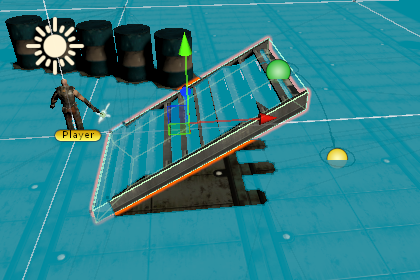
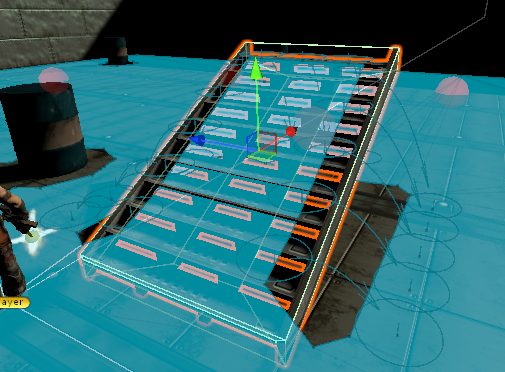
사용자 정의 Off Mesh Link
기존의 Generate OffMeshLinks 속성을 언체크하고 다시 Bake 해준 다음에
Start 지점, End 지점을 정해준 다음에 Off Mesh Link 컴포넌트를 추가해 준다음에 Start, End를 연결해준다.

이 때 Bi Directional 옵션을 언체크해야만 반대로 못 올라온다. 양방향으로 연결되지 못하도록 할 때 꼭 언체크해주자.
자연스러운 회전 처리
몬스터의 회전을 NavMeshAgent 에서 처리하는 회전 로직이 이동하면서 실행되기 때문에 부자연스럽다. 따라서 빠르게 회전 처리하고 이동하도록 스크립트에서 직접 회전 로직을 구현한다. (Agent의 회전은 꺼준다.)
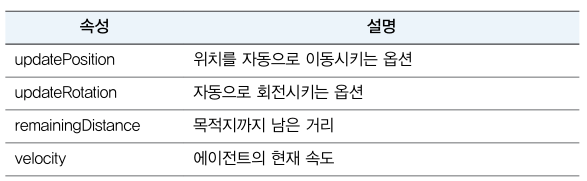
이동 또는 회전 처리를 직접 구현해야 하는 경우에는 updatePosition과 updateRotate 속성을 활용한다.
세밀하게 NavMeshAgent를 컨트롤할 때 유용한 속성

Area Mask 활용
내비게이션 기능 중에서 특정 경로에 가중치를 적용해 최단 경로 계산 과정에서 경로의 가중치를 고려할 수 있다. (가중치 : 아스팔트 도로 < 비포장 도로 < 강 )
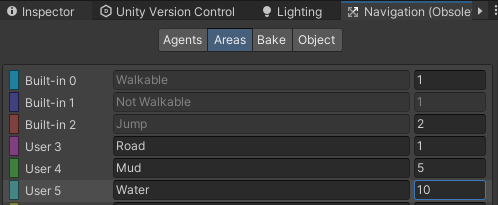
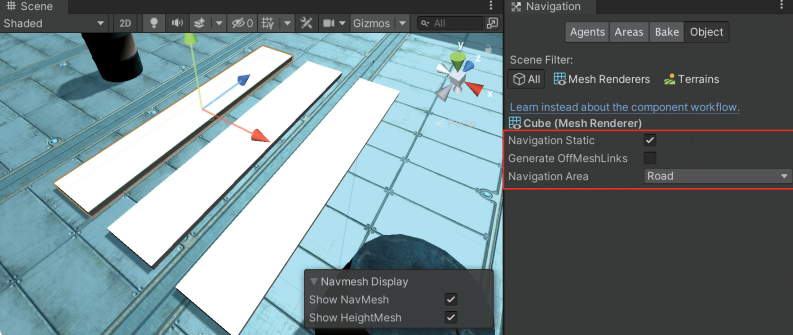
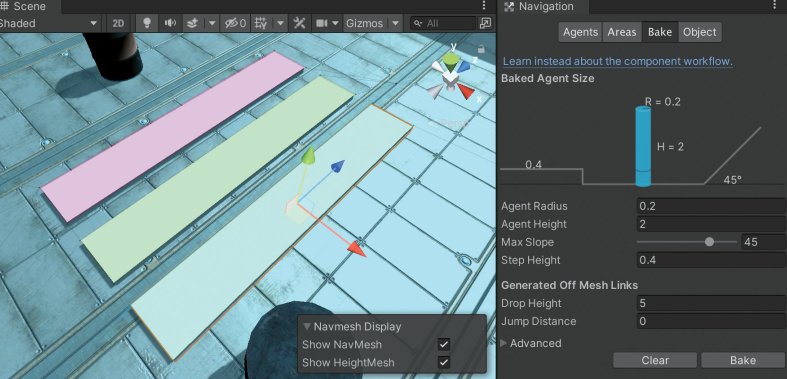
Area Mask를 지정한 후에 베이크하면 다른 색상으로 베이크가 된다.
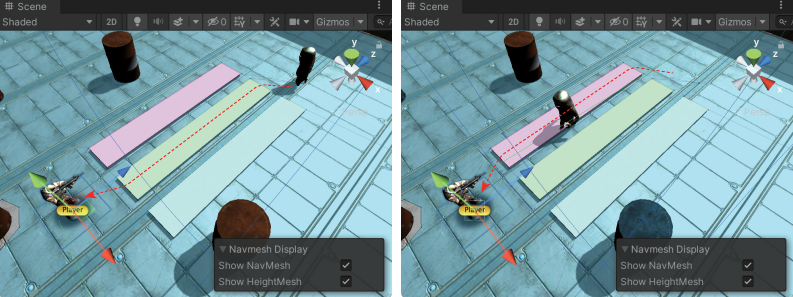
몬스터가 가중치를 반영한 최단 거리를 따라서 이동한다.
Scripts
추가적인 업데이트가 있는 코드만 포함되어 있습니다.
GameManager.cs
using System.Collections;
using System.Collections.Generic;
using UnityEngine;
using TMPro;

public class GameManager : MonoBehaviour
{
    public List<Transform> points = new List<Transform>();
    public List<GameObject> monsterPool = new List<GameObject>();

    public int maxMonsters = 10;

    public GameObject monster;

    public float createTime = 3.0f;

    public bool isGameOver;

    public bool IsGameOver {
        get {return isGameOver;}
        set {
            isGameOver = value;
            if (isGameOver) {
                CancelInvoke("CreateMonster");
            }
        }
    }

    public static GameManager instance = null;

    public TMP_Text scoreText;
    private int totScore = 0;

    void Awake() {
        if (instance == null) {
            instance = this;
        }
        else if (instance != this) {
            Destroy(this.gameObject);
        }

        DontDestroyOnLoad(this.gameObject);
    }

    void Start()
    {
        CreateMonsterPool();

        Transform spawnPointGroup = GameObject.Find("SpawnPointGroup")?.transform;

        foreach(Transform point in spawnPointGroup) {
            points.Add(point);
        }

        InvokeRepeating("CreateMonster", 2.0f, createTime);

        totScore = PlayerPrefs.GetInt("TOT_SCORE", 0);
        DisplayScore(0);
    }

    void CreateMonster() {
        int idx = Random.Range(0, points.Count);

        GameObject _monster = GetMonsterInPool();

        _monster?.transform.SetPositionAndRotation(points[idx].position, points[idx].rotation);
        _monster?.SetActive(true);
    }

    void CreateMonsterPool() {
        for(int i = 0; i < maxMonsters; i++) {
            var _monster = Instantiate<GameObject>(monster);

            _monster.name = $"Monster_{i:00}";

            _monster.SetActive(false);

            monsterPool.Add(_monster);
        }
    }

    public GameObject GetMonsterInPool() {
        foreach (var _monster in monsterPool) {
            if (_monster.activeSelf == false) {
                return _monster;
            }
        }
        return null;
    }

    public void DisplayScore(int score) {
        totScore += score;
        scoreText.text = $"<color=#00ff00>SCORE : </color> <color=#ff0000>{totScore:#,##0}</color>";
        PlayerPrefs.SetInt("TOT_SCORE", totScore);
    }
}
MonsterCtrl.cs
void Awake() {
    monsterTr = GetComponent<Transform>();
    playerTr = GameObject.FindWithTag("PLAYER").GetComponent<Transform>();
    agent = GetComponent<NavMeshAgent>();
    agent.updateRotation = false;

    anim = GetComponent<Animator>();

    bloodEffect = Resources.Load<GameObject>("BloodSprayEffect");
}

void Update() {
    if (agent.remainingDistance >= 2.0f) {
        Vector3 direction = agent.desiredVelocity;

        Quaternion rot = Quaternion.LookRotation(direction);

        monsterTr.rotation = Quaternion.Slerp(monsterTr.rotation, rot, Time.deltaTime * 10.0f);
    }
}