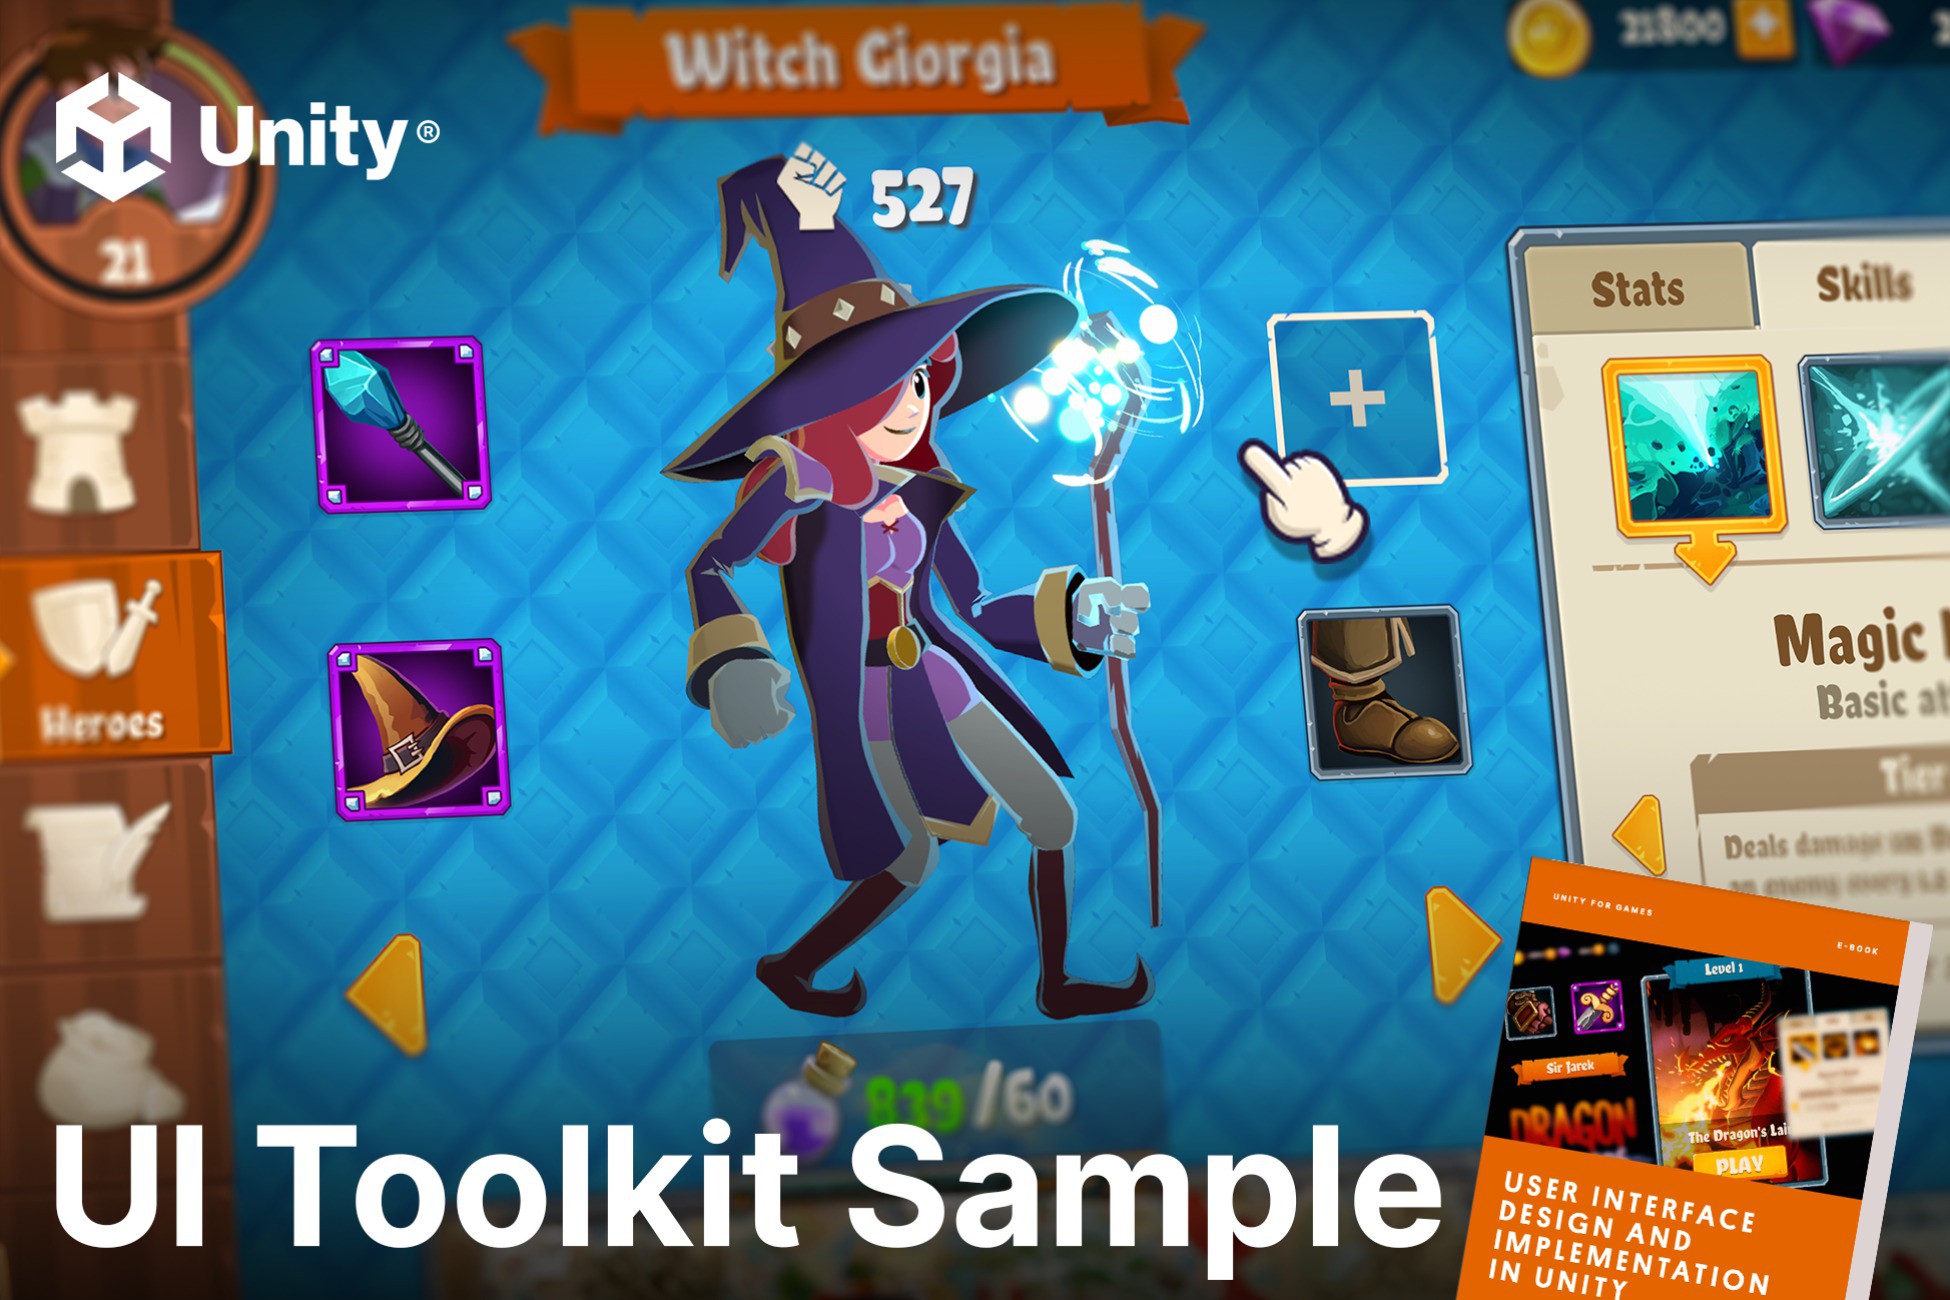
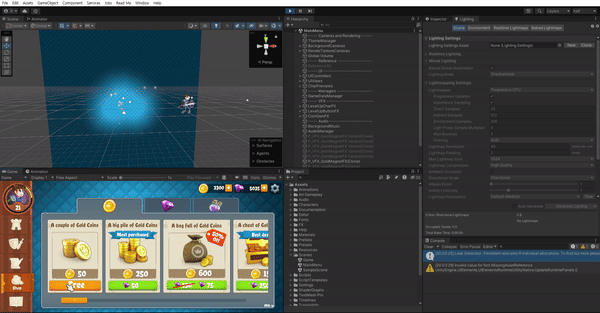
UI Tool Kit을 간단하게 나마 공부하고 나서 이런 UI Tool Kit을 실제로 적용한 게임 샘플이 궁금했는데 유니티에서 공개한 Dragon Crashuers - UI ToolKit Sample Project가 있어서 해당 프로젝트를 둘러보면서 어떤 기능이 있고 어떻게 구현했는지를 공부하면 좋을 것 같아 진행해보았다.
샘플 프로젝트 사이즈가 작지 않은 만큼 아마 지속적으로 둘러보고 구현하는 과정을 진행할 것 같다!
해당 샘플은 Assets Store에 무료로 공개 되어있다. 에셋 Add 해주고 import 해주면 파일이 많이 생기는데
Reward Effect
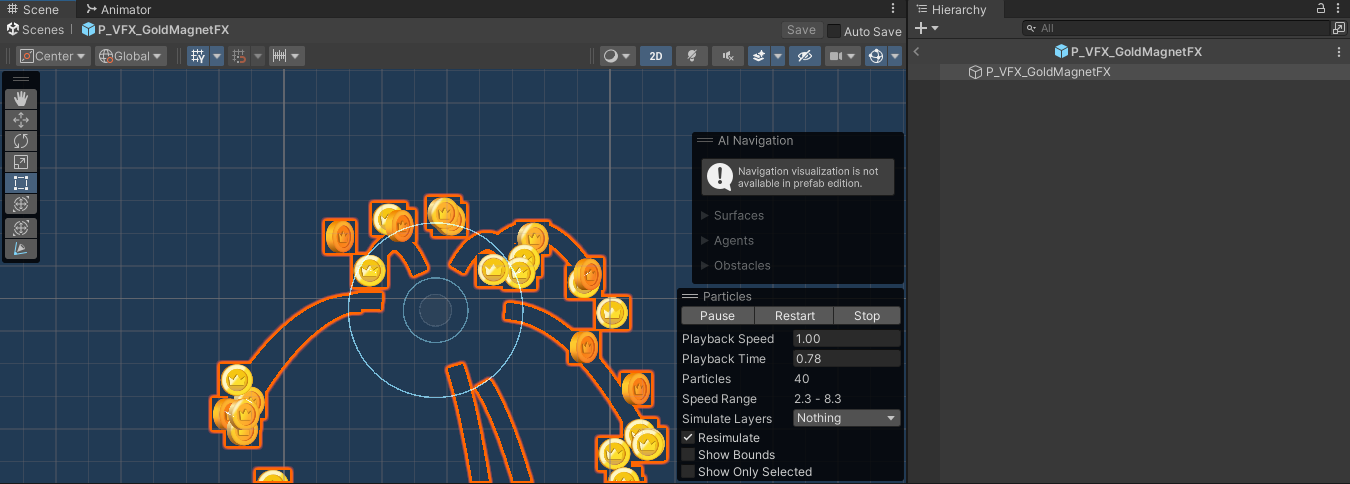
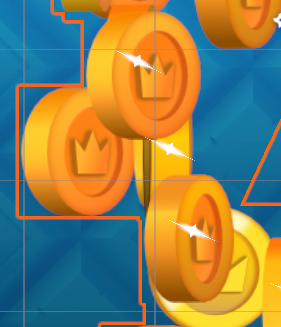
골드 구매를 눌렀을 때 골드가 막 나오면서 골드 창으로 날라간다. 이걸 실제 인 게임에서 많이 보는 효과긴 했는데, 어떻게 구현하는지 궁금했는데 한 번 살펴보자.
일단 해당 UI 로직이 어디서 실행되는지를 살펴보자. 해당 버튼을 누르면 P_VFS_GoldMagnetFX 라는 파티클 시스템이 Clone으로 복사 생성된다! 파티클로 동전이 생성된다.
파티클 시스템에 어떤 속성들이 적용되어있는지 한 번 보자.
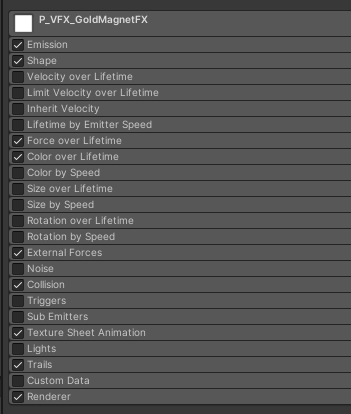
생각보다 많은 요소들이 적용 되어있다. 주목할 것만 하나씩 살펴보자.
속성에 대한 설명은 유니티 공식 문서를 참고했다.
Particle System
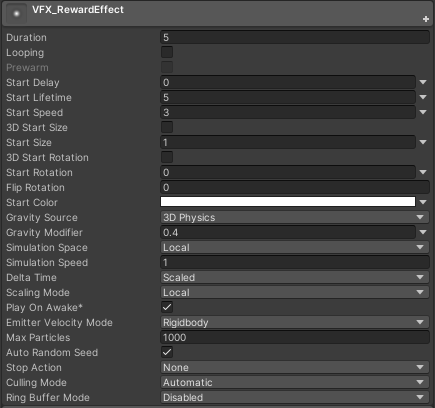
Gravity Modifier : Physics 창에서 설정된 중력 값을 스케일한다. 이 값을 0으로 하면 중력 효과가 해제된다. (0.4니깐 동전들이 초반에 중력의 영향을 받아서 아래로 떨어짐)
Emitter Velocity Mode : 파티클 시스템이 Inherit Velocity 모듈과 Emission 모듈에 사용할 속도를 계산하는 방법을 선택한다. 시스템은 Rigidbody 컴포넌트(있을 때에 한함)를 사용하거나 Transform 컴포넌트의 움직임을 추적하여 속도를 계산할 수 있다.
Max Particles : 최대 파티클의 수, 한도에 도달하면 파티클 일부가 제거된다. (수치에 따른 양 조절에 사용해도 좋을 것 같다.)
Stop Action :파티클 시스템이 중단되는 순간의 동작을 결정한다.
- Disable : 게임 오브젝트가 비활성화된다.
- Destroy : 게임 오브젝트가 파괴된다.
- Callback : 해당 게임오브젝트에 존재하는 MonoBehaviour의 OnParticleSystemStopped() 메소드를 호출한다.
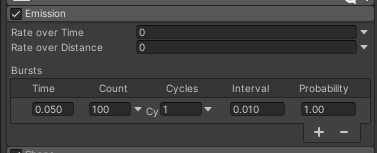
파티클을 한번에 Bursts로 생성되는데 0.05초에 100개를 생성해낸다. 1번만 반복하고 0.01초 만에 Burst 한다.
- 위에 Max Particles를 40으로 해놔서 40개를 제외한 나머지 particle 들이 지워진다.
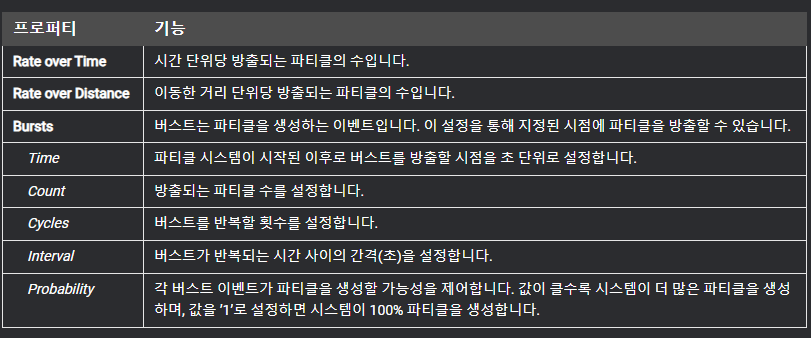
파티클은 원형(circle)로 생성한다.

이 모듈에서 설정된 힘에 의해 가속화 될 수 있다. 이 때 Space는 힘이 로컬 공간에 적용될지 월드 공간에 적용될지 선택한다.

alpha 값이 뒤로 갈수록 작아진다. 시간이 지날수록 코인이 투명해진다는 뜻!
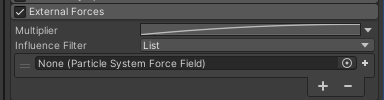
외부 힘 모듈은 유니티 공식 문서 설명으로는 wind zones와 Particle System Force Field의 영향을 받는다고 한다.
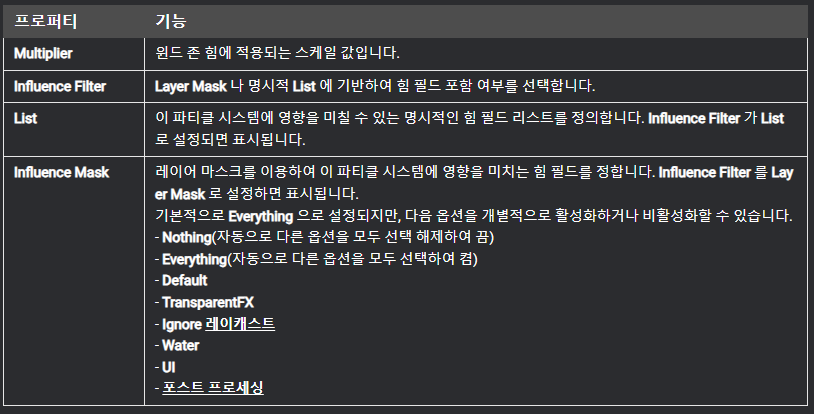
Particle System Force Field?
파티클 시스템의 파티클에 힘을 적용한다. 이 컴포넌트를 파티클 시스템에 연결하려면 External Forces를 적용하고 레이어 마스크나 해당 힘 필드 컴포넌트를 할당한다.
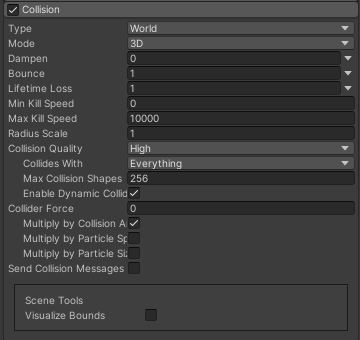
Collision을 활성화해줘야 파티클과 게임 오브젝트의 충돌을 제어할 수 있다. 이때 World 모듈 프로퍼티를 쓴다. (Planes Moduel Properties는 충돌 평면을 정의할 때 사용한다.)
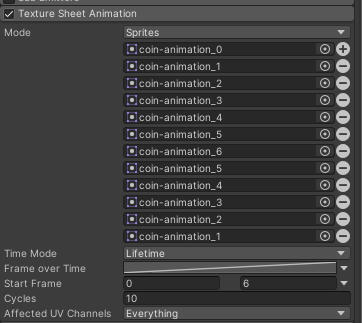
여기서 아래의 스프라이트를 slice해서 애니메이션을 구현해놨다.
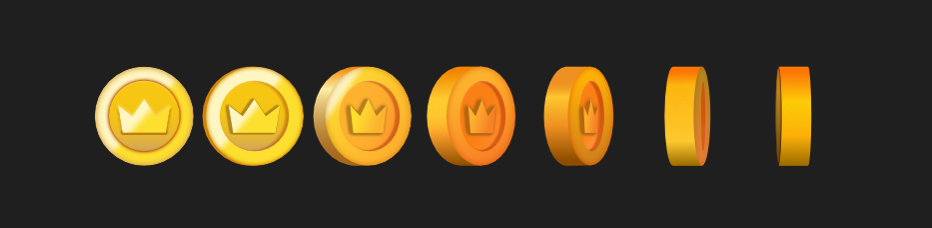
Time Mode는 파티클의 생명 주기(Life Time)이고, 생명주기 동안 어떻게 프레임을 구성할 것인지를 그래프로 설정해놨다. 12프레임을 아래와 같은 직선 그래프로 설정해놨다, 즉 생명주기 동안 한 사이클에 12장의 스프라이트가 순서대로 진행되서 반복되는 방식이다.
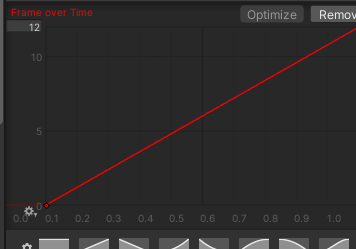
총 12장 스프라이트가 있기 때문에 y값을 보면 12까지 직선 그래프로 증가하도록 돼있다. 즉, 한 번 사이클 동안 0~11번의 스프라이트가 변경된다는 뜻이다.
사이클이 10이라 한 번 실행하면 10번 회전한다는 뜻!
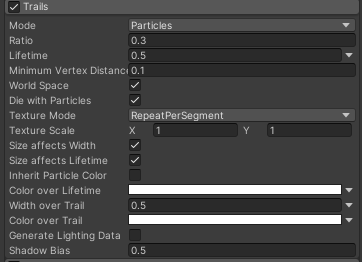
파티클에 잔상을 추가할 수 있다. Trail Renderer 컴포넌트와 많은 프로퍼티를 공유하지만, 잔상을 파티클에 쉽게 연결하고 파티클의 다양한 프로퍼티를 상속할 수 있는 기능을 제공한다.
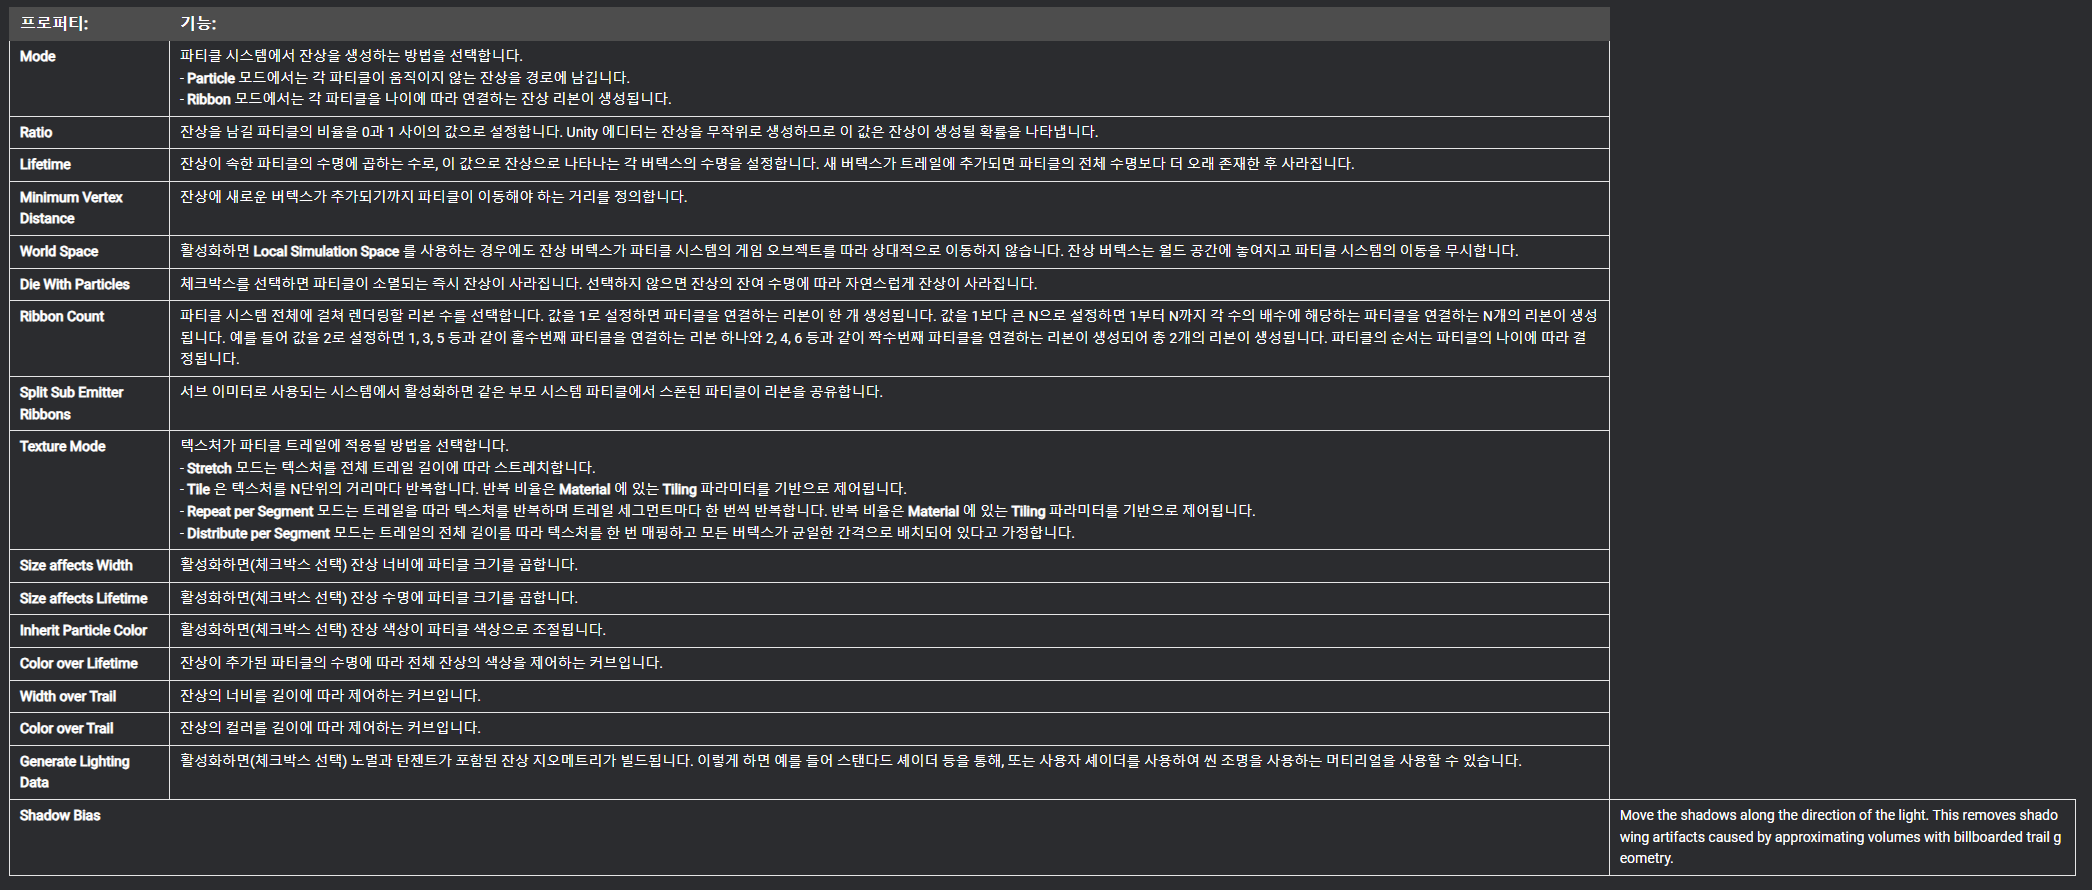
유니티 공식 문서를 보면 프로퍼티에 대한 설명이 있다.
Material과 Trail Material로 파티클의 Material과 파티클 Trail을 렌더링하기 위해 사용하는 Material을 지정해줄 수 있다.

근데 왜 Trail Material을 Mat_Taril_Saprkles로 해놨을까?
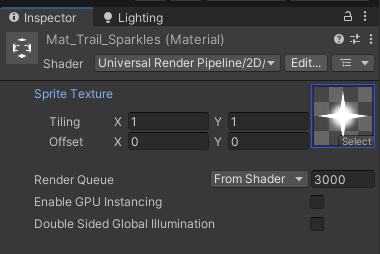
아무래도 코인에 반짝이는 효과를 주기위해서 코인을 따라가면서 출력해주기 위해 Trail Renderer에 반짝이는 Material을 넣어준 것 같다.
그럼 이렇게 생성된 Particle들이 목적지를 어떻게 지정해서 날아가게 해줄까? 코드를 한 번 찾아가보자.
Scripts
코드에 주석으로 상점 버튼 클릭 이벤트의 흐름을 설명해놓았다.
// Clicking the Buy button on the ShopItem triggers a chain of events:

//      ShopItemComponent (click the button) -->
//      ShopController (buy an item) -->
//      GameDataManager (verify funds)-->
//      MagnetFXController (play effect on UI)
우리가 주목할 점은 MagnetFXController이기 때문에 CoinMagnet으로 한 번 가보자.
CoinMagnet.cs
using System;
using System.Collections.Generic;
using UnityEngine;
using UnityEngine.UIElements;
namespace UIToolkitDemo
{
[Serializable]
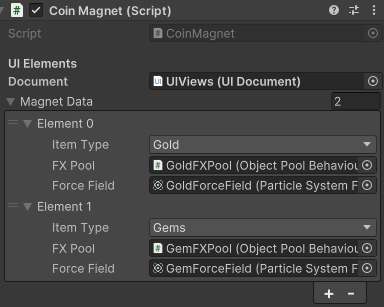
public struct MagnetData
{
// gold, gems, health potion, power potion
public ShopItemType ItemType;
// ParticleSystem pool
public ObjectPoolBehaviour FXPool;
// forcefield target
public ParticleSystemForceField ForceField;
}
// FX generator when buying an item from the shop
public class CoinMagnet : MonoBehaviour
{
[Header("UI Elements")]
[Tooltip("Locate screen space positions from this document's UI elements.")]
[SerializeField] UIDocument m_Document;
[Tooltip("Match a target VisualElement by name to each ShopItemType")]
[SerializeField] List<MagnetData> m_MagnetData;
[Header("Camera")]
[Tooltip("Use Camera and Depth to calculate world space positions.")]
[SerializeField] Camera m_Camera;
[SerializeField] float m_ZDepth = 10f;
[Tooltip("3D offset to the particle emission")]
[SerializeField] Vector3 m_SourceOffset = new Vector3(0f, 0.1f, 0f);
// start and end coordinates for effect
void OnEnable()
{
// FX from ShopScreen
ShopEvents.TransactionProcessed += OnTransactionProcessed;
// FX from MailScreen
ShopEvents.RewardProcessed += OnRewardProcessed;
ThemeEvents.CameraUpdated += OnCameraUpdated;
}
void OnDisable()
{
ShopEvents.TransactionProcessed -= OnTransactionProcessed;
ShopEvents.RewardProcessed -= OnRewardProcessed;
ThemeEvents.CameraUpdated += OnCameraUpdated;
}
ObjectPoolBehaviour GetFXPool(ShopItemType itemType)
{
MagnetData magnetData = m_MagnetData.Find(x => x.ItemType == itemType);
return magnetData.FXPool;
}
ParticleSystemForceField GetForcefield(ShopItemType itemType)
{
MagnetData magnetData = m_MagnetData.Find(x => x.ItemType == itemType);
return magnetData.ForceField;
}
void PlayPooledFX(Vector2 screenPos, ShopItemType contentType)
{
Vector3 worldPos = screenPos.ScreenPosToWorldPos(m_Camera, m_ZDepth) + m_SourceOffset;
ObjectPoolBehaviour fxPool = GetFXPool(contentType);
// Initialize ParticleSystem
ParticleSystem ps = fxPool.GetPooledObject().GetComponent<ParticleSystem>();
if (ps == null)
return;
ps.gameObject.SetActive(true);
ps.gameObject.transform.position = worldPos;
// Add the Forcefield for destination
ParticleSystemForceField forceField = GetForcefield(contentType);
forceField.gameObject.SetActive(true);
// Update the ForceField position relative to the UI
PositionToVisualElement positionToVisualElement = forceField.gameObject.GetComponent<PositionToVisualElement>();
positionToVisualElement.MoveToElement();
// Attach the ForceField to the particle system
ParticleSystem.ExternalForcesModule externalForces = ps.externalForces;
externalForces.enabled = true;
externalForces.AddInfluence(forceField);
ps.Play();
}
// event-handling methods
// claiming free reward from MailScreen
void OnRewardProcessed(ShopItemType rewardType, uint rewardQuantity, Vector2 screenPos)
{
// only play effect for gold or gem purchases
if (rewardType == ShopItemType.HealthPotion || rewardType == ShopItemType.LevelUpPotion)
return;
PlayPooledFX(screenPos, rewardType);
}
// buying an item from the ShopScreen
void OnTransactionProcessed(ShopItemSO shopItem, Vector2 screenPos)
{
// only play effect for gold or gem purchases
if (shopItem.contentType == ShopItemType.HealthPotion || shopItem.contentType == ShopItemType.LevelUpPotion)
return;
PlayPooledFX(screenPos, shopItem.contentType);
}
void OnCameraUpdated(Camera camera)
{
m_Camera = camera;
}
}
}
ObjectPooling
여기서 제일 먼저 Object Pooling을 쓰는 기법이 좀 신기했는데 ObjectPoolBehaviour 타입으로 FX Pool을 선언한 후에 사용한다는 점인데, 여기서 어디서 ObjectPollData를 Scriptable로 해서 오브젝트별로 게임 오브젝트 + 오브젝트 별 수량 + 확장 가능(수량)을 설정해 놓는다. 자세한 스크립트는 다음 문서 구현(Implementation을 살펴보자.)
이제 다시 CoinMagnet으로 돌아가보자. MagnetData에서 FXPool이 선언되고 초기화된다.
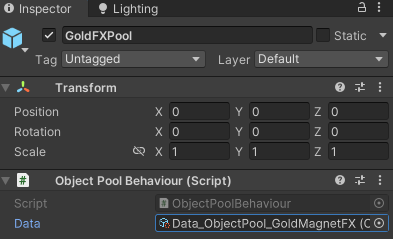
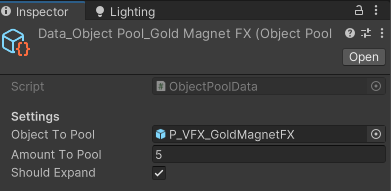
여기서 VFX_GoldMagnetFX (프리팹)을 게임 오브젝트에 넣어서 해당 오브젝트를 미리 5개 생성해서 비활성화 해놓는다.
어디서 활성화하나 찾아보니 PlayPooledFX에서 GetPooledObject로 Pool 안에 있는 VFX 오브젝트를 가져와서 Component로 ParticleSystem을 가져온 다음 여러 속성을 설정해준다. 아무래도 여기에 코인의 Target 기능이 있는 것 같다.
PlayPooledFX
void PlayPooledFX(Vector2 screenPos, ShopItemType contentType)
{
    Vector3 worldPos = screenPos.ScreenPosToWorldPos(m_Camera, m_ZDepth) + m_SourceOffset;

    ObjectPoolBehaviour fxPool = GetFXPool(contentType);

    // Initialize ParticleSystem
    ParticleSystem ps = fxPool.GetPooledObject().GetComponent<ParticleSystem>();

    if (ps == null)
        return;

    ps.gameObject.SetActive(true);
    ps.gameObject.transform.position = worldPos;

    // Add the Forcefield for destination
    ParticleSystemForceField forceField = GetForcefield(contentType);
    forceField.gameObject.SetActive(true);

    // Update the ForceField position relative to the UI
    PositionToVisualElement positionToVisualElement = forceField.gameObject.GetComponent<PositionToVisualElement>();
    positionToVisualElement.MoveToElement();

    // Attach the ForceField to the particle system
    ParticleSystem.ExternalForcesModule externalForces = ps.externalForces;
    externalForces.enabled = true;
    externalForces.AddInfluence(forceField);

    ps.Play();
}
하나씩 천천히 봐보자.
Position 변환
먼저 매개변수로 넘어온 screenPos로 worldPos를 계산한다.
Vector3 worldPos = screenPos.ScreenPosToWorldPos(m_Camera, m_ZDepth) + m_SourceOffset;scrrenPosToWorldPos가 알고 보니깐 ExtensionMethods로 따로 작성된 메소드다. 이 메소드로 UI Tool Kit의 좌표를 월드 스페이스 좌표로 바꿔준다.
// Converts a UI Toolkit screen position to world space.
public static Vector3 ScreenPosToWorldPos(this Vector2 screenPos, Camera camera = null, float zDepth = 10f)
{

    if (camera == null)
        camera = Camera.main;

    if (camera == null)
        return Vector2.zero;

    float xPos = screenPos.x;
    float yPos = screenPos.y;
    Vector3 worldPos = Vector3.zero;

    if (!float.IsNaN(screenPos.x) && !float.IsNaN(screenPos.y) && !float.IsInfinity(screenPos.x) && !float.IsInfinity(screenPos.y))
    {
        // convert to world space position using Camera class
        Vector3 screenCoord = new Vector3(xPos, yPos, zDepth);
        worldPos = camera.ScreenToWorldPoint(screenCoord);
    }
    return worldPos;
}
생각보다 엄청 대단한 로직이 있는건 아니고 Vector2 타입으로 screenPos를 받아주고 main Camera를 가져온 다음에 x, y 값에 대한 유효성 검사(값이 없거나, Infinity 인지를 확인)를 하고 괜찮으면 기존에 사용하던 ScreenToWorldPoint 함수를 이용해서 WorldPos를 계산하는게 전부인 코드다. 어렵지 않은데?
왜 이렇게 했을까? UI Tool Kit이 좌표를 어떻게 보내는지를 따라가봐야 할 것 같다. 일단 나중에 하고 PlayPooledFX를 따라가보자.
ForceField 설정
// Add the Forcefield for destination
ParticleSystemForceField forceField = GetForcefield(contentType);
forceField.gameObject.SetActive(true);
ForceField를 가져와서 forceField를 활성화 해주는데 어디서 가져오는 걸까?
ParticleSystemForceField GetForcefield(ShopItemType itemType)
{
    MagnetData magnetData =  m_MagnetData.Find(x => x.ItemType == itemType);
    return magnetData.ForceField;
}
CoinMagnet에 m_MagnetData로 MagnetData가 리스트 형식으로 저장되어있고 여기서 연결된 Force Field를 찾아온다. 동일한 ItemType의 MagnetData를 가져와서 ForceField를 반환해주는 방식!
그런 다음에 ForceField 포지션을 UI의 코인 수치 위치로 옮겨야한다. 그걸 PositionToVisualElement의 MoveToElement를 진행하는데 ForceField를 가진 CoinForceField 오브젝트가 PositionToVisualElement를 가지고 있다.
// Update the ForceField position relative to the UI
PositionToVisualElement positionToVisualElement = forceField.gameObject.GetComponent<PositionToVisualElement>();
positionToVisualElement.MoveToElement();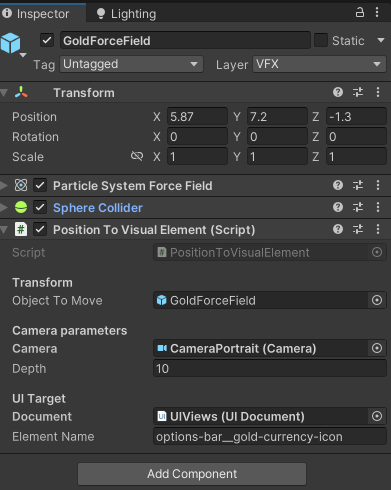
MoveToElement
public void MoveToElement()
{
    if (m_Camera == null)
    {
        Debug.LogError("[PositionToVisualElement] MoveToElement: Camera is not assigned.");
        return;
    }

    if (m_ObjectToMove == null)
    {
        Debug.LogError("[PositionToVisualElement] MoveToElement: Object to move is not assigned.");
        return;
    }

    // Locate the center screen position in UI Toolkit
    Rect worldBound = m_TargetElement.worldBound;
    Vector2 centerPosition = new Vector2(worldBound.x + worldBound.width / 2, worldBound.y + worldBound.height / 2);

    // Convert to pixel coordinates using extension method
    Vector2 screenPos = centerPosition.GetScreenCoordinate(m_Document.rootVisualElement);

    // Convert to world position using extension method
    Vector3 worldPosition = screenPos.ScreenPosToWorldPos(m_Camera, m_Depth);

    if (m_ObjectToMove != null)
    {
        m_ObjectToMove.transform.position = worldPosition;
    }
}
일단 worldBound로 m_TargetElement의 worldBound를 가져오는데 이 m_TargetElement는 m_ElementName으로 엘리멘트의 이름으로 Query해서 찾는다.
//OnEnable 안에 있음
m_TargetElement = root.Q<VisualElement>(name: m_ElementName);
해당 오브젝트의 중앙을 찾기위해 worldBound.x에 가로길이의 절반(가운데)를 더하고, worldBound.y에 세로길이의 절반(가운데)를 더한다. 그 다음 해당 좌표를 screen 상의 좌표로 구해야해서 GetScreenCoordinate를 해준다. (현재 worldBound로 구한 좌표라서 screen상의 좌표로 구해야 함) 그리고 screen 좌표를 얻으면 위에서 다뤘던 ScreenPosToWorldPos를 써서 최종적인 worldPosition을 구할 수 있다. 해당 Position으로 ForceField가 옮겨간다.
Rect worldBound = m_TargetElement.worldBound;
Vector2 centerPosition = new Vector2(worldBound.x + worldBound.width / 2, worldBound.y + worldBound.height / 2);

// Convert to pixel coordinates using extension method
Vector2 screenPos = centerPosition.GetScreenCoordinate(m_Document.rootVisualElement);

// Convert to world position using extension method
Vector3 worldPosition = screenPos.ScreenPosToWorldPos(m_Camera, m_Depth);

if (m_ObjectToMove != null)
{
    m_ObjectToMove.transform.position = worldPosition;
}
(이런 복잡한 과정을 거치는 이유가 아무래도 해상도 조절에 자유롭게 제작하다보니 UI의 위치가 계속해서 변하다보니 해당 위치를 유동적으로 계산하기 위한 과정인 것 같다. 고정 해상도의 위대함을 다시 한번 깨닫는다.)
ExternalForces 설정
이제 ForceField의 설정이 끝났으니 해당 ForceField를 Particle System에 붙여주기위해 ExternalForces를 설정해준 후에 Play해주면 된다.
// Attach the ForceField to the particle system
ParticleSystem.ExternalForcesModule externalForces = ps.externalForces;
externalForces.enabled = true;
externalForces.AddInfluence(forceField);

ps.Play();
여기서 VFX 프리팹을 불러와서 적절한 위치로 ForceField를 설정해주고 Play하는 것은 알았는데 PlayPooledFX를 어디서 호출할까?
// event-handling methods

// claiming free reward from MailScreen
void OnRewardProcessed(ShopItemType rewardType, uint rewardQuantity, Vector2 screenPos)
{
    // only play effect for gold or gem purchases
    if (rewardType == ShopItemType.HealthPotion || rewardType == ShopItemType.LevelUpPotion)
        return;

    PlayPooledFX(screenPos, rewardType);
}

// buying an item from the ShopScreen
void OnTransactionProcessed(ShopItemSO shopItem, Vector2 screenPos)
{
    // only play effect for gold or gem purchases
    if (shopItem.contentType == ShopItemType.HealthPotion || shopItem.contentType == ShopItemType.LevelUpPotion)
        return;

    PlayPooledFX(screenPos, shopItem.contentType);
}
이 녀석들은 ShopEvenets에 있는 Action에 붙어있다.
void OnEnable()
{
    // FX from ShopScreen
    ShopEvents.TransactionProcessed += OnTransactionProcessed;

    // FX from MailScreen
    ShopEvents.RewardProcessed += OnRewardProcessed;

    ThemeEvents.CameraUpdated += OnCameraUpdated;
}
참고로 ShopEvents의 TranscationProcessed에는 CoinManget뿐만 아니라 PopUpText.cs의 OnTransactionProcessed도 붙어있다. (나중에 한 번 보도록 하자)
이 TransactionProcessed는 GameDataManager.cs의 OnPurchaseItem에서 호출하고 있다.
GameDataManager.cs
// event-handling methods

// buying item from ShopScreen, pass button screen position
void OnPurchaseItem(ShopItemSO shopItem, Vector2 screenPos)
{
    if (shopItem == null)
        return;

    // invoke transaction succeeded or failed
    if (HasSufficientFunds(shopItem))
    {
        PayTransaction(shopItem);
        ReceivePurchasedGoods(shopItem);
        ShopEvents.TransactionProcessed?.Invoke(shopItem, screenPos);

        AudioManager.PlayDefaultTransactionSound();
    }
    else
    {
        // notify listeners (PopUpText, sound, etc.)
        ShopEvents.TransactionFailed?.Invoke(shopItem);
        AudioManager.PlayDefaultWarningSound();
    }
}
그리고, 이 OnPurchaseItem은 ShopItemPurchasing이라는 ShopEvents의 Action에 붙어있다.
ShopEvents.ShopItemPurchasing += OnPurchaseItem;이 ShopItemPurchasing은 ShopScreenController.cs에서 관리한다.
ShopItemPurchasing.cs
// try to buy the item, pass the screen coordinate of the buy button
void OnTryBuyItem(ShopItemSO shopItemData, Vector2 screenPos)
{
    if (shopItemData == null)
        return;

    // notify other objects we are trying to buy an item
    ShopEvents.ShopItemPurchasing?.Invoke(shopItemData, screenPos);
}
이 OnTryBuyItem은 ShopEvents의 ShopItemClicked에 또 붙어있다.. (이 때부터 뭔가 이상함을 느꼈따.)
ShopEvents.ShopItemClicked += OnTryBuyItem;ShopItemComponent.cs에서 BuyAction을 찾았다. 아무래도 콜백 함수로 붙어있는 것 같다.
ShopItemComponent.cs
// Clicking the Buy button on the ShopItem triggers a chain of events:

//      ShopItemComponent (click the button) -->
//      ShopController (buy an item) -->
//      GameDataManager (verify funds)-->
//      MagnetFXController (play effect on UI)

void BuyAction(ClickEvent evt)
{
    VisualElement clickedElement = evt.currentTarget as VisualElement;

    // Retrieve the Shop Item Data previously stored in the custom userData
    ShopItemSO shopItemData = clickedElement.userData as ShopItemSO;

    // Get the RootVisualElement
    VisualElement rootVisualElement = m_SizeContainer.panel.visualTree;

    // Convert to screen position in pixels
    Vector2 clickPos = new Vector2(evt.position.x, evt.position.y);
    Vector2 screenPos = clickPos.GetScreenCoordinate(rootVisualElement);

    // Notify the ShopController (passes ShopItem data + screen position)
    ShopEvents.ShopItemClicked?.Invoke(shopItemData, screenPos);

    AudioManager.PlayDefaultButtonSound();
}
찾아보니 BuyButton에 아래와 같이 Callback 함수로 붙어있다.
public void RegisterCallbacks()
{
    if (m_BuyButton == null)
        return;

    // Store the cost/contents data in each button for later use
    m_BuyButton.userData = m_ShopItemData;
    m_BuyButton.RegisterCallback<ClickEvent>(BuyAction);

    // Prevent the button click from moving the ScrollView
    m_BuyButton.RegisterCallback<PointerMoveEvent>(MovePointerEventHandler);
}
이 ShopItemComponent.cs의 RegisterCallbacks가 어디서 실행되냐면 ShopView에서 실행된다.
ShopView.cs
void CreateShopItemElement(ShopItemSO shopItemData, VisualElement parentElement)
{
    if (parentElement == null || shopItemData == null || m_ShopItemAsset == null)
        return;

    // instantiate a new Visual Element from a template UXML
    TemplateContainer shopItemElem = m_ShopItemAsset.Instantiate();
    shopItemElem.AddToClassList(k_ShopTemplateContainerClass);

    // sets up the VisualElements and game data per ShopItem
    ShopItemComponent shopItemController = new ShopItemComponent(m_GameIconsData, shopItemData);

    shopItemController.SetVisualElements(shopItemElem);
    shopItemController.SetGameData(shopItemElem);

    shopItemController.RegisterCallbacks();

    parentElement.Add(shopItemElem);

}
정리하자면 아래 그림처럼 표현할 수 있다.
위와 같은 과정을 거쳐 UI Tool Kit의 버튼에 Particle System Play가 연결된다. (생각보다 많은 과정을 거친다.)
모든 과정을 똑같이 구현하는 건 어려워도 비슷하게 나마 한번 직접 구현해보자.
구현은 다음 문서로 별도로 작성한다.
Points
- 생각보다 코드가 그렇게 복잡하지는 않다는 점!
- 코드는 복잡하지 않지만 서로 연결되어 있는 부분이 복잡하다는 점.. (처음 구조 설계가 중요한 이유)
- 생각보다 delegate, 그 중 Action을 굉장히 많이 쓴다는 점이다. delegate를 사용 여부가 생각보다 코드의 복잡도나 로직의 구현 면에서 굉장히 큰 영향을 준다는 것을 느꼈다.
- 오브젝트 풀링을 별도로 관리해서 오브젝트 별로 풀을 관리하는 것은 신기했다! (이 방법은 어렵지 않아서 바로 사용 가능할 것 같다!)
- 헝가리안 표기법으로 멤버 변수 앞에 "m_"를 붙이는데 이게 좋은지 안좋은지는 모르겠다.. 구별하기는 쉬워보이긴 한다. 아무래도 다른 프로젝트도 한 번 살펴볼 필요가 있을듯?